Last year John’s younger sister Carrie moved to Philly for work and found herself living in a cute high-rise apartment in need of a bit of cheap sprucing. So in under $200 we skipped through Ikea, got art and accessories to transform her space, and made over her apartment in an afternoon (here’s that story). Well, a year later she’s been transferred back to Northern Virginia (closer to the fam- hurrah!) but has found herself once again in a plain jane room in need of some serious spiffing. So we took on the help-Carrie-makeover-her-room-on-the-cheap challenge again in this doozie of a sunroom turned bedroom:
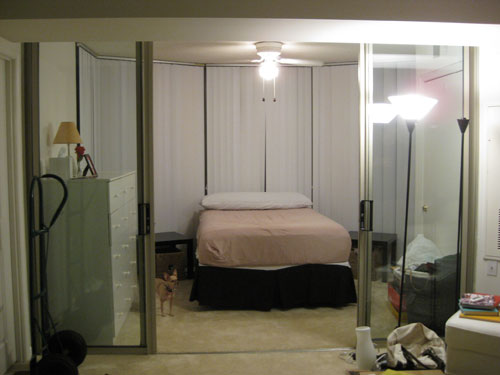
Yes, the room is almost entirely surrounded by glass- from the sliding doors that make her bedroom reminiscent of a fishbowl (let’s watch Carrie sleep… creepy) to the five- yes five!- floor to ceiling windows that create the irregularly shaped five-sided back wall. But we weren’t scared. Ok, well maybe a little. But thanks to our trusty $200 budget and another trip to Ikea, we had high hopes for this space. So off we went to our favorite Swedish furniture store for curtains, more curtains, a few accessories and some furniture to adapt with some cheap Home Depot supplies that we picked up on the way. Four hours later, the room looked like this:
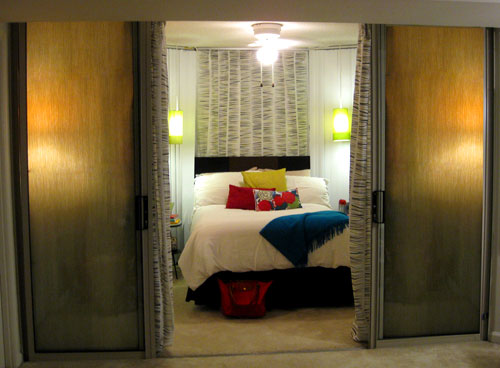
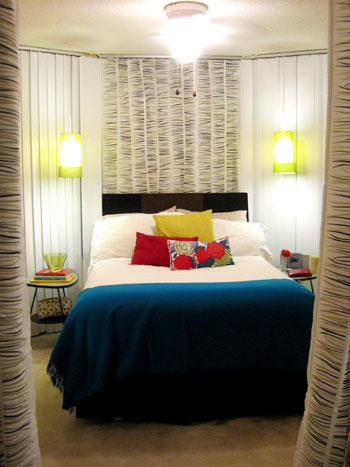
Cay you believe that’s the same space? Here’s how it all went down. First and foremost we wanted to work with what Carrie already had to keep her precious pennies in her pocket. So as you can see from last year’s apartment makeover, she already had two black Lack side tables, some colorful pillows, and those textured striped curtains to work with. The only issue is that the black tables were formerly sofa side tables, and were wayyy too low for her bed (see before photo) so we brainstormed an alternate plan to use them to create something else that we needed in the space to save money and keep them from going to waste. Can you find them in the after picture above?
If you were wiley enough to guess that the black Lack tables from Ikea became the headboard, feel free to reward yourself with a celebratory donut. Yup, we were driving to Ikea with our new catalog in hand when I wondered aloud how wide those tables were. Turns out that three of them are almost the exact width of her bed, so we snagged one more (in a rich wood tone for interest) and did the happy dance at the “new lower price” of $7.99.
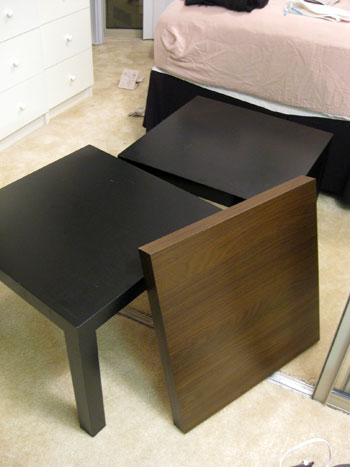
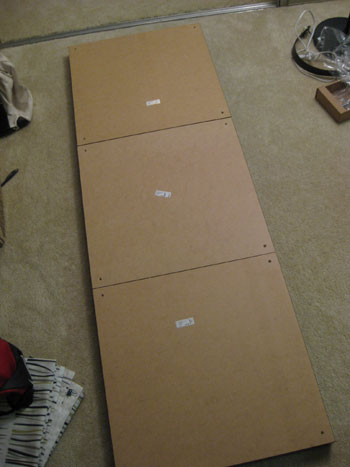
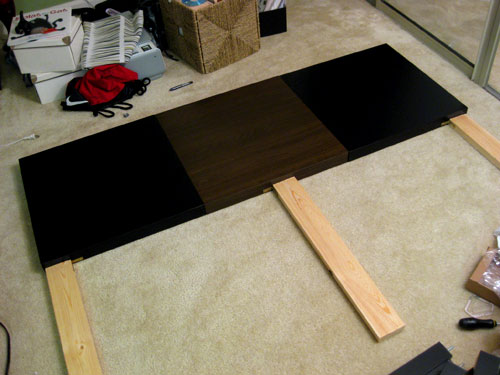
Then all we needed were a few dollars worth of metal brackets from Home Depot and a long 2 x 4 (which we had cut at HD into three 26″ pieces). The assembly process was simple. Step 1: unscrew the legs and turn all the tabletops upside-down and line them up with the brown square in the middle:
Step 2: Use strong metal brackets to connect each tabletop to the one next to it in at least two places (tip: don’t get decorative hardware- be sure it’s heavy duty enough to do the job). Oh and drilling a 55″ 1 x 3 across the back of your headboard will add even more durability and reinforcement so that’s extra credit (not shown below).
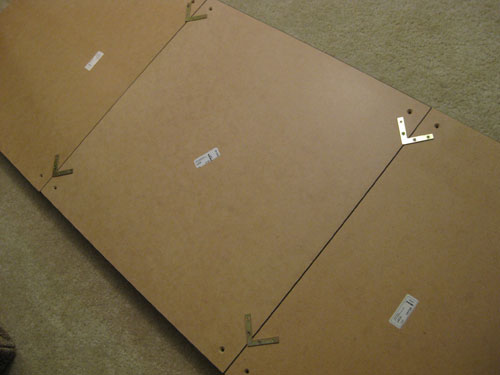
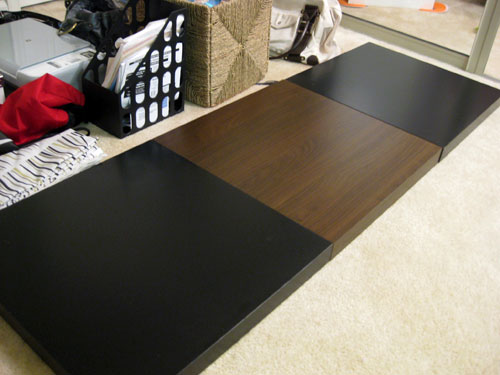
Step 3: Flip everything over to admire your handiwork (seriously guys, anyone can do this- we didn’t even use a power drill to assemble ours, I just used a regular old manual screwdriver and some elbow grease).
Step 4: Use three (or six for even more reinforcement) right angled L-brackets to connect the headboard legs (our three 26″ 2 x 4 pieces that we had pre-cut at Home Depot) to the newly-joined squares that make up the headboard:
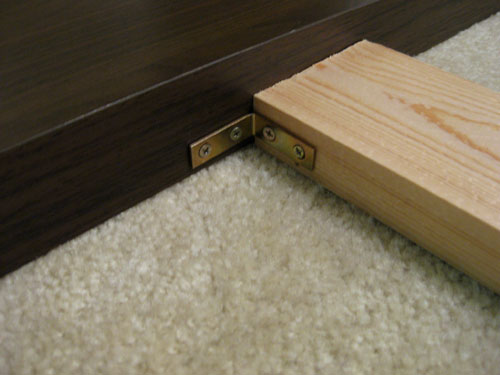
And voila- a DIY headboard that we created for under $20 using a few things that Carrie already had laying around:
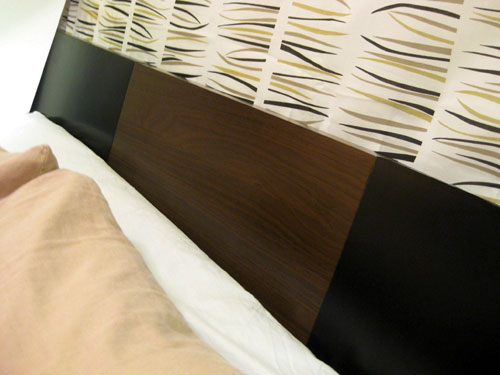
The headboard was actually more for function than form since the glass walls where the head of Carrie’s bed was resting come together to create an irregular angle that was causing Carrie’s pillows to get wedged between the bed and the window (and she kept waking up with her face in those vertical blinds). But thanks to the new made-it-ourselves solution, that pillow problem is a thing of the past.
But on to the biggest decorating road block we have ever encountered to date (truly- we were stumped for hours). We all agreed that Carrie needed some soft billowy curtains in front of those less-than-lovely vertical blinds (which she could not remove- no ifs, ands or buts) so we snagged a bunch of panels and rods and even a wire pulley system at Ikea in the hopes of turning a wall of vertical blinds into a soft and inviting cocoon of a bedroom. The unforeseen issues? We knew that we couldn’t hang the curtains from the “back wall” since it’s literally made up of five floor to ceiling glass windows (or use the track of the vertical blinds to hang the curtains since it wouldn’t accommodate any modifications of the sort) BUT we never anticipated that we couldn’t hang our curtains from the ceiling! Nope, we failed to anticipate that the ceiling would be a rock solid concrete-esque material that was literally impervious to screws, nails, and even our heavy-duty power drill. It could possibly have been made out of diamonds, it was that impenetrable.
So there went our wall of curtains idea. Right out those floor to ceiling windows. We did realize that we could “hang” one striped curtain panel behind the bed across the vertical blinds (we physically clipped it to the top of each blind to hold it up) creating the soft stripey fabric panel above the headboard. But once the curtain was clipped (with little Ikea curtain-hanging clips, btw) the blinds were no longer able to be opened or closed. So because Carrie doesn’t mind losing the ability to see out of the window behind her bed she was fine with us clipping the curtain to the vertical blinds… but for the rest of the windows in the room, we had to leave the verticals as-is to allow her to open and slide them on a daily basis (and again, the management would not let us remove the verticals- and they would see from the outside of the building if we had gone that route).
Long story short: Carrie has since called her building’s superintendent and asked two other renters how to hang curtains in the sunroom and no one has found a way! We’re still brainstorming though, so you can bet that if we think of something we’ll be there in a flash adding soft white curtain panels in front of those verticals to frame out the textured striped ones above the bed. Someday…
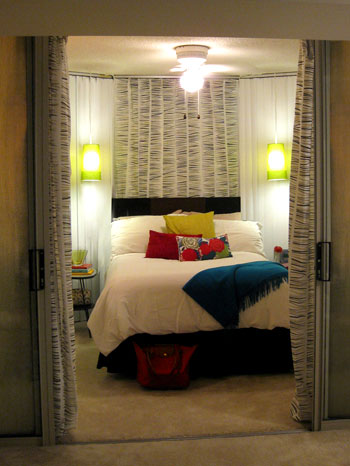
You’ll also notice that we brought in new side tables (conveniently shaped like rounded triangles, so they slip right into the triangular shaped space on each side of the bed). And at just $29 each we were psyched about our glass-topped Ikea finds. We also snagged some hanging lamps, which we knew would make the space. When you’re dealing with a small room, anything you can do to create drama and get things off of the few surfaces that you have for display/storage is always a plus. So don’t forget about plug in pendants or even sconces! At $12.99 each, these lights were totally within our budget. Huzzah. But how could we hang them from those bullet-proof ceilings? After approximately ten minutes of woe-is-me whining, we ran to CVS with our fingers crossed and returned with heavy-duty 3M wall hooks that we stuck to the ceiling to swag our little green shades. Success! Then we just plugged them in and we were in business.
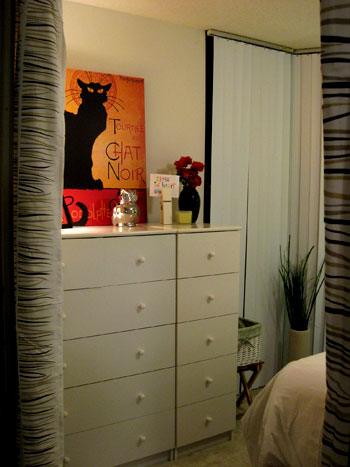
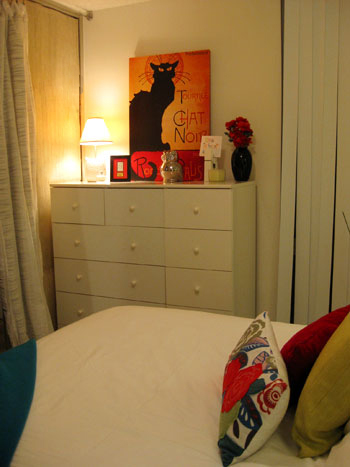
We also used Carrie’s existing items (the pillows from her old apartment, her fun blue throw, the colorful books on her side table) to decorate her little jewel box of a room. And we snagged one more pillow (the goldy-green one) from Ikea for just $7.99. We love how it ties the green shades and the green stripes in the curtains into the red and blue pillows and accessories that we integrated. We also grabbed her existing red canvas art and leaned it against the wall behind her childhood dressers (snagged from home for free) for another fun pop of color that every no-painting-the-walls rental needs:
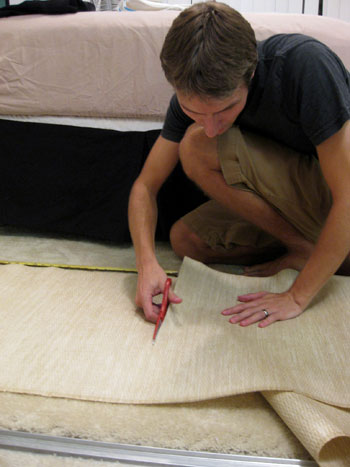
But what about the sliders that lead into the room? You know, the ones that give Carrie’s roommates a Truman Show-esque perspective? Well, we originally thought about hanging curtains but thought that something a bit flatter and less billowy for at least part of the 10′ expanse of glass might make Carrie feel less like she’s sleeping in a curtain warehouse. So we trolled Ikea for some interesting textures that we hoped to place over the glass from the inside for privacy and interest. Wrapping paper? Nope, too thin. Wallpaper? Didn’t see any. Grasscloth window panels? Jackpot. It was just like purchasing a huge roll of grasscloth wallpaper for only $15 a roll (we used two of them to get ‘er done) and we simply cut them to size and used clear heavy-duty packing tape to seam them together for a clean look. We LOVED the outcome- and it was so easy. Here’s the play by play as demonstrated by my other half:
Step 1: Measure the glass and cut the grasscloth panel to fit either horizontally or vertically (we went horizontal because our sliders were a bit too wide to do vertical):
Step 2: Use clear packaging tape to very smoothly tape the exterior edges of each panel to the metal glass door surround. Go slow and steady for the cleanest effect possible.
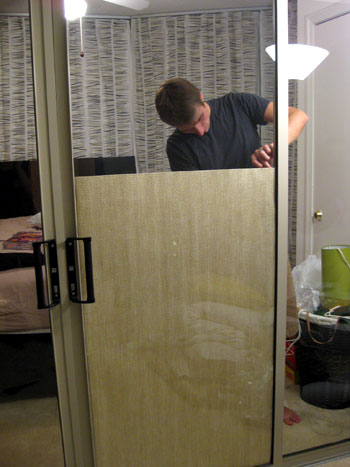
That’s it. And after a good amount of measuring, taping, stepping back to admire, repeat- you’ll have an awesome privacy screen built right into your sliding doors! Of course heavy duty clear tape is the key (this isn’t a job for scotch tape!) and hanging the grasscloth curtain panels the way they were intended to be used (from the ceiling or wall- both of which weren’t options for us) would also yield something fabulous and textured for your space- so you definitely don’t have to DIY everything if you’d rather stick to hanging the panels as they’re meant to be hung. Oh and we thought of another way to adhere the grasscloth if the tape method is too sticky (literally) for you (or if your house gets humid and warm, in which case we wonder if the tape will last for the long haul). Very strong magnets placed on either side of the glass would definitely hold the paper in place- and look pretty darn cool to boot.
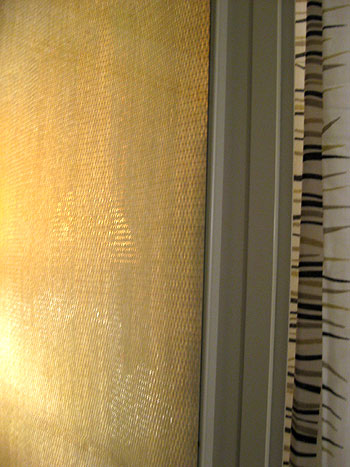
Oh and you’ll notice above that we did actually add two breezy curtain panels after hanging the grasscloth for a layered effect. They felt light enough not to be too invasive (plus since we couldn’t hang the wall of curtains behind the bed, we knew the room could handle a bit more softness in other places). And thankfully there were walls perpendicular to the glass sliders (unlike behind the bed) so we could hang a curtain wire from those two walls to secure them. We loved how the textured panels on the glass and the billowy striped curtains worked together in the space. Tip: curtains slide extra effortlessly on wire, so it’s always good for a doorway- and Ikea sells a great kit called the Dignitet.

So that’s the story of an angular glass sunroom, a trip to Ikea, a $200 budget, and a ceiling that could probably deflect Superman. Oh but we can’t just mention the budget without doing a little play-by-play of how we spent our allotted cash, so here’s the breakdown for all you curious home improvement enthusiasts (items not on list below were existing last-apartment remnants, which really helped us stretch our dough):
- Striped curtain panels throughout room: $30 (for two sets of 2)
- Curtain clips (for panel over bed) & curtain wire (to hang sliding door curtains): $20
- Hanging lamp shades and lighting kits on either side of the bed: $26 total (such a deal!)
- 3M hooks to hang lights from impervious-to-everything ceiling: $6
- Third lack table to complete headboard project: $8
- Wood and brackets from Home Depot to create headboard: $12
- Goldy-green pillow on bed: $8
- Glass topped side tables: $30 each
- Grasscloth curtain panels turned into slider door wallpaper: $30 (for two rolls)
- GRAND TOTAL: $200 (and not a penny to spare)
Don’t you guys love those green hanging pendants? They have to be one of our favorite details in the room. And although it’s still a small space (9 x 11′ to be exact)- it feels so cozy and inviting. Hooray for Ikea and apartment makeovers! So what about you guys? Anyone itching to snag some of the goodies that we reached for while we shopped til we dropped? Any soon-to be-head-board-making individuals out there who are ready for the Lack table challenge that we detailed above? Anyone else with wall to wall glass and impenetrable ceilings who have curtain woes of their own? Let’s commiserate.

Roeshel says
Holy cow! When I saw the before I felt so bad – she got the short end of the stick on the choice of rooms. But WOW! I bet her room mates are jealous! You guys did an amazing job at transforming her room into something beautiful and on a $200 budget?! Are you kidding me?! It’s awesome!
Averill says
Great job guys! I absolutely love the colorful bedding.
Jacques Richer says
I can think of two options that have worked for me: You could use hot-glue (which is really a thermoplastic). This works well, but will eventually fail after repeated thermal cycling. It is, however, easy to remove later – and since this is a rental that may be a good answer.
For a more lasting solution, I’d suggest using a construction adhesive like Liquid Nails. Once you put that up, getting it off requires demolition tools.
In this type of situation, I’d probably use one or the other adhesive to attach a running board to the ceiling, and hang the drapes, blinds, or whatever you needed to hang from the running board. A pint of paint tinted to match the ceiling and a few somewhat careful miters will make this appear part of the room. If you use hot-glue you can remove it by tapping the edge of the piece sharply with a hammer. Any residue can be scraped off with a fingernail or plastic scraper.
Alyzande says
The Lack-table-tops-as-headboards idea isn’t working for me, due to the width of the bed being 2 1/2 table widths. I’m hoping to think of another way to position one tabletop behind each pillow on the bed, instead.
YoungHouseLove says
Hey Alyzande,
Is your bed a twin or a full? We’re sorry the tabletops don’t fit perfectly across your bed like they do for a queen sized one! Although with a full there’s only about 4″ of overlap on each side, which would make for a nice accent in the room and would probably look intentional and lovely. Good luck adapting things to work for your space!
xo,
s
Jacqui says
That must be a Meridian apartment building. You guys did an amazing job making it homey!
Jamie says
You guys made that a room I would actually love to have. Yes, it’s small, but it’s full of character now. (Maybe it’s because I love sunlight, so all those windows appeal to me.) I think the grasscloth is my favourite, it looks fabulous!
Where does the side door lead? I hope to a closet, that poor girl needs some more storage space! Can she put things under the bed?
YoungHouseLove says
Hey Jamie,
Glad you’re enjoying the room! That side door is actually to a utility closet, which must remain locked, but Carrie has a closet nearby in the common area that she has full rein of. And of course, she also stuffed a lot of boxes and bins under the bed for even more storage. Hope it helps!
xo,
s
Colleen says
Like so many others I just love the headboard idea, so creative! But I am also a little confused about how it is the perfect size for a full size bed. My full size bed is standard size (54x75in), and by my calculations 3 of the lack tables would be two big (since they are over 21″ wide each, so that comes to over 63″…am I missing something?
Also, how did you affix the headboard to the bed? Or didn’t you?
Thanks so much!! I absolutely love this and am asking all these questions because I would love to make it work!
YoungHouseLove says
Hey Colleen,
A full sized bed is about 55- 56″ wide when it’s made up with bedding and pillows, which means a 63″ headboard is only about 4″ too long on each side. This means you could simply assemble the headboard which will be a bit bigger than the bed in a good way. It will frame out the sleeping area and add some nice presence (just be sure to place the legs inside a bit, not attach them to the edge, so the bed still hides them). Carrie actually has a queen sized bed, which is around 63″ wide with bedding, which made it perfect for our headboard solution.
In Carrie’s room the alcove where we stuck the bed was exactly wide enough for it to nestle in there against the window, so placing the headboard between the back window and the bed was all it took to hold it in place (since there’s no possibility of it wiggling from side to side due to the shape of the space). In a regular flat wall situation, we would definitely recommend screwing a few super long screws right through the headboard legs into the wall to hold it in place. You’ll only make a few small patchable holes in the wall but you’ll get a super sturdy outcome that way. Hope it helps!
xo,
s
Sarah says
First off – the transformation is indeed completely amazing! How awesome that you made a formerly depressing and a tad creepy space not only liveable but loveable. :-) I do have one thought/suggestion…if it were possible to stretch the $200 budget just a tad, what would you think about ditching the vertical blinds in favor of bamboo shades (like the ones in your place) or more of the grass window panels? The rest of the space is so delightful, and (especially during the day, I’d imagine) has this great cottage in the Savannah vibe that it seems a shame to keep even a hint of the former 80s hotel thing going, haha. Just wondering what you think about that, or if you have any other ideas for a finishing touch on the windows. Thanks for all your inspiration!!xo
YoungHouseLove says
Hey Sarah,
Unfortunately since Carrie’s a renter and the landlord ordered that the vertical blinds must stay (they can’t be removed, altered or replaced), the only option was to cover them in some way (which was quite the challenge since the ceiling was impenetrable and Carrie would still like to have access to her verticals to open them, which is why we couldn’t clip curtains across all of them since it made them impossible to open and close). But thanks to lots of helpful reader suggestions we have a few new ideas (magnetic rods, velcro, etc) to get some more soft billowy curtains up in front of those verticals to obscure them while keeping them fully functional. Fingers crossed that something works for the long haul…
xo,
s
Sarah says
Ha – oops – my bad…maybe it would be helpful if I had actually *read* the entire blog post instead of just drooling over the pictures! Totally see where you stand w/ the blind dilemma now – that’s why all these folks are commenting w/ ideas on how to hang the curtains!! Wow – duh. Anyhoo – feel free to let me know what you think about the bamboo thing, in an ideal world – and good luck w/ figuring out a solution!!
YoungHouseLove says
Bamboo blinds are always a yes in our book! Hope it helps!
xo,
s
Renee says
Since the bed wedges right up against the windows, could you attach a tall board to the back of the headboard (wedged between the bed and the window) that you could fix the curtain wire to in lieu of a wall? It would be totally superficial, so the landlord wouldn’t need to worry.
In any do it yourself project there always seems to be that road block or the trip down the nuts and bolts aisle at Home Depot (we call that aisle purgatory in our house). I hope you can find a solution to the vertical blinds covering, and as I’m sure you realize, that room looks infinitely better even with the vertical blinds showing because of the changes you’ve already made!
Cami says
My husband and I are renting a condo and the main wall in the master bedroom is solid mirrors. Yuck. Do you think the panel idea would work in there as well? How do you suggest hiding the tape?
YoungHouseLove says
Hmm, it might be hard to hide the tape (with Carrie’s room the clear tape is less noticeable because there’s that row of breezy curtains in front of it so things are layered and soft). Maybe you could do fabric panels in front of the mirrors (hung with curtain rods across the whole back wall attached to the ceiling). The more panels (ex: 6-8 instead of 3-4) the better the draping will be (you want them breezy and loose, not pulled tight to look like they’re oddly covering something). One of our favorite designers Candice Olson uses walls of fabric all the time in her designs. They’re soft, warm and lovely. Hope it helps!
xo,
s
Heyruthie says
I keep thinking about those blinds and the curtain dilemma. Has anyone suggesting using floor-to-ceiling tension rods to hang curtians? You could install them, and then drill a hole near the top of each tension rod, and then thread the IKEA Dignitet wiring through each one, or even attach the Dignitet hardware directly to each pole. Here are some more ideas like that:
http://www.apartmenttherapy.com/chicago/good-questions/good-questions-where-can-i-find-a-floortoceiling-curtain-rod-011545
There are multiple types of floor-to-ceiling tension rods, including bona fide curtian rods (appear to be expensive) plant hanging rods (think 1970’s) or the easy-to-find shower caddy tension rods (probably easiest and cheapest.) If you got the shower caddy rods, you’d just remove the caddies. Here’s a link:
http://www.bedbathandbeyond.com/product.asp?order_num=-1&SKU=13383006
Maybe this could work, or it could get the creative juices flowing to come up with something similar….HTH.
YoungHouseLove says
Good suggestion! Thanks for bringing yet another idea to the table.
xo,
s
Eve says
Amazing!!! I love it!
Lynn says
Thanks so much for all of your fantastic ideas. Quick question about the headboard…I read above your suggestion about nailing it into the wall. My walls are old plaster and I’m not really keen about making too many holes as any time I do drill into them, my intended hole size crumbles into something a bit larger! Is it possible to attach the headboard to the metal bed frame instead? And if yes, any suggestions on how best to do that?
YoungHouseLove says
Hey Lynn,
We bet that’s definitely possible with either some extra strength adhesive (liberal amounts of Liquid Nails) or some other device to attach them firmly (metal L-brackets? bungees? extra strength velcro in many places to create a firm bond?). Maybe you can experiment with a few ideas and maybe even google “attach headboard to bed frame” for ideas. Good luck!
xo,
s
bellasugar says
well..well.. caught ya carrie… I spotted in a picture ( where your husband is applying the grasscloth panel) the curtains are ACTUALLY hung on other windows as well… now someone said it was not possible etc etc hmmm… also if a hook can go in a ceiling than a nail can also..eh?
YoungHouseLove says
Hey Bellasugar,
You’re right that in that picture curtains were hung on other windows as well, but other than that I have to burst your bubble on a few things. :) That’s me in the picture with the grasscloth (Carrie’s brother, not husband – gross) and those curtains were hung by clipping the curtain to the existing vertical blinds, just like Sherry described doing with the curtains behind the headboard. Believe me, no hook nor nail was making it into that ceiling (her landlord later confirmed was an intentional design on their part). After that picture was snapped, Carrie broke the news to us that she needed those other vertical blinds to be able to open and close, so we had to remove the curtains for the final reveal, which is why they made a disappearing act.
So sorry to rain on your detective work, but I just wanted to clear things up a bit so it didn’t look like Carrie (and that mysterious husband of hers) were trying to dupe anyone. Hope that helps!
-John (Sherry’s husband)
Shannon says
You should definitely submit that Lack end table headboard idea to http://www.ikeahacker.com ! What a great idea!
YoungHouseLove says
Hey Shannon,
Thanks so much! Done and done. We sent it off a while ago but she’s so backed up over there with her AMAZING site that it might take a while for it to see the light of day. We’re sure it’ll be totally worth the wait though. Back when she featured our Ikea-wardrobes-turned-bedroom-built-ins we kept pinching ourselves for making it onto such a fantastic site!
xo,
s
Jamie says
LOVE THIS!!! Hey guys, where did you get those floral pillows on the bed, I NEED them! lol Thanks so much, you guys are awesome :)
YoungHouseLove says
The floral bed pillow was from Pier 1 a while back. Hope you can hunt one down (maybe try ebay if they no longer sell them at Pier 1?). Hope it helps!
xo,
s
Haley says
LOVE the Lack end table hack and want to try it with our king size bed! I’m worried though proportions – do you think they will look tall enough for such a big bed? With 4 tables there would be about a 4.25″ overhang on each side – should we still go for it? Anyone done it with a king? Thanks a bunch!
YoungHouseLove says
We definitely think you should go for it! Assuming your king sized bed isn’t super high off the ground (as in, you need a stool to get up on it) it’ll look sleek and modern. And of course you can tape off the wall to see how it’ll look with blue painter’s tape to get an idea before building it to see how you like the proportion. Good luck!
xo,
s
Heather says
Are these the panels you used? They don’t say grass cloth.
http://www.ikea.com/us/en/catalog/products/80078132
I am going to use this idea to cover a sliding door in our rental so that I can take down the HUGE one piece sage green damask blackout panel that we put up for privacy and hang some bright, punchy drapes instead. I plan to send you some before and after photos. I think it will be quite the dramatic change.
I bought the green panel with the best of design intentions, but it made my little dining room feel claustrophobic when they are shut and when they aren’t we have no privacy. We had vertical blinds when we moved in but we took them down.
YoungHouseLove says
Yup, that looks like them. Good luck!
xo,
s
Vickie says
ahhhh thank you so much for this post! I think I live in the same building as Carrie, and I discovered your blog through a google search for “sunroom curtains”. I’m headed to IKEA tomorrow for the grasscloth and wire curtain hanging system!
Jen says
I’m beyond excited about this headboard idea. I’ve been wanting to make a headboard and was going to use the idea you posted about buying a frame from an art store and then putting fabric over it. But then I saw this! I went to Ikea’s Web site, saw that you could buy these tables in yellow and blue (the exact colors I wanted), and can’t wait to get started:)
Thanks for the idea(s).
Victoria Bellow says
You truly transformed their space. It’s gorgeous, awesome job!
Albion says
I tweaked your awesome headboard idea and made a twin-sized headboard using the Ikea VIKA AMON table top (which is only $3.99, and is the perfect size all on it’s own to act as a headboard. Thanks for the inspiration! :)
Kati says
I am wanting to hang pendant lights in my bedroom, as you did here. My only problem is I can not figure out what kind of lighting kit to use… What did you use here? and where can I get it! Thanks!
YoungHouseLove says
These are just plug in lights from Ikea hung from the ceiling with plant hooks. Hope it helps!
xo,
s
Meredith says
Is she still the the same room? If so, I have a way to hang curtains over those panels. I have the same looking awful panels in my apartment. I used curtain hooks and bent them to attach to the little hooks on each panel. That way, the curtains cover the panel and can still move. :) Hope they are the same design and it works well.
Meredith
YoungHouseLove says
She’s actually not still there. She’s a mover and a shaker!
xo,
s
David says
I am trying to mount curtain wire (the Ikea diginet system) across the sliding glass door and I’m hitting some really hard “studs” in the side walls that my drill bit isn’t penetrating. I found your blog, I was hoping you might be able to answer some questions:
How did you mount the curtain wire hardware to the side walls next to the sliding glass door? Did you just sink screws into a stud, or did you use anchors? How did you ensure that the tension on the wire wouldn’t pull the mounts out of the wall?
Thanks, this problem is making life miserable right now :)
-Dave
YoungHouseLove says
We sunk screws into studs when we could and used anchors when we couldn’t. Hope it helps!
xo,
s
Casey says
FYI- I hung curtains from the cement ceiling in my condo. I needed a hammer drill and a LOT of time. two screws took ages to even get half way in!! But the job got done :)
YoungHouseLove says
Wahoo! So glad it worked for ya!
xo,
s
Kelly says
Just wanted to leave my experience in case anyone else is trying the headboard idea (and reading the comments):
I found that the l brackets were not strong enough to keep the 2x4s from trying to bend off when i picked it up off the floor. I ended up going back and buying 2packs of steel reinforcement plates (found in same section as l brackets) which i attached to the back of the outer 2x4s. If i was starting from scratch again I would even use some wood glue to help keep it even more sturdy. Also, I just wedged it between the wall and the bed frame, then used super-puddy to “attach” it to the wall so it wouldnt lean forward. Obviously wont last forever but the project was only 10 bucks (and gave us a use for the no longer needed LACK media table) and will hold us over till we can save up for a really nice one.
thanks yhl!
YoungHouseLove says
Love it! Thanks for sharing those tips for anyone else attempting it!
xo,
s
Katherine says
So this is not a solution… but I’m moving into the same apartment complex in NoVa in about a month and am currently searching for the same solution to the blinds! I have been googling for hours and trying to figure out if I can somehow attach a rod to the top of the vertical blinds track or remove the blinds and hang the curtains in their place. I thought of velcro but want to be able to open and close the curtains. I’m so happy I found this because it let me know what was out of the question… and I will keep searching for a solution!
YoungHouseLove says
Aw, good luck Katherine!
xo,
s
Melissa says
This is many years later, but I live in this same style of apartment in NoVA, and was about to order ceiling mounted drapery rods to try to obscure/soften the sliding glass doors and the unattractive vertical blinds in the sunroom. Love the view/hate the blinds. So a big thank you for reminding me that the ceiling is impenetrable before going through with that purchase!
YoungHouseLove says
No way! So glad to save you some trouble!
xo
s