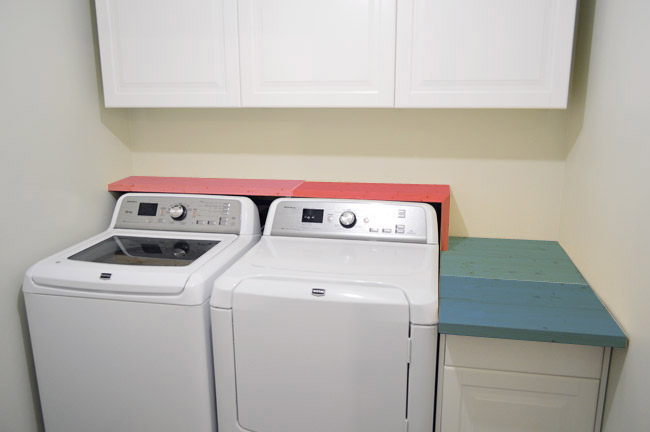
That’s right. You can call me T-Boz. Let’s talk about our new shelf in the laundry room, which is sporting a sweet arm band waterfall edge and some light natural stain. It was a simple DIY project involving some wood and some stain/sealer for a butcher block like effect.
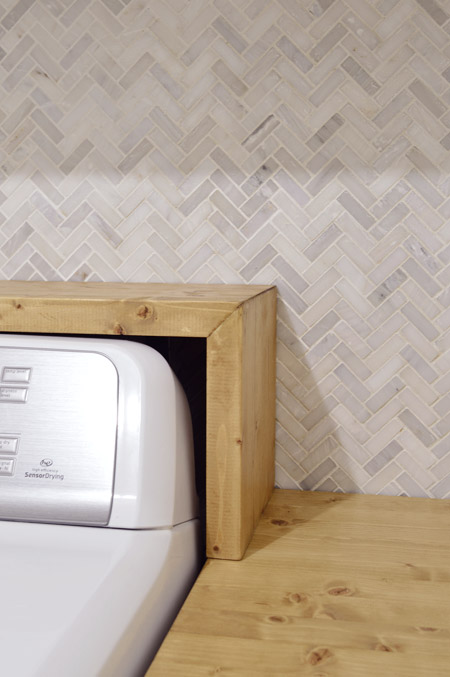
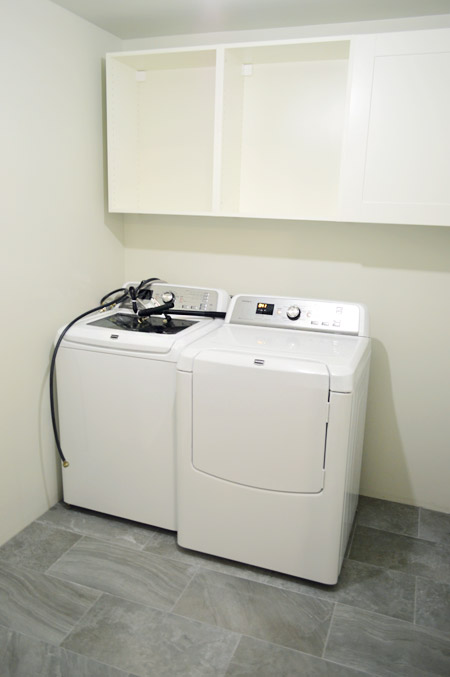
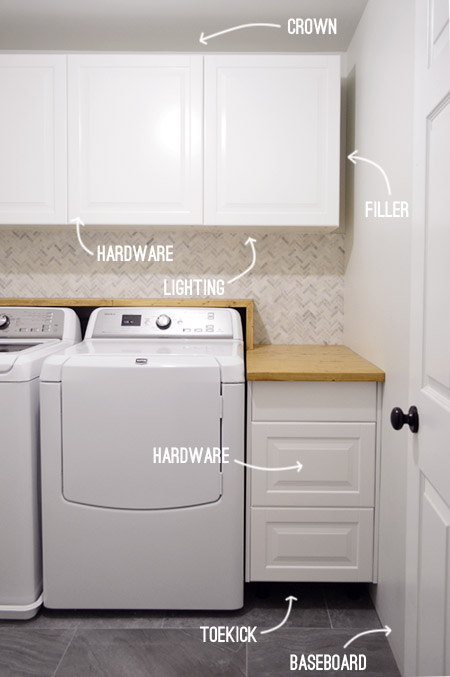
We deviated from our usual mocha stain choice because we were inspired by a few rooms we’ve seen with light cabinets and tile mixed with with natural wood to add some texture and warmth. Here’s a wider shot for you. Ignore the missing filler/crown/toe kick/baseboard/hardware situation. We’re also chasing that stuff (you know, along with the waterfalls).
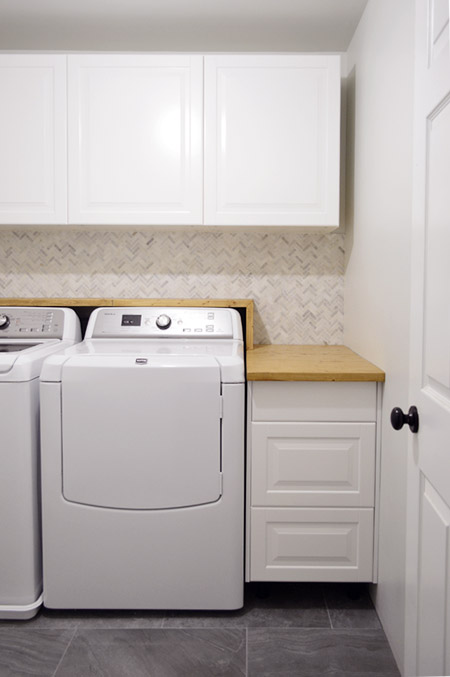
But first we have to talk about installing our appliances since I meant to cover that a while ago. It wasn’t all that big of deal since it was just re-attaching what I had unattached during the demo process. But one challenge was setting the washer pan under the washer and attaching it to our new overflow drain, so I thought I’d talk through how we did it (we couldn’t find many detailed tutorials about that step). The washer pan is the thing that usually sits under a washing machine when it’s on the second floor – that way if it springs a leak, the water hopefully won’t flood your upstairs, rot the floor, and send the washer plunging through the joists onto something valuable below. A nightmare scenario, no doubt, but in my head it always plays out like some Wiley Coyote cartoon. Either way, it’s not something I want to experience.
All of the contractors & plumbers we talked to actually said it was an optional thing to have a pan and an overflow drain (there’s no code dictating it in our area). One even told us that he wasn’t sure it made much of a difference (his opinion was that if your washer’s gushing water, a pan and a drain aren’t going to do much). We heard from others that it can save you a ton of trouble for those slow leaks you might otherwise miss, so we decided to be better safe than sorry, and had the plumbers put one in when they were here moving all of the other hook-ups (it was included in the $375 plumbing fee). Note: a few folks have asked about the outlet situation in the room, so you can see the extra pair we added in this shot too.
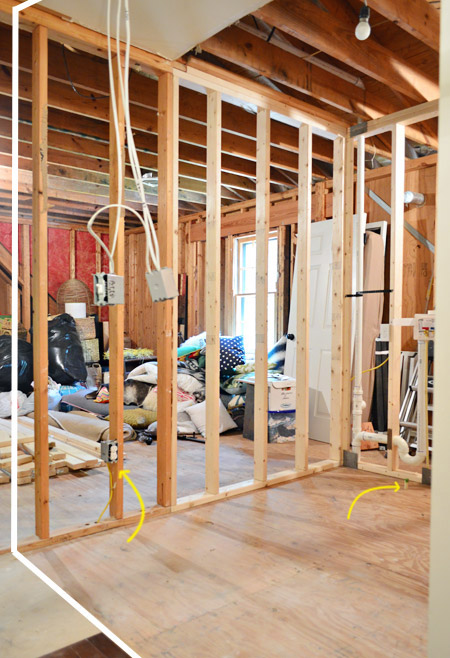
Some of you noticed that we cut around that overflow drain as we laid various levels of flooring (for example, you can see it poking up in this thinset shot from this floor tiling post). The drain was set in a way where we could gently raise or lower the pipe in the garage ceiling below, which came in handy so we weren’t constantly tripping over it.
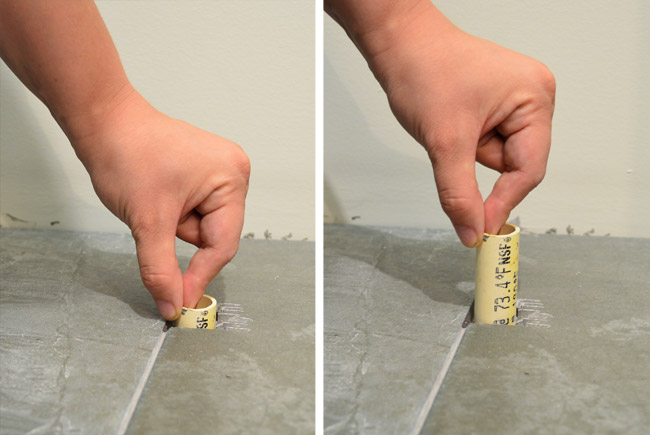
When the plumber left us the washer pan, he shared instructions for attaching it ourselves. But first we had to figure out the exact placement of the appliances so we could precisely set the pan.
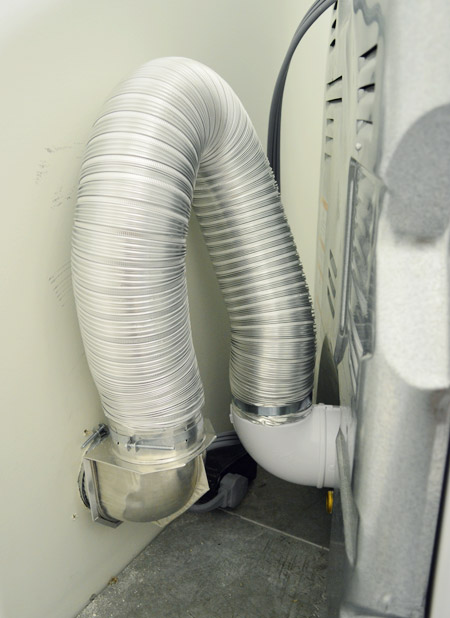
The washer would’ve happily sat nearly flush to the back wall, but the dryer’s a different story. During an installation, leaving some excess semi-rigid ducting behind the dryer is recommended so you can easily pull the dryer away from the wall without violently yanking the duct out of the wall every time it comes forward. That ducting takes up some space obviously (it’s pulled out below to show you it a bit more clearly, but even when it’s nested more closely, the dryer sits out about 8″ from that back wall). Note: they sell systems for sinking the ducting into your wall (between your studs) so it doesn’t protrude, but all the systems we found called for a vent that went up to the ceiling and ours goes straight out under the attic stairs (more on that here) so they weren’t compatible.
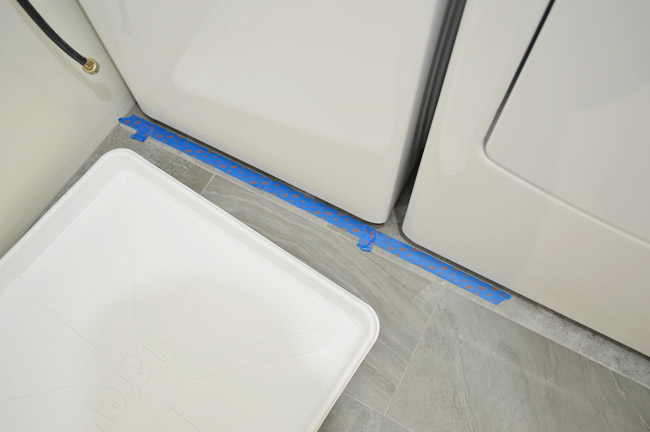
Thankfully that vent-space behind the dryer wasn’t a big deal to us since we expected it and had already planned the shelf. And after finalizing the dryer placement, we could finally determine where the washer should sit so it matched that depth exactly (didn’t want the washer pan sitting too far in or out). We marked the line on the floor with tape so that when we pulled the washer out again, we knew exactly where to place the pan.
To cut a hole in the pan for the drain, the plumber recommend this suuuuuuper scientific method that involved mustard. Squirt some on the drain pipe, press the pan into it (while using the tape in front as a guide for where to place the pan), and then drill where the mustard left its mark. I marked over our mustard circle with Sharpie, since the “real honey goodness” was a bit overpowering odor-wise (at least when it wasn’t accompanied by a hot dog or something).
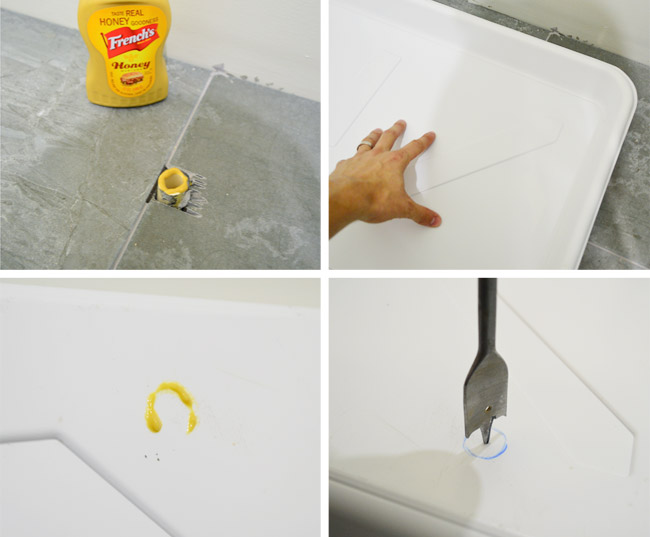
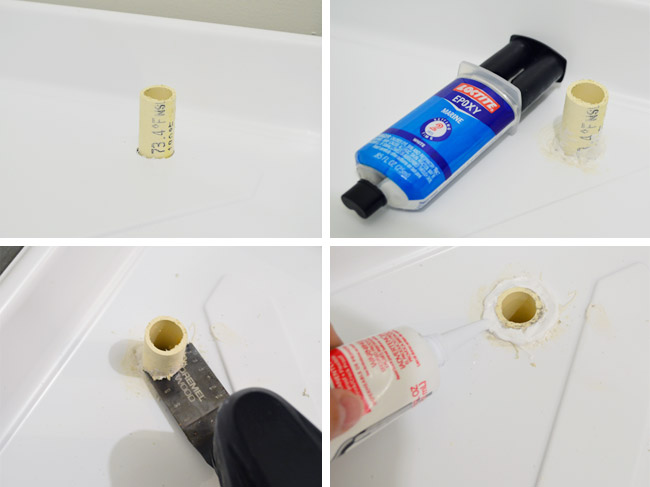
Once the pipe was in the pan, we had been instructed to “silicone caulk the heck out of it.” I didn’t feel totally comfortable relying on caulk as our only adhesive (silicone caulk has some flex to it and we worried the weight of setting the washer down in the pan could flex it loose right off the bat) so I talked it over with another plumbing guy and an employee at Home Depot and they both suggested an expoxy, like this Marine Loctite (marine = crazy waterproof). So I glued the pipe and pan together, let it dry overnight, cut off the excess pipe with my dremel (you need the pipe to be as flush to the pan as possible so the water can drain down it) AND THEN silicone caulked the heck out of it – just to be safe.
Then it got interesting. I don’t have any pictures of Sherry and I hoisting the washer over the lip of the pan into place, but I’m sure our faces were super attractive. Somewhere in the vicinity of strained and extra veiny.
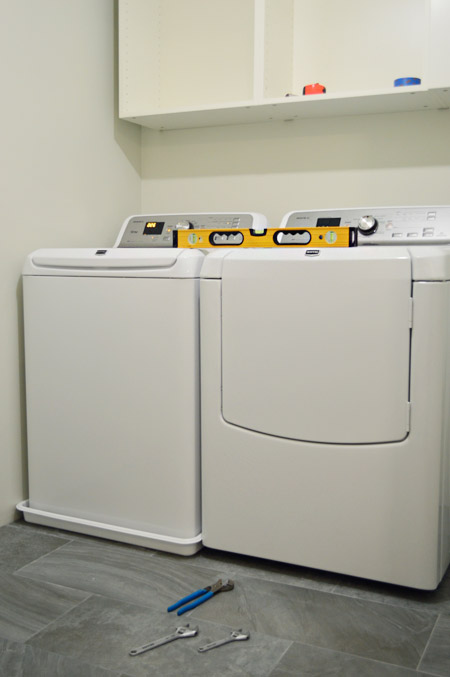
There was also some adjusting of the dryer feet to get it level with the washer – not only did we want the front of both appliances to line up, we wanted the tops to be the same height as well (hence the level and those wrenches you see one the floor in the picture above). And when it did it was sort of like we hit the jackpot. There was celebrating. We finally had a washer & dryer again.
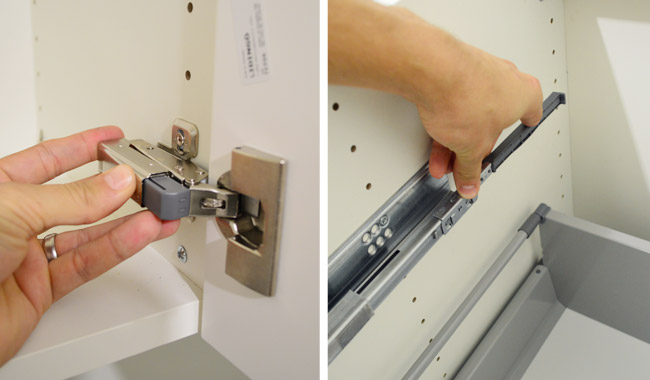
Speaking of other small adjustments – in our post about the Ikea cabinets a few of you recommended getting the soft-close drawer and door add-ons, so we planned to grab those the next time we were near Ikea. Then, in an exciting hinge-related turn of events, about 12 hours later we happily realized the Ikea lady must have added them to our order, because they were in the bottom of our bag with all the under cabinet lighting stuff. I’d estimate the drawers and doors are now approximately 35 times less slammy. Well worth the upgrade.
But back to the shelf. You may recall that we built it before tiling so that we knew exactly where our tile needed to go.
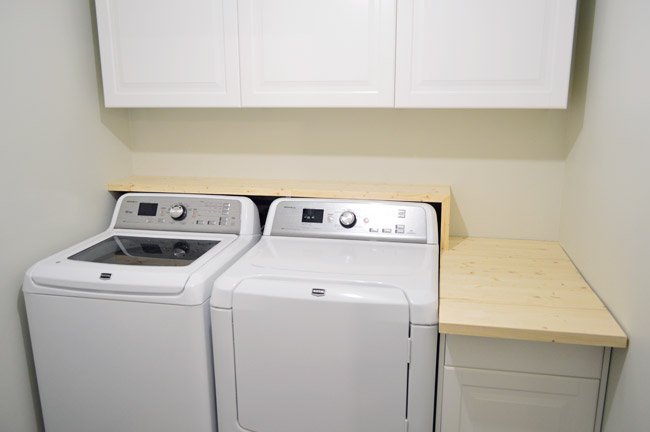
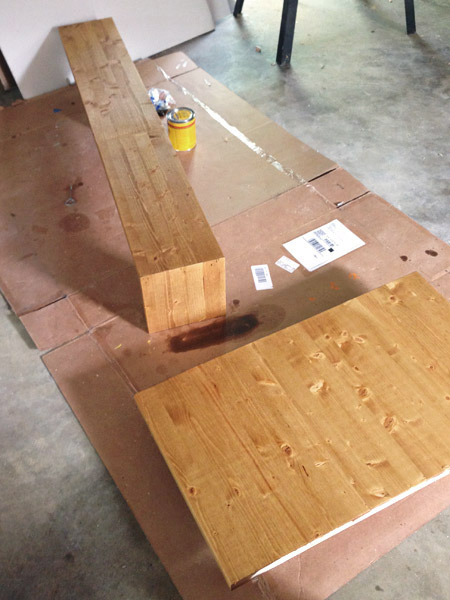
We constructed the shelf and counter out of two of these solid 2 x 4′ panels from Lowe’s. We liked ’em because they were chunky (1.5″ thick) and had that nice butcher-block look to them.
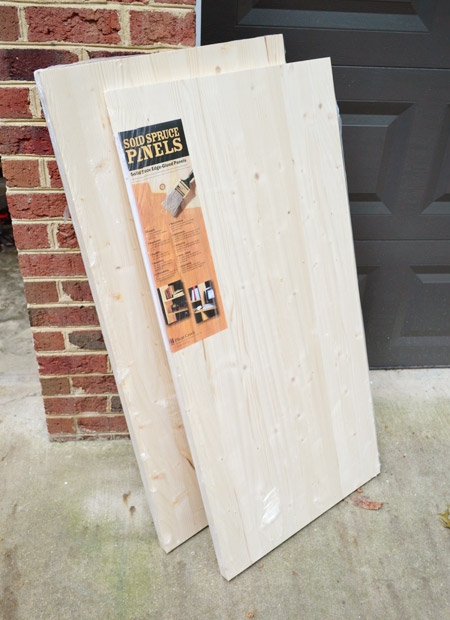
We used one panel for the shelf and one for the counter. For the shelf I cut one panel into two 9″ wide boards and then we Kreg jigged them together into one long shelf. The counter involved cutting the other panel into two 18″ wide pieces and jigging them together. I didn’t cut off the excess counter until after the tile was installed since I wanted to be sure to get the overhang right (so you can see it hanging over too far in this picture).
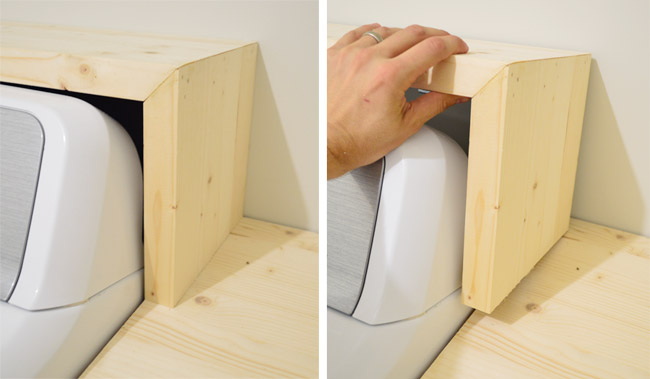
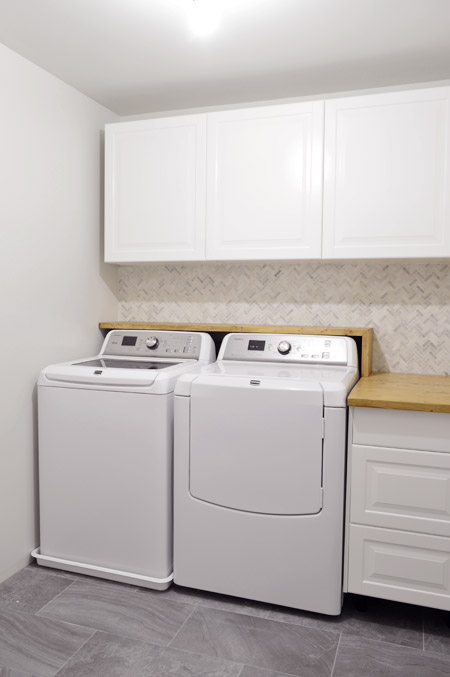
The waterfall edge came from cutting the end of the shelf off at a 45-degree angle and then gluing & nail gunning it together again at a right angle. Since it’s attached to the shelf (which we made removable so we have easy access to the appliance hookups when we need them), I just measured carefully so that it would rest on the counter and line up nicely on the left edge, to make it look like one piece. The top of the shelf doesn’t rest on the appliances, it rests above them on four heavy duty brackets, which you can see better in this post (three of them were screwed into studs to make them extra strong). We didn’t want the washer to shake the shelf and knock things off as it ran. We’ve done three pretty big loads of laundry and so far, so good.
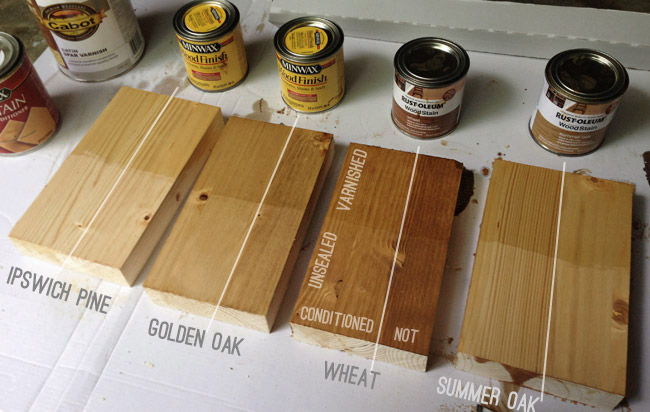
Since we don’t have a go-to lighter stain preference, we tested out a bunch of options on some scrap pieces from the shelf/counter build. Sherry pre-stained/conditioned half of each, then stained the whole block with one of four colors (two by Minwax, two by Rustoleum). Once dried, we pained some varnish on the top half of each – but it made them more yellow than we wanted, so it quickly got nixed. Of course the nuances are easier to see in real life, but we thought Ipswich Pine and Summer Oak looked a little too light and Wheat was a bit too dark/red for us. So Golden Oak was a pretty easy choice.
We applied one coat of stain, followed by three coats of Safecoat Acrylaq, which is what we used to seal the wood vanity top in our first house’s bathroom (it held up so well to water in there that we knew it would be great in a laundry room).
I’m stoked with how it turned out. I think it’s exactly what the room needed, and it’s exciting to start layering things in over the light & bright foundation of the cabinets and the tile. Admittedly our shelf looks a little lonely right now, but we’re just getting started…
So we still have some loose ends to tie up on this wall (here’s my visual checklist of sorts), but on the bright side – we got the door hung!
And the fancy glass one that leads to the future bunk-room is in the works, so we’ll hopefully finish that up and have the details for you next week. It bears mentioning that we’ll also be adding things like a laundry sorter, a pull-out drying rack, and a wall-mounted ironing board on some other walls of the room, so those details should be coming soon too.
This feels like a good moment to do a budget update, so here you go:
- Framing (labor & materials): $360
- Electric (labor & materials): $400
- Plumbing (labor & materials): $375
- New dryer vent: $87
- New HVAC vent: $59
- Drywall & insulation: $298
- Drywall mudding: $84
- Sub-floor materials: $30
- Tiled floor: $451
- Ikea cabinets & under-cabinet lighting: $862
- Appliance re-install: $15
- Tiled marble accent wall: $281
- Shelf & counter (including stain testers & stain): $97
- TOTAL: $3,399
The two contractor estimates that we got for just the framing, electrical, plumbing, and drywall stuff came in at $3,250 and $5,000, so it’s incredibly comforting that we’re still on the low end of that range after adding a marble backsplash, tiled floors, cabinetry, and a shelf/counter (including some upgrades like soft close doors and under-cabinet lights). That being said, we’re almost exactly double where we were at our last check-in because we hit our big ticket items like tile & cabinets. But hopefully once we’re past the door and trim/crown installation we’ll be at the end of our major expenses. Dare I say this new room of ours (and reconfigured bunk-room entry) might clock in under the $4,000 mark?

That sounds like a jinxy thing to say. Maybe I should play it safer? I’m certain we’ll come under the $100,000 mark (now I really hope I didn’t jinx myself).

Ro says
So excited to see the rest of the projects… very glad to see you’re including a pull out drying rack! :)
YoungHouseLove says
Wahoo! I can’t wait to hang stuff on a legit drying rack! Never had one in my life!
xo
s
sarah dorsey says
Looks good! I’m loving the lighter stain with the gray and white!!
YoungHouseLove says
Thanks Sarah!
xo
s
Katie B. says
I absolutely love the wood countertops against the marble tile. Just love it. That is all.
Sara says
I like what you’ve done in here-it looks great! I do think the light wood counters are a good idea and based on your mood board I think the combo of the “natural-ish” wood and the grey and white will look great. I think what people are reacting to is the fact that the stain color you chose still looks unfinished/unstained. I think it might look better just a hair darker- not mocha, but I did prefer the wheat color- I think it brought in the warmth better than this color and made it look more finished and polished. But if you leave it as it, I think the comments will die down once you layer in the accessories. Nice work!
Sara says
Oh and also- I was under the impression that a waterfall edge referred to one that was rounded. I think what you’ve got there is just an edge.
YoungHouseLove says
Thanks Sara! We hear that when stone or wood wraps over something and down the side (like a kitchen island) they call it a waterfall edge. Not sure if wrapping over and down a dryer really counts, but we’ll pretend ;)
xo
s
Lynn says
Place me squarely in the “so far, I hate the stain color” camp! First time commenter coming out of the woods to express that. :) I trust your process, vision and taste, so I’ll wait to pass complete judgement. Ha ha ha.
YoungHouseLove says
Ha! Thanks Lynn!
xo
s
Marisa says
I feel the same way! I have a feeling that I’ll be loving it by the end, but I’m not convinced yet. I would have gone with the Wheat. Can’t wait to see how it all comes together!
Care says
Well Mr. Strained & Mrs. Extra Veiny….(I totally lol’d at that description) it looks awesome! Great work – can’t wait to see it all finished!
YoungHouseLove says
I’ve waited my whole life to be called Mrs Extra Veiny.
xo
s
Care says
Lol! Or was it Mr. Extra Veiny & Mrs. Strained? Either way, hilarious visual!
Alissa says
I’m extremely impressed with the level of detail you guys go into making everything level, straight, even, and fitting together well.
Since I don’t own a washer and dryer and thus know very little about setting up a laundry room, are all washers and dryers the same size? That is, when these guys need to be replaced one day (years and years down the line, hopefully!) would you / next occupants be able to put a new set in using the current placement of cabinets, floor pan, drains, etc?
YoungHouseLove says
Thankfully the base of nearly all washers and dryers are extremely similar (that’s why standard washing pans fit under virtually all types/brands) so the space we left should allow us to slide new appliances in down the line without trouble. The height might vary so we may have to remake the shelf (and possibly extend the tile, so we kept some extra) but it should be pretty simple!
xo
s
John says
You can also get water shut off valves that will automatically shut off should the hoses break. Saw this on the “This Old House Show”.
YoungHouseLove says
So smart!
xo
s
Suzanne says
There are also water alert alarms that are part of a whole house security system, so you’d get an alarm on your phone. If you’re worried, check for the add with your security system people. They’re really a cheap add-on and tons of peace of mind.
I’m in the waiting camp – not sure of that color, ooks a little too much like all those oak cabinets that everybody can’t wait to paint! But hey…easy to slap a coat of paint on there any old day, right? Bright yellow, teal, coral…I’d like to see your swimmer picture in here, and one of the colors from that painting. It’s just a laundry room, have some FUN!
YoungHouseLove says
Great tip about the alarm!
xo
s
Kate says
Now that song is stuck in my head………
Em says
Please get to the lighting aspect ASAP because I have to get undercabinet lighting soon and you usually think things out better than I. :)
Megan says
Love the wood! I’m a fan of the wheat (or dark walnut), but who cares… the beauty of stain (without the yellowing varnish topcoat – ugh!) is the ability to live with it and adjust as you go. You can always go darker, but not lighter, so I appreciate your approach! I have to laugh that light wood is now coming back… says the girl with the dripping white paint brush as she paints over her natural maple trim! I do like the blonde look in smaller doses, as in picture frames or accessories… which I think would be the perfect addition to your room, just a few more pieces to enhance the wood.
Marisa says
Good idea about the matching frames! I was wondering how they’d tie in the wood colour in more places.
Cristy says
Would be cool if you could add the pull out drying rack next to where the cabinets are to save that wasted space….. just an idea.
Looks great! Terribly jealous!
Bill says
Just wondering, where the other end of the pan drain connected?
BTW, nice job.
YoungHouseLove says
Thanks! It’s routed down into the garage ceiling like the main washer drain.
xo
s
Bill says
What I meant, is it connected to the same drain line as the washer’s drain?
YoungHouseLove says
We honestly didn’t look at it while the plumber did his thing but our best guess is that they’re connected or tied into each other?
xo
s
Brittany says
Love the stain color! I’m very much into the driftwood/light/grey colored wood stain right now. Even so much so that my husband noticed all the wood frames, our new desk, etc. were in that tone. Plus it definitely gives it that beachy feel.
BeccaK says
It plays out in my head like a Wiley Coyote cartoon, too, complete with a “bounce and splash” on the bottom floor. In reality, it would be far, far worse, I know, but I’m right there with you on the imagery!
Erin says
I think your laundry room is coming along amazingly! I just had woodwork added around our washer and dryer because I was sick of fishing hats and mittens out from behind when we were late to school! It has been a great addition and so functional.
I would like the light stain if it was a solid counter. With the different levels, my feeling is that since it a contrasting color that is the first place your eye looks. I would paint it white so that it blends, and then your eye would be drawn to the gorgeous backsplash. Just my two cents!!
Karen J says
This is such a neat room; I can’t believe all the work you have done. I agree the shelf looks a little lonely in there (almost like plywood in the lighter stain) so I am looking forward to seeing it “tied” in. I always thought I wanted one of those drain pans, but I’m not crazy about how they look. Did you look at using one of those “intelligent” valves that automatically turn the water off if a leak is detected? I think I might look into that instead; wish you’d install one as the guinea pig!
http://www.diycontrols.com/p-7099-watts-intelliflow-automatic-washing-machine-water-shutoff.aspx
YoungHouseLove says
These are very intriguing to us! Anyone tried them? Do they ever fail? Something about an actual overflow drain feels comforting, although I agree the pan isn’t very cute!
xo
s
Katrina says
I actually love the stain color being natural. We have natural light oak all through our house even though its not on trend right now necessarily. We have really ended up liking it. BUT what I will say is that we have found white walls do not accent it well at all. When we moved in every wall was white and I thought I hated the stain. As soon as there was any paint on the wall it totally made the wood shine. It looks nice with the lighter shades like revere pewter a d the dark shades like gunmetal … So maybe the stark white walls just aren’t doing it any justice???
Melanie says
What kind of under lighting did/are you using? We went to Ikea this weekend looking for something similar, but we couldn’t decide on anything. Thanks!
YoungHouseLove says
We’re going to try ikea’s LED system for under the cabinets. Will keep you posted!
xo
s
Kati says
I think you’ve done a good job! I LOVE the stain color… and I normally loathe light stains. But… Put me in the Yay light stain camp! I prefer it so dark that it seems painted black, but this. This is great! Now don’t show my husband or everything will be stained light haha.
YoungHouseLove says
So funny!
xo
s
Ashley says
I love how this room is coming together! I’m anxious to see the molding and other finishing pieces installed. I’m thinking about IKEA cabinets fort kitchen reno. What sheen will you use when you paint the trim pieces?
YoungHouseLove says
The filler pieces are finished to match the cabinets by ikea, but the baseboards and crown and doors will be semi-gloss :)
xo
s
Britt says
If there ever was an opportunity to use the phrase “Back your shelf up” is was between the cabinet-shelf paragraphs!
YoungHouseLove says
Saddest missed opportunity ever. Might need to start a shelf help group.
xo
s
Marisa says
LOL. Hilarious.
Jessie says
I love the tile. As for the new shelf/counter, I’m not seeing a waterfall edge, only a mitered edge? Did I miss the curve somehow? Also, while I love the lighter color, I don’t think the tone is correct. It’s too yellow. You need a little more depth. It looks like a piece of wood that you got from Lowe’s. And while that’s technically what you did, you don’t really want it to look that way, ykwim?
YoungHouseLove says
Thanks Jessie! We hear that when stone or wood wraps over something and down the side (like a kitchen island) they call it a waterfall edge (even if it’s a right angle instead of being curved). Not sure if wrapping over and down a dryer really counts, but we’ll pretend ;)
xo
s
Todd says
With the addition of the natural colored counter, I’m thinking another clothespin light fixture would fit pretty awesomely in this room. Just saying.
Jessie says
Oh, no, not a fan of the clothespin light fixture!
Emily @ Life on Food says
It seems so bright and airy which I like but I am ready for your accessorizing!!
Lillian says
Ok, normally I try to avoid pointing out typos because we are all human and they happen to every single one of us, but most of us aren’t posting something for the masses! However, this one made me laugh SO LOUDLY in my office that I needed to point it out.
“The drain was set in a way where we could gently raise or lower the pope in the garage ceiling below, which came in handy so we weren’t constantly tripping over it.”
I immediately started picturing y’all raising and lowering the pope in your garage.
Thanks for the big laugh! As always, I love everything you do and how gracious and classy y’all are with criticism in the comments!
YoungHouseLove says
That was a pretty good one ;)
xo
s
Lillian says
Please know I sent that comment out of love, not hate! I know nit-picking isn’t great, but the mental image made my stressful day so much better!
YoungHouseLove says
The Pope In The Floor sounds like the sequel to The Indian In The Cupbard or something…
xo
s
Lillian says
Yes it does and that screenplay needs to be written ASAP!
Amanda says
I can’t believe people are questioning the lighter stain! I think it is stunning and exactly what the room needed. A grey stain would have been too blah and the darker stain/grey combo is so predictable. The warmer golden tone is the perfect compliment to the cooler finishes and when you accessorize, it will be amazing! Love all of it!
YoungHouseLove says
Aw thanks Amanda!
xo
s
Kitty says
I LIKE the lighter color on the wood in the laundry room. I think dark mocha is on its way out, so you made a great choice in there. :-)
That said, it feels like you are really milking this laundry room. So far there have been at least a dozen posts about this one tiny room and I have a feeling there are more to come. I am looking forward to your tackling a different room. My vote is for the kitchen!
Tom says
Quick question: Where does the overflow drain go to? Does it tie into your wastewater system or does it drain out into the garage or the back of the house somewhere?
YoungHouseLove says
I believe it ties into the same waste waterline our washer drain ties into? We honestly didn’t look at it while the plumber did his thing but our best guess is that they’re connected or tied into each other somehow.
xo
s
christine says
I second a previous poster’s suggestion of getting a water bug which ties into your security alarm system. We have one in our fully enclosed basement sitting right next to our sump pump. Total peace of mind, especially when away for awhile. A friend of mine had a very small leak in the tubing for her ice maker in her refrigerator while she was on holiday and came home to nearly $50,000 worth of damage since it not only destroyed her kitchen floor and base cabinets, but her family room beneath it!
YoungHouseLove says
Yikes! Thanks for the tip!
xo
s
Haley says
I was picturing this with a darker stain, but I know there is still a lot to be done before the room is ‘finished’. I can’t believe how much stuff you guys have done. This looks good.
AshleyM says
Love the stain color! If I remember correctly, on the mood board, you were going with a basket in a similar tone, right? The stain color is perfect for that! (Which you already know, obviously.)
Anyway, are you guys working on the house this beautiful (though cloudy, I think) weekend?
I’m in the military, so we get a much needed four day weekend. My husband and I are working outside this weekend. We’re painting our new porch (we took out a really FUGLY deck) and moving some plants around in the flower beds and on Monday, we’re having a huge pile of brush removed. I think seeing progress outside might be more satisfying than seeing progress inside my house!
Loving the laundry room!
YoungHouseLove says
That’s so exciting Ashley! Best if luck with everything! We are hoping to squeeze in some family time & laundry room time this weekend ;)
xo
s
Jill says
Sherry, this is off topic but I have been pouring over your current house tour photos and am so curious what you plan to do with the dark wood trim in the kitchen area and living room. I know you plan to paint the planked wood white in the living room, but do see yourself leaving any of the dark wood trim anywhere? I am in a house with all dark wood trim and instead of diving right in and painting four coats on every door, baseboard, and window casing (which will take forever and ever and ever)…we are going to work with it as is, at least for now. It is proving to be difficult. What are your plans?
YoungHouseLove says
We’ve debated leaving some things wood (like the beams in the living room) but we love how fresh the wood paneling feels in the kitchen now that it’s painted. So that’s our plan for the living room too… eventually!
xo
s
Karey says
One of the toughest things in decor is mixing cool and warm tones. For me, you’re not there yet but I love that you put it out there for all to see (and comment!). I think a tad darker would serve you well, if only to compliment that beautiful tile. The current color looks too yellow and a bit cheap (pains me to say, cuz you’re work is ANYthing but cheap!). I know the total package will end up marvelous, just think this color was a misstep along the way!
Karey says
Ha! Love the complete opposite back-to-back comments! I totally agree no grey – but a SMIDGE darker would be warmer and less competition with the star of the room!!!
Annie says
I think you’d understand the people who’d have gone darker better if you read a little about undertones.
http://www.mariakillam.com/secrets-to-choosing-neutrals-that-will-always-take-your-side/
http://www.mariakillam.com/whats-an-undertone/
The blue grey tiles on floor and walls and pure white on cabinets and appliances call for a cool undertone in the wood. The very yellow warm stain you’e chosen doesn’t play at all nicely with the cool grey of the backsplash. Maybe have a look back to the very pretty collection of items you posted as an ad-hoc mood board.
Kelsey, the top drawer is so narrow that the space within the frame is smaller than the frame itself. It ends up looking very busy and not at all like it matches the drawers (more like the inverse of the drawers). I have Shaker doors and there would not be room for cup pulls inside the frame, I’d have to have them wedged up under the countertop (frameless cabinets). Also, visually if the top drawer is a slab it helps create a line all the way around the kitchen. You can still get framed shallow drawer fronts, though, if that’s a look you prefer. Just make sure you’re not using cup pulls unless they’re raised panel!
Carla says
I really agree with you. The yellowed wood does not at all play well with the grey tones in the tiles, and it makes the cabinets look more like a yellowish white and the appliances more of a stark grayish white.
But the shelf itself is such a great design. I love this room.
Annie says
I found a picture that illustrates my point.
http://4.bp.blogspot.com/-lWeAIVHnM4o/UAqHVV7zidI/AAAAAAABi1E/esvtcbTmK9Q/s1600/13.jpg
The wood has a bluish undertone, so it doesn’t clash with the cool marble.
To pull the dryer out, you just pull the washer out first, then disconnect the dryer vent from the side. Easy. The unexpanded vent idea is nice, but someone still needs to reach in there and attach it, which is why goingfrom the washer side is the way to go.
Marian says
Hi Sherry and John!! I just wanted to tell you that I really LOVE your home and laundry room, I’d love to have a house like yours, but I’m writing you from Barcelona – Spain, and you know, we do not have much space in Europe for houses, so I live in an apartment. I have just rearanged my laundry nook in my kitchen, and I’m happy with it but ohhhh how I’d love to have a laundry room with a sink!! So I would like to know (if you haven’t told it yet) why didn’t you include a sink in this room? Sometimes you have to wash some clothes by hand, and maybe a sink would have been useful…
I read your blog a while ago when you were with the book tour, and then I don’t know why, stopped doing it. Then I came back to your blog and realized you moved and had Teddy so congratulations for these “news” hehe. I’ll stay over here!
Marian :)
YoungHouseLove says
Aw thanks Marian! We debated adding a sink but it would have been pretty small so we opted to skip it. Thankfully we have a sink down the hall and our washer allows us to soak things (it’s a top loader so it doesn’t drain whenever you open the top, so it’s easier to add things).
xo
s
Julianne says
Looks fantastic! Love the mixture of colours and textures. Can’t wait to see where it ends up! :O)
Kate says
Fabulous work on the laundry room! I’ve been looking into moving ours to the second floor and one thing I come across in a lot of articles is to make sure that the floor is reinforced because of the machine vibration (supposed to help cut down on noise?). Was that something y’all were warned about by contractors? Was the floor already good to go because you were close to your old laundry? Or is your new laundry over your garage so there isn’t a living space below it? Questions… questions… enquiring minds want to know.
YoungHouseLove says
Both contractors who bid the job for us said our subfloors + cement board + tile would be a nice firm foundation (under our previous washer and dryer we just had subfloors + carpet when we moved in!).
xo
s
Theresa says
I CANNOT wait to see how you organize this room and throw in decorations. It’s even better than your last laundry room. Xoxo
Amanda says
“I seen a rainbow yesterday…” Now that’s stuck in my head and visions of bad karaoke nights are coming back to haunt me :) I love the herringbone tile. I think chevron may be going out, but this is timeless. Maybe it’s the tweed-esque effect. Great job!
Cathy Ropiski says
Fantastic laundry room! Looking forward to seeing the finished room. Thanks for sharing!
Megan says
Ahhhhh, obsessed with this post! 3rd comment of the day from my household (my sis is also addicted to your blog!). The stain jury is out on my end, wheat was my fave… but I can see the look you’re going for. Curious to know if you lived with the sample pieces in the room before deciding??? And if you stick with the color, do you think you’ll incorporate more blonde tones throughout the house to help tie it all in? Wood is sooooo hard to get “right” when tone/color/accessories all mix together. It’s a dilemma for us all!!!
YoungHouseLove says
The funny thing is the side table and rocker in Teddy’s room tie into the counter (yes I dragged them down the hall while playing around in there) and our table in the kitchen is pretty similar, so I think they’re slowly layering in. The bamboo shades we’d love to add in the office might be close too. We’ll have to see where we end up!
xo
s
Carla says
I love the shelf, but it looks so crowded and tight. I would have mounted it higher. Even 1/2″ would look much better.
The stain seems too yellow and really brings out the yellow tone in the cabinets, making the appliances look stark and a bit on the gray side of white. Because of the mismatched whites I would have gone darker with the wood stain or more toward a walnut minus the yellow undertone.
I’m wrestling with conflicting whites myself. The frig is a nice bright white and the trim color for the door frame, baseboards and doors is a warmer white. It’s Marscopne by Benjamin Moore, one of Candice’s favorites.
I love the white, but it looks a bit dingy now that I’ve painted a door frame near the fridge. I’m wondering what a nice bright white would be that works well with warm colors.
Heather says
Your overflow drain may be completely different, but ours pipe goes into the crawl space and pokes out of an exterior wall just next to a downspout. When we had our washer disconnected, we poured water in it just to find out.
YoungHouseLove says
So funny!
xo
s
Lauren says
I personally love the stain of the counter! Very Scandinavian and warm with the rest of the room :)
Lori says
Like many others avower, I gotta say that I just don’t love the stain color. However, I’m reserving final opinions until the room is complete. You’re kind of in the akward “middle” where things don’t always make sense, and making rash changes to your plan can sacrifice your end result — looking forward to seeing it all come together.
Lori says
Avower? How about ABOVE. Sorry …
Nik says
I think it all looks great. Just one question though … why don’t you have a sink in there? Maybe it’s an American thing … I’m from Australia and all our laundries have sinks in them … it comes in very handy.
YoungHouseLove says
Thanks Nik! It sounds like laundry sinks are standard in Australia, but here it’s not as common (we know a lot more people without them than people who have one). In our case, it would have been really small, so we opted not to. We have a hall bath so that’s where we’ve been spot cleaning things so far, and it seems to work. We also love that our top loading washer can be filled with water and then the lid can still be opened to add/soak things (we couldn’t do that when we had front loaders since they always drained before you could open them).
xo
s
BamaCarol says
I just got some antique wood (is that even a thing?) to use for shelving in the laundry room and now I want to get more to do a shelf over the washer and dryer and redo the counter on my cabinets. And some tile behind washer and dryer, and painting the cabinets white….you have unleashed a beast!