First things first. Thanks for being such great sports about our little April Fool’s Day prank (seen here).

Sherry was giggling the entire time she made that crazy nautical themed doggie mood board (at one point Katie Bower called and I actually heard a laugh-snort or two as she shared her little “project”). And it’s safe to say that every single comment – ranging from those of you who fell for it and those of you who knew it was a joke from the first sentence – made her day. Which made mine. Happy wife = happy life. In fact things were so copacetic around here that I was inspired to start my next big build.
I couldn’t dodge it anymore. The time had finally come get started on a behind-the-sofa-Karl console table for our living room. Having more than a padded ottoman in the room will be a big help, but it promises to be a big task. 140 inches big (er, long), to be exact.
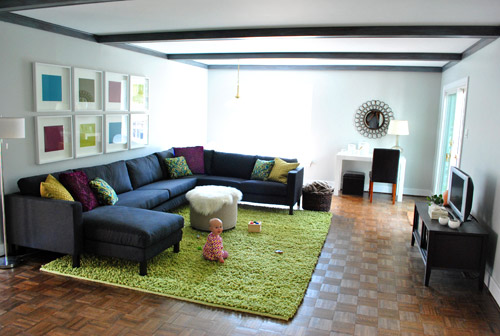
Let me back up for a moment. From the second that Karl arrived, we both agreed that putting a big not-Clara-friendly coffee table (even a round one) would probably be too heavy for the room and might result in more baby bumps and bruises than we were prepared for. And we’ve enjoyed being able to move the ottoman easily to make more room for playing, hosting, and vacuuming – so for us it was definitely the way to go. But we quickly decided that we needed a nice long console table behind the sectional (between it and the wall), to create a solid (and super functional) surface for two table lamps for reading, a spot to drop drinks, a box or basket to stash things like remotes, and more storage and display space for various other living area must-haves (that weren’t exactly hanging out on the non-existent coffee table).
But where does one find a nearly 12 foot long console table (!) to span the entire length of Karl? Um, yeah, nowhere. Unless you want to pay 3K to commission a custom build.
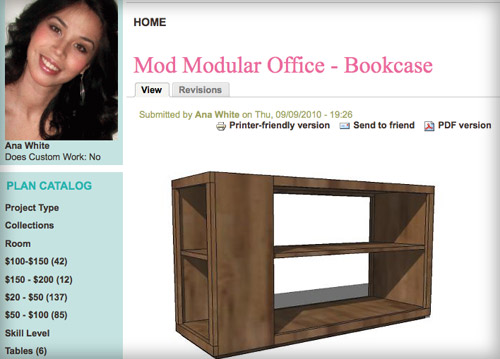
So I spent the last couple of months mustering the energy/confidence/game plan to create a customized DIY solution. We considered just putting a couple of floating shelves up to act as a long “floating console” behind Karl, but figured that left too much unused space underneath (and might not have the homemade weathered look that we wanted in hopes of balancing out more modern things like the green rug and the sleek sectional). So we decided I should build something customized to fit our giant sectional. Something that takes advantage of as much of the space as possible. And that’s when this plan from Wood Wonder Woman (aka: Ana White) caught our eye.
I knew I’d have to build this 140-inch behemoth in multiple pieces since maneuvering 12-ish feet of bookshelf just didn’t sound like a good time. So I hatched a plan to build three 4-foot sections that would be covered by one long “tabletop” for a nice seamless look. And the two end sections could take some serious inspiration from Ana’s bookcase above. Each of my two console table “end pieces” could have those two open shelves on one side (hello bonus storage!) but they wouldn’t need that interior shelf cutting through the entire middle since that wouldn’t be accessible (so we could save some wood, money, and effort by altering the plan a little). My version definitely looked a bit lot rougher when I sketched it out.
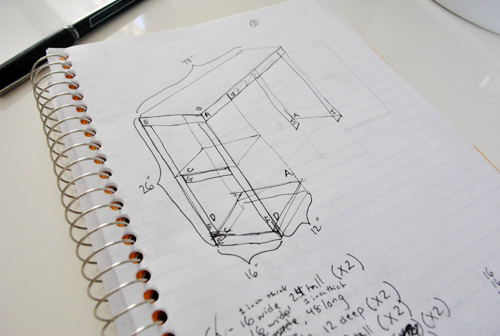
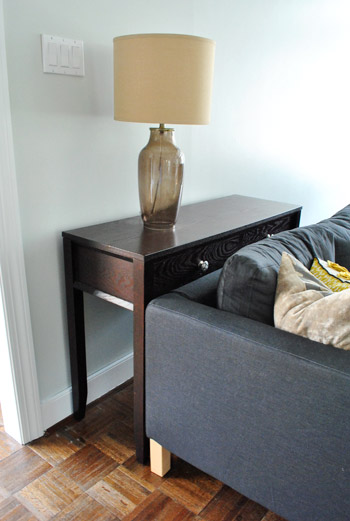
We figured out our measurements by doing a test with our existing console table from the hallway several weeks ago (I originally planned to start this in February… oops). We tucked it behind Karl to see if it was wide enough for a table lamp (it was just barely deep enough with the large sized lamp shade, so we decided to make my version wider – don’t want any head-into-shade issues). We also used the hallway console to see what height would look best (clearly our “test model” was too tall). The new one will sit somewhere slightly above the back edge of the sofa but below the back cushions for a hopefully balanced look with lots of easy-access function.
With measurements made and plans sketchily sketched out, we hit up the Home Depot for a bunch of wood – most of which we had them cut to size for us right in the store (for free). It saved us time and enabled us to squeeze everything into the Altima (which definitely wouldn’t have been able to accommodate planks that weren’t cut down). As usual, the happy baby of the group had a blast.
To keep costs down we bought basic white wood for everything except for the 1 x 2″ poplar pieces that we used to trim out the “end” bookshelves that would be seen on each side (no sense using the good wood on parts that would be hidden in the end- and the white wood provided more than enough support/strength/sturdiness). If I were a pro furniture builder I probably would’ve splurged on better wood, but who are we kidding – I’m cheap and this amateur didn’t want the pressure of screwing up the “expensive stuff.”
So here was my supply pile for one of the two end pieces. I’ll spare you an exact breakdown because this piece is so specific to our space. And if my drawing above is any indication, I should not go into the business of posting furniture plans. Like ever.
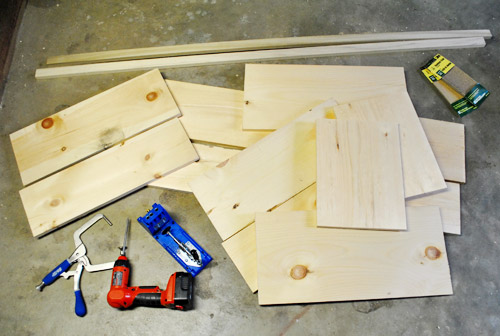
Notice those two semi-thick boards on the far left? Those are a 1 x 8″ and a 1 x 10″ piece that we had them cut to the same length right in the store. We wanted the console to end up about 16″ deep, but the widest board they sold was 12″. So putting two shorter boards side-by-side was our solution, since the boards are actually 7.25″ and 9.25″ wide (so they add up to about 16.5″ when put together – which was pretty much exactly what we were going for). So there’s a tip, even if the sign says that boards are 8″ wide and 10″ wide, they can definitely be substantially smaller.
Anyway, when I got home I rekindled my ongoing love affair with my Kreg Jig for the task of joining the boards.
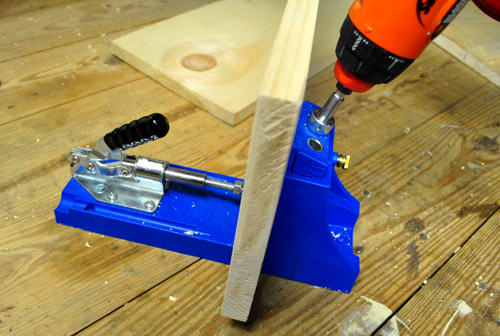
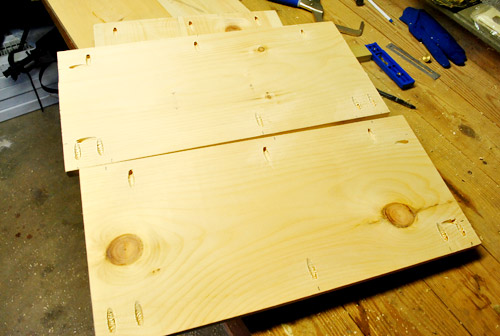
You can read more about what my main man Kreg does in this post, but basically he helps create perfect pocket holes to connect pieces of wood like a pro. They look a little something like this mid-job:
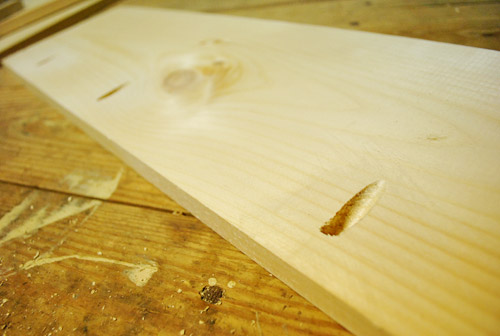
Then I lined everything up and screwed the two pieces together for a super tight hold like this:
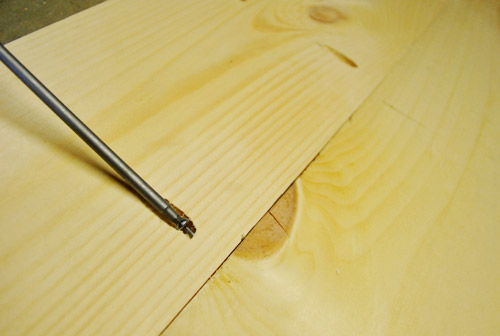
That’s how I ended up with three 1 x 16.5″ planks to form the top and the two sides (aka: wide legs) of the console:
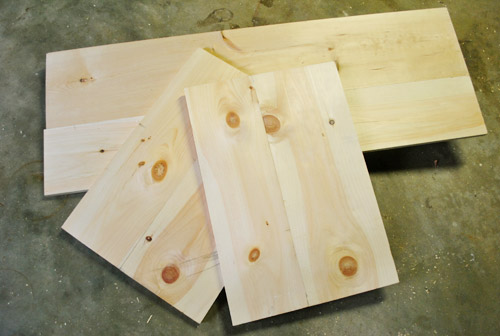
And yes, the top isn’t exactly flush on the left side. But since the whole thing will be covered by a long, separate tabletop in the end, it was only important that things were lined up perfectly on the exposed parts. Actually, since most of this piece will be unseen behind Karl and thanks to the new top that we’ll be adding, it really only had to look pretty on the open shelf end of each end piece that I was building (remember I’m making two end pieces and one middle piece to put together under one long 140″ top for the look of one long 140″ console in the end).
A few more Kreg holes and some meticulous clamping later, I was on to screwing in my first leg (the one that would be hidden on the interior side of this section)…
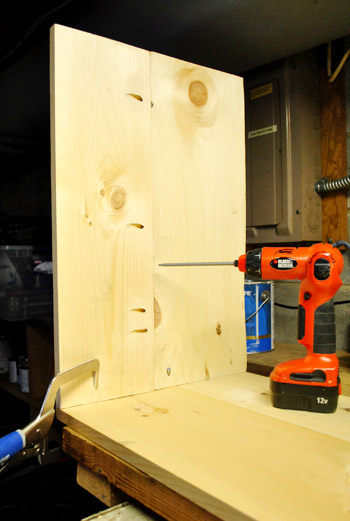
…and adding some 1 x 2″ rails for extra support.
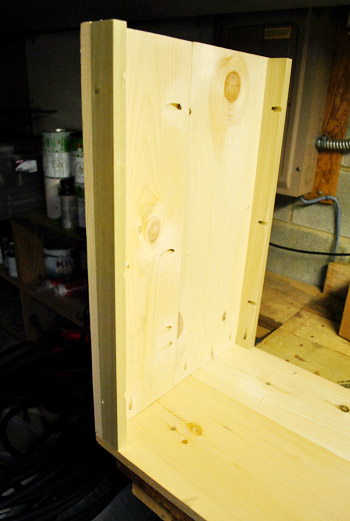
Next up was the bookshelf side. I started with the two sides of the shelf, comprised of two 1 x 12″ boards. Between attaching these to the top and the other leg, plus securing the finishing trim to them at the end, I realized I’d be doing a lot of screwing (that’s what she said). So I had myself a little pilot hole drilling party before attaching anything, just to get that step completely out of the way all at once.
Then my drilling party turned into a screwing party. Um that sounds even worse. But you know what I mean. On went the sides…
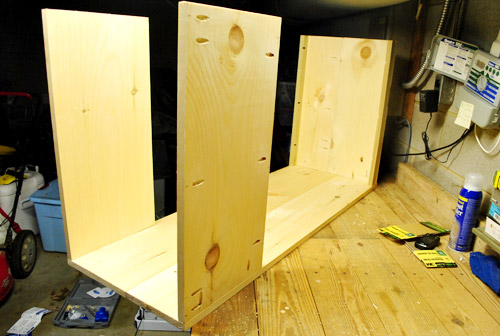
…then the back. Typically I’d put all of these ugly holes on the inside of the shelf, but since Karl will be blocking the entire side off the piece (since it’ll be snugly placed between the back of the sectional and the back wall) I kept the inside of the shelf, pristine (since it’ll be seen). Meanwhile the outside can be all busted up and hole-y, since that will be the hidden part (sandwiched between the sofa and the wall).
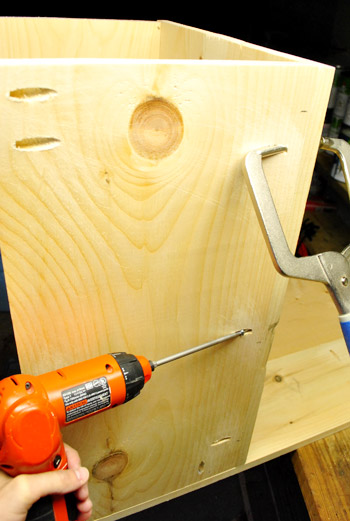
Next up were the two shelves (keep in mind this is all upside for now, so all of these holes will be hidden):
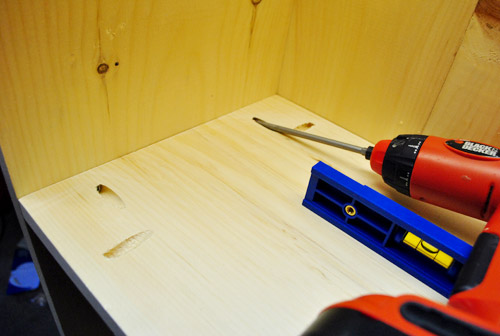
And last up was the trim on the outside to finish things off nicely. I used my miter saw to cut the 1 x 2″ to size and attached them using the holes that I pre-drilled in the sides and shelves. Now is it coming together for ya? I know it’s really confusing to read this step by step play by play, but hopefully now it’s starting to look like my sketch (it’s just upside down in this shot).
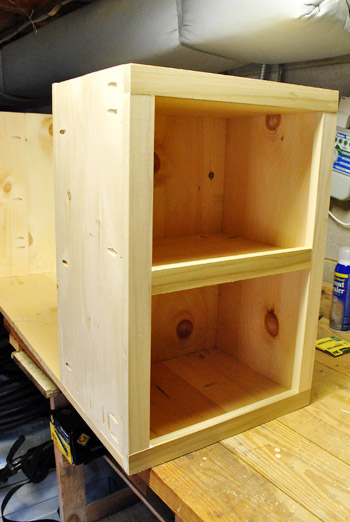
All-in-all, it took me about 1.5 Clara naps (that’s around 2 hours) to get ‘er done. Not all three, just one of my three pieces without the top. She’s not the prettiest thing yet, but I was surprisingly proud about how it turned out and how much less difficult it was than I expected.
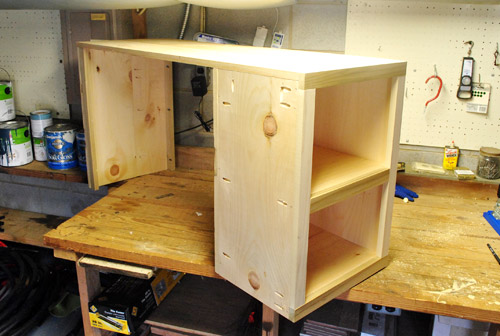
I’ll fess up that the console section that I photographed above was actually the second one that I made (since I need one for each end). I was so focused on not screwing up the first one that I forgot to take pictures. But that one came out really well, as did the second one (and the good news to anyone else who needs to build a console table in three parts is that you get faster as you go).
So since you’ve already seen my second one in the shot above, here’s the first one making its appearance during a test run behind Karl. Oh yeah but in this shot you can see my one “mistake” with my first console creation. Notice how I didn’t think to put all of my holes on the outside of the interior bookcases (which will be seen) my first time arond? Boo. Thank goodness for wood putty.
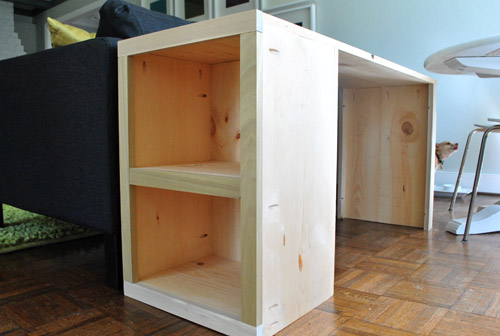
Of course this isn’t the side of Karl that it’ll sit behind eventually (it will go between the back wall with the frames and Karl’s backside), but I was just too lazy to move him out from the wall (he’s a big boy) for this quick test. I mainly just wanted to make sure the height felt right (which it did). When we add the new top it’ll sit just slightly above the sofa back, but below the back cushions just as planned.
And yes, Burger decided this was the perfect moment to eat lunch (despite the traffic jam of furniture going on). He’s not howling in the picture above, just chewing and looking out the window.
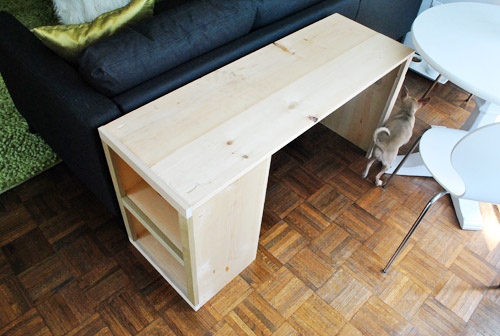
The third / middle piece of the console is actually already mostly built too, I just haven’t finished a few last minute details and snapped any pics yet (and let’s face it, this post is already long enough as it is). But we actually incorporated some storage into it even though it’s going to sit between the two side console pieces that I built. That’s right, it’s top-entry storage. More details soon. I still have the entire “countertop” to tackle as well, but we’ve decided to use some reclaimed wood (aka: slats from the old shipping pallets left in our yard) to inject some rustic beat-up style into this a-bit-too-modern-for-us-at-the-moment living room. As for the rest of the piece, we’re planning to stain it a dark wood tone so it sort of blends/disappears behind Karl. You know, so the more weathered and varied looking top can – in the words of my wife – be the star.
And as for the cost, for the two end pieces and the almost-done middle piece we’ve spent around $65, which doesn’t include the top that we’ll add (but since we’re planning to “recycle” the pallets that we have, we shouldn’t spend much more on this build). We’ll share a full budget breakdown (including stain and all that good stuff) when we’re done.
We’ll post more about the console as our work continues, but for now lets talk shop. Have you guys built anything yourself lately? Did you put some Ana White plans to good use while you were at it? Seriously, that girl can build anything.

Sara says
Oooh! This is great! So inspiring! Can’t wait to see the finished product! This afternoon? ;)
Jen says
SO excited to see how this turns out! These are my favorite post, as we love to make our own furniture when we can and are so often inspired by your projects! Giddy happy over here right now!
Here is a recent build that we took on, and had great help from the local Home Depot as well to have it pre-cut for us! Love them!
http://iheartorganizing.blogspot.com/2011/03/built-in-beauty.html
xoxo,
Jen
Rachael says
Can’t wait to see the final product! Looks great so far, John!
Kim at Yellow Brick Home says
Whoo for DIY big ol’ projects! We’re smack dab in the middle of one ourselves. We started with the plans here:
http://www.yellowbrickhome.com/2011/02/04/let-the-planning-begin/
And we’re somewhere between chaos and thisclose to completion. It that makes sense:
http://www.yellowbrickhome.com/2011/04/04/so-hard-to-say-goodbye/
Good luck, and I can’t wait to see your end results!
Crystal says
Love, love Ana White!! My husband and I actually built the floating shelves she featured here this past weekend and we took an old door, cut it in half and it’s going to be two custom desks under the floating shelves! Door into desk idea courtesy of YHL of course! I can’t wait to get everything primed and painted so I can take pictures!
Is there a wood putty that you would recommend? The one I used this weekend just didn’t work smoothly for me.
YoungHouseLove says
We actually haven’t used it for a while (but were planning to ask the pros at Home Depot what they would recommend). Although we’ve heard from a reader who prefers “wood plugs” to putty so that might be another option for ya. Good luck!
xo,
s
Sheela says
If anyone chooses to use the Kreg wood plugs to fill pocket holes, be aware that you have to flush cut them somehow before you can finish your piece. They will stick out about 40% higher than your wood surface, so you either need a flush cut saw or a router to smooth it out. Then they need sanding and may need a little additional filling with wood filler. Believe me, I learned this all the hard way when I built a coffee table. Pocket hole plugs are great, but it may be easier to use a good wood filler if it’s not critical that the finished piece look absolutely perfect.
YoungHouseLove says
Good to know!
xo,
s
Claire says
I used a wood filler for my coffee table that boasted the ability to be stained since it contained “real wood bits!” (wasn’t sure how I was going to finish the piece at the time)
Boy, was that a mistake for ME because I didn’t have a great place to do the finish work and the putty also seemed harder to me than other putties I’ve used in the past. I never got it sanded flush and I managed to gouge out some of the wood on either side of the putty in the process of sanding (I was doing it by hand). In hindsight, I wish I had gone for the putty that doesn’t contain the extra grainy wood bits. Not sure how you want to finish your pieces but if you’re going to paint, I would just get the regular stuff. (Oh, and I was using Elmer’s brand available at HD).
YoungHouseLove says
Thanks for the tip Claire!
xo,
s
Sayward says
Claire, I’ve had bad experiences with the Elmer’s wood putty with real wood bits too. It’s so hard to squeeze out and I wasn’t impressed with the results.
carolinaheartstrings says
Love how the room is coming together. Cannot wait to see the finished project.
emily @ the happy home says
love it! we built something according to her plans, and are now just trying to find the right color for it. http://www.happyhomeblog.com/?p=2441 i think we’re taking a hint from you guys and going with a deeper peacock blue!
Candace says
Man, this makes me want to build something! And, if I showed this to the bf, I think he’d be leaving work right this second to go caress his miter saw…. We built this bar before getting the miter saw (super awesome!) http://candyskitchen.blogspot.com/2011/01/this-is-bar-that-jack-built-yall.html After we got that (best ever) present, the bf uses any excuse to use it! Including: http://candyskitchen.blogspot.com/2011/02/utility-room-overhaul-organize-organize.html making peg board frames, http://candyskitchen.blogspot.com/2011/03/bathroom-breakdown.html and fixing my mistakes on the vanity.
I think we are currently distracted by yard work and re-finishing pieces for the time being to start a new wood-building-project, sadly.
Stephanie B says
I love Ana!! I followed her for a year before I made my first project. I got a kreg jig and a miter saw for Christmas and so far I’ve made a few small projects from her site: the laundry basket dresser, Rolling C table and 10 dollar ledges. Haven’t tackled a big build yet. But I fully intend to build the play kitchen and playhouse this year! Just need to make the time. I can’t wait to see your finished console table! And I get a bit perplexed on where to place the kreg jig holes so thanks for sharing on the work in progress pics! It’s a tremendous help for wanna be woodworkers like me!
jbhat says
I am just beyond impressed. With the planning, the describing and the doing. The top sounds very intriguing. I am feeling impatient to see more progress. Come on, Clara, go for a loooong nap today!!
jbhat
Heather Andrews says
Holy crap you guys. I was just looking on Ana’s site this morning, trying to find plans for the EXACT SAME THING!!!!! Well, not exact, but close enough. We don’t have a Karl, but we do have a long and low sectional that needs something to go between it and the wall. Plus, we also use an ottoman instead of a coffee table! I was looking for plans that had some storage on the ends, and I couldn’t find exactly what I was looking for.
And lo! Here you are posting it. You are my heroes of the day. Perhaps even my whole week.
I’ll have to modify these for our own couch & wall space, but this is seriously EXACTLY what I was trying to find. I’ll totally be copying you guys, to an extent. I prefer to think of it more as a “mind meld” or something since I read this after I went plan hunting, lol. I couldn’t believe as I read this post that you are building just what I was trying to find. Anyway, thank you guys so much for posting this!!!!!!!!!!!!!!!!!!!!
Kathy W. says
Love where you are going with this. We had a similar dilemma and finally bought two unfinished book shelves to put behind the sofa. We stained them and they look OK but are not the exact right size. I sent a link to your article to my husband – a little hint – because I would like to have it look just right.
Love your blog – thanks especially for the ‘step-by-step how-to’s!
Kirsten says
Love it! It would never have occurred to me to go with two boards side-by-side… Why did you opt for that rather than plywood? Cheaper? Lighter?
We’re gearing up to build a captain’s bed soon using Ana’s plans… may need to invest in a Kreg Jig…
YoungHouseLove says
Hey Kirsten,
In the name of being green we opted for solid wood (plywood has glue in it that can offgas for a while). It’s also nice and easy to work with solid wood with the Kreg Jig (although I’m sure it could handle plywood as well).
xo,
s
Lara says
There is actually VOC free plywood out there. Sierra Pine makes one. I wouldn’t be surprised if Home Depot has some. Also, most plywood is made from recycled content nowadays, which is definitely more sustainable than using “virgin” wood lumber. Just a thought.
YoungHouseLove says
Very very good to know. Thanks for the info!
xo,
s
Ashley @ DesignBuildLove.co says
LOVE this idea! I’ve been toying with some console/buffet table ideas for a while now too, so I’m putting this one away in the mental file for later! Thanks for sharing! Can’t wait to see it all done. :)
Lindsay says
Nice!
I built an end table of Ana’s a while back that I am just ridiculously proud of even though it has some seriously visible flaws. Heh. But it was my first piece and I learned a lot!
Plus, I own a Kreg Jig now (BEST TOOL EVER!!) and so I have a few more plans bookmarked. :)
The finishing (as in paint/stain/poly, not completing) is what always takes me forever. Can’t wait to see what you’re going to do!
Michelle says
We just built Ana White’s laundry basket dresser. We used old wood from an old entertainment center we dissected, so it has a rustic look to it. There’s just enough room between the W&D and utility sink in our laundry room for it. I’m excited and it was SO easy!
Pam the Goatherd says
I’m addicted to Ana White (she’s where I learned about you guys). So far I’ve adapted her laundry basket dresser plans for a drink station in my kitchen. I’m glad to see how well your adaptation of the console is working out because I’m want to use that plan to make a media console for my living room so it’ll have to be 24″ deep to hold all my media equipment.
Will eventually be re-doing my entire spare bedroom/sewing room/guest room in Ana White furniture.
T.D. says
Love the post! I also love Ana White’s building site as well. I have many bookmarked topics.
Suggestion for the middle storage (if you haven’t completed it already):
Using hinges like those you see at a bar as the bartenders entry-way. You can lift up the storage (after moving the goods on top) without having to remove a top completely.
Gen says
Love it! Glad to see you building! I love Ana’s site. I have built a desk, daybed, 2 bookcases, spa bench, 2 nightstands, a changing table and a dining table directly from Ana’s site. I live in an old house so with my new confidence I also built my first custom radiator cover after looking at the insane price tags online.
Anna says
Oh my gosh! You stinkers! I totally fell for that prank! I can’t believe I didn’t make the connection, good one guys!
Stephanie says
How were you guys able to get Home Depot to cut all of the wood for free? I thought they only let you have one or two cuts free and then they charge for the rest? Great job on the project!
YoungHouseLove says
As far as our experience goes, they are always happy to make multiple cuts per board for you without any additional charge. We don’t ask for anything crazy like 15 pieces or anything, but they cut down some of them three times for us (creating four pieces). Hope it helps.
-John
Eric says
I used her plans to make 4 bookshelves(short, 2 shelf units). It worked out great!
I use her all the time.
Val says
Good work! They look great! We ended up putting a wall-mounted shelf behind out sectional because the back is sloped, not straight up and down. It would have made for awkward-ness. But it worked out great in our case since there is an intake vent over there and giving it room to breathe is probably a good thing.
I’m voting for saint-hood for Ana White. We love her! We’ve built two bookcases, a trestle desk, and some picture ledges already and we’re eyeing some outdoor furniture plans as well.
Carrie says
John, nice work on the console tables. I’ve built multiple floating shelves, working off the exclusive plans that Ana did for you guys way back…my floating shelf count is at 5. I find they really open up the floor space, our house is small and every square inch counts. Thanks for the plans. Also thanks to Ana and her website I’ve also built the spa bench and the closet organizer (I gained much needed storage space). Just printed off plans for the change table last week…looking forward to getting started on it.
Lina says
Thank you for directing me to Ana’s site! We just bought an older home 1.5 years ago and we are working hard to update it. We came from a smaller town home and are lacking in the furniture department. My hubby has been wanting to build something since our new home has a “shop”. A behind our love seat console table is just what we need!
My question is … what do I put on it? We already have lamps on our side tables and lots of nick knacks on an Ikea shelving unit in the room. Any ideas? Thank you!
YoungHouseLove says
We plan to put lamps there along with some large hardcover books, a basket or box for remotes, and other small items that we like having near the sofa (like Sherry’s lip gloss, which she must have on hand or else). Maybe you can stack some books that you love along with a box or basket for remotes? Good luck!
-John
Brooke says
This is looking really great! I’m in love with Ana’s site. Seriously, what haven’t I built from it lately? Last week I helped a friend build herself the Nursery Armoire. The week before I built her Changing Table plan for $15! Can’t beat that. I love everything she does, and since discovering her site I’ve discovered a love for carpentry. So far I’ve built a house full of furniture, and can’t seem to stop!
Angie K says
I am so excited about this post. I needed something similar for my couch and I was just gonna use 1×2’s and make a very simple u shaped table sort of thing. Probably half the depth of yours.
I would have been so disappointed in my crummy console table after this super inspiring post! I think I’m off to amazon to buy myself a kreg. Can’t wait to see how it all comes together!
Thanks for the inspiration!
Angie K says
yikes, there are lots of kreg kits that come up when you search for them! Which one did you guys get…I’m so confused!
YoungHouseLove says
I have the most basic one they sell (this one) but I also have a couple of clamps (they sell those separately) which are awesome.
-John
Jen @ The Decor Scene says
WOW!!! John you did an amazing job figuring all of that out. {clapping} LOVE IT!!! I can not wait to see how the table top comes out. I loved what Dana over at HouseTweaking did with their headboard from old reclaimed fence wood. It’s goregous if you haven’t seen it yet.
Here is how her hubby put it together. http://www.housetweaking.com/2010/11/30/diy-fence-board-headboard/
Here is how it looks in their bedroom.
http://www.housetweaking.com/2010/11/23/master-bedroom-sneak-peek/
They also made a gorgeous barn door for their master bedroom bathroom out of the same wood.
YoungHouseLove says
I really like that project! Thanks so much for sharing the links.
-John
KathyG says
Great Work John! I’ve been using some WElm console bookcases around my couch, but they are expensive. PLUS I really like these a lot more! I’m going to get hubs started on this idea right away.
P.S. Any plans to have furniture-making as a side job (with all that free *winkwink* time you have?!
YoungHouseLove says
I have to admit that I love building furniture, but it’ll probably always be a hobby and never cross over into a profession. Especially since I still have so much to learn and Clara only naps for so long!
-John
nate says
John, great job on the console. Question for you. My wife and I are making end tables from one of Ana Whites plans she mentions using 2 1/2 which seems really long. Our boards are the same thickness as the ones you used for your consol and we are trying to figure out what size pocket hole screws you used.
YoungHouseLove says
I think the ones I used were 1 1/2″ screws, which worked really well. But Ana is definitely an expert so maybe there’s a reason to use longer screws on that build!
-John
Jessica says
Can’t wait to see the finished project!
Now what to stop you from building that media cabinet for the same room that’s on your wish list?!
Amanda says
Dear Bob- It does, in fact, help!
Thanks John!
Kiran @ KiranTarun.com says
Great console! But nothing compares to Clara’s smile :)
Andrea says
Love the table(s)- especially the shelves! I think that’s the perfect solution given Karl’s size and all the potential for wasted space!
Ana’s plans are awesome; I built a dining room table of hers not too long ago.
A word of caution about poplar + dark stain: Poplar absorbs stain very irregularly, and can look splotchy if not prepped right. When working on my table, I Googled some wood-working sites and found out the best thing to do (besides a ton of sanding) is to use a wood conditioner before staining. My poplar tabletop turned out beautifully using this method. But you probably already have all that figured out – can’t wait to see the finished project! :)
YoungHouseLove says
Thanks so much for the tip. We actually had no idea!
-John
Erin says
I totally called it! As I was typing in your web address I was thinking, I bet today’s post is about a console for Karl- it seems about time that they’d want to get that going. Can’t wait to see how it goes!
Lauren says
I have just discovered Ana White adn she is my new hero! I have so many projects that I want to start now thanks to that woman!
Mary says
THAT’S WHAT SHE SAID!!!
I LOVE IT!!
ROFL!!!
Christi says
Yep. The hubby and I used the reclaimed wood from our old deck when we were having it replaced to build two mack daddy chaise lounges, a “West Elm Coffee table” on casters, and a side board. All are from the Anna White plans and they are awesome!! Love that girl!
- Sarah :-) says
Haven’t gotten to build anything, yet, but that’s because I have no where to build. We live in a teenie tiny little townhome and don’t have the space to build and/or store while in-process.
HOWEVER, I actually have big dreams of getting into the furniture building business… and doing it for less than most people pay for custom pieces. I just don’t understand why it has to be SO stinking expensive to have something that is “YOU” built. Ya know? Hey. It’s just a dream for now, but even hubby is on board for when we get a “real house”. Can’t wait! :-)
I’d love to know what wood-working tools you have on hand, other than the Kreg Jig. I need to start saving up, soon, to buy all of my equiptment and I’m honestly not sure how much it’s all going to run me at once. Any tips?
YoungHouseLove says
Honestly I only seem to need a power drill and my Kreg Jig (along with small things like clamps and sandpaper and screws and a screwdriver) when it comes to building things so far. Granted I’ve only tackled a desk, this console, and some shelves for Clara, but so far it seems to work!
-John
Robin says
ooh yeah. the living room is becoming a little ‘too modern for my taste’ too. Can’t wait to see how you balance things out!
Marymc says
In a couple of years, Clara is going to need a “hiding place.” If you replaced the back of one book shelf with a little door, this could make a hidden playplace. Of course, you could just hang a big sheet over the dining table and create the same effect.
YoungHouseLove says
I used to love making a fort with the sofa cushions and putting a sheet over the dining table! Memories.
xo,
s
Marije says
I am utterly impressed. Yay for real diy-ing! You have some real talent, John!
Payal Thomas says
the console table looks awesome so far. can’t wait to see the finished table.
Maggie @ Cheneyhome says
It’s fun to see so many people making their own furniture these days. We recently built our own version of Pottery Barn’s Vintage Lockers and though it took a good amount of time to complete, it was well worth it with the amount of money we saved! We also were able to customize the dimensions to fit the space perfectly. I told my husband there will be more furniture building in his future…
Here’s the How-To if anyone’s interested: http://cheneyhome.wordpress.com/2011/03/24/how-to-make-your-own-pottery-barn-vintage-lockers-2/
Katherine@YeOldCollegeTry says
not at all related to the console– way to go on the 10K on saturday! my sister in law saw you running and was very flustered, couldn’t figure out how she knows you (using that term loosely), then finally placed you. we yelled “way to go blog guy!”. i’m suuuuure you heard us, right?
YoungHouseLove says
Haha, I hope I didn’t look like I was dying! I actually got my second best time ever (I’ve run it for the past 10 years) even though I stopped to kiss the baby and the wife, so I’m kind of proud.
-John
maribel says
I have a very clumsy hubby who is always spilling drinks (thank goodness for tile flooring. So when I was reading your post…it came to mind if I made something like this I would add a lip of some sort to prevent spills down my new couch or just make for easy clean up.
Jen F says
I am so impressed John, I think you really may have outdone yourself this time! Can’t wait to see it all done!
Meredith K A says
Love! The shelves facing out from each end are genius, I was ambivalent about your behind-the-couch table, but I always reserve judgement with you guys until I actually see it, and as usual I am totally on board (no pun intended) now that I see what it’s going to look like! And great idea for the additional storage by lift-off center section, I am even more impressed! Looking forward to the big reveal, as usual.
I just visited the Baltimore Ikea (in Whitemarsh), and they had those big white ceramic pots on sale for $10!! The biggest size, they list them as 9.5″ but that’s at the bottom, and you usually measure pots across the top, and these are more like a foot. I already have my three biggest houseplants re-planted into them, and they look awesome in my living room on either side of the fireplace! I got the three different striped ones (tight horizonal, wide horizonal, and wide vertical). Thought you’d appreciate that awesome Ikea steal! We also saw Karl’s little brother in the showroom, hehe :-)
YoungHouseLove says
Nice score on those huge ceramic pots! And so cute that you saw Big Karl’s little brother (Little Karl).
xo,
s
Ashley says
Dude, I was seriously wondering if you guys were so desperate to do a post that the Burger room was all you could come up with. Good job lol.
Rosa says
I would’ve built the original design (to your specs), but have made room for industrial casters to pull out. It would be a storage of things we don’t necessarily want to see, but want to keep around, but out of sight.
Great job!