Crack is still whack. I couldn’t resist breaking out that Whitney Houston inspired one-liner, even though we already used it here. Why? Because this is a serious hard-hitting blog about real life issues. Just kidding. This time my fifth grade crack joke is in reference to a giant crack that was running across the side of the ceiling in the laundry room. Here’s the craggy before:
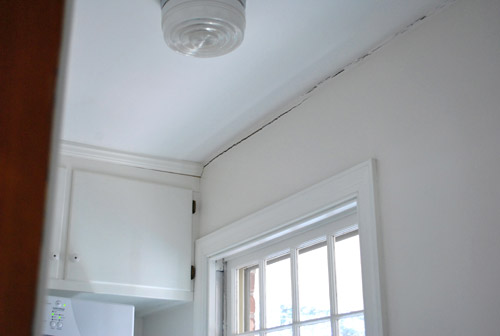
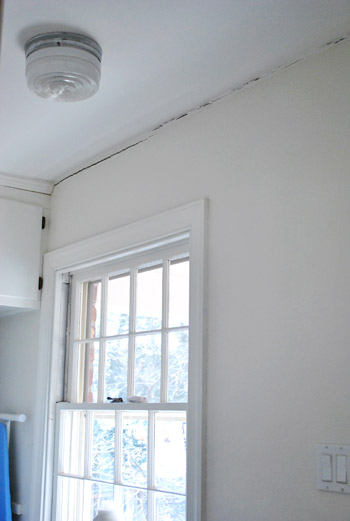
And the much less craggy after:
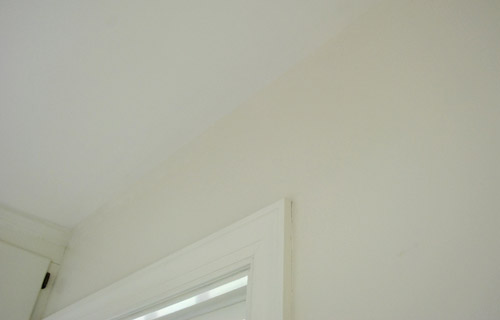
We had them check that beast of a crack out during inspection and learned it’s nothing like foundation issues (just normal house settling). Whew. And it was nothing that a little paintable white caulk couldn’t fix. Double whew. Tip: always make sure it’s paintable for jobs like this or it’ll never blend in correctly – we like Dap’s white paintable window & door caulk. We didn’t use spackle (as opposed to caulk) because we’ve heard experts mention that it can shrink up and “fall out” of the crack over time, but caulk usually doesn’t shrink or crack as much. Anyway, it was a super easy process. I just:
- Squeezed out a line of it along the crack
- Smeared it with my finger to remove excess caulk
- Went over it with a wet rag for an even smoother look
- Let it fully dry (I waited around 48 hours, mostly out of laziness)
- Touched it up with wall & ceiling paint left in the basement by the previous owners
So if you have a crack in your wall or ceiling and are wondering if you can handle it, I promise you can. Even if you’re 5’2″ and have to stand on a chair while the baby naps and the dog looks questioningly at you as if you’ve lost your mind and gives you the stink eye the. entire. time.
Like this, but picture one bug-out eye and one sinister squinty one:

My mom even recently caulked her bathroom all by herself (after calling me ten times from the hardware store to compare the merits of different caulk guns). So proud of her.
And so (almost) ends our second crack-related adventure. You thought I could keep it short? Do you even know me? Not in real life, I mean via the internet. Anyway, we’re actually sharing this mundane caulking detail since we’ve decided that it’s high time we tackled our laundry room makeover. Woo to the hoo. Cue the fireworks! Strike up the drum line! Watch out for those fire juggling clowns (don’t be afraid, they’re of the friendly and not freaky or nightmarish at all variety).
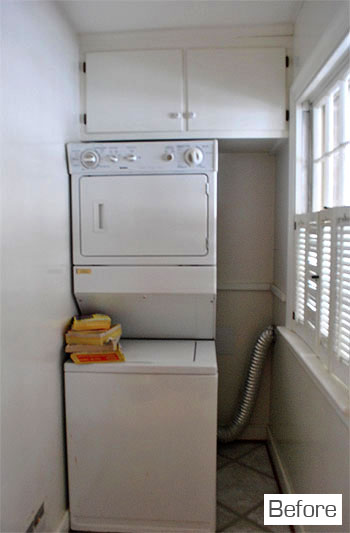
We’re planning to make a few one-project-at-a-time changes that hopefully add up to a nice refreshing difference when it comes to the look and function of our tiny 3.5′ x 8′ space. Here’s what it looked like when we moved in:
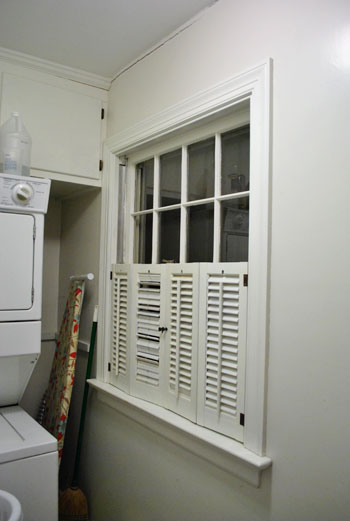
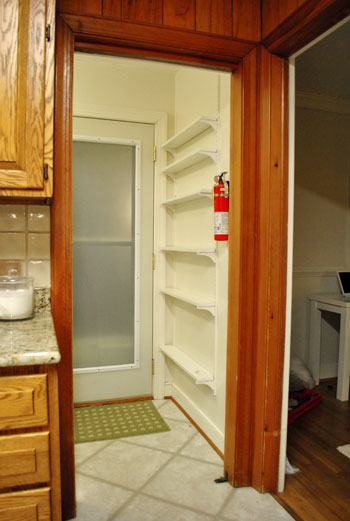
And here’s what it looked like after we 1) upgraded to some new (very on sale) front loading appliances, 2) took down the window shutters, 3) frosted the everybody-can-see-me-breastfeeding side door that looks into the kitchen, 4) removed the shelves behind the side door (opposite the washer/dryer):
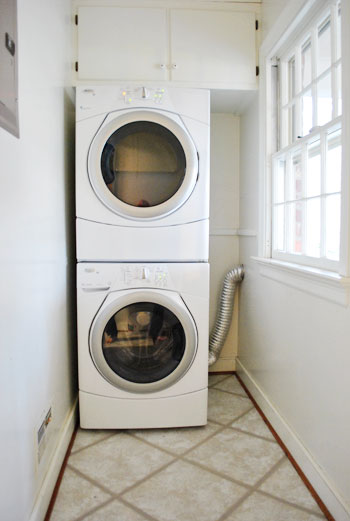
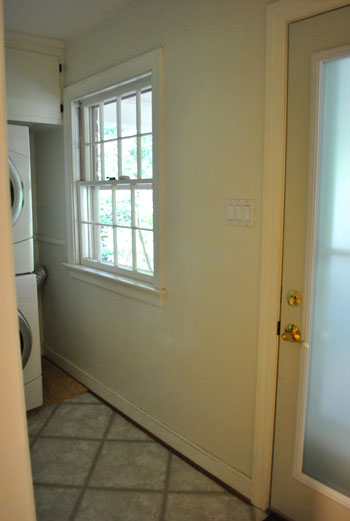
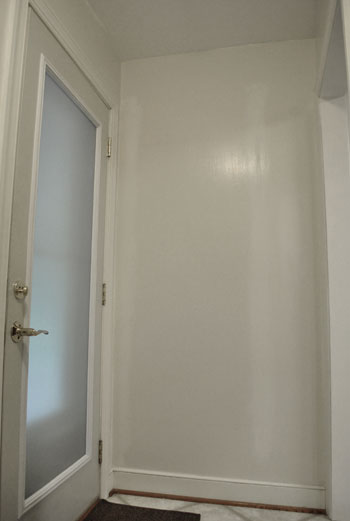
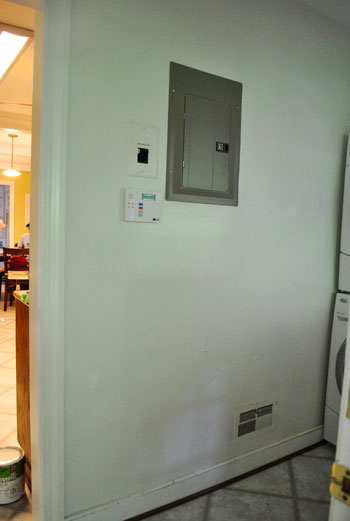
We’ve been meaning to add some built-in storage next to the stacked washer and dryer among a few other functional (and just plain purty) things, so here’s the to-do list as it stands today:
- Paint the odd brown quarter round near the baseboards glossy white
- Redo all the dinged up trim (also in semi-gloss white)
- Paint the walls (we’ll be back with color details later this week)
- Add adjustable built-in shelving in that nook next to the stacked washer & dryer <– we can’t unstack them and put them on the long wall since the room is only 3.5′ wide, so we’d only be left with seven inches of space between the front of the unit and the opposite wall if we moved ’em
- Replace the hinges and knobs on the upper cabinetry
- Get a new light fixture (see the old one in the first two pics?) <- DIY something?
- Add a window treatment (maybe a homemade one?)
- Add other functional storage near the door for shoes, Burger’s leash, etc
- Hang some art to keep it cheerful and obscure the giant metal fuse box
And of course in the long term we’d love to rip out the vinyl tile to hopefully uncover hardwoods that we’ll someday refinish (we’re crossing our fingers that they carry into the kitchen as well). But that’s a waaay down the road thing since it’ll necessitate removing all of our kitchen cabinets to get to it (they rest on the vinyl tile and a layer of plywood with hardwoods underneath- oh the humanity). So for now the focus is on adding some everyday function and storage… and some cuteness while we’re at it. Game on.
Do you guys have any laundry room makeovers going on? Any projects or art or colors that you love in your laundry area? Do you think all clowns are of the terrifying murder-you-in-your-sleep variety? I think there are two kinds. Friendly and skeeeeery. It’s all in the eyes and hair.
Psst- Check out how we hid a big ol’ electrical box at our first house here and here, and how we pimped an old bi-fold laundry closet here and here.

House on Pender says
We actually had our laundry room on our to-do list last summer, (www.ourhouseonpender.com/2010/07/out-to-dry.html) but then one thing lead to another and we never got around to it. However, with a baby on the way and a lot more laundry in my future it is next on the do-to list after the nursery.
Sangeetha says
I can’t wait to see what you do the laundry room!
Umm…. I would like some advise from you guys as I am very new to any kind of DIY. But I have been following your blog for a long time, have beem much inspired to start tacking projects on my own and always look for solutions here first (like the no-stitch curtains which I made for my baby’s room). Okay anyway back to my question: the paint in my bathroom is peeling off and I would like to re-paint the walls. Can I paint over the peeling paint or do I need to do somethign to remove the uneven peeling paint? I will be SO SO glad if you can help!
YoungHouseLove says
You’ll want to sand it down to get it smooth. And you might want to wear a respirator and do a lead test if it’s an old house (safety first!). Just ask your home improvement pros what they recommend. Good luck!
xo,
s
Valerie says
I like the laundry room makeover very much. Just hoping you didn’t throw out your old window shutters. If not, here’s a link to what I’ve been doing with poor, discarded window treaments: http://studiovalerie.blogspot.com/2011/07/fruits-of-spirit-shutter.html
YoungHouseLove says
So cute! We donated ours to Habitat For Humanity!
xo,
s
Julie says
Thanks for the tip on caulk! Our house was built in 1937, with plaster walls, in earthquake-prone Los Angeles – so we have tons of whack cracks. I’ve been filling them in with lightweight spackle but they always seem to re-appear.
Personally I think they add character, but it’s annoying when every person who comes over says “oh no, that’s probably a foundation issue!” as if we didn’t think of this and get it thoroughly inspected before we purchased. Like yours, our little cracks are just a result of foundation settling and a quirky old house.
Michelle says
Once upon a time I saw someone add hinges to art in a wooden frame and use the whole thing as a door to hide the unsightly electrical panel. I always thought that was a cool trick. Good luck and I can’t wait to see it finished.
janie says
Take it from someone who’s switched all our quarter round out, just go to Lowes and buy new pre-primed quarter round, paint it, then cut and install and retouch the nail holes. Really, messing around with smelly primers and sanding and painting in such a high traffic area is a PITA, and shoe moulding is cheap.
Kelly says
We have the same old school light fixtures in our kitchen. Though they are kinda cool in their way, we too plan to replace them someday. I keep thinking there must be something we could do with the glass. Do you have any ideas simmering? Maybe I’ll paint the insides a bold color and hang them on the wall.
YoungHouseLove says
I always love donating thing to Habitat For Humanity- just because I figure there’s probably someone out there searching for “original” lights like ours!
xo,
s
Kelly says
Do you have actual fuses, or has it been upgraded to circuit breakers?
YoungHouseLove says
Yup, circuit breakers.
xo,
s
Beth says
We have been working on ours. Ours is right off the kitchen, and has a door so it can be closed off, but I want to remove that door and leave it open. We have old, rusty linoleum floors in the laundry right now, but we want those floors to match the kitchen floors, so we are stuck w/them until we replace the kitchen floors. Luckily, we already had some good built in shelves, but no cabinet doors, so I wanted it to be organized and look fun too! So far, we have primed and painted the walls, shelves, and ceiling to coordinate w/the kitchen. We bought some fabric and plastic storage bins, and also some brightly colored laundry baskets for the open shelves. We already had some framed poster prints that we hung on the walls, along with a clock and a hook rack for a “mud-room” type area. We also moved a chair that we already had in there. I plan to move a small table in there too, and hope to DIY a fabric message board! Still have plans to switch out the light fixture, and get a new washer and dryer too!!
Can’t wait to see what you do with yours!!
Beth says
Oh, and the color we chose for the walls actually ended up being pretty close to the color of the electric panel box, but I painted 2 coats of the wall paint on the electric box as well, and now it the same color as the walls.
Kara says
I’m renting and have no immediate plans to redo the laundry room. But when I have a room of my own, I am dreaming of covering the walls in some seriously glam/unique pattered wallpaper. Appliances are so monochromatic, and the room is usually out of the way somewhere, so why not offset the big white cubes with something a little wilder than I have in the rest of the [imaginary] house?
On a totally different note, Grandin Road has pop art laundry prints that might inspire a DIY project. http://www.grandinroad.com/pop-art-laundry-prints/home-care-pets/laundry-accessories/156018. Good luck!
YoungHouseLove says
Ooh those are fun!
xo,
s
Tara says
I have a hardwood story:
We bought a 110+ year old house, which had hardwood everywhere except the upstairs hallway, the stairs, the entrance way and the kitchen. On a whim (on move-in day), my Dad tore up carpet in upstairs hallway to find hardwood. We were so excite we told him to keep going… the carpet on the stairs was taken up and again hardwood!!!
So did we push our luck for the entrance way? Yuppers! We pulled up the peel’n stick laminate tiles to find… wait for it…parquet flooring. Bummer! So we lived with the parquet for a month or so before I declared that it “had to go”. Obediently my husband tore it up to find… retro 1960’s style laminate. Bummer again! (This is starting to get to be a Sherry-length comment eh? heheh just kidding). So up came the retro laminate and there was sub-floor. Finally, under the sub-floor we found… HARDWOOD!!!! Man I was relieved! We joke that the entrance way was like those little Ukrainian dolls that all fit inside each other: it just kept going and going. One layer over another!
If you’re keeping score this means there was now hardwood in every room of the house except the kitchen… should we go for gold? Yes sir-e-Bob! With great trepidation we tried to peer under the tiles and between the joists in the basement. We were pretty sure that there was hardwood in the kitchen too, but what kind of shape would it be in? It was not to bad for 11 decades under foot!
We got the whole shebang refinished last month and love it.
Moral of the story – go for it! What is the worst that can happen? :-)
YoungHouseLove says
Haha- hilarious how many layers you had to excavate to get to the gold!
xo,
s
Farrah says
Looks great. But how can you tell the difference between a crack that is cosmetic/safe just to be sealed with caulk and one that is structurally problematic?
YoungHouseLove says
We asked at our inspection! You definitely don’t want to be dealing with foundation issues, so if you’re nervous call in a pro to double check!
xo,
s
r8chel says
I’m actually in the midst of a mini laundry room makeover right now. None of the changes are too dramatic, glamorous, or expensive, but sometimes a whole lot of small tweaks can make a big difference in the overall look/feel/function of a room!
OwningSingle says
I can’t wait to do some more in my laundry room. All I’ve done so far is paint it a cheerful yellow (not too bright though)and add a shelf that I took out of an extra closet to hold laundry products (I turned that closet into an accessory closet).
Ali says
I have been a caulking maniac lately because our house is 40 years old and we have a bit of settling here and there as well. And just this weekend I did some cleaning and painting in our laundry nook. Makes it so much nicer to look at!
And btw, clowns freak me out. All of them. lol
Paula M. says
Caulk for wall cracks, woo hoo!
Why didn’t I think of that?? I’m in earthquake country (eastern San Francisco Bay Area), so I know from cracks, but I’ve been using joint compound (when I get around to dealing with them at all, ahem).
And as everyone says on this board, using joint compound is like sending yourself an invitation to a Sanding Party. (OK, so they didn’t literally say it that way.)
Thanks for the tip. I’m going to have to try that over my bedroom windows; they have matching cracks (I think from half-assed framing — wait, is this all sounding like double entendres now? — but whatever…) that I need to fill before that room can be painted.
Diana says
We just finished a major laundry room reno (well, major to us!) that you can check out here:
http://dianamatt.blogspot.com/2011/05/on-december-31-2010-matt-and-i-decided.html
It’s actually a closet turned laundry nook but we think it’s still pretty fabulous!
YoungHouseLove says
So cute!
xo,
s
Elizabeth says
Just saw this cute photo on another blog and it reminded my of your space. Not sure where it is originally from, but perhaps some inspiration is in there.
http://4.bp.blogspot.com/-AaA_vr46S3E/Thsmyp0EHeI/AAAAAAAALf0/dsAO5nZylaA/s1600/9270014_ARrnX7Ue_c.jpg
YoungHouseLove says
Very very cute! I think it’s originally from BHG!
xo,
s
Lauren says
I wish I had a laundry room instead of a laundry closet. Maybe then I would do laundry. Excited to see what you do!
LibraDesignEye says
Have you considered shifting washer dryer to right side so useful “stuff” could continue down open left wall?
Even a top of the dryer height shelf along the breaker box wall with cute corbels and colorful bins for solo socks and rags? Maybe over the breaker box John could build a flip up / pull down (think piano hinge at wall/possibly a fold out gateleg to support) folding shelf/counter? Like you walk into the space, then turn back to “drop down” the shelf behind you across the room – if the width of the drop shelf fit between the window and door trim and went 24″ into the space, then you could still get past but would have another surface to fold clothes, apply stain spray, button pants etc. before washing / after drying. You could make it the full width of the room and put a cleat on the opposite wall to hold it up if you liked (and wouldn’t feel like a beautiful yet claustrophobic laundress behind the counter). You could just duck under in a pinch!
Seems the solid wall offers more opportunities than the window wall – guess you wouldn’t have to shift the washer dryer to incorporate these storage suggestions at all if you liked them. Loving your grellow and looking forward to the laundry room counterpoint!
YoungHouseLove says
We did consider moving those guys but because of the way some of the plugs are hooked up it works best in this configuration. Should be interesting to see how it all turns out though! Love all of your fun ideas!
xo,
s
Heather W says
Just thought you both would want to know that I ran across your blog on my favorite author’s website/blog Jennsylvania.com. The author is Jennifer Lancaster and if you want to laugh out loud when reading a book then just pick one she has written. She had a post about how her and her Mr. just bought theier first home and she mentioned how much she loved your blog etc. The funny part is her new book is supposedly non-fiction and it is about a couple who buy there first home which is a huge fixer upper and the drama/comedy goes from there. I am in the middle of reading it now and it is too funny. I know you would enjoy. Just wanted to let you know. =)
Heather W says
Duh forgot to mention the title of her new book is “If you were here” Oops!
YoungHouseLove says
Love that book and Jennifer (and her amazing blog) so much! When she wrote about us we couldn’t believe it- totally starstruck. And her book is a riot!
xo,
s
Cassandra says
i have lots of cracks like that in my house. the house was built in the ’40s. now i know how to fix them! thanks. =]
Catie says
Oh my gosh, how perfect that you featured your crack today!
This past weekend we visited a house that we are waiting on short sale approval for just to get another peak at all the stuff we missed when we did our first walk through. I swear all I could focus on were the cracks. The house is 85 years old so I know that is common but could you ealborate a little about the products you used and possibly post or send some more close ups of your fix? Have you done any that aren’t in a corner? Thanks so much, I love your blog!
YoungHouseLove says
Hmm, close ups on the ceiling are hard to get (I’m short) haha. But you can see other ways that we filled cracks and holes here (with close ups): https://www.younghouselove.com/2011/01/breathing-room/
Hope it helps! Good luck with everything!
xo,
s
Rebecca Miller says
I’m in the midst of my laundry room makeover and in love! So far, I’ve spent 2 hours on my knees cleaning the floor and am pretty sure I could fashion a second drooling Labrador Retriever from the hair I found under the washer and dryer. But I digress.
Next, I painted in Benjamin Moore 1545 “Iron Gate” and LOVE IT. Then I beadboarded the whole lower third of the room, which made the Iron Gate even more lovely:)
On tap from this week, curtains inspired by my evil mistress, Pinterest. No Sew Roman Shades made with $5 Wal-Mart mini-blinds? Eeeek. But if it works, AWESOME! http://365days2simplicity.blogspot.com/2011/04/easy-no-sew-roman-shades.html
Meanwhile, the hubs is working diligently on this from Ana B White: http://www.ana-white.com/2011/01/saushas-washerdryer-pedestals.html. I can’t wait. Add that and some storage and some Pinterest inspired art and I seriously might sleep in there the first night it is done.
YoungHouseLove says
Bwahaha, evil misteress Pinterest. I die. Love those links too.
xo,
s
Anna says
Call me lame, but I’m loving your current light fixture in there. I’m a sucker for its vintage/school-house charm!
YoungHouseLove says
Not lame at all! It’s super cute. I’m just a fool for something dangly. Something a little swanky if you will. Haha.
xo,
s
Kacie says
You guys are amazing! How in the world do you get all this stuff done!?
Kacie
http://www.acollectionofpassions.blogspot.com/
YoungHouseLove says
It helps when the baby naps! Haha. Or when J’s mom sweetly offers to come watch Clara for an hour or two!
xo,
s
Jami says
You guys work at such amazing speeds! I wish It took half as long for us to finish projects! The laundry room looks nice now! Obviously there’s room for improvement but you’re not finished! Not that it matters anyways because I feel like even once something’s done there is still some tweaking I can do later! We actually created a laundry room out of an old cat/storage room!
http://whatthegraham.com/?p=2038
I swear our kitchen does NOT look like that anymore…the glory of morning sickness! AND some walls are gone and a pantry has been built!
YoungHouseLove says
Love it! What a makeover. I especially adore the lonely socks and empty pockets bins!
xo,
s
Melissa says
We switched to a tankless water heater and reworked a hallway to create a laundry room. Our stackable washer/ dryer took up the same amount of space as the water heater. We reused old cabinets and created a laundry room that we can close off. A nice laundry room makes the task just a little easier. Good luck :)
Lisa says
We just put an offer in on a house that only has room for a stackable washer/drier set, which is not included in the sale. Any advice on the stacking process? Were there instructions with the set? Is there anything you need to screw in place to keep the drier from falling off? Did you have to buy any extra brackets or anything? Thanks!
YoungHouseLove says
You definitely need to buy a stacking kit that comes with your specific washer and dryer (ours was like $30 I think- and there was free delivery and installation so those guys took care of it). Good luck!
xo,
s
Dani says
We redid our laundry room a while back – the previous owners used to lock their dog in there so things were pretty rough. You can see it here (it’s about halfway down the page on June 8th): http://www.danimiller.com/KSC/June2009/June2009.htm
We went with a blue, black and white look. I think my favourite thing though is the shower curtain rod we used for hanging clothes on – I wonder if you could do a version of that between the washer and the wall somehow?
YoungHouseLove says
Amazing! What a difference- love that door!
xo,
s
Kari says
I actually love the light fixtures. They kind of have a vintage school house look to them that I have been seeing in a lot of design magazines. I recently perked up my laundry room after Bryn Alexandra’s blog inspired me. Super easy ideas and DIY art. My dryer sheets in a galvanized bucket make the whole room smell so good. This is the site that I copied (sincerest form of flattery right?) http://brynalexandra.blogspot.com/2011/06/laundry-room-details.html
YoungHouseLove says
Oh yeah we love her blog! She did an amazing job on her room- I pinned the heck out of it on Pinterest. Haha.
xo,
s
toni from says
I love that your blog and iheartorganizing are both blogging about laundry rooms today. that is so funny when that happens. Keep the posts coming-you are my favorite blog ever!!!
Toni
Raleigh, NC
YoungHouseLove says
Love her blog too! So funny!
xo,
s
natalie says
hey sherry/john, where is the post about making the p that you hung on clara’s wall? i tried all the key words i could think of and cannot find it. i want to do an initial for my new nursery. i know it’s pretty straight forward but i just wanted to read that one again before i did it. thank you!
YoungHouseLove says
It’s hiding over on BabyCenter! Here’s that link for ya: http://blogs.babycenter.com/life_and_home/initial-impressions/
xo,
s
Tineke Galvan says
What about possibly opening up the laundry room into the main kitchen room… its so tiny and strangely shaped. I’ve seen some really nice photos of kitchens where the washer and dryer have been integrated into kitchen with nice effect. Or you could just add them under some counter and then have the little room for a mudroom?
Just some ideas. I love being able to fold and stack on top of the washer and dryer.
YoungHouseLove says
Thanks for the suggestions! Our kitchen is a whopping 25 feet long, so we don’t need to add any more length in there. We know we’re odd, but we actually don’t mind a small space for laundry (in our first house our washer/dryer were in a tiny hallway and we loved that little nook). We just want to cheer it up in there so it feels special – especially since we picture it getting piled high with dirty clothes and backpacks and cleats and all that kids stuff down the road (which I’m sure we’ll appreciate being sectioned off from the kitchen)!
xo,
s
Kathy says
I can’t believe it, hubby & I, mostly hubs worked all weekend on our laundry room makeover. Long story but we had to totally reconfigure so we could add a kitty litter in the room. It’s a very small room so we stacked our new washer & dryer & had to redo everything to replace our lost storage. New cabinet & countertop from Restore. I couldn’t believe the timing! From the looks of all these comments lots of folks have washroom makeover fever! :)
Ann says
You read my mind. Seriously cannot believe I was just thinking “I really, really, really want to paint my bedroom walls NOW, but what the h@ll do I do about that crack in the corner by part that covered the chimney???” And it’s Young House Love – to the rescue!! Had to say thanks – hope mine ends up looking as nice as yours does.
Erin says
So, one of my virtual BFF’s and yours, the sassy and talented ana white, has plans for the most simple yet functional laudry room storage extravaganza. At the end of the day, it’s a wood box, some casters, and plastic laundry baskets, but for some reason it makes me giddy for the day I have a laundry room and can build functional storage for it. I am such a nerd, for dreaming about laundry room storage, but somehow I think you might appreciate it as much as I do… http://ana-white.com/2010/11/laundry-basket-dresser
YoungHouseLove says
Oh yeah I love that thing so much! Ana is amazing.
xo,
s
Liz says
If you are interested in DIY-ing a light fixture, you should check out the website Design*Sponge for a DIY capiz chandelier. If you search their site I’m sure you’ll find it – I could totally see something like that in your laundry room, it’d chic it up a bit. Can’t wait to see the final result!
YoungHouseLove says
Isn’t that project amazing? Already pinned it on pinterest a while back!
xo,
s
Dorrie says
Have to tell you that “Your the Inspiration”!!!! I saw where you had stacked your machines in a previous picture and it started the ball rollling for me. I am so excited to have just finished my laundry “closet” make-over. I have hated the space since we moved in. We had to take the doors off the “closet” in order to fit the machines – i.e. visible ugliness!!! There were very, very scary old cabinets that were a waste of space above the machines. Also, this “closet” is next to the back door as a part of the kitchen so it is unavoidable to see.
My machines are black so I went with a black and brown color scheme. I used Behr’s “macchiatto”, and it is a yummy medium brown color. I painted some old wire shelves black, bought black and brown baskets at Target and World Market as well as using the black “itso” fabric bins. I also found two cute laundy signs. One has hooks and says “laundry”.
Thanks so much for inspiring me to tackle a space that I have hated. Y’all are the best!!!! Can’t wait to see what you do with your laundry space!!!!
YoungHouseLove says
Aw it sounds so nice in there! Thanks so much for the kind words and congrats on your “new” laundry room!
xo,
s
Laura Bellamy says
We redid our laundry room and it was so pretty I didn’t want the machines to go back in there! Having a large family, ours works very hard. We used ceramic tile that looks like stone on the floor and set on the diagonal on the walls up to chair rail height. Then paint and a branch over the window with a sheer piece of cloth draped over it. I then hung baskets (flattish ones) on the walls. It is nice and I don’t have to worry about marring the walls anymore or cleaning baseboards.
Carla says
So cool! I have a few cracks like that and I used spackle and it didn’t work for long – off to get some paintable caulk!
andrea p says
Speaking of breastfeeding… (lol)….my son is nearing 12 months of age and he is still breastfeeding. How long do you tend to go with Clara? I love to hear from other moms!
andrea p says
Ooops I meant PLAN to go (not tend). Thank you!
YoungHouseLove says
As long as she’ll have me! At almost 14 months she’s losing interest fast though!
xo,
s
Maude says
It’s also important to note that the caulk must not be silicone. If it is, you will never be able to paint it. Great Job!!!
Maude
YoungHouseLove says
Great tip! If it says “paintable” it’s never the silicone stuff, so I always keep an eye out for those buzz words!
xo,
s
Amy says
So In January I moved in with my beau who has this great house that was built in 1947. The only not-so-great aspect of the house is the kitchen. Or is it a laundry room? Well, actually it is both. Because of the super awkward layout and peninsula table I actually have to lean over the cupboard door by the dryer to get clothes out. It is amusing when there is one sock in just out of my reach. I was THRILLED when we had a kitchen designer come in and tell us that the first thing that needs to be done is move the washer and dryer OUT. Whoo hooo! Unfortunately, they are going into a utility closet, so I don’t actually get a laundry room, but I do get a brand spankin’ new kitchen. This gal is stoked that she won’t have to pull a muscle reaching for a sock.
Demo begins in 2 weeks and 3 days!
YoungHouseLove says
Wahoo! Have fun!
xo,
s
Paula M. says
Another caulk question (if you ever revisit these days-old threads or maybe do global searches for question marks :) ) —
Has either of your houses had any poorly done baseboards?
The reason I ask: Many of the baseboards in my condo were not cut properly; it’s as though prior owners (or some nightmare handyman) cut everything at straight angles, rather than properly angling them to nest together. Now, that’s hunky-dory if it’s just pieces of baseboards that butt up straight agst a doorway, but when it’s baseboard pieces that are supposed to meet at a wall corner and continue on, well, you can just imagine how that looks.
I was going to shell out to pay someone to come in and remove the baseboards and –after the walls have been painted — cut, paint and install some new ones, but now I’m wondering if some caulk and paint over the baseboards would be sufficient? …
I suppose I could always go ahead and experiment and try it on a poorly cut corner. It can’t look any worse than it is. If it works, yay! If it doesn’t, what have I really lost?
YoungHouseLove says
Oh yeah- I would give it a try for sure. Just squeeze some caulk in all of those areas that should have baseboard and smooth it with your finger. Then go over it again with a moist rag (very softy) if it still needs smoothing. Then wait for it to dry and give everything a fresh coat of paint (be sure the caulk is paintable though!). Good luck!
xo,
s
Kelli says
Hey guys, I just ripped out a bunch of nasty old caulk from some trim in our basement bathroom. My husband and I are terrible caulkers. We make a huge mess with it!! It’s not as easy as it sounds when hearing someone describe how to do it. Do you have any application tips to make it flawless?
I’ve got the ‘get the paintable’ kind and the wet rag is a good idea. Anything else before I totally butcher my trim? Lol
YoungHouseLove says
I would try to keep the hole you make in the tube on the small side (cutting off too much makes it pour out and it’s extra messy). Good luck!
xo
s
Heather Rivard says
Hey guys!!
I’m about to start working on my bedroom and the sloppily installed trim is in some major caulking action. My question is this: When caulking a gap between trim and wall with paintable caulk, caulk you intend to … paint over, is it still important to have a straight line? In this situation, do you used the frog tape caulk line trick??
Heather
YoungHouseLove says
Yes, I’d still try to get it as straight as possible for a nice clean line when it’s painted. The tape trick should work well for you I think!
xo
s