Feeling too nervous to install crown molding yourself? We were too. But we just installed crown molding in our daughter’s bedroom and it was surprisingly cheap to pull off (less than $100!) and easy to execute. *PATS SELF ON BACK*. All it takes is the right tools and some attention to detail.
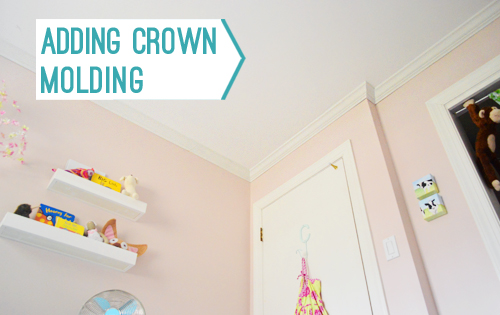
So let me back up, tell you how I did it, and explain why installing crown molding went from one of my most dreaded projects to one I’ll surely be doing again.
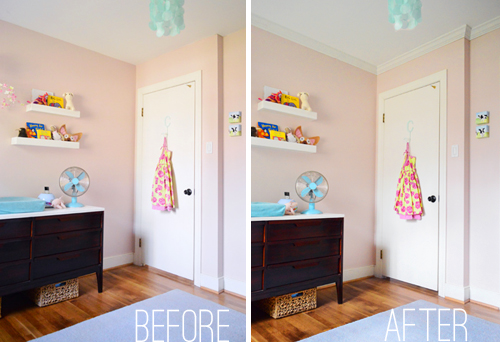
Steps To Install Crown Molding
We’ll provide a more detailed photo and video tutorial below, but here are the basic steps to installing crown molding in any room:
- Select your crown molding
- Determine the angle of your cuts
- Set your cutting platform
Adding Crown Molding: Video Tutorial
The photos in this post will show you how we installed crown in our daughter’s nursery, but it was so easy that we decided to do all of the other bedrooms too. So in the video below you can see each step in detail as we install crown molding in her big girl room.
Note: You can also watch this video on YouTube.
Selecting Your Crown Molding
I bought standard 3 5/8″ crown molding from Lowe’s because it appears to be what the previous owners installed in our other rooms. It’s almost the most affordable option available. There are other options with different profiles as well. Or, you can use this easy trick to make standard crown molding look thicker.
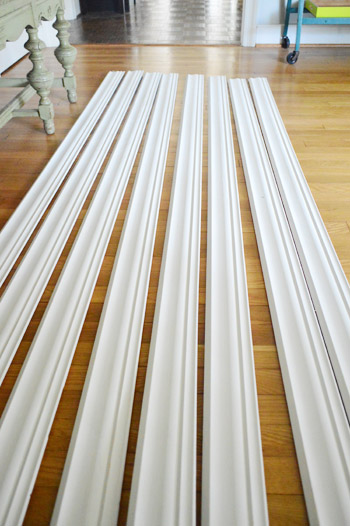
Each 8ft, pre-primed piece was about $9.50 so, including a couple of extras to cover my butt, my total material cost was $72.
Tools & Materials Needed
You can cut and install crown molding by hand, but simple power tools make this project MUCH faster. We used a miter saw like this one and a nail gun (the ones photographed in this post are no longer available, so I’ve updated these link to our current favorites).
- Miter saw
- Nail gun
- Kreg Crown-Pro
- Measuring tape
- Stud finder
- Pencil
- Caulk & caulk gun
- Paint
- Short handled paint brush
- Ladder or step stool
We already had a saw and nail gun on hand, but we did purchase the Kreg Crown-Pro. It was the real hero of this project!
How To Use A Kreg Crown Pro
I had read great reviews of the Kreg Crown Pro and considering my love of the Kreg Jig, I figured it was worth the $30 price tag to give it a go. Spoiler alert: I love this thing.
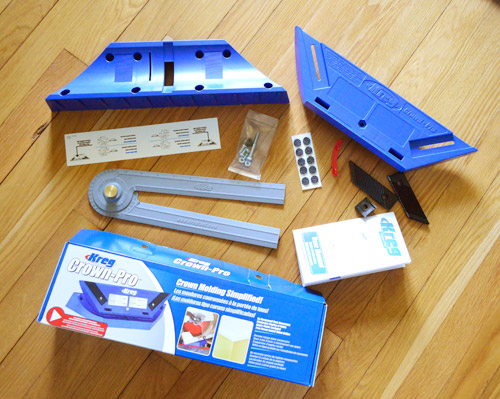
Once assembled (which takes all of five minutes) it looks like this. It creates an angled, adjustable platform so you can cut your crown molding at the same angle that it will sit against the wall. Sounds simple, and it is, but this is a huge help when it comes to cutting crown.
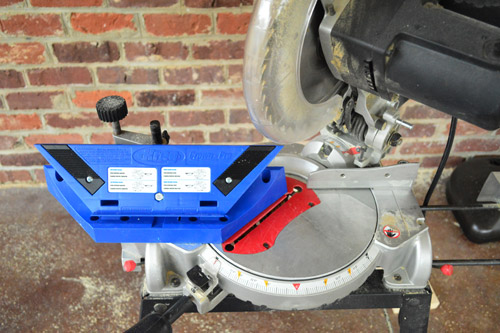
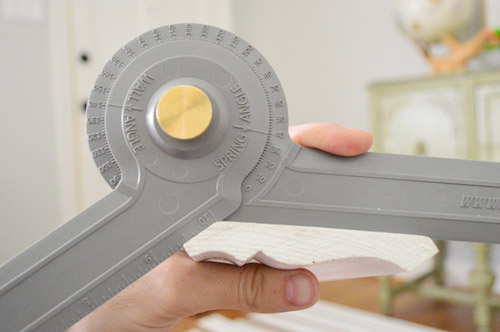
To find the angle the cutting guide should be set at Kreg includes an Angle-Finder tool so you can determine the “spring angle” – or the angle at which the crown leans away from your wall. Apparently, most moldings sit at either 38°, 45° or 52°. Mine was 38°.
Then you just use the red guide on the underside of the Crown Pro to match.
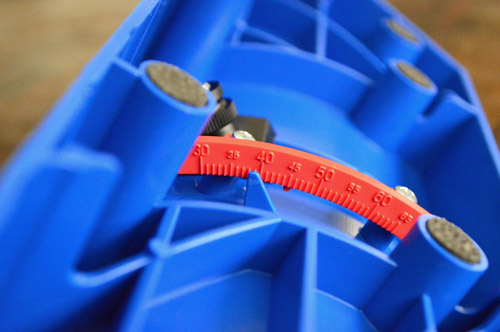
Now the cutting guide is ready to help you cut.
Determine Your Wall Angles
Before cutting anytime, measure and record the angles of each corner of your room. Walls aren’t perfect, so son’t assume every corner is exactly 90°. And these not-quite-right angles can mess you up if you’re not careful. Thankfully, you can use the same angle finding tool for this task.
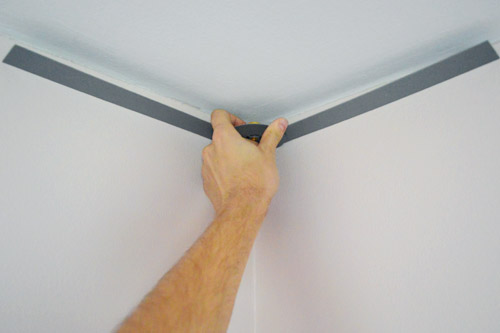
So after measuring and recording every angle, I could figure out how my miter saw should be turned to give me the right cuts. Luckily most of my corners were very close to 90°, so I could set my saw at 45° (half of 90°) for pretty much everything.
For the non-so-perfect corners there was a bit of extra math involved that I won’t get into here because it depends on how your particular saw is labeled, but the instruction booklet that came with the Kreg has a great illustration for this.
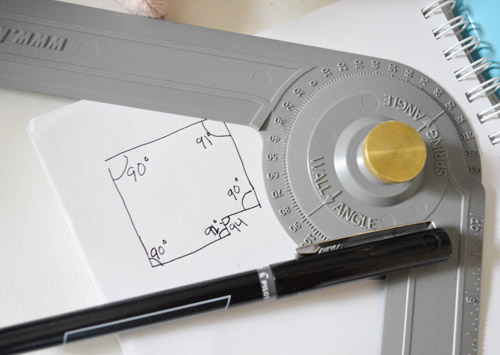
Measure Your Wall Lengths
Next, Sherry and I took precise length measurements from corner-to-corner of each wall using a tape measure. This goes MUCH faster with an extra set of hands or you could purchase an inexpensive laser tape measure tool.
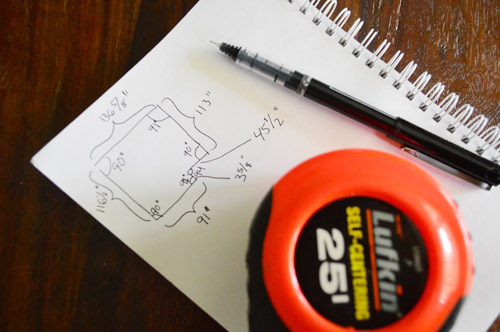
We made a sketch of our room with every measurement to help us stay organized while we started cutting.
Set The Angle of Your Miter Saw
Since you’ll be cutting your molding on an angle, you’ll need to swing your miter saw blade to the left or right. Which way depends on what kind of corner you are adding molding to (inside vs outside) and which side of the corner your piece is going into (right vs left).
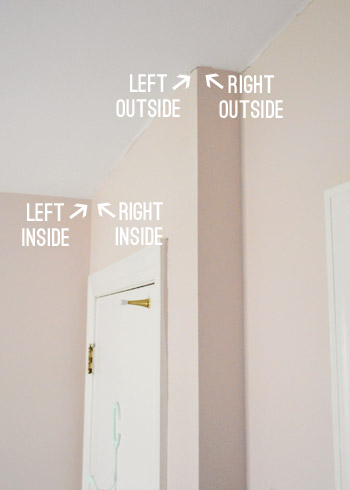
Luckily, the Kreg Crown Pro has a handy guide on the bottom. It shows exactly how your blade should be angled and where you should place your wood to get each of the four most popular cuts.
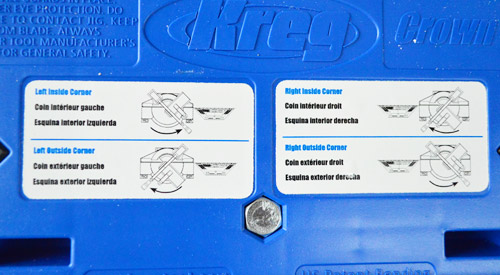
While you’re getting the hang of this, be sure to double check this guide before starting a cut to make sure you’ve got your saw set correcting.
Cutting Your Crown Molding
The other important thing to remember when cutting is to put your corwn molding pieces UPSIDE DOWN on the Crown Pro. This means the edge that sits against the ceiling is down on the bottom of your saw.
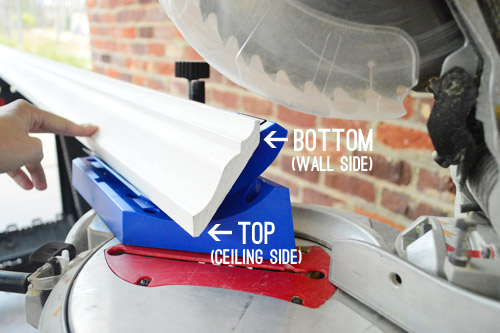
So with my measurements all taken, my Crown Pro all set up, and my saw blade angled I was finally ready to get cracking, er, crowning.
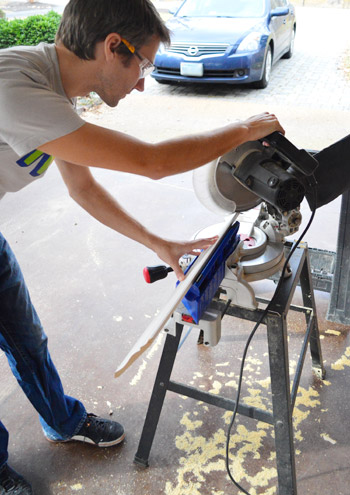
And remember the old adage: measure twice, cut once. Or, leave a little extra on your first cut. You can always shave off a little extra wood. You can’t add it back!
Nail Your Crown Molding In Place
Securing your cut crown pieces to the ceiling is easy, especially if you have a nail gun on hand. The one pictured was bought for our DIY board and batten project, but we’ve since upgraded to one that doesn’t require an air compressor.
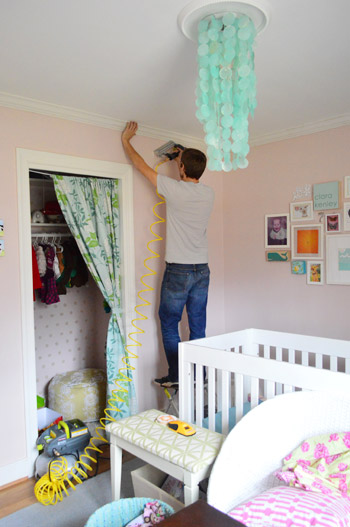
We used 2″ 18-guage brad nails and placed a nail about every 12-16″ inches, hitting both the top and bottom edges of the crown. This keeps it tight to the ceiling and the wall.
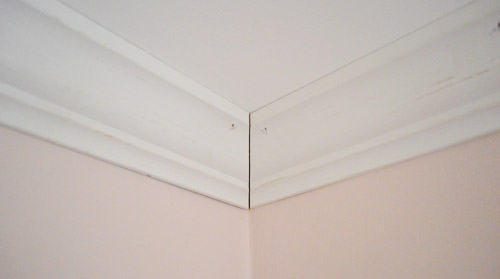
I think it took me just about 2 hours to get all of the molding cut and nailed in place this time.
How To Make A Scarf Joint
One shortcoming of the Kreg tool is that it doesn’t address scarf joints. That’s when two pieces of crown meet along a straightaway, not at a corner. This happens when your wall is longer than your piece of molding. I could only fit 8ft pieces of crown in my car, so I had three of these joints in the room.
You’ll get a more seamless transition if you overlap the two pieces (like below) rather than simply butting them together.
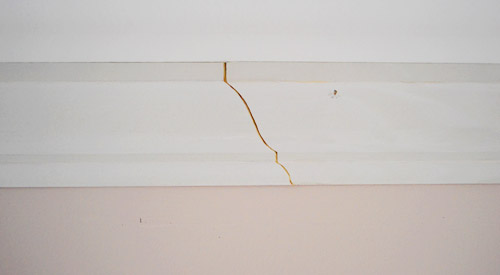
To achieve this, you’ll want to cut one side like an inside left corner and the other like an outside right corner. Or you can do switch left and right listed above, as long as they’re opposites.
Finish With Caulk & Paint
Once everything is hung, you’ll want to caulk the seams, gaps, and holes before you point. We used white paintable Dap caulk. Use a caulk gun in the following places:
- Where the crown meets the ceiling
- Where the crown meets the wall
- Where two pieces of crown meet
- Any nail holes (you could also use wood putty or spackle for this)
This will help hide any places your walls or ceilings are flat, while also giving you a seamless surface to apply paint.

See, much better. And the stuff isn’t even painted yet!
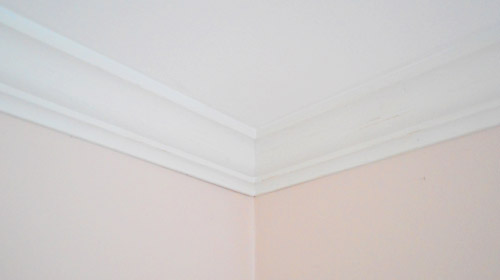
After the caulk dried, we used a small angled paintbrush to apply a coat of semigloss paint that matched the rest of the trim in the room.
Total Crown Molding Project Cost
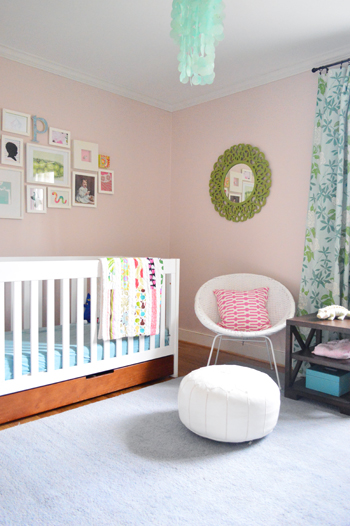
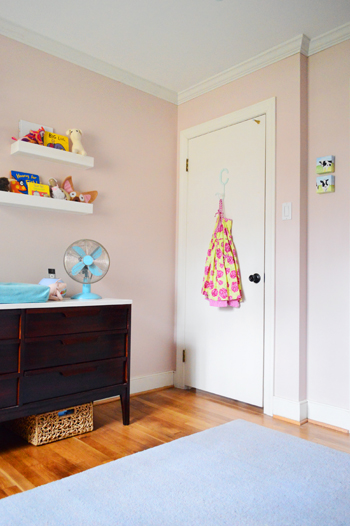
Our material cost ended up being $67. Add the cost of the Kreg Crown Pro ($30)and my total project cost at just $97. Not bad! We’ve seen enough house listings that say “crown molding throughout” to know that it’s a nice selling point – and now we’re one room closer to a fully crowned house.
More Crown Molding Projects & How-Tos
Since first publishing this post, we’ve tackled a few other crown molding installations – include how to make beefier, more fancy looking molding. Check them out below:
- How To Install Chunky Crown Molding For An Upgraded Look
- Adding Crown Molding To Kitchen Cabinets
- Installing Crown Molding Around Built-In Bookcases
Does anyone have any tricks to their crown molding installations that they’d like to pass on? Or have you had a similarly discouraging first experience with crown, only to crack the crown molding code on your second attempt?

Em says
We had a terrible first experience too! After spending an entire day gluing plaster cornicing in her kitchen, we went to bed that night with a very self satisfied feeling, only to be woken up a few hours later by a loud crashing noise ! It took us a few months to gather up the courage to try again… they are now firmly screwed on as well! It really makes a room, though. Really worth the effort!
YoungHouseLove says
Oh no! So glad you got them to stay!
xo
s
Beth says
Do any of the rooms in your house with crown have popcorn ceiling? We’ve added crown in some of our rooms and are working toward all, but two of our rooms have popcorn ceilings in them and I’m not sure how that would look…
YoungHouseLove says
I think you could just follow this tutorial and caulk the line where the crown meets the ceiling for a seamless look!
xo
s
Staci @ My Friend Staci says
Woo-hoo! This is so exciting! Also, glad to see it spelled “molding” and not “moulding” as I see it a lot of places online. You guys shall be my definitive spelling reference for home-related stuff.
Asif Sheikh says
Nice job on the crown. I recently bought the Kreg Crown-Pro from Lowe’s as well and did my whole living room. I looked at a few other brand jigs, but went with this one because of the included angle finder. I installed the same design molding you put up, but the 4-1/4″ size. Funny thing is, the most common spring angle on this design is 38-degrees, but I kept measuring 45-degrees on mine. Either way, with some wiggling on the wall, I was able to match up my corners. I’ve got one question though; any idea’s on how to fill a, um, somewhat “large” gap in one of my corners? (I came up about a 1/4″ short in one corner and was too lazy to rip the piece out and cut a longer piece)
YoungHouseLove says
Oh yes, I’d just try some caulk to see if a few rounds of caulking and smoothing and drying (repeat, repeat) will fill it seamlessly. Hope it helps!
xo
s
Maggie says
I’d looooove to do this to our apartment, deposit be damned. It’s a 106 year old building and some of the other units (and the impressive lobby) have amazing crown molding, but our unit doesn’t. The 10 foot ceilings are BEGGING for it, but our window molding ends only inches from the ceiling. If we owned, I’d eventually tackle it but I feel like it might be a whole other can of worms to try to incorporate that somehow. So I’m take notes for our future home and live vicariously through you. Looks good, John!
Ginny @ Goofy Monkeys says
Gorgeous! We were thinking about adding crown to our daughter’s bedroom and I think seeing yours will seal the deal! It looks wonderful, really.
Michelle says
I think you got spammed. Unless you support websites that find Asian girls?
YoungHouseLove says
Definitely not! Can you tell me when you saw them and where (what spot on the site and what they linked to). When we don’t see things and readers do it helps so much to have that info so we can block them!
xo
s
Michelle says
It’s right under your search engine at the top of the page. I wonder if it’s just on mine and I wonder why! Sometimes it goes away? I’ll email a print screen to you and title the email “Problem”.
YoungHouseLove says
Thanks Michelle! So sorry about that!
xo
s
Rachel says
Looks great! Great tip about measuring the ceiling- I probably wouldn’t have.
Karen F says
Sounds like it was $30 well spent on that crown-pro tool! It’s amazing how much more finished the crown molding makes the room look!
Question – We had some crown molding installed when we did some renovations, and there are a few cracks – I guess they didn’t acclimate the pieces first? When I asked the contractor about it, he said that if they fixed it they would just crack again due to temp fluctuations, etc. Do you think I can just go over the cracks with paintable caulk and then touch up those areas? (the molding’s been up for 3 years).
YoungHouseLove says
Yes, I would try to use paintable caulk on the cracks and then touch them up with paint. Hope it helps! It does sound like if they were acclimated it would really have helped (temps in a house are usually pretty standard thanks to heating and cooling systems, so it’s never 30 degrees in a house in the winter, etc).
xo
s
Kari says
Looks great! Though I’m surprised you started with the nursery since it will probably be re-painted if Baby P #2 ever shows up. :)
Cara D says
It looks great! Our house has zero crown adn I would like to put it everywhere. So you used a 2′ brad nailer? Is that 18 gauge? i was lookign online and it seems like a lot of people recommend a 16gauge. I am just curious if it feels secure to you as I really wat a 18gauge nailer for my various projects.
Cara D says
2″ not 2′!
YoungHouseLove says
Oh yes, we read a lot of people saying that but we had our 2″ nailer on hand so we tried it, and going into studs with it is really secure!
xo
s
HeatherM says
When we did our crown we used lots and lots of sticky notes. We would draw each of the angles & measurement on the note & then attach it to the board. We also had to remember that all measurements were from the inside of the moulding. Our notes were something like this: /______64____\. Can you add a picture of the caulked scarf joint once it was caulked? I always have a hard time making those blend in. Thanks!
YoungHouseLove says
Sure! Will try to add a pic of that for future posts (we’re going to try to do a video for you too!).
xo
s
Amber says
Does anyone have tips on adding crown molding to popcorn ceilings? I don’t want to remove the popcorn, because it’s in the whole house, and the house inspector told us because of the age of the house (1971) there’s a chance it could have asbestos in it. But the rooms would look so much nicer (and be easier to paint) if they had crown molding.
YoungHouseLove says
I think you can just hang it the same way we did and caulk any cracks between the textured ceiling and the crown. Hope it helps!
xo
s
Dave says
I had deep mud swirles in my living room and caulk between the crown and ceiling sealed everything perfectly!
Ekaterina says
Looks great!!! P.S. I don’t know, if this is just me, guy, but I was not able to read your blog in Google Chrome for about a week now. It will only show first page and won’t let me scroll. I have to start IE up then and read on. Just wanted to let you know, in case anyone else was having this problem.
YoungHouseLove says
So odd! That’s the first time we’ve heard that. Anyone else having this issue!
xo
s
Kay says
My miter saw is my Absolute Favorite Power Tool (a title that admittedly changes sporadically), and I believe you just convinced me it needs a companion jig before I tackle the crown molding in the kitchen redo.
Jenny says
My handy, handsome hubby recently tried to tackle crown molding in our master bathroom. He has taken on LOTS of other projects around our work-in-progress-home-sweet-home (laying laminate flooring; tiling showers and floors; putting in a new kitchen sink, faucet, garbage disposal; fixing plumbing; installing bathroom vanities; basic ceiling fans, lights, and switches; insulating our entire basement; more painting than you can imagine; etc.) and all with a completely untrained “figure it out as I go” approach. I guess he figured crown molding would be just another thing crossed off our never-ending to-do list. However, he spewed more 4-letter words during the crown molding fiasco than during our entire 2-year+ journey of fixer-upping together! In the end, he wound up with only one piece of molding on the wall and called in a contractor buddy to finish the job. Part of the problem stems from the fact that the walls of our master bathroom are relatively uneven…and include 6 inside corners and 2 outside corners thanks to a bathtub partition. Yeeeeks. :-(
Long story short: while I’m doggone impressed by just about everything you do, I was blown away by your success with this notoriously frustrating project. Crowning achievement indeed! You are both amazingly talented, I’m thrilled I discovered your blog last year (yeah, I’m late to the party), and I can’t wait to read your book – which I received for my birthday last week! Woo!
YoungHouseLove says
Aw thanks so much Jenny! I can assure you that our first attempt on the kitchen crown molding was similar to your husband’s experience! Haha!
xo
s
Jenny says
P.S. Many of your painting-related posts hit home too: I’m the requisite cutter-inner and my husband is the one who wields the roller!
YoungHouseLove says
Aw thanks Jenny!
xo
s
Christy says
This is so exciting!!! I got a miter saw for Christmas, my first project was putting molding on my doors to give them the illusion of being paneled. The next project is crown molding throughout my entire house! I’ll admit I’m a little intimidated, but this post gives me hope! I will definitely go out and look for the Kreg Crown-Pro.
Meg says
Could the crown kreg jig work for floor molding? I would assume so. We love out Kreg Jig and use it all the time.Maybe we would actually get the framing done in our place if we had a fun tool to help us out!
YoungHouseLove says
It actually isn’t necessary for floor moldings, assuming you’re using traditional baseboard, shoe or quarter round. All of those sit flat against the floor / wall so you’ll still need to turn your saw 45 degrees, but you want need the Kreg tool to hold them up at an angle.
-John
Carla says
Great job! The before and after of the caulked joint looks amazing. Thanks for the inspiration.
LARY@ Inspiration Nook says
It looks great!!!! It’s amazing how a simple change can make such a big difference. I love it :)
rachael says
On a non-crown moulding note, I had a dream bout you guys last night!! Most of it is faded now, but the part I remember was that you drove me home and wanted to come in but I insisted on saying bye at the door because I had decorated my house to be an exact clone of your first house and was embarrassed. I shouldn’t look at your instagram photos just before bed. Plus, I live in Canada so I doubt you’ll be giving me a ride anytime soon, haha!
YoungHouseLove says
Haha so funny!
xo,
s
Dave says
Looks great, awesome work!!
I just finished 3 bedrooms, hallway, living room and foryer with 4 5/8 and it really completes the house. I used a similar jig (Crown 45) and is one of the smartest things i’ve purchased for the home!!
Rachel says
If you two do another post about this would you be willing to put in a few tips for those of us who want to add crown molding to our walls but don’t have a miter saw or the funds to buy one? It would be greatly appreciated!!
YoungHouseLove says
Sure! You can use a miter box and a hand saw for all the cuts (it takes more time but there are tutorials for doing it that way too if you google for them). Good luck!
xo,
s
Julia says
Did you measure wall length at ceiling or lower on the wall? How much error would be okay?
I’m asking because I ran into problems when I measured the fridge nook in my 101 year old house (I think the nook was added in the 30s, so still plaster and lathe) and the new fridge didn’t actually fit. While the wall appeared straight, there was enough variation between the narrowest point, and the widest (which was the one I happened to measure) to mean I had to return that fridge and find a new one with smaller dimensions. But of course, this is in an older house, so perhaps there’s less variation in a newer house like yours.
YoungHouseLove says
I measured at the top of the wall right where the crown would sit, that way I didn’t have to worry about any wiggle in the wall. Bummer about your fridge!
-John
Sarah says
Have you guys ever thought about doing bead board ceilings in any rooms? I was to add architectural interest to some of our rooms but we’ve never done any project like that, and a bead board ceiling seems a little intimidating.
YoungHouseLove says
That would be gorgeous! Someday we’d love to!
xo
s
Anna-Lisa says
That’s really good to know about the crown molding tool! I’ve been kind of nervous about attempting crown molding because so many much more experienced DIYers say it’s a giant pain.
Johanna P says
To me, rooms always seem to have a little extra touch of class when they have their molding on. Colours pop that little bit more and edges feel that little bit cleaner.
While we’re on the topic of crown molding, don’t ever use a shticky on them! I used one I mine and the top layer of plaster separated from the rest of the plaster and I got rained with white dust. Thankfully I was able to pull the shticky off without doing any obvious damage.
For anyone that doesn’t know what a shticky is, it’s a sticky silicone roller used to gather dust, pet hair, spider webs etc.
Tania@ Run to Radiance says
It looks awesome!!!! I love it!! Will you all plan on painting it and the ceiling the same color or leave it white?
YoungHouseLove says
We’ll paint the trim white like the ceiling and then perhaps will paint the ceiling a soft color down the line (leaving the crown white).
xo
s
Carley says
I was wondering, could you maybe do a post about larger tools used for products? I’m not sure what to really look for in tools like a miter saw and what not. Maybe some benefits and negatives comparable to what you’d be using them for. Like, for small occasional products, is it worth the money for a DeWalt. Does that make sense?
In full disclosure, my hubby has been wanting a miter saw, and I’d love to actually surprise him a little! :)
YoungHouseLove says
Totally makes sense! We just read reviews and look for lots of people who say they love something and that it has a reasonable price and works well. It means we never spring for DeWalt, because thankfully other brands make certain models that are highly rated and hold up well (our miter saw is made by Craftsman and came well rated from Sears). Amazon.com has lots of awesome reviews to look at too! Hope it helps!
xo
s
Erin says
It may have been asked but would crown look good with a textured ceiling? Our house was built in the 70’s so we have the wavy plastered look (not sure how to describe it)…
Thanks!
YoungHouseLove says
I bet it would work! Anyone used crown with a really textured ceiling? I’m sure it still adds polish, right?
xo
s
Katie says
Hey Erin! We have 70’s wavy weird ceilings at my house and have added crown molding in every room. It definitely works and makes the rooms look more finished.
Amanda K says
Looks great! I wish my husband had known about that Kreg Crown-Pro when he did our moulding. He had a really hard time visualizing which direction to make the cuts, and there were lots of expletives floating around our garage.
Alex says
Hey youngsters — thought you might want to know, because you’re pretty conscientious about your ads here; there’s one of those slidey-ads that comes on to this page whenever I view it. It’s a survey each time, I think one of the questions was “How likely is it you’ll be visiting Texas?” or something, and I noticed this time it said “Powered by Vizu.” Could just be on my end, but wanted you to know since as far as I know you try to keep those slide-over-and-cover-the-whole-screen ads away from your little slice of the Internet!
Keep up the great work! I <3 YHL. :)
YoungHouseLove says
Argh! Thanks so much! We never see those random things and can only “kill” them once we hear about them! If you can grab a screen shot whenever they happen (or give us the URL that they link to) it also helps us get them gone fast! We’ll try to hunt this guy down right now. Thanks!
xo
s
Laura & the Shell says
It looks great, John! We seriously need to get on that over here. The rooms in our house feels so naked without it!
Random question: That stool in Clara’s room, the one in the picture where John is working, and the stud finder is resting on it… does the pattern of that fabric have a name? I’m looking for something like that to cover our dining room chairs but don’t know how to search for it. Thanks!
YoungHouseLove says
I wish we knew the fabric (it was from a local outlet called U-Fab, so maybe if you go to maryjos.com – another online fabric outlet) you might be able to find it?!
xo
s
tambryn says
After 3 months of weekend work on our basement where we dry walled, painted, removed old trim, painted brick, installed baseboard, ran electrical, and basically did the whole project ourselves, we ended up paying someone to do the crown. This post makes me think we could do it ourselves in the future. Thanks for all of the tips!
YoungHouseLove says
Wow- that’s a ton of work! Congrats!
xo
s
Joanna Banana says
QUESTION: Would the Kreg Crown Pro also work if installing baseboard or window trim?
YoungHouseLove says
You wouldn’t need it for that stuff since it sits flat against the wall (the Kreg Crown Pro tips the wood up at the angle that it’s hung on the wall so you can cut it that way, whereas baseboard and window trim you just cut flat).
xo
s
Jess T says
We just installed crown ourselves and think its one of the smallest way to make the biggest impact on a room…looks great guys!
So question time…you kind of grazed over the caulking part (and filling in the seams for long walls and corners), but we’re having some difficulty accomplishing this in a “pretty” way (aka, not getting globs of it on the ceiling or our already painted walls). Any tips on how to really rock out with our caulk out? (Sorry I just had to do a play on words for this post…but seriously, help!)
YoungHouseLove says
Haha, we just use a gun to get a line of it against a seam and smooth it with our hands. We have video of us caulking things in our board & batten post from last week if that helps, and we’d love to do a crown molding video for you when we tackle the next room! Soon I hope!
xo
s
Mary | lemongroveblog says
Now I got crown molding envy! ;) That looks great – it makes such a difference in the room.
Lara says
Thank you for eye candy – and the inspiration! Question for you: What was that turquoise thing on wheels I see peeking out beyond the crown molding that’s laid out on the floor in your entryway? Is that a new addition?
YoungHouseLove says
That’s a book project that’s still hanging around. It’s the painted bar cart on page 30. We’ll share some more pictures of it in the room soon!
-John
Mike Thompson says
Nifty jigs, John. To avoid gaps in inside corners, you should use a coping joint. Much simpler than determining the angles and eliminates the need for caulking.
http://americanwoodworker.com/blogs/techniques/archive/2009/11/03/coping-with-inside-miters.aspx
http://www.thisoldhouse.com/toh/how-to/intro/0,,1016651,00.html
Miyu says
Thanks for this post! I’ve been at Lowe’s and just stood in the power tool section wondering if the Kreg Crown-Pro is worth the investment… and it sounds like it is! I have 3 rooms that lacks crown molding, I just got a Brad Nailer for my birthday, so now I’m excited!
Anne says
Showing my husband this post. Thanks for sharing the Kreg kit thingy. I don’t think he knows about that. :)
Yvonne King says
Wow! Two hours sounds amazing. I am about to add crown molding to my dining room and would be thrilled to make that kind of time. I might look into renting a nail gun.
I recently wrote a post on how to select crown molding (if you didn’t have other house crown molding to match). Here is the link if you are interested: http://dressthisnest.wordpress.com/2013/02/19/crown-molding-101-the-basics/
Also, I wrote another post on cutting the crown molding “on the flat” if you don’t want to use a jig: http://dressthisnest.wordpress.com/2013/02/20/crown-molding-102-deciding-on-a-cut-method/
I am planning on cutting mine using a jig, but I’ve heard people with experience prefer cutting the molding on the flat, so maybe some day I will get skilled enough to use that method.
Great work on the trim! I prefer to pre-paint mine so I only have to do touch up paint in the end, but I like your method of letting the crown sit in the house for a while to adjust to the temp. I have mine sitting in the basement, but I probably should bring it upstairs for a few days before we install.
I can’t wait to see the hallway!
Sandy Rizzardo says
John, I’m really interested in that nail gun. Can you use different size brads or just the 2 in. Thanks
YoungHouseLove says
It’s an 18-guage brad nailer that can take nails up to 2-inches. So I used 2 inches on this, but was able to load smaller ones (like 1.5″ when we did the board & batten).
-John
Carli says
Wow!! What a difference! Can’t wait to start adding some crown moulding to our home :)
Megan says
My husband tried to tackle 2 short walls in our kitchen this weekend and it ended it a nightmare. The corners aren’t square, so it caused him to have to crow-bar off the pieces he’d installed. Of course, that dented/squished the drywall where he’d pulled (on the ceiling AND the wall). So, had had to repair it all and start over. It looks better this time around; though they don’t seem to meet at the inside corner exactly. It’s close enough for me at this point! It took all day and he was close to throwing a nutty. I’ll make sure he reads your post so that he can get that cool gadget! (I’m sure he won’t mind owning another gizmo tool). :)
YoungHouseLove says
I feel for him! Tell him that I’m sending some good crown mojo his way right now.
-John
Ashley@AttemptsAtDomestication says
The crown looks fabulous! Definitely finishes off the room nicely!
Georgia says
Thank you so much for reviewing that kreg tool! Oh my, I feel your down molding pain. The first attempt I made I had no idea what I was doing and couldn’t believe how I just could NOT get my head around the angles. The second attempt was much better, but I was using an old wooden mitre box, a hand saw and good old’ hammer and nails…on my own on 12 foot ceilings! ARG. Swore never to do it again. But I think with that tool, a proper saw, nail gun and a person to help I may change my mind….
Lauren says
Not sure if someone else already mentioned this as I didn’t read through all 237 comments, but Lowes sells crown molding corner blocks that eliminates all the corner cutting. We used them in our baby’s nursery & got the whole room done in 2 hours! Here’s how we did it: http://www.hausofgerz.com/2012/03/diy-crown-molding/
maggie says
What’s your tip for scarf joints?
YoungHouseLove says
I like to cut my scarf joints one end right after the other, that way I can be sure that the angle of the saw and everything stays the same for each side of the scarf joint. I’ve found that helps me ensure that they’re going to match up once I put them on the wall.
-John
rachel says
Uhhhhh. Just had a flashback to 10th grade geometry class and had a mental shut down for a second.
I recovered and finished reading. Looks snazzy! Color me impressed!