We’ve long disclaimered pictures of our kitchen with “oh, and we still need to add crown molding.” But that stops today! The unfinished edge where the wall/tile meets the ceiling…
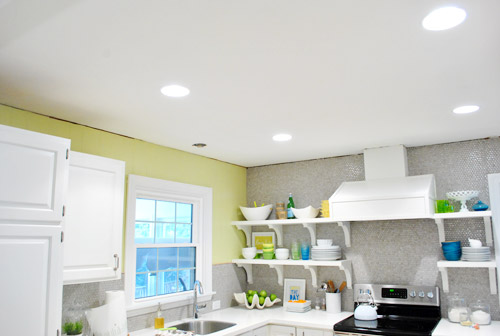
… is no more!
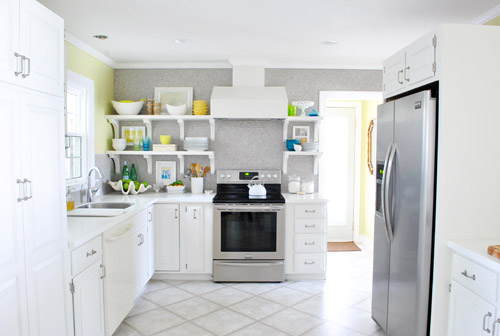
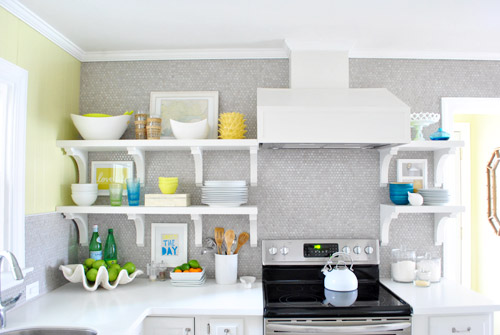
Let’s get a little closer…
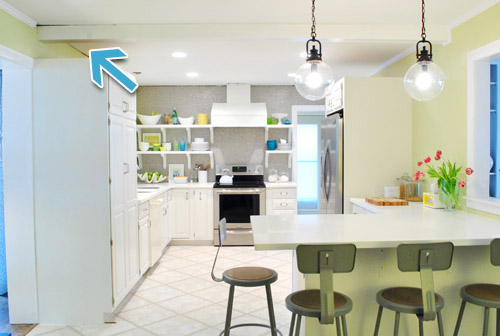
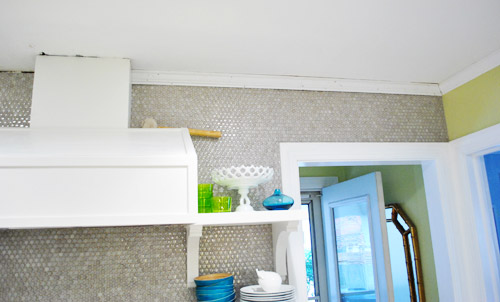
Wait, let’s rewind so I can attempt to tell you how we got there. For all of those who have been wondering about that dark line above our pantry (a few folks asked if the beam was sagging or if there was a hole) – it’s just another spot where we’ve been missing crown molding. Since there had originally been cabinets to the ceiling along that entire side of the kitchen (including one that wrapped around that beam), we’ve been stuck with a few crownless areas since we took those cabinets down in November. So they look dark and crag-y without trim to lend that finished look.
But before we could start installing crown molding, we had to make a quick fix to our hood. In a rush I had used some regular duct tape to seal up the vents on my hood. Hey, it’s called duct tape, it has to work in ducts, right? Wrong! A few smart commenters expanded my tape knowledge on my hanging post (and kept me from having some ventilation issues down the road) by reminding me that I needed to use the real metal foil tape stuff instead. So I took a moment to pry off a few pieces from my wood cover…
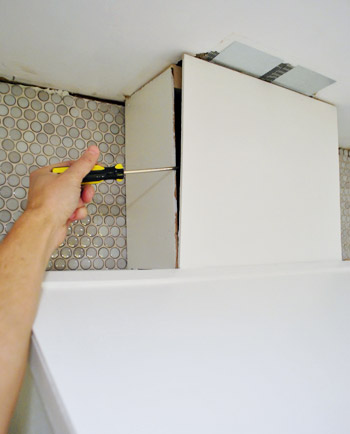
…and shimmied my hand in there enough to remove the bad duct tape and rewrap everything in the legit foil stuff.
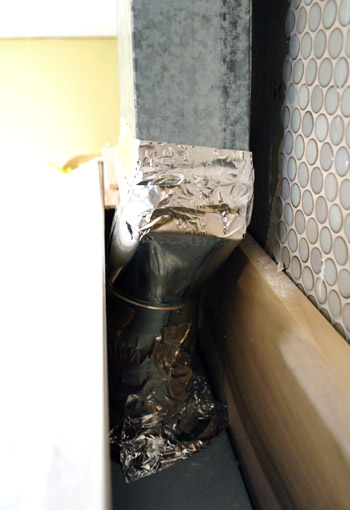
But enough about tape. Let’s talk crown molding. This will be a bit hard to explain (and the fact that I took less-than-stellar pictures of this process won’t help me), so bear with me:
Our kitchen has three types of crown for some weird reason. There’s traditional crown around the perimeter of the room – except that it’s very very slightly smaller on the fireplace half of the room (nothing you’d ever notice with the naked eye unless you were literally holding them up next to each other, but thanks to the beams they never touch so we didn’t even detect this phenomenon until we tried to fill in a few crown-less areas and learned it was slightly different). Meanwhile, the beams just have a thin cove molding on them except for one side of one that randomly has thick crown running across it – so strange!
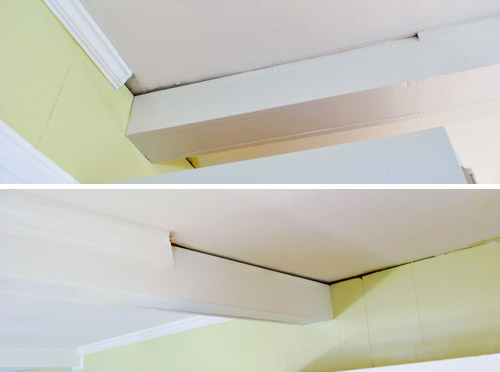
So our challenge was that we had to replace small bits of all three and remove the way-too-thick trim on that one mismatched beam. Because redoing the entire room from scratch would actually have been a big project and a pretty pricy undertaking since all the beams that would have to be trimmed out on each side would add up to the equivalent of about four rooms’ worth of trim.
Further complicating things – none of the molding seemed to be the standard stuff you can buy at Home Depot, so we couldn’t just fill in the gaps with fresh pieces from the store. The only thing saving me from having to re-crown the entire room? I had carefully saved every single piece of crown that we took down with the cabinets.

Of course it needed some primer and paint to keep flashbacks of our old woodsy kitchen at bay (we like Zinsser Smart Prime when it comes to painting wood trim since it can bleed through and ruin your paint-job if you don’t use a stain-blocking primer first). Then we followed that with a few coats of off-the-shelf white from Behr (the one with paint + primer in it, so it gave us great coverage with stain-blocking primer underneath it). Why did we use that paint? It was what we used for the rest of the trim in the kitchen back when we painted the paneling. It’s a really nice crisp white color that layers in nicely with our white Corian couners.
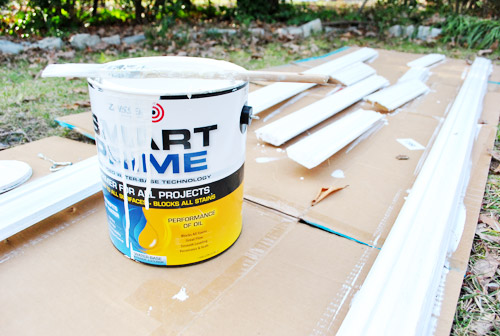
Now for the bad news: I was short a few pieces. Wop wop. My leftovers of this large sized crown weren’t enough to fill the gaps around that side of the room. Then I had a flash of brilliance (or used ordinary common sense that any human being would possess) and realized that the odd mismatched beam with the thick trim on one side was the right size for the job. So I could steal it from there and replace it with store-bought smaller trim (which exactly matched the stuff on the other beams- or was at least really close). Then the whole room would have trim that actually appears to make sense and I wouldn’t be short on trim to finish the job. Talk about lucky breaks. That weird mis-matched beam actually saved us from having to re-crown the entire kitchen.
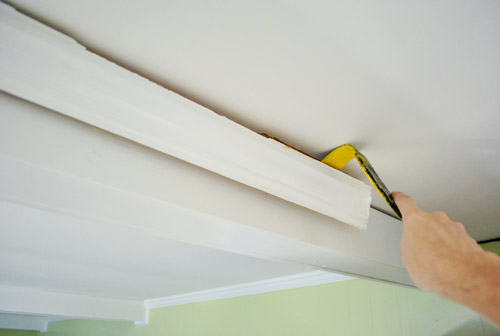
So the good news was that I had another big, long piece of crown to use to fill in all the spots that needed filling in. And the bad news was that the kitchen was actually looking a lot uglier at this point:
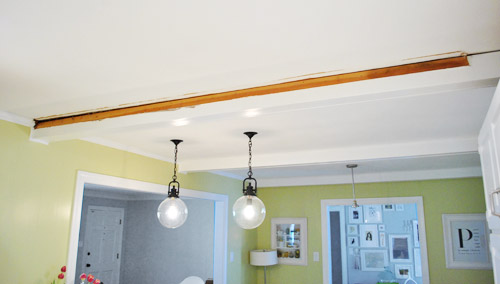
Now this is where my photos start to get terrible. I don’t know where my head was (actually I do – I was in a post-book photo shoot fog). So forgive me that this isn’t really a “how to install crown molding” post and more of “here are fleeting snippets of how we did it and some pics of the finished product.” Maybe next time I’ll be a better documentarian (we’ve always wanted to put crown in Clara’s room along with the other two bedrooms on that side of the house, so we promise to take better photos and actually share a step by step rundown when we do). And in the meantime, here are links to some of the tutorials that I learned from (since this was my first time and all). I read the ones here, here, here and here.
Cutting was interesting, to say the least. You have to cut crown at the same angle that it will sit against the ceiling – i.e. not laying flat. One of the tutorials suggested temporarily gluing a piece of guide wood to your saw table to help hold the piece of molding at the angle. I took a picture of myself starting to try this, but it never really worked for me (I didn’t want to use heavy duty glue and ruin my saw, and the lighter duty stuff I had wouldn’t cure thanks to the cold temps).
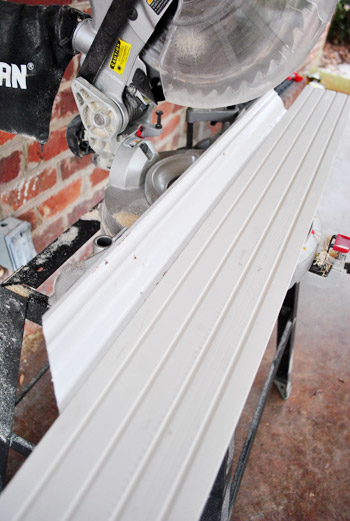
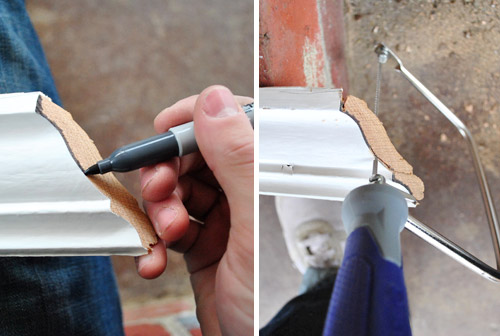
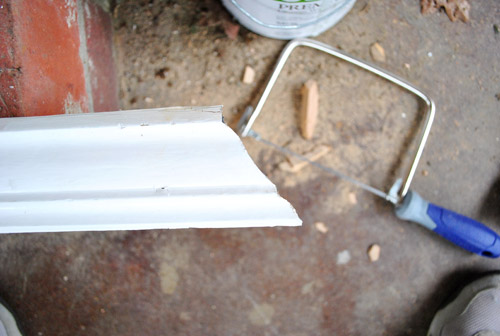
And even once I figured out how to make those cuts (just by holding things by hand), I still wasn’t done cutting. I still had to use a coping saw to get rid of some extra overhang that would prevent my corners from sitting flush. See that going on below? All of the tutorials suggested marking the edge with a darker marker to help ensure that I was cutting as close to the edge as possible. I guess it helped.
Being my first time, things went okay – but I’ll admit my cuts weren’t perfect. Nor was my ceiling perfectly flat (oh the joys of an older home). But everything was sufficient enough that a little caulk and paint ended up finishing it off really well. Whew. So here are my first few pieces in place (without caulk and paint yet, obviously).
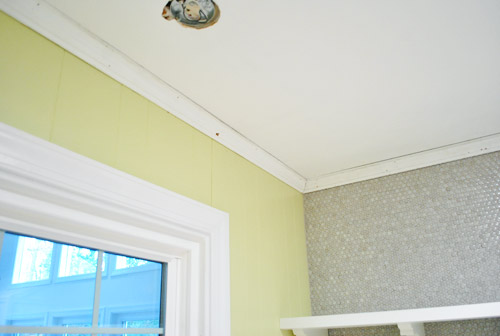
Despite having primed and painted all of the pieces, the general banging around that happened during the cutting / coping / hammering process got them fairly beat up.
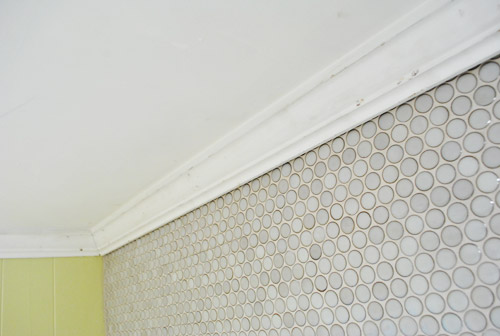
No biggie, I knew we’d have to break out the paint anyways for nail holes and more obvious spots (like where we would be replacing the big crown on that one beam with smaller cove molding).
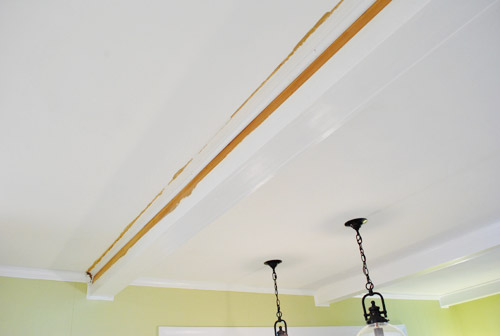
Speaking of cove molding, remember how I was missing just a small section on the other side of that beam? Well, I had hoped the new stuff that I got from the store would match… but I wasn’t so lucky. Turns out our existing stuff wasn’t a standard size. So that one whole of the beam ended up needing to be replaced with something slightly larger. Thankfully since each side of the beam runs into thicker crown around the perimeter (and doesn’t meet other beam trim on the other side) the difference isn’t detectible at all (it’s one of those you-can’t-tell-unless-they’re-next-to-each-other-things). So although it might sound annoying to replace one side of a beam for a small missing piece of not-standard cove trim, it was muuuuch better to replace the side of one beam instead of six sides of beams and ten perimeter pieces between each beam and around the rest of the room. In short: it could have been much much worse.
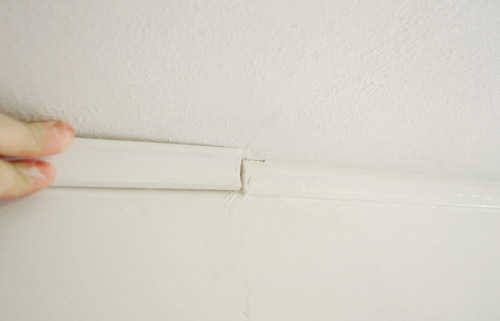
And I did get lucky when it came to the small section of missing crown on that side (remember how it’s slightly smaller than the rest of the crown in the room?). In a last ditch effort to keep from having to replace all of the crown on this half of the room, I found a single piece of matching molding in a trash bucket in the basement. I was never so happy to see old orange-y trim in my life.
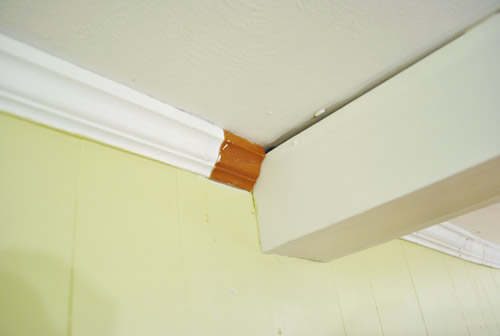
So here are those pieces installed and caulked over. The shot below sort of demonstrates how the thinner trim along the beams meets the thicker trim around the room, so I hope that makes sense now. And yes, this is the only picture that I ended up snagging of the whole caulking and painting process that Sherry and I tackled over the course of a few hours. Basically we just used white paintable Dap caulk and a caulk gun to run some beads wherever we need to fill things in, smoothed them with our finger, waited for it to dry, and painted it to keep it all looking seamless.
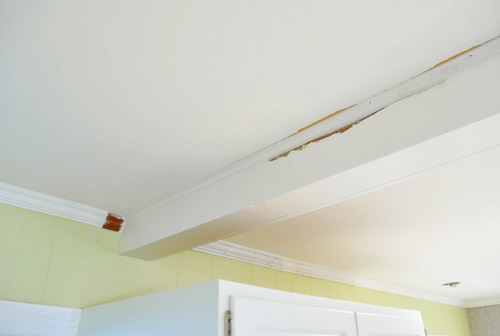
So let’s just fast forward to some afters, shall we?
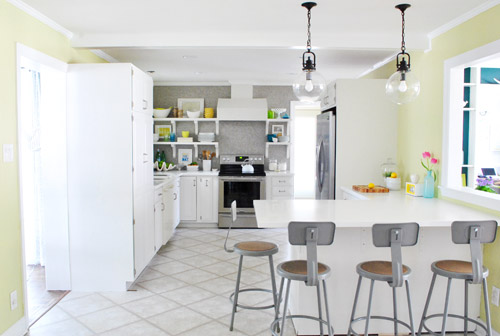
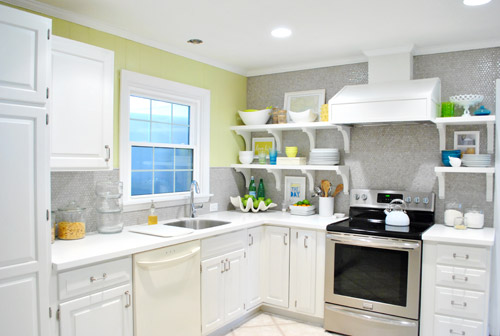
It’s a small change, but it makes a pretty noticeable difference in our opinion. Minus the empty fixture hole in the ceiling above the sink (and mismatched dishwasher) you could almost be tricked into thinking this was a finished room now. Although the real game-changer will definitely be those cork floors – which we’re more anxious than ever to get in there so we can call this kitchen done-zo. Slowly but surely.

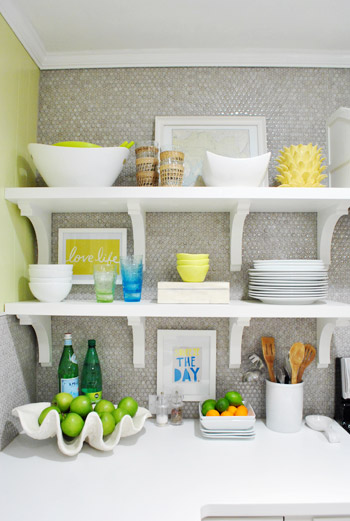
Oh yeah, and since everything came off the shelves when the trim went up, of course it didn’t all go back up in the same way. In other words: Sherry had a grand ol’ time playing around with a few things – like adding two more frames, eliminating some stuff that we realized we weren’t using very often, and just playing around because it’s her idea of a good time). As for a few of the frames that are actually hung, we used 3M removable picture hanging strips (which meant no holes in our tile and an easy-to-remove-whenever-we-want result).

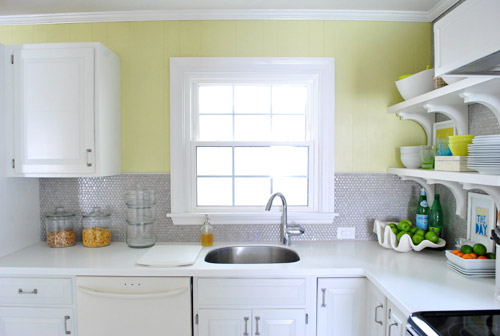
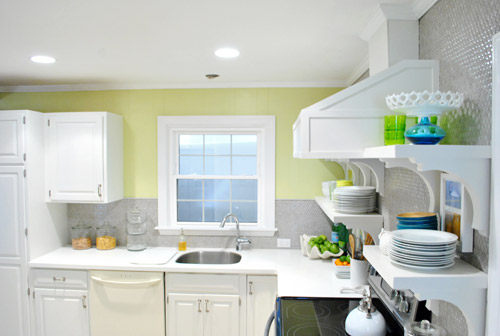
Oh and since some of you requested a photo of the window to see the slice of “breathing room” on each side that finally makes it looked balanced, here it is. Once we have a nice gleaming pendant light hanging down in front of the window it should be pretty darn charming. It’s a nice little airy spot since the wall of shelves is a pretty big focal point, so not filling up every square inch of every other wall feels like the way to go for us. We’re also toying with something on the window (roman shade or blind) so we’ll have to keep you posted.
We’re thankful that it’s a far cry from the crazy off-centered deal that we had going on for a while before the tile and shelves went up to restore the balance:
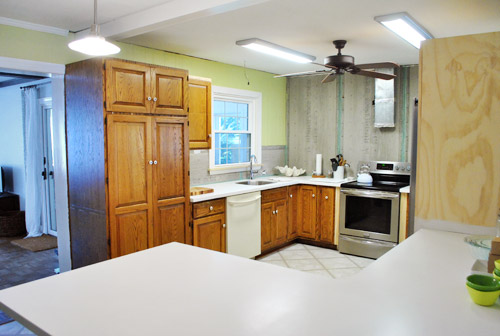
Here’s another shot from a similar angle where you can see more of the crown.
And another:
So that’s where we are. Next up: finding/hanging a pendant over the sink, finishing the peninsula with some decorative wood molding, installing the dishwasher, and finally adding those cork floors so we can call this 3.5 month marathon done! Oh yes, and doing something to the side of the pantry and possibly altering the stools is at the very end of the list (not sure how the cork will change things so we don’t want to jump the gun on either of those things).

What did you guys do this weekend? Any trim hunting/cutting/hanging? Or open-shelf tweaking? Or metal-foil-tape using?

Rebecca says
My husband worked on bathroom plumbing. A one sink bathroom to two. After 2 small leaks and lots of anger on wanting to give up all hope it finally was complete last night. Still to do…seal the grout, shorten the door trim since the tile raised the floor, paint all door/floor trim then install, put the toilet back (going downstairs is getting annoying fast), caulk around the shower so it can be used again, make a towel rack and hang, install new mirrors/hand towel ring, toilet paper holder, find some pieces to hang on the wall to lighten up the space…
Yeah, we’ll be done sometime…
YoungHouseLove says
Wahoo! Must feel good to have that complete! Good luck with everything!
xo,
s
Laura says
The new crown makes your range wall pop, like BAM! Love it!
Random question: do you think as a DIY-er you get a better end result on trim than if you paid a professional to do it? The reason I am asking is because I recently had new baseboards installed and noticed that the installers slapped it down FAST (no coping saw step) and filled the resultant gaps with caulk, saying this was “industry standard”. The end product looks pretty nice if your not looking too closely, i.e. Type-A like me!
These installers were very well reviewed on Angie’s list and they certainly had professional tools/demeanor. Presumably they were inherently focused on speed for economic reasons. Left me wondering if DIY is really the only way to go if you want your trim near perfect. As a working mom, I couldn’t swing DIYing the baseboard — but maybe for the crown?
Whoah, long comment. Thanks for the great blog!
YoungHouseLove says
Hmm, we paid someone to do crown in our first house (I got it as a gift for John so he didn’t have to break his back over it) and did it in this house ourselves. I’d say they both look the same (not 100% perfect, but pretty darn good once they were caulked and painted). Maybe it’s impossible to get it totally perfect since walls and floors aren’t always perfectly level? Anyone else have info or suggestions for Laura?
xo,
s
Sam says
I’m totally just curious, but how much kitchen stuff did you guys do and stockpile blog posts of before the book photo shooting craziness began? You mentioned in the range hood cover building post on Feb 1st “Note: these pics were taken before we realized we should use metal foil tape and not duct tape for those vent joints, but we’ve since swapped it out and will share those pics in another update post about other things we have to share, like how we patched our giant honking ceiling holes, etc).” I enjoy hearing about the inner-workings of YHL, so I was just wondering what the lag-time is between completing a stage of the kitchen and posting about it?
YoungHouseLove says
Our longest lag-time is only around 1-3 days, even with book stuff going on (we tend to bulk up on projects on the weekend but then finish them as the week progresses and then shoot and blog about them). For example, we hung and began framing out the hood on the weekend before we posted about it, finished it a day later and then posted about it) but once it was posted we learned about the tape so we went back in and switched it out! We actually switched out the tape right after we heard from folks about it, but saved those pics for this post since we didn’t think it was worth it’s own post. And we thought it tied into the crown molding project (which we completed this weekend)! So most things are just a day or two behind (which is usually how they always are since shooting things and uploading them and writing a post usually takes us a day or so). But we’re not going to lie: a crew of five folks in our house + shooting 100 secret projects + blogging about the kitchen reno = complete and utter chaos! But after three weeks we’ve gotten so used to it we think we’re actually going to miss it!
xo,
s
Bryna says
Cab you please tell me more about the stacking glass container to the left of your sink?
YoungHouseLove says
That’s from HomeGoods about a month ago!
xo,
s
Manda says
I always find it amazing, that although our tastes may differ with paint colors, furniture arrangement, fixtures, etc – we all want the same thing, to come home to something wonderful. Though I may have gone a different route with my own kitchen renovations, I can’t deny how happy and inviting your kitchen looks! It really is a blessing and inspiring to be able to watch your home transform from “it’s got potential” to “look at me now!”
YoungHouseLove says
Aw thanks so much Manda!
xo,
s
Marianne says
Gorgeous!! We have issue with our moulding each winter. When our house gets dry all the moulding ‘shrinks’ and any caulking that was hiding seams etc. cracks and the seams all become visible. Anyone have any good tips and tricks for this? It is frustrating to have to touch up all of the seams every year…
YoungHouseLove says
Ooh that sounds so frustrating! Anyone have tips for Marianne? Maybe there’s shrink-proof caulk you can use?
xo,
s
Karen F says
I have the same problem! We had crown installed 2 years ago when we renovated our house. It immediately cracked and the contractor told me it was due to fluctuations in the temperature (we live in the northeast, so it gets hot and humid in the summer, and dry and cold in the winter). I assumed we just had to live with it that way, but it drives me bonkers!
Suzanne says
I like it! I want to put in my vote for the top shelf in the corner. I think you need something tall and clearish and bright there. Like a vase or a hurricane filled with fruit…
YoungHouseLove says
Always another possibility! I love playing around with things!
xo,
s
Deborah Nowland says
We have a rental home that we were DEEP cleaning and painting. The hubs was installing tile in the master bath. I spent my share of time painting crown molding this week-end, mainly doing some spot painting to get clean lines.
One fun tip that a neighbor told us about when installing crown molding is to use auto body Bondo for large gaps. If you make mistakes or just need to fill in large spaces due to cutting problems use Bondo to fill in the gap. It can then be sanded smooth and then painted. That math really gets used with crown molding! Glad we had an Engineering major son helping with that project!
YoungHouseLove says
Great tip!
xo,
s
Kelly B says
Much like the rug in Big Lebowski, the crown molding really ties the room together :)
YoungHouseLove says
Hahahaha, thanks Kelly B.
xo,
s
Sarah says
I have a confession to make — I’m not loving the range hood cover. I’m not trying to be critical and I know I don’t have to live there, so my opinion doesn’t count (and it definitely shouldn’t), I’m just wondering if you guys are loving it.
I love different kitchen styles — wood with granite, all white with marble, etc., etc., but I think I’d like to see the range hood cover in something other than white…there’s a lot in the kitchen and I think the range hood cover being white actually takes away from that gorgeous tile a bit. I also think the scale is a bit different than what I’m used to, which is throwing me off — I think I’ve generally seen range hoods that are wider than the stove.
I’m really not trying to be a negative Nancy and I love Love LOVE everything else, just wondering if y’all are planning to tweak anything that you’ve finished and aren’t 100% happy with. I know things will definitely look different with the new flooring, too!
Also, what has a girl got to do to see a picture of the kitchen from the dining room? I want to see what it’s looking like almost finished and framed by that lovely new opening!
YoungHouseLove says
No worries Sarah! The range hood cover is actually one of our favorite things, so we’re definitely loving it (although we know it’s not for everyone)! Our first kitchen had a stainless steel hood cover so we wanted something different this time, and we appreciate the wood cover since it ties into the open shelves and makes that whole wall “read” as one unit (sort of like how upper cabinets would but less heavy). It’s probably just a personal preference thing though! As for the dining room picture, it’s full of secret book projects and photography equipment, so we can’t share that until we wrap on our third week of shooting and clean things up in there! Soon I hope!
xo,
s
Katie says
I have to admit to not being a huge fan of your kitchen plans at first. I’m still trying to come around to the idea of white countertops on white cabinets (to each their own, right??). But I must admit, with every project – big or small – it gets better and better for me. And MAJOR props for doing so much of it on your own. It definitely looks like a professional reno!
p.s. I was not a fan of the lone grellow wall along the sink side, either. But WOW, does a little bit of molding go a long way!
YoungHouseLove says
Aw thank Katie!
xo,
s
Ashley says
I promise I’m not a negative comment leaver… Don’t hate me! ha! But I’m just wondering – it looks like the hood vent pipe is a little to the left instead of directly in the center. Did you choose not to fix that for some reason or is it just me and it really is centered? I was just wondering because if the way you enclosed the hood it seems it would be an easy fix to extend the framing boards a little extra on the right and voila etc. Kitchen is looking good YHL!
YoungHouseLove says
The hood cover itself is centered to the centimeter (John is crazy like that). It just depends where we stand to take the pics. Sometimes it looks off to the left and sometimes it looks off to the right!
xo,
s
Sherry from BC says
It looks so beautiful. Amazing how crown moulding finishes off a room. I am loving it and right now really like the stools as is with the penny tile & stainless behind but the cork may change that. So great that you had all those little bits and pieces of the old moulding. It definitely pays to save pieces of trim till you are totally finished a room cause sometimes they just save your bacon. How long did the moulding take you? Were the walls fairly straight? I live in an old Craftsman (approx 100 years old) & would love to have crown in my living room but it scares me. All my walls are a bit off true and crown moulding on my own may be more than I could handle.
YoungHouseLove says
I think it took John about 5 hours to cut and install and about 2-3 hours for us to caulk and prime and paint it all? One long day or two half-days would probably do it if you’re just doing a few walls and filling in a few other areas like we were! The walls weren’t perfectly straight but caulk can definitely help!
xo,
s
courtney says
The crown was the “crowning glory” well I really think the tile was ..but that doesn’t go together as well…Looks great!
We spread 10 yards of mulch this weekend…loads of fun…at least for the three year old who actually commented on Saturday that “That was the hard work daddy…can we do more hard work tomorrow?”
YoungHouseLove says
Haha, so cute!!
xo,
s
Steph says
LOVE the crown molding. Really ties it all together. That range hood box, though… I’m so trying to love it, but it just seems off to me.
YoungHouseLove says
I think it’s definitely just personal preference! Here on this post we have people who have said it’s their favorite thing and it looks amazing and others who can’t get into it! I think that’s the fun of decorating though, not everyone would make the same calls, so it’s fun to sit back and watch everyone do what works for them in their home!
xo,
s
Katy says
Beautiful!
Heather S says
To me, crown moulding is like the finishing touches to an outfit. It just makes the room. The kitchen is a great transformation. Wish you would have made the crown more substantial though.
YoungHouseLove says
We definitely could have if we wanted to redo the whole room and had more in the budget for it! Just one of those calls you make based on how much time and money you want to spend!
xo,
s
Susan (Between Naps on the Porch) says
So enjoying this process! Everything is really coming together. Love seeing the changes on the shelves, too. :)
Lola says
I love how light and bright the kitchen is now compared to what it was before.
I love the idea of the shelves, but to me they look a little cluttered…do you plan to change up the “scenery” now and then to mix it up? I think my nerviousity (yeah I just did that) toward open shelves is because I am extremely disorganized and could never keep it looking perfect.
We’re doing our kitchen come Spring and plan to do exactly as you have done – white cabinets but instead butcher block counter top but also cork floors!
Nice to see white cabinets coming back into “style”.
YoungHouseLove says
Oh yes, just like I mentioned a bunch of times in the post about loading up the shelves last week, they’ll definitely evolve over time. Open shelves aren’t a museum since they’re really about function first and foremost, so stuff gets used and comes down and other stuff will go up and I’m sure they’ll change over time! Heck, that’s half the fun for a weirdo like me! Haha.
xo,
s
Seriously Sassy Mama says
The side of the pantry should be a message center. Paint it with chalkboard paint!
YoungHouseLove says
Always a possibility!
xo
s
Danielle Moore says
I love your kitchen!
Debbie k says
Good job guys! I hate to add more more work but I feel your upper cabinets are begging for a moulding-even a square crown about 2″ high. I did this in my own kitchen and it really helped. I promise it will will finalize your kitchen.
YoungHouseLove says
We actually planned that all along and held up some different trim/molding options and didn’t like them! It totally threw us since we always planned to do that, but it somehow didn’t go with the rest of the room- maybe because there aren’t a ton of upper cabinets and are only a few tall things? It just looked weird. Can’t explain it! Haha.
xo,
s
Wiggs says
So now that things are a little more finished, how are you guys feeling about the way you’ve styled the shelves? This is definitely not a criticism, I’m just curious…I was trying to imagine what I’d put on open shelving if I had it in my kitchen. DEFINITELY some framed prints, like you have! I’m also drawn to the stuff on your shelves that takes up more visual space (the large white bowls, the stack of plates).
YoungHouseLove says
I think as a person who loves for open shelves to evolve (like they did in our first house’s dining nook) I’m of the “I love it for now” POV. It definitely won’t stay like this forever since I know myself enough to know I love playing around (open shelving = not a museum, so stuff moves around)! Haha. But so far unloading the dishwasher is a lot faster with things that we use out on the shelves (no doors to open) and we haven’t had dust issues since we use things quickly. So we’re loving the mix of function and frames and fun stuff. Can’t wait to see where we end up!
xo,
s
Lisa@wanderdownpennylane says
You guys are my heroes right now! Our crown molding in our house is so different that I am afraid when we fix up the back room that we won’t have any solutions to try and “match”. I love hearing how you figured it all out. It looks great.
Jenny says
You guys have made a lot of amazing changes, but it’s incredible how the moulding just pulled it all together.
Kate @ The Loud and Clear says
I’ve so been looking forward to this post! The crown looks so good and gives the room such a finished look. Bring on the flooring! :)
YoungHouseLove says
Aw thanks Kate!
xo,
s
Annie Swift says
I was skeptical of the shelving in the last post but the molding really helps balance it out! Looks fantastic!!!!
This weekend we were going to paint our living room, but right at the last minute on Friday night we found our we are pregnant! So all DIY went out of the window for some good ol’ lazing around playing video games and watching TV – just because we can.
Annie Swift says
Oh p.s. Do you use a wide angle lens for your shots? Possibly the reason why people keep commenting about things being off center etc…. Trick of the camera!
YoungHouseLove says
We just use a stock lens that comes with out Nikon D3000 but things can bow a bit, so you’re right about that possibly being the culprit!
xo,
s
YoungHouseLove says
Haha, thanks Annie! It’s definitely hard to “see” everything when it’s all a work in progress! And congrats on the bun in the oven! So exciting!
xo,
s
Abby says
It really looks awesome!
I spent the weekend painting our newly-installed crown molding in our office. Our house is 100 years old and walls are not as level and square as they probably once were. We had to get really creative with joints to get it to hug the wall properly. Unfortunately, we had to do a couple of mid-wall seams to accomodate the wavy walls, but i’m happy to report that after some buttering with wood putty and my second coat of trim paint, they were virtually undetectable.
YoungHouseLove says
Sounds amazing! Congrats on a job well done!
xo,
s
Sally G says
It’s always fun to watch a space be so amazingly transformed. I bet it’s a joy to get up and make breakfast in the morning. :)
YoungHouseLove says
Aw thanks Sally! Does pouring a bowl of cereal count? Haha.
xo,
s
Tara says
Looking good….can’t wait to see the cork floor go down! I think that’ll really change the whole look of the room for sure (not that it doesn’t look great now, but I bet the dark floor will really ground it…no pun intended, LOL!).
On the side of the pantry, have you thought about painting it with chalkboard paint for a cool little message centre? I’m wishing I had some end cabinets or a narrow strip of wall in my kitchen so I could do that, but no luck unfortunately. I’m sure you have something great planned already, but I just thought I’d toss that idea out there anyhow. ;)
YoungHouseLove says
Oh yes, that’s definitely a possibility! We’re waiting for the cork floors to go down to see if black paint is too dark, but we could always mix up chalkboard paint in a lighter color too!
xo,
s
Darcy says
WOW! Loving the crown molding – It totally makes the room look “finished” (until that gorgeous floor is laid down)!!
SO — This is the final week of book craziness, right?!? How is it going? I remember that first week, you said you got over 30 projects done, and in the can — how much do you have left to do for your final week? I hope it all goes smoothly, and I know you will be soo happy when its all done!! And I’m sure as nice as they all are, you can’t wait till they’re out of your house!! :-) LOL!
YoungHouseLove says
We have around 35 shots left this week plus we’re spending a full day shooting cover stuff (ahhhhhhhh! so intimidating) but we think we’ll get everything end of the week! We’re just hoping for good weather (rainy days slow us down because we have to light more instead of using natural light). Oh man, on one hand we’ll be so happy to have our house to ourselves again, but on the other hand we’ll miss them! Haha.
xo,
s
Darcy says
COVER STUFF — SQUEEE!! That is super intimidating — yet SOO exciting!!! Do you just keep saying to yourself — OMG – this is for the COVER of our BOOK! That is really being published, and is going to be for sale — OMG! OMG! OMG!!
That is literally what would be going through my head!!!
Saying prayers for no rain in Richmond!
YoungHouseLove says
Ahhhh- you’re freaking me out! Haha. Just kidding. It’s definitely intimidating, but you’re so cute for making me smile.
xo,
s
Darcy says
Hi!
I’m so glad that I could return a smile …You guys give me one daily, so I am so happy to return the favor!
OK — this is my last comment of the day — you’re busy, so no more from me! I promise!
Leanne says
It’s amazing what crown molding can do any room!
Greg Smith says
I tried open shelving in my kitchen. All the dishes ended up with a layer of dust and cat hair glued on with residue of smoke and grease from cooking. Having the dishes for practical use means a lot of rewashing.
YoungHouseLove says
Thanks for the info Greg! We actually did some research before taking the plunge (more on that here) and so far it has been great (even with 7 people using the kitchen thanks to the book photography crew). Perhaps it’s having a cat or not having a strong enough range hood that makes the difference? We’ll definitely keep everyone posted over time and change the entire room if open shelves don’t work for us for the long haul!
xo,
s
Abby says
AAAHHH!!! I can’t tell you how much I love the open shelves! The colors….the backsplash…I die. Another younghouselove win. I would expect nothing else. :)
YoungHouseLove says
Aw thanks Abby! You’re sweet.
xo,
s
Crystal says
You guys are doing a great job with the kitchen – the whole house really. I can’t remember exactly when I found your blog but I check in often to see the progress. Makes me incredibly grateful that I’m no longer in my 20’s-30’s when we moved with hubby’s job every 2 years and had to cram 5 years of redecorating/upgrading houses into the first 2 months so we had time to enjoy before packing up to move again. Good times – ha, sometimes NOT. But now I’m much older – much wiser in as much as I can hire it all out now and maintain my perfect manicure infinitely longer :) But all kidding and reminiscing aside – where is that amazing Aubergine Jarvis? Does he not have a place in this gloriously crowned room? He has to be my most favorite accessory ever.
YoungHouseLove says
Sweet Jarvis has been in the bedroom due to book photoshoot chaos, but I think he’ll end up back in the kitchen eventually!
xo,
s
Elizabeth says
Forgive me if you already answered this, but did you caulk along the bottom of the moulding where it touched the tile?
YoungHouseLove says
We did that where necessary (ex: if the wall was wiggly and there was a big dark shadow we’d caulk it). Hope it helps!
xo,
s
Christina @ The Frugal Homemaker says
Have loved that you have sort of had a series in all these kitchen posts. I have found myself ANXIOUSLY awaiting the next one to see the next change you were making. Sometimes, felt a little sad when one ended and I REALLY wanted to see the finished product (I am sure not has much as you guys!)
It is really looking nice! I was just going to ask if you were going to do some kind of window treatment so glad to see you are considering it. some bright yellowey or cheerful print would be so fun!
Krystle @ ColorTransformedFamily says
It looks great! I am looking forward to adding crown molding to our bedrooms. It really puts the finishing touches on a room. My favorite kinds are the less bulky ones like yours. Especially in older houses since usually you have to work with an 8′ ceiling height.
Natalie says
It looks great! A hint for you that will save you tons of time and effort if & when you decide to install crown molding in Clara’s room:
Paint your crown to complete finish coat and install carefully using a nail gun (you can rent from Home Depot if you don’t own one and it’s so worth it! – For around $150 you can buy one with the compressor and you will wonder why you didn’t have one all along!) so as not to muck up (much simpler when you are doing a square room). Then, all you need to do is fill the nail holes with the spackle that starts off pink and turns white. Once it dries wipe off excess with a damp cloth and your crown will look perfect – no repainting required. Finish with caulk.
We learned that trick from a friend of ours who installs crown professionally and it really works. Not having to repaint saves TONS of time. :)
YoungHouseLove says
Love it! Thanks for the tips Natalie!
xo,
s
Sarah S. says
Beautiful!! Great job!!
Tania G says
I see you all are fans of the stacked apothecary jars too!! I have like….5 of them. How sick is that? I just LOVE them!!
YoungHouseLove says
Haha, they’re addicting!
xo,
s
Ramona says
How about using a couple of Sue the Napkins for a window treatment?
Your kitchen is beautiful. I love seeing the before and after pictures each time you do something. I can’t wait to see it all done!
YoungHouseLove says
Aw thanks Ramona! That definitely could be fun!
xo,
s
Khia says
Awesome job on the crown! I just got finished doing my very first crown project in my hall bath and needless to say, it was a very ambitious undertaking. I chose not to cope the corners because I got so annoyed and ended up cutting everything on a 45 degree angle…all I can say is thank goodness for caulk and paint!
Can’t wait for the floors/dishwasher. I know your finished product will be amazing.
BS says
Looks great…you’re sooooo close!!! I can’t believe you did all of this in 3.5 months–it’d take me 3.5 years! :)
On an semi-kitchen related note, are your greenware Cuisinart pots/pans from John’s bday/Christmas a few years back still holding up well or have you purchased new cookware? If they’ll still in good shape, do you use them regularly? Any pros/cons for me as I’m considering investing in “green” cookware (I cook A LOT)? Thanks!
YoungHouseLove says
Yes, we still use them whenever we cook! They’re not 100 mint looking (some dings and scratches) but that’s usually what our pots look like!
xo,
s
Shelby says
This is turning out so freaking awesome! I’m totally in love with the open shelves and the color scheme. Where did you get the glass jars/canisters to the right of your stove? Looks like they’re housing your sugar and flour. I love them!!
YoungHouseLove says
Those are from West Elm a while back (2007!)
xo,
s
Katie @ JKHomestead says
Finishing details like crown make everything else that much more beautiful! Excellent job!
And now for a completely random side question – is there a reason you guys don’t watermark or in some other way mark your personal photos with your YHL logo/blog name etc. I noticed most bloggers do this now and I was just curious from your “professional” blogging experience why you don’t. I’m trying to decide if it’s worth the extra time/expense of doing this to all my photos. :)
YoungHouseLove says
Great question! The answer: we’re really not sure! Haha. We like the look of a pic without a watermark, and our readers are generally great about telling us when someone is using an image without our permission so I guess it saves us time to spend on more projects and our images don’t have any writing on them? We also figure that watermarks in the bottom corner can always be cropped out, and we’d never want to put one right smack in the middle of the pic, so maybe we think there are ways of getting around them if someone is really determined anyway? Hope that makes sense!
xo,
s
Jessica says
OMG!! How fabulous! I think I might’ve drooled a tad! ;)
I do have a head scratching {weird} question? Where is your cabinet handles from? I’m pretty sure we have the same ones… I need 4 more in my kitchen…for a cabinet we just put in… {ours were here before we were!!} Thanks in advance!
YoungHouseLove says
It’s from myknobs.com and I believe the maker is Amerock? Hope it helps!
xo,
s
Megan says
I have never been a fan of bright and white kitchens, but this has COMPLETELY changed my mind! I absolutely love your kitchen makeover and now I’m torn on what to do with ours! Planned on dark cabinets with no open shelving, but now my concept has done a 180. Love your blog and look forward to reading it daily :)
YoungHouseLove says
Aw thanks Megan! So sweet of you to say.
xo,
s
Kate says
Oh man I can’t wait to see it with the new floors!
Emily says
If it makes you feel any better, we finally got most of the baseboard installed this weekend from our ongoing hardwood floor project. We started it, oh, 2 years ago! Haha- one more closet to do and some caulking and painting and that project will finally be finished! Little ones definitely slow you down!
YoungHouseLove says
Aw, it sounds like you’re moving right along!
xo,
s