Mission: Finish installing crown molding around the rest of the house (with the nursery done, we still had the guest room, the playroom, and the hallway on our list).
Status: Complete.
And thanks to the magic of the internet, something that took us about two weeks on and off, will appear to have been done in two seconds. Behold.

Yep, as I mentioned in this post about hanging crown in Clara’s nursery, it ignited a burning desire to install crown in the other main areas of our house that were oddly missing it (our bedroom had it but the other bedrooms didn’t, one hallway had it but the other one that was connected to it didn’t, etc).
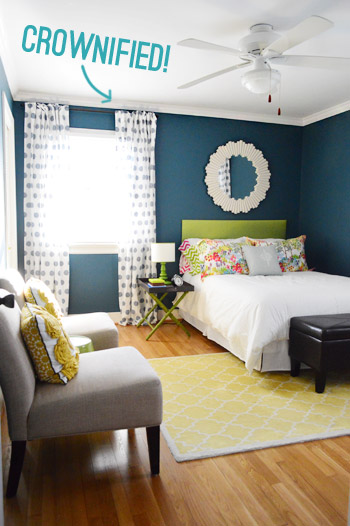
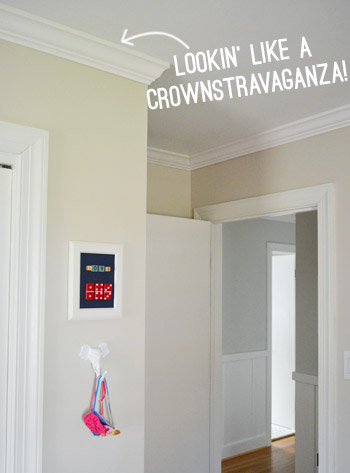
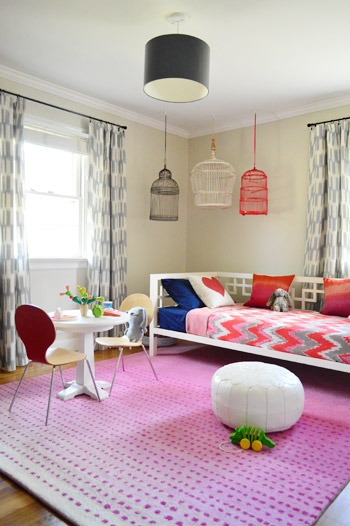
So we finally got it done in the guest bedroom (see above), Clara’s big girl room (see below)…

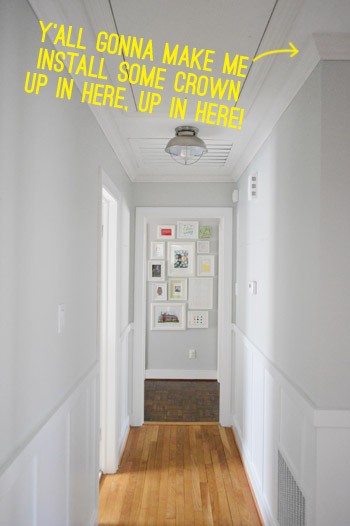
… and even the recently-board-and-battened hallway that connects them all (which was especially helpful since it leads to another hallway that has crown already).

Although it took us about five days of on and off work to install, once we got the hang of it, it wasn’t nearly as mentally strenuous as it was physically (arms over your head holding an eight foot board up for a few days in a row = tired). Our total cost for all four spaces (guest room, Clara’s nursery, playroom, and the hallway) was $218, including the pack of nails for our nail gun, which breaks down to $54 per zone, although some areas like the hallway were cheaper than the bigger rooms.
And while it’s kind of hard to illustrate the difference in pictures, in person it’s easy to see that all the time, arm-fatigue, and loot was worth it. Every room looks noticeably more polished, but in that “I can’t really put my finger on what’s different” sort of way. In fact you saw a lot of the molding installed in our recent house tour video, it just wasn’t painted yet, so we finally got around to that. Which involved a lot more of the whole arms-over-our-heads things, but it looks great now that it’s done (we used Benjamin Moore’s Decorators White in a semi-gloss finish).

Since we already did a photo tutorial of the crown installation process, we decided to use this portion of the project to make a video for you guys (sometimes DIY videos can be less intimidating than trying to digest typed out words and pictures that can’t always show every last angle like a video can). We tried to cover every single step and cram in as many little tips and tricks as possible along the way for you guys. Seriously, you can do this. So from measuring your angles all the way to caulking the gaps, it’s all here:
]
Does anyone else smell Oscar? No? I’m not talking Best Picture – I mean Best Supporting Actor for the role of “intense bird screaming in the background while filming” during the outdoor sequences. Ah, spring.

John says
Don’t stop there John, do you porch, garage and man cave!
YoungHouseLove says
Haha! Don’t tempt me…
-John
Caitlin says
Alright, one more question! :) So we had the popcorn ceilings removed in our house and there are still tiny bits of painted over (so asbestos firmly sealed in) little popcorns in the corners where the wall meets the ceiling. If we were to install crown, would it be a problem that the corner is uneven due to those remains? Or would that area be floating in the “space” behind the crown? Does my question make sense? :)
YoungHouseLove says
That corner would be covered by crown I think (there’s a little reverse triangle of negative space behind the crown so it should be all sealed away. Then some caulk in the corners should have it nice and seamless :)
xo
s
Lisa says
Great tips! If only this video was up 2 weeks ago–unfortunately we learned all these things the hard way. But at least it’s up. One room down…
Robyn says
Looks loveyly! Crown is such a nice finishing touch!!
Peggy McKee says
The molding (moulding?) is great–detail really helps! This brings me to the squared-off columns.
While I understand that you did not like the turned columns, IMHO the squared-off columns would have looked much better if the fascia had been 1/2 inch (or even less), thus allowing for 1/2 inch (or more) of trim.
Your fireplace surround is a perfect example of how good something looks with trim. Especially outside, those little shadows created by trim make a big difference. I know the column placement doesn’t give you much to work with, but I really think you should reconsider the flat look.
Good luck. Peg
YoungHouseLove says
There are four other columns in our carport that are the same design (no extra trim) along with many other ranches in our neighborhood with the same columns, so we’re happy to stick with the standard squared off look that mid-century ranches are known for (craftsman homes are more known for adding trim, so we’re cool to stay true and “ranchy” with ours). Hope that makes sense :)
xo
s
Laurie says
I think your crowning project was the smartest thing to do. You are right, it looks a lot more finished and it is the kind of detail they call out in real estate listings so it adds value.
I have a little 70s ranch house that has quite low ceilings (8ft maybe) and the ceiling and walls have that slight texturing they slapped on all the walls in the late 70s/early 80s. Does crown molding look OK against that? And does crowning a low ceiling look good or bring it further down on your head? I’d love to hear what all y’all think. I’ve wrestled with this idea for years.
YoungHouseLove says
Oh yes, as long as you caulk the edges I think it’ll look great! We have 8′ standard ceilings and it seems to draw the eye up and make things look taller (thankfully nothing feels more squat :)
xo
s
Rachel says
Thank you for the awesomely detailed video!! My husband and I have talked about doing crown molding for a while now but have been super nervous to do it ourselves! But maybe since we have just finished our first official diy project with our kitchen backsplash, our confidence is boosted enough to try the crown molding with the help of your video :)
YoungHouseLove says
Good luck Rachel!
xo
s
Sarah Zepke says
I am such a visual person, and that video was excellent for me! And, I too John, like being in the know of such terms as the ‘spring’ angle hee hee :) Thanks so much!!
YoungHouseLove says
Happy to help Sarah!
-John
Tiffanie says
Hi Petersik family!
Love the crown molding! The outcome is polished and fantastic! Related question for you: we have quirky angled ceilings throughout our open concept house. In other words not a single room in our house has all four walls that are the same height, many many angles (sigh). We LOVE the look of crown molding but just don’t know how it would look running at upward and downward angles versus nice pretty 90(ish) degree angles. I know this probably has a lot to do with personal preference but I really appreciate ya’lls “design eye” and would love your weigh in :)
Thanks so much for your time and sharing your life/projects with us!
xoxo-Tiffanie
YoungHouseLove says
Hmm, I would check out sites like Pinterest and Houzz to see if you can find rooms with angled ceilings that you like – then study the things they have going on (maybe they have exposed beams or beadboard on the ceiling or some cool ledge to fill the angled space?). I haven’t seen a lot of crown in rooms with angled walls that I can think of, but they might be out there on those sites I mentioned :)
xo
s
Peggy McKee says
Question–in the video was John standing on a ladder–or scaffolding? If scaffolding, can you post a photo of it? Many thanks.
YoungHouseLove says
Just a step ladder :)
xo
s
Ellen says
Where did you guys get the yellow rug in the guest bedroom? It would look perfect in my green and yellow kitchen.
YoungHouseLove says
That’s from Pottery Barn on clearance about 4 years ago. I think it was called the Moorish Tile rug. Maybe try ebay?
xo
s
Carolyn says
As a huge DMX fan I just got to give you love for the referance. And, duh, the crown looks fantastic.
YoungHouseLove says
Where my dogs at?
xo
s
Jennifer T. says
WOW! Really, really great tutorial! This JUST may convince my DYI-phobic hubby to give it a try :) Thanks so much for your time & efforts. (BTW, we live just down the road from you, outside of Charlottesville, in Crozet, & I just love seeing your sources for all of your great finds. I’ve got a huge list of places to hit in Richmond, just as soon as I can arrange for a day-long chunk o’ childcare for my kidlets.)
YoungHouseLove says
Thanks Jennifer! Good luck with your projects – and Crozet is beautiful!
xo
s
Koliti says
DIY Super Heroes: John & Sherry Petersik
Super Powers: Kreg Crown Pro and Nail Gun
Undercover Project: The Crowning Touch
Arch Enemy: Gaps & Cracks
Secret Weapon: Caulk
Ok, “Youngsters”, take your capes off and go eat a plate of tacos – you deserve it!
I’ll expect more amazingness tomorrow – there’s always more DIY crimes to solve!
YoungHouseLove says
Hahahahahah!
xo
s
Jeanine says
Something about a nail gun really gets the work moving, huh?!
I used mine to staple down a huge carpet remnant on the garage stairs yesterday and it was awesome!
btw, Clara needs this in her room: http://www.ikea.com/us/en/catalog/products/00233783/
YoungHouseLove says
Ooh that’s CUTE!
xo
s
Katie says
Great video! You guys amaze me…you make it look so easy but that’s way too much math for my brain to handle! Haha :) I didn’t notice the crazy bird noises but I did see that when you were in Clara’s big girl room it was 12:05 but it was 8:50 when you were outside! I’m guessing one of those clocks isn’t actually set :)
YoungHouseLove says
Haha, I think the outside clock was off! That needs new batteries :)
xo
s
Leisa says
When you said “don’t mind the loud bird in the background” I thought you meant Sherry! (In the nicest possible way of course xx)
In the UK bird is a word for women. Ha ha :)
I wasn’t expecting an actual bird.
YoungHouseLove says
Hahahahh! Comment of the day for sure.
xo
s
Jenny says
Holy schmokes, you’re both my heroes. When you guys first took on crown molding, I made a comment about my husband (who’s normally the “I can totally do this” type) and his crown molding woes/cursing/frustration/throwing in the towel…so seeing the completely finished house and your how-to video gives me tremendous hope that he’ll give it another try in the future. Our bedroom and living room have vaulted ceilings, so he’d only have to take on an extra bedroom, hallway, bathroom, and office. Oh, and our entire basement. No big deal, right? ;)
P.S. My husband always laughs because I can never pronounce the word “caulk” correctly either. I tend to say “cahhlk” or “cowlk” or…well..you know. He recently gave me a tip: just think of the star of ‘Home Alone.’ So, no lie, I imagine saying Macaulay Culkin’s name each time I have to say it, and “caulk” is magically pronounced normally! And by normally, I mean that only weirdos think about circa 1990 child stars when talking about home improvement projects…
YoungHouseLove says
Haha!
xo
s
Valerie says
Hey I was wondering if I could get some advice from you guys. We would like to install crown molding in our house, however Our main living area has vaulted ceilings. Can we Install crown molding on vaulted ceilings? Or does that just look silly. Thanks!
YoungHouseLove says
I would look around for inspiration rooms online (on Houzz or Pinterest) with vaulted ceilings and see if you see anything you like. It’s hard to picture without photos to base things on sometimes :)
xo
s
Cara D says
THANK YOU!!!!! This is a great video. I have been wanting to attempt crown and now i think I can do it. Thanks so much. The rooms all look great.
YoungHouseLove says
Thanks Cara! Good luck with everything!
xo
s
Donna says
Looks like you made good use of your Kreg Crown, John! Aside from that nifty tool, do you have any other favorites? I would love to surprise my husband with a couple good tools for Father’s Day ( he’s pretty handy ), but I have no experience with them.
YoungHouseLove says
I love my Kreg Jig, my miter saw, and my Kreg Crown pro. I also think our laser level is really handy.
-John
Chris says
Fellow ‘Hoo,
Big fan of the site. A couple extra crown molding tricks: 1) use a coping saw and notch out the back of your corners to get a really tight fit. Caulk is everyone’s best friend, but if its stained/finished wood you can’t caulk it and need a tight fit. 2) You only need to miter one end of each piece. So start with your longest wall and put up a piece that has flat cuts on both ends. Then miter cut and notch out the next piece that goes into that joint, leaving the opposite end of that board flat. Work your way around the room, and the last section needs to be mitered on both ends.
Email if you have any questions, would love to talk more.
YoungHouseLove says
Thanks for the tips, Chris!
-John
Mel says
Great tutorial, it was so easy to follow. One thing that interested me is what your crown moulding is made of, in Australia ours are all plaster but yours looked like wood. Also did you have to touch up the wall colour under the moulding due to the caulk?
YoungHouseLove says
Oh yes, ours is made of wood, although it also comes in other materials like foam to make it extra light, etc. We did have to caulk under the molding in just a few areas, which meant touching up some wall paint, but most of the cracks and gaps were above the trim, which just meant caulking and smoothing it out (thankfully that blended with the white ceiling really well :)
xo
s
megan says
so impressive!! you have inspired me, again!!
Katie H. says
Oh man, where was this a few months ago?? We installed crown molding in a few of our rooms totally by trial and error. This was before we had the nail gun and miter saw so we used a miter box and a good ol’ hammer. My husband gets all the credit for figuring out all the angles. I still keep finding little pieces around the house that he used as guides for which way a certain angle was supposed to go. We will definitely review your video the next time we want to install more! Thanks!
YoungHouseLove says
Oh yeah, that’s definitely the hard way! John did some of the kitchen molding last year that way (nail punch and all) and it was killer! Especially figuring out the angles. Congrats to your husband!
xo
s
Donna says
A room without molding is like a lady without eyebrows. You have done a masterful job of completing these rooms! Thanks for all your inspiring posts.
YoungHouseLove says
Aw thanks Donna!
xo
s
Ali says
I never thought about it until we bought this house, but I love crown molding! We have it in the living room, dining room, and family room, but I want to put it in the bedrooms. What do you think about crown molding in the bathroom – weird? My husband and I disagree about this. :)
YoungHouseLove says
Haha, I think it could be great! I’ve definitely seen some dream bathrooms with crown molding on Pinterest!
xo
s
Lorna says
Awesome video! Unfortunately it came too late for the previous owners of our house. When we moved in, there was crown molding throughout the house, but in perfect keeping with the hideous, dark, man-cave (ancient cheap paneling) house-wide decorating theme, it was nailed flat to the walls!!! It was proper crown molding (albeit non-glossy and stained dark reddish), but installed like baseboard, just up by the ceiling. It was so comical – and such a tragic waste!
YoungHouseLove says
Oh. NOO!
xo
s
Marc says
I’m installing crown as part of dressing up our dining room (along with chair rail and wall frames) – it is definitely easier than most people fear it to be and I would encourage anybody that is considering it to give it a try.
Did you consider coping the corners instead of cutting at angles? Coping eliminates the whole measuring and calculating angles problem and also makes the two pieces of crown match tighter in the corner – reducing the need for or eliminating the need for caulk.
YoungHouseLove says
We did, we actually tried that method back when we did molding in the kitchen, but prefer the miter saw method sincewe weren’t always the best at coping (it usually called for a lot more caulk).
xo
s
lauren says
Thanks so much for this post! Our house lacks crown molding and I feel the house looks unfinished. This will totally be our next project!
Jennifer says
We’re about to embark on a crown molding project so I’m sure your video tutorial will come in handy, great timing! Love the DMX reference (did anyone else catch it? didn’t see any DMX fan shout outs as I scrolled thru comments)… Did you see DMX on an episode of Fix My Life with Iyanla Vanzant? Man, that dude really lived up to the lyrics of that song; he truly lost his mind. Hot mess. You should google it.
YoungHouseLove says
Oh man, now I’m going to google it!
xo
s
Tipling says
My husband and I are actually tackling the crown in our house this week. Your posts have been extremely helpful so thank you! And we bought the Kreg :). Quick question, our very last piece, a left outside corner, just will not match up, it is almost as we worked our way around the room, the angle of the wall to the ceiling changed. Did you experience any issues like this and do you have any fixes? Thank you!
YoungHouseLove says
Hmm, we didn’t seem to have that issue except once when our Kreg Crown angle slipped. So I would check the bottom to make sure the angle on the back is right and the bolt is nice and tight. Other than that, maybe just pushing it as hard as you can to get it into place and using caulk to cover any small imperfections?
xo
s
ktowles says
Thanks! One of the best step by step videos i have seen.
YoungHouseLove says
Happy to help!
-John
Jennifer says
What color is that shade of blue in the first pic (crownified nursery)? What brand?
YoungHouseLove says
It’s Plumage by Martha Stewart (at Home Depot). Hope it helps!
xo
s
Jenise says
Hi, I love your blog (it’s my naptime indulgence!) and always enjoy the projects you tackle. I’ve never actually commented before, but I’m wondering about your trim paint color. I’m thinking that I remember you used to paint all your trim with out-of-the-can-white, but I noticed a little while back and also in this post that you used BM Decorator’s White. Why the switch? And did you go back and repaint any trim that was out-of-the-can-white? The trim in my house is currently painted 3 or 4 different shades of white I think, (thanks to previous owners) and I’ve been trying to figure out which direction to go, how much I have to repaint, etc. Thanks a bunch!!
YoungHouseLove says
Oh yes, we just found that BM has the best coverage, so it’s very close in color to out-of-the-can white but only needs one coat in places that Olympic/Glidden needed two. Hope it helps!
xo
s
Ali says
I have to tell you how inspiring you were…I’ve wanted crown forever in our house. Seeing the Crown Pro and how easily you used it made me determined. My husband went camping two weekends ago and the night before he left I cuddled up to him and said “do you mind taking down the chop saw and stand and the nail gun?” He was less than excited, but since I was so great about him going to the woods for a few days, he complied. I figured I could do the powder room before he got home. Bam. I did ALL THREE bathrooms. This weekend I did the dining room! I love you guys and hope you come to Denver!
YoungHouseLove says
Wahoo! That’s awesome!
xo
s
Erika says
Crownstravaganza . . .
*snork*
Looks beautiful though. I wish I could put that up in my rental, alas, but I’m grateful I’m at least allowed to paint in colors of my choosing.
Veronica says
We just did crown molding in our den remodel. We have a split level house and one of the walls in the den ends at an opening for a stairway going up to the kitchen. We ended the crown molding with a standard return but I think it looks funny. Are there other ways to end crown molding in situations like this? I’ve googled to no end but have come up empty handed!
YoungHouseLove says
Oh Ive seen a pin on pinterest about how to end crown molding and it’s basically a vertical piece of molding you put in to cap the whole thing at a corner or along a wall and it really looks finished! I’d hunt around for that pic over there. Hope it helps :)
xo
s
Erin says
Wow! I’ve been on vacation so I’m playing catch-up on all of your posts… I’m so glad you guys posted this video! Crown molding is pretty intimidating but now it seems easily do-able! My dad is a licensed builder (for personal use in our family rentals) and he is very anti-crown because of how complicated the corners can be. I’m wondering if you had any areas that you did an out-facing corner? Does that make sense? Was it just as easy as the inside corners? I’m excited! Thanks again!
Cara D says
I have a quick question about crown. I am currently working on two built in bookcases each in a corner of a room. There will be a built in window seat between then. For now I was planning on just putting crown on the bookcases which go all the way to the ceiling. I just wondered if I later want to put crown in the whole room do I have to take it off the bookcases or can you just join up to it. Hope this makes sense.
YoungHouseLove says
You can just join it later, assuming it’s the same type/thickness :)
xo
s
Cara D says
Thanks so much! That is what I was hoping. I haven’t done crown before but really want to do my whole house eventually. Your tutorial video was wonderful. Right now though I have so many projects going I only have time to put crown on the bookcases!