After excitedly declaring “the hardwood floors are done!” just in time to move in, we got a bunch of requests for a follow up post with details about the “tricky stuff” like how we handled transitions, cutting boards shorter, cutting them thinner, how we addressed the top of the stairs, and how long it all took. So let’s dive back into floor world for a second. The entire floor-laying process took us about 6 days from the placing of the first board to the nailing of the final strip of quarter round. Sherry was able to help me for some of those days, but other days were just me myself and I while Sherry was back at the old house with Clara (to keep her out of the sawdust).
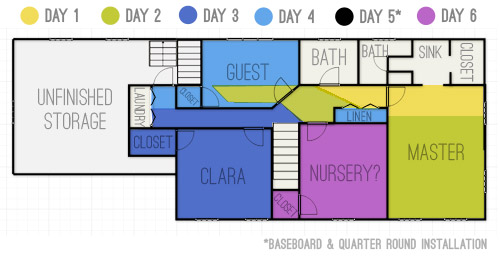
Note: Some days were shorter and tackled solo while others were mega-long with two of us working, so take this little graphic with a grain of salt, and know that four hands are faster than two.
Day 1 was a pretty slow start because we were still finding our groove. But even once we’d found our rhythm slapping boards down, a flooring installation is still riddled with various side-tasks that can eat up a lot of time. Even having installed a floor before, we had mentally blocked out many of the non-laying-floor activities so some of them caught us by surprise again. Things like…

Getting Floors Clean: Since your subfloor needs to be free of dust and dirt, we swept and vacuumed each room thoroughly before we started on Day 1. But since the install was a messy process (more on that soon) we went over each floor again as we moved from room to room. You know, just to be sure.
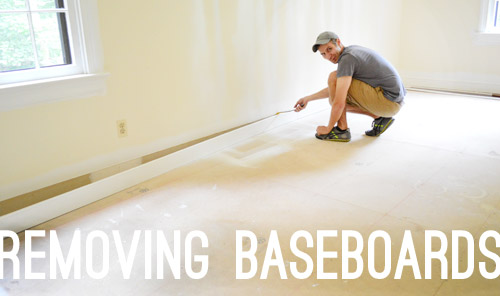
Removing Baseboards: As mentioned before, we ended up having to remove our baseboards before the install. It took a couple of pulls with a crowbar preceded by slicing a utility knife along the seam between baseboard and the wall to diminish paint peelage. It was a simple process but it can add up to a fair amount of time when we’re talking 4 bedrooms and a long hallway.
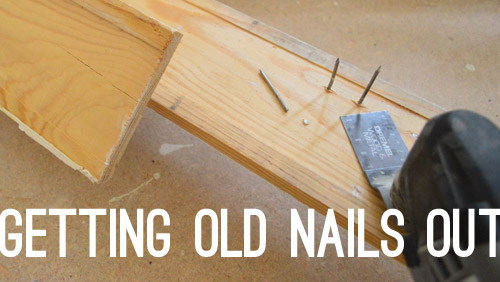
Getting Old Nails Out: Since we planned to reinstall the old baseboard, we wanted to get all of the old nails out so it’d be easy to sit them flush to the wall later. Rather than hammer them through the front (damaging the paint job), we found that our Dremel’s metal cutting bit sawed them off nice and flush.
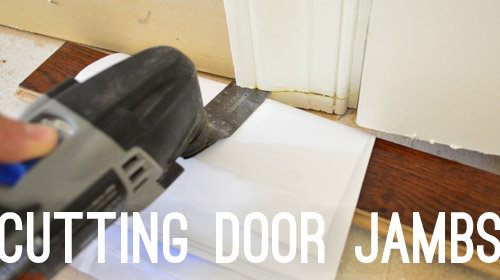
Cutting Door Jambs: Speaking of the Dremel, it was a life-saver when it came to cutting the door trim and jambs (all 12 of them!) so that the floor boards could slide under them, helping to create that seamless look between rooms. To determine the height of my cut, I used a scrap piece of wood (plus a scrap piece of underlayment) to rest my blade on as a guide. Oh and a scrap piece of paper just to protect the wood in case I needed to use it later.

Lifting Heavy Boxes: All of our boxes of flooring were downstairs in the dining room, so every hour or two we’d need to carry up a few more to keep ourselves well stocked in whatever room was being worked on. Since boxes can vary in color slightly, we always tried to grab planks from three different boxes at any given time. So whenever it was time to take a pause from leaning over flooring (our aching backs) to carry a few 60lbs boxes up a flight of stairs … well, it wasn’t really a break, but it had to be done.
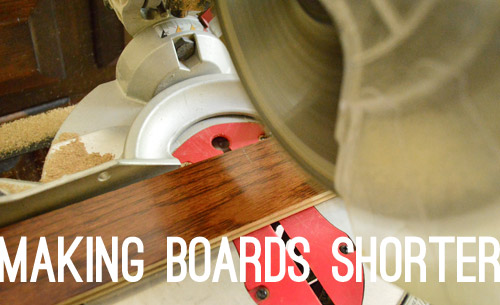
Making Boards Shorter: When you reach the end of a row of floor boards, you’ll probably have to cut the last piece to fit. We used our miter saw to make quick, straight cuts and whenever possible, tried to cut the end boards for 2 to 3 rows at a time so that we were minimizing time spent going back and forth.
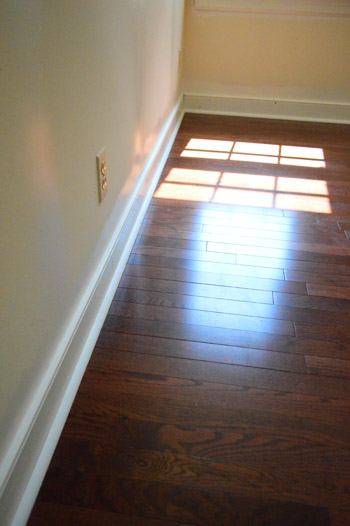
Since the ends of these boards would eventually be covered by baseboard and quarter round, we knew they’d all look flush and finished as long as they weren’t too short (you’d see the gap sticking out from the quarter round). It could also be bad if we cut them too long down the line (they’d still look seamless at first, but if they expanded when it got hotter, they could warp/shift) so we were careful to leave the manufacturer’s recommended expansion gap hidden behind the baseboard.
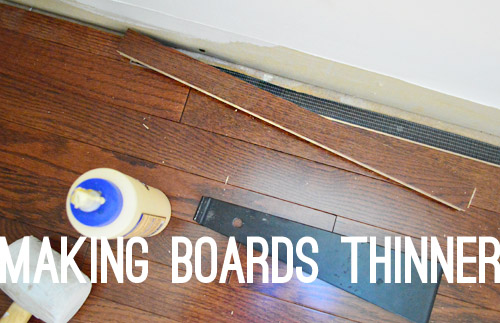
Making Boards Thinner: At the beginning or end of a full room, we often found ourselves having to rip boards the long way so that the last row would fit. To do this we used a table saw since it can make cuts of any length. Once again, we knew these would be hidden behind baseboard and quarter round, so it just came down to allowing for the recommended expansion gap.
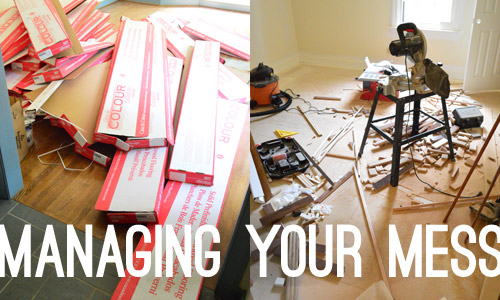
Managing Your Mess: With all of this cutting came lots of sawdust and scraps, not to mention empty boxes. We designated the spare-room/possible-future-nursery as the lowest priority (i.e. if we didn’t get it finished before we moved in, it wasn’t that big of a deal) so it became our cutting room. That way we weren’t hiking up and downs the stairs all week every time we got to the end of a wall and needed to make a cut. But when it came time to finish that room on Day 6, it meant we had to spend a good portion of Day 5 cleaning it up so it was dust free and ready for flooring.
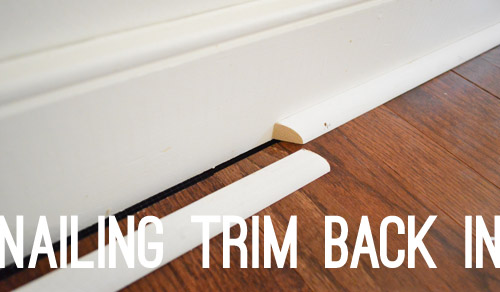
Nailing Trim Back In: As we hit Day 5 and all but the last room was done, I decided to reinstall the baseboard (and add new quarter round) in the other rooms so I had fewer piles of baseboard in my way (they were cluttering up almost every room at that point). Relying on my nail gun to reattach the already cut-to-size baseboard made the job pretty quick (maybe 2 hours?) but having to measure and cut the new quarter round slowed me down. In the end it surprised me that I spent an entire work day doing this, but it also was that turning point where the new floors finally came together and the rooms started looking a lot more finished.
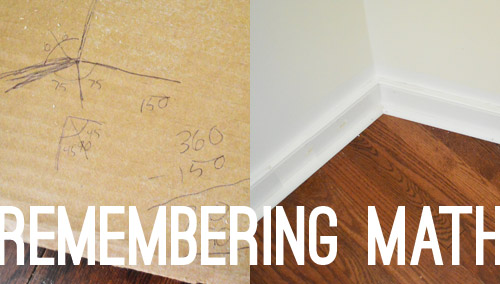
Remembering Math: We have the privilege of having an angled wall (which you can see better in photos like this). Which meant I got to conjure up some semblance of 9th grade geometry so that I could cut my boards and my quarter round at the right angle. I’m not even going to try to explain how I figured it out. I think there was a complementary angle in there somewhere. But it definitely wouldn’t hurt to have a calculator (even if it’s just on your phone) as well as a scrap piece of paper and a pen in case any unexpected math pops up during your installation.
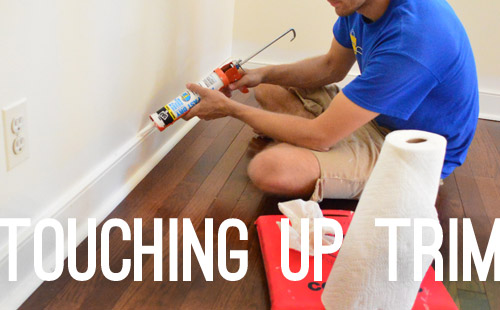
Touching Up Trim: Removing and reinstalling our baseboards banged them up a little in a few areas (kinda made us feel silly for so carefully painting them beforehand) but we were pleasantly surprised with how fast re-caulking the seam against the wall went, followed by some touch-up paint here and there. It actually wasn’t too bad. So the lesson we took from this was that installing baseboard and quarter round is the long part. The caulking and touch ups (if it’s already painted) aren’t bad at all.
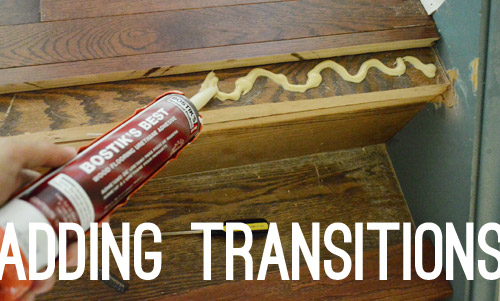
Adding Transitions: These are the spots where the new floor meets another flooring surface. Since we went seamlessly between all of the bedrooms we didn’t have too many of these, but that didn’t spare us from adding one at the top of the stairs. At the advice from the Lumber Liquidator guys, we cut off the end of the existing step (called a “bullnose”) and added some special adhesive to hold the new bullnose piece in place (which we purchased to match our new floor when we made our initial order).
We also followed up with a couple of nails with our nail gun just to hold that nice and steady. Here’s a shot where you can see the existing oak flooring on the stairs and our new floors at the top of the staircase. It’s not a perfect match, but it’s close enough. It’s less obvious in person than this photo, maybe because of the way light reflects on different planes and because photos look flatter than real life?
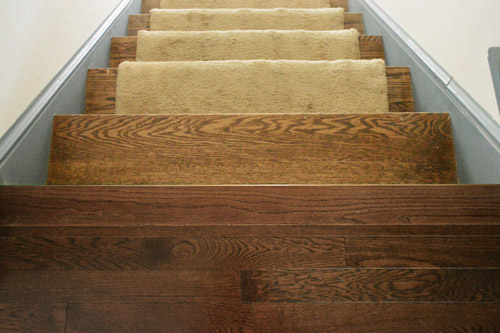
Once we had that bullnose piece at the top of the steps installed, the long journey of putting in the new floors was officially done. After which we furiously packed like our lives depended on it. No rest for a DIYer, eh? Speaking of which, that carpeting on the stairs gets the stink eye every time we come upstairs, so that’s definitely on the list…
Did any part of installing floors catch you guys off guard? Or are you working on another project that has “little” steps that seem to be more time consuming than you accounted for?
PS- Here’s the original post about how we laid our hardwoods for additional info about the underlayment, how we installed each board, etc.

Anele @ Success Along the Weigh says
Oh man, that made my head hurt. I know for expert DIYers like yourself and those who asked, it might not be a biggie but for someone like me, I think I’d be checking for the nearest floor installer! I wish I had your talent and more importantly, your patience!
Meredith says
I was thinking the same thing; specifically, “yep, I’d pay someone $4000 to do that”. :)
Tj @ Phunkblog says
Yes!!
Massively impressed you guys pulled this off yourselves and made it look so professional (& easy!!)
YoungHouseLove says
Aw thanks!
xo
s
Anne says
You guys deserve some sort of reward or award or both for this amazing project.
Josh says
Floors are the last part of our kitchen project. We’re getting there though!
http://bit.ly/11y8knX
YoungHouseLove says
Those counters are awesome! Love Chestnut too.
xo
s
Silke says
We were in stalling tiles in our new bathroom in our new (very old) house, and figured out that the floor was not entirly straight. So in the middle of the room, there is about twice as much glue underneath the tiles than in the corners. Luckily it turned out quite okay – the clue only caved in a little bit. But we manage to see the charm of our old wooden house in it :)
Loving the transition to the staircase, well done !!
Janette @ The 2 Seasons says
I’m looking at your floor plan, and you could have a much bigger laundry area if you rip out the closet on the right and put your laundry room door there at the end of the hall. Since you have already have a linen closet, you might not miss that closet, and your laundry room would be more than an area with doors at the end of the hall. Add a solar tube, which we put in all of the second floor closets/baths that don’t have windows, and it will change your life.
YoungHouseLove says
Oh yes, we considered that, but that closet is Clara’s (and the whole reason she picked that room). She loves it (here she is having a ball in there) so we don’t mind a smaller laundry room since we only use that once a week or so (and she hangs out in her room a lot more).
xo
s
Angel says
You could also just borrow some space from the storage area if you really needed a bigger laundry room. Personally I find I always fold laundry in the living room anyway. More room to spread out and you can watch TV while you do it. Big laundry room would be a waste for me.
Nadia says
Great idea! it would make it a real laundry room and offer more storage overall.
Sherry thought you meant the bedroom closet :-(
YoungHouseLove says
There’s another comment thread on this post with more info on that subject for ya :)
xo,
s
Larissa says
Wait. You only do laundry once a week? That’s almost more impressive than the gorgeous floors!
YoungHouseLove says
Everyone thinks that’s crazy but I think it’s just because we only have one kiddo and we work from home, so we usually all wear the same thing all day and then wash things at the end of the week.
xo,
s
Megan @ Rappsody in Rooms says
You guys are so great – hard working and so informative! I wouldn’t have thought of any of those things. But installing hard wood scares me – mainly because I don’t think I have the right tools. I am so impressed on how you got those floors done. Those must have been long, hard days!
YoungHouseLove says
Aw thanks Megan! In the middle of it I won’t lie, it was hard. But looking back we’d totally do it again. So worth the end result!
xo
s
Annabel Vita says
My current project full of a zillion unexpected steps is our wedding next weekend! I can’t believe how many tiny details and logistics there are…
I was curious about how you finished the floor boards around the post at the top of the stairs – was it just little bits of quarter round?
YoungHouseLove says
Oh yes, great question! Wish we had a pic of that. It’s small pieces of small wood trim that met with mitered corners to look nice and clean.
xo
s
Constance says
I continue to be impressed that you did this all by yourselves! A couple of questions:
1) I see in the “remembering math” photo that one corner (pic on the right) looks like the flooring is laid diagonally but I don’t see any diagonally laid pics anywhere else. Are my eyes tricking me on that one?
2) From the graphic you made at the top of the post, it looks like you did not lay down hardowodd in your master closet, but you did in the other closets. Other plans for that area?
YoungHouseLove says
If you follow the link in that blurb under the pic you’ll see the angled wall in the hallway, where the planks are laid straight (they just hit that angled wall at an angle since it’s not parallel to the hall). As for our closet, there’s a sink nook and a bathroom as well as that closet that we’re planning to join/combine, so we think we might carry the new flooring (tile perhaps?) into all of those spaces so it has a more seamless and open feeling.
xo
s
Janette @ The 2 Seasons says
Whoops, forgot to tell you. Since you would be ripping out the guest room closet, you could build closets and a window seat on the window wall.
Janice says
I totally agree with making the guest room closet part of the laundry room, and moving the door to it with the closet starts now. Bonus – it would make the hall much shorter. Great idea.
YoungHouseLove says
Maybe I’m just a hallway geek but we don’t mind that it’s long. All of the lights lining it and the angled wall are so nice. In our area, removing a closet from a bedroom means it’s not counted as a bedroom anymore. So for resale we’d be going from a 4 bedroom house to a 3 bedroom one for a larger laundry room, which isn’t really something we care about (our last house and first house also had tiny laundry spaces, but as long as they’re open and conveniently located, we’re down). I think it’s definitely a personal preference thing though! My sister in law would kill for a larger laundry room. Haha!
xo
s
Heather says
Where I grew up, a bedroom (for child custody purposes) is any room with both a window and a latching door, closets not withstanding. For realty purposes, it just has to have a latching door and be above basement level–a house with four bedrooms in a basement and one upstairs is a one bedroom house. I don’t know if there were any square footage concerns for realty purposes.
One apartment we looked at had an “office” which was no more than a walk-in closet since it opened into the master bedroom (which also had a regular non-walk-in closet and a connected bathroom), but as it had a window and a door we were allowed to use it for the munchkin’s bedroom. It was big enough for a twin bed, her play kitchen, a dresser, and toy box with plenty of room to play, with bonus: No risk of her sneaking out of her room and bothering the roommates by getting past us!! But as it wasn’t connected to the hallway, they couldn’t bill it as an extra bedroom. I still wish we’d gone for that apartment, but it had too many stairs for my poor knees to handle.
Brit [House Updated] says
Nice work Petersiks! But sounds like you guys face the DIY denial that keeps me going too – thinking everything will be faster and easier and use fewer tools than it ever does in reality! Great job powering through this one (yes, I can be punny).
YoungHouseLove says
Haha, it’s true! On one hand we’ve learned that everything takes longer than you think in theory, but when we dive in we’re like “let’s knock this out! I bet it’ll go fast!” – total denial.
xo
s
Lizzy says
Great job with the floors! My Type A personality LOVES a good “John post”.
:)
Tiffany says
So excited to see your transformations! I’ll be along for the ride as we just bought a house yesterday, and boy does it need some love! Original owner of 46 years and she kept it in great condition. Has the original kitchen and everything in the bathroom is purple. Love the potential. Can’t wait to finally put your tips to good use! Can you tell I’m excited! haha. Thanks guys, keep up the good work!
Janette @ The 2 Seasons says
No, I’m talking about the closet in the guest room – not Clara’s closet.
YoungHouseLove says
Oh we need that one too I think (it’s full of my gift wrapping supplies and craft stuff and sewing stuff since I want to use that room not only as a guest room but as a craft/storage room for stuff I use a lot). Of course who knows where we’ll end up, so it should be fun to see where things go over time!
xo,
s
Cindy_FearlessDIY says
I know in my county, to be considered a bedroom a room must have its own framed in closet. If you did eliminate that closet it would mean you could no longer call that room a bedroom (at least here where I live) which would very likely negatively impact the overall value of the home. Another added bonus for a smaller laundry area is that you don’t have anywhere to PILE dirty laundry…of course I never do that here in my home…;-) Ha!
Great job on the flooring, Petersiks! It looks beautiful! I’m so glad you tackled this project as it’s also right at the top of my list, too. Time to get rid of our disgusting carpet – happy happy happy to get that stuff out of here! :-)
Rene @thedomesticlady says
When we did our whole main floor the thing that got us was having to change the direction we were laying the tongue and groove. Thankfully the guys at our local lumber supply told us about slip tongue. Made our floors seamless. Love it !
YoungHouseLove says
So smart!
xo
s
bethany says
Mega DIY props for taking on this project. Holy moly.
Allison says
I for one am totally impressed. Laying floors is not easy. I watched my laminate floors go in and don’t think I could handle that myself, say nothing about hardwoods.
I’m so excited to see what else you do to this house! The transformation of the hallway is already remarkable!
Adrienne says
did you guys allow time for the flooring to acclimate to the rooms? we are laying hard wood in the next week and are wondering how long to allow for that. we may just buy a moisture meter to be able to check it?
YoungHouseLove says
Oh yes, it’s so important! We did a full week of it just in boxes acclimating for a while (our boxes were cardboard so we didn’t have to open them, but we did spread them out so there was lots of air moving around them and they weren’t one big stack). I’d just ask wherever you buy them what the recommended acclimation time is and they should be able to look it up!
xo
s
Asia says
Laying hardwood is so much work. Your post makes it seem so easy and straightforward, lol. I guess it is but it’s tedious.
Mary | lemongroveblog says
We are just starting the refinishing process on our floors, so I hear ya on the work load! At the end of the day, it is super gratifying to have beautiful new floors to gaze at! Yours look awesome!
Tracy says
If you were also installing the woods into the bathrooms, would you have used seamless transitions there? Asking because we did an ensuite with laminate wood (so yeah, different – floating floor) and we decided to make a hard transition, even switching the way the boards were laid. We did this just in case we’d ever encounter water damage in the bathroom. If the floor would ever need to be ripped out, we wouldn’t have to worry about tearing out the flooring into the bedroom. I guess the fact that the floor floats would mean a large amount of water could get under the bedroom flooring anyway!
But just curious if you would have made seamless transitions into the bathrooms?
YoungHouseLove says
I think we generally like a seamless look, so if we were carrying flooring into a bathroom we’d go without a transition and keep it running the same direction if possible.
xo
s
Samantha says
This might sound funny but I’m pretty sure all of the quarter round in our house was installed in the other orientation from yours (taller flat end against the baseboards). Is there a “right” way to install quarter round?
YoungHouseLove says
Oh that picture looks funny and long because it’s cut at an angle (it’s a scarf joint, so that’s not a normal cross-section). Ours is actual quarter-round molding, so it’s just a quarter of a circle (no taller than it is long) but there’s also shoe molding, which is longer on one side and shorter on the other side, which it sounds like you have (and I think it’s right to put the longer part against the baseboard so you’re good in that regard! Haha!)
xo
s
Morgan says
We are renovating our only full bathroom…by ourselves. We saved a bunch of money on the materials with craigslist, habitat restore, materials from other projects, and using goof paints. We certainly underestimated the time that each step would take…Three weeks without a shower builds character…luckily we can shower at the gym!
YoungHouseLove says
Oh my gosh we remember that from our first house’s bathroom reno. It was winter and I was hosing John off in the backyard since he was covered in dust. Poor guy was frozen! We showered at the gym too!
xo
s
Amy B. says
How do you do this without killing each other? Lol. Seriously, though… props to you. I know that if the hubs and I were to do this, things would be tense. We have the kind of relationship where I decide what design element would look good in the house, then if I can’t accomplish it on my own (saws and more complex tools have never been my special friends), I vacate the premises and allow him to do his thing. I am a little envious of the teamwork so obviously present in your home!
YoungHouseLove says
I think years of doing this we’ve slowly learned (and sometimes things get hairy and we forget, but for the most part) that we’re both trying to accomplish the same thing. So if we’re mad it’s usually at the situation, not at each other. It’s us vs. the house! Haha!
xo
s
heyruthie says
Lifting Heavy Boxes: “…so every hour or two we’d need to carry up a few more to keep ourselves well stoked…”
Hehehe! I love being “well stoked.” That typo made me laugh :-D
YoungHouseLove says
Hahah!
xo
s
sarah says
What kind of floor are y’all thinking for the master closet?
YoungHouseLove says
We’re thinking of doing the same tile throughout the larger bathroom (once we expand those two spaces to be one bigger bathroom) and the closet so that whole area has an open and seamless feeling (it’s so choppy right now with the carpet and tile that’s currently there).
xo
s
Laura says
I’m most amazed by your energy and patience! The finished product looks great. We have (original) hardwood floors in almost every room of our house, but the stairs and master bedroom and breakfast nook were carpeted when we bought it, and we just replaced that carpet for expediency, but down the line we plan to refinish the hardwood underneath. Do you have experience/insight with refinishing existing hardwood floors vs. installing new ones?
Laura at Rather Square
YoungHouseLove says
We’re had floors refinished by a pro (in our first house) and have laid new ones ourselves (in our current house) but my advice would be to decide whether you want to DIY it or not, do some research for how you’d go about it, and maybe get a pro quote too (our guy was really affordable!). Hope it helps!
xo
s
Manda Wolf says
Do your research if you decide to tackle it yourself. We didn’t do enough before we bought our house and were in a time crunch to get the floors done before we could move in so now (after 3 years) they need to be re done.
Koliti says
Thanks for the thorough how-to project break-down.
I have a “remembering math” question…
Wouldn’t your Kreg Crown Pro have helped in cutting the quarter-round? It seems like quarter-round is a mini version of crown that goes on the floor instead of the ceiling. (Just looking for a way to lessen the amount of stress on the ole gray matter:) )
YoungHouseLove says
Good question! The crown pro is great for cutting things that are installed on an angle (since crown sits against the wall at an angle) but since quarter-round just sits on the floor a regular miter saw was all we needed. If we had the angle finder tool for the floor, that might have helped, but it was at the other house. Woops!
xo
s
Ethne @ Wom-Mom says
A near week of this…my back aches for you. It’s lovely though. The carpet on the stairs HAS GOT TO GO!!!!!
Leila says
What program do you use to make those floor plans?
YoungHouseLove says
I just used a floor plan we had previously made on floorplanner.com and photoshop to add colors to it.
-John
alisha says
Am I the only one who thought after first glance that this post was a Layout/Future Paint Color post!? After glancing at my device, I got all geeked you guys selected colors for the rooms already! Haha. Silly me.
I like the color-coded day by day breakdown! Very helpful to see evidence that projects can take a while for even the most advanced DIYers =]
Liz says
Oh my word you are my heroes, I’d end up paying someone to do that. It looks beautiful though, I love the colour of the wood you’ve chosen.
Joy says
You guys are crazy. I mean that in the best way really. I am not a DIY home improvment person. My hubby and I tried to install floating floors in his condo back when we were dating….not a good situation. Ha! Looks great guys, can’t wait to see the rest of the house come together!
Annie says
I’m confused about the new bullnose part, what’s it laying on top of, underfloor or wood, and if it’s the old step, then how did you get it level?
/just curious
YoungHouseLove says
It’s on top of the old bullnose (we used our Dremel to cut off the top of it so the new one could lay flush with the rest of the floors). So when you see the adhesive being applied in that picture, that’s the old bullnose under it. Ours just got glued and nailed on top after we cut off enough of the old bullnose for it to lay flush with our floors.
xo
s
Ann Sato says
Thank you so much for the picture of the bullnose cut. I have been trying to figure out how to finish the top of the stairs after putting down flooring and could not figure out what to do. I will be cutting the bullnose this weekend.
Thanks again!
YoungHouseLove says
Good luck Ann!
xo
s
heyruthie says
OK, now for 2 questions:
Was the original bullnosed stair tread at the top hardwood? It looks like wood, but I guess i thought it would be subfloor instead.
You mentioned the paint job for the baseboards. In retrospect, do you wish you’d removed them first and then sprayed them outside or in the garage, etc. and then reinstalled them? I am about to undertake a similar job, and wonder if I should paint the baseboards after removing them, but before putting them back up.
YoungHouseLove says
The new bullnose is on top of the old bullnose (we used our Dremel to cut off the top of it so the new one could lay flush with the rest of the floors). So when you see the adhesive being applied in that picture, that’s the old bullnose under it. Ours just got glued and nailed on top after we cut off enough of the old bullnose for it to lay flush with our floors.
As for the baseboards, I think they would have gotten dinged a little either way (just from reinstalling them) so it probably would have all evened out in the end whether we popped them off, painted, re-installed, and touched them up or painted them, popped them off, re-installed them and touched them up.
xo
s
heyruthie says
thank you, Sherry!
Chebrutta says
Long story short: Bad seal on hurricane shutter ledge + Florida + moving couch for summer cleaning = discover of mold. Discover of mold = removal of baseboard and dry wall… except that whomever installed the tile floors didn’t wait for grout to dry when reinstalling baseboards. That was fun. Oh well, it’s not like the baseboards could have been saved, anyway.
YoungHouseLove says
Oh no! So sorry about that!
xo
s
Katherine says
I’m pretty sure that a team of two professional installers couldn’t put the floors down that quickly with trim installed back in.
You two are what I lovingly call ‘Marines’ {tough and determined}.
It looks amazing.
Elaine in Ark says
Your floors are beautiful! My dad was a good diy-er, and I hate seeing sloppy work. Yours would definitely pass his inspection.
I’m glad to see that you like your Dremel tool. I worked in the office there for a couple of years. We had a lot of loyal customers.
Megan says
You know, I like to think of myself as a tough DIY chick where I could tackle anything but then I read a post like this and think, “Well, maybe not….” The flooring turned out amazing and I am coveting it hardcore. Whenever we move, hardwood floors are definitely going on my Wants list.
Shannon says
Impressive! John, bet it felt good to post this. “Closure.” ha
YoungHouseLove says
Amen!
-John
Julianne says
It always amazes me how you two just take the bull by the horns and dive in! Did either one of you have prior ‘handy’ experience, or grow up in a DIY family? With our first home reno, we hired the complete job out, but with blogs like your’s, we’ve been trying our hand at almost everything in this last reno. It’s been a little scary at times, but definitely rewarding. Thanks for always showing us ‘scardy cats’ the ropes and guiding the way. Your blog has come in handy MANY times over the past 8 months!! ;0)
YoungHouseLove says
We both met living in NY where we didn’t have to do anything (we called the landlord if anything broke, haha) but our parents were handy and into home stuff (my mom had renovated a few houses in my childhood and John’s dad had even built a deck when he was just a baby). So I think we have slowly built up to these things. We definitely hired a lot more stuff out in our first house (floor refinishing, cabinet installing, patio laying, etc) and then built up to doing more there towards the end (gutting the bathroom ourselves). Then we got a little braver in our second house, where we did a lot more of the kitchen ourselves along with building our own deck and patio, and now we’re here and we have slowly over 7 years of home-ownership taken a little bit more on, so it’s nothing that happened overnight, but it has been a fun learning curve!
xo
s
lauren says
Great details! Helpful, cause we’re just about to extend our laminate wood flooring into the kitchen (and bathroom maybe? Thoughts on whether that’s a good idea, anyone???)
Also, just a note that in your “Note: some days were shorter…” near the top of the post, it should be “were” instead of “where” :)
YoungHouseLove says
Thanks Lauren!
xo
s
Christine says
I’m sure you weren’t stoked about lifting heavy boxes ;) Typo in that paragraph fyi
YoungHouseLove says
Haha, oh yeah, all fixed!
xo
s
robyns says
Why do I have a feeling that John will run out to do an errand and come home to find that Sherrie has ripped all that carpet off the stairs….oh yeah, cause she likes those surprise projects!
YoungHouseLove says
Haha, I totally do!
xo
s
Courtney Leigh says
Oh man, what hard work! This makes me rethink my “flooring is an easy change” statements during our house hunting.
Question: Did you leave the old carpet in your master closet? What do you plan to do with that flooring down the line? Replace with other carpet, or carry the tile from the master bath into it? Or something else!?
YoungHouseLove says
Yes, that stuff is still there (ick) but since we plan to combine the bathroom and the sink nook into one larger bathroom we thought we’d retile then and extend the tile into the closet so that whole “mini wing” has seamless flooring that’s not all broken up.
xo
s
christina @ homemade ocean says
You forgot the part where you taught the Bean and Burger to walk on your backs for a deep tissue massage!
So much hard work….but so worth it :)
YoungHouseLove says
Haha! That needs to be on my to do list. Seriously, how did I miss that?
xo
s
Marie says
We have hardwood floors in our whole house and our 1/4 round is stained the same color as the floor. Should it have been painted or is that a personal preference kind of thing? Our daughter just bought a house and she is having all her hardwood sanded and stained so now is the time to find out what that 1/4 round should be!
YoungHouseLove says
It goes either way! We had stained quarter round in our first two houses and painted stuff in some of the rooms here, so we just said “we’ll go with painted!” – but there are pros to either one (stained shows less dirt and scuff marks, painted make the baseboards look larger/beefier).
xo
s
Michelle says
I am inspired! My husband and I just took on the draining task of refinishing our hardwood floors in our new(first) home so I feel your pain! All that is left now is installing quarter-round (there was carpet down before). I was wondering, did you buy the pre-painted quarter round or did you take the time to spray those before installation? Which would you recommend? Oooh and I can’t wait to see the colors you choose for the rooms, those floors are really going to pop!
YoungHouseLove says
We got it pre-primed and painted it before it went on. Definitely did touch ups where the nails when through when it was up though! Seemed to work well.
xo
s
Kathy says
Thanks for this post! Super helpful – I forwarded the link to my husband who wants us to DIY laminate floors in our den. I’m sure it’s probably doable, but I don’t think he thought of all these little details!
Janice says
Great post. Lots of good information.
I’ve got to say, I am so glad the quarter round in this house is the same colour as your baseboards. It drove me crazy in your other houses that it matched the floors. So much better this way!
maddy says
it made such an amazing difference! will you eventually carry it down the stairs and to the ground floor?
my brother just got the most gorgeous wooden floor in his room and I’m still stuck with this awkward 90’s green carpet! not pretty haha xo
YoungHouseLove says
We already have hardwoods in the office, dining room, and living room downstairs as well as on the stairs (once we rip up that carpet it’ll hopefully be a lot nicer looking) so we’re happy to have those existing hardwoods (we wouldn’t replace them since it’s the same solid oak that we brought upstairs in an attempt to have more of it, haha).
xo
s