This project gets a “don’t try this at home” warning for two reasons:
- It involves fire & broken glass so please use extreme caution & attempt it at your own risk.
- I couldn’t get it to work so you may not want to waste your time trying it anyway.
Yup, despite some die-hard persistence on my part, I couldn’t get this project to work successfully. Which sucks because I was really excited about it. According to the instructions I found in Men’s Health, it was a simple way to take beverage bottles and turn them into glass tumblers. Cool right?
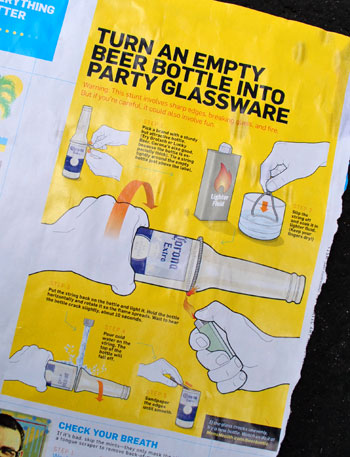
Despite the project not working, we figured we’d share it with you anyway. Perhaps you’ll see where I went wrong or it will inspire you to try your hand at it (hopefully with a better outcome). If nothing else, it serves as proof that not everything goes smoothly around here 100% of the time. Plus I’d filmed just about all of my dozen or so attempts and I hated for the footage to go to waste. So check out the how-not-to video below (or watch it here on YouTube). Note: We recommend additional safety precautions like safety goggles, a fire extinguisher, and safety gloves (although Men’s Health didn’t mention them). Again, tackle this project at your own risk since glass plus fire can equal ouch!
And for anyone who can’t watch a video (if you’re at work perhaps) just keep scrolling for the written play-by-play below (which includes the sanding step that we accidentally left out of the video).
My first step was to gather the supplies that the article suggested:
- Lighter fluid and a cup to house a small amount of it
- Glass bottle(s)
- A lighter (or matches)
- Scissors
- String
- Cold water (we put ours in a watering can)
- Sandpaper (not pictured)
- Paper towels (not suggested, I added them for clean up)
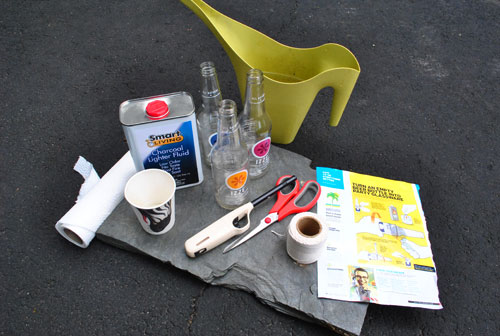
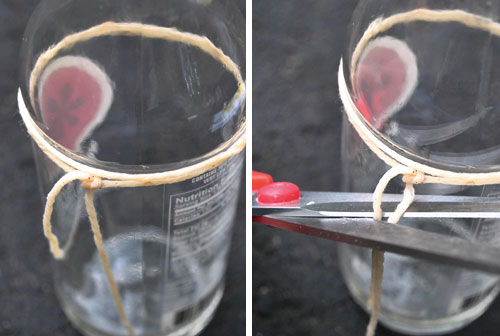
You’ll also see that I conducted this project on a spare piece of patio slate so that I wouldn’t risk burning our driveway below. The basic concept of the project is that by concentrating a lot of heat around the bottle in one clean line then suddenly cooling it with cold water, you’ll break the bottle apart leaving an un-tapered cup for drinking. So the first step is tying a string around the bottle right before it begins to taper.
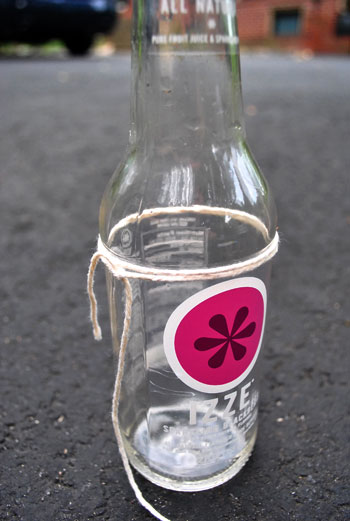
I tested this once before taking any video or photos and discovered one loop of string didn’t create enough heat to break a Boylan’s bottle, so I used two loops with my Izze bottles (seen above). Once you’ve tied the string, you remove it from the bottle and give it a good soak in some lighter fluid (doing your best to keep your fingers dry).
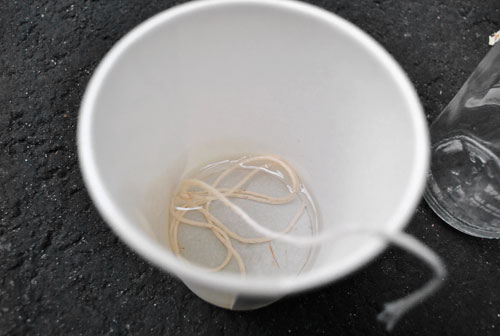
Once soaked, you put the string back on the bottle and cut off any excess (so as not to invite the flames to move down your bottle away from the spot where you want it to break). Putting the string back on inevitably got my fingers wet with lighter fluid so I washed them off in the water (so as not to invite any flames onto my hands).
Then came the fun part: lighting the string on fire. The article said to hold the bottle while doing this so that you can rotate it and help the flames spread evenly. I did this in some of my attempts, but usually just let the bottle sit on the slate so I didn’t have to have my hand near the flame. I just was sure to light the string on all sides before setting it down.
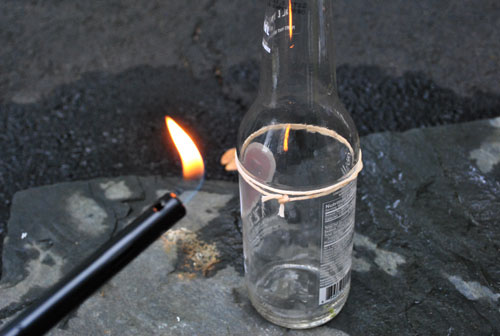
It produced something pretty like this! Oooooh, fire…
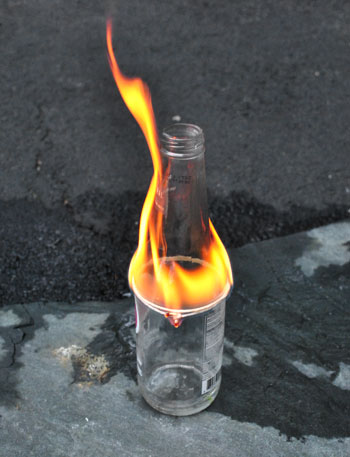
Now the article said I would hear a crack after about 10 seconds. That never happened for me (no matter how long I waited) so I jumped ahead to the next step which was pouring the cold water on the bottle which seemed to induce the cracking sound. I thought this might be where I was going wrong, but if I ever waited for the flame to go out completely before dousing it with water the bottle wouldn’t crack at all.
Ultimately, the goal is to get something like this:
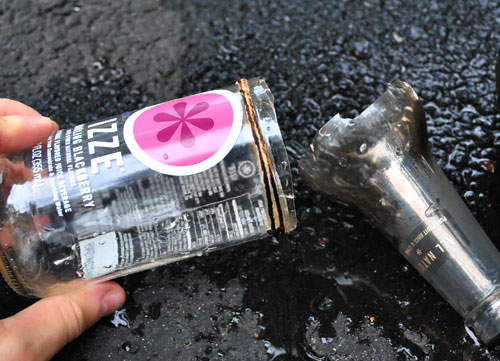
Except you’ll notice in that picture that the break isn’t totally clean. In fact it’s a lot more jagged than I would like – and certainly not something I’d put my lips to and drink out of.
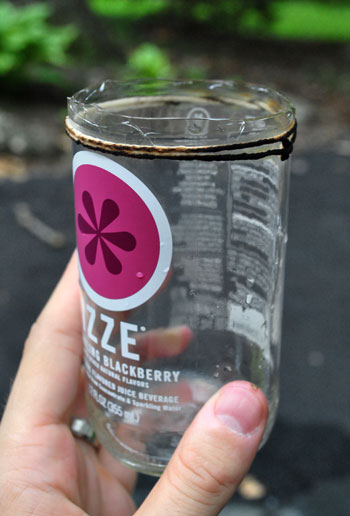
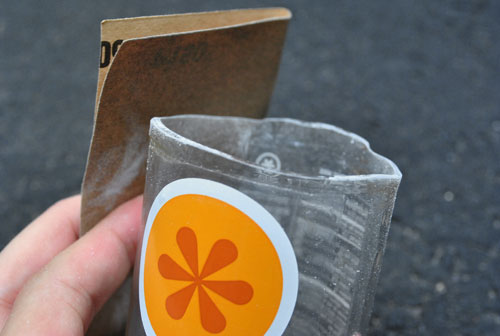
Sadly, this is actually one of my more successful attempts. I hoped that I could solve the jaggedness during the next step, which was sanding the edge so it would be smoother (you can see this being done below on my other semi-successful attempt). The sanding definitely make the edge smoother but it would’ve taken a lot of sanding to get a perfectly flat top to this glass. We did the sanding outside btw, oh and beware of inhaling any nasty silica dust if you take this on.
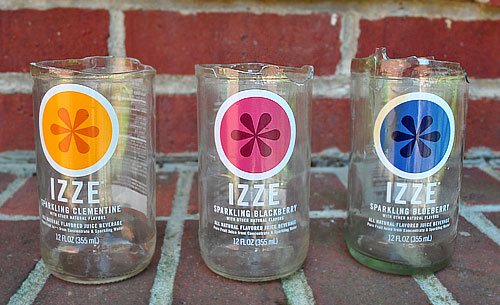
In the end this is what my three Izze bottles looked like. I didn’t even bother sanding the blackberry and blueberry ones since their breaks were so jagged. Sigh.
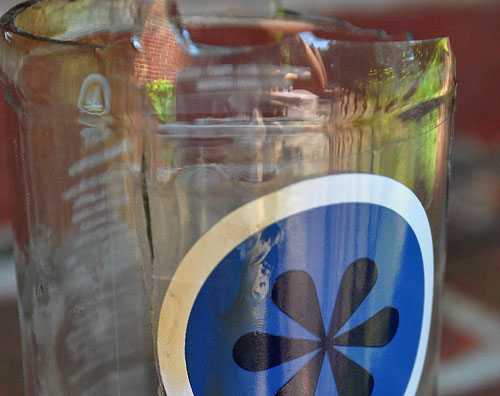
The blueberry Izze also illustrated a reason bottles like these aren’t perfect for this project. Since their logos are actually plastic labels stuck to the bottles, they can get melted and burned in the process (which is why cutting off the excess string is helpful).
After my attempts with the Izze bottles I questioned where I went wrong. I wondered if it was my bottle choice (not just for the label reason, but also because the article did suggest using a thick-ish bottle). So I tried the project again – as you saw in the video – with some IBC Root Beer bottles. They were both thicker and didn’t have plastic labels. But unfortunately the results were no better.
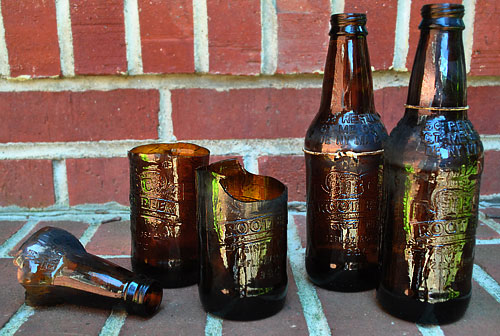
The thicker glass made them much tougher to break and the couple that did break were pretty jagged (while the others refused to break at all). I only got one that was semi-decent but for the most part it just looked like I had been in a bar fight.
In the end we didn’t end up keeping any of them, even though some could’ve made for decent little vases (assuming the flowers would cover the uneven edges). I have all sorts of theories about where I went wrong: was my string too thin? should I have started with cold bottles? is there some other bottle brand that would do better? But ultimately I’m just figuring it’s a “too good to be true” project and I’m not sure my belly can handle any more soda right now to try it again.
Have any of you guys tried this project or something similar? Have you had more success than me? If so, please leave your tips so someone else can try this with hopefully better results!

Kerry says
Hm, so I did a quick search for the name of the “article” (if you can call it that) from Men’s Health. They apparently have a video that seems to detail where you might have gone wrong.
http://www.gentdaily.com/2010/07/sweet-site-mens-health-tv-turn-an-empty-beer-bottle-into-party-glassware.html
Essentially, I think you need to soak your string longer (I also wonder if butane lighter fluid may be more successful than grill lighter fluid, but what do I know). AND the more important thing I think is that he held the bottle horizontally and twisted it to keep all the heat in the one spot (he says this is important, too).
It is a plan I have in the vague future, ps, to make a wind bottle lamp. I don’t want to use a kit, though, and am excited.
ALSO, silica, yes, is a carcinogen, but it’s only harmful if you’re in a closed-air environment. Otherwise, going near a beach would kill you. Do your sanding outdoors!
Kristen says
Hey I saw your room was on apartment therapy today!
http://www.apartmenttherapy.com/chicago/living-room/living-rooms-with-zones-125476
YoungHouseLove says
Thanks Kristin! So exciting!
xo,
s
Elaine says
Thanks for sharing a not-so-successful project… you are just like the rest of us. Even if it did work, seems like a lot of trouble to get a tumbler that you could buy for 50 cents. I know that’s not the point, but just sayin’… :)
Ashli M says
I’m so sad this didn’t work! I was really root’in for you!
Nice try, video was funny, none the less!
~Ashli
http://www.maillardvillemanor.com
Lauren says
I have done this before, but with a bottle cutting kit you can order online similar to the one another poster mentioned was used in the Wedding bee tutorial. In that case I found that after the bottle is scored you must be really patient when rotating it over the flame. I had to heat it much longer and much closer to the flame than I would have thought before I heard the crack the directions mention. Also, I dunked mine in a bucket of ice cold water to create a faster reaction from hot to cold. This helped with a cleaner separation. I think if you want really smooth edges the cutting kit really helps.
KD says
you get an A for effort. I heard about DIYing these. but ultimately I opted to buy them instead. I love my UPcycled juice glasses. We use them everyday. I got mine from here:
http://www.etsy.com/shop/YAVAglass
Michelle says
I have done this before except with wine bottles. The only thing I did differently was dunking the bottle into a bath of ice water (lots and lots of ice) and that seamed to help it break more evenly. Hope that helps if you ever try again!
Barbara says
Your room on apt. therapy – where did you find the concrete dog??
YoungHouseLove says
That’s from a local home & garden store called Great Big Greenhouse. Here’s the post about John surprising me with him: https://www.younghouselove.com/2008/02/puppy-love/
xo,
s
Barbara says
I think you need a propane torch and not a lighter, butane lighter fluid, and a bucket of ice water.
Nancy says
Sorry guys, I’m with Elaine…this kind of project just doesn’t make a lot of sense to me. Recycling the cute bottles for vases-cool- glassware to drink out of? No thanks!
YoungHouseLove says
Hey Nancy (and Elaine),
We’re so sorry if it doesn’t make sense to you! You know how boys are about fire, right? Seriously, the only explanation I have for this project is that since the moment John ripped the idea out of the magazine a few weeks back he was dying to try it. And who am I to keep him from having fun in the yard with some lighter fluid? Haha. Plus we know readers love to see when things don’t always go perfectly for us so we opted to share our epic failure! Hope that explains it!
xo,
s
Val says
Saw that a previous poster had recommended YAVAglass on Etsy. Just wanted to second the motion. They’re nice folks and their prices are pretty reasonable. And no inhaling of silica dust on your part…
Gretchen Greenwood says
Hello! I have no experience in the project you just attempted but I had read an article on how to do the same thing (different process, supposed to be the same outcome) in the magazine Ready Made! I love your blog and got a Ready Made magazine and was absolutely thrilled with it- it actually reminded me of you guys! Anyways, if you want to check out their process you may have more luck…It seemed simple enough if you have a glass cutter…I do not own one but have since looked into purchasing one in the near future. They used cola bottles from mom and pop producers that were very colorful and not found everywhere. Anyways, check it out! Maybe it will help to solve this project :).
LeAnne says
“I’ve never tried this myself, but just last weekend, we went to a glass blowing museum, where we saw a demo of how to create a vase. This involved cutting the glass to get a clean edge, and the glass blower specifically called out scoring the glass to ensure that you get a clean break and that you don’t get stress cracks (like you got in the blackberry bottle). If you try this experiment again with scoring, please let us know if it worked for you!”
Typically, the vase is broken off the pipe or the punty by jacking down on the hot glass to thin the point where it attached, then cold metal or water (we often used jacks dipped in water) is applied to the hot glass to “score” it. Basically, you use the difference in temperature to create stress fractures in the glass. Then, the pipe or punty is tapped to send a vibration, causing a clean break at the controlled point of stress. When done right, the break is very clean. If sloppy with the application of cold to the hot glass, there will be stress fractures introduced that extend beyond the place you are breaking. I did glassblowing demonstrations for about 6 years. :)
I will say that even with my hot glass experience, I still wouldn’t do the bottle breaking with the string method and expect a clean break. Use a bottle cutter. It’s safer and easier.
Melody says
Valiant effort. The video was definitely entertaining, and I loved the cracking sound.
Becky says
I know you are into being green, recycling, making the most out of everything, etc, etc, but isn’t this a bit much? And really, what’s the point of making this huge post if it didn’t work to begin with and is actually kind of dangerous? Me thinks you and hubby are running out of diy stuff to make this site interesting and you’re totally reaching at this point.
Beth says
My grandfather made drinking glasses and vases out of beer and wine bottles for a couple decades before he passed away. He just used a simple glass cutting tool then sanded them smooth. Wine bottles make really nice sized glasses, and we often buy bottles as much for the color of the glass as for the (hopefully) delicious wine they contain. I have a set of beautiful cobalt blue glasses that he cut from large bottles of fancy carbonated water. Luckily, my cousin is trying to carry on the tradition with my grandfather’s equipment, so my family will continue to have an excellent way to up-cycle the byproducts of our alcohol consumption.
Beth H says
Too bad it did not work…. however your video made me laugh after a long day at work, so thank you! You win the award for persistence!
Karina says
Oh sad! Were those the Izze bottles that you were using as vases? :( They looked so great in your kitchen window.
I’m sorry for all the failed attempts, but thanks for showing us that not all projects are easy or even successful!
CommaHappy says
Is it wrong to feel a bit of happiness that even Sherry and John sometimes have trouble pulling off killer projects? ;)
I love the simple bloom in a bottle look though, and Izzes have that perfect pop of color.
Nicole says
I am so with you! I have been researching this but have not tried it yet! Here are two sites that I have looked at. The youtube link is very cool to watch! Good Luck!
http://www.wikihow.com/Cut-a-Glass-Bottle
http://thegogreenblog.com/diy-make-drinking-glasses-from-bottles/
Jen says
it’s possible! I just met the woman who started this business tonight, it’s another eco-friendly alternative to throwing away beautiful glass bottles:
http://www.bottlehood.com/
Jennifer says
I’d say scrap the bottle idea, and make a great cheese board out of your piece of slate. You could back it with felt feet, and you could even write the names of the cheeses on it with chaulk
YoungHouseLove says
We’re actually loving that idea Jennifer!
xo,
s
adrienne says
this kinda so cool..but yah it is too risky..though you turn them into glasses, yet the glasses have sharp brims…so I guess it would just a waste of time..
Amanda says
After reading this post and the comments I googled cutting bottles and found this:
http://www.youtube.com/watch?v=sFXngPx3w3M
the best method I’ve seen yet. clean, easy and fast.
michelle says
don’t feel bad ;)
check out danny seo’s attempt here:
http://www.dailydanny.com/?p=2861
YoungHouseLove says
Nice! We feel better already…
xo,
s
Nic says
The suggestion of holding the bottle horizontally is a good idea. The more you limit the area being heated, the better the cut will be. I think the flames burning upwards could be the reason that your glasses are breaking unevenly. It might be a good idea to use something that burns at a higher temperature, like acetone, for example.
Love your blog, guys. Good luck!
Jessalyn E says
I tried a similar project with wine bottles which I was going to use to make a coat rack (similar to this: http://www.uncommongoods.com/item/item.jsp?itemId=15988). But because I wanted the bottles cut at an angle (so that coats wouldn’t fall off as easily), I tried to saw a PVC pipe (the interior of which the wine bottle would fit inside) at the angle I wanted, and then slid the wine bottle snuggly inside, using the PVC pipe as a guide to score the wine bottle and then saw. While scoring the bottle first seemed to help, my breaks weren’t as clean as desired either, and some bottles actually ended up breaking totally apart–maybe something to do with the varied shapes of wine bottles? Anyway, I abandoned the project with a similar sigh, but in case you were hoping to try again with wine bottles, I’m not sure that my method will prove successful.
Britt says
We did this using a tile cutting machine. So if you ever rent a tile cutter for another project, you can try using it to cut bottles…
jen says
Seriously, there are so many cool (and cheap) glasses in the world, I can’t imagine why doing this and risking injury would be necessary.
Dusa says
Thank you for this fun-filled post. I, for one, loved seeing epic fail and knowing that not all projects are destined for greatness. Thanks for keepin’ it real!
Jessica Tenberge says
Hey did you know you are the headline for MSN’s Decor and Organizing site? Not only do I love your house, but I love your outfit! Super cute! It said “fun room makeover” and thought “hey that couch looks like mine and I’m dying for some advice” and low and behold it was a site already visit daily!!! Small world!
YoungHouseLove says
Hey Jessica,
No way! Thanks so much for the heads up! Off to check it out…
xo,
s
David F says
Sorry, random question… anybody know what kind of bug sound that is in the background?
YoungHouseLove says
Interesting question David! I don’t think I could tell you what was making the sound but I do know there were lots of mosquitoes out at the time!
-John
Rosi T says
I have a friend who actually did this, and it really works better with beer bottles (not rootbeer, like actual beer), they use them as little flower holders in their bathroom and kitchen. It’s really cool! I’m sorry it didn’t work out for you guys! Maybe somewhere down the road you’ll find a bottle that works :)
Julie says
That’s too bad because they would have been pretty cool. We have a set of juice glasses made from green beer bottles that we got from Pottery Barn and LOVE! There are also a lot on Etsy that I often look at and want.
AppleTree says
I became obsessed with this type of project, as well, after seeing Yava Glasses.
So we went on eBay and bought a circa-1970 glass cutter super cheap, and it worked really well once we got the hang of it.
My husband decided he wanted a cool rolled edge instead of the sanded edge, so now we have boxes of cut beer bottles waiting his discovery of the perfect means of edge melting.
Any thoughts or ideas would be most appreciated.
Good luck.
YoungHouseLove says
Hey AppleTree,
If you scroll back through all these comments there are lots of suggestions and links to other methods that might help. Good luck!
xo,
s
Amanda says
My inner pyromaniac loves this. It’s not about the success, it’s about the fun of trying and burning things, LOL.
Fun try, though!!
LiveLikeYou says
My 9 year old son and I watched this and we were very intrigued. The result might not be what you wanted, but my son definitely wants to give it a go. :)
Tammy says
Check this method out.
http://blog.makezine.com/archive/2010/03/how-to_cut_a_wine_bottle_in_30_seco.html
Nathan Strange says
Oh gosh, you guys are doing it the hard way!
As mentioned in an earlier comment, a wet tile saw is the way to go. You can get a cheap one at Orange or Blue and be making 99% perfect cuts in no time at all and with much less danger. It’s super fast, too!
Still haven’t figured out how to make a nice rounded rim, though – our friend put ours in her kiln and they completely slumped! Maybe someone here has an answer to that?
Catherine says
This post is hilarious! Thanks for sharing. I hate when projects go wrong, but love it too.
anna see says
wow! you are more persistent than i am. i would have lasted through 2, maybe 3 attempts!
laurie eller says
This was really fun to watch (despite being unsuccessful). I work with a torch and we’ve tried this before too, it works pretty well with the torch but it’s a lot hotter. My husband gets his kicks by melting the glass (until molten) and trying to make globs of nothing with it. It never turns out well, but a least he has fun, right?
You should write Men’s Health and ask them if they really tried this. lol
Great fun! :)
Michelle says
Men’s Health actually has a video on their website as well. The only difference I could really see was that holding the bottle and spinning it at a fairly quick rate kept the heat on the twine and did not allow the heat to go up the neck of the bottle. Perhaps this is why yours did not crack evenly.
I never heard the crack in their video either but he dumped a cup of water over it and the neck literally just fell off.
Cailen says
My fiance and I tried this a few weekends back. Did not work! I was so excited to try this project out and make some unique and crafty homemade gifts, but we failed miserably. It did not work as it did in the video we watched online beforehand explaining the procedure. Oh well…we’ll have to think up some new cheap Christmas gift ideas now. lol
Cailen
jolene says
This method is terrifying!!! I use a bottle cutter (a small investment, but well worth it) and then I just use the boiling water method to break the glass at the score. See http://lifehacker.com/5488097/use-boiling-water-to-make-a-perfect-wine-bottle-cut
I’ve found that Miller High Life bottles make AWESOME little wine tumbler-sized glasses, and this method requires very little sanding. I’m getting a Dremel for my birthday, so watch out!
I’ll be at Bizarre Market in RICHMOND with my various re-purposed wares this Sept. 18. Thanks for the great local blog, younghouselove!
Lindsey says
We did this experiment in a college sculpture class when a student wanted to cut glass. She used beer bottles instead, which worked much better, I believe, but the results still weren’t really clean enough to use for glassware. Some bottles worked better than others, so you would have to experiment with several to see which produced the best break. They could make some interesting vases.
For the sake of cool pyro fun, it is a pretty neat trick to do.
Holly says
Hi guys! So weird, I read this 2 days ago and today picked up the June/July 2010th ReadyMade mag ($1.00 steal as used magazine in local antique mall!) and there in the “Reply All” section some safety issues are noted from someone after seeing the glass cutting feature like this from their Feb/March issue. The gentleman who wrote in owns a recycled glassware business & wanted to send a “safety first” note on sanding the edges of the glasses. As glass dust is extremely dangerous when inhaled he was concerned their article did not mention wearing a respirator or mask. He states at the very least make sure respirator/mask is worn and have good ventilation. And a wet sander or grinder should really be used. Anyways, really LOVE your blog and thanks for all the continued inspiration!
YoungHouseLove says
Safety first! Thanks for the tips. We definitely thought it was funny not to see any sort of cautionary warnings on the Men’s Health article, and it’s funny that they weren’t there in the ReadyMade feature either. Maybe those publications just assume it’s a try-at-your-own-risk project? John definitely did all of his sanding outside and he said the dust wasn’t flying around in the air, it was more like the sand-like shavings fell to the ground and the edge of the glass was left a bit gritty so he rinsed it with the hose. But a respirator or mask along with a well ventilated area (like outside) is definitely a good idea just in case!
xo,
s
Erica Rex says
I laughed so hard watching this. Thank you guys for such fun and creative ideas. (my husband says that your site is starting to burn a hole in our pocket)(In a good way!!) hahaha. I would say atleast once a week, I am constantly wanting to change the house in someway or another with your brillianceeeeee! :)
Tristan says
This “cracked” me up. You must have been “smashed” after so many attempts, hope you are not “burnt” out. I am “shattered” you didn’t get it to work, they would have looked “glassy”! mmm maybe I took it too far on the last one.
YoungHouseLove says
Haha. Nope, just far enough. Love it.
xo,
s
Cara says
At one point I wanted to make/sell these, so I bought a $30 device to score the glass, which didn’t work. I ended up buying a tile cutter, which did make less jagged cuts. But then I still needed to sand down the edges. I was going to buy a dremel tool to do it, but then I realized that it still wouldn’t look nearly as good as others I’ve seen in stores. Without the ability to blow glass, I don’t think you can get a truly nice edge. So I moved on to other projects, and now I have a tile cutter for the next time we have a tile project!