Dude, stencils are no joke. But I did it! I bit the bullet and ordered the stencil that John and I have been pining after for the past month (mentioned here a few weeks back). We loved the idea of adding some subtle tone on tone detailing above the chair rail in our office (we didn’t want anything with too much contrast since it’ll compete with the dark teal built-ins and the fun curtains in the nearby dining room). So we settled on a softer gray tone with a tiny pop of color (leftover grellow paint from the adjoining kitchen). At 54 honking dollars it was hardly a drop in the bucket, but let me tell you, this stencil is hardcore. First of all, it’s made of super durable plastic, so I don’t have to worry that it will rip or crease while I’m taping it, untaping it, and bending it manhandling it to get into the corner crevices (I’m pretty sure I would have trashed a thinner stencil after one wall, just because it’s kind of a more rigorous application process than I expected). And let’s just talk about how big it is. It’s over two feet tall and almost two feet wide, so it helps to make things go faster since you don’t have to reposition it every three seconds like you would with something smaller.
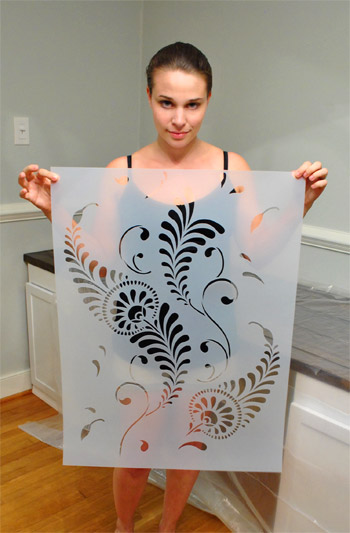
And yes, this is quite an evil face I’m making. No idea why. I remember saying something like “make sure I don’t look naked” when John snapped this, but had no idea I was giving off such an I’m-the-female-Hannibal-Lecter vibe.
Another way that I’m rationalizing my purchase is that we only spent $6.30 on cabinets for the built-ins and $27 to build a 13 foot counter, so maybe it’s time we splurged in the office. Haha. I also figure any type of wallpaper (even the cheap stuff at Lowe’s and Home Depot) would be way more than $54 for the entire room above the chair rail, so there ya go.
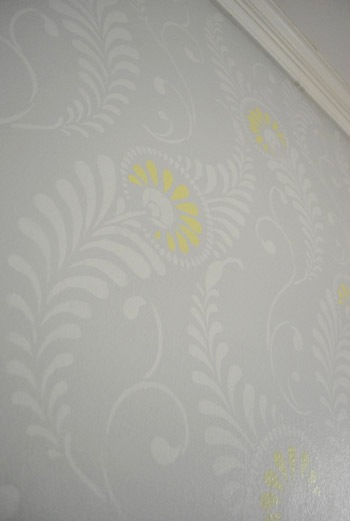
I’ve actually never done a giant repeating stencil like this on a wall (we did stencil the floor of our first house’s sunroom) so here’s where I’ll get to the keeping it real part: stenciling is haaard. I’m not gonna lie, my arms were cramping after about an hour and it took four and a half solid hours (from 8pm to twelve thirty in the morning) just to almost finish one wall (out of the four that I want to do). But in the spirit of sharing things real-time as we go, I couldn’t wait to share the in-progress madness. Here’s a close up:
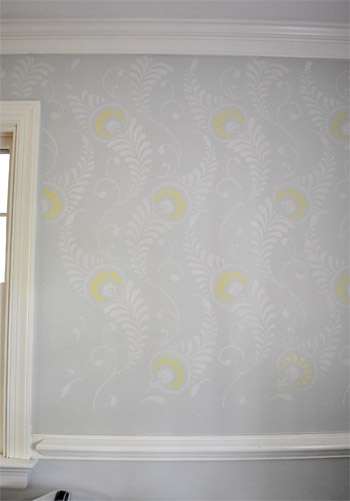
And here’s one side of the wall that I almost completed (I still have to do those last 6″ above the chair rail). Oh but ignore the weird dark and light vertical shadows on the wall (couldn’t wait for the lighting to be better – too impatient and excited to share, haha).
As for my method, here’s a little breakdown of what seemed to work for me:
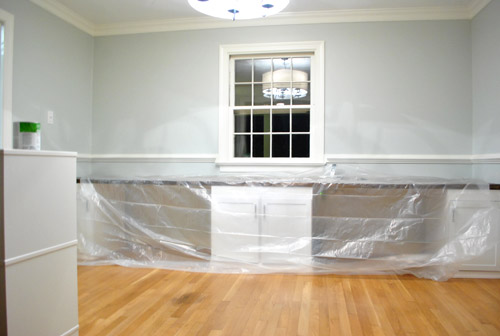
1. I prepped the room by clearing it and tossing a drop cloth over the desk so we wouldn’t get paint splatters on it.
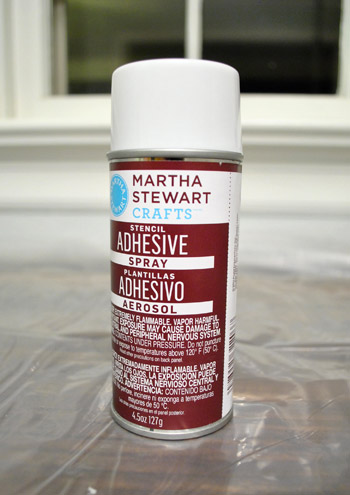
2. I used Martha Stewart Craft Stencil Adhesive Spray from Michael’s (purchased with a 40% coupon of course) to spray the back of the stencil before taping it up on the wall with painters tape. This helped the middle parts of the stencil stay close to the wall and not bend out for a nice crisp line. I probably repositioned the stencil two or three times before re-spraying it (when I noticed it holding less firmly to the wall I just took it down and sprayed it and taped it back up for the next application). Oh and you’ll want to use a large piece of cardboard or drop cloth to spray the back of your stencil so you don’t get stick stuff all over the floor).
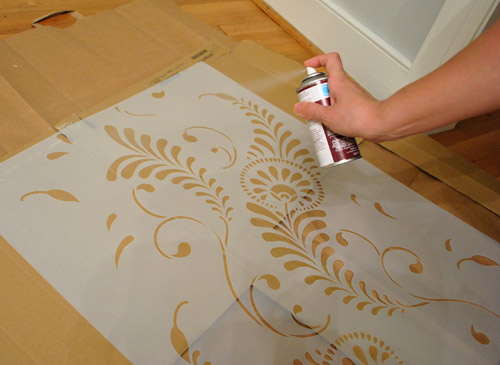
3. As for where to start, John held the stencil up in the top middle of the wall so we could center the pattern and work out from there in all directions.
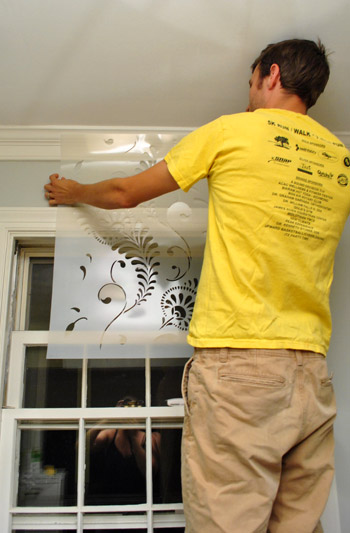
4. I also used delicate surface frog tape for holding the stencil up at the top, bottom, and sides (we already had it on hand and I didn’t want to tear off fresh paint as I moved it around the room so it seemed to do the trick).
5. I used small foam craft brushes (also from Michael’s). They were basically dowels with flat foam tips.
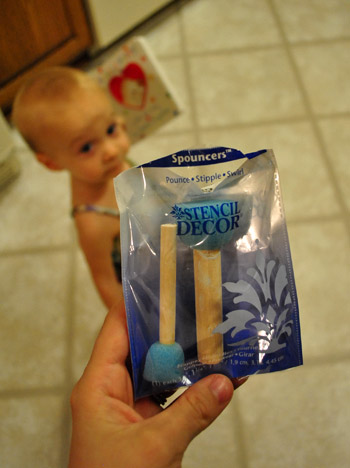
6. As for how I loaded my little foam brushes, I just dipped them in the paint (more details on the paint colors later) and dabbed the brush around the lip of the plate to remove excess before tapping it against the wall to apply the stencil.
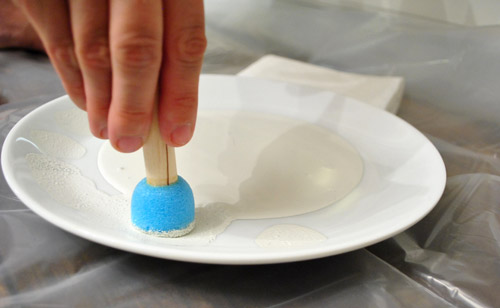
7. I always tapped the wall at a right angle with a not-to-gloppy foam brush for a nice clean edge (so the paint wouldn’t slip or drip behind the stencil and smear around).
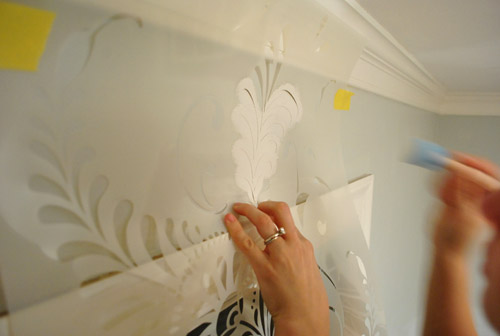
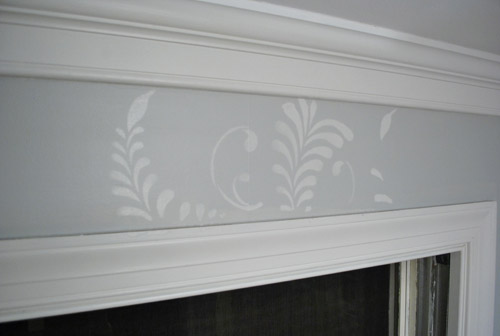
8. If I feared that a little bit of paint somehow got behind the stencil, before repositioning it on the wall for the next application I would lay it on my drop cloth on the floor (face down) and wipe the back with a dry folded paper towel to remove the excess paint. Then I would respray my stencil adhesive and stick it back on the wall for the next application.
9. The way that the stencil is applied means that there are repeats. So you position it right over the last 3″ that you previously stenciled and work your way across the wall that way. I didn’t wait for the paint to dry before moving the stencil (that would have probably taken five million hours), so I just took my time applying the paint so nothing got behind the stencil and then matched up the stencil carefully for the repeat and continued on. Since there was no wet paint on the back of the stencil, it was fine to be pressed against the 3″ of wall that was already done, and it didn’t look any different than the non-overlapped part. I wonder if the application of paint was so thin that it was drying really quickly so it didn’t make a difference…
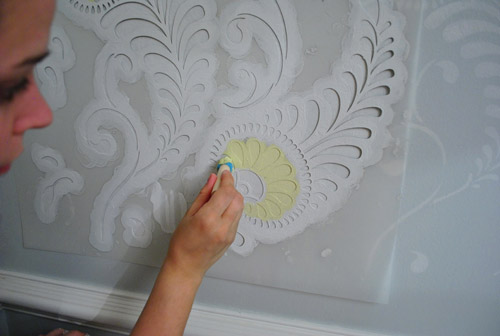
10. The corners were the hardest part. To get the stencil to lay flat against the wall in the corner so you can cram your brush into the small little stencil openings was sort of impossible to get perfect. But I did learn that this stencil is extreeeeemely forgiving (probably because it’s a more organic pattern than a regularly spaced geometric one, which would probably make any inconsistencies a lot more obvious). So when I didn’t quite get deep into all the corners, once it dried it was somehow not obvious at all (a stenciling miracle?). Of course I’m not exactly a corner expert because I’ve only attempted one of them, so as I go around the rest of the room maybe I’ll have more tips.
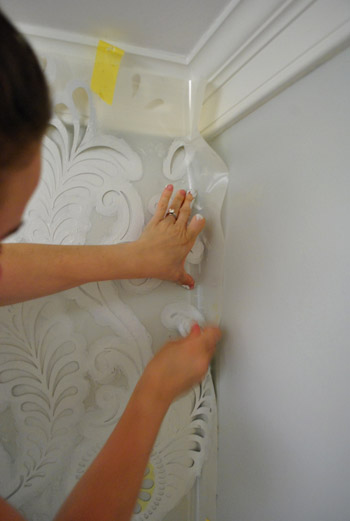
After about three hours I was here on the first wall:
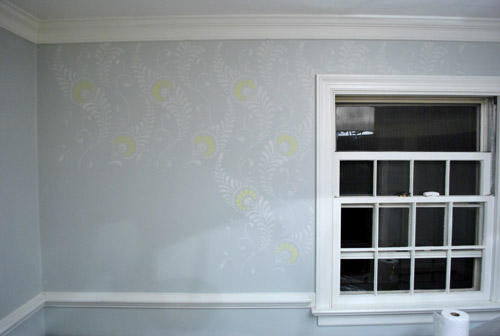
And after 4.5 hours I had one wall almost all done (sorry for the terrible picture, I was sort of losing it at this point).
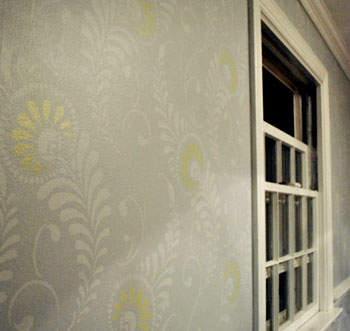
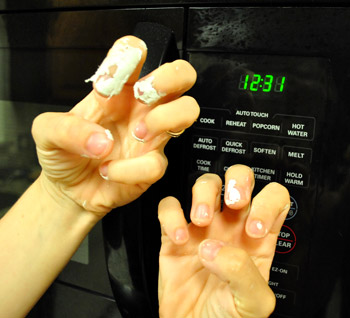
So although I wasn’t completely done with that wall, I decided that 12:31 am meant it was time to put the foam brush down and throw in the towel for the night. And do some finger stretching (I seriously had cramped up hand-claws).
Oh and as for the colors, here you go:
- Walls: Moonshine by Benjamin Moore (color matched to Olympic No-VOC paint in a satin finish)
- Main stencil color: I just asked the paint guys to give me a half-tint of the wall color (also color matched to Olympic no-VOC paint in a satin finish). This means they just add half as much tint to the white base as the original formula calls for, so you end up with a half-as-intense tone-on-tone effect.
- Grellow stencil flower accent color: Leftover wall paint from the kitchen, which is Sesame by Benjamin Moore (color matched to Olympic no-VOC paint in semi-gloss). You actually can’t tell the difference in finish unless the light hits it just right from the side and the grellow sort of looks iridescent, which is actually awesome. Yay for happy accidents.
I also made a video to hopefully help demonstrate the foam brush prepping and actual stenciling part of the process (including a quick demo on corner stenciling):
So that’s where I am with the stencil. One wall-above-the-chair-rail almost done, three more to go. I’m planning to tackle another 4+ hours tonight and hopefully can fit in one more session this week (my goal is to be done by Thursday or Friday, soreness permitting). It’s definitely one of those projects that you just need to force yourself to complete as fast as possible – because as soon as you start all you want is to get to the point where you can let out a huge sigh and say “so glad that’s over!”
But so far I have to admit that it’s totally worth the trouble. We’re loving the effect (it’s sort of like subtle modern wallpaper, not too in your face but not too tame and unnoticeable either). It’s sort of the perfect amount of “ooh, look at that” without being too competey and chaotic with the adjoined dining room. And John and I both have said the following sentence about ten times so far: “the pop of color totally makes the entire thing.” So might I recommend a splash of grellow (or any color you love actually) to take something that’s gray on gray to the next (still-kinda-subtle) level?

Ok, now I have to hear from you guys. Have you ever stenciled something, be it an accent wall, piece of furniture, or entire room? Do you have any secrets you’d like to share? How long did it take? Is four and a half hours for the top half of one 13 foot wall (with a big ol’ window in the middle) about right? I might just be moving at a turtle-like pace. Haha. Just too nervous about getting paint all down the back of my stencil if I go any faster. Anyway, hopefully I’ll be back with finished pictures (and maybe a bulging right bicept from dabbing away) by Thursday or Friday. Until then, picture me standing on a chair at 11pm wearing my inside out painting clothes and listening to shows on Hulu (I tried radio, but somehow hearing Community and Parks & Rec play in the background kept my spirits up a little more).
Psst- I’m over on BabyCenter chatting about my favorite kids clothing store and how I save money when it comes to shopping for Clara’s clothes & shoes. Did I mention that I snagged 47 cent shoes on my latest mission? Excited doesn’t even begin to describe it. Check it out here.

Sunnie says
RAD!
Kim D says
Absolutely gorgeous! I am in LOVE!
Jen says
Ok, you totally convinced me to bite the bullet and order the stencil. YAY!
Kristen says
Wow Sherry, you’ve done it! I am speechless! A feat that never, ever happens! Seriously I am just staring at my monitor with my mouth hanging open! The stenciling looks so amazing and you are so inspiring…I have these lists of things that I would like to do but never do because, well who knows…but it’s like you take the “what if” lists from all of us (maybe I should stencil a wall?) and do them for us! With fantastic results! Congratulations on you taking more risks in your new house! It looks beyond awesome!!!!
MrsLindseyM says
I just stenciled my pantry this weekend!! I was nervous at first that it was going to be a pain and way too time consuming but it actually went pretty quickly and turned out great. Probably took me 1 1/2 hours to do a 42″ x 8′ wall and a 30″ x 8′ wall with a 16″ square stencil. I used one color and rolled it with a 4″ foam roller. I will post a picture on your facebook wall.
I love your two toned stencil and now that I have a little experience I might try that next! Can’t wait to see the finished product!
YoungHouseLove says
Oooh, I’d love to see a pic!
xo,
s
liz says
Holy crap, guys. This is GORGEOUS! Talk about elegant – kudos!
Jessica Willis says
Breathtaking! I’m swooning!! Can’t wait to see the finished product. Hope your fingers got some good rest last night :)
Chrissy says
STENCILS!! Just when I’ve begun stenciling everything in my house! So far I’ve attacked gift bags, picture frames, a dresser, curtains, and kitchen towels. My husband seriously thinks I need to step away from the foam brush! I’m about to stencil an accent wall in our guest room to give it something a little extra special. After reading your post, however, I’m kind of glad to only be doing one wall! :) Especially, because the stencil I’m using may be a bit harder. It’s one you trace and then paint over with the same width brush. I found it here, (http://jonesdesigncompany.com/decorate/painted-wallpaper-a-tutorial/) for a Moroccan theme. I hope I have as steady a hand as I think I do! Thanks for sharing all of your wisdom, awesome projects, and funny faces!
Susan Peltz says
Looks great, but for a time saver you may want to try a small foam roller brush. (I used the kind they sell for painting behind toilets) I stencilled my mudroom walls and it went quite quickly.
YoungHouseLove says
Thanks for the tip! I worried since I had two colors to do it wouldn’t work that well. I guess I could have rolled the whole thing in gray and then painted over the grellow parts on top of that. Just too scared to try. Haha.
xo,
s
Nikki says
You could make a “cover” for that area, roll out the grey, remove the cover and paint the color…seems like it would cause less hand cramping. It looks amazing so far!
YoungHouseLove says
Oh that’s a good idea! I might try it if I get over my fear of rolling (since dabbing at a 90 degree angle seems like it would keep paint from getting behind it more). We shall see how gutsy/exhausted I get. Haha.
xo,
s
Holly@Loveoflifeblog says
Not to sound like a weirdo but you have beautiful skin! And great job on the stenciling. I’m impressed and think the colors are beautiful!
YoungHouseLove says
Aw thanks! You’re sweet to look past my I’m-gonna-murder-you expression.
xo,
s
JMJE says
Wow, that is beautiful. I don’t think I would have the patience for it but it looks really gooooood.
ruthy says
I just did a stencil piece of wall art for the first time this week…I’ll be posting about it tomorrow! I am not in the least bit crafty, but needed something to put up on my walls. I did two pieces and the first I can definitely see where I used too much paint and the stencil bled in the corners, but I still love the way it turned out. I stenciled some of the lyrics to my first dance at my wedding! I absolutely love the way your wall turned out. I’m totally inspired!
Kim says
I have to admit, when you first mentioned the stenciling idea I wasn’t 100% on board. But this looks amazing! I love the grellow accents…they really add a great pop of color. And I’m glad you didn’t go with wallpaper. If you ever change your minds this will be so much easier to just paint over.
I’m also glad to hear I’m not the only one who listens to Community while doing work around the house. I helped my brother move to his first apartment last month and we listened to the whole first season of Community while we built an apartment’s worth of ikea furniture. Nothing like laughter to keep your spirits up during a tedious project.
YoungHouseLove says
I love the idea of building Ikea furniture to the sounds of Community. Haha.
xo,
s
jamie says
You’re going much faster than me! I started stenciling a wall back in June! But I’m working with a much smaller stencil that I designed and cut myself. It takes forevvvvver. I totally agree with the line about how as soon as you get started, you want it to be finished!
Samantha Smith says
I painted my daughter’s room in a checkerboard pattern of pink, khaki, and chocolate…. it took two weeks. (Walls were plaster, so I had bleed-through on the white lines.) I understand your hand pain – but your office is looking terrific!
Here’s a photo:
http://twitter.com/#!/SamIAm1117/status/118697401983836160/photo/1
Sam
YoungHouseLove says
Love it!
xo,
s
Nicole says
You guys always seem to post exactly what I need at the time. I’m moving in a month and wanted to have a yellow-ish kitchen, grey living room, but was at a loss for how to tie in the dining room which joins them. This is perfect! Would it have been easier do you think to start on an edge or would you still have ended up smooshed in a corner by the time you got to the other end of the wall? Also, are the margins of the stencil so large that if you started at a wall corner, would there be an awkward gap?
YoungHouseLove says
We thought a lot about where to start and decided that the whole wall should look “centered” since you look in on it from the dining room. So starting in the middle of the wall meant we’d be squished into every corner (you kinda have to squish into the corners anyway since applications overlap so you never just end in an edge anyway) but looking in from another room it wouldn’t feel shifted to one side or the other. Hope that helps!
xo,
s
kyla says
I have had a stencil sitting and waiting for me for 2 months! I’ve been fearful of the tedius task..but you’ve given me motivation!! Maybe I shall tackle it this weekend. I know the end results will be so worth it. LOVE that pop of color and so happy you decided to do it, it really MAKES that stencil and ties in the other rooms. Any advise on the “math” or did you just start in the center because you see it from the dining room and work your way out?
YoungHouseLove says
Yup, just wanted it to look centered from the dining room and just worked around from that point. Hope it helps!
xo,
s
JillM says
Umm..that is the exact stencil that I want! Did you get the large or small version from their site? I’ve been wanting to stencil curtains for some time now. I see a few people have commented on doing that so I might actually get up the guts to do it! Not a small task though, I would need eight panels of 115″ in length each. I’ll surely have claws!
YoungHouseLove says
We got the large one. Love it!
xo,
s
Skye says
Oh my goodness, the stencil looks so great!! Thanks for sharing such an awesome idea!
KatyB says
I love it! It looks amazing. I think you will be so happy once it is done and you get to stare at it every day. It is like child labor, you quickly forget the pain.
Totally unrelated, I would love to see a close up of your chair rail near the window casing. It looks like theey ended it in an interesting way. I am always curious as to how people work out problems like this.
YoungHouseLove says
Oh no, that’s just not done. Still have to do the bottom 6″ of the wall above the chair rail, but I ran out of gas. Haha. Soon!
xo,
s
Katy B says
I meant the actual millwork. You chair rail seems to be capped off in some way, rather than going up to the edge of the window casing. I get why, cause it is probably thicker. I just want to see how it was done…as someone interested in adding some to my own home. Problems always arrise when you add new millwork to an old home, I was merely curious to see the solution.
Also, I was thinking about the wallpaper, and now stencil craze. In the early 80’s my mom papered every possible surface in our home. Towards the mid 80’s she took a stencil class, and you can see where this is going. We used to joke if you stood still long enough she would stencil a pineapple on your forehead.
We all know design moves much faster these day. This must be the natural flow of things. Makes sense, not too many people can commit, or shell out the cash for wallpaper.
YoungHouseLove says
Sorry for not understanding your initial question! Haha. I getcha now! The best way to describe it is that it’s beveled at the end, so it sort of creates an arrow that seems to point to the windowsill. I’ll try to share more pics in a future post!
xo,
s
Meredith says
I think she meant the chair rail itself, not your stenciling. ;)
YoungHouseLove says
Oh yeah, gotcha! They just ran the chair rail into the windowsill (ending above it so it looks like it’s resting on it). We’ll try to incorporate some shots of that in the final stenciling post if I get there! Haha. Fingers crossed that I make it through!
xo,
s
Christine says
Your stenciling job looks amazing! My husband and I stenciled an accent wall in our dining room. We used foam rollers instead, went much quicker just need to keep an eye on how much paint is on the roller and stencil so the paint doesn’t bleed around the design edges. To help tackle corners, we made little replicas of the stencil onto poster board and cutout what we needed. Grant it the poster board stencil only lasted a few uses, but that was what they were intended for since our plastic stencil didn’t like folding into the 90 degree corners.
Beano Wagner says
I keep wanting to stencil our small entryway, which is hopefully much more time-friendly than a whole room since it is the size of, i don’t know…an extra large telephone booth? (Lol, why did that pop into my head as a size reference, not sure.)I might do stripes also, so we’ll see.
Keep up the good work, you’re muscles will be huge and you’ll have an even more awesome office–WIN WIN!
Teresa says
I am in LOVE with this!!! seriously!!!!
Keep plugging away.. I know projects like this are so daunting.
and on a side note: my husband is giong to ask me why I am trying to stencil stuff now… lol ;)
I really like how you have tied your colors together. And I am very curious to see what you do for window treatments!
Wom-mom Ethne says
I have never done this, though so far it’s brilliant. I did buy a large stencil one time to chalk a hand-quilting pattern onto a quilt but never got around to it. Maybe I can use it on a wall someday instead. It kinda has a feather-y feel that yours does, sans the leaves. I was skeptical when you mentioned using the kitchen grellow, but so far it’s looking good. Anyway, looking forward to the update.
Krystle @ ColorTransformedFamily says
Wow! That looks great. I love that you used two colors. The little pop of yellow makes it seem all worth while. I agree with you it looks like a nice wall paper. Maybe your arms/ hands will get the rest they need to finish the room. I can’t wait to see the finished product.
Kristen says
The wall is beautiful!! You’re doing an awesome job with the stencil! I’ve never tried it mostly because I don’t think I’d have the patience to do it right. Maybe someday. Can’t wait to see the entire room finished.
P.S. The pic of you holding up the stencil is very Black Swan!
YoungHouseLove says
Haha, you’re the third person to say that. I do look like I’m about to kill someone…
xo,
s
Jamie says
I love the way the stencil is coming out!!
I just tried my hand at stenciling two weekends ago…and let’s just say that the wall that was supposed to feature the stencil got more of a wainscoting stencil along the bottom only haha!! I just COULDN’T KEEP DOING IT!!! Of course I also chose the French Poem stencil which was intricate and too much for an inexperienced DYI-er such as myself! And I started the project at about 11pm at night…In the end, the effect is still a nice one, the poem is all along the bottom of one of my walls and I am quite happy that I tried it. I have another stencil for my bedroom wall…which I am completely set on doing. At some point.
I also just saw on Pinterest someone used the same paint color as the wall, but the glossiest version of it (not sure what that is called). Which made the stencil look subtle and very pretty, which is what I am leaning towards doing but not quite sure just yet…I like the 50% tip too.
Thanks for posting, now I wish I had waited :)
Vonda says
I did a diamond pattern stencil in the entry way in our old house. I did the base wall color flat and used the exact color in a semi-gloss for the stencil. It was a tiny place w/10 foot ceilings so it was a solid wall but for the doorways. I used the adhesive but I used one of those small rollers. I think that made it go faster, along w/the diamonds (about 4 inches tall)being bigger and less detailed than your stencil. I loved it and have just bought a morocan trellis for our kitchen in our new house. Hope that one goes as smooth as my first.
I love the stencil you’re using by the way. It’s going to be beautiful when you’re done.
Kay says
love how its looking so far-looking forward to the finished product
Julie says
Love it! Could you show us what it looks like from in the dining room (with the teal bookshelf backs showing)?
YoungHouseLove says
We owe you guys some wider shots of the room! We’ll definitely include those in a few days when I’m (fingers crossed) done!
xo,
s
Lyndsey says
Love it! It looks fantastic. I haven’t done a stencil but I did do tone-on-tone stripes that I now love: http://fifteenminuteplan.wordpress.com/2010/02/10/and-all-it-cost-me-was-a-weekend-of-my-life-an-eyeshadow-brush-and-possibly-my-fiance/ . I loooove them now, although at the time I wrote the post I was still about salty about them haha. I have been considering doing a stencil somewhere, although I think I’d like to do a pretty obvious pattern and then constrict it to just one wall. But which wall to do? So I wait and try to decide. :)
YoungHouseLove says
I love them! So pretty.
xo,
s
Bea says
I did the semi gloss on flat in the same color, and it took me about as long as it is taking you, Sherry. I used Cutting Edge Stencils, and they said I could use a foam roller, so I did. After the first wall, I did get faster- thank goodness! And the foam roller worked well- no seepage. I was careful to make sure it was pretty dry before using it. But I loved that first wall so much, I kept on going! Your wall is truly beautuful!! Outstanding!
Melanie says
Wow, that looks incredible. I faithfully read your blog daily and this might be my favorite thing you’ve done! The patience you must have! Stencils always give me grief, especially the corner globbing factor. I’m inspired, now to convice my husband to let me do this somewhere. I’m assuming you said where you got this stencil…I’ll have to read again. Beautiful!!!
YoungHouseLove says
Yup, linked to it up top. We also have a discount code for their site on the sidebar (it basically knocks off shipping). Hope it helps!
xo,
s
Angie K says
It looks amazing! You have to be proud of your endurance…I would have probably given up and said I did a feature wall!!!
Rachel says
Looks great so far! I think you’re right on track as far as timing goes! Stenciling takes a while!:(
I don’t have a step by step, but I do have pictures in my blog of a wall I stenciled in my dining room that you can see here:
http://www.rachelsnest.com/p/tour-my-nest.html
It was a total pain (and I was 6 mos. pregnant when I did it! LOL)…but like you said, I love the result!
I also had a HUGE stencil, and I used the same method and brushes that you did! When it came to corners (even though I didn’t wrap around them) I had to free-hand some spots with a small artists brush because I just couldn’t get my stencil in close enough. You can’t even tell the spots I free-handed when you look at the wall as a whole.
I had to wash my stencil off after each pattern because it was so large that the paint was drying on parts of it and making it crusty:( I hope you’re not having that problem!
WOW…sorry that was long! Hopefully something I said will be helpful!:)
YoungHouseLove says
The front of my stencil is totally layered with paint, but the back is nice and clean. Whew!
xo,
s
Lizz says
Oh my goodness, I LOVE this! Great work!
Brandy says
Wow, that looks amazing! I’ve been meaning to do this to one of our bedrooms and you’ve inspired me. Maybe I’ll actually get it done!
http://jonesdesigncompany.com/decorate/painted-wallpaper-a-tutorial/
Cara D says
I love it!I’ve tried to stencil on a kids table I was revamping and it didn’t go well. I had to free hand paint. Maybe the heavy duty stencils would make a difference. I couldn’t get clean edges. Yours looks amazing though. Love the subtle white on the gray. It keeps it from being too busy looking.
Mona Alicia says
Totally LOVE it! It looks very modern, yet also retro. Good job on your part. I absolutely hate stenciling, I always end up with paint behind the stencil. Your’s looks great! I just stenciled numbers on my stair risers and it took way too long, I’d hate to tackle a whole room. I think you’re quite speedy, haha!
Melissa says
Wow that looks AMAZING! I love the addition of yellow. Great job. I have a stencil but have not yet braved it. May be about time.
tia says
Thank you so much! I am planning a stencil project and I had no idea about stencil adhesive. I really have no idea about any of this. I think I’ve been waiting for you to tackle it.
Allison says
Fabulous stencil, and gorgeous color choices!!! Love it! You may have given me the courage to tackle (just one) wall in my entryway!
Mandy Madison says
Shut the front freaking door. I LOVE THIS!
Karen says
The stencil you picked is beautiful! I’ve done some stenciling over painted wooden panels and a few bathrooms- I laughed when I saw your left hand covered in layers of paint!
One trick that helps me- and doesn’t smear the paint around, is to use a single wooden chopstick and lay it down to hold the stencil flat. And it’s a little less work for your finger muscles to apply even pressure as you dab away. Can’t wait to see the finished product!
YoungHouseLove says
Love that tip!
xo,
s
ali says
Okay, the stenciling is AMAZEBALLS, but I also felt compelled to comment when I saw sweet Clara with her Snugglepuppy (ooooh, Snugglepuppy of mine…) book – my husband and I get REALLY INTO that song and it’s quite the production when we pull it out to read. Love that book!
Kristyn M says
I love these stencils but they are so expensive! We should get a stencil exchange going and share them!
YoungHouseLove says
I love that idea! Although I wonder how mine will look when I’m done with all four walls. It’s covered with so many layers of paint on the front already- just trying desperately to keep the back clean!
xo,
s
Kristina Strain says
…Wow… I debated doing a stencil thang in our house, but since the wallpaper I wanted to emulate had like eight colors, I chose to turn the wallpaper into an overhead projection, trace the outlines of all the shapes, and fill them in freehand with a paintbrush. Six hundred or so hours in: http://sweetfernhandmade.blogspot.com/2011/04/flowers-on-wall.html
The funny thing is, I’m really, really enjoying the project. Probably because it’s not quite as repetitive as what you’re doing. I am totally impressed with how gorgeous that stencil is turning out, btw. Definitely my favorite new-house project of yours thus far!
YoungHouseLove says
Holy cow- that’s amazing! I can only imagine how long it’s taking. So glad you’re enjoying the process!
xo,
s
Missy says
OMG, I would never never never have the patience for a project like that, although it’s going to be really gorgeous. I am super impressed!
Laura says
Just a quick observation…. This room essentially matches your website. A cool grey background, with a lighter grey stencil & a “grellow” top bar.. hmmm, were you giving us hints early, or just really inspired, or was it pure coincidence?? :) Love the stenciling…
YoungHouseLove says
Haha- we definitely tried to redesign the site with colors that we’re loving now, so it makes sense that we’re bringing them into our house too! Too funny.
xo,
s
Laura says
I’m sure I’ll be doing something similar. Our little site incorporates colors I’d like to use in our current closet, eventual nursery :) I think it’s cute.. just thought it was funny! Hope your hands “uncramp” soon!
Maureen says
I LOVE this! It looks so great! I’ve never stenciled, still trying to get into that first house where we want to do things like this to make it “ours” but I think I know what one room will have eventually!