Dude, stencils are no joke. But I did it! I bit the bullet and ordered the stencil that John and I have been pining after for the past month (mentioned here a few weeks back). We loved the idea of adding some subtle tone on tone detailing above the chair rail in our office (we didn’t want anything with too much contrast since it’ll compete with the dark teal built-ins and the fun curtains in the nearby dining room). So we settled on a softer gray tone with a tiny pop of color (leftover grellow paint from the adjoining kitchen). At 54 honking dollars it was hardly a drop in the bucket, but let me tell you, this stencil is hardcore. First of all, it’s made of super durable plastic, so I don’t have to worry that it will rip or crease while I’m taping it, untaping it, and bending it manhandling it to get into the corner crevices (I’m pretty sure I would have trashed a thinner stencil after one wall, just because it’s kind of a more rigorous application process than I expected). And let’s just talk about how big it is. It’s over two feet tall and almost two feet wide, so it helps to make things go faster since you don’t have to reposition it every three seconds like you would with something smaller.
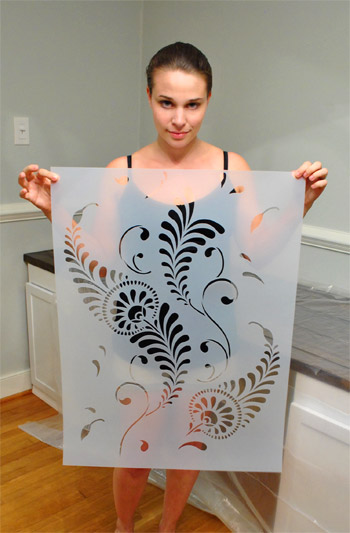
And yes, this is quite an evil face I’m making. No idea why. I remember saying something like “make sure I don’t look naked” when John snapped this, but had no idea I was giving off such an I’m-the-female-Hannibal-Lecter vibe.
Another way that I’m rationalizing my purchase is that we only spent $6.30 on cabinets for the built-ins and $27 to build a 13 foot counter, so maybe it’s time we splurged in the office. Haha. I also figure any type of wallpaper (even the cheap stuff at Lowe’s and Home Depot) would be way more than $54 for the entire room above the chair rail, so there ya go.
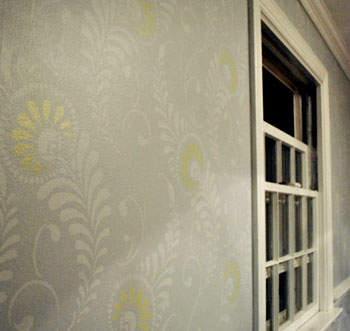
I’ve actually never done a giant repeating stencil like this on a wall (we did stencil the floor of our first house’s sunroom) so here’s where I’ll get to the keeping it real part: stenciling is haaard. I’m not gonna lie, my arms were cramping after about an hour and it took four and a half solid hours (from 8pm to twelve thirty in the morning) just to almost finish one wall (out of the four that I want to do). But in the spirit of sharing things real-time as we go, I couldn’t wait to share the in-progress madness. Here’s a close up:
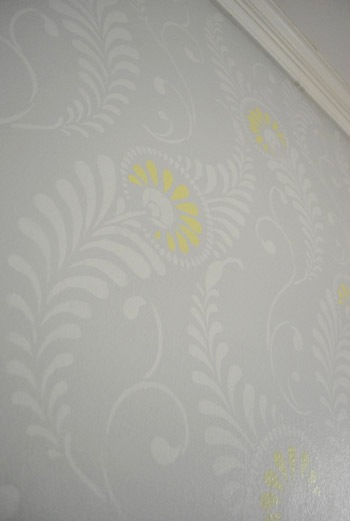
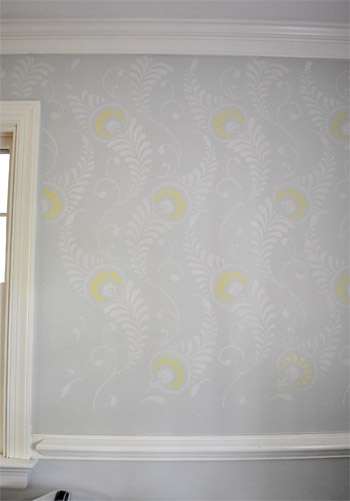
And here’s one side of the wall that I almost completed (I still have to do those last 6″ above the chair rail). Oh but ignore the weird dark and light vertical shadows on the wall (couldn’t wait for the lighting to be better – too impatient and excited to share, haha).
As for my method, here’s a little breakdown of what seemed to work for me:
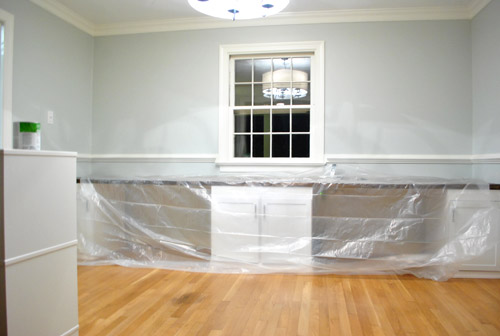
1. I prepped the room by clearing it and tossing a drop cloth over the desk so we wouldn’t get paint splatters on it.
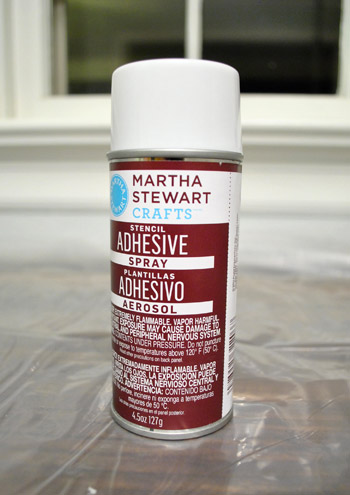
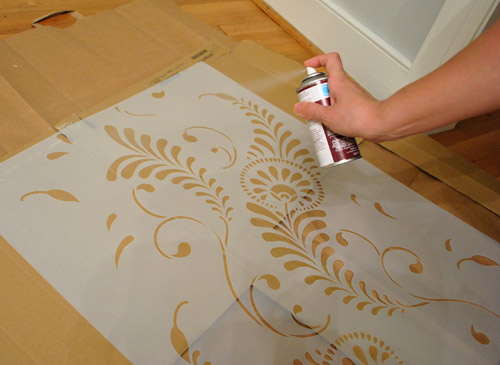
2. I used Martha Stewart Craft Stencil Adhesive Spray from Michael’s (purchased with a 40% coupon of course) to spray the back of the stencil before taping it up on the wall with painters tape. This helped the middle parts of the stencil stay close to the wall and not bend out for a nice crisp line. I probably repositioned the stencil two or three times before re-spraying it (when I noticed it holding less firmly to the wall I just took it down and sprayed it and taped it back up for the next application). Oh and you’ll want to use a large piece of cardboard or drop cloth to spray the back of your stencil so you don’t get stick stuff all over the floor).
3. As for where to start, John held the stencil up in the top middle of the wall so we could center the pattern and work out from there in all directions.
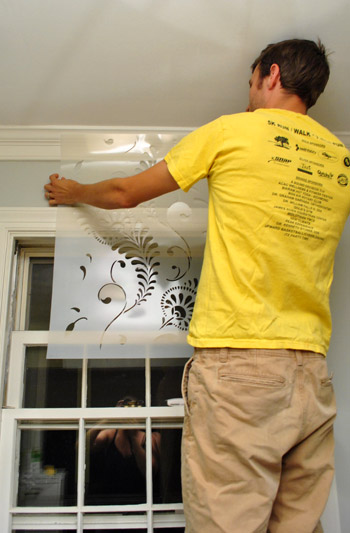
4. I also used delicate surface frog tape for holding the stencil up at the top, bottom, and sides (we already had it on hand and I didn’t want to tear off fresh paint as I moved it around the room so it seemed to do the trick).
5. I used small foam craft brushes (also from Michael’s). They were basically dowels with flat foam tips.
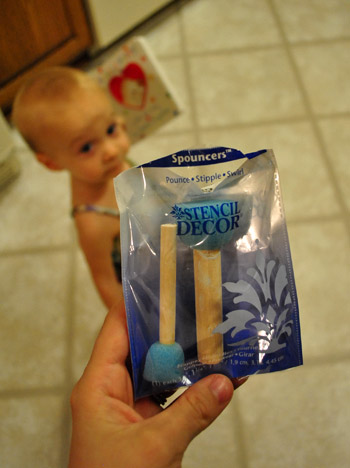
6. As for how I loaded my little foam brushes, I just dipped them in the paint (more details on the paint colors later) and dabbed the brush around the lip of the plate to remove excess before tapping it against the wall to apply the stencil.
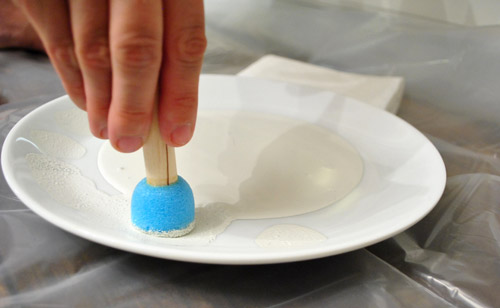
7. I always tapped the wall at a right angle with a not-to-gloppy foam brush for a nice clean edge (so the paint wouldn’t slip or drip behind the stencil and smear around).
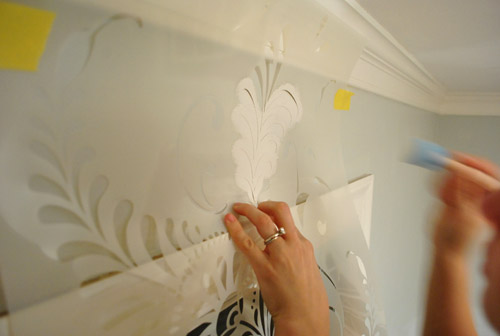
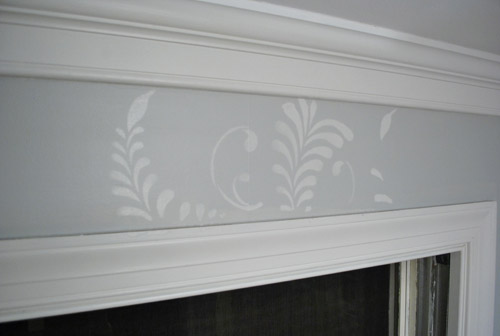
8. If I feared that a little bit of paint somehow got behind the stencil, before repositioning it on the wall for the next application I would lay it on my drop cloth on the floor (face down) and wipe the back with a dry folded paper towel to remove the excess paint. Then I would respray my stencil adhesive and stick it back on the wall for the next application.
9. The way that the stencil is applied means that there are repeats. So you position it right over the last 3″ that you previously stenciled and work your way across the wall that way. I didn’t wait for the paint to dry before moving the stencil (that would have probably taken five million hours), so I just took my time applying the paint so nothing got behind the stencil and then matched up the stencil carefully for the repeat and continued on. Since there was no wet paint on the back of the stencil, it was fine to be pressed against the 3″ of wall that was already done, and it didn’t look any different than the non-overlapped part. I wonder if the application of paint was so thin that it was drying really quickly so it didn’t make a difference…
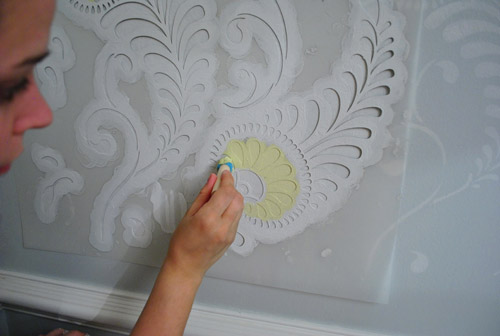
10. The corners were the hardest part. To get the stencil to lay flat against the wall in the corner so you can cram your brush into the small little stencil openings was sort of impossible to get perfect. But I did learn that this stencil is extreeeeemely forgiving (probably because it’s a more organic pattern than a regularly spaced geometric one, which would probably make any inconsistencies a lot more obvious). So when I didn’t quite get deep into all the corners, once it dried it was somehow not obvious at all (a stenciling miracle?). Of course I’m not exactly a corner expert because I’ve only attempted one of them, so as I go around the rest of the room maybe I’ll have more tips.
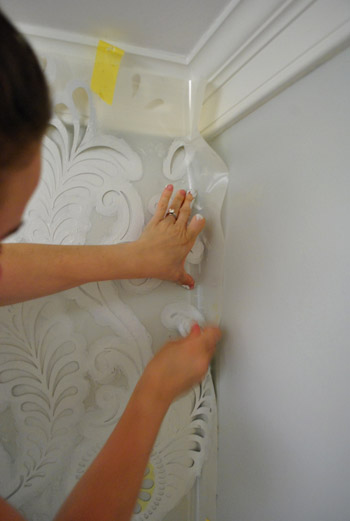
After about three hours I was here on the first wall:
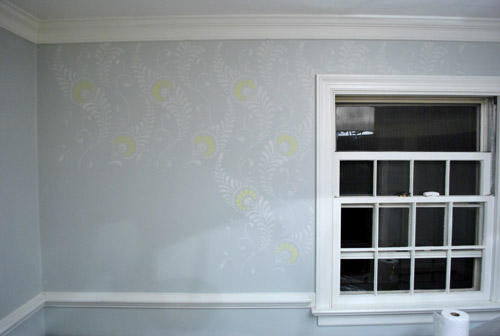
And after 4.5 hours I had one wall almost all done (sorry for the terrible picture, I was sort of losing it at this point).
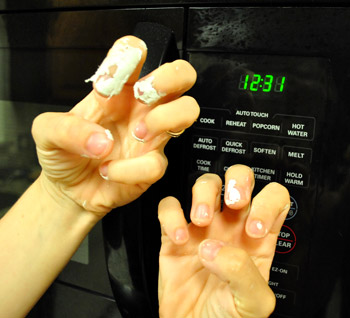
So although I wasn’t completely done with that wall, I decided that 12:31 am meant it was time to put the foam brush down and throw in the towel for the night. And do some finger stretching (I seriously had cramped up hand-claws).
Oh and as for the colors, here you go:
- Walls: Moonshine by Benjamin Moore (color matched to Olympic No-VOC paint in a satin finish)
- Main stencil color: I just asked the paint guys to give me a half-tint of the wall color (also color matched to Olympic no-VOC paint in a satin finish). This means they just add half as much tint to the white base as the original formula calls for, so you end up with a half-as-intense tone-on-tone effect.
- Grellow stencil flower accent color: Leftover wall paint from the kitchen, which is Sesame by Benjamin Moore (color matched to Olympic no-VOC paint in semi-gloss). You actually can’t tell the difference in finish unless the light hits it just right from the side and the grellow sort of looks iridescent, which is actually awesome. Yay for happy accidents.
I also made a video to hopefully help demonstrate the foam brush prepping and actual stenciling part of the process (including a quick demo on corner stenciling):
So that’s where I am with the stencil. One wall-above-the-chair-rail almost done, three more to go. I’m planning to tackle another 4+ hours tonight and hopefully can fit in one more session this week (my goal is to be done by Thursday or Friday, soreness permitting). It’s definitely one of those projects that you just need to force yourself to complete as fast as possible – because as soon as you start all you want is to get to the point where you can let out a huge sigh and say “so glad that’s over!”
But so far I have to admit that it’s totally worth the trouble. We’re loving the effect (it’s sort of like subtle modern wallpaper, not too in your face but not too tame and unnoticeable either). It’s sort of the perfect amount of “ooh, look at that” without being too competey and chaotic with the adjoined dining room. And John and I both have said the following sentence about ten times so far: “the pop of color totally makes the entire thing.” So might I recommend a splash of grellow (or any color you love actually) to take something that’s gray on gray to the next (still-kinda-subtle) level?

Ok, now I have to hear from you guys. Have you ever stenciled something, be it an accent wall, piece of furniture, or entire room? Do you have any secrets you’d like to share? How long did it take? Is four and a half hours for the top half of one 13 foot wall (with a big ol’ window in the middle) about right? I might just be moving at a turtle-like pace. Haha. Just too nervous about getting paint all down the back of my stencil if I go any faster. Anyway, hopefully I’ll be back with finished pictures (and maybe a bulging right bicept from dabbing away) by Thursday or Friday. Until then, picture me standing on a chair at 11pm wearing my inside out painting clothes and listening to shows on Hulu (I tried radio, but somehow hearing Community and Parks & Rec play in the background kept my spirits up a little more).
Psst- I’m over on BabyCenter chatting about my favorite kids clothing store and how I save money when it comes to shopping for Clara’s clothes & shoes. Did I mention that I snagged 47 cent shoes on my latest mission? Excited doesn’t even begin to describe it. Check it out here.

Carrie says
One word: AWESOME!
Adriane (aka the greenhorn) says
Hahaha, I LOVE the claw hands picture. And the stencil was well worth whatever money or effort you may have been hesitant about. You know that “something” or “extra” bit that comes from a designed house that I think most people (okay, maybe just me) find so hard to replicate? This is a beautiful finishing addition. Internet high five!
Ashley says
oh my freaking word!!! I ADORE THIS! I’m talking in the top 10 of my fav things you guys have done! I’m sooo obsessed. It’s subtle, a little bit romantic feeling but not girly. And you are right, the grellow totally makes this! I love how it ties the three rooms together… dining room, office and kitchen. makes all three rooms so cohesive without them “matching” ADORE (okay, okay… enough talking)Long story short…I HEART it!
Amelia @ House Pretty says
This is going to look AMAZING and I agree that the pop of colour makes it! Stenciling is definitely something I’d like to try in the future, although your hand-claws aren’t making me rush out to buy a stencil haha :)
Erika says
This is absolutely beautiful! I love that little touch of color too. I think it’s going to look way better than wallpaper and will be MUCH more forgiving should you ever want to change things up. Although, after doing all that work you will probably live with it when it’s way past it’s prime. hee.
Marin says
I feel your pain!! I did a tracing rather than a stencil. I took a template I printed from online, and backed it with cardstock. Then I hand measured my wall and marked a grid, then traced on the stencil. THen I went back over it free-hand-ish, with a paint brush for the lines! perfectly imperfect :)
http://pinthere-donethat.com/2011/08/15/my-finished-wall/
I was sore and eshausted too. I had to do mine over three nights – I think it took over 12 hours for the one wall!
YoungHouseLove says
Looks awesome!!
xo,
s
Lindsay says
OMG I FREAKING LOVE IT!!! I’m going to stencil a wall in my house now.
Andrea says
Love, Love, LOVE IT!!!!!
Robin says
OMG. LOVE this! What an effect! Two thumbs up!
(Also? Sherry? You are seriously a beauty.)
Rachael says
That is ABSOLUTELY GORGEOUS!!!!!! I have never stenciled before, but this makes me want to! Something like this would be perfect for the wall behind my bed!!!! Thanks so much for the inspiration. Like I said GORGEOUS!!!!!!
P.S. (Sorry for all the exclamation points, this is just too beautiful though)
Mika Anna says
Sherry,
You are insane. I would never tackle such a project. By 8pm, all but a smidgen of patience is drained.
Good for you!
Sarah B says
I’ve never stenciled before… but I LOVE how your project is coming together! Makes me (almost) consider doing a bit of stenciling… not that I need another project right now! Can’t wait to see it complete!
Cali says
LOOKS AMAZING!! So beautiful..very impressed!
Lexi M. says
Can I buy that stencil from you!? Thats gorgeous! You just inspired me to do the same thing to my own walls! Looks great guys, and I’m serious about buying it from you! ;)
YoungHouseLove says
Haha, you’re sweet! Ours is already covered in layers of flaking/peeling paint on the front, and with three more walls I fear it’s going to look insane (and not really be something we can ship/sell). But others have talked about a stencil exchange idea, which would be awesome!
xo,
s
Rachel @ Common to Moms says
I let out an audible gasp (in a good way) when I saw the first picture of the stencil… WOW!! It is BEAUTIFUL! You are definitely making a case that stencils are worth the effort… Awesome job Sherry!
Emma says
Wow! That looks *so* fantastic! I’m very impressed. I used a Royal Design studio stencil on my bathroom wall. I set out hoping to do the entire wall but quickly gave up and only did a 6×13 foot stip. The quality of my stenciling also improves from where I stared to where I finished-woops! I used 3 paint colors and it took me about 10 hours – so painstakingly slow! However, I’m very happy with the results. Well done and good luck!
Sarah says
That looks awesome. I think this is my favorite project in your house so far. We’ve been considering stenciling our small half bath for a while so it’s nice to see how it’s working out for you.
grace says
HAPPY BIRTHDAY BURGER!!
YoungHouseLove says
Thanks Grace! I’m having a great day full of eating and sleeping!
-Burger
Kate says
I absolutely love how this looks! I wouldn’t have ever thought to paint just that one section a bright color, but it turned out beautifully.
Kristen says
We LOVE snugglepuppy (in Clara’s hands). Oh. And nice stenciling! :)
Michelle says
I really want to stencil my huge fireplace bump-out wall (on the drywall, not the brick, obviously). However, I have a hard time shelling out $50 for the stencil, which is about the going rate that I have found. What if it doesn’t work out and I don’t like it? I’m kicking around the idea of creating my own using an exacto knife and some thin sheet of plastic, since I would prefer something more geometric. What would be your thoughts on that? Think it’s worth it for the professional stencil? I’ve never seen one in person, so I don’t know…
YoungHouseLove says
Ours was definitely worth the money and then some! It’s huge and thick and easily repositionable (I worried that something thinner would rip since you sort of fold/manhandle it in the corners). I also like to remember that wallpapering a room can be hundreds of dollars, so $50 for a stencil and some affordable paint is actually not a bad alternative for a detailed and “special” look!
xo,
s
Kim S says
I love it! Good for you for sticking with it because it is totally worth it. I tried to stencil our guest bathroom with a small homemade cardboard stencil and I only made it through about 4 stencil “moves” before I was sick of the whole thing. I painted over what I had already done and called it a day. Maybe someday I’ll buy a pro stencil like you did and give it another go, I do think it would be beautiful if I could make it work!
Tami says
AMAZING!!! love it!
Kelley says
You’re totally channeling Natalie Portman in Black Swan in that top picture. Hair and everything. And the stencil is fabulous! I’ve been wanting to use one in my dining room and haven’t fallen in love with a particular one yet, but now you’ve inspired me to look again! Lovely!
YoungHouseLove says
Hahah, so many people have said that! I must look ten minutes away from killing Mila Kunis!
xo,
s
Riva says
I am so inspired! I have been contemplating repainting our downstairs bathroom (again) but couldn’t think how to justify this to my hubs (we almost got divorced when I made a giant mess painting it the first time!) Maybe he will go for a beautiful stencil upgrade though, especially after seeing the pics you and everyone else have posted… thank you!
Rikki says
Does the Martha Stewart spray stuff leave a sticky residue on the wall? Will you be able to wash it off after everything is all stenciled?
You should try listening to AudioBooks! I have no trouble zoning into a task when i have someone nicely narrating a story to me. :)
The wall looks great! I can’t wait to see the rest.
YoungHouseLove says
Ooh I love the idea of audio books! As for the spray, it’s only sticky on the stencil for some reason (maybe it’s meant for plastic surfaces?) so when you pull it off the wall isn’t sticky. It’s sort of like a sticker (you can press it only the wall and remove it and nothing is left behind).
xo
s
Kristen says
Congrats, that looks FABULOUS! and totally worth all the effort! You inspired me to stencil the nursery (#2) and once I find out the gender I am going to find me a stencil!!!
Beatrice says
It looks beautiful and I am sure it will be the start up to many conversations around the dining table. Great job!
Erin G. says
I LOVE it! Can’t wait to see the final product!
Question- How do you decide b/t glossy, semi-glossy, satin? Does it matter? Do you have a standard for trim vs. walls? Does it matter the type of wall (paneling vs. dry wall, vs. textured wall)? So many questions I know, but inquiring minds would like to know!
YoungHouseLove says
We use satin for all walls except bathrooms and kitchens which go semi-gloss. Some folks think that’s too glossy so they go eggshell in most rooms and satin in bathrooms/kitchens. It’s just one of those personal preference things (satin and semi-gloss are more wipeable/durable so we like to keep things as baby-friendly and low maintenance as possible).
xo,
s
Katie says
I think this is perhaps my favorite thing you have ever done. It looks ah-mazing!!!! And something I might actually be able to pull off (unlike your incredible built console).
Katie says
I. Adore. This. Seriously! You are doing a phenomenal job. I’m off to dream about stenciling my dining room. If only I didn’t have those laminate wood floors in there. Aargh! Kind of kills the elegance. :)
Kesley says
Absolutely love the colors! Two of my favorites :) And I just thought Sherry would enjoy the fact that I had a totally random dream about how we were roommates; like all 5 of us (Sherry, John, Clara, Burger, and myself). Really weird lol You’re not the only one with random dreams!
YoungHouseLove says
Haha, sounds like fun.
xo,
s
Lauren says
Love it!
Jodie Kirk says
Gorgeous! Can’t wait to see a nice wide shot of the whole room, and also through the dining room!
Sherry, were those crickets I heard in the YouTube video??! lol!! :)
YoungHouseLove says
Haha, totally some sort of bug! Cicada?
xo,
s
Adrianne Bugg says
Stenciling IS hard and SLOWWWWWWW. But, like you said, totally worth it. Your wall looks just like awesome sauce! I got into a geometric pattern with our new TV room (converted from a DR). I have GREAT before and after pics. How to send these to you? Anyway, great job. I look forward to seeing the end result!
YoungHouseLove says
You can send any Reader Redsign submissions to [email protected]. Or post them on our Facebook page for all to see!
xo,
s
Kristal says
Very nice! I love the grellow and white on the gray wall :)
Karyn says
I knew it, I knew it, I knew it and I’m so excited about this project – it looks awesome. I can’t wait to see it completed (I imagine, however, that Sherry is much more anxious to reach the end)! Love that you listened to Parks & Rec and Community while working – my husband and I do that all the time.
Sarah H. says
This seriously might be my favorite project to date. LOVE how this is turning out!! Almost makes me want to take on stenciling a room…almost. The hand cramping scares me. Maybe a small room… :) Can’t wait to see the final product!
amy says
This is perfect! I’m planning on eventually stenciling just one wall in our bedroom and I’ll definitely be checking back in on this post once the time comes! Thanks!
Steph F. says
Oh, I am SO happy right now! I just wrote a post about stenciling a cabinet last night (http://glitterandgoatcheese.com/2011/09/27/scared-of-stenciling/) and my terror at the thought of conquering it, and I kept thinking to myself, “If only Young House Love had a tutorial!” (I’ve seen your floor stenciling post, of course, but I figured that might be a slightly different method.) It’s like the blog gods answered my prayers! Thanks so much for posting this, guys! It came out INCREDIBLE.
Sarah S. says
Love this project, it definitely gives a look of luxury to your office. It’s probably my favorite painting project you all have ever done and now I’m wondering if there’s a small space in my house that would benefit from the stencil treatment! Good luck with the next 3 walls, can’t wait to see the finished product!
Jessica D says
OMG that is a lot of work! But it looks awesome! Can’t wait to hear about the paint colors (love them btw)!
Stephanie says
I may just have to steal this idea!
I love love love grey and yellow together!! My hubby and I have a grey guest room. In the meantime we’re going to decorate it with red accents (aka the bedding we got as a wedding gift). But, if our first child is a little girl, I am totally going all out with the yellow accents! Yay!
andrea worley says
I haven’t stenciled anything yet, but I’ve been dying to do a whole wall in our master bedroom. thanks for the tips!
harmony says
This. is. so. beautiful! Seriously, one of the most beautiful things you guys have ever done.
Lynette says
Totally amazeballs!
Love the grellow accent color – really bumped it up a notch. Can’t wait to see the finished walls.
Lara says
That looks awesome, Sherry! Great work. I can only imagine the hand cramps that came with that one. And will come. :)
I stenciled some curtains for our bedroom. Sounds weird, yes, but I used this fabric paint that doesn’t dry “crunchy”. Did a little medallion design in mass, gray paint on white fabric. Sort of a West Elm look but for a lot cheaper! But, the curtain was on the floor while I stenciled, so crazy hand cramps didn’t really happen.
Amanda says
I did a huge 5-foot stencil in my bedroom. A friend made it for me out of posterboard with an exacto-knife. We applied it three times. The first time was amazing, but the second and third made us curse copious amounts. Once the stencil got wet paint on it, it bowed up in odd places and would never lie flat against the wall again. It was a long process but so worth it!
Picture at the bottom of this post here:
http://jimmiesworld.org/2011/05/15/room/?preview=true&preview_id=596&preview_nonce=9d38b651b8
and then with bedding changes here, all the way at the bottom:
http://jimmiesworld.org/2011/05/22/today-im-boring-and-a-tease/?preview=true&preview_id=641&preview_nonce=2316b4c529
YoungHouseLove says
Pretttyy!
xo,
s
Carrie says
Happy birthday Burger! :-D
YoungHouseLove says
Thanks! I’m having a great day. Just eating and sleeping. Eating and sleeping…
-Burger
Rebecca says
So, I rarely comment (but love the blog), but I just have to say: Sherry, you are totally channeling Natalie Portman in Black Swan in your “evil face” picture. Seriously, you should google it (but don’t see the movie – its too scary/disturbing).
Also, I love, love, love the stenciling idea, and immediately want to try it in our dining room.
Keep up the good work!
YoungHouseLove says
Haha, I love that movie. And I kind of love that I look so murderous. Although I had no idea I was making that face. Maybe that’s the scariest part.
xo,
s