We can officially stick a fork in it, guys. Well, Sherry actually stuck an oversized fauz clam shell in it, but that’s doesn’t roll off the tongue quite as well. Either way, the fireplace makeover is complete.
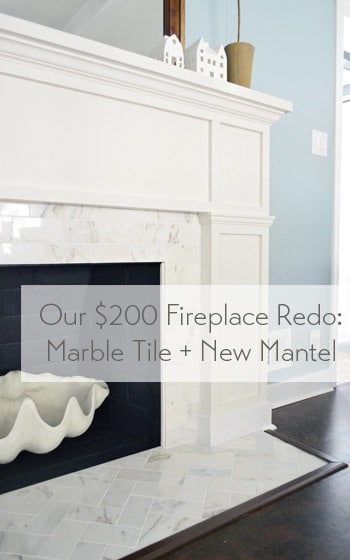
To back up a smidge, you saw us devise a plan for this little refacing makeover, add some marble subway tile and then build out around it. Reminder: fireplace code is different in every area (and requirements vary if it’s wood burning or if it has a gas insert, etc) so it’s a good idea to check that before going nuts on your fireplace.
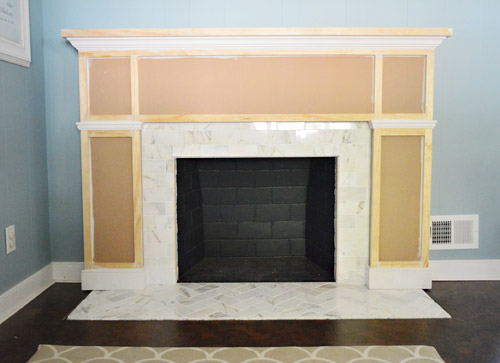
Our fireplace is non-working (we’d love to add a gas insert and even double-side it down the road) but for this phase of the process all that was left was to add some primer and paint.
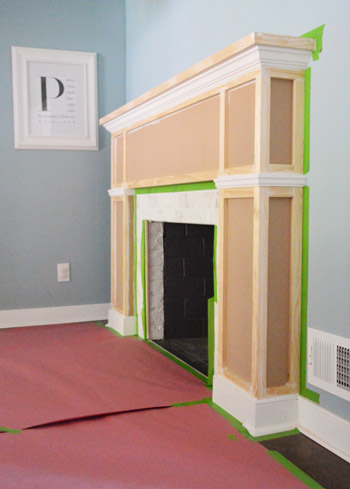
I’ll spare you the play-by-play of the painting process because it wasn’t all that exciting. First we primed (using what we already had on hand) then painted the whole thing with Benjamin Moore’s Cloud Cover since it’s what’s on the nearby cabinets (and because we had some leftover). After that we did some touch-ups, like giving the firebox itself a fresh coat of its original color (Benjamin Moore’s Temptation) Note: use fireplace-approved high heat paint if you have a working fireplace.
And after giving it a couple of days to “cure” we put everything back so that we could call this puppy complete. And it’s a puppy that I kind of want to curl up with (yes, Sherry pets it).
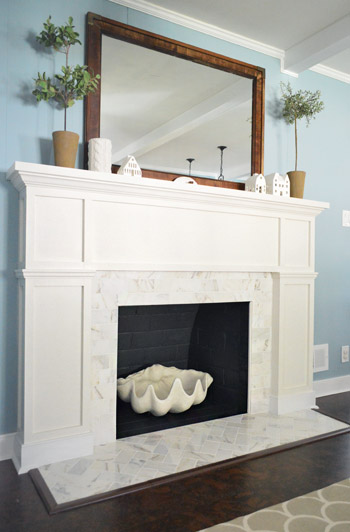
Update: A few folks are asking if we considered widening the tiled heath to match the width of the built-out sides of the fireplace – we did, but since it’s just a bit of shoe molding (which also extends around all of our cabinets) it didn’t bother us enough to rip up cork to make it happen. Perhaps down the line we’ll paint the brown floor trim white to make it appear wider if it bothers us :)
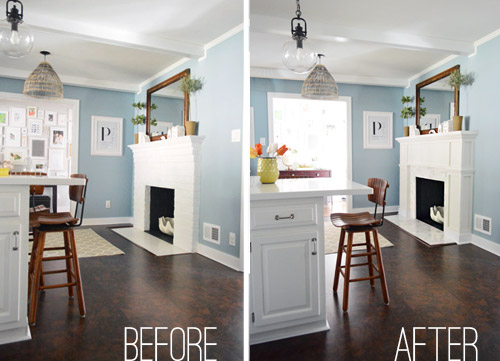
Here’s an obligatory before and after for ya:
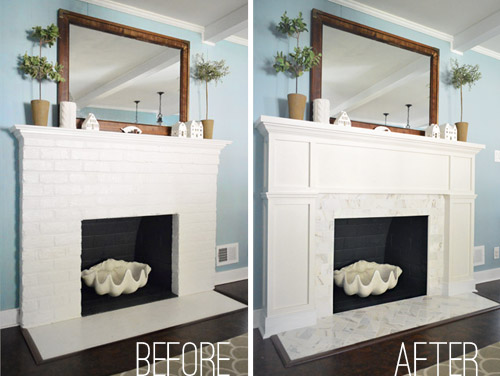
But I much prefer this one, which shows what the fireplace looked like when we bought our house back in 2010…
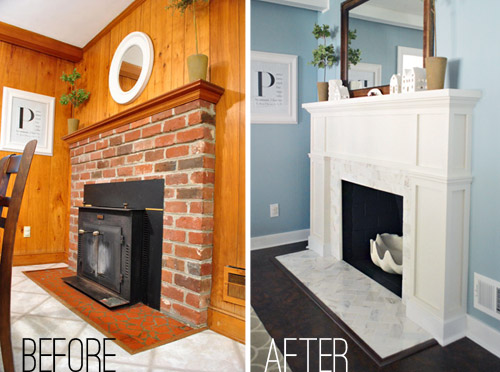
Since the painting step didn’t cost us any extra money (we used supplies that we already owned), the total cost for the project is just the addition of the two budgets we’ve already shared (tiling was $99 and building out was $98.75) but here’s the full breakdown:
- Cement board (2 sheets): $16
- Masonry screws: already owned
- Liquid Nails Heavy Duty: $2
- Subway tile: $5.50/sq ft, totaling $70
- Thinset: already owned
- Tiling tools (saw, trowel, float, etc): already owned
- Grout: $11
- Tile sealer: already owned
- MDF frame: $35
- Mantle top: $17
- Crown, baseboard, & decorative trim: $22.75
- 1 x 2″ boxes: $24
- TOTAL: $197.75 (* thanks to holiday gift cards from the family we only spent $147.75 – but without gift cards or already owned supplies this might be a $250 upgrade)
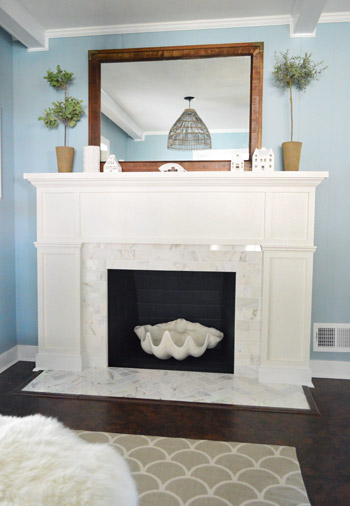
Definitely not our cheapest project, but we love it. The herringbone marble tile and the tailored built-out surround looks pretty darn expensive (at least in our humble opinion). We’ve never had a tiled fireplace so we suddenly feel very swanky indeed. Perchance I’ll start sporting an ascot.
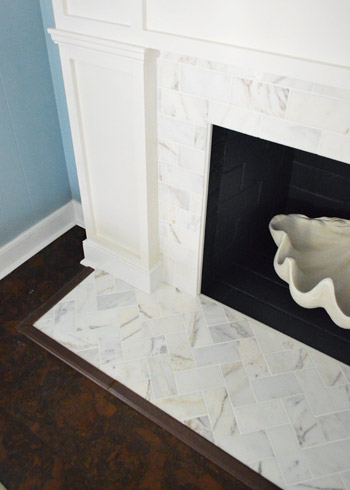
Some of you were curious about how we concealed the exposed edge of the cement board around the firebox. We just used a piece of trim that we had in our scrap pile (it’s slightly rounded on both sides). Before grouting we glued it in place to provide a clean edge to grout up against and now it’s painted to match everything else. Obviously for a functioning wood-burning fireplace that’s no bueno, so you’d probably want to use something like this. And if we ever convert our fireplace to a wood-burning one (which is unlikely since it would require a ton of chimney work) we’ll just pop out the wood trim and install tile edge pieces.
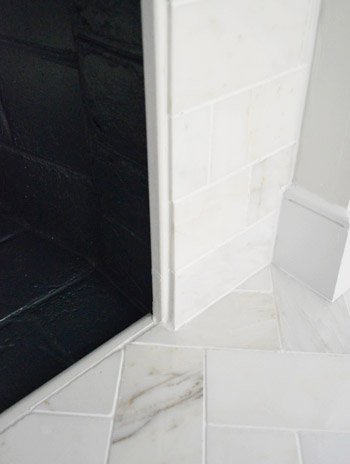
Now back to the gratuitous after shots.
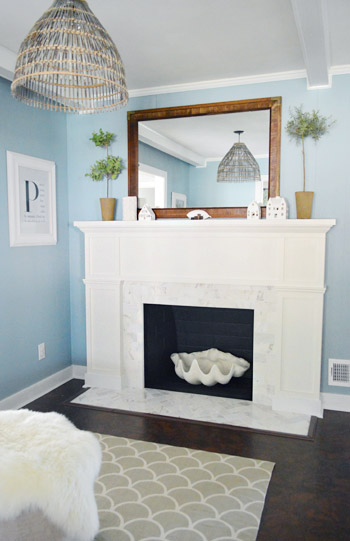
Ok, one more and we’re done.
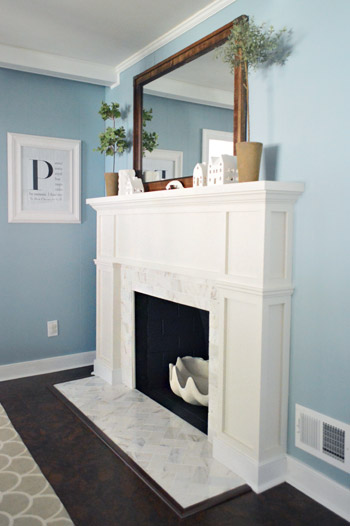
Just this guy and I’m out.
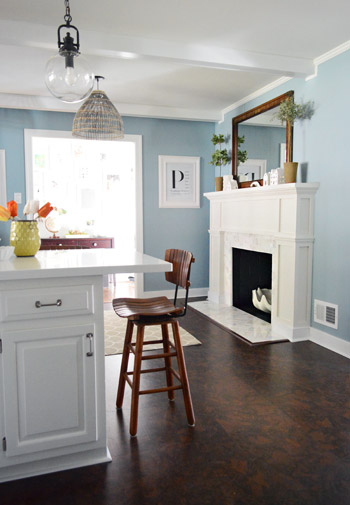
Oh wait, here’s a good comparison shot that shows how the original fireplace was pretty thin and even a little top-heavy, while the new chunkier tiled-and-framed-out version feels more “focal-point-ish.” In person has even more dimension (unfortunately photos of a white-ish surround with white-ish tile don’t depict all the texture and interest that they have in real life).
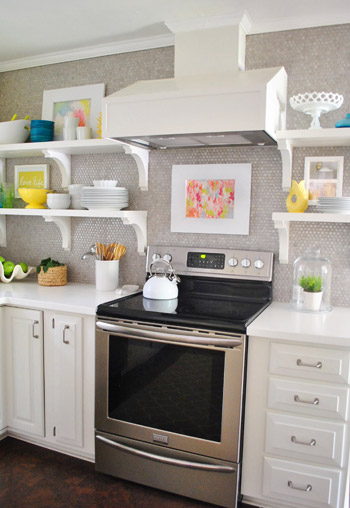
But perhaps best of all, our wall of penny tile on the other side of the room no longer feels like it’s “the fancy wall” while the rest of the kitchen struggles to keep up. The herringbone marble fireplace finally gives the penny tile a run for its money, in the best possible way. According to Sherry “it’s a swank-off in our kitchen.” Fireplace vs. wall o’ penny tile. Who will win? It’s anyone’s guess. (Spoiler alert: Sherry says the wall of penny tile wins because she pets it slightly more than the marble but it’s very close.)
So that’s the end of our little fireplace update. We’re really glad to have it done and are looking forward to some porch and carport updates. So come on end-of-March snow, give it a rest so we can get outside and start working! What are you guys doing? Any tiling, mantel building, priming, or painting? What about placing giant clam shells around the house? Any of that going on? That’s all in a days work for my lady.
P.S. If you want to read about this makeover from the beginning, check out our planning process, how we tiled and how we built out the wood frame around it.
Update – Wanna know where we got something in our house or what paint colors we used? Just click on this button:


bonnie says
Looks great! Did you guys mean to say “faux clam” instead of “fauz” in the first line?
YoungHouseLove says
Haha, yes! Faux!
xo
s
Tammy says
Ooh-La-La!!! Amazing update…great job. When can you come to my house???
YoungHouseLove says
Ding dong! That’s us at the door. Haha!
xo
s
Alice says
Looks fantastic guys! You mentioned this before I think, but what is that beautiful blue wall color behind the fireplace?
YoungHouseLove says
Thanks! It’s Colorado Blue by Benjamin Moore.
xo
s
Val says
Excellent craftsmanship! You write up projects like they are no sweat, but most people do not have a finished product that looks this good. I’m sure it is because Burger was a contractor in a former life. He whispers home improvement tips to you in your sleep. I can’t believe you did it all for under $200. Do you have any idea what it would have cost to hire a “professional”? It would be fun if you got an estimate on your next project to really compare the savings.
YoungHouseLove says
Haha, thanks Val! I’m not sure what it would have cost, but to have tile work and some building for a custom fireplace frame I would guess maybe 1K?
xo
s
Heidi says
you GUYS!!!!!!!!!!! I have no words. You should feel very proud of yourselves. Its to die for. :)
YoungHouseLove says
Aw thanks so much Heidi!
xo
s
Tessa says
Showstopper!!!
Melissa Ricci says
Hey!
I lurrrve everything! Looks amazing! I have a question…we are about to move into our home and have all white cabinetry…how do you keep it crayon/marker/toddler proof? Any tips on cleaning products?
Thanks!
Melissa
YoungHouseLove says
We just use scrubbable paint (Advance paint by BM) – we’ve even dripped wall paint on it and scrubbed it off.
xo
s
Trudy says
Hi there. Love your blog and all your projects! Could you source your mirror? Looks antique, so I’m not holding my breath. Exactly what I want. I have a very old family painting with nearly the exact same frame.
YoungHouseLove says
I’m so sorry Trudy, it’s from a yard sale so I don’t have an info for you.
xo
s
Jennifer says
Ok y’all this is the best makeover yet!! The deck is awesome but that was a complete gut job. This is kind of a revamp, just a really big one. It looks amazing and worth more money!! It also looks giant (which personally I love) but I think you said it is the same size (and the mirror looks to be the same from the ceiling). I know you can’t do post like this everyday but this is the stuff I read you guys for!! LOVE LOVE LOVE!!
YoungHouseLove says
Thanks so much Jennifer!
xo
s
Tina says
I am in love with that tile-turned out amazing!
Also, my mom just handed over her copy of real simple-saw you guys got a shout out in there for “blog to bookmark”. :)
YoungHouseLove says
Aw thanks Tina!
xo
s
Jillian@TheHumbleGourmet says
Umm…exquisite. Exquisite. Gold star!
Lynn @ Our Useful Hands says
Wow that turned out bright and beautiful! I like how much chunkier it turned out and I didn’t think that I would, but I do. The last side by side comparison really nails the point home that it needed to be balanced out and was a bit top heavy. Hello Dolly Parton! March made one year down in our little casa and we’ve done alot so far but not enough if you ask me. :o) So we are currently in the midst of ripping down wallpaper in the kitchen and picking through our swatches. So far I love Wood Stone and Polished Limestone for wall contrasts. If we get this done before spring really is sprung then maybe we can start planting this year. If not, there’s always next year! :o)
My best, Lynn
YoungHouseLove says
Thanks Lynn!
xo
s
Koliti says
Looks like your fireplace went to the gym and got all pumped up then got all spiffed up for a night on the town!Wowza! That’s DIY beef-cake!
Have you decided how you will hang your Christmas stockings on the new mantel?
YoungHouseLove says
Haha, the fireplace has been working on his fitness. As for the stockings, I think we’ll do cup-hooks from under the mantel again (so the holes aren’t seen and so they’re kid-safe since weighted stocking hooks on top of the mantel can thwack kiddos).
xo
s
MC says
Might I suggest petting penny tile…but NAPPING on the hearth? Mostly because it’s hard to nap on a wall, but also because pretty.
YoungHouseLove says
Best. Suggestion. Ever.
xo
s
Bluenoser says
Gorgeous job. I love the before and after shots!
Britt says
Gor-geous! Seriously, a great before/after and awesome photos. Love these kinds of posts. Enjoy the new fireplace!
Ana says
I wish I had a non-working fireplace — my 40-lb. dog would take up residence there. She loves cozy spaces like that (even when she doesn’t quite fit). Just add something soft for Burger to lie on and he’ll have a good vantage point during family gatherings.
Really love the herringbone tile. I’ve got a penny round backsplash, too, and wish I had a place for herringbone. I’ll just have to live vicariously through you. :)
YoungHouseLove says
Haha, that’s so cute about your dog!
xo
s
Meghan says
Wow! This may be my favorite project ya’ll have ever done. The new wall color, the mirror, the new fireplace – oh my. Cheers.
Nichole K says
Love, love, love this fireplace update! I agree that it is giving the penny tile a run for it’s money. I think our yet-to-be-finished basement may need penny tile AND white marble :)
PS: I couldn’t help stalking your old house on Zillow too. So sad they removed the built-in bed/closet system in the master. Funny that they’re publicizing it as the former home of “Richmond’s most famous DIY bloggers” but won’t let you share pics. To each their own I guess :)
YoungHouseLove says
I know isn’t that weird?! We totally asked nicely if we could post about it (hopefully send them more interest, etc) but we got denied! Haha!
xo
s
Elizabeth @ Real Inspired says
It is gorgeous! And it looks great with the penny tile. We have a red brick gas fireplace that goes the entire length of our living room wall. I would love to paint it white(I do like the painted white brick look) but we rent so I think that would be a no-go. Even if our landlords are also our In-laws. They are letting me do a lot, but I’m not sure that would fly…which is really too bad because it would look soooo much better.
Ally says
OK. I loved your cute little white brick fireplace. I thought it was understated and lovely. When I read that you were changing it / beefing it up, I was all, “Noooo! This is going to be the Petersiks’ first design mistake!!” Well, now that I see the finished product, I see I was completely wrong. I was way wrong. I love the new fireplace surround. It’s classy and stunning. Great job guys.
YoungHouseLove says
Aw thanks Ally! We totally thought “this is going to be a project that folks think is weird” before we started (since the old one wasn’t bad) but we hoped by the time we were done we’d win you over. Haha! So glad we did :)
xo
s
Kari says
It looks so great! I thought it was fine to begin with but this is pretty amazing. Can’t help but imagine what an impact an upgrade like this could’ve made in your first homes living room?!
YoungHouseLove says
Oh man, it would’ve been fun!
xo
s
Sara says
I have a bit of fireplace envy going on! We live in a 100 year old house that doesn’t have a fireplace. (Perhaps there is one hiding behind a wall someplace but we haven’t found it yet). The whole thing looks great! I’m sure your said this but where did you find that huge oyster shell? I love it.
YoungHouseLove says
Thanks Sara! It’s from Joss & Main a while back (ZGallerie sells them too I think).
xo
s
Kelly @ Kelly Day Interiors says
I just wanted to say what a beautiful job you did on the fireplace! We installed a fireplace in our home and used herringbone tile as well. I love that look! Thanks again for sharing the transformation, great job!
Melody says
Absolutely stunning! You guys are so freaking talented! I am still in shock when you post the before and afters… it’s very inspiring! :)
Jenny says
I always wonder if the old owners of this house follow your blog. I bet they are totally in awe. As am I! what an incredible improvement!
YoungHouseLove says
They do and they’re so sweet! We want to have them over someday, just to see things in person :)
xo
s
Karen Q. says
Beautiful- what an amazing transformation! Love the before/after shots at the same angle- WOWZA! :)
Melissa says
It looks fantastic!!! Nice work!!
Have you considered swapping out the brown mirror above the mantle with the goregous new one you just got for the guest room? You could paint the one on the fireplace a more coordinating color to the guest room. Just thought that might be a nice switch(er-roo).
Anway, haven’t read the other comments so maybe this has already been suggested 3 million times. In which case, apologies.
Take care,
M
YoungHouseLove says
Oh yes, I thought about painting it or switching it out, but for now I like how it ties into the stools and the cork floors and even the basket light. Who knows where we’ll end up!
xo
s
Nora says
It’s beautiful!
Also, congrats on the Emily Henderson shout out. I wish she read something of mine every day (my palm?).
YoungHouseLove says
Aw thanks Nora! She’s so sweet!
xo
s
Katy @ The Non-Consumer Advocate says
I thought your fireplace surround looked fine beforehand, but . . . WOWSA!
¡Muy excelente!
Katy
[email protected] says
I know you guys said you used one color for the whole fireplace, but my computer is picking up the two lower panels, more so the lower panel on the right side of the fireplace, is more of a creamy white then the rest of the fireplace. Did you guys use the same paint can or was it two paint cans of the same color that was left over?
YoungHouseLove says
The baseboards around the whole room are a smidge lighter, so because I’m type-A I carried that into the fireplace to keep things consistent. It’s not really obvious in person, but in the pics you can pick it up slighylu.
xo
s
Wrenaria says
Has this increased how often you sit in the grey armchair in there? I imagine this room is potentially your favorite now, eh? :)
Gorgeous transformation. Well worth the effort.
YoungHouseLove says
Oh yes, that’s the best seat in the house.
xo
s
Mallory says
I just painted 2 horrible paneled walls, using the same primer you used. That stuff works miracles! Both now look amazing!
YoungHouseLove says
So glad!
xo
s
Thais Bessa says
WOW!
Even if it wasn’t the cheapest upgrade (although I don’t think it was expensive at all), it is the kind of thing that once you try to re-sell the house makes it look way more well finished. At least if I were viewing houses to buy that fireplace would impress me.
YoungHouseLove says
Thanks Thais!
xo
s
Steph says
I think my favorite part of this is how the mantel and the things hung above it look so much more balanced now. Not that they looked bad at all before, but it looks a whole lot better!
I’m so excited for the weather to get nice for the outside posts. We just moved/are still in the process of moving into an adorable rancher with a similar carport. Can’t wait to see what you do with yours!
Alison says
Random but did you guys see your old house is for sale? The Trulia description is so cute, “Former home of Richmond’s most famous DIY bloggers!” Love it!
Alison says
Oh yeah, and the fireplace rocks!! Seriously gorgeous!
YoungHouseLove says
Yes, isn’t that crazy?! We wanted to share the pics on our blog and sweetly asked the realtor but she denied us! Haha!
xo
s
Alison says
Bummer! That would have brought so much more traffic to the listing. Oh well.
Jenna says
Can I just express here how jealous I am of the house prices in Richmond? Blows my mind! In my neck of the woods, fixer-uppers cost $350K+ for something tiny, in not a great area or far from city, and small to no yard or trees. Fixer-uppers in high-demand areas? $650K minimum. And some have been known to sell for MUCH MUCH more – especially if it’s a larger lot or has mature trees (~$1mil for a NOT new house – crazy, huh?)! Lots like you guys have with all the beautiful trees don’t even exist here (well a few do, but for BIG bucks). I need to move I guess :(. You’re very lucky!
YoungHouseLove says
Aw thanks Jenna! You’re so sweet! There are definitely pricier houses here, they just seem to be huge, and we thankfully like a more modest size (less to clean, haha).
xo
s
Rachel says
The fireplace looks fantastic! I’m loving the herringbone marble tiles!
I also second Eva on the gel fireplace inserts. I had a working fireplace in my last apartment, but I didn’t want to deal with the mess of using wood so I got faux woods with gel canister inserts and they worked great! They even make a crackling sound like real wood does! Plus no smoke.
I got mine at overstock.com. They have a good deal on the gel canisters and the ceramic log sets.
http://www.overstock.com/Home-Garden/Real-Flame-Birch-Convert-To-Gel-Log-Set/6345099/product.html
and
http://www.overstock.com/Home-Garden/Real-Flame-13-oz-Gel-Fuel-Case-of-16/7233007/product.html
YoungHouseLove says
Thanks for the tips Rachel!
xo
s
Caitlin @ Desert Domicile says
Gorgeous! I had kind of sort of planned to build a faux fireplace up in our loft but nothing can top this makeover! Back to the drawing board haha
Jamie says
You guys did a great job. It looks very well done! Love the marble – and especially the herringbone pattern!! As well as the fact that it’s now a more defined focal point. Looks professionally built – you should be very proud!
My only problem with it is that the shape and style and white paint is kind of “builder basic”, or generic, for lack of a better term – it’s the kind of fireplace you see all over, especially in all the newly built cookie-cutter homes. The herringbone tile brings some uniqueness out though!
Also, couldn’t you trim the edge of the cork flooring to expand the hearth? Or is the cork glued/too difficult to cut?
YoungHouseLove says
Oh yes, we mentioned in the post that we could have cut the cork and expanded the hearth but it didn’t bother us enough to make it worth the trouble :)
xo
s
Stephanie says
LOVE IT! The marble looks like shells to me but that may be the clam asserting itself on me! I’ve always loved that clam too. I’ve been looking for one for a few years now! Just call me copycat! :)
Penny Lynn says
We are about to start master bathroom demo. Aaaahhhhh!!!!! I got the tile that looks like wood for the floor so I can’t wait to see how that comes out. I also can’t wait to smash the old floor with a sledgehammer because I hate it. It’s hideous. Maybe when I’m done with the new tiling I will pet my floor. I’ll keep you posted.
YoungHouseLove says
Good luck Penny!
xo
s
Christy says
You two are so incredibly talented.
YoungHouseLove says
Thanks so much Christy!
xo,
s
Amy K says
BEA-U-TIFUL! nice work!
What color is the celing above the fireplace? Is that moonshine too?
YoungHouseLove says
It’s just the color that came with the house (looks white in person).
xo
s
Becky says
I know you said you wouldn’t turn it into a wood burning fireplace, but is it usable as a fireplace at all? Can you make it a gas one? We turn our gas fireplace on almost every day in the fall and winter so I couldn’t imagine just having one as decoration and not usable.
YoungHouseLove says
Oh yes, we’d love to stick a gas insert in there and even double side it someday! We can go in from the back so none of the tile or mantel-building will be ruined :)
xo
s
Crystal @ 29 Rue House says
Blown away guys! This is a classy update and it kind of makes me want to go watch the BBC Pride and Prejudice right now (lots of neat interiors).
YoungHouseLove says
Thanks Crystal! Can’t wait to check them out!
xo
s
natalie says
Do you guys watch Cougar Town? Every time you mention your penny tile I think of penny can!
http://www.youtube.com/watch?v=hfCWokpI0BE
It actually sounds like that in my head when I read it…but penny tile instead of penny can :)
YoungHouseLove says
We do! Never thought of that though. Now I’m sure I won’t stop saying it that way in my head. :)
-John
Leigh says
Now I am saying it that way in my head!
Laura & the Shell says
Looks amazing! And you guys have made this project feel very approachable. I have a very similar fireplace that would benefit greatly from this type of upgrade.
Danielle says
I LOVE the fireplace!! Forgive me if this comes off wrong, but I feel like it doesn’t fit the style of your home now. It feels very tradional compared to what you have done in other parts of your home. But I think it works well with the flooring and wall color and looks amazing!!
YoungHouseLove says
Thanks Danielle! Our cabinets in the kitchen are traditional (very similar trimwork, baseboards, etc) so we based the fireplace off of those. It really adds lots of balance to the room- and we love mixing styles (not all modern, not all traditional, just a little bit of everything :)
xo
s
Lauren says
This looks AH-MAZING you guys! I am seriously in such major awe of you both. I wish I had even one iota of the vision, talent and willingness to tackle things DIY that you do. I am beginning with baby steps in the hopes that maybe I will get more brave as I go, but you two are just such an inspiration! Awesome job–it looks stunning!
Erin says
This looks absolutely amazing! We re-did the tile on our fireplace last year, but now I wish we had beefed it up before retiling. Maybe I will need to rip this out and re-do it again. The hubs is going to be so excited for that one!
http://magentaandlime.blogspot.com/2012/10/fireplace-makeover.html
YoungHouseLove says
So pretty!
xo
s