Before we dive into our recent office progress, we just wanted to send out a heartfelt thanks to everyone who left such sweet comments on yesterday’s announcement. To say that it has been completely surreal and that we’re so grateful are two of the biggest understatements we could make. But back to the office.
You might remember on our initial planning post, we left off saying “We’re still letting the concept simmer in our heads, but we’re fairly confident that we’ll start heading in that last layout’s direction since it feels like it makes the most sense for the way we work.”
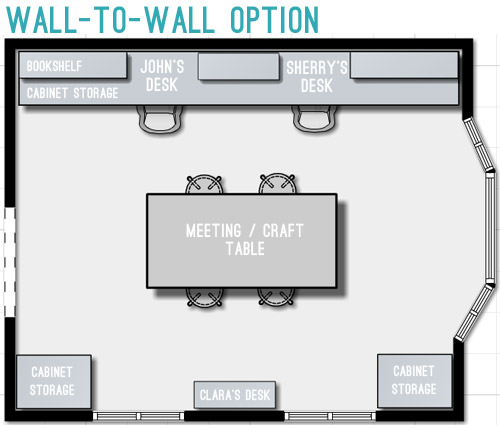
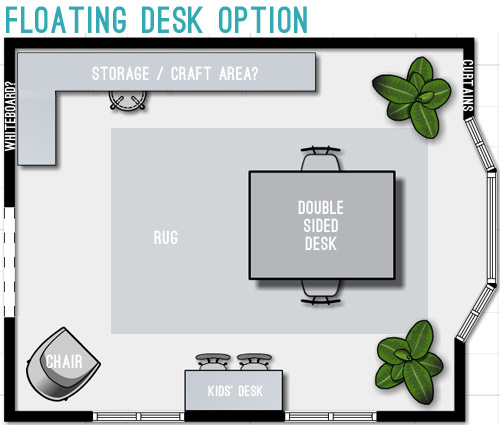
We still wanted to tape things off on the floor to really get a feel for things, and after 700+ comments rolled in with ideas and suggestions, we had fun mulling over every last alternative. After a whole lot of thinking (and debating, and sketching, and standing in the room with tape lines all over the floor) we decided:
- an optimal layout would be some sort of floating double desk so we could both be in the middle of the room, instead of sitting right against the wall (we both would have window views, and would prefer to orient it so nobody has their back to the door)
- a meeting table in the office would make that the third room on our first level with a table in the middle of it, so although there was some initial embarrassment at the thought of holding meetings in our blue-trimmed dining room, we’re planning to redo that shortly, so it makes sense to let it multitask. It honestly might get more use for meetings than formal dinners anyway – plus we won’t have to worry if our office is a mess before meetings
- a craft/photography zone would still be most useful right in the office – and would most likely work best against the back wall of the room since the sunlight can’t stretch that far (that’s where John has been sitting/working for the last nine months)
So with those three slow realizations (sometimes it takes us a while to get there…) we determined this layout might give us more function (and less wall-staring time) than the one we were initially leaning towards in our last office planning post.
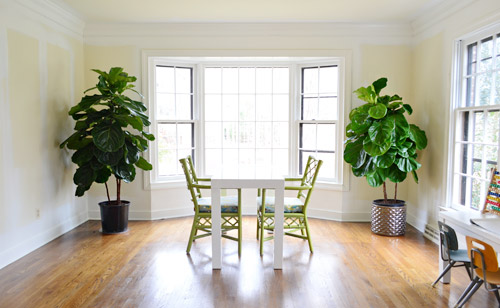
We even dragged the comically small desk into the middle of the room just to picture things a little better. We both LOVED being sort of cradled by the bay window, and sitting in the middle of the room, so it confirmed that we were finally on the right path. Psst- the plants are fiddle leaf figs from Home Depot (on sale for $59 with a 1 year warranty) so here’s hoping I can keep them among the living…
Ever since we’ve been keeping an eye out for something to use as a double desk that could float in the room. We assumed we’d need to adapt it in some way to make it wider or longer to accommodate two people, but we knew a good solid piece would be just the “bones” we’d need to begin, so we’ve been hitting up thrift stores, checking out craigslist and freecycle, and even the occasional yard sale (theeeeeey’re staaaaarting up again guys! hooray spring!). After at least eight failed missions/searches, this nice big, packed with storage, solid wood desk popped up on craigslist as a curb alert.
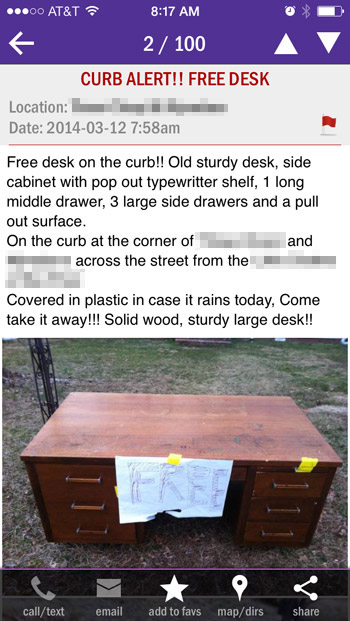
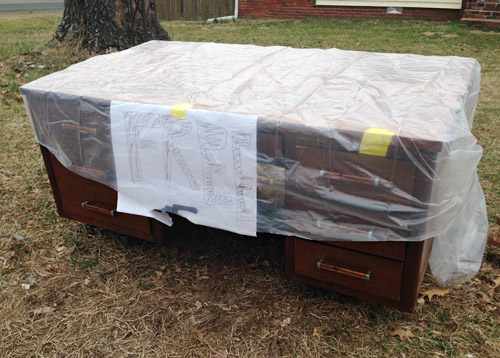
It was sheer luck that I saw it about twenty minuntes after it was initially posted (free curb alert items don’t usually last long) and it was even better luck that it happened to be a Wednesday, because on a weekend I think it would have been gone in a minute. We dropped Clara off with John’s parents so we could fold down the seats to make room for something big, and raced over to the curb… hoping to see something on it.
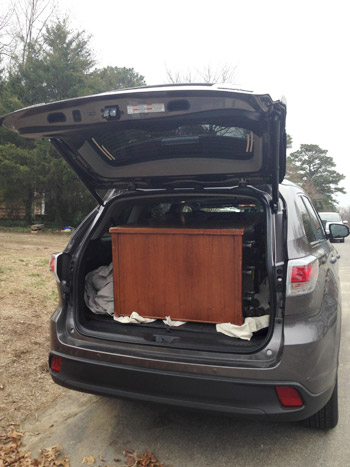
Oh happy day, we made it! And it fit into the car by about two inches (if the legs weren’t removable it would have been too tall).
There might have been happy tears from this highly emotional pregnant lady. I also cry during commercials and the occasional youtube video about puppies.
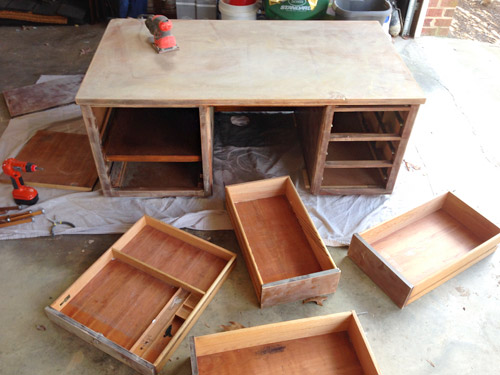
Anyway, once at home we set it up on a dropcloth with four small pieces of wood under it to lift it up a few inches off the ground. The drawers were still out from our travels, and the other side was a cabinet with a faux-drawer front. There was even a pull-out thing on the right.
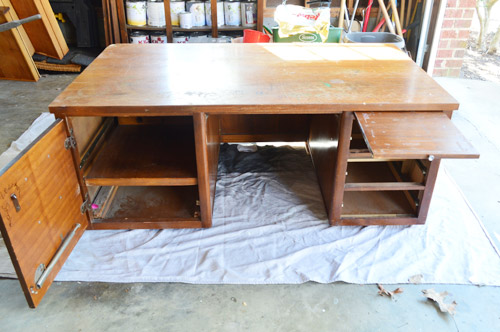
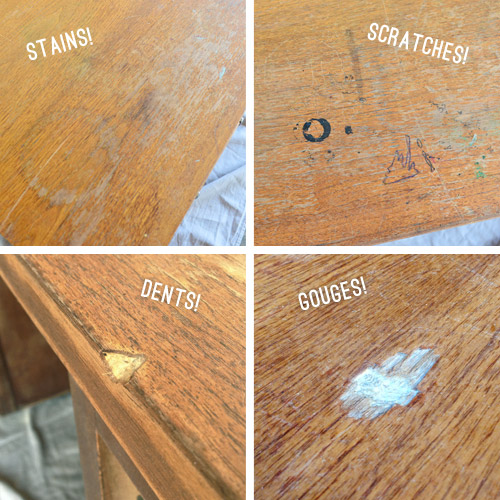
It was pretty beat up, so we were glad we were both sold on painting it white from the start.
We’ve been craving a clean/light/airy office from day one (we have dark walls in our bedroom, and more planned for the dining room across the hall from the office – but we always envisioned a light and bright work space). So although we LOVE a good old piece of furniture that’s unpainted, like our media cabinet, which we just cleaned up and brought back to its original beauty with a combination of this method and this method; and Clara’s dresser, which we just stained with a painted top; and this hand-me-down dresser from John’s dad that now lives in our closet…
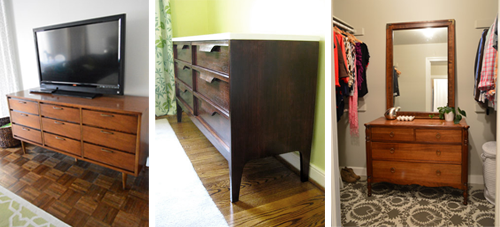
… painting the desk a no-brainer thanks to the combination of more wear and tear along with our desire for a clean and light office.
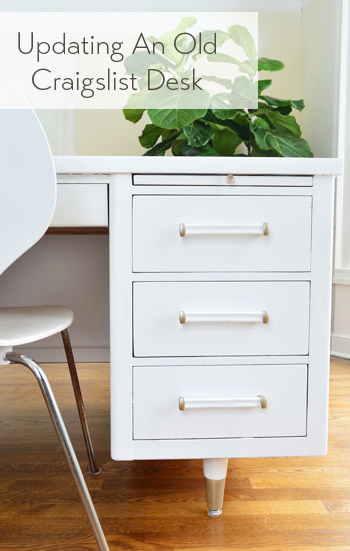
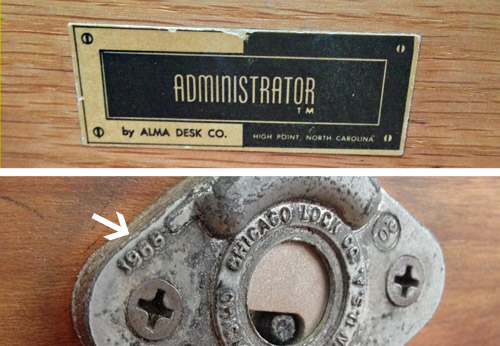
We also removed all the hardware, drawers, and doors to prep it. That’s when we saw this tag with the maker’s info. Doesn’t “Administrator TM” sound official? I loved squinting at the old drawer lock that said 1968 (it kinda looks like 1999 in in this picture, but up close it’s definitely ’68). In fact in googling around for “Alma Administrator Desk 1968” I found one (albeit in a lot better shape) on eBay for $1000! Is that crazy or what?
How cool is this world we live in, where people leave things they no longer want on the curb and they just might happen to be exactly what someone else is looking for.
I’m sentimental these days, huh? It’s just a desk.
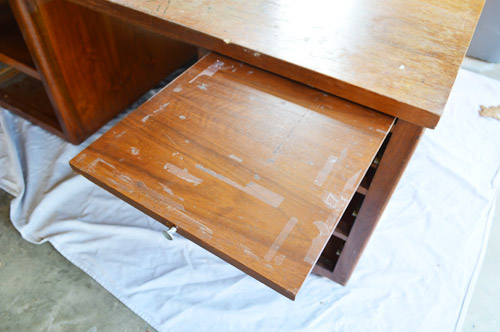
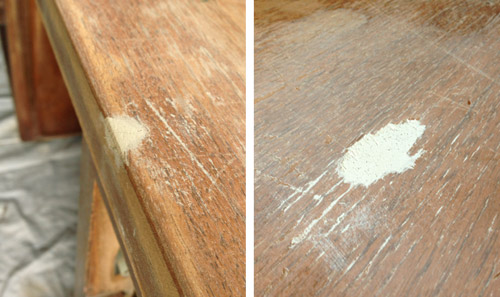
Anyway, next up was the “remove all the other random stuff” stage. This included using a straight razor to scrape off some paint blobs, weird raised areas of glue, and some old tape that had been stuck to the surface.
Then it was sanding time, so John donned a mask (sanding old wood can be particularly dusty) and used our hand sander to really rough things up.
Once it had all been sanded down, we applied wood putty in a few spots, just to fill in the divots and low points. We sanded those areas again when they were fully dry, and we were good to go.
Next I wiped it down with liquid deglosser, just to remove any leftover sawdust or grease/build-up that might be lurking. Then John broke out the Kilz Premium primer and applied one thin and even coat with a small foam roller. It’s what we used to paint our kitchen cabinets, which didn’t give us any issues with bleed.
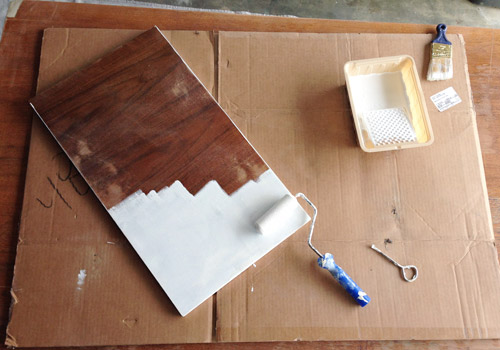
One coat only took about an hour, and we did the back and fronts of the cabinet door, and the fronts of the drawers (so we left the interior of the cabinets and the drawers wood, which we did in our last office as well).
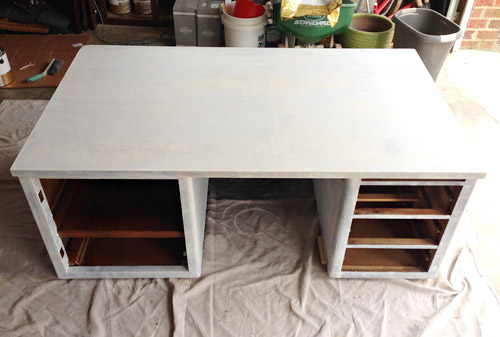
Before painting it, we decided it was probably smart to bring it into the house so we didn’t risk dinging up our paint job by moving it afterwards. We used the same dolly that came in handy for getting the fridge on the back porch a few weeks ago but this time John and I got ‘er done. The dolly did all the heavy lifting, so John pulled and I just sort of steered it, opened various doors, and made sure we weren’t hitting anything or falling off the front pathway while we pulled it along.
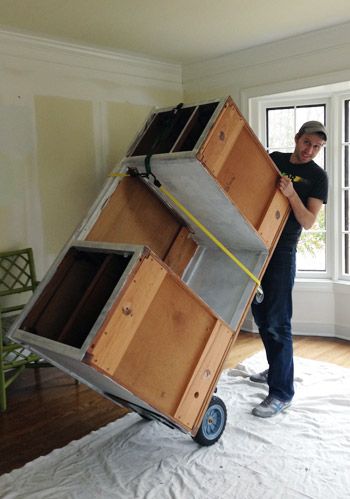
Once inside, we set up the same drop cloth + four scrap pieces of wood system to slightly lift the desk off the floor and used the same BM Simply White Advance paint that we used for the upper cabinets in the kitchen (it’s self leveling and specifically made for painting cabinetry or furniture). Once again we applied it with a small foam roller – using a small angled brush to get into some of the areas a roller wouldn’t reach, and then rolling over them as much as we could to blend everything together.
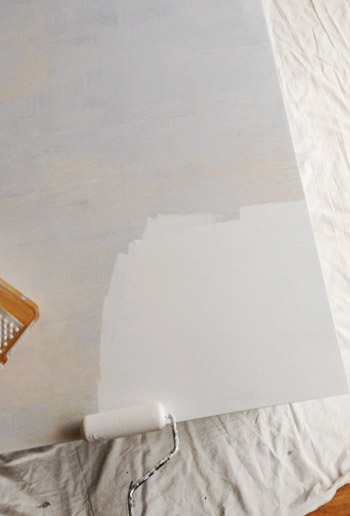
John did the first coat, and tagged me to do the second one the next day. If you can imagine, I looked even less graceful doing this part. Thankfully there is zero photographic evidence.
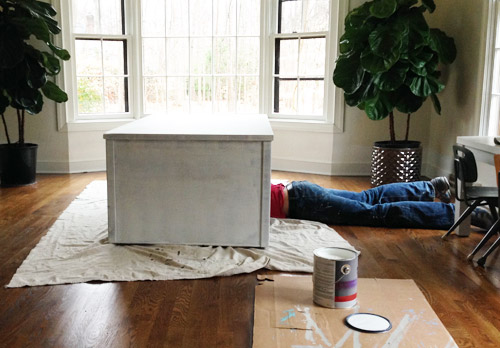
It just took those two coats to get it covered, and the following day I applied some satin Safecoat Acrylacq to the desktop just to seal everything and give it added protection – once again with a small foam roller (I did two thin coats).
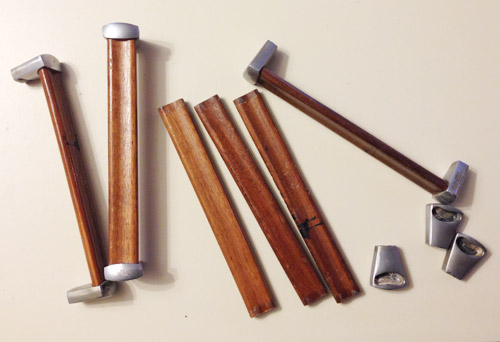
We also decided to have some fun with the legs and the handles by painting the wood parts the same Simply White color as the desk itself, but once that dried we taped off the freshly painted parts (or disassembled the handles) so the old silver metal could get a subtle metallic-champagne color (I used Champagne Mist by Rustoleum).
It definitely has that light/airy office vibe going on now.
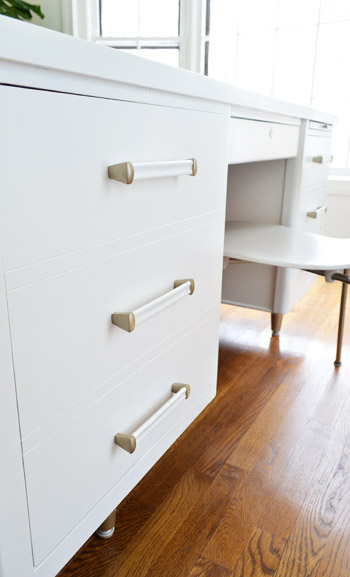
You can catch a glimpse of the legs in this photo.
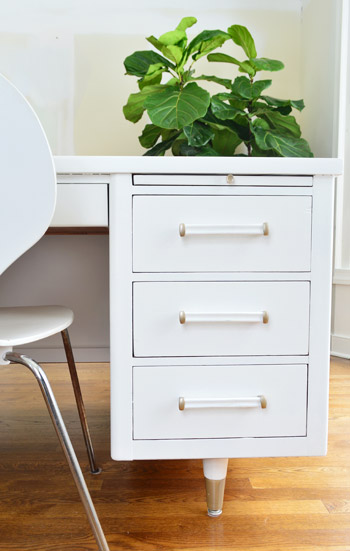
Overall, we’re really happy with how it came out. Especially since it was a free secondhand find, which means we can put more money towards other things we want to do in here – like window treatments, an awesome overhead light, storage systems, nice new office chairs, etc.
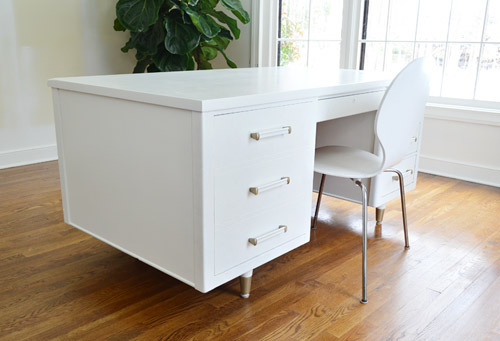
So here’s how the room is looking now:
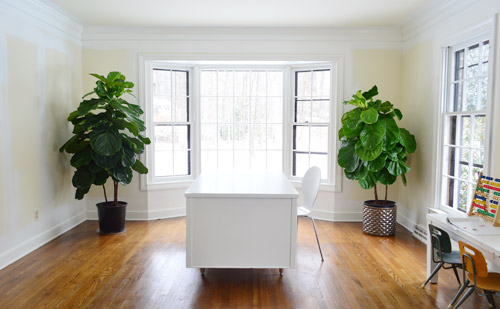
With more of a handle on our layout, we’re excited to move on to other steps, like painting the office (so far we’ve only done the trim) and working out how we’re going to make a wall of organization (we’re planning to use the wall behind this shot, since it’s hidden from the foyer (that way the room won’t look messy even if our command center gets chaotic).
As for adapting the desk to work for two people, we think it’ll be a pretty simple cut-a-hole-in-the-back-and-trim-it-out process, and we might add a wider top down the line (wouldn’t soapstone be cool?). But we didn’t want to rush into that just in case over the next few weeks as this room comes together we change our mind and want a single desk for some reason (with another desk area somewhere else). So we’re resisting the urge to rush into any decisions that we can’t undo, like cutting this baby open.
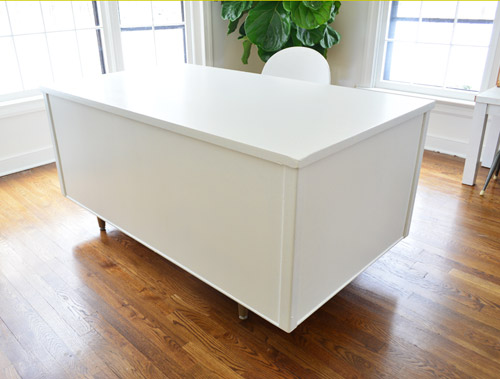
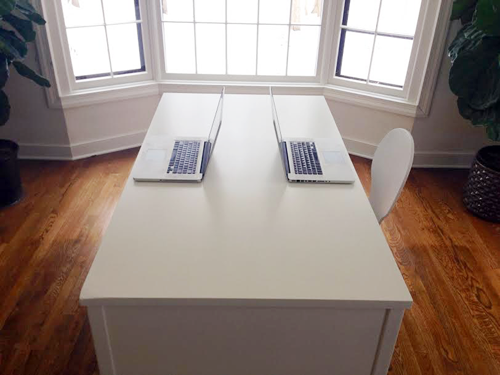
Update: Apparently using laptops for scale would have been helpful to show how two people can easily fit at this desk (it’s 34″ wide and would be 38″ if we added some sort of counter with a 2″ overhang) so here’s that pic for you guys! Our first house’s double desk was 18″ deep, and we each had ample rooms for legs and computers, so we think this plan should work well – but of course we’ll keep you posted!
What secondhand finds have you guys been hunting down lately? Have you ever actually gotten in on a curb alert before someone beat you to it? This was our very first time. Gotta say, I liked it. I liked it a lot.
PS: Wanna see another desk makeover? Check out the DIY herringbone pattern we painted on another thrift store desk.

Mary Beth says
oh my gosh that DESK is beyond!!!!!!
How you have the vision to transform these things is beyond me.. lol it’s amazing!
I love it.
I finally got the courage to attack a tranformation that YOU guys inspired – I turned my little girl’s closet into the most ADORABLE reading nook/nap spot. She LOVES it so we have to thank you – and Clara! – for such an amazing idea!!
http://hystericallyeverafter.com/2014/03/04/nobody-puts-baby-in-a-corner-but-a-closet-works-for-us/
THANKS!!!
Mary Beth
YoungHouseLove says
So sweet Mary Beth! Thanks for sharing the link!
xo
s
liz says
That’s a darling closet nook! Great Job!
Bethany says
I want to live in that closet.
Anele @ Success Along the Weighn says
That desk looks AMAZING all spiffed up! So I’m thinking of painting my armoires to save some money since we still like the lines but not the colors. Would you suggest foam rolling or would be better off investing in a sprayer? I really want a smooth finish because if there’s one thing we can’t stand when we’re in antique stores is when people paint furniture and the finish is “textured” where they painted. We’re weirdos like that.
YoungHouseLove says
I would go with a foam roller I think. Definitely more error proof (the sprayer can be tempermental for us).
xo
s
Crystal says
I also like using mini nap rollers (more than the foam type) and the type of paint could make a difference too for getting a nice, smooth finish.
The desk did turn out amazing and I love that you went ahead and painted the desk rather than sitting on the project while you figure out how to handle the backside.
Alison says
AMAZING DESK! This is exactly what I’m envisioning for my future desk in my future home!! Quick edit- (….it to lift it up a few inches off the grount.) I think you meant ground. :-)
YoungHouseLove says
Thanks Alison! All fixed!
xo
s
Sara says
You all continue to amaze! I love what you’ve done with the desk (particularly the champagne touches!~) One question though-do you ever experience bubbling when using a foam roller? I’m a DIY newbie, and used a foam roller on a bathroom vanity and found bubbles–any tips? Thanks!
YoungHouseLove says
Hmm, I wonder if you rolled too fast or used thin paint (both seem to get bubbles since things are riled up/thinner). We love Advance in thin even coats with a small foam roller, applied nice and steadily (not crazy slow, but not super fast either :)
xo
s
normaleverydaylife says
That looks so good! All the white trim and new white desk is sharp. I love painted furniture and that desk was a great find!
liz says
I love seeing your “thought process” with layout and design… but I have to ask… who is going to have to have their back to the window? I’m probably a little nutty… but I wouldn’t want to be the one with that side of the desk (Never know what could be lurking outside the window / or alternately, you can’t daydream out at the lawn…)!
YoungHouseLove says
We both sat on either side of the desk and didn’t mind, so I guess we could flip a coin. We just wanted a window view somewhere (since the bay is right there, we both get that). We also spun the table so one person faced the bay and one person faced into the room, but neither of us liked facing the bay since our back was to the door and we felt like someone could sneak up on us. Haha!
xo
s
liz says
hehe… ok… fair enough… I like your set up, and agree that seeing out the bay window, and having a view of the door is very important! :)
Britt says
Yay! I’m so glad you guys changed your minds about the layout. I like this one so much better. No more staring at the wall. Also, the desk looks great! The metallic ends on the handles add just the right touch.
Mary Beth says
No honestly I thank you guys… I was stuck in the biggest decor rut for about 5 years before I found this site. You have literally changed my home, and KIND of also my life. Suffering through postpartum depression as a stay-at-home mom of three was really tough, being able to turn my attention to fixing up this old house has truly been an amazing hobby and I am feeling great again.
I know it might sound odd, but I really do credit you guys for some of that!
: )
You brighten every day for me!!!
MB
YoungHouseLove says
You’re so sweet MB.
xo
s
Bethany says
Awesome find! Love the champagne details, they make this free desk look so expensive! I never would have thought to do that, but I love how it turned out. Do you think this desk will be wide enough for both of you to work at comfortably? I tend to have tons of paper spread out around me, but you might be neater than I am.
YoungHouseLove says
Good question! I just added a picture to the post (at the bottom with an update) about that. In person it’s a monster (see how it fills the whole trunk?!) but we realized without laptops on it for scale it looked like it might be too narrow. We especially think if we add a wider top down the line it’ll be nice and roomy – but it should also work as-is for us I think!
xo
s
Bethany says
Thanks for the update, it’s definitely a lot bigger than I originally thought! It’s nice that you also have the option to add a wider top if you decide you want that later on.
YoungHouseLove says
Thanks Bethany!
xo
s
Heather says
I was thinking that you could attach a shelf on the back side (with decorative brackets on the ends) instead of cutting a hole in it. That would add a little extra surface area, too.
YoungHouseLove says
That could work too!
xo
s
Maureen says
I love it! I had a desk just like this once, but it was so old and beyond my ability to repair. It’s hard to catch these at a good price! Yay Craigslist!
Evelina says
Congrats on a great FREE find! You guys made it look gorg with the white treatment! Hurray for yard sale season!
Susan says
I love that desk! I can’t believe it was free… I’m sure they could have sold it for a little bit of money at least! I have one that is very similar and have been thinking about painting it but have no supplies. What brand of sander do you guys have? I’m guessing you like it?
YoungHouseLove says
It’s a hand sander from Black & Decker. Have had it for years. Got it at Home Depot like 5 years back. Very happy with it!
xo
s
Meg says
Where did you get those plants? Are they real? What kind are they? I love them!
YoungHouseLove says
They’re from Home Depot on sale ($59 for those giant guys). They’re fiddle leaf figs – the quintessential blogging plant. Haha! So far I haven’t killed them and I’m thrilled.
xo
s
Lauren says
Holy crap behold the power of fresh white paint. So perfect.
Elaine in Ark says
Love the desk! This is the kind we had back in the olden days, when I was a young clerk-typist. The pull-out tray was sometimes used for a typewriter, or as another writing surface when the top of the desk full of other stuff. I feel like I should apologize for all the old scotch tape on the tray – we used to tape different notes, calendars, schedules, etc. on the trays for quick reference. It was really handy to have that info close by.
I wish any of the desks I’ve ever had looked as clean and beautiful as your new/old one!
Angela-Rose says
Looks awesome! I just had a quick question as far as using the foam roller with the Advance paint…do you find that lots of little air bubbles appear on the surface and, if so, how do you deal with them? I’ve tried rolling over them as the paint’s setting up but then I lose the smooth finish. Thanks for your help!
YoungHouseLove says
We don’t typically have issues with air bubbles – but sometimes those come if you’re applying water-based paint over oil paint. Could that have been the case? I also wonder if you rolled too fast or used thin paint (both seem to get bubbles since things are riled up/thinner). We love Advance in thin even coats with a small foam roller, applied nice and steadily (not crazy slow, but not super fast either :)
xo
s
Angela-Rose says
Thank you for the advice! I’ll give those tips a shot & see how I do…it can’t possibly look worse! ;)
Carol says
Got to a curb alert for free pegboard…only it was too big to fit in my car and I failed to bring anything that could cut it (womp womp). I considered knocking on the door and asking to borrow a saw but then someone else pulled up with an appropriate-sized vehicle and I awarded them with the pegboard for their foresight (how did I not consider that one day I might be gifted with free pegboard when purchasing my car???).
YoungHouseLove says
Aw man!
xo
s
Sunny says
Is there an app to get curb alerts?
YoungHouseLove says
I just search for things each morning (or every night before bed) so I was just looking for “desk” every day for a few days in a row and then this popped up on a random Wednesday morning.
xo
s
Cat@ Mary Martha Mama says
I love the desk. Good call with the champagne for the metal parts. It makes it look a little more special. I will be interested to see how you do eventually adapt it.
Monique says
The layout is soo much better! I like the wall to wall but your back is to everything and you’ll box in the beautiful bay window. Awsome thriftiness with the desk! Looks amazing!! (Way better than the $1,000 one!)
amy says
The transformation is striking. LOVE how you transformed the handles/legs. And I totally get emotional over things like this too. I love how they covered it in plastic. They didn’t need it anymore but really cared about the piece. All those dings, glue marks and tape from their important business lists to kids school projects to hand written sympathy cards…(snifffle, sniffle). Good times, desk. Good times.
molly says
Gorgeous. I love what you did with the handles. And, I love the sort-of local connection
Manda Wolf says
Looking good guys. My grandma had a desk similar to that when she taught first grade! I like the nice clean look of it painted white. But right now it is just too bright in there; it would give me a headache. I would have caved and painted the desk a nice soft color, maybe blue? But I’m sure once you get the walls painted, a rug, and curtains in there it will look great. Wouldn’t have be wonderful if you could find another desk exactly like that and point those together? It would give you a huge work space plus plenty of storage in the drawers for both of you. Probably impossible to find, but I think that is the route I am hoping for!
YoungHouseLove says
We’re hoping for a soft color on the walls, some bright art, curtains, etc – so we hope it’ll all layer in. Hard to see it now though, with those unpainted walls and nothing else really in place :)
xo
s
KimberJ says
Have you considered extending the top out somehow to make the table easily big enough for 2 without cutting a hole? That would also give you a beautiful well lit surface for layouts that you could walk around and view from all sides. I’m somebody who needs a really big project surface available without junking up the rest of the house. I like to be able to leave something in the middle, walk away, shut the door, and take a break. Its the only way I can keep a bit of work/life balance.
KimberJ says
Sorry, forget to tell you just how amazing I think the desk looks now!!!
YoungHouseLove says
We’re definitely considering that option too! Neither of us want our back to the door of the room (we tried that and it felt strange) so we’re not sure how wide we can make this thing without it crowding the walls on each side with chairs tucked under it, but we’re not planning to rush into anything so we can think out all possible scenarios! Will keep you posted!
xo
s
Rachael says
Extending the top/building out a desk that made this desk just slightly larger was my initial thought too! I don’t know how you would deal with getting matching legs…but I’m sure it’s possible. It just looks like if you cut a hole in the back of the desk, you may be playing footsie all day…but maybe that’s okay too! ;) I love the white and champagne! I am totally inspired to do a fun desk project now!
Anuja says
I was thinking the same…Maybe John can engineer a fold-able leaf on the other side? That way you dont have to cut a hole in the solid wood and it can be tucked away when not needed!! Just some food for thought….
YoungHouseLove says
Such a fun idea!
xo
s
Anne says
My thoughts exactly, KimberJ! To me, it’d also make the most sense since one of you won’t have any drawers (= quick access storage) on hand. If you widen the top you can easily fit some extra drawers or a shelf underneath. That would be so neet, wouldn’t it!? For me personally it’d just e such a hassle to stand up all the time to file my stuff and on-top storage systems are necessary, but shouldn’t take up all my work space…
Anne says
My thoughts exactly! A widened top would also give you the option of more storage. Especially for the one who works on the non-drawer side. On-top storage systems are necessary, but shouldn’t take up all the work space. So if you don’t want to get up all the time, you are in need of some extra drawers/shelf or storage of some sort for that side of the table.
Erica says
Love it! I can’t believe that thing was free – it looks amazing! What are you guys planning on doing with the cords? I love the idea of a floating desk, but I have no idea how I’d hide the cords! Can’t wait to watch this space evolve!
YoungHouseLove says
We’re thinking of getting a covert plug added under the desk (or behind it on the bay side so the wires aren’t too visible). Apparently it’s not that expensive and can be added through the crawl space, so we’ll keep you posted!
xo
s
Thais says
I was thinking the same thing? Are you going to lift the floor to run cables? Because how are you going to get power from the nearest wall to the table? If there is a cable running in the middle of the floor, I think it not only wouldn’t look too tasty, but no matter how tucked in it would be a tripping hazard for children and crawling babies.
YoungHouseLove says
The outlet would be in the floor right behind the desk on the bay side, like they do in new offices (like the showhouses our builder makes). They also do it for floating side tables or consoles in open plan living rooms. Apparently it’s super convenient, keeps cords neat (they wouldn’t be tripping hazards), and isn’t too expensive since they can be added through the crawl space. Will keep you posted!
xo
s
Kelly says
Adding an outlet in the floor is not difficult, it can easily be a DIY if you want! Especially since you’ve already switched out existing outlets, this is just the next step. The easiest thing would be to add it to an existing circuit, and to do that you wouldn’t need to do anything at the panel. I know electrical work seems daunting, but it’s as safe as working with power tools as long as you observe safety protocol, and it’s really not complicated to put in an outlet. Just follow directions. It’s a great skill to have, too! Think about how much money you could save over the next 30 years by being able to do this yourself instead of calling in electricians for every job at their hourly rate. The supplies are cheap and labor is expensive. You do need to get a permit for it (in my city anyway). Here the permit is granted online instantly for a fee, and then you have to get your work inspected by the city inspector, just like an electrician would. You enjoyed the deck inspection process, right? :) Actually my electrical inspections were all of about 5 minutes long, easy. We have rewired almost our entire house, and this book is our go-to: http://www.creativehomeowner.com/product/1580114873 If you want to tackle it and have any questions, let me know, I would be very happy to help.
YoungHouseLove says
You’re amazing Kelly! It would be really interesting to learn! I think we’re temped to have them add the outlet when they’re here adding fixtures to all the bedrooms upstairs (they’re mysteriously lacking lights) but maybe I can convince John that we should give it the old college try…
xo
s
kerri says
nice! nothing better than a solid free find. I’m interested to see how it all comes together. :)
Jane says
It seems kinda silly to choose a layout, buy a desk for it, then finish it up all nice, without first making the modifications to have it be a two-sided desk, as originally planned.
You say you want to make sure that it’s definitely the layout you like before making the modifications. But then why not wait to refinish it? It seems like a lot of extra work. If that were in my house, I know the second modification step would never happen if I just refinished it an put it in the house.
Can you tell us more of your thought process behind this?
YoungHouseLove says
I’m sure everyone would do it differently (some might adapt the desk right away – some might never paint it, etc), but we’ve also been weighing the idea of adding a wider top and some legs (which would mean we wouldn’t have to cut the top at all) and we also think this desk could end up against the wall as the craft station if we somehow found some other double desk solution that worked better (we’ve learned to expect the odd DIY curveball now and again). So because this is clearly the very beginning stages of the room, we just wanted to paint it and get it into place and let the room evolve around it. I think we’re good about those second modification steps (if we plan them, we tend to follow through if they still make sense for us over time) so we’ll definitely keep you posted!
xo
s
Stephanie says
Amazing! I just started following your blog a few weeks ago and I am HOOKED! It is my morning ritual to read your blog 1st thing when I get to work (shhh…don’t tell!) You guys inspire me! Love it!
Kelly says
The desk looks amazing painted white! And the legs and handles – what a transformation!! Question: what are you planning to do about electrical with the floating desk? Would you install an outlet in the floor or something like that, once you decide if you like this layout? Or maybe have some kind of “charging station” along a back wall, where you can plug laptops, etc. in overnight?
YoungHouseLove says
We’re thinking of getting a covert plug added under the desk (or behind it on the bay side so the wires aren’t too visible). Apparently it’s not that expensive and can be added through the crawl space, so we’ll keep you posted!
xo
s
Christine says
Idea! Could you top the desk with a larger top, with an overhang on the back side? That way, a couple of people could pull up to that side for a small meeting. And you’d avoid having to cut a hole in the back of the desk. I guess you could also top the desk with a larger-all-the-way-around top, so there’s legroom all the way around, too. Looks super with the paint!!
YoungHouseLove says
We’re definitely considering that too! Didn’t know how wide we could go without crowding the room, but we also didn’t want to cut that baby without being sure! Will keep you posted.
xo
s
Amanda says
Love this layout and the desk is awesome.
I do have one question – how are you planning to address cords and electrical outlets with the desk floating in the middle of the room?
YoungHouseLove says
We’re thinking of getting a covert plug added under the desk (or behind it on the bay side so the wires aren’t too visible). Apparently it’s not that expensive and can be added through the crawl space, so we’ll keep you posted!
xo
s
Crystal says
Man you guys are going paint crazy lately!!! I love it and I’m jealous. It is still too cold here for me to paint out in the garage and I want to be able to open some windows if I paint in the house.
CandiceMcC says
OMG, you guys. I got nearly that EXACT desk at Goodwill about a month ago for $75. It’s so heavy! How on earth did y’all get it in the car?! Mine is in better shape so I’m going to try to keep it wood (even though my first instinct was to paint it white, too). I’m percolating like y’all do. Mine has brass (or faux brass) pulls and “socks.” Like everyone else, I’m digging brass now so I’m going to keep it. Planning my wall of white built-ins and going to paint the office–wait for it–pale pink. Wee!
CandiceMcC says
Ahh, I forgot the coolest part. Based on the random contents, I’m betting this desk came from NASA (which is down the road). Ok, I’m done now. :)
YoungHouseLove says
It was really heavy! We took the legs off and the drawers out, which helped. And John lifted the heavy side (mah strong man) so I just sort of guided it in. You’re so lucky to find one in better shape. It’s such a beauty!
xo,
s
Callie says
Yes!!! I *love* the floating two-sided desk! You had probably thought of it before I suggested it or heard it from other people too, but I am doing a happy excited hand wavey dance at my desk that it was my suggestion too! :D Husband and I (both in physics) have done a two-sided desk arrangement before and I love it. Super functional and it looks so great aesthetically, with the bay window and everything! Clara and her brother will have great memories of wandering over to the parents’ island :D
Also, great desk find, and I love the “Administrator TM” sticker. Haha. Maybe a future ironic vintage sign idea for the desk area somewheres?
YoungHouseLove says
Haha!
xo
s
Laura @ Rather Square says
What an amazing free find, and your transformation is pretty cool too! I wonder if the people that left it on their curb would see this and be all “man, why didn’t we think of doing that to our old desk?!?”
Paula says
lol. I was thinking the same thing!
Tasha says
Love it! I love the floating desk idea instead of staring at a wall. On a side note (and you may have already let us know in a previous post), LOVE the plants/trees! What are they? They are gorgeous…
YoungHouseLove says
Thanks! They’re fiddle leaf figs from Home Depot. On sale for $59 with a one year warranty (here’s hoping I don’t kill them…)
xo
s
Gabbi @ Retro Ranch Reno says
LOVE the desk and makeover you gave it! I’ve never retrieved a piece from a curb alert, although I’ve found my fair share of Craigslist finds. They are my favorite pieces in our home!!
mcampbell says
Great find! May I share what I did in a similar case. I kept the single desk (I painted itvwhite also) and added a simple sofa table I’d made from laminate. No cutting into the desk. Just add a chair. Also consider locking castor wheels for your desk. I love everything modular & moveable in an office.
Stardancer says
Aha! I thought that the layout we voted on last time was okay, but I also thought it wasn’t perfect. I LOVE that you found a way to relocate the desk into the sunlit middle space. And it makes sense to turn the dining room into a meeting area, since it doesn’t seem to have another function in your future plans.
The refinished desk is beautiful. The metallic hardware bits take the whole thing to a shiny new level.
Sarah @ Sarah's Daybook says
Love that! So excited to see the progress!
Isabel says
Love that new layout! I think you’ll like it very much especially with the bay window views. Such a treat to work in a light and airy room! I share my window-less office with two designers and they’re all into mood lighting (no overheads, just desk lighting), so it drives this tropical bird a little crazy, especially in the winter. Great find on the desk, it reminds me a lot of a desk that used to be in my dad’s office growing up, probably from the same era too! What’s the name of the trees by the window? I bought two pieces from your Target collection yesterday, anxiously waiting for their arrival at the end of the month :D
YoungHouseLove says
Thanks so much Isabel! Those plants are fiddle leaf figs from Home Depot. They’re on sale for $59 and have a one year warranty. The warranty is the only thing that gave me the confidence to try them out…
xo
s
Heidi says
What a great find – it looks perfect in there! I can’t wait to see how you cut a hole in the back to fit a second chair in. We mostly take anything for free that we can find – because we know eventually we will find a use for it. Some friends of ours were recently replacing their granite countertops and gave us a call to see if we wanted them before they went in the dumpster!
Nicole says
You guys dont want to rush into anything you can’t undo? Like painting a gorgeous old desk that doesn’t even fit your needs both aesthetically and functionally? That kind of un-do?
Seriously a a double sided desk with BOTH your knees and legs under a spot only designed for one is ridiculous…you need to be offset. Also your going to have no room to actually work at that desk since your laptops will butt up against each other and you can’t slide to the side. Also one person isn’t going to have drawers.
YoungHouseLove says
There’s no doubt some folks would never paint the desk, but we wanted to, it was free, and it was dinged up, so we went for it (we shared a bunch of secondhand finds that we haven’t painted right in this post). As for your fears about the width of the desk, we added an updated pic and explanation right in the post for you at the bottom. It looked a lot skinnier than it truly is, but there’s plenty of leg and computer room (more than our first house’s double desk had). We also mentioned that we’ve considered adding a new top to give us even more space to spread out. Will keep you posted!
xo
s
Bethany says
I just measured how far my legs/knees go under my desk when I’m sitting normally (because I’m clearly insane) and it’s only about 9 inches if I’m scooched in a lot. It seems like there should definitely be plenty of room unless one of you likes to stick your legs all the way out. Knowing me I’d probably prop my feet up on the other person’s knees because I’m annoying like that, haha. Built in foot rest!
YoungHouseLove says
Haha, thanks Bethany! That’s good to know! John and I work in tandem a lot anyway (someone is the parent and someone is the blogger, or someone is doing a project while someone else writes a post and Clara sleeps) but it’s nice to know we should both have enough room if we happen to be typing together :)
xo
s
Nicole says
Just because it was free doesn’t mean it actually works for what you want, you guys again continue to choose free/cheap over a piece that actually suits your needs. And you painted it before you even figured that out, my your own admission…therefore destroying the whole integrity of the piece in the event that it doesn’t work out and it ends up on craigslist.
Hope you guys don’t ever want to stretch your legs out or maybe do some writing in front of your laptops. The picture still proved to me that you aren’t looking for function in this desk.
Simonne says
If you do end up determining that it doesn’t suit your needs….I sure hope that you offer someone else the chance of scoring a free desk as opposed selling it.
YoungHouseLove says
Sure! We don’t see ourselves parting with this desk anytime soon, but if we did we’d donate it or craigslist it for free. You know we love the Habitat ReStore…
xo
s
Jenny says
y’know, maybe it’s just me, but I don’t see how a nice paint job destroys the integrity of anything. It was obviously in a beat-up condition and the first thing anyone would have done would be to give it a good sanding and freshen it up. It’s not like you can’t sand off the paint if it comes to that, either. At the end of the day, it’s just furniture!!!
I do agree that this desk is a kind of weird choice for you, though. It’s a beautiful piece and anyone would have snapped it up, but you probably could have found something that could work better for this space if you had held out a bit, and I wouldn’t be surprised if you still do down the line. Maybe you should consider this desk “office phase 1.” :) :) Please don’t cut it, just in case!!!
Judy says
I’m always so impressed at your diplomacy Sherry! Don’t know why anyone would complain that it might be a waste of your time when we get the eye candy, and that desk is certainly going to bring a lot more enjoyment in its new incarnation, where ever it might end up!
Dave says
this may have been asked, but have you thought of cutting the back of the desk in the center to allow both of your legs to go under the desk…..you know to allow you to play footies…
It would make the desk seem more double sided instead of a desk for one and a Squatter using the other side of the desk.
YoungHouseLove says
Oh yes, that’s the plan – it’s in one of the last few paragraphs of the post :)
xo
s
Emily says
I like the white, but I am such a sucker for those wood desks that it makes me a little sad to see them painted.
My husband and I both have desks just like that. We got them from our local university surplus for $20 each. We only sanded and refinished the tops because we were still in school at the time and didn’t have time to do more. We still have both of them in our office because we both have a lot of stuff and don’t share well :)
If you haven’t ever looked at your local university surplus, you might look into it. We have wooden chairs, bookcases, desks, filing cabinets, and dishes, and art all from surplus for cheap.
YoungHouseLove says
Love that tip! Thanks Emily!
xo
s
Stephanie says
Emily,
How do you find out about a university surplus? That’s a great idea – now I want to check one out!
Amanda says
Stephanie, I just did a quick “university surplus (city name)” google search and something popped up! Albeit for only one of three university in my city, but it worked!
Lisa@Double Door Ranch says
I’ve gotta say, I’m loving these slightly earlier posts. Though it does make my day seem longer now. Haha
The desk looks fantastic! I’m loving those champagne metal accents. Do you think the lack of drawers on the opposite side might get annoying?
We’re frequent Freecycle stalkers, so we’ve scored some amazing finds for free, but I think my favorite bargain find was a $7.00 goodwill entertainment center that I refinished and repurposed for craft storage.
http://doubledoorranch.com/2014/01/06/goodwill-hunting/
YoungHouseLove says
I worried one of us would get annoyed without drawers but John pointed out that he has worked at the parson’s table for 9 months and I have been at the kitchen table – so as long as one side has a bunch of drawers (I’m thinking of giving those to John since he does a lot of the accounting stuff) it should be ok as long as I have some storage somewhere in the craft area for things like backup notebooks. Most of my things end up on the desk anyway (planner, cup of pens, etc).
xo
s
Steph says
You guys have me itching to paint things. If only it’d warm up in Boston.
That desk looks so gorgeous in white. I just want to pet it.
Not that I’m weird and pet furniture or anything. And I certainly don’t ever get the urge to bury my face in all the pillows at HomeGoods. Nope. Not me.
Nikki says
Great desk makeover! I especially love the champagne on the hardware and the feet, it makes it look so elegant.
blythe says
I am always so astounded by the things you two find for free or cheap!!! I get compliments from people about the stuff that I find for my house on craigslist a lot. But YOU TWO WIN, hands down.
This looks fantastic :)
Samantha @Fabulous Fabris says
What a find! It looks fabulous!
Steph says
The desk looks great… but I’m really staring at those trees. I’ve seen them on a bunch of blogs but I still like them and I’m jealous of those giant ones.
YoungHouseLove says
Hope Depot! On sale for $59 with a one year warranty (since lets face it, I’m worried…).
xo
s