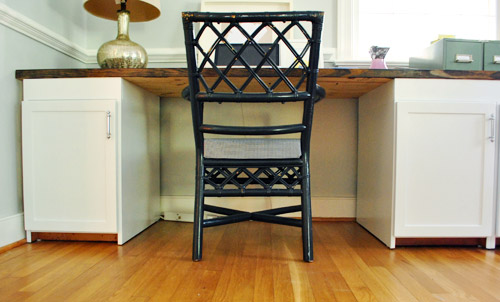
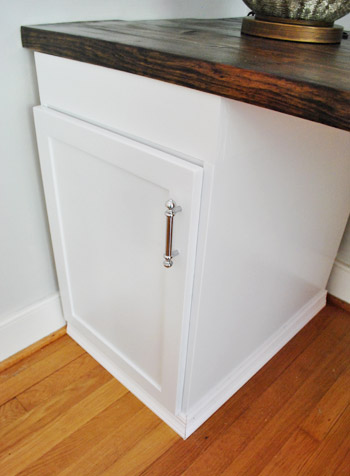
Yup, we got a little trim. As you read in last week’s Day In The Life post, we recently tackled the add-trim-to-the-hooter-and-the-hotter-office-desk project. The basic game plan was to add some simple baseboard or molding to the bottom of our cabinets so they looked more like built-ins. In other words, the bottoms were looking a little unfinished…
I took measurements and headed off to the store with my little cheat sheet. Notice how I mark which way my cuts go? When I’m making angled miter cuts I’m so anxious about cutting the wrong way that I leave myself as many reminders as possible.
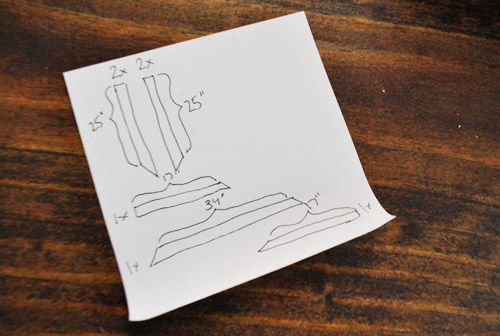
One very critical measurement, not shown here, was the trim height. We had less than 3″ of distance between the floor and the cabinet doors, so traditional baseboard wasn’t gonna work. I actually ended up (dramatically) bringing home trim that was very similar (actually, maybe exact) to what we used around our bathroom mirror. Total cost for three 8ft pieces = $14.

I measured my pieces and again left reminders about what angle my cuts needed to be…
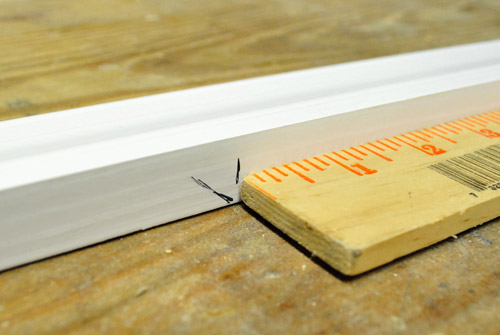
…so that even at the last second I could make sure I didn’t have my blade or trim piece in backwards or something.
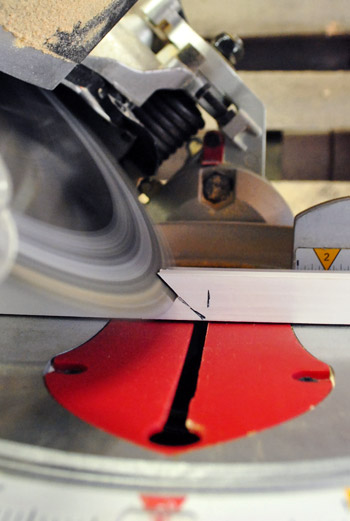
I checked each piece as I cut it just to make sure the lengths and angles were right.
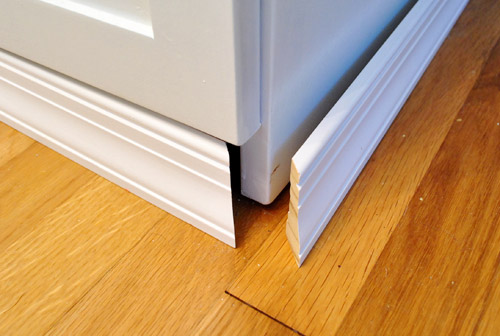
After everything seemed to be lining up, it was time for the nailing portion of the day’s festivities. I hammered the small finishing nails in most of the way with my hammer, then finished it off with my nail punch (which helps get the nail set into the trim slightly without banging up the surrounding wood).
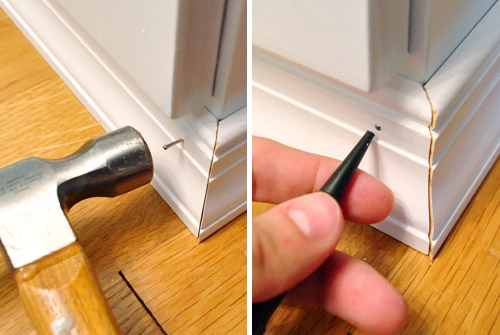
Of course the edges weren’t 100% perfect, but that’s what a bit of caulk is for (just rubbed into the edge with a finger). It’s also good for hiding those slightly sunk nail heads (thanks to the nail punch). Though we actually haven’t done either of those things yet. Oops. Soon…
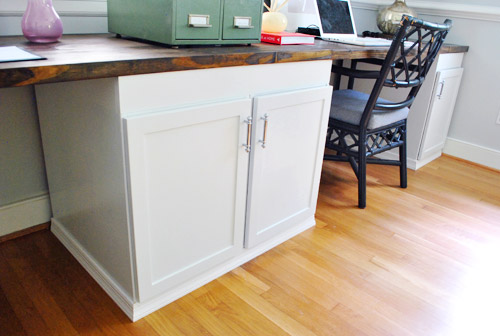
I put two or three nails in each piece of trim, securing it to the cabinet – not the floor – and was done in almost no time. If the white of the trim weren’t so darned close to the white of the cabinets already, we’d probably have painted them immediately. But they actually look great as they are (so we plan to paint them when we caulk stuff, just to finish things off).
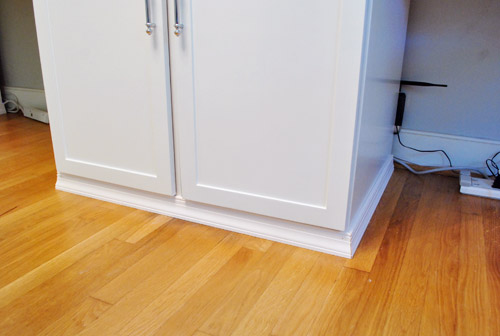
What wasn’t looking so great was the mess of cords in these pictures. We’ve just sort of been ignoring them up to this point, but after taking the pic above we suddenly realized that they were ruining the finished look of our new trim. So we decided to finally do something about it.
Sherry’s side was easy because she only has two plugs in one small power strip (her computer and lamp – although for some reason her lamp wasn’t plugged in for the picture below). The outlet is hidden behind the desk, so we thought ahead and plugged the power strip in before finishing the desk. Luckily I was able to just tuck her strip out of sight behind the cabinet since there’s a smidge of space to allow for the plug (there’s no space between the countertop and the wall, so it looks 100% seamless from above – you only see that small crack where the cabs don’t sit right against the wall if you’re on your knees under the desk). Oh and ignore the raw bottom of the countertop in all of these pictures (it’s also not seen except by someone who is Burger’s height, but we’ll probably do something about it someday because we’re anal).
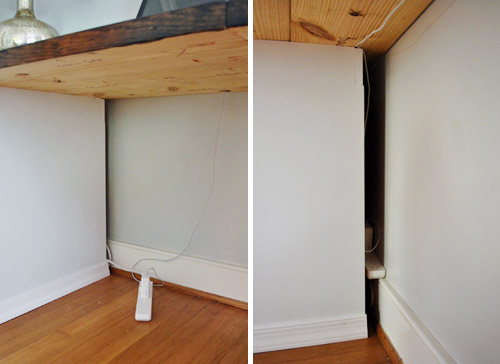
My side was a bit crazier, since I had a larger power strip (from our old office set-up), more plugs (computer, phone, external hard drive, etc) and that big honking wireless FiOS router. Behold the hot mess:
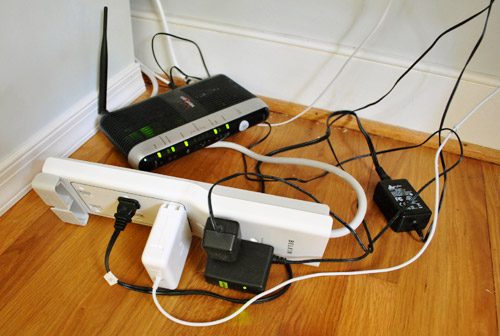
Since tucking it away like Sherry’s side wasn’t an option (stuff was way too bulky to slide behind the cabinets), I opted to hang the power strip on the wall right under the counter, that way it’d be virtually out of sight. The power strip already had notches for screws on the back, so I just used a homemade guide to make sure I drilled my holes in the right spots.
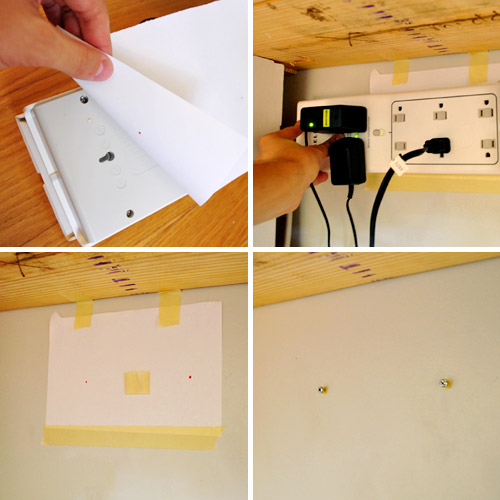
In case the pic isn’t self explanatory enough, my basic system was:
- I taped a piece of paper to the back of the strip and poked holes through the paper with a red pen, marking the notches.
- I then held the strip where I wanted it on the wall and taped the paper to the wall
- When I gently pulled the strip away, it un-taped itself and left me with two red guide dots
- I just drilled right through the paper so I had perfectly placed holes for my anchors and screws
- Then I hung the strip on the wall and plugged everything back in (and slid the router behind the cabinet)
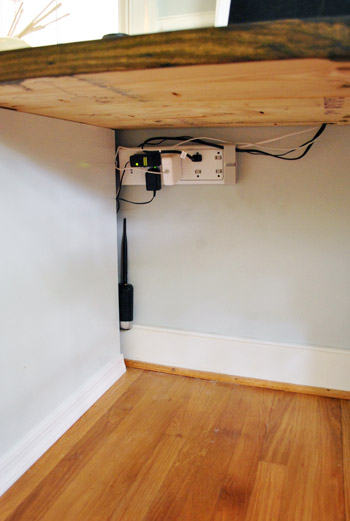
Still looks a bit messy in the pic above, but when you stand back to look at the whole room it’s not very noticeable at all. So your eyes can just concentrate on the freshly added trim instead. Note: of course we still have to hang art and window treatments and add bright lamps/shades and rearrange tons of desk stuff, so other than the newly completed desk there’s not much about this room that’s done.
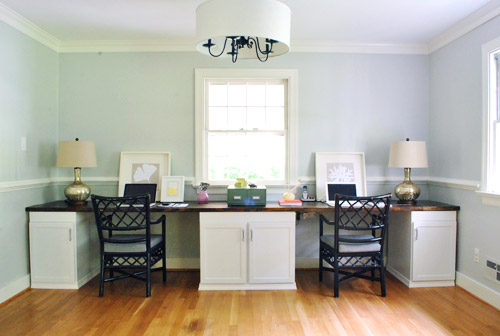
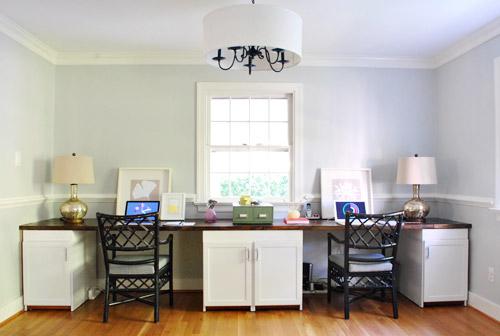
Just as a reminder, here’s what the room looked like without the added trim and cord organization. We think it was well worth $14 for the extra polish that it adds:
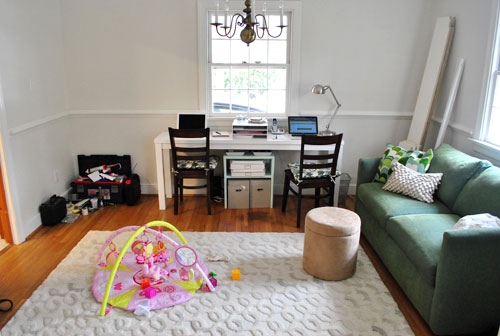
Oh and here’s what the room looked like right after we moved in nine months ago, just for some way-back-when reminiscing:
This room in general has really come along in the last month or so. Which is nice since we spend so much time in there.
Oh, and I had once talked about trying to add some trim to the side edges (where they almost meet the wall) to complete the look, but Sherry and I had about fifteen pow-wows on the subject and finally decided it wasn’t worth the trouble (to make it look truly flush I’d have to do lots of cutting around the baseboard and that didn’t sound like much fun – and doing it half-heartedly would probably just make it look worse). So once we caulk those newly added trim corners and nailheads, I think we’re pretty much calling this desk project D-O-N-E. Here’s how much we spent in total on our 13 foot long wall-to-wall double desk:
- Cabinets (from Habitat For Humanity ReStore): $6.30
- Kilz Clean Start No-VOC Primer: $0 (leftover from painting the kitchen paneling, but it would be around $20 to buy for those wondering)
- Electric sander & sandpaper: $0 (already owned, but would be around $25 to buy)
- Benjamin Moore Advance paint (in Decorators White, satin): $40 (thanks to 10% off haggling/begging)
- Pre-primed & unprimed wood to build up cabinets (from Home Depot): $51
- Framing lumber for counter (from Home Depot): $27.30
- Stain & poly for top: $0 (already owned, but would be about $8 and $20 respectively if you didn’t have any)
- Drillbit for boring cord holes in counter: $4 (from Lowe’s)
- Trim for bottom: $14 (from Lowe’s)
- TOTAL: $142.60
Not surprisingly, our attention has already moved on to another project in the office and we CAN’T WAIT to share it with you. Lets just say that Sherry’s epically sore, there’s paint in her hair, and she’s nowhere near done. More details (and pics) tomorrow for sure. Until then, have any of you guys added trim to make something look more built-in. Or launched a full-scale cord organization? Tell me about it.
Psst- To check out our entire desk building adventure from start to finish, here’s the post about planning the layout of the room, here’s the post about buying the cabinets, here’s the post about other cabinet research we did, here’s the post about sanding/priming the cabinets, here’s the post about building them up to desk-height and painting them, here’s the post about building and staining the counter, and here’s the post about drilling cord holes into the counter.

Alexi says
The trim looks great! Love all of the office projects. I think my favorite is the light fixture. Can’t wait to see the rest!
Kate says
No trim this weekend, but I did get bitten by the finish-those-projects-sitting-around bug. I patched and spraypainted two chairs that have been waiting to get redone, and the seats are pulled off and bare waiting for some new batting and fabric (chairs were a beside the dumpster find as we moved out of our apartment, score!). I also spraypainted two of Ana’s $10 ledges for our living room and an old lamp that was a “here, we don’t want this” from my parents. This is after painting a Craigslist hutch two weeks ago, and I have a few more plans for this week – The cool fall weather is really inspiring me to get the house a little more finished and cozied up before winter!
Saleha says
“… so other than the newly completed desk there’s not much about this room that’s done.”
I’m feeling w little upset on behal of your super cool lamp after readIng that.
YoungHouseLove says
Haha, oh yes- but that was waaaay overdue! We should have done that months ago. Haha. We’re just talking about the lack of art and window treatments and furniture in the other corner and rug and all that. Haha. But you’re right, our light was a huge upgrade! Still very much in love.
xo,
s
Saleha says
Yeah, it was. I’ve been thinking for a while about adding something fun to the inside of out bedroom chandelier-with-drumshade. I taped piece of really pretty mustard paper to (like a paontswatch on a wall) it and I’m staring at it right now…think this is a keeper. Any idea’s on how to make it non-permanent? Doublesided tape? Hot glue?
YoungHouseLove says
Hmm, I would try double stick tape I think. Or maybe that sticky tack stuff that people use to hang posters on the walls of their dorms? Good luck!
xo,
s
Saleha says
Haha, thanks. I just walked back into the room and decided I don’t care if it’s non-permanent. Thank you thought! X
Briel K. says
I’m always amazed at what a big difference such a small change can make. It looks great! As for Sherry’s project, I can’t even begin to guess.
I think it’s silly how people are hesitant to comment now that they’ve learned how much time you spend dealing with comments. For one thing you’ve said time and again how much you love interacting with us. For another, comments are a valuable asset to the blog. People definitely shouldn’t feel bad about leaving them! Just a little rant there. ;) Don’t worry, I will have no problem continuing to leave comments! haha
YoungHouseLove says
Haha, thanks Briel! We love hearing from ya!
xo,
s
Amy says
It looks fantastic. I cannot believe what y’all have done with a set of $6.30 cabinets. Cute, amazingly talented.. and funny.. love you guys. Seriously look forward to reading your new posts each day.
threadbndr says
I love the way this room is coming together. I love the big wall sized cork board in the inspiration room. Are you going to do something along that line in your office, too?
re cord wrangling – I almost always mount my power strip at the back of the desk somewhere, but I usually use an undermount beneath the desk surface instead of the wall mount that John used. (Love the tip on how to space the screws; it sure beats lying on your back under the desk with the power strip in one hand and an big @$$ electric drill in the other and no third hand to hold the screws LOL)
Another tip is to use some type of channel attached to the back of the desk (I’ve seen plastic guttering used on AT several times) and just lay everything in there. Both of those ideas might help your readers that rent. The key is to be sure your screws into the desk are short enough to not come out on the top surface.
YoungHouseLove says
We have found that bulletin boards stress us out. Haha. I love how they look in inspiration rooms, but in person we figure we might enjoy looking at something else more- hopefully something that’s soothing/calming since we spend so much time staring at the wall! Hah. Love the cord tips too!
xo,
s
Carley Peters says
The cabinets look great! I love those little touches that change the entire look of the project (including the wire rearranging – the bane of my existence) Awesome!
Is it totally weird that I love the pics of you using the nail punch? It’s like getting in the last word…”Oh, you think you’re done cuz you’re flush with the board? Well how ’bout this?? What now?! Muahahahaha!”
I swear, I’m not as controlling in life as I am in my projects LOL Usually it’s whatever I’m working on that gets the last word, so I welcome what small victories I can get from my nail punch. Keep on keepin’ on!
YoungHouseLove says
Haha, you’re so right about the nail punch. It’s the final one-two punch to knock the trim out. Haha.
xo,
s
Katie says
The trim looks great but I have a random question about something else in one of the pics. I noticed you had one of those toy gym things (for clara?) in the picture. My 3 month old LOVES her, grandma thought about getting one for her house but we worried she might grow out of it soon… does Clara still play with hers?
YoungHouseLove says
That was a flashback picture from when we moved nine months ago. She probably outgrew it around seven months or so? Maybe eight? But she loved it for a while so it was well worth it when she was smaller! Hope it helps!
xo,
s
Katie says
Thanks! That is helpful… didn’t really think about that being a flashback :) I think I’ll tell grandma to buy her a different “big girl toy” for when we visit!
YoungHouseLove says
Good luck!
xo,
s
Bethany says
If that was a flashback… that means you did your lighting treatment a long time ago!!
YoungHouseLove says
No, the one with the kid gym on the floor was a flashback! You know, the one with the tiny desk?! The one without the trim was just last week or so. Haha. We do all of our projects (and share them) in real time for ya!
xo,
s
Bethany says
Oops! Joke’s on me. I was looking at your picture without the new trim and somehow combined it in my mind with the older, flashback picture. Never mind! :)
YoungHouseLove says
No worries! Haha.
xo,
s
Amy Kelly says
The desk is looking amazing with the addition of the trim! I was thinking though that maybe some pulls on the top of the cabinets (where you added the extra wood for height) might be a nice addition to create a faux drawer look. That extra bit of unadorned wood looks a little empty and out of place now that the trim has been added to the bottom. If you could add some details to make it look as though there were functioning drawers there it might help fill that awkward space. Just a thought… the desk looks seriously amazing though! I am shocked at what you’ve been able to pull off for so little money!
Nine says
Seeing those plugs reminded me – how do/did you childproof things for Clara? My 6 month old is just starting to get mobile (backwards only, so far!) and always seems to make a beeline for any possible danger area in the room (electrical cables or things she could pull over!)
YoungHouseLove says
We just used cord covers on all outlets that were empty and said “no, no, we don’t touch those” whenever she’d touch a cord (we tried to tuck as many as we could behind things like the TV stand, under the desk, etc) so now she generally just ignores them (and the open outlets are still capped). Hope it helps!
xo,
s
Kate @ Bread & Chocolate says
Love what you’ve done! It looks so polished. Cords are driving me crazy in my living room, so I like the way you cleaned yours up.
Allyn says
My hubs was going crazy about the cords at his desk. His solution? Masking tape to the desk leg. Not quite as elegant of a solution, but still effective.
YoungHouseLove says
Haha, I love it! Whatever works!
xo,
s
Anita says
We have the same huge Fios router that I’ve been hesitant to hide away because I thought it would affect our signal. Did you notice any difference after hiding it behind the cabinet?
YoungHouseLove says
We worried about that too! Thankfully we still get great service all over the house (even in the living room, which is beyond a thick brick wall since it’s an addition).
xo,
s
Jennifer says
Seeing the Jonathan Adler book cover in the “We’re Digging” section made me think you should paint your office chairs yellow (like your front door). They would be a really fun pop of color & tie into your dining room.
Your new office desk looks great, and I always look forward to your project posts. I love the step-by-step details & the cost breakdown.
YoungHouseLove says
That’s definitely one of the colors we’re debating (among plum, grellow, indigo, teal, etc). Should be fun to see where we end up!
xo,
s
Jess @ Little House. Big Heart. says
It’s amazing what a little trim work can do! The cabinets look so much more finished now.
The hubs and I plan on adding crown molding to the top of our Ikea bookshelves in hopes of achieving the same thing.
Mandy says
Love it, and totally blown away at the budget breakdown!! I love how you guys do amazing things on pennies, you are truly an inspiration! Can’t wait to see what you are working on for tomorrow…now off to figure out a good solution for my too many cord sitch in the office :/
Suzanne Supplee says
The new office looks beautiful. Can’t wait for tomorrow’s post!
Dan VanWinkle says
Just a tip from a computer nerd, the higher you hang your wireless router, the better wireless signal you will have. That is the reason you see businesses hanging their routers on the ceiling in the middle of the room.
With that being said, I have my home router tucked away too, but I have a small apartment. If you notice bad signal anywhere in the house, you may want to try just moving the router up the wall.
I would be really interested in seeing how you two would hide the eyesore that is a router as well, as it isn’t easy. On that note though, you don’t really have to move the router, just the antennas.
-Dan
YoungHouseLove says
Wow- thanks so much for the tip Dan! So far we have a great signal but if it gives us trouble we’ll try to raise it up behind the desk with a little hidden shelf or something!
xo,
s
Liz says
The trim looks great! It’s too bad you couldn’t put trim on the sides. I’m guessing Sherry painted the ceiling. Am I right?
YoungHouseLove says
Nope! Haha. But good guess. More info and pics tomorrow morning!
xo,
s
Blair says
I love it and in the pictures you can’t tell the different white colors! Are you going to add anything (i.e. cork boards) behind in the desks?
~Blair
YoungHouseLove says
We definitely have to add some art to those bare walls!
xo,
s
Beatrice says
That looks so great. Sometimes you forget about the little details, but they are the ones that make the biggest difference. Your old desk looked so huge before, but looking at it again, it looks small now. Have a great day!
Stephanie says
Wow, another great update! The desk looks instantly more built in. I can’t wait to see the other project tomorrow.
Libby says
I’m happy to see this post. Visible wires are my pet peeve and it gave me a “so simple, why didn’t I THINK OF THAT idea”….mount them to the wall under the desk. Exactly what I’ll be doing tonight.
Danielle says
The finished product looks amazing! And once again, a project that I’m hoping will convince my husband that we should do more DIY. Thanks again!
Carrie says
In the inspiration photo I noticed that the trim around the base of the cabinets was the same height as the wall baseboards. I know you added the trim around the top of your cabinets to add some height to the desk and I was wondering if there was a reason that you didn’t add it to the bottom instead -so that the trim on the cabinets matched your current baseboards? In the photos the trim on top of the cabinets looks like it’s the same height as the baseboards. It seems like something you guys would have considered.
The desk looks great! I can’t wait to see how everything comes together!
YoungHouseLove says
Since the cabinet bases were constructed with those little indented legs, building them up from the bottom would have been a lot more difficult than building them up from the top. We also liked the idea that all of the stuff in the cabinets wouldn’t be resting on the added built-up part (just the weight of the counter is on ours built up part, while the stuff in the cabinets rests on the original bases of the cabinets, so they’re nice and sturdy). We just didn’t want them to wobble or feel off balance.
xo,
s
Maggie says
I’m smacking my forehead and saying “D’oh.” I have a mess of power cords also, and it never occurred to me to put the power strip on the wall. My cat unplugged the router the other day laying on the cords. Your office looks really good. Mine . . . is a “work in progress.”
Reenie says
WOW~~~you guys did a fab job ~ looks great ~ and so much more room :)
Brooke says
Love the way the trim spruces things up. It’s amazing how sometimes the smallest details can make the biggest difference. I’m inspired to try something similar with inexpensive white bookshelves to make them look like built-ins!
Sarah @ The Strength of Faith says
Wow, when you look at the “before” picture it’s amazing how much small the old desk / work space was!
Laura says
Wow, this project totally made all the difference! I would never have thought to add the trim/baseboards on your desk, but it totally makes it seem more built-in and finished. I am exploring options for a new desk in our office, and I love the dark wood with white. I am amazed at how little you spent on such a large desk! Nice work!
J says
That would make an excellent buffet come holiday dinner time. Looks great!
Samantha says
Hey guys!
Did you know that MinWax makes a two in one stain and poly? I doubt it is low/no VOCs but it is soooo easy to use.
YoungHouseLove says
Yeah, we hear it’s so easy and cheap! I’m just a crazy person for Safecoat (I love how non-toxic and eco it is).
xo,
s
RLB says
Very nice finishing touch John. Those cuts are perfect, and I’ve got to tell you that your template system always amazes me for the fact it’s so obvious, but something I’ve never thought of myself! It’s definitely tucked away now in my house-project-brain.
Jen says
LOVE the new office!! I am thinking of doing something quite similar! Question…we have an old farmhouse with the high wood baseboard…it currently has an almost reddish color, old stain on it…I am really wanting to paint the trim white and go all new….however, some people say “NO, leave it the “old” way!” I know that Sherry would say PAINT IT!! Do I need to sand it all or can I just start out by putting the primer right on? Am I a fool for painting?!?!? Great job, again, on the office!!
YoungHouseLove says
Haha, you know I’d paint that glossy white! MMmmm, especially in an old farmhouse. So clean and light and charming! As for how to do it, you’ll probably be ok with just using an oil-based primer followed by a coat or two of latex paint. Good luck! A short handled angled brush will probably help you go faster too (more control). Good luck!
xo,
s
Melanie @ Mailbox Journey says
Wow, that trim makes a HUGE difference! It looks great.
Megan says
I think that this look fantabulous! What a great find for those cabinets. Great job on everything and I can’t wait to see what you’ve done next.
Nikki P says
Suggestion- John, walk around the slightly , um, “rougher” side of Richmond stating you’re “getting a little trim”. Bet you’ll get some high fives, lol.
From Lauryn Hill’s Doo Wop (That Thing): “It’s been three weeks since you were looking for your friend/The one you let hit it and never called you again/Remember when he told you he was about the benjamins?/You act like you ain’t hear him, and gave him a little trim…
YoungHouseLove says
Are we totally missing a reference in the title of the post? We’re totally taking about getting a haircut. Head hair. Not any sort of manscaping. Haha. Is that what Lauryn is talking about? We’re clueless.
xo,
s
Maureen @This (Kinda) Old House says
That trim adds a WORLD of difference. I have to do this in my kitchen, actually. The previous owners put that disgusting commercial peel and stick rubbery baseboard on the bases of our cabinets. Blech. I have since removed that, but now we need to get some nice trim. And the cord organization probably hits home with everyone here. I will be tackling that soon, as well.
Carrie C says
I am a nut for the custom “built in” look. My old house had a fireplace that stood alone on a wall in the living room. I needed more storage so we did custom bookshelves on either side. When I sold the house this past spring it was the most commonly noted feature. Everyone LOVED the custom built in and thought it was original to the 1950 house. That was my evil/master plan all along. Here is a snapshot
http://13pandorasbox09.blogspot.com/2008/01/act-three-mantle-upgrade.html
I am already planning my next built in project for the basement:)
YoungHouseLove says
Wow, what an upgrade!
xo,
s
bridget b. says
the trim looks great and i also like your cord hiding. i know you guys opted not to place trim on the side edges, but i have a question about that: we replaced the existing white vanity in our hall bath with a stained wood vanity. it was from the habitat restore and did not come with matching side trim.
is it possible to paint or stain side trim to match the color of the wood vanity cabinets?
thanks!
YoungHouseLove says
Oh yeah, I would just try my best to match it (maybe bring a door and the unpainted/stained trim to the hardware store and see what they recommend?). Good luck!
xo,
s
Kristi says
Wow! The trim makes such a difference. Looks great!
Christina W. says
i reeeeeeeeeeeeeeeally like the cork board in the inspiration photo! do you guys think you will have a feature like that anywhere in your new office?
YoungHouseLove says
Oddly enough we love the look but bulletin boards stress us out. I know they’re meant to inspire but I think they’re just too busy for our tastes. So we’re hoping to add some art that we love looking at instead, since we stare at those walls all day. Haha.
xo,
s
Sara says
If you got to do it over again from scratch, would you start by pulling out the existing trim in the desk area? I thought at first that would’ve been the best thing to do to make it look built in. But the existing trim is a lot taller than the new trim. Maybe not a big deal until you consider what may NOT be under there: wall board. So having to add a couple inches worth of wall, finishing the seams between old and new wall, PLUS all new trim AND finding a solution for transition in trim between taller room and smaller desk areas (so you don’t have to redo the whole room)… well that’s actually a LOT of extra work! I really like the way you did it. I can’t think of an easy method of joining your desk to the wall.
It’s really gross and nasty, but one of the problems living in our old house (built in 1895), is that we get invaded annually by mice. Fall colder weather = furry infestation looking for warm nesting spots. The areas behind and on the sides of your desk are perfect for what we would call “mouse runs”. *shudder* I’m breaking out in hives now, because I HATE having them in my house so much. There are things you can do to get rid of these critters, and one of them is eliminating this kind of hiding spot. Is this a problem you have ever encountered before? Does your more southerly climate prevent this from being a problem in your area (I live in Iowa)? Is this a consideration that plays into your (desk) design? Is your (relatively speaking) newer house proof against critter invasions? Wouldn’t that be nice, I hope it is true! :)
Sara
YoungHouseLove says
Yeah, we had the same train of thoughts as you! We just realized that removing the baseboards from the old plaster walls might be a huuuge can of worms! So happy we skipped that. Haha. As for mice, so sorry to hear about the horror! Sounds really freaky! We didn’t have any issues with mice at the last house or at this one since last winter (this is our first fall here, but so far so good). I wonder if they don’t like brick houses since they’re harder to get into? Ours is pretty sealed up around the exterior, so perhaps filling any holes with steel wool or other mouse/proof insulation might help? Good luck!
xo,
s
Robin @ our semi organic life says
Love the built in look! Question: do you find it hard now to get the laptop cords plugged in with it snug behind the cabinet? That is the most annoying thing about moving the laptop around the house I find… after a while I have to move my power cord then it often never makes it back to its organized home.
YoungHouseLove says
Surprisingly it hasn’t been that annoying so far (we always work on the sofa at night, and sometimes move the cords back and forth). So far so good, but if it’s annoying maybe we’ll keep an eye out on ebay or craigslist for a spare cord to keep in the living room? My BFF has an extra one and she says it’s her favorite luxury of the year. Haha.
xo,
s
Andreina says
Nice job! What is the grey thing on John’s power strip? Is to to hold the cords?
YoungHouseLove says
Yup, that came with the power strip, it’s just to help hold the cords. Hope it helps!
xo,
s
Leslie says
It’s amazing to me what a huge difference the trip makes! When I first saw your project, I was like, “hmm, not that big of a deal..” but it looks so great and substantially more polished!
Veronika says
I love the hooter and the hotter! haha! rewind!
you guys are so funny!
Carla says
Vast improvement with the trim. They look much more connected to that space now. But I’m still bothered that I can see the power strip and all that wiring. Have you considered sliding out the cabinets, mounting the power strip behind them (cutting out a space in the backboard to make them accessible), and then encasing the visible cords in a special tube that you tuck snugged up against the wood desk top? That would make things look more polished. Just a thought.
YoungHouseLove says
Always another possibility if it starts to bother us! The height at which we take pics for the blog is around 3.5′ though, so you see it more in these photos (in real life your head is too high to see under the whole desk to the strip on the wall if that makes sense).
xo,
s
Nichole@40daysof says
The desk looks beautiful and I can’t wait to see what color she painted the ceiling. :)
Christine says
Those desks look like they have always been there! Such a great project. The trim really makes it look polished. I like how, even if there comes a day when you aren’t using that room as an office, you could still use the desks as a tv ledge, for art display, or for a buffet for parties, etc.