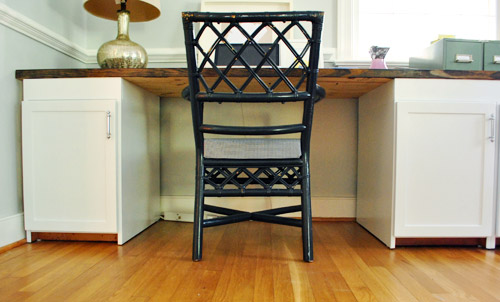
Yup, we got a little trim. As you read in last week’s Day In The Life post, we recently tackled the add-trim-to-the-hooter-and-the-hotter-office-desk project. The basic game plan was to add some simple baseboard or molding to the bottom of our cabinets so they looked more like built-ins. In other words, the bottoms were looking a little unfinished…
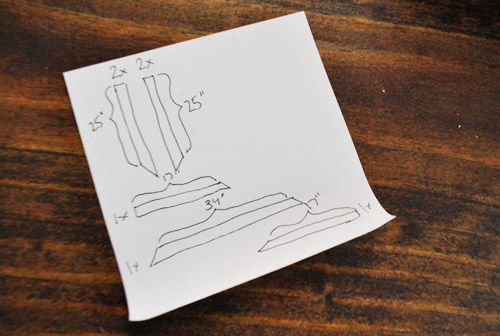
I took measurements and headed off to the store with my little cheat sheet. Notice how I mark which way my cuts go? When I’m making angled miter cuts I’m so anxious about cutting the wrong way that I leave myself as many reminders as possible.
One very critical measurement, not shown here, was the trim height. We had less than 3″ of distance between the floor and the cabinet doors, so traditional baseboard wasn’t gonna work. I actually ended up (dramatically) bringing home trim that was very similar (actually, maybe exact) to what we used around our bathroom mirror. Total cost for three 8ft pieces = $14.

I measured my pieces and again left reminders about what angle my cuts needed to be…
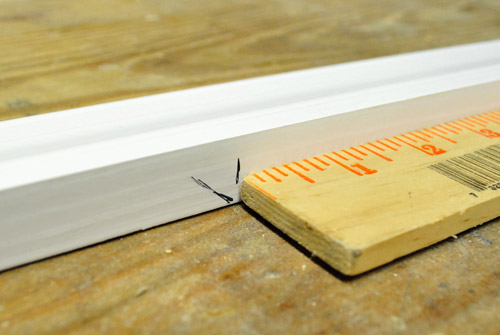
…so that even at the last second I could make sure I didn’t have my blade or trim piece in backwards or something.
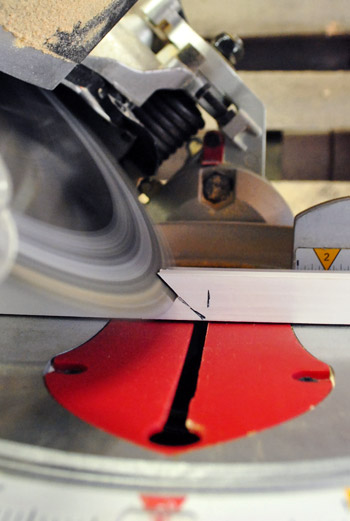
I checked each piece as I cut it just to make sure the lengths and angles were right.
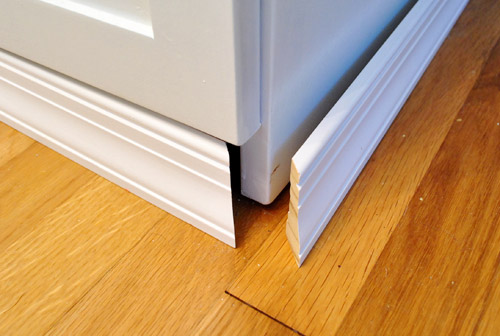
After everything seemed to be lining up, it was time for the nailing portion of the day’s festivities. I hammered the small finishing nails in most of the way with my hammer, then finished it off with my nail punch (which helps get the nail set into the trim slightly without banging up the surrounding wood).
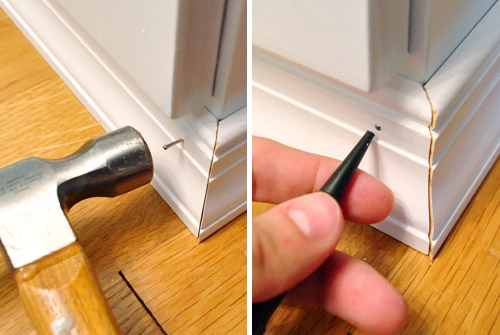
Of course the edges weren’t 100% perfect, but that’s what a bit of caulk is for (just rubbed into the edge with a finger). It’s also good for hiding those slightly sunk nail heads (thanks to the nail punch). Though we actually haven’t done either of those things yet. Oops. Soon…
I put two or three nails in each piece of trim, securing it to the cabinet – not the floor – and was done in almost no time. If the white of the trim weren’t so darned close to the white of the cabinets already, we’d probably have painted them immediately. But they actually look great as they are (so we plan to paint them when we caulk stuff, just to finish things off).
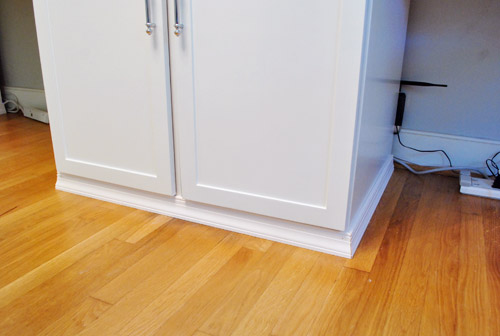
What wasn’t looking so great was the mess of cords in these pictures. We’ve just sort of been ignoring them up to this point, but after taking the pic above we suddenly realized that they were ruining the finished look of our new trim. So we decided to finally do something about it.
Sherry’s side was easy because she only has two plugs in one small power strip (her computer and lamp – although for some reason her lamp wasn’t plugged in for the picture below). The outlet is hidden behind the desk, so we thought ahead and plugged the power strip in before finishing the desk. Luckily I was able to just tuck her strip out of sight behind the cabinet since there’s a smidge of space to allow for the plug (there’s no space between the countertop and the wall, so it looks 100% seamless from above – you only see that small crack where the cabs don’t sit right against the wall if you’re on your knees under the desk). Oh and ignore the raw bottom of the countertop in all of these pictures (it’s also not seen except by someone who is Burger’s height, but we’ll probably do something about it someday because we’re anal).
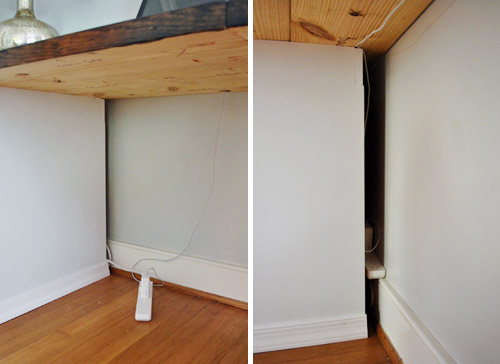
My side was a bit crazier, since I had a larger power strip (from our old office set-up), more plugs (computer, phone, external hard drive, etc) and that big honking wireless FiOS router. Behold the hot mess:

Since tucking it away like Sherry’s side wasn’t an option (stuff was way too bulky to slide behind the cabinets), I opted to hang the power strip on the wall right under the counter, that way it’d be virtually out of sight. The power strip already had notches for screws on the back, so I just used a homemade guide to make sure I drilled my holes in the right spots.
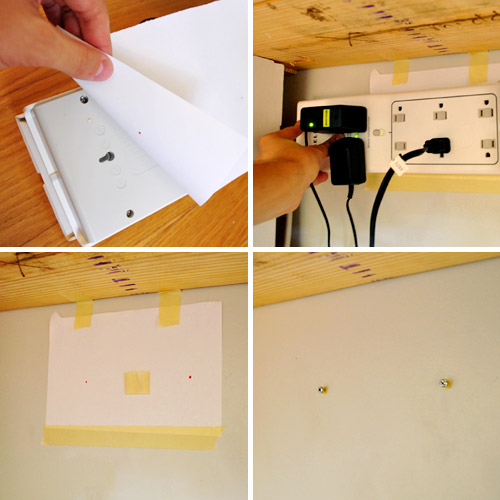
In case the pic isn’t self explanatory enough, my basic system was:
- I taped a piece of paper to the back of the strip and poked holes through the paper with a red pen, marking the notches.
- I then held the strip where I wanted it on the wall and taped the paper to the wall
- When I gently pulled the strip away, it un-taped itself and left me with two red guide dots
- I just drilled right through the paper so I had perfectly placed holes for my anchors and screws
- Then I hung the strip on the wall and plugged everything back in (and slid the router behind the cabinet)
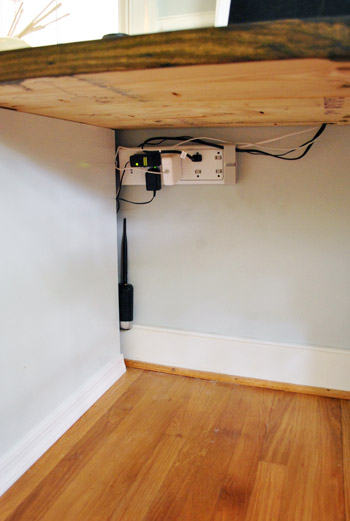
Still looks a bit messy in the pic above, but when you stand back to look at the whole room it’s not very noticeable at all. So your eyes can just concentrate on the freshly added trim instead. Note: of course we still have to hang art and window treatments and add bright lamps/shades and rearrange tons of desk stuff, so other than the newly completed desk there’s not much about this room that’s done.
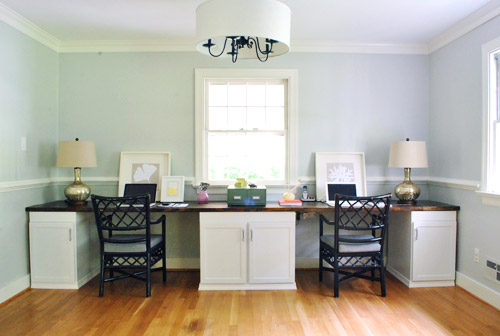
Just as a reminder, here’s what the room looked like without the added trim and cord organization. We think it was well worth $14 for the extra polish that it adds:
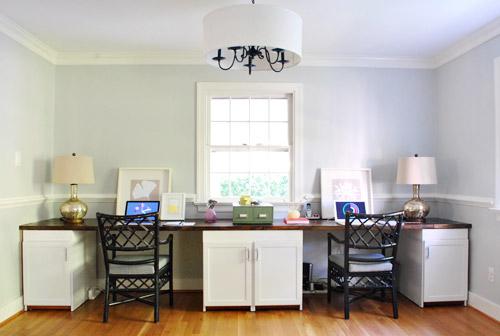
Oh and here’s what the room looked like right after we moved in nine months ago, just for some way-back-when reminiscing:
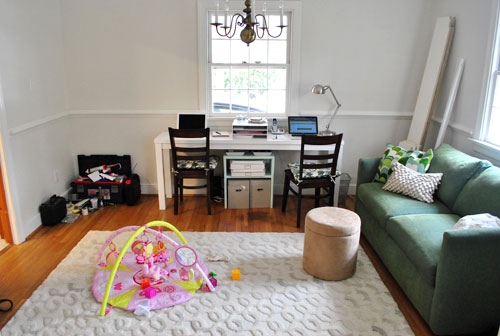
This room in general has really come along in the last month or so. Which is nice since we spend so much time in there.
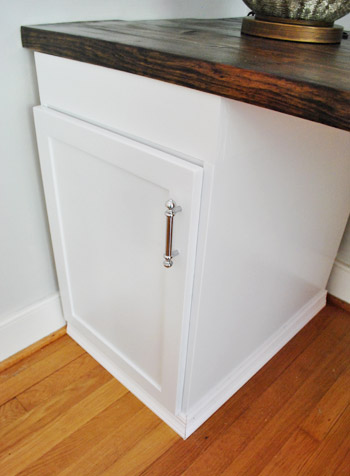
Oh, and I had once talked about trying to add some trim to the side edges (where they almost meet the wall) to complete the look, but Sherry and I had about fifteen pow-wows on the subject and finally decided it wasn’t worth the trouble (to make it look truly flush I’d have to do lots of cutting around the baseboard and that didn’t sound like much fun – and doing it half-heartedly would probably just make it look worse). So once we caulk those newly added trim corners and nailheads, I think we’re pretty much calling this desk project D-O-N-E. Here’s how much we spent in total on our 13 foot long wall-to-wall double desk:
- Cabinets (from Habitat For Humanity ReStore): $6.30
- Kilz Clean Start No-VOC Primer: $0 (leftover from painting the kitchen paneling, but it would be around $20 to buy for those wondering)
- Electric sander & sandpaper: $0 (already owned, but would be around $25 to buy)
- Benjamin Moore Advance paint (in Decorators White, satin): $40 (thanks to 10% off haggling/begging)
- Pre-primed & unprimed wood to build up cabinets (from Home Depot): $51
- Framing lumber for counter (from Home Depot): $27.30
- Stain & poly for top: $0 (already owned, but would be about $8 and $20 respectively if you didn’t have any)
- Drillbit for boring cord holes in counter: $4 (from Lowe’s)
- Trim for bottom: $14 (from Lowe’s)
- TOTAL: $142.60
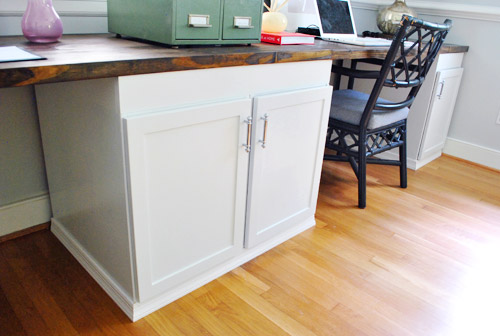
Not surprisingly, our attention has already moved on to another project in the office and we CAN’T WAIT to share it with you. Lets just say that Sherry’s epically sore, there’s paint in her hair, and she’s nowhere near done. More details (and pics) tomorrow for sure. Until then, have any of you guys added trim to make something look more built-in. Or launched a full-scale cord organization? Tell me about it.
Psst- To check out our entire desk building adventure from start to finish, here’s the post about planning the layout of the room, here’s the post about buying the cabinets, here’s the post about other cabinet research we did, here’s the post about sanding/priming the cabinets, here’s the post about building them up to desk-height and painting them, here’s the post about building and staining the counter, and here’s the post about drilling cord holes into the counter.

Kristi W. says
The trim makes a HUGE difference, and the room is really looking great! I was wondering what you did with the small couch that was originally in the office. Sorry if I missed that explanation somewhere else. But it’s a cool piece, so I’m hoping you found another place for it, if not in there. As always, keep up the good work!!
YoungHouseLove says
We’re not sure where he’ll go but right now our sleeper sofa is living it up in the sunroom. We’ll definitely share details when we hopefully find him a more final home.
xo,
s
Emily Drake says
Looks fantastic. The trim definitely makes it! Another option for the cord issue could be a basket under the counter (like this… http://pinterest.com/pin/189357432).
YoungHouseLove says
Love that solution too!
xo,
s
joyjoy says
The cabinets look great, but the cord hiding–love! I have a thing for hidden wires. :-P
Paula says
I noticed in a previous post that you guys painted your Karlstad legs a dark brown. What process would recommend for doing that?
YoungHouseLove says
Here’s the post about that for ya: https://www.younghouselove.com/2011/03/nice-leg/
Hope it helps!
xo,
s
Isabel says
It looks fantastic!! I’ve been waiting to see this part of the project done and now the desk looks so pretty and polished! The office is really coming together and I can’t wait to see what you guys do for the accents and decor.
At my mom’s place, we have a pretty awful cord situation with the entertainment center. There’s a flatscreen so it could look so pretty, but everything besides the Blu-Ray player is from the mid-90’s and my mom refuses to upgrade. The way it’s set up, there’s no way to hide all the cords so for now I just wrapped everything with twisty-ties. It still looks awful but at least it’s an organized kind of ugly, haha. Maybe when I go home for the holidays I’ll figure something else out and give the gift of a better looking entertainment center.
nikki says
We have a more ghetto diy desk (2 filing cabinets with an unfinished door on top), but on the bottom side of the door is a peg board, and all of the electronic stuff is zip tied to it (router, power strip, extra cords, and I don’t remember what else, hubs is the tech person). If you find the secured power strip isn’t enough, maybe that’ll help!
YoungHouseLove says
That’s a fun solution!
xo,
s
Julie says
You know, I was originally team I-don’t-hate-the-new-light-fixture-but-I-don’t-love-it, but I’m digging it in these more recent photos. Maybe it’s because the room is coming together around it? Whatever the reason, I’m liking it.
Jade says
I think the desk looks so gorgeous and the trim was so worthwhile doing because it makes it look really polished. It wouldn’t have stuck out if you had left it but now that you’ve added the trim, it has made the whole desk look ‘finished’.
As for staining the underside of the desk, I don’t think it matters at all. I think those who would be bothered by it are definitely in the minority. That time was probably well spent on more important things like teaching Clara more animal noises!
YoungHouseLove says
Haha- this is true. We’ve added other automobile sounds to her collection like train (choo-choo), car (vrooom-vrooom), bus (beep beep), and firetruck (neeee-nawwwwwww neeeee-nawwwwwww). Hilarious!
xo,
s
HeatherM says
Ooh, we love trim projects at our house! We made a built-in in our 14-foot closet, using kitchen cabinet bases for the drawers in 2 spots, w/ shelves above them, and clothes rods at different levels on the left third, middle third, and right third sections. We trimmed out the drawers, and we also put a small piece of trim under each shelf to both add support to the shelf and also finish out the look.
Also we have a very long and relatively narrow bedroom, and I wanted the look of crown moulding, but I knew a standard 4.5″ crown moulding would make the room feel much smaller (we only have 8′ ceilings to begin with). So we added a bit of trim instead, and it finishes off the room nicely. So then we did the same thing to my office. And then of course we did trim above the upper cabinets and below the base cabinets as well. We are fortunate that my FIL works for a cabinet manufacturer, so we get cabinets, and trim stained to match, for nearly nothing. I love doing trim b/c it is one of the projects that I (the weakling of the extended work-project family) can actually do on my own!
YoungHouseLove says
Wow- love that you got the cabinet hookup! So lucky!
xo,
s
Heather S says
The trim is just the lipstick the desk needed! :) I also have to always hide the chords, they’re just not pretty to look at.
I guess, if it continues to bother you to “see” what little you have left of the chords, you could always put a little molding “apron” along the back, leaving yourself enough clearance to unplug and replug items as needed, but it would be back far enough not to bump your knees & what not.
I really looks great and I can’t wait for tomorrows post! :)
YoungHouseLove says
Oh yeah that defintely could work if it bothers us! The pics of this room are taken a lot lower than the average person’s gaze (we set the camera on a tripod at 3.5′ instead of around 5-6′ like most folks see the room) so that might be why it’s not very noticeable in person! Haha.
xo,
s
bfish says
Offering something to think about next time you do a built-in such as this . . . .
20/20 hindsight being what it is, if you’d opted to add height to your nightstand/desk cabinets at the bottom rather than the top, you could have continuous base molding that matched or complemented your existing molding for an even more finished look. Going along with this, if you remove the base molding on the sides of the room before installation, the left and right side cabinets can be placed right next to the wall rather than being held off of the wall by the depth of the base molding. This eliminates the concern of filling the gap between wall and cabinets. With the desk components hugging the walls on the sides and wall baseboard trim continuing around the bottoms of the cabinets you have more of a true built-in look.
My husband has made or installed several bookcases and cabinets in our house and this was the method. Our base moldings are extremely deep (over 9″) so if we didn’t match that height on the built-ins’ bottom trim pieces it would be quite obvious.
I appreciate your openness to suggestions, as always!
YoungHouseLove says
Yup, we debated both of those options but didn’t want to open the can of worms that removing baseboards from our original plaster walls and building up the cabs from the bottom would have been a lot more complicated since there were legs to begin with at the bottom (we didn’t want them to be tippy, so adding a box to the top was the easiest, most solid result). Thanks for the tips though!
xo,
s
ashlee says
alright, i’ve got a question (as usual). i know you guys are keen fans of spray paint.
i can’t spray outside because we live in an area that has been INCREDIBLY windy this season. it’s awful.
so…i’ve been spraying frames in the garage.
well, there is spray paint ‘powder’ so i call it on EVERY SINGLE THING.
we’ve tried just washing things down but it doesn’t really go away. do you have any suggestions? mop the floors in a solution with tsp, possibly? wipe things down with tsp, possibly? it’s DISGUSTING out there!
YoungHouseLove says
Oh man, never encountered that. The dust can’t be wiped or washed away? Hmm, maybe try using mild soap or mineral spirits? Anyone else know?
xo,
s
ashlee says
it’s total dust central everywhere. we already swiffered it, and then used the swiffer that comes the solution – didn’t work. it literally poufs through the area, covering EVERYTHING. shoes, tools, you name it.
i’m going to have to take a day to unload everything from the garage into the yard (oh god, what a job that will be), wash everything thoroughly, and then mop the living poop out of that floor. tsp seems to take paint off everything – so i’m hoping it works, mixed with warm water and a good old fashioned mop and bucket
how is it possible that no one has had this happen except me? lol. could it be that i’m spraying from too far away from my project? take frames, for example. i’m about 6 inches away. if i go any closer, however, i get goops all over my project. & i’m using drop clothes (well, queen sized old sheets). but the spray dust is still flying EVERYWHERE.
YoungHouseLove says
Oh man, so sorry! I always try to spray outside so maybe I haven’t noticed and then the rain washes the dust away?
xo,
s
Meredith says
There is trim made for going against the edge of cabinets for when they are right up against the wall – since walls are never truly square and plumb. It doesn’t go flush against the cabinet but on top of the cabinet against the wall. I forget what it is called but is usually about 1/4 ” thick, maybe 3/4″ wide, flat on one side, and rounded like a quarter round on the other. It is MADE for what you need to do.
YoungHouseLove says
Thanks for the tip Meredith! It really doesn’t bother us right now but if it does it’s awesome to know there’s something made for the job!
xo,
s
Jamie says
OK… am I the only one that thought your post title was hilarious. I only scanned the first page but saw no reference to it. Naughty!
YoungHouseLove says
We had no idea what that was! Haha. People had to teach us that it was a naughty reference a little further on in the comments. It was totally just a haircut joke to us. Haha.
xo,
s
Lisa says
I was going to guess painting the kitchen cabinets! That would certainly get a bit of paint in your hair Sherry!
YoungHouseLove says
Oh man I wish! I’m so over those orange cabinets! We just have to figure out some appliances switches before we do that (so we don’t scratch up our newly painted cabs).
xo,
s
Erinn says
I love how the desk has come along, especially now that the trim is added! The only thing I think I would add would be faux drawer fronts above the cabinet doors, that would be the icing on the cake for me just to finish things off. You guys are such an inspiration to wanna-be DIYers like me!
YoungHouseLove says
Aw thanks Erinn! We do think about that sometimes but figure we’re ok with everything as-is for now. Who knows if we’ll get bored someday and toss some skinny faux drawers on there (they’d just be about 3-4″ thick, so we worried it would look disproportionate and dinky). Ya never know though!
xo,
s
Beatrice says
Trim really works, I wasn’t sure what it would look like, but it really finishes things off.
OTOH, I’m quite sure this is one of those days when you had no idea where a post would take you in the comments! HAHA
Erin says
i just had an idea that you could paint the chairs blue to match the lamp.
YoungHouseLove says
That’s definitely one of the colors we’re debating (along with grellow, emerald green, turquoise, and plum). Should be fun to see where we end up!
xo,
s
Dawn says
Delurking to say love the post title. Hey, I’m easy that way.
Kiran @ KiranTarun.com says
Amazing how little projects can make such a huge difference :)
RMS says
it’s amazing what a difference the trim makes! but this has been bothering me in all your cabinet posts–in the budget you only count the cost of one cabinet, while actually there are four of them, so it should be not $6.30, but $13.20.
YoungHouseLove says
Each cabinet was actually only a dollar at the ReStore (more on that here)! So it was $6.30 for six of them (two of which we didn’t actually use but still count since we paid for them for the project and later decided to nix them). Hope it helps!
xo,
s
saver says
hey guys. hope you had a grand weekend. don’t have time to peruse all comments, so sorry if this is a repeat, but I too hate those hanging wires! 2 things that worked for us:
for wires that are running along the baseboards/or can run along baseboards, there’s a adhesive channel trim that you get at stores. it’s white and slim and sits on top of the baseboard, so just looks like a taller trim, that’s all. you use those u-shaped wire tacks to hold wire in place then stick on the tube trim, so wires are hidden inside.
for shorter wires/higher wires like yours, ever seen those wire sleeves that look kind of like those stair-hopping slinkies? they stretch to encase a bunch of wires. so you just velcro tie the wires together, then slide through that. makes it look just one cord from a distance. much neater.
have a good week!
Jana says
I’ve been reading your blog for a while and I love all your ideas!! Someone already mentioned the pegboard-solution in the comments, I found the diy tutorial for it here: http://www.decluttered.com/
Greetings from the other side of the pond (Germany),
J
YoungHouseLove says
Thanks Jana! Off to check it out!
xo,
s
Erika B says
Have you thought about adding a fake drawer on top of the cabinets in the blank space? I think it would make it look even better!
YoungHouseLove says
We didn’t know if they’d look too oddly skinny (they could only be about 3″ tall, which is a very very skinny drawer indeed). Just not sure if the proportion would be crazy, so for now we’re happy to live with things like this. If we add them someday we’ll definitely fill you in though!
xo,
s
Lee says
Love this post…great advice for any endeavor!
Olivia S. says
This looks fantastic! I was a little blown away reading the post this morning. What a huge difference a little molding can make. Nice work!!
-Olivia in OR
Barbara says
Love, love, love the desk project and the cost only makes it miles more appealing!
But…. am I the only person a little bothered by the unstained underside of the counter top??? (totally anal, huh?)
Christina says
Gorgeous stenciling aside, I love the shot of the Decor Sponges with Clara in the background. It’s always nice to see her hanging around!
YoungHouseLove says
Haha, she’s like my shadow these days. Or John’s. Or Burger’s.
xo,
s
Krystle says
Oh, my goodness! I just had to google Habitat for Humanity ReStore and I cannot believe it! I will definitely have to be checking this out. Thank you for all your fabulous ideas and pointers… I had to delurk on this one. Your DIY ideas are amazing!
Cate says
Hello. Nice job! Could you please tell me where you got your light fixture in the office. I have been looking for one like that for awhile. Thanks so much!
YoungHouseLove says
We actually made that! Here’s the post for ya: https://www.younghouselove.com/2011/09/the-updated-light-fixture-blues/
xo,
s
Beth says
Can you please remind me of the stain that was used for the top of the desk? Thanks! The office looks great, and I think the cord solution is genius.
YoungHouseLove says
That’s Dark Wallnut by Minwax. Hope it helps!
xo,
s
Nora says
I love the barrel shade that you put on your chandelier. I’m inspired to try it—any tricks to fitting it on? Thanks!
YoungHouseLove says
A few comments back I linked to that tutorial. Hope it helps!
xo,
s
Aimee says
Did you notice you are replicating the design of an Emmy Award winner? :) Thought I would point that out to ya if you didn’t know already. There’s an Emmy on the left hand corner of the desk.
YoungHouseLove says
Haha, love it! Never noticed that!
xo,
s
Ginger says
WHat is the material for the bulletin board? THanks.
YoungHouseLove says
That’s just an inspiration pic (not our house) but it looks like cork board covered in some sort of neutral linen or burlap fabric. Hope it helps!
xo,
s
Kate says
Love the post!! Wondering where you got the shade to cover your chandelier? You guys are inspirational:)
YoungHouseLove says
That was from a local store here in Richmond called the Decorating Outlet.
xo,
s
Yvonne says
I love the gold base lamps on your work space area. I’ve been searching for some. Where did you find those??
YoungHouseLove says
Those were from HomeGoods. Hope it helps!
xo,
s
Cara says
Just wondering how long that desk area is? We are looking to do something like that and I love how yours turned out!
YoungHouseLove says
Thanks! I think it was 13′ wide (we no longer live there or I’d run in and measure it for ya).
xo
s
Amy says
Love it!! Just wondering what paint color you used on the walls. It is beautiful. Is is the same color you also used in the dining room?