Remember when I admitted that I was glad this was over? I’m even more glad that the following project has come to an end. Let’s just say standing on a stepladder leaning back and up to paint three sides of five beams plus crown molding and quarter round around a mammoth 25 x 15′ room isn’t exactly a picnic according to this girl. I’d point to myself with my thumbs as I said that but I’m too sore. That’s right, my thumbs are sore. Along with my neck, back, chin (yes, chin) and various other body parts (calves, glutes, even my obliques for some odd reason). So to those of you who guessed that beam painting might burn more calories than rolling (see this post) I can assure you that it’s moderately to severely more uncomfortable, so I’m betting there were some calories that were burned (along with some muscles that were pulled and a few chins that were strained- all of which were mine).
But it’s worth it. Oh so worth it! The beams went from a reddish tone that we tried to love, but just couldn’t (to us they just looked like they stuck out like a sore thumb)…
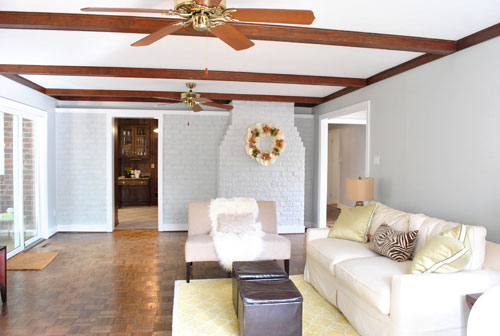
… to a warm rustic gray tone with enough of the brown wood color still peeking through.
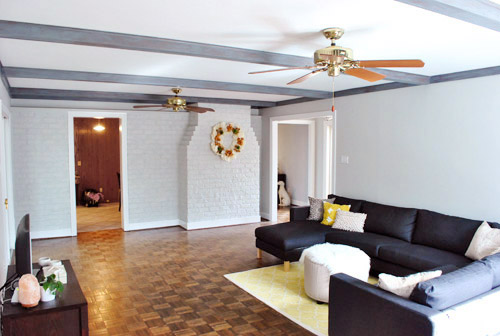
We definitely still have to deal with the ceiling and those fans among a few other things, so this is just the beginning of the top 5% of the room’s transformation. We have no idea what color we’ll paint the ceiling but we’ll share all the details when we reach a final decision. Promise.
And the soft gray color washed over the beams seems to be a really good start when it comes to making the living room feel more like us. We think it’s kinda charming and dramatic without feeling nearly as heavy as the old dark reddy-brown beams felt. See how the thin wash of paint sort of diffused those sharp red undertones?
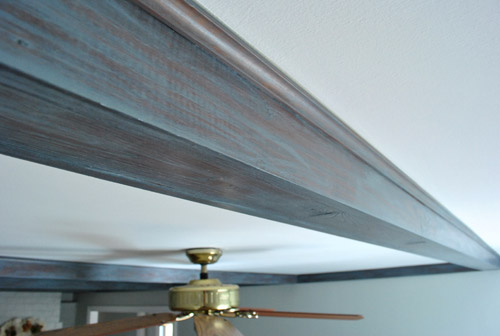
Here’s another detail shot of the beams more thoroughly painted so you can appreciate the dimension and the wood grain that shows through:
Ah, victory. It doesn’t feel any less good, even when you’re slowly shuffling around like an achey old grandma. I know some people love the look of untouched wood beams but they just weren’t right for us. And as the light changes the freshly gray-ified beams go from soft and rustic to deeper and more dramatic. Which is definitely fun since the room seems to get a bit swankier and more moody as the sun sets. See how the beams look deeper later in the day? We love it.
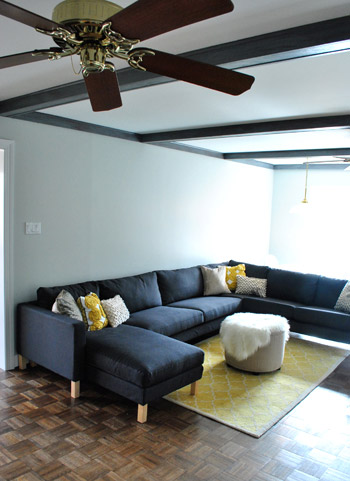
And for those who aren’t quite convinced, just remember that the room is about 8% done. We have a too-small rug and media center, huge honking fans on either side of the room (centered over nothing) that will be coming down, giant naked windows and sliders crying out for some curtains, nothing on the walls at all, etc. Heck, just adding in a bright 8 x 10 rug (instead of our current 5 x 8 one) and hanging some bold floor length curtains panels high and wide on those windows and glass doors will make this space feel 500 times more finished (and help the beams fit right in with the other textures and saturated colors that we’ll be adding in).
Can’t forget art either. Right now the walls are bare, but along with a bold rug and some punchy curtain panels we really want to add in some large scale brightly colored art which will also keep the room from feeling like a cold gray box and balance out the boldness of the beams with a bit more going on (so they’re not the only thing you see, they’re layered and lovely among a room full of color, contrast, shapes, fabrics, etc). Of course you’ll have to bear with us since this isn’t HGTV, so we definitely can’t snap our fingers and finish the room in 30 minutes. Instead you’ll get to watch it slowly evolve one project at a time along with the rest of our house – in real-time, on a real budget. And we think the beams will fit right in with our vision for the space as we slowly add in more color, art, fabrics, etc.
But anyway, on to how I did it. Yes, that’s the word I. John gets no credit for helping. Well except for Clara-sitting (and blog-sitting) while it all went down. Which was supremely helpful, but let’s just say that his neck and back didn’t revolt for three consecutive days like mine did. But again- it was so (so so so so) worth it. I walk into the room and smile now (we even catch Clara gazing up and grinning at our “new” beams). I might have even been smiling as I painted – although I think that face could probably best be described as a grimace. Hence this back-only progress shot.
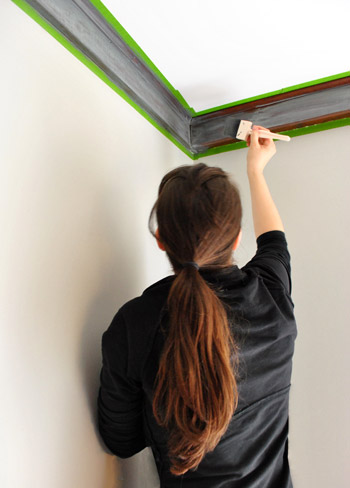
Yes that picture alone spurred me to get a haircut the very next day (the first one I got since Clara was born 9 months ago). Insanity. Just a $14 trim at Haircuttery though. Nothing too crazy.
But on with the beam painting project. I’d actually use the term “painting” very loosely when it comes to this process. What I did to the beams could best be described as a combination between whitewashing graywashing, sponging, and drybrushing. But let’s start at the beginning. First we taped a few different swatch cards up on the beams and picked the three gray tones we liked best (which ended up being the last three swatches on the middle card from Benjamin Moore: Shaker Gray 1594, Rocky Coast 1595, and Nightfall 1596).
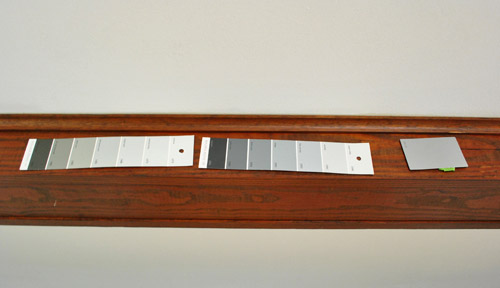
Then we went to Lowe’s and had them color match those three colors (they had them in the computer so they didn’t even have to scan our swatch card) to three small test pots of satin Olympic Premium No-VOC paint. We returned home with those three test pots and did a series of applications on the beams to see what we liked best. We picked an out of the way back edge of a beam that you can only really see when you’re standing in the corner (where the desk currently is) in the back corner of the room – just in case anything we didn’t like stuck around. But luckily everything we did was easily wiped down after each test was conducted. Especially the first attempt. We tried watering down a drop of paint on a ceramic plate and applying it with a foam brush.
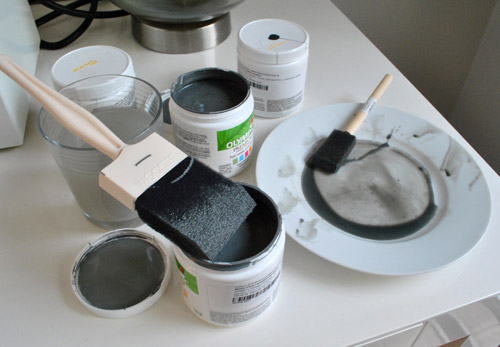
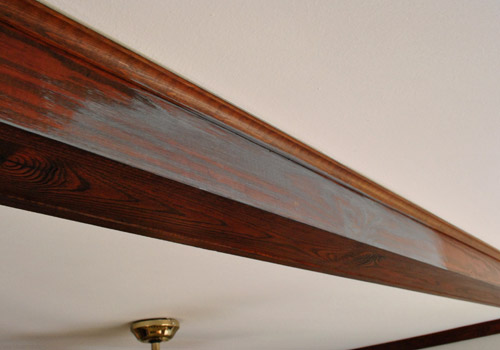
That was a disaster. Ok, disaster is probably a bit too dramatic, but it was so watery it ran right off the beam I was test painting and onto the floor. It was gross and drippy and just not working. Then I tried using a dry foam brush to lightly brush on some paint directly from the tester. No watering down (or brush wetting) at all. As soon as I feathered it out, it started to look pretty cool. So we picked the test pot color that we liked best with the dry brush method (which happened to be the lightest of the grays that we brought home- Shaker Gray 1594 by Benjamin Moore) and used a wet rag to wipe down the other two test applications on the beam. Amazingly the unchosen paint applications came right off since they were so freshly applied and we left the winning one up there as a starting point. Here’s what it looked like at that stage in the game:

Next John helped me tape off the area around the beams and crown (since the 2″ foam brush wasn’t nearly as easy to control as my usual short handled brush). Then it was as easy as as simple as as mindnumbingly repetitive as using the 2″ foam brush to softly dry brush the medium gray paint all over the bottom and sides of each beam, piece of trim, and piece of quarter round for an imperfect but soft and charming weathered gray wood effect. We went with only one coat (which was very thinly applied, I’d stretch the paint as long as possible, dragging the foam brush so it would spread it out for a nice thin and translucent effect). In fact, although the project took me three days to fully complete (parts of Friday, Saturday, and Sunday – mostly because I couldn’t stay up on the stepladder for more than a few hours at a time since my neck got so cramped and my extended arm got so shaky) it probably only took about 6 hours total.
So sorry to sound so complainey- it was just an honest to goodness hard a$$ job. And you know we vowed to keep it real, so it just wouldn’t make sense to say things like “it was as easy as pie” when it wasn’t particularly difficult with regard to skill level, but a bit tough when it came to things like strength and endurance. Especially when you’re height-challenged like my 5’2″ self. Hah.
Oh and here’s a good demonstration of how much I stretched that paint. The entire project didn’t even exhaust the small amount of paint that we originally picked up to use just as a tester. This is a pic of our Shaker Gray test paint pot when we were completely done painting the beams with it. And there’s still about 10% left on the bottom! Who knew the paint used for this project would cost us just $2.80? Amazing.
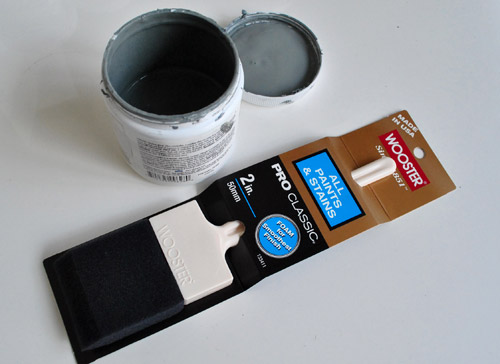
Oh and see the foam brush in the photo above? That’s an extra one I grabbed just in case my first one got beat up (I’m pleased to report that it made it through) so I stuck the extra guy in the picture above for anyone wondering exactly what foam brush I used (it’s from Lowe’s btw).
Anyway, back to the paint job. We love how the paint grabs the knots in the wood so it looks stained instead of painted for a subtle diffused look:

It’s almost as if we turned down the red and upped the weathered gray tones for a soft aged effect that fits right in thanks to the deep charcoal sectional on the ground (which definitely does its part to balance out the dark beams). And again, once we bring in a larger rug and media cabinet, remove the fans, add some art, hang lots of textured and bold curtains, etc – this room should really start to come together and warm up (since it’s pretty much a gray sandwich right now).
In the end, we both love that we took a risk and went waaaaay outside of our paint-it-white comfort zone and did something that looks weathered and stately and polished yet surprisingly soft. We definitely think it’s a risk that’ll pay off as the room starts to come together over the next few months. And we think it’ll look even more finished once we figure out what color we’ll add to the ceiling (a soft metallic champagne color? a light blue or green or yellow tone? wallpaper? more details on that as soon as we’re 100% sure about our direction).
And now we’ll end this beam-altering diatribe with a fun little journey back in time to this shot of the room as it looked when we moved in less than two months ago:
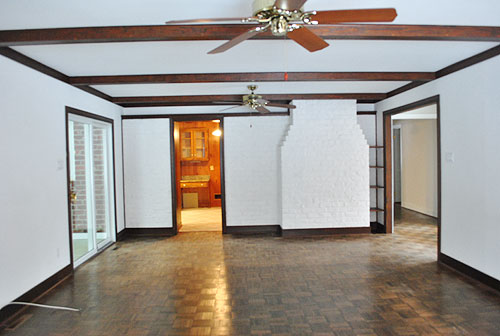
So crazy. You’ve come a long way baby living room. Can’t wait to start in on a few more projects…

Jenny says
I think it looks great! Way better than the wood tone. Can’t wait to see what color you choose for the ceiling it’s screaming to be painted now that the beams are done!
Amber Lee D. says
looks great! Congrats on your hard work.
Melissa @ A Place to Nest says
Love it! Was unsure of loosing some of the wood look that I thought was going to happen by painting them grey. But love the washed effect- looks amazing as always!
Rebecca @ the lil house that could says
Looks great! I can’t even imagine how sore you are…
I have a quick question about the color matching process… can Lowe’s match anything to Olympic paint? I had a Valspar color I wanted and they told me they couldn’t do it. But if you’re matching Benjamin Moore, I’m not so sure I believe them!
YoungHouseLove says
We have heard that some stores won’t match other colors they sell (which means Lowe’s wouldn’t match Valspar to Olympic since they sell them both and feel like they’re betraying “their own”) but we’ve never heard of a Lowe’s that wont’ match Ben Moore since it’s a competitor and they have nearly every single formula in their computer. Our Lowe’s will match anything (even Olympic, etc) so it seems to vary store to store. Hope it helps!
xo,
s
Elizabeth says
I had that same issue at Lowe’s…they were more than happy to rip off..err…I mean match some Benjamin Moore colors into the no VOC Olympic Paint, but when I wanted to use a Valspar color they said they couldn’t do it in that paint. So I bought my paint elsewhere…and will from now on. (I’m still bitter, can you tell?)
Melissa S. says
I had the same issue with our local Lowe’s with color matching a Valspar color in Olympic paint. But, then I reworded it to say I wanted that specific color in Olympic paint using their scanner instead of the Valspar formula and they happily did that. Maybe try that?
Melissa says
Looks good. Even if that’s only 8%. I first starting reading the blog when there were millions of posts available to go through and there was the fun instant gratification of hearing about a project and then reading it a few posts later.
I suppose people must be chomping at the bit and that’s why we are being reassured that lots is in store. But I’m one of the few (or many) that are happy to hear updates and ideas as they come up.
JR says
Swell idea guys! Well worth a pain in the neck (…and back and shoulders and rear and legs and arms…)!
Audrey says
I really, really love it! I am just hoping that when you get art & decorative pieces up, they have a lot of color in them. I ADORE your sectional, and I think too much gray anywhere else might take away from it.
Heather @ REOlisticRenovation says
That was a huge project! Impressed you guys already finished! Things are coming together in that room.
Chelsea says
Wow, what a difference! And it only took six hours of back-breaking labor! :P I think John owes you a massage now.
Bob says
I think what makes the beams work now is that the reddish undertones are being picked up by the wood in the fans and also on the floor. Once both of those are gone (hopefully soon!), the red will look weird, I think. I think I would have just painted them solid gray and let the texture of the wood (not the “dimension” of the grain) add the visual interest. Of course, though, to make that update you need only to do about 6 more hours of painting. :)
I think hand-carved black wooden floors would look amazing in the space, btw.
YoungHouseLove says
Hey Bob,
Well the wood floors will be refinished but they’ll still stay wood in tone (maybe dark chocolate). And the media cabinet will most likely have rich deep wood tones to it too along with other things we bring in like the console table behind the sofa, etc). So now that the red has been zapped out of the beams (they look like they have chocolate brown undertones, not red ones anymore) all should be well. Who knows though! We’ll just have to see how it goes!
xo,
s
Bob says
I’ll be interested to see how you refinish parquet floors. Seems like it would be challenging with the grain going in different directions… i.e. how do you sand them? how do you stain them?
I’m sure it’s possible so I’ll follow along to see.
YoungHouseLove says
Hey Bob,
We’ve seen pro refinishers take it on, so it might be a job that we hand over to the pros. We’re definitely not above paying for reinforcement when something’s above our skill level!
xo,
s
thecounselormom says
Wow, it makes such a difference!!
Tanya from dans-le-townhouse.blogspot.com says
Looks great! I love the bit of grain peaking through. That must definitely have been such tiring work. You definitely deserve a rest.
Rachel @ The Avid Appetite says
Love this look! I love the whole gray tone that you have going on. Can’t wait to see the rest!
Hope says
I’ve always been partial to gray, but seeing your transformation take place has made me fall in love with it all over again.
How the heck do you get your bangs to behave? Whenever I try to pull the front locks of my hair up and back like you do, then do a pony tail, it just ends up falling down or looking weird. YHL hair tutorial to the rescue? ;)
YoungHouseLove says
Who says they behave? Or that they don’t look weird or fall down. They’re guilty on all counts. My one tip would be that I criss cross two bobby pins so they grab each other along with my bangs, which seems to add up to a better grip, but they definitely slip out and get in my face every few hours or so. So I just reclip them and go on my way. I wish I had some big secret to share though!
xo,
s
Allison says
Hope,
Depending on how much hair you want to include, this could work: Take a bobby pin (even the stretched out ones work, sometimes better since they’re more like a hair pin) and stick it in backward. So the pin tips enter your hair at the place you pulled the bangs back to, then goes underneath your hair and back toward your forward. So in the end the bobby pin is perpendicular to your forehead (pretty much) but is underneath your hair except for the looped end which you can kinda see.
Someone taught me to do that once and I find it to stay in really securely once you get the hang of it!
Haha that we’re having a hair tutorial on here.
Steph @ Birdhouse Family says
It looks amazing!!! I was among those who suggested a gray wash and I really love how it turned out! I like that the gray adds a dramatic, sophisticated touch, but I also like that you can still see the original wood grain showing through. You keep apologizing for the fact that the room is incomplete, but I think it already looks amazing. You’ve accomplished so much in two months!
Sara says
You guys are fast! I love how you mention an idea and then you do it! I feel like I need a lot more “thinking” time before I actually decide on a project.
I totally feel your pain (literally!) because I spent this weekend sanding and priming my lower kitchen cabinets in preparation for (silvery-grey) paint. I finished the uppers (in white) a few weeks ago and the anticipation of the back pain as I bend over the project table to paint the next set was unbearable! Hopefully, I’ll finish this week/weekend and reward myself with a long hot bath.
Ashley @ Bungalow895 says
Amazing! I love the ceiling in white, but I’m sure you’ll come up with something else to wow us all!
Can’t wait to see the remaining 95%!
pam says
such a wonderful transformation that hardly even cost anything! amazing! you guys constantly blow me away! And now i’m itching to paint the beams in my living room!
But I’m not sure on a color just yet, my whole ceiling is white since someone before me painted them. my walls are a beigy color, almost the color of the large backgroung on the site. you think brown/mocha beams might work?
YoungHouseLove says
Ooh yeah, a rich mocha color on the beams should look lovely! Good luck!
xo,
s
KatyKey says
You used a tester for this? I have always been told by the people at both the big box stores (Lowe’s and Home Depot) and my dudes at Sherwin Williams and Ace that you can’t “use” the tester paint for the actual project because it’s really cheap quality. They intentionally use cheap paint that will peel so you have to come back and buy the good stuff. ACK! NECK! CHIN! I hope yours doesn’t peel.
YoungHouseLove says
So not true! At least in my experience. I’ve used tester paint for furniture painting and frame painting projects that have lasted for years and still look mint! I wouldn’t use test paint to tackle floors (or something that gets foot traffic since you need to use something extra durable) but for things that nobody walks on or touches all the time (like frames and ceiling beams) it seems to be perfect! Hope it helps.
xo,
s
Jen says
Looks gorgeous! I didnt like those wood beams either, so glad you decided to paint them!!
sarah (sarah learns) says
it looks great! the grey beams definitely go with the room better than the dark wood did. :)
Cara says
Looks awesome and I’m really loving the yellow and gray so I wonder if you’ll stick with that theme.
I must ask – why not go for a 9×12 rug? I don’t think 8×10 will actually feel much bigger than what you have now since it will only be about a foot longer on each side. With such a large room a 9×12 would be really cozy and plush! And with lots of remnants to choose from at carpet stores you would have tons of options. We scored a 9×12 for under $400 (including edge binding) that way. Just a thought!
YoungHouseLove says
That would be awesome too! More expensive but awesome! I guess it just depends on what we find slash fall in love with!
xo,
s
Emily says
What a wonderful change to the room – very pretty. And now I wish my hair was longer. Just a trim or did you take a few inches off?
YoungHouseLove says
I got 2″ off but you can’t even tell. I guess that’s what happens when you go 9 months without a trim!
xo,
s
Paige says
You’re a trooper! But you’re right, the pain is totally worth it.
I’ve been debating what to do with our hideous oak dresser we inherited from my childhood bedroom, and dry brushing seems like a good option! Hubsey wants it to still look like wood (so straight up painting is out), and I think this might be the winner.
Maya says
Looks amazing!! So sophisticated!
Amy B says
You didn’t ask for opinions on what to do with the ceiling, but – WALLPAPER!!!
Brianne says
Love the beams. Not sure what you have planned for the lighting/fans but Three Pendants hung in a row in place of the fans would look fabulous. Like this: http://www.charlestonmag.com/home/feature/trading_paces
Cara says
Love that photo! What a great idea!!
Patti says
Wow, those lamps make the room, beautiful!
Wintry Mix says
Hmm. I’m glad you’re happy with them (since you’re the ones who are actually living there!), but I have to say that this look is definitely not for me. I don’t love the gray and I REALLY don’t love the effect of seeing the wood grain through the gray paint. But maybe when the room transformation is complete I’ll feel differently…you’ll be holding your breath to find out, I’m sure! Congrats on finishing such a difficult project.
skye says
awesome job! I can’t believe you got it all done with one tester of paint – that is definitely ah’mazing.
Patti says
This room only 8% done is already more interesting than my current living room which I’ve been living with for 13 years. You’re not the Homies winners for nothing ya know!
laxsupermom says
What an amazing transformation! It looks so much more like you guys. I can sympathize with the sore neck, shoulders, etc. I painted the beams in our 15×30 cathedral when we first moved into this home. I don’t think I was moving right for more than a week.
carolinaheartstrings says
That looks 5000 times better. I am impressed.
Beth says
I have to admit, I was skeptical of the process, being a “purist” wood beam person (or so I thought). I’m a believer in the painting now though, these look amazing!
Design Elements says
looks great! congrats for the Apartment Therapy vote! lovely greetings
Oona says
Ugh, painting ceilings is the worst! I’ve been putting off painting our office/craftroom/sunroom because I’m going to have to scrape and patch the ceiling and my shoulders are already protesting the project!
It’s looking good, really staring to come together.
Micha says
Wow, what a difference! It looks fabulous!
Sadie says
Looks amazing! And I’m so glad you’re keeping the yellow rug. I love love love that rug.
Laura *You Stir Me* says
Bah, it looks fantastic. I love seeing how each little detail is coming along and how it will eventually fit into your bolder design vision. Great job – I’m sure the pain is worth it! You may have said this before, but what do you plan to do with your yellow Pottery Barn rug when you get a larger one for the living room? Are you keeping it? Donating it? Giving it to me? ;)
YoungHouseLove says
We’re planning to use it in another room- possibly the guest room since it has an adjoining yellow bathroom!
xo,
s
Kay says
It looks SO WONDERFUL!!!! So glad to see the finished product. You guys inspired me this weekend to do my own little DIY project. Shout out to you on my blog today. :) http://atimetolaughwithkay.blogspot.com/2011/02/time-for-creativity.html
Amber says
Sounds like you need to go visit a chiropractor after all that back and neck intensive work!! Or maybe John will (should) treat you to a professional massage :)
rachel says
Love them! Really blends well into the room. Im excited about your new bold approach, cant wait to see what you guys come up with.
I’ll be honest though, i am still skeptical about your couch choice. I LOVE the look and the color of it but for large items, I really don’t trust Ikea. Its great how cheap they are but that low quality just makes me nervous. Try to really beat the crap out of it and let me know how it holds up!
YoungHouseLove says
Will do! We’ve had nearly 100 comments & emails come in from people who have and love various slipcovered Ikea sofas (for years with kids and dogs). On a personal note, we’ve also had great experiences with other Ikea furniture for the long-term (like beds and dressers, etc) so we’re crossing our fingers that Karl is as awesome as the rest of our beloved Ikea friends- er, furnishings.
xo,
s
Meredith says
I think Ikea has different levels of quality. If you buy a $20 side table vs. a $60 side table you get what you pay for. I bought a bookcase that was $180 at ikea. Way more than the cheap Billy bookcases. It is beautiful and looks much more expensive than it’s price suggests. The Karl sofa is probably a lot better sofa than that $200 sofa that used to go into every room in Trading Spaces.
Jen @ The Decor Scene says
Love it. This look really changes the room. It’s getting warmer and warmer in your Living Room.
Emily says
I’m not so sure I’m loving it – I think I’d toy with painting the beams white to match the trim and then add some color to the ceiling like you’ve done before…a deeper shade of the wall color probably. I think it would help to draw your eye upward.
My husband and I definitely painted and repainted just to get it right and yet I still don’t think we have everything ‘right.’
Jenn says
I think it looks great, makes the room look much more cohesive. The reddish brown beams broke the ceiling up too mcuh.
I’m keeping in mind that you still have lots of plans for this room, but I was wondering if you had thought of moving your sectional off the wall and closer to the TV? It’s such a big room and the space between TV and sofa seems so big (of course the current smallish rug contributes to that). I thought bringing the sofa further into the room might work.
YoungHouseLove says
Yes! We’re planning to build a console table to sit behind it among a few other things!
xo,
s
Kate @ Travelmoon says
The gray beams completely transform the room! It looks fabulous! It is fascinating seeing this room come together. It would be nice if everyone could just borrow an HGTV crew for the day, but I am sure it is even more rewarding to do it yourself!
Krysta says
LOVE how the gray turned out! I love that you guys have the guts to do things I would never dream of doing. I am DYING to see what you do with the rest of the room, especially that huge blank wall behind the sectional.
Katie @ Epistle says
I love all the little ways you’re making this house your home – little in budget though definitely not in effort for this one. I am excited to see the floor plan for this room since it is so big and is the main living area.
susan says
Lookin good………….. Are the drapes next? susan
YoungHouseLove says
It really depends what we find next! We’re thinking that tackling the fans are next and then maybe some art while we save up money for bigger things like the rug, curtain fabric, a bigger media cabinet, etc. Oh yeah and we’ll build our console table sometime soon too (hopefully).
xo,
s
Kim says
I’m glad to hear the ceiling fans are next!!
Jana says
you need a hot soak in the tub and a massage! Hats off to you for doing such a beautiful job!
Alicia says
I love watching the transformations! Before and after pictures (or semi-after pictures) are the best! I would LOVE to see you guys tackle DIY built-ins for your living room. I think that the huge room is screaming for some:0) Can’t wait to see the rest!