Remember when I admitted that I was glad this was over? I’m even more glad that the following project has come to an end. Let’s just say standing on a stepladder leaning back and up to paint three sides of five beams plus crown molding and quarter round around a mammoth 25 x 15′ room isn’t exactly a picnic according to this girl. I’d point to myself with my thumbs as I said that but I’m too sore. That’s right, my thumbs are sore. Along with my neck, back, chin (yes, chin) and various other body parts (calves, glutes, even my obliques for some odd reason). So to those of you who guessed that beam painting might burn more calories than rolling (see this post) I can assure you that it’s moderately to severely more uncomfortable, so I’m betting there were some calories that were burned (along with some muscles that were pulled and a few chins that were strained- all of which were mine).
But it’s worth it. Oh so worth it! The beams went from a reddish tone that we tried to love, but just couldn’t (to us they just looked like they stuck out like a sore thumb)…
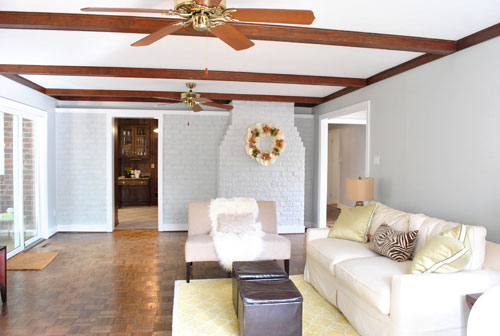
… to a warm rustic gray tone with enough of the brown wood color still peeking through.
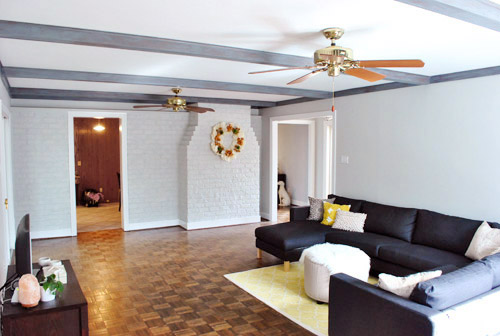
We definitely still have to deal with the ceiling and those fans among a few other things, so this is just the beginning of the top 5% of the room’s transformation. We have no idea what color we’ll paint the ceiling but we’ll share all the details when we reach a final decision. Promise.
And the soft gray color washed over the beams seems to be a really good start when it comes to making the living room feel more like us. We think it’s kinda charming and dramatic without feeling nearly as heavy as the old dark reddy-brown beams felt. See how the thin wash of paint sort of diffused those sharp red undertones?
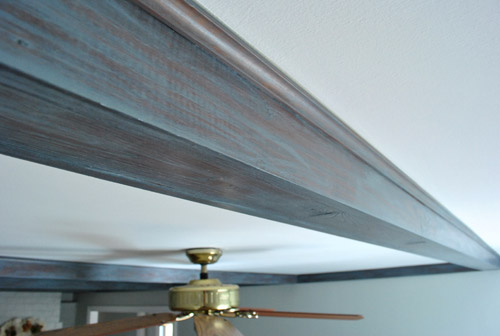
Here’s another detail shot of the beams more thoroughly painted so you can appreciate the dimension and the wood grain that shows through:
Ah, victory. It doesn’t feel any less good, even when you’re slowly shuffling around like an achey old grandma. I know some people love the look of untouched wood beams but they just weren’t right for us. And as the light changes the freshly gray-ified beams go from soft and rustic to deeper and more dramatic. Which is definitely fun since the room seems to get a bit swankier and more moody as the sun sets. See how the beams look deeper later in the day? We love it.
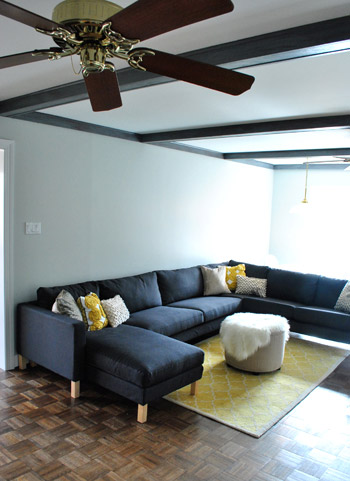
And for those who aren’t quite convinced, just remember that the room is about 8% done. We have a too-small rug and media center, huge honking fans on either side of the room (centered over nothing) that will be coming down, giant naked windows and sliders crying out for some curtains, nothing on the walls at all, etc. Heck, just adding in a bright 8 x 10 rug (instead of our current 5 x 8 one) and hanging some bold floor length curtains panels high and wide on those windows and glass doors will make this space feel 500 times more finished (and help the beams fit right in with the other textures and saturated colors that we’ll be adding in).
Can’t forget art either. Right now the walls are bare, but along with a bold rug and some punchy curtain panels we really want to add in some large scale brightly colored art which will also keep the room from feeling like a cold gray box and balance out the boldness of the beams with a bit more going on (so they’re not the only thing you see, they’re layered and lovely among a room full of color, contrast, shapes, fabrics, etc). Of course you’ll have to bear with us since this isn’t HGTV, so we definitely can’t snap our fingers and finish the room in 30 minutes. Instead you’ll get to watch it slowly evolve one project at a time along with the rest of our house – in real-time, on a real budget. And we think the beams will fit right in with our vision for the space as we slowly add in more color, art, fabrics, etc.
But anyway, on to how I did it. Yes, that’s the word I. John gets no credit for helping. Well except for Clara-sitting (and blog-sitting) while it all went down. Which was supremely helpful, but let’s just say that his neck and back didn’t revolt for three consecutive days like mine did. But again- it was so (so so so so) worth it. I walk into the room and smile now (we even catch Clara gazing up and grinning at our “new” beams). I might have even been smiling as I painted – although I think that face could probably best be described as a grimace. Hence this back-only progress shot.
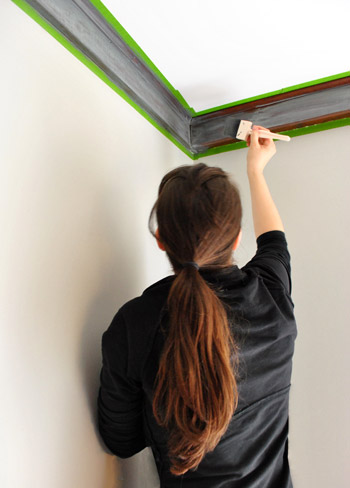
Yes that picture alone spurred me to get a haircut the very next day (the first one I got since Clara was born 9 months ago). Insanity. Just a $14 trim at Haircuttery though. Nothing too crazy.
But on with the beam painting project. I’d actually use the term “painting” very loosely when it comes to this process. What I did to the beams could best be described as a combination between whitewashing graywashing, sponging, and drybrushing. But let’s start at the beginning. First we taped a few different swatch cards up on the beams and picked the three gray tones we liked best (which ended up being the last three swatches on the middle card from Benjamin Moore: Shaker Gray 1594, Rocky Coast 1595, and Nightfall 1596).
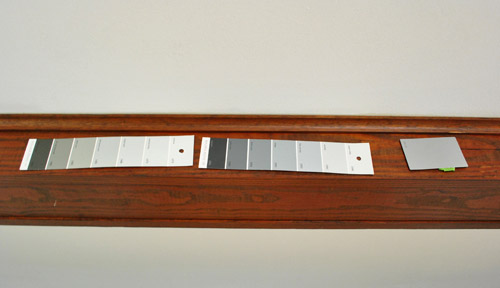
Then we went to Lowe’s and had them color match those three colors (they had them in the computer so they didn’t even have to scan our swatch card) to three small test pots of satin Olympic Premium No-VOC paint. We returned home with those three test pots and did a series of applications on the beams to see what we liked best. We picked an out of the way back edge of a beam that you can only really see when you’re standing in the corner (where the desk currently is) in the back corner of the room – just in case anything we didn’t like stuck around. But luckily everything we did was easily wiped down after each test was conducted. Especially the first attempt. We tried watering down a drop of paint on a ceramic plate and applying it with a foam brush.
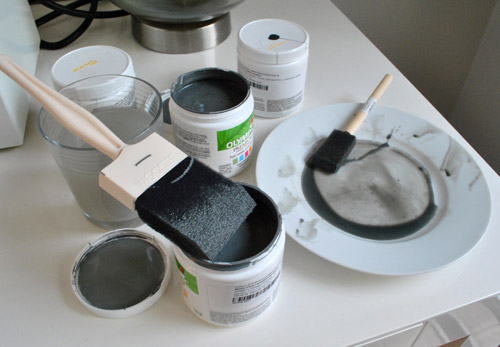
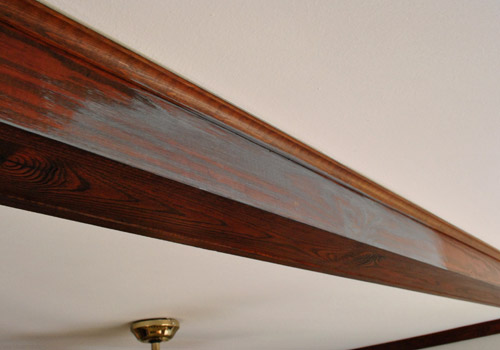
That was a disaster. Ok, disaster is probably a bit too dramatic, but it was so watery it ran right off the beam I was test painting and onto the floor. It was gross and drippy and just not working. Then I tried using a dry foam brush to lightly brush on some paint directly from the tester. No watering down (or brush wetting) at all. As soon as I feathered it out, it started to look pretty cool. So we picked the test pot color that we liked best with the dry brush method (which happened to be the lightest of the grays that we brought home- Shaker Gray 1594 by Benjamin Moore) and used a wet rag to wipe down the other two test applications on the beam. Amazingly the unchosen paint applications came right off since they were so freshly applied and we left the winning one up there as a starting point. Here’s what it looked like at that stage in the game:

Next John helped me tape off the area around the beams and crown (since the 2″ foam brush wasn’t nearly as easy to control as my usual short handled brush). Then it was as easy as as simple as as mindnumbingly repetitive as using the 2″ foam brush to softly dry brush the medium gray paint all over the bottom and sides of each beam, piece of trim, and piece of quarter round for an imperfect but soft and charming weathered gray wood effect. We went with only one coat (which was very thinly applied, I’d stretch the paint as long as possible, dragging the foam brush so it would spread it out for a nice thin and translucent effect). In fact, although the project took me three days to fully complete (parts of Friday, Saturday, and Sunday – mostly because I couldn’t stay up on the stepladder for more than a few hours at a time since my neck got so cramped and my extended arm got so shaky) it probably only took about 6 hours total.
So sorry to sound so complainey- it was just an honest to goodness hard a$$ job. And you know we vowed to keep it real, so it just wouldn’t make sense to say things like “it was as easy as pie” when it wasn’t particularly difficult with regard to skill level, but a bit tough when it came to things like strength and endurance. Especially when you’re height-challenged like my 5’2″ self. Hah.
Oh and here’s a good demonstration of how much I stretched that paint. The entire project didn’t even exhaust the small amount of paint that we originally picked up to use just as a tester. This is a pic of our Shaker Gray test paint pot when we were completely done painting the beams with it. And there’s still about 10% left on the bottom! Who knew the paint used for this project would cost us just $2.80? Amazing.
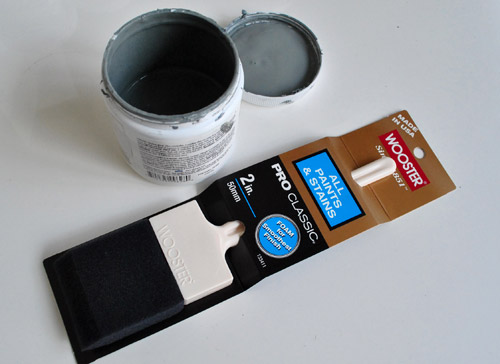
Oh and see the foam brush in the photo above? That’s an extra one I grabbed just in case my first one got beat up (I’m pleased to report that it made it through) so I stuck the extra guy in the picture above for anyone wondering exactly what foam brush I used (it’s from Lowe’s btw).
Anyway, back to the paint job. We love how the paint grabs the knots in the wood so it looks stained instead of painted for a subtle diffused look:

It’s almost as if we turned down the red and upped the weathered gray tones for a soft aged effect that fits right in thanks to the deep charcoal sectional on the ground (which definitely does its part to balance out the dark beams). And again, once we bring in a larger rug and media cabinet, remove the fans, add some art, hang lots of textured and bold curtains, etc – this room should really start to come together and warm up (since it’s pretty much a gray sandwich right now).
In the end, we both love that we took a risk and went waaaaay outside of our paint-it-white comfort zone and did something that looks weathered and stately and polished yet surprisingly soft. We definitely think it’s a risk that’ll pay off as the room starts to come together over the next few months. And we think it’ll look even more finished once we figure out what color we’ll add to the ceiling (a soft metallic champagne color? a light blue or green or yellow tone? wallpaper? more details on that as soon as we’re 100% sure about our direction).
And now we’ll end this beam-altering diatribe with a fun little journey back in time to this shot of the room as it looked when we moved in less than two months ago:
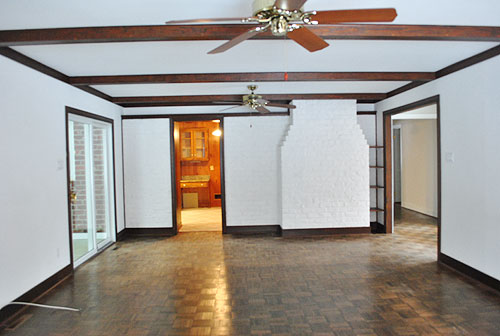
So crazy. You’ve come a long way baby living room. Can’t wait to start in on a few more projects…

amyks says
Well done Sherry, and may be you could add overhead beam painting to your sledgehammer aerobics class offering. Your obliques must hurt because of all the balancing you had to do to stay on the ladder and paint! You should take a bath with Epsom Salt. It will draw all the aches out of your sore muscles. Feel better and the room looks fantastic!!!!
Sarah @ The Strength of Faith says
Sherry, you are my hero! I painted a ceiling the other day – just a bedroom ceiling, not even the master bedroom! I almost cried I was so exhausted from craning my neck and holding my arms up. This room was huge, I can’t even imagine. You deserve a vacation!
Kim says
Bravo Sherry!!! Looks incredible. I love the way the wood grain shows thru – I wouldn’t have thought of that. I like the idea of natural wood too but just LOVE that clean crisp look of white trim and baseboard. You achieved an amazing balance with the wood beams with the soft gray ‘whitewashed’ approached. Everything looks wonderful so far and can’t wait to see the color you bring into the space! Makes me want to do my house over – ahhh, maybe someday!
Jenny @ Bakography says
I love the way it looks! This reminds me of a time I refinished a coffee table at my in laws house (because we didn’t have any outdoor space). I got all the way through sanding it, which took me 2+ days, and at the very end my m-i-l remembered she had an electric sander. My poor fingers wouldn’t have hurt nearly as bad if she had remembered that before hand! Parts of my hands and arms that I didn’t know existed were sore for 3 days!
Tiffany P says
Love the beams! It looks like its coming together!
Quick Question (not regarding the beams!)
Sherry you and John agree on most decorating things… what would happen if you didnt? My husband and I are not agreeing on this beautiful pattern for curtains (that I making using your hem tape method- which i pretty much use for everything in my house including making our halloween costumes!) and I am just not sure how to get him to see my point of view on it! Perhaps make a mood board to show him… hmmm not a bad idea…
any other ways to try and get hime on my side?
YoungHouseLove says
Here’s a post that hopefully helps: https://www.younghouselove.com/2009/03/email-answer-have-husband-will-decorate/
We have a full agreement agreement for all things that we do and buy, so we try not to bring home anything that the other person vetos since it can grow into quite a battle and even lead to heavy things like resentment. Life’s too short for that, so if John detests something after I do my best to plead my case, I have just learned to let it go. Good luck with everything!
xo,
s
tiffany says
amazing transformation. love the finish you
created!
BethanyB says
wow! way to go Sherry! The beams look ten times better then the preview (and the preview looked great). Next time you guys venture into a ceiling project you two should switch and you should make John do all the aerobics. Only far. :)
ps. So its a little soon, but do you guys intend on keeping the color scheme? I know the rug has got to go but I would hate to see the Yellow leave.
YoungHouseLove says
Us too! We were originally thinking of apple greens and navies and inky blues like the colors in Sue the napkin, but now we love the yellow too since it warms up all the gray! Should be interesting to see where we end up!
xo,
s
BethanyB says
It sure will. I like Sue as well so I can see were it will be a tough choice to make. Two totally different feels but either way I know it will turn our great.
kathy says
Monday Morning Quaterback here. Great job guys. Looks so much better. I am going to make a suggestion – you 2 have many projects to go yet so you might want to invest in a ladder with a tray on it. As a decorative painter it has paid for itself many times over. You can leave your materials on the tray at work level. Not as much crazy stretching. Plus, the steps are larger so your feet are not scrunched up on a rung all during the job. Cosco makes a nice one. The other thing to save yourself a lot of pain is to buy a cervical collar at the pharmacy. Yes, you look really stupid while you’re painting, but your neck will not suffer at all. It prevents you from straining your head too far back. My 2cents but if you take care of the painters you can give that young house more love – pain free.
YoungHouseLove says
Wow- that sounds heavenly. Seriously! I’ll definitely have to look into one!
xo,
s
Sara @ House Bella says
Wow, it looks incredible! Amazing work Sherry. I love love love it.
It was a big risk, too. Our kitchen has oak cabinets, and while I don’t like them, I’m scared to death to paint over them because I keep thinking “Well, some people like that look, and what will happen when we go to sell?” So you get really high points for bravery.
gemma@thesweetestdigs says
Looks great! I love the wood grain seeping through. Totally worth the pain, Sherry :)
Kim at Yellow Brick Home says
Whoot! So moody, modern, and FUN! I’m loving the change, although I’ll be the first to admit that I was nervous you’d be painting over the original wood. But if it doesn’t work for you, hey, it doesn’t work.
Excelente!
Angel says
Fan-freakin-tastic! Goes from almost beachy, rustic in the day to cozy, moody at night. Now go get yourself a massage- you totally earned one!
KellyD says
I am still really surprised you didnt go with white on the beams against a gray ceiling paint….I am trying to keep an open mind until I see the finished result, in the end your rooms always look perfect.
Just a note on the ikea furniture – we had an ikea sofa with black slipcover for 4 years, over time and many washings (thanks to eating on the couch and a dog)it faded ALOT over time. So maybe use super gentle detergent? and be careful washing just pieces so that the color stays consistent between cushions…something I wish I had known
YoungHouseLove says
Great tip about washing everything equally to keep the color consistent! We use super gentle green stuff for Clara’s diapers which now has carried over to being all we buy (Charlie’s soap) so it should hopefully be nice and mild!
xo,
s
Lauren says
Much Improved!
Random question, how come you leave the bottom trim piece of the baseboards in the wood stain? Just curious b/c in homes I have been in I found it to be either all white or all wood stain.
YoungHouseLove says
Our last house was already like that so I guess we got used to that look, and the hallway of this house (which is adjoined) is also already like that, so we went with the same formula to keep things consistent!
xo,
s
Nikki says
Funny I was having the same conundrum at our house and ended up painting the baseboard white. I looked online and there seemed to be some pretty serious debate and no definitive right answer. Maybe good fodder for a user poll!
Julia M says
I love it. In the midst of a painting project myself, I am tired just looking at these pictures–but I can concur with the oh-so-great feeling of being done and it looking fab. ‘Cause it definitely looks amazing!
Nicole R says
Sherry, I feel your pain (literally). I spent the entire weekend scraping and sanding 600 sqft of popcorn ceiling. Now I just have to muster up the energy to prime and paint. *sigh*
emily @ the happy home says
yeee-ouch. we have a few beams that i’d like to get a-painted, but you’re making a hard sell. looks gorgeous, though!
Jennifer says
Fantastic job Sherry! (And John too since you couldn’t have done it without him I’m sure). I totally dig the “later in the day” look.. super moody and fresh! I can really see that the pops of color will make that room feel SA-WEET! I can’t help but see fuchsia…What kind of artwork are you leaning towards?
YoungHouseLove says
Something bright and geometric maybe. Who knows what we’ll find slash make!
xo,
s
Allison says
I love the beams–especially in the evening picture when you’re right that it gets moody and romantic in there. It’s fun to see the room coming together!
Maybe you could train Burger to give out massages??
Kate says
Looks great! I really appreciate your honesty about how crappy the process was – I am in the middle of doing some really tedious home reno stuff and feeling quite whiny about it myself… good to know I am not alone :-)
Carla says
I love it! I’ve been dreaming of refinishing our hardwoods in a grayish stain. This turned out great, totally worth the effort!
TheCarolinaHousewife says
Only 8% done, huh? Then I’ll have to make my final decision about those beams until the end! I really, really loved the beams the way they were, but I think I might have been the only one, lol!
I really love the new sofa and pillows and can’t wait to see what new, larger area rug you purchase! :-)
Handy Man, Crafty Woman says
ugh, I know the neck/back/arm ache of painting trim all too well, unfortunately!! Can’t wait to see the rest of the room come together!
Amanda says
Im excited to see the kitchen transformation!!! Cant wait, I’ve a thing with kitchens!!
Clara’s room is sooo sweet! Love the lilac soft pink color on the walls prefer instead of the green ones in the old house. I’ve a Clara of my own to :) her name is Maria Clara and she is 5. Her nursery was cream, blue and a litle very litle of soft pink.. now is ALL pink.. all she wants is pink and I’ve learned to like it too :)
I found your blog yesterday and Im just in looove with everything! Congrats!
Greetings from Brazil!
Threadbndr says
With owning a Craftsman Bungalow with all original (fumed, not painted) woodwork, you know I’m a ‘leave the natural wood’ kind of gal. BUT, those beams look fantastic.
Good work on the stain – I like it that the wood grain still shows through – subtle and sophisticated.
Ana Silva says
Not bad. I like it, I never saw something like this. Can’t wait to see it all done.
Val says
I love it! It lookg gorgeous! Makes me want to put beams up in our den (though maybe paint BEFORE install…).I know you’re planning on putting up with the cieling fans for a while before deciding what to replace them with, but you could probably give them the same treatment in the mean-time. And you could take the blades off to paint them, so that project would be way easier on your body!
Danielle says
Are you going to do anything to the ceiling between the beams? For some reason, I am visualizing a little color in there.
YoungHouseLove says
Yup, still gotta paint the ceiling. Not sure what color/style/treatment yet, but we mentioned a few ideas in the post. Hope it helps!
xo,
s
Kelly says
You should donate that mane to Locks of Love! ;)
Danielle says
Oops…nevermind. I just reread and saw you answered my question.
jen says
Seriously, guys? I love your blog and I can almost say I love you (since through the magic of the Internet I feel like I kind of “know” you from following your blog for years). But you are driving me insane with the defensive tone you guys take with every. single. post. Don’t get me wrong…I’ve never been in your shoes and I can only imagine how hard it is to put yourselves out there for the world to critique. I’m sure you guys get plenty of annyoingly critical comments and I’m sure it doesn’t feel good to have every move you make questioned or second-guessed by the Internet world.
But for the LOVE OF GOD…or for the love of all your “normal” fans who have two ounces of common sense…PLEASE don’t keep explaining yourselves in EVERY. SINGLE. POST. about how “this is not the finished product” and “don’t worry, this will look better once we do X, Y, and Z” and “remember, we are taking this one step at a time and this house will take time to be finished.” OH MY FREAKING LORD. We get it already!!!!!!!! You guys already explained yourselves in the beginning when you first moved. I think that one explanation was enough. Any idiot who is still dim enough to not understand that your house is a work in progress and is not going to look HGTV perfect in a few weeks is just that – an idiot. I don’t understand why you feel the need to humor people who don’t get that.
Anyway…sorry to lash out but I just can’t take one more sentence that begins with “And for those who aren’t quite convinced…” or “Of course you’ll have to bear with us …” Go back and read all the major posts you’ve made since you guys moved and I’ll guarantee you that 9 out of 10 times you’ve felt the need to make excuses for yourself or justify each thing you do. Stop it. Ignore the haters and the doubters that don’t understand and just focus your time and energy on your beautiful house and your faithful readers who come here for inspiration. For most of us, this blog is invaluable because it gives us a realistic picture of what it’s like to fix up a house together a little bit at a time, on a realistic budget and on a realistic schedule. Most of us appreciate that so much and keep coming back for more because of it. So please…try to drop the defensive tone already.
YoungHouseLove says
Those explanations are mainly for my mom! She won’t quit calling and asking when I’ll do this or that. So sorry it bugs you though. Wait no I’m not. You told me to stop apologizing. Hehe. Here’s hoping you can just skip the mom disclaimers if they’re not your jam.
xo,
s
Steph says
I agree! Own all the changes you are making! If you love it- who cares what others think (ALTHOUGH I am sure it isn’t pleasant to get overly opinionated peoples comments here and there)?! I think y’all are fab and I speak for a lot of people when I say you don’t need to explain anything to us! Keep doing the great job you are doing!
YoungHouseLove says
And now for a wordy and over-explanatory response. Just kidding. I’ll try to keep it short. We’re all about owning our changes, which is why we mentioned that we love our beams & we’re so happy to be taking chances. It would have been so easy to paint ’em white. But the gray is all kinds of exciting. Another thing we can own is that we’re chronic over-sharers/over-explainers. We’re wordy buggers. Always have been. We’ve been sparing no details since 2007 when we started this thing. It’s just our nature. You know, to blather on about anything and everything! And pepper in a few sentences for mom while I’m at it…
xo,
s
Kristin says
I agree that you guys don’t need to preemptively defend yourselves, but hey – if mama ain’t happy, ain’t nobody happy, amirite? Obviously a lot of people (myself included) love what you do here, wordiness and all! :)
Meredith says
I would think your mom would get it by now…. :)
YoungHouseLove says
Haha. One would think that. What can I say. I love the woman but sometimes you have to “gently remind her” something once a week-ish.
xo,
s
melanie says
Wow–looks much better! (though I think white could work too).
janie says
I have to put in another vote for keeping ceiling fans in the room. I live not far from you and in the summer having a ceiling fan lets me keep the A/C 5 degrees warmer, and to delay starting it up at all. It makes a huge, massive difference.
You would be amazed how decent fans can look. With light kits they are really expensive, but without a light kit you can get really nice sleek ones for well under $100. If you want a light kit you can’t get a nice looking one for under $300, unfortunately.
Heather says
I really wish that they were white with a color on the ceiling. A darker color than the wall on the ceiling would have been lovely. I know that this took an incredible amount of work to accomplish. This feels like a misstep.
YoungHouseLove says
Different strokes for different folks! We definitely considered a rich color on the ceiling but thought it would close things in too much for our liking.
xo,
s
Jo says
I have a quick question….
We have lots of original thick wood trim in that same deep brown/reddish wood color in our entire house. We want to keep the wood but are having a hard time finding paint colors that go with it and not fight it.
Our carpet is a cream color and we would really like to find a lighter and darker tan to go with, but everything we try looks too pink or just looks plain horrible. And maybe even a light greenish/blue for another paint color. Do you have any suggestions on paint colors for it?
Thanks a bunch!
-Jo
YoungHouseLove says
Benjamin Moore’s Dune Grass (greeny khaki) and Quiet Moments (soft blue gray) would probably look great with it. For a rich tan tone just bring home swatches and see what looks best! Good luck.
xo,
s
Ann says
Lovely – I like the way the beams tie in with the charcoal furniture. And this is why professional painters can command such high prices. Hope your muscles will be better soon and ready to tackle the rest of the ceiling. Maybe rethink wallpapering as that sounds like another invitation for soreness!
Patricia says
Just wanted to mention that your neck will thank you if you wear a cervical collar – think whiplash victim – while you do overhead painting. It provides a nice support and makes the job a bit easier. I’ve threatened wearing it while shopping for ceiling fans or light fixtures too!
Katie says
Wow- those beams look fantastic! and A+ for effort, Sherry! B- for John for helping you tape and taking over blog/baby duty, and A+ for Clara for being so darn cute! Love that she seems to notice the beams. She’s definitely your child!
Random question: I finally got around to hanging a large (80″x80″) piece of art on our dining room wall, and now that it’s hanging, I’m wondering if I made a mistake. The top of the art is about 4″ higher than our pendant light. It looks funny to me now (possibly because I just finished this 15 mins ago), but is there a rule that art should hang below a pendant/chandelier?
YoungHouseLove says
There are probably lots of rules, we just don’t know them! We like to eye things so if you think it’ll look better lower, we say lower it!
xo,
s
Ashley @ sunnysideshlee.com says
I think this is the first thing you guys have done that I’m not over the moon for. I just think they look unfinished by still having the wood peeking through. BUT! You love them and that’s all that matters! Glad to see the room is coming together! And I heart that couch! :)
Shelley says
It’s so hard to tell without everything in there yet. So much better than the wood. My mind is screaming white, but I like the not so matchy matchy of the see through gray. In the end I think it is going to make the room look richer and not so I bought everything on the same day from the same store look that we see too much! So much work, A+ for commitment! We painted all the ceilings in our house and that is the most miserable job! Oh, and I don’t get the wreath. Maybe close up I would appreciate it… sorry, just had to get that out;)
leah says
I truly admire your “stick-to-it-tiveness” and your gutsy approach, but I am just not feeling the dark gray punctuation of the parallel lines at the ceiling. I guess I would agree with RebeccaNYC and Jennifer that painting the beams white would accentuate the architecture… BUT, I know that your project is still in process, SO we will all just have to wait and see! Congrats on your Homies win – well deserved for your fun writing tone, and your sunny take on all things DIY.
Jo says
Love the beams!
However I do have a quick question for you two…
We have thick original wood work throughout our entire house in that same reddish/brown tone, and we want to keep it. However we’re having a hard time finding paint colors that compliment it and not fight it. We’re looking for a lighter and darker tan and maybe even a light greenish/blue color. Do you two have any suggestions?
Thanks a bunch!
Jo says
oops sorry my last post didn’t show! Thanks a bunch for the response!
taylor @ thetodolistqueen says
Love. Love. Love. I was so skeptical when I saw your sneak peek last week, but WOW it turned out great!
Keep the ideas coming!
Stephanie says
I love the beams and the way they change in the light. Great idea. I was going to ask about the rug but I see someone else already did, to a resounding NO from you! :) I wouldn’t sell it either…but I would buy it if you change your mind. I’m local. :) Okay, okay…I’ll stop but where did you get it? Thanks for all the beautiful ideas!
YoungHouseLove says
It’s the Moorish Tile Rug from Pottery Barn. They don’t sell it anymore, but maybe try eBay? Good luck!
xo,
s
Jason says
I love it – love it – love it! This makes people go from being glad they don’t have beams to deal with to wanting them – it looks so nice!
You guys mention the floors a lot, and I know how beautiful it was in your last house when they were done. But, I too am saving up for floor refinishing and also crawl space waterproofing because the humidity can mess with your hardwoods and I want it to be dry at all times before I do the floors over just in case.
Anyway – I see a lot of floor painting these days and have thought about it as an in between from now until refinishing just for fun maybe if nothing else.
Would you guys consider it? I believe apt therapy (homie:)) did a post on inspiration not long ago and some of those were parquet. I know it would be different than painting your porch and sunroom at casa I, but it could be a quick bang for your buck right?
YoungHouseLove says
We’ve seen it done in person and it’s gorgeous! But straight from the owner’s mouth we heard that it doesn’t hold up to kids and dogs like she would have liked it to. We’re all about serious livability and durability for stress free living, so I’d hate to cringe when the dog runs after his toys and Clara clomps around someday in her sweet shiny baby shoes. That’s why we lean towards 20+ year solutions for floors like refinishing! But again, we love the look of a painted floor, we’re just too scared to commit to it for ourselves!
xo,
s
Jason says
So what you are saying is I have to try it and show you instead of you trying it and showing me how it looks lol!
YoungHouseLove says
Haha, sure! Sometimes that’s the key! Good luck!
xo,
s
Hilary @ My So-Called Home says
Looks great, can’t wait to see it all come together. You think you’ll keep yellow as an accent in the rug or do something totally different?
YoungHouseLove says
We love it but we’ll have to see what we find! Should be interesting to see where we end up!
xo,
s
pam says
Oh yes – you deserve a massage. It’s worth every single penny, too! Love the beams – I would have chickened out and whitewashed them. The grey is much more sophisticated looking. Good job!
Shelley says
I didn’t read all the comments, but someone should tell you that you have beautiful hair! Glad you didn’t cut a bunch off=)
Angie says
Not sure if you familiar with this blogger but she had a neat idea about concert poster art. link is below.
http://oddgirloutblog.blogspot.com/2011/01/concert-posters-are-rad.html
YoungHouseLove says
Love it! Thanks for the link!
xo,
s