Remember when I admitted that I was glad this was over? I’m even more glad that the following project has come to an end. Let’s just say standing on a stepladder leaning back and up to paint three sides of five beams plus crown molding and quarter round around a mammoth 25 x 15′ room isn’t exactly a picnic according to this girl. I’d point to myself with my thumbs as I said that but I’m too sore. That’s right, my thumbs are sore. Along with my neck, back, chin (yes, chin) and various other body parts (calves, glutes, even my obliques for some odd reason). So to those of you who guessed that beam painting might burn more calories than rolling (see this post) I can assure you that it’s moderately to severely more uncomfortable, so I’m betting there were some calories that were burned (along with some muscles that were pulled and a few chins that were strained- all of which were mine).
But it’s worth it. Oh so worth it! The beams went from a reddish tone that we tried to love, but just couldn’t (to us they just looked like they stuck out like a sore thumb)…
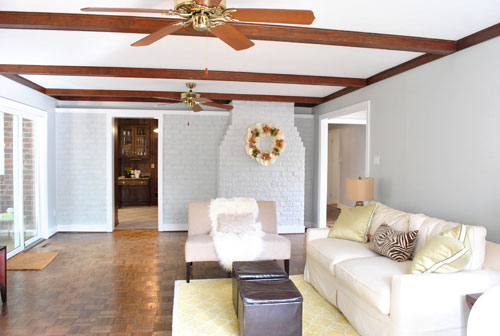
… to a warm rustic gray tone with enough of the brown wood color still peeking through.
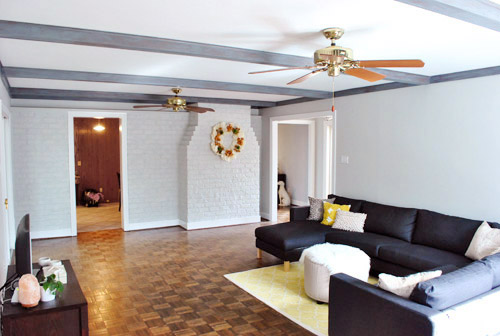
We definitely still have to deal with the ceiling and those fans among a few other things, so this is just the beginning of the top 5% of the room’s transformation. We have no idea what color we’ll paint the ceiling but we’ll share all the details when we reach a final decision. Promise.
And the soft gray color washed over the beams seems to be a really good start when it comes to making the living room feel more like us. We think it’s kinda charming and dramatic without feeling nearly as heavy as the old dark reddy-brown beams felt. See how the thin wash of paint sort of diffused those sharp red undertones?
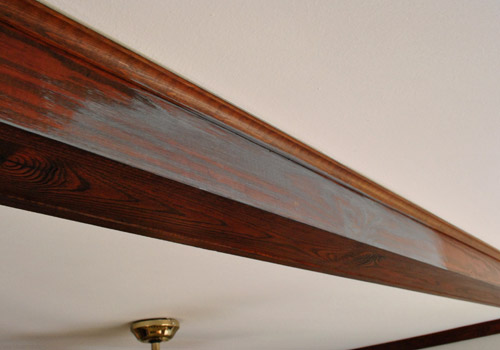
Here’s another detail shot of the beams more thoroughly painted so you can appreciate the dimension and the wood grain that shows through:
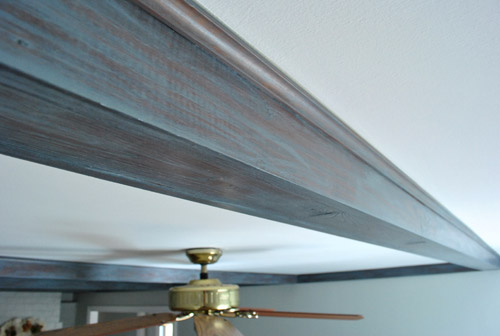
Ah, victory. It doesn’t feel any less good, even when you’re slowly shuffling around like an achey old grandma. I know some people love the look of untouched wood beams but they just weren’t right for us. And as the light changes the freshly gray-ified beams go from soft and rustic to deeper and more dramatic. Which is definitely fun since the room seems to get a bit swankier and more moody as the sun sets. See how the beams look deeper later in the day? We love it.
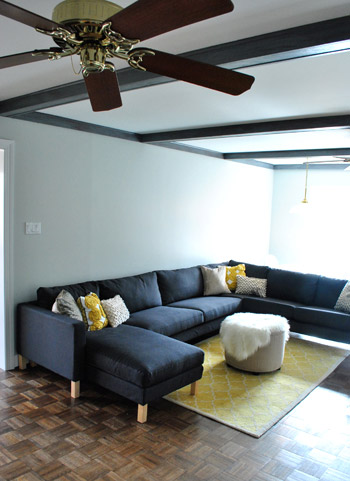
And for those who aren’t quite convinced, just remember that the room is about 8% done. We have a too-small rug and media center, huge honking fans on either side of the room (centered over nothing) that will be coming down, giant naked windows and sliders crying out for some curtains, nothing on the walls at all, etc. Heck, just adding in a bright 8 x 10 rug (instead of our current 5 x 8 one) and hanging some bold floor length curtains panels high and wide on those windows and glass doors will make this space feel 500 times more finished (and help the beams fit right in with the other textures and saturated colors that we’ll be adding in).
Can’t forget art either. Right now the walls are bare, but along with a bold rug and some punchy curtain panels we really want to add in some large scale brightly colored art which will also keep the room from feeling like a cold gray box and balance out the boldness of the beams with a bit more going on (so they’re not the only thing you see, they’re layered and lovely among a room full of color, contrast, shapes, fabrics, etc). Of course you’ll have to bear with us since this isn’t HGTV, so we definitely can’t snap our fingers and finish the room in 30 minutes. Instead you’ll get to watch it slowly evolve one project at a time along with the rest of our house – in real-time, on a real budget. And we think the beams will fit right in with our vision for the space as we slowly add in more color, art, fabrics, etc.
But anyway, on to how I did it. Yes, that’s the word I. John gets no credit for helping. Well except for Clara-sitting (and blog-sitting) while it all went down. Which was supremely helpful, but let’s just say that his neck and back didn’t revolt for three consecutive days like mine did. But again- it was so (so so so so) worth it. I walk into the room and smile now (we even catch Clara gazing up and grinning at our “new” beams). I might have even been smiling as I painted – although I think that face could probably best be described as a grimace. Hence this back-only progress shot.
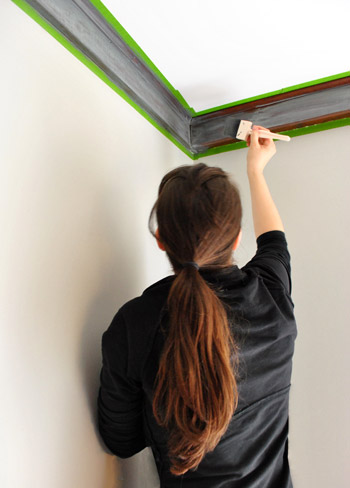
Yes that picture alone spurred me to get a haircut the very next day (the first one I got since Clara was born 9 months ago). Insanity. Just a $14 trim at Haircuttery though. Nothing too crazy.
But on with the beam painting project. I’d actually use the term “painting” very loosely when it comes to this process. What I did to the beams could best be described as a combination between whitewashing graywashing, sponging, and drybrushing. But let’s start at the beginning. First we taped a few different swatch cards up on the beams and picked the three gray tones we liked best (which ended up being the last three swatches on the middle card from Benjamin Moore: Shaker Gray 1594, Rocky Coast 1595, and Nightfall 1596).
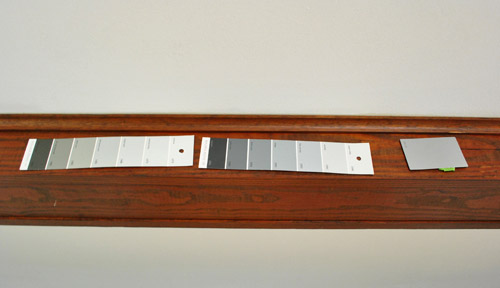
Then we went to Lowe’s and had them color match those three colors (they had them in the computer so they didn’t even have to scan our swatch card) to three small test pots of satin Olympic Premium No-VOC paint. We returned home with those three test pots and did a series of applications on the beams to see what we liked best. We picked an out of the way back edge of a beam that you can only really see when you’re standing in the corner (where the desk currently is) in the back corner of the room – just in case anything we didn’t like stuck around. But luckily everything we did was easily wiped down after each test was conducted. Especially the first attempt. We tried watering down a drop of paint on a ceramic plate and applying it with a foam brush.
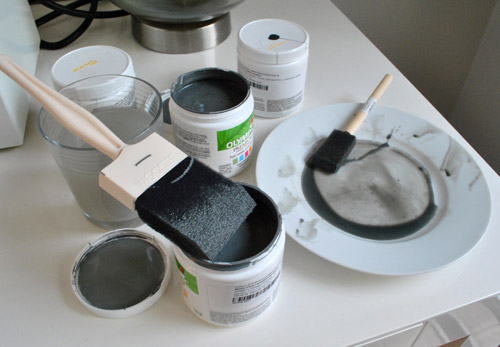
That was a disaster. Ok, disaster is probably a bit too dramatic, but it was so watery it ran right off the beam I was test painting and onto the floor. It was gross and drippy and just not working. Then I tried using a dry foam brush to lightly brush on some paint directly from the tester. No watering down (or brush wetting) at all. As soon as I feathered it out, it started to look pretty cool. So we picked the test pot color that we liked best with the dry brush method (which happened to be the lightest of the grays that we brought home- Shaker Gray 1594 by Benjamin Moore) and used a wet rag to wipe down the other two test applications on the beam. Amazingly the unchosen paint applications came right off since they were so freshly applied and we left the winning one up there as a starting point. Here’s what it looked like at that stage in the game:

Next John helped me tape off the area around the beams and crown (since the 2″ foam brush wasn’t nearly as easy to control as my usual short handled brush). Then it was as easy as as simple as as mindnumbingly repetitive as using the 2″ foam brush to softly dry brush the medium gray paint all over the bottom and sides of each beam, piece of trim, and piece of quarter round for an imperfect but soft and charming weathered gray wood effect. We went with only one coat (which was very thinly applied, I’d stretch the paint as long as possible, dragging the foam brush so it would spread it out for a nice thin and translucent effect). In fact, although the project took me three days to fully complete (parts of Friday, Saturday, and Sunday – mostly because I couldn’t stay up on the stepladder for more than a few hours at a time since my neck got so cramped and my extended arm got so shaky) it probably only took about 6 hours total.
So sorry to sound so complainey- it was just an honest to goodness hard a$$ job. And you know we vowed to keep it real, so it just wouldn’t make sense to say things like “it was as easy as pie” when it wasn’t particularly difficult with regard to skill level, but a bit tough when it came to things like strength and endurance. Especially when you’re height-challenged like my 5’2″ self. Hah.
Oh and here’s a good demonstration of how much I stretched that paint. The entire project didn’t even exhaust the small amount of paint that we originally picked up to use just as a tester. This is a pic of our Shaker Gray test paint pot when we were completely done painting the beams with it. And there’s still about 10% left on the bottom! Who knew the paint used for this project would cost us just $2.80? Amazing.
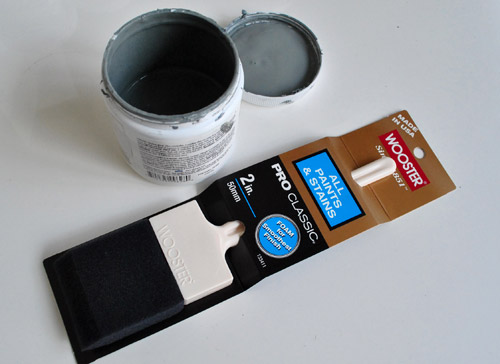
Oh and see the foam brush in the photo above? That’s an extra one I grabbed just in case my first one got beat up (I’m pleased to report that it made it through) so I stuck the extra guy in the picture above for anyone wondering exactly what foam brush I used (it’s from Lowe’s btw).
Anyway, back to the paint job. We love how the paint grabs the knots in the wood so it looks stained instead of painted for a subtle diffused look:

It’s almost as if we turned down the red and upped the weathered gray tones for a soft aged effect that fits right in thanks to the deep charcoal sectional on the ground (which definitely does its part to balance out the dark beams). And again, once we bring in a larger rug and media cabinet, remove the fans, add some art, hang lots of textured and bold curtains, etc – this room should really start to come together and warm up (since it’s pretty much a gray sandwich right now).
In the end, we both love that we took a risk and went waaaaay outside of our paint-it-white comfort zone and did something that looks weathered and stately and polished yet surprisingly soft. We definitely think it’s a risk that’ll pay off as the room starts to come together over the next few months. And we think it’ll look even more finished once we figure out what color we’ll add to the ceiling (a soft metallic champagne color? a light blue or green or yellow tone? wallpaper? more details on that as soon as we’re 100% sure about our direction).
And now we’ll end this beam-altering diatribe with a fun little journey back in time to this shot of the room as it looked when we moved in less than two months ago:
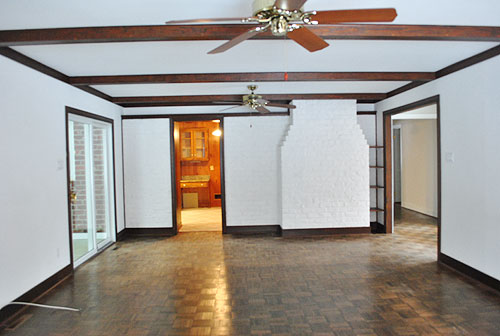
So crazy. You’ve come a long way baby living room. Can’t wait to start in on a few more projects…

KrisCross says
http://www.decorativeceilingtiles.net/products/206-Faux-Tin-Drop-In.html
Or, we have seen this pattern before! Your bathroom mirror. I wonder if you could center them, and put some kind of decorative frame around a few pieces in your ceiling!
Ky says
I love the yellow flower pillows that you have on your couch…do you think they would go with chocolate brown? I really really want to brighten up my living room but I have brown curtains and brown pillows that I really want to keep! Btw, I really love your blog!
YoungHouseLove says
Sure! They’d look great!
xo,
s
Ali says
Oh dear, guys. I hate to say it, since it caused you so much trouble, but this was a fail. The charcoal doesn’t relate to anything else in the room and works in opposition with the warm-toned floors. I hope a change to white is in your future when you can stomach redoing it.
YoungHouseLove says
We love it so it’s definitely staying around! As we mentioned in the post, we’re only 10% done with the room, so although we think the big gray sectional balances out the beams already, hopefully it’ll make even more sense to ya when we bring in a bigger rug and media cabinet, hang curtains, remove the fans, hang some art, etc! There’s lots more to layer in for sure! We’ve also mentioned that we plan to refinish all the wood floors in a rich deep tone (that’s much less red and faded) someday. Can’t wait!
xo,
s
laurenjanelle says
That looks beautiful! The combination of the new couch and the painted beams makes the room look so sophisticated.
Aly says
well worth the time and effort!
Nesting Newbies says
Looks GREAT!!! I know you must be sore though!
Original_Ann says
That is just so stunning! You both have a fabulous gift for envisioning the end product – I had no idea it could look so beautiful, fresh – and yet so deliciously vintage. Gorgeous and inspiring!
wanita says
So glad you’re doing this particular project! I had thought of staining my kitchen cupboards grey and was having a hard time explaining it to my husband :) Now i will show him these pics :))
Very random question…I have been searching for a specific type of lamp without any luck, for a few months now. Do you ever watch the show ‘No Ordinary Family’? They have a glass lamp, shaded slightly blue, with a deco’d lamp shade. LoVe this lamp!!! Or one similar :) And i have searched the internet and all the lamp stores in the big towns close by with no luck!! bummer! Do you have any advice for me?
YoungHouseLove says
Hmm, we wish we could help you hunt it down but we don’t watch that show. Do any readers out there have advice or links to share with Wanita when it comes to tracking down that lamp from No Ordinary Family?!
xo,
s
Danya says
Okay, so I have two questions for you, but first: I love the color scheme you’ve got going on in here, I look forward to seeing how this room pulls together!!
First, and I’m just curious, what drove your decision to paint the crown in the same tone as the beams rather than white, like the rest of your trim?
B.) A while, like a long time ago, you guys mentioned a company customsofadesigns.com….did you guys consider them for your new sectional? If so, why did you decide against them? I’m curious to get some feed back on the company as I’m in the market for a new sofa and keep finding my way back to their site.
Anywho, great work Sherry & John!! Can’t wait to see what’s next from you two!
YoungHouseLove says
Hey Dayna,
We thought it would look too criss-crossed and mismatched in a zany sort of way so we decided to go with all one color overhead when it comes to beams and trim and then go white with the trim from the neck down (haha, such an odd way to say it). We did consider Custom Sofa Designs but heard that their delivery rates to our area were very very steep, so it didn’t make it worth the money we’d save on the sectional itself. Hope it helps!
xo,
s
Carrie says
Looks fantastic!
Have you thought about pulling the sofa out from the wall and possibly putting a narrow table behind it? That room is so big! Might cozy it up a bit (along with the larger rug, media center, curtains, etc. that you are already planning!)
YoungHouseLove says
Oh yes we’re planning to built a sofa table ourselves! Soon hopefully!
xo,
s
Jenn from The Mustard Seed Blog says
It turned out absolutely awesome! I love the sense of adventure with which you approach your projects!
Mrs. Mango says
We totally use a sledgehammer at my boot camp class! The trainer is awesome he is always trying to find new and interesting exercises. His buddy gave him these huge wheels (think huge tractor wheels) and so he makes us slam it with a sledgehammer at full force in different ways. Very fun.
J R says
Looks like the owners of a “Stylish Apartment in Sweden Invaded by Color” are ‘beaming’ (harhar) with joy over a similar color palette to yours. Thought you might want to see. :-)
http://freshome.com/2011/03/10/stylish-apartment-in-sweden-invaded-by-color/?utm_source=feedburner&utm_medium=feed&utm_campaign=Feed:+FreshInspirationForYourHome+(Fresh+Inspiration+for+Your+Home)
YoungHouseLove says
Love it so much!!! Thanks for sharing the link!
xo,
s
Teresa says
Love how it’s all coming together! Looks great! You definitely have my style.
I have a quick question. My living room has “real,” honey colored wood, not the typical paneling, on one whole wall and the ceiling. Another wall has huge, dark wooden beams. I’d like to paint the normal walls a light sage green color, but what should I do about all the ugly wood. The sun is only there in the morning so it’s kind of dark in there the rest of the day.
Thanks!
YoungHouseLove says
We’d paint it! But that’s definitely a personal thing. You might want to start by painting the normal walls light sage (which looks great with honey wood) to see how it looks without painting the wood. And if you think at that stage that you’d like to go ahead and paint it, you can make the decision more easily then. Hope it helps!
xo,
s
Chase says
Sorry this is such a delayed response…I’m bored at work and reading the archives. I love the way the beams turned out, but I had a question about your use of paint samples. I recently got some Sherwin-Williams paint samples for my bathroom and was considering using the sample to paint (and obviously get additional paint as well), but the jar said it was only to be used to test colors, not for actually painting and needed a topcoat (or something along those lines). Did you just ignore that or did your paint samples not say that? I figured since it was a bathroom and I needed a different finish it wasn’t a big deal not using the sample, but I was curious about your thoughts on that…
YoungHouseLove says
I have heard that the paint quality isn’t as great in the testers but I wonder if that’s a ploy to get people to buy quarts (more moolah) instead of using testers? So far it has looked great and we haven’t had any adhesion issues or peeling or anything. Maybe if it was a wall in a bathroom that I want to be super scrubbable and waterproof I’d use the “right” paint, but for something overhead that doesn’t get much wear and tear I think it’s working out well!
xo,
s
Amber S says
The beams look great! We have a similar situation with wood beams. We love them but we also don’t. Ha! The den has one 1/2 wall window and a glass-paned door but it’s still so very dark. I’ve been recently working on wood built-ins in the den and I sanded them to make the paint adhere and last as long as possible. I, however, do NOT want to sand our beams and am wondering if you sanded yours? One, two, or even three steps less would be fantastic. :)
YoungHouseLove says
We skipped the sanding step on ours, but the adhesion on them is definitely not as great as it is on thing we did sand. The paint on our beams would be pretty easy to scrape or even wipe off with a wet rag, but we figured since we basically never come in contact with them that it’d be okay to forgo sanding in this case.
-John
Amber S says
Woot! That makes tackling them easier for sure! Thanks!
Amber S says
Have you guys painted the ceiling yet and I just haven’t seen that post? :)
YoungHouseLove says
We actually haven’t yet!
xo,
s
tosha says
Going to try this on my wall trim..also what type flooring is that? Wood squares?
YoungHouseLove says
It’s wood parquet.
-John
karmen says
Thinking about painting living room shade of gray…would you paint the fire place wall same color or go with a white with the same color gray tone
YoungHouseLove says
You could probably not go wrong either way! It just comes down to what you like more. I would google around or look at magazines to see if you see rooms done either way that you’re particularly drawn to! Hope it helps.
xo,
s
Carey says
I stumbled upon your site a few days ago and I have the same beams in my living room. Mine may have more of an orange tone, but I have tried to embrace the rustic charm not quite knowing what to do with them. I ran out and got some Shaker Gray and am a little scared to start. How do I know if I need to sand first? The house was built in the early 80s. Your house looks great!
YoungHouseLove says
I would just test it very lightly on a beam in a corner that faces the wall/corner so you don’t see it very often. If it goes on well you’re all set and if it beads up and sits on top of what look like sealer you can just wipe it off and then sand and start over.
xo
s
kylee says
I couldn’t find the post when you actually talked about getting rid of the ceiling fans in the room. When you did, how did you finish off the ceiling where the junction box resides? We are interested in moving a light fixture in our room, but not so into having a plastic white cover in the middle of the ceiling where the old junction box resides.
YoungHouseLove says
Since we still had attic access to the junction boxes we could seal them up from below (with a metal plate and some spackle to camouflage them), but if you have a second story instead of access in the attic beware of hiding fixture boxes behind spackle because its hard to find them again and can be dangerous if there unmarked :)
xo,
s
Elyse Danielle says
Hey y’all! I love this look so much; I eventually want to add beams to my vaulted living room ceiling and paint just the same. In the meantime though, I am considering painting my stair rails (that look very similar to your original beams color) with the same shaker grey, foam brush method. How do y’all think this will look on stair rails (vs. ceiling beams)? I can send you a picture of what my current stair rails look like now if that will help…let me know! Thanks so much; I appreciate the guidance!
YoungHouseLove says
I think it’ll look great! Just be sure to sand them if they’re sealed with super thick and glossy clear-coat since the paint won’t really grip that well and it might look wonky. Then after it’s applied, clear coat over it with poly to seal it in (since no one touches the beams we don’t need to do that :)
xo
s