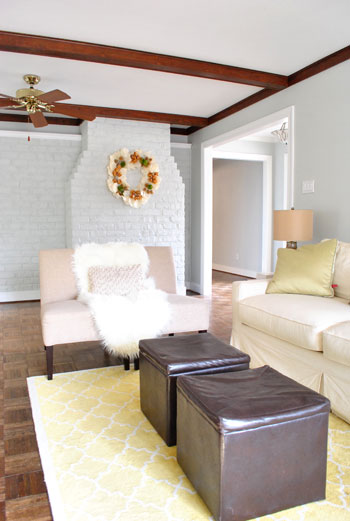
Glad that’s out of the way. Painting the trim was as long and tedious of a process as we expected. Maybe more-so actually, but it’s done! Wahoooo! And it feels pretty darn good. Seriously, there was more than one happy dance (one on Friday night when we finished, and another one in the morning when we saw the room in the light). What is it about certain annoying home improvement jobs that make you want to ugly-cry while doing them but happy-cry when you’re done? Talk about roller-coaster emotions. In the end, we never regret them, and we’re happy we got ‘er done. We’re just not ready to “do them all over again” the next day or anything. Haha. Anyway, it’s looking pretty good. Here’s the view in the living room now (ignore the beams, we’ll get to that later):
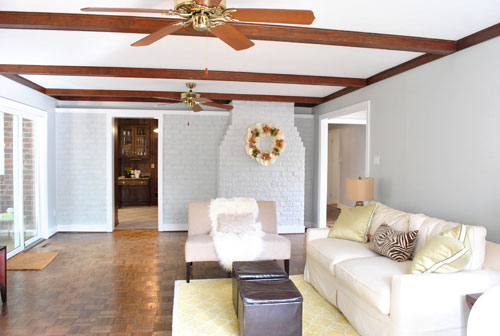
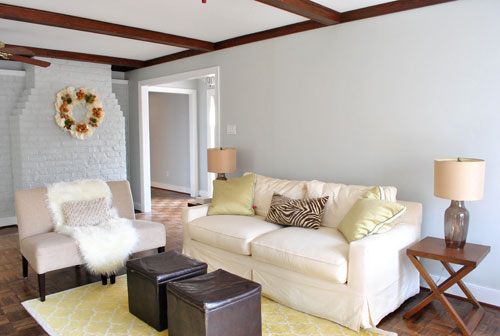
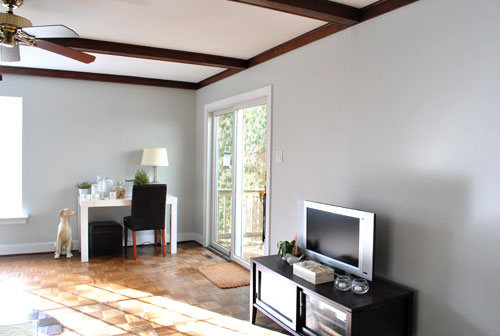
As far as the process went, experts recommend using oil-based primer to block potential bleed-through when it comes to painting wood trim (followed by latex paint). We threw caution into the wind and went straight to white semi-gloss latex no-VOC paint (Olympic Premium from Lowe’s). I had gotten some gray wall paint on the trim a few days back when we tackled that project, and it seemed to cover well without any signs of bleed through. So I went for it. Could have been a terrible plan. Could have resulted in having to go back and repaint all the trim with primer if I did see some bleed-through. And possibly pulling 60-80% of my hair out as a result. But it didn’t! Oh happy day.
So we saved the nastiness of working with oil-based primer and all the VOCs that come with it. Call it a baby-and-eco-friendly risk that happened to pay off. If it hadn’t we would have sought out the lowest VOC stainblocking primer that we could find, but it was pretty sweet that it didn’t come to that. That’s about where the words “pretty sweet” stop with regards to this project. We vowed to keep it real with you guys, so although we’re eternal optimists who generally love nearly every project that we tackle (even the ones that don’t work), we promised to tell you if something sucked. And painting the trim totally did.
It wasn’t that it was very hard (I used this brush, which I swear by for “staying in the lines” and going a lot faster that I used to move with a traditional long-handed brush). It was just that it took for.ever. I started at around 10am on Friday and went it alone until about 3pm (while Clara took her morning nap and then John watched her and tended the blog), then around 3, out of sheer desperation, I asked John to help while Clara was taking her afternoon nap (he traditionally rebuffs detail work since he’s the “big picture” guy who rolls while I cut in, so he claims he has less control when it comes to fine motor skills with a brush). At that point I was on coat #2 though, so I just asked him to go down the middle of the trim and baseboards with the second coat while I followed him and added a second coat to the top and bottom of the baseboards and trim (which requires a bit more control since that’s where the brush can meet the floor or the wall).
By coat number three it was around 7pm (thanks to a lot of blog, Clara, and food breaks among other things) and that’s when we realized that it wasn’t going to be a three-coat process like we thought. It was going to take four full coats to cover that dark dark trim. Boo to the hoo. There may have been a temper tantrum (not by Clara) but no actual tears were shed (which I consider to be a semi-mature response to such devastating news). But we pressed on. And it was actually past midnight when we finally finished (and snapped this victory shot of our paintbrushes “toasting” in front of the microwave clock). Klassy, right?
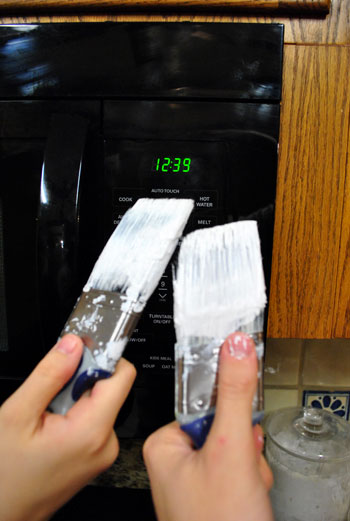
If we had used oil-based primer it definitely would have only been a 1-2 coat process (after the coat of primer was applied, which would add up to 2-3 total applications) so it may have taken us until 5 to 7pm instead of 12:30 in the morning. But those 1-2 extra coats were worth it to us in exchange for a completely zero VOC result. Even if it meant dragging a little bit the next day. So for those who are looking for the expert recommendation for tackling this project, use oil-based primer applied with a brush followed by 1-2 coats of latex gloss or semi-gloss paint also applied with a brush (and tape things off if you like to work that way). But if you wanna know how we did it, I used my trusty short handled brush and we applied 4 coats of semi-gloss latex paint (without taping off, since over time I’ve gotten nice and steady without tape). We actually painted all of the wood trim in our first house (including the stuff in the bathroom and kitchen) using this method (no sanding or primer) and we luckily didn’t have any chipping or bleed-through issues after 4+ years there. Fingers crossed for the same luck here!
As for the paint choice, we used the off-the-shelf white stuff that comes without any tint from Olympic Premium called “Base 2” (since “Base 1” is also known as “Ultra White,” and we wanted something crisp and white but not crazy white with a glowing blue tint to it). We love the color, and plan to use it for the rest of the trim in the house. When we finally work up the energy to tackle a project like that again in a few years. Har har.
Oh and the beams. We promised more details about those. We left them au naturale to be 100% sure that we don’t prefer them that way (we don’t). But now that the trim is all painted, we’ve decided that we definitely want to stain or paint them a deeper gray color for some richness and dimension. And of course those fans have to go. So for a vague idea of what that might look like, picture this…
… looking something like this:
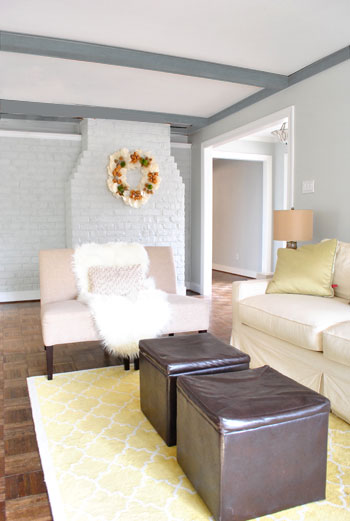
They definitely would have looked gorgeous in white just like the trim, but we want to take a risk and do something a little unexpected. We love that it’ll hopefully be just the right amount of drama without looking too heavy (we have standard 8-foot tall ceilings so we didn’t want them to feel like they’re closing in on you). But we think it’ll have a nice not-too-top-heavy look in the end, especially since we’ll be bringing in a large charcoal sectional to ground the room and add balance. Then we can start layering in some bold colors in the curtains, art, rug, accessories, etc. Should be interesting.
And why not end with a nice little flash-back to what the space looked like a little over a month ago when we moved in?
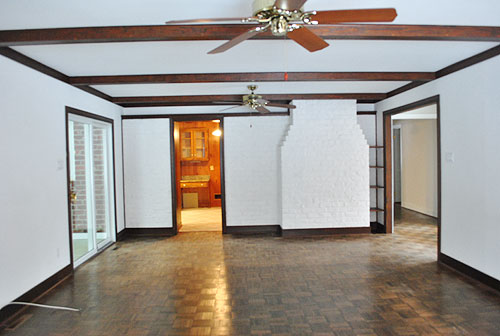
Oh the memories. Change is good.

Jenn Kemper with Stella & Dot says
LOVE it!!! I’m glad to hear how much it sucked, though. Makes me feel WAY better for hating the trim-painting-process. We just bought in nov and our new, old house does have white trim, but it’s all different shades & finishes & lots of it needs sanding & a total re-do. It’s on our list!
Heather says
I did the exact same thing this weekend. We have oak trim in part of our house, and I think it makes the house look so much darker. We’ve been worried about tackling the project because once we started, there was no going back. But, we’re super excited about the results. We lightly sanded, then primed, and then put on the paint. It took 1 coat of primer and 2 coats of paint. There are still a few places that the primer didn’t coat well enough that needs to be touched up, but we love the results. So much work though, and still several more rooms to go. Whew…
jessicookie says
Looks great! We are going to have to do that soon, too… it’ll take us forever to tackle all the trim in our house. Glad it went so well for you guys!
Nichole@40daysof says
It looks wonderful, but just hearing about those 4 coats make my body hurt. :)
Mandy Ford says
Looks great! And I’m loving the idea for grey on the beams. You have inspired me to maybe finally grab the paintbrushes and white paint and do our family room trim!
Mindy says
Looks awesome. I love that you guys commit to a project and just go for it! And i think the gray beams are going to look pretty sweet. So different! Question {a la Dwight}: Any tips on how to paint trim when there’s carpet in the room? I’d love to touch up ours, but I’m a little nervous about touching up the baseboards… Is it possible, or would we need to just replace it?
PS. I love how you said in your cleaning post that baseboards are like little shelves for dust… ugh, so true! Anyway, thanks!
YoungHouseLove says
Hey Mindy,
We’ve never actually done that! But perhaps taping off or even using cardboard or a long metal putty knife to block the carpet would work? Good luck! We definitely recommend touching up baseboard instead of replacing it for sure!
xo,
s
jen says
visually, this is real encouraging. .every. bit of trim in my house is dark stained wood (okay, minus one bathroom that the previous owners did .one.single.coat. on.. yeah, that looks great.) we’ve painted every room in the house and have redone flooring, the trim is the one last detail i keep putting off. but i know the before and after will be so worth it. yours looks so significantly better, i am going to have to bite the bullet and get this project started soon. or, uh, you guys want to come down to florida for a week? ;)
Elisa says
Gray + Yellow = :D
Isabella says
Awesome job! I hope you took it easy over the weekend!
felisha says
You guys did an AWESOME JOB !! I am not a fan of wood. My husband and I bought our home 3 years ago, and the first thing we did was paint all the wood white. I did not take any before pictures of our house to show the projects we have done :(
I think the beams will look GREAT painted the gray color.
Ashley @ Simply Creative Things says
Looks great guys! We’ve had plenty of nights like that at our house also, it’s always worth it in the end. Keep up the awesome work and inspiration :)
Dennis says
We had a similar hair pulling project this weekend where we stripped 12 year old. sun baked on, papered over old wall paper. Oh fun!
carley says
I love the preview of the dark gray beams. It’s a bold, dramatic statement that works wonderfully with the room! Great idea!
The crisp, white borders look phenomenal. You did an amazing job!
Lindsay @ A Walk in the Closet says
The place looks fantastic! I love seeing the progression shots as you work on this room. The darker gray beams makes a nice contrast to the pale colors of the room. I also love the pop of yellow in the carpet. Works really well with the grays!
Rachel Z says
It looks great!! I really love reading your blog and seeing all the amazing stuff you guys come up with! We painted the trim in our house white too (well, my hubby did…haha) but I was wondering if you did the trim around the windows too? We haven’t done ours yet, but I’m kinda thinking that would look good?
YoungHouseLove says
Hey Rachel,
Yup, by trim we mean baseboards, window trim, door trim, etc. Looks nice and cohesive that way. Hope it helps!
xo,
s
Evie says
I think the white trim looks gorgeous! I just can’t wait to see what it looks like when you spruce it up with color…I think it kind of looks like a jail cell with the light gray walls & dark gray beams (no offense!)
Eve says
Thanks for posting this – it looks great! I too have been wanting to paint the trim at our house since we moved in this past summer. I’ll be re-reading this post when I feel like conquering that task.
Pam says
Looks great … if you are looking for stain ideas, Houzz recently had an article on staining old paneling, floors, and maybe trim? modern contemporary grays. It was a great ‘how to’ … good luck!
dave says
i would leave the beams or stain them darker and then use the same color for the floor to add some warmth into the room
susan says
I like the beams in gray!!! Good job with all that trim and many, many coats of paints. Susan
Christy Panzarella says
I love that you painted your living room practically the same color at mine!
Nicole says
Nice! I wondered if you’d keep the wood it’s original color or paint. And before I got to the end I thought, I bet they paint the beams a darker gray. Man I’m good. ;) Seriously though, it looks great. Not a job I would want to undertake!
Ericka says
Soo pretty! I painted my kitchen this weekend (HATE painting) and I’m still not sure about the color (Tabu by Olympic) but I think once everything is done I’ll like it!
Corinne says
That’s it, I’m going to paint the trim white in my house! I’ll just do one room first and see how it goes, especially since I’ll be tackling this with carpet on the floor.
I love the way this room looks, and I think it’ll look great when the beams are painted gray. I didn’t think I would like it, but the photoshopped picture makes me think otherwise!
Michelle says
Hi-larious. That tantrum-y feeling is the same as the one I get during almost every house project I do nowadays. DIY burnout, anyone? I’m there.
Although — before you write off those fans, would you consider painting them? We have one in our living room that was just as ugly as yours — with the added bonus of that hideous 1980s basket-weave stuff on the tops of the blades for “variety.” I followed a Krylon tutorial to make the brassy bits an oil-rubbed bronze color and then painted the blades white. With a new antique-looking fan pull, it really looks good now, and the whole project cost about $15.
Here’s the tutorial:
http://www.krylon.com/projects/household/light-fixture/index.jsp
YoungHouseLove says
Hey Michelle,
The placement is just so weird that they have to go. But we painted a fan in our first house and loved the look!
xo,
s
kristin says
Wow, LOVE the paint choice-great work you guys! I also am loving your choice to keep the beams, with a little sprucing up. I grew up in an old farmhouse and am obsessed with beams, while our beams stayed natural wood with white paint-your grey paint/stain will make everything look so tied (sp?) together. Maybe it was growing up with ceiling beams that I expect to see them when I look up, but I still get dissapointed when I don’t have them in a current apartment, lil Clara just may grow to have the same love for them. I have been keeping track of your decision on those and I want to applaud your final choice, I think it will look incredible.
**Thanks in general for the heads up on the Art Shark couple/umbrella prints. I just purchased a Philly couple print and it looks divine, yellow umbrellas to match our yellow and grey living room.
YoungHouseLove says
Hey Kristin,
Aw, yellow umbrellas sound adorable! Enjoy!
xo,
s
Kate says
It’s amazing how the wall color really pops now – and when the trim was dark you could hardly tell a difference after you painted the walls.
We painted EVERY piece of trim in our house over the last year. It was a total pain (especially windows), but thankfully we were just painting over ivory trim.
cass says
Ahhhhh….. It is beginning to look a lot like HOME!!
Amanda @ Our Humble A{Bowe}d says
I love the white trim! Serioiusly looks so much better and it will look like a million bucks once you’ve painted the beams.
Christy Panzarella says
-Mindy:
I use a trowel at the carpet. I have never been lucky enough to have hardwoods, only carpet lol. And Ive actually tapes around funky spots (like doorways).Frog Tape (the green stuff) will stick to carpet!! We have carpet up the wall in our hall closet, with no trim or anything, so I taped that too. Perfect. And shout laundry spray on a paper towel will get paint up if you drip & catch it before it dries.
Hope that helps!
Melody says
The gray ceiling beams look so much better…I love that you can use photoshop to see the result!
Are you planning on replacing the fans with light fixtures, or are you planning on patching up the ceiling?
YoungHouseLove says
Hey Melody,
Since they’re in such awkward places and don’t actually have lights on them now, we’re thinking of patching the ceiling where they are (and possibly adding a light centered over the seating area (and of course bringing in lots of lamps).
xo,
s
Caity says
Looks awesome!!! So much crisper and cleaner! And I’ve got to say, those beams are going to look awesome stained dark gray!! Great idea!!
Shannon says
Looks fantastic! I really think the beams will look so good in the deep grey!
Kim S says
Oooo I love the gray beams! I couldn’t picture it but once I saw the photoshop version I can’t wait to see it for real! Quick question…where is the wreath that’s hanging on your brick wall from? It’s beautiful!
YoungHouseLove says
Hey Kim S,
It’s from Pottery Barn a while back – it was a gift from John’s mom!
xo,
s
Sandy says
Love it! It looks fantastic! Great job! I’m actually considering repainting my living to a soft gray as well … thanks to you guy. Keep up the great job.
sarah @ handbagsnpigtails says
Its so exciting to watch your home take shape(the john & sherry way) one step at a time. Its looking wonderful! Keep up the good work:)
Jackie K. says
Looks awesome guys! What a difference!
I’m about to tackle all the window trim in our house. It’s a blond color wood so hopefully I wont need as many coats as you guys did. YIKES!
candace @ thecandace.com says
PHEW. I am glad that’s over for you too – what a huge project!! It looks absolutely fabulous!!!
maggie says
Do you know where we can get the Clara rug?! i love it but they no longer sell it at PB :0(
YoungHouseLove says
Hey Maggie,
Maybe ebay? Or craigslist? Good luck!
xo,
s
meghan s says
So, definitely love the paint color- I had recently ordered Grey Owl for a client but I haven’t seen it yet. Definitely on board with your idea of painting the beams- I agree with one of your other comments, gray-washing or a weathered barn wood effect could be a really fantastic contrast, but WAY tedious to do. I also recently saw a ceiling wallpapered in something like this: http://www.grahambrown.com/uk/product/50-159/Woodland
for the effect of weathered wood without the cost, but then the beams were left white. I like the gray too though- carry on you two!
amyks says
Love the white trim and I think the gray stained beams will look fabulous! Can’t wait to see it all finished up.:)
Ashley says
I hope I don’t rain on your parade, but a little warning about the “bleeding through.” A while back I lived in an apartment that had a white door in the bathroom. Little did I know, the owners had painted the white over a heavily stained door before I moved in. After a year or soo strange brownish stains started coming through the white paint and there was nothing I could do to clean it off (at first I just thought I was super dirty, which was not the case!). The continued to get darker as I lived there.. very odd.
I hope you guys don’t run in to the same problem!!
YoungHouseLove says
Hey Ashley,
Thanks for the heads up! We actually painted all of the wood trim in our last house with this method (no primer) and we luckily didn’t have any chipping or bleed-through issues after 4+ years there. Fingers crossed for the same luck here!
xo,
s
kyla says
When did you modify the comment/response layout? woo hoo!!
YoungHouseLove says
Hey Kyla,
After three weeks (and lots of ugly-crying, not lying) we finally were able to make threaded comments work with our volume of comments. Love it so much! Here’s hoping it doesn’t crash the site though…
xo,
s
Irene says
bleed through isn’t something you see right away, it’s something you’d see after a few weeks. ask me how I know…
Sarah says
Doesn’t white trim make a huge difference? Our neighborhood is all 80s homes with dark trim and wallpaper on every surface. A little paint makes a night and day difference.
Just wondering – had you considered painting the crown molding white to match the rest of the trim and painting just the beams gray? It seems like that’s the more common way (from my super-scientific “ceiling beams” search on google images), so I was wondering why y’all chose the pattern you did.
YoungHouseLove says
Hey Sarah,
We did talk about that for a bit but worried it would look disjointed and sort of criss-crossed if that makes sense.
xo,
s
carolinaheartstrings says
Love that trim. It looks amazing with the gray. The beams will look fantastic in the “gray” family. Good work!
Stephanie says
Looks great!!! I had to paint the trim in my house about 4 or 5 years ago and it was a medium stained pine with some spots being darker than others. But anyway, I was able to get by with 2 coats of Kilz premium and 2 coats of white semi gloss paint. I didn’t know about oil based primer at the time. But, it has held up great so far. Definately the biggest pain in the boohonkis I’ve done around the house!
Lauren says
It’s looking beautiful. Can’t wait to see it finished up with the beams. I’m assumming the position of those beams might bring some ugly-crying during the process. Good luck with those but I’m confident it will be worth the work later and you’ll be able to enjoy some happy-cries.
YoungHouseLove says
Hey Lauren,
For reals. Not looking forward to the during, but the after…. ahhhh, that will hopefully be amazing!
xo,
s
Sara @ House Bella says
I hate trim (and doors) so much that the trim (and most doors) in our great room aren’t done (though everything else in the room is). In my (semi) defense we, at the moment, have carpet. And there really is nothing like painting trim with carpet. It’s a wet and wild ride that it like some sort of punishment chamber.
Liz says
I was wondering if you considered keeping the beams natural and stripping and re-staining them to something lighter – a real light wood color like maple. just a thought – might be a pretty contrast – possibly a lot more work.
YoungHouseLove says
Hey Liz,
We definitely considered a ton of possibilities (that included) but just feel the most excited about the gray stain/paint idea for now. Who knows where we’ll end up though!
xo,
s