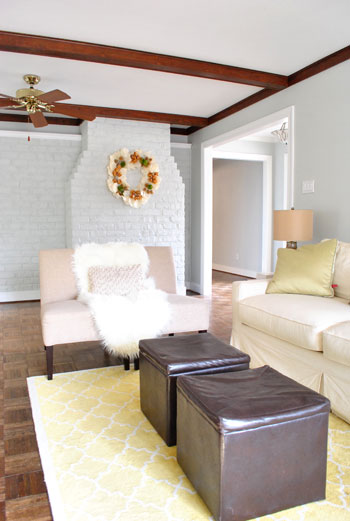
Glad that’s out of the way. Painting the trim was as long and tedious of a process as we expected. Maybe more-so actually, but it’s done! Wahoooo! And it feels pretty darn good. Seriously, there was more than one happy dance (one on Friday night when we finished, and another one in the morning when we saw the room in the light). What is it about certain annoying home improvement jobs that make you want to ugly-cry while doing them but happy-cry when you’re done? Talk about roller-coaster emotions. In the end, we never regret them, and we’re happy we got ‘er done. We’re just not ready to “do them all over again” the next day or anything. Haha. Anyway, it’s looking pretty good. Here’s the view in the living room now (ignore the beams, we’ll get to that later):
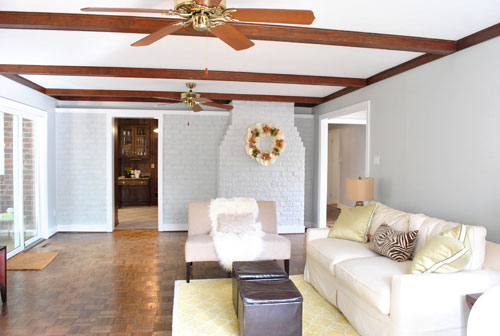
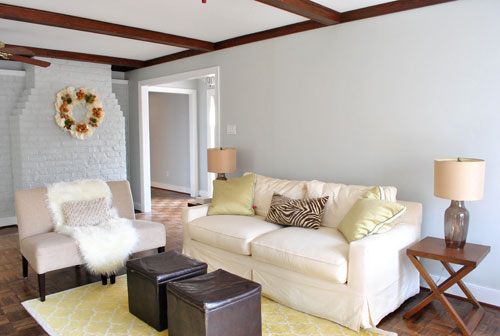
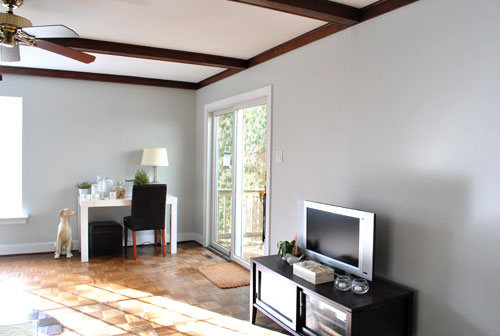
As far as the process went, experts recommend using oil-based primer to block potential bleed-through when it comes to painting wood trim (followed by latex paint). We threw caution into the wind and went straight to white semi-gloss latex no-VOC paint (Olympic Premium from Lowe’s). I had gotten some gray wall paint on the trim a few days back when we tackled that project, and it seemed to cover well without any signs of bleed through. So I went for it. Could have been a terrible plan. Could have resulted in having to go back and repaint all the trim with primer if I did see some bleed-through. And possibly pulling 60-80% of my hair out as a result. But it didn’t! Oh happy day.
So we saved the nastiness of working with oil-based primer and all the VOCs that come with it. Call it a baby-and-eco-friendly risk that happened to pay off. If it hadn’t we would have sought out the lowest VOC stainblocking primer that we could find, but it was pretty sweet that it didn’t come to that. That’s about where the words “pretty sweet” stop with regards to this project. We vowed to keep it real with you guys, so although we’re eternal optimists who generally love nearly every project that we tackle (even the ones that don’t work), we promised to tell you if something sucked. And painting the trim totally did.
It wasn’t that it was very hard (I used this brush, which I swear by for “staying in the lines” and going a lot faster that I used to move with a traditional long-handed brush). It was just that it took for.ever. I started at around 10am on Friday and went it alone until about 3pm (while Clara took her morning nap and then John watched her and tended the blog), then around 3, out of sheer desperation, I asked John to help while Clara was taking her afternoon nap (he traditionally rebuffs detail work since he’s the “big picture” guy who rolls while I cut in, so he claims he has less control when it comes to fine motor skills with a brush). At that point I was on coat #2 though, so I just asked him to go down the middle of the trim and baseboards with the second coat while I followed him and added a second coat to the top and bottom of the baseboards and trim (which requires a bit more control since that’s where the brush can meet the floor or the wall).
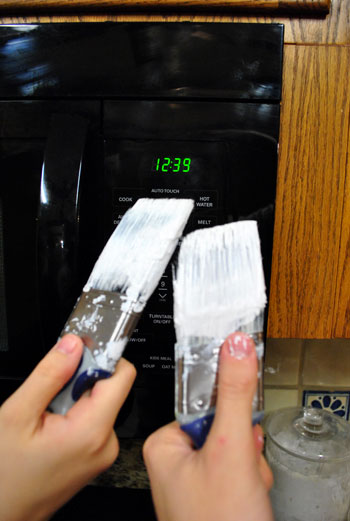
By coat number three it was around 7pm (thanks to a lot of blog, Clara, and food breaks among other things) and that’s when we realized that it wasn’t going to be a three-coat process like we thought. It was going to take four full coats to cover that dark dark trim. Boo to the hoo. There may have been a temper tantrum (not by Clara) but no actual tears were shed (which I consider to be a semi-mature response to such devastating news). But we pressed on. And it was actually past midnight when we finally finished (and snapped this victory shot of our paintbrushes “toasting” in front of the microwave clock). Klassy, right?
If we had used oil-based primer it definitely would have only been a 1-2 coat process (after the coat of primer was applied, which would add up to 2-3 total applications) so it may have taken us until 5 to 7pm instead of 12:30 in the morning. But those 1-2 extra coats were worth it to us in exchange for a completely zero VOC result. Even if it meant dragging a little bit the next day. So for those who are looking for the expert recommendation for tackling this project, use oil-based primer applied with a brush followed by 1-2 coats of latex gloss or semi-gloss paint also applied with a brush (and tape things off if you like to work that way). But if you wanna know how we did it, I used my trusty short handled brush and we applied 4 coats of semi-gloss latex paint (without taping off, since over time I’ve gotten nice and steady without tape). We actually painted all of the wood trim in our first house (including the stuff in the bathroom and kitchen) using this method (no sanding or primer) and we luckily didn’t have any chipping or bleed-through issues after 4+ years there. Fingers crossed for the same luck here!
As for the paint choice, we used the off-the-shelf white stuff that comes without any tint from Olympic Premium called “Base 2” (since “Base 1” is also known as “Ultra White,” and we wanted something crisp and white but not crazy white with a glowing blue tint to it). We love the color, and plan to use it for the rest of the trim in the house. When we finally work up the energy to tackle a project like that again in a few years. Har har.
Oh and the beams. We promised more details about those. We left them au naturale to be 100% sure that we don’t prefer them that way (we don’t). But now that the trim is all painted, we’ve decided that we definitely want to stain or paint them a deeper gray color for some richness and dimension. And of course those fans have to go. So for a vague idea of what that might look like, picture this…
… looking something like this:
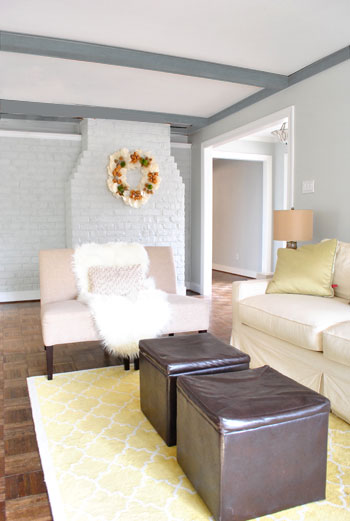
They definitely would have looked gorgeous in white just like the trim, but we want to take a risk and do something a little unexpected. We love that it’ll hopefully be just the right amount of drama without looking too heavy (we have standard 8-foot tall ceilings so we didn’t want them to feel like they’re closing in on you). But we think it’ll have a nice not-too-top-heavy look in the end, especially since we’ll be bringing in a large charcoal sectional to ground the room and add balance. Then we can start layering in some bold colors in the curtains, art, rug, accessories, etc. Should be interesting.
And why not end with a nice little flash-back to what the space looked like a little over a month ago when we moved in?
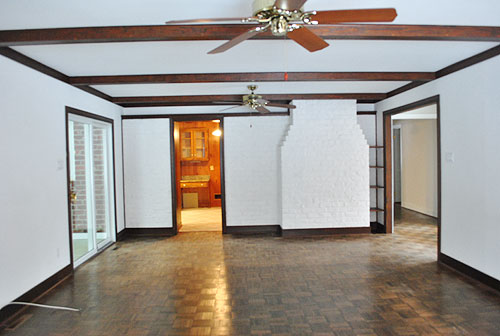
Oh the memories. Change is good.

Melanie says
Hi Guys, it’s been great reading about your new home and all of your updates. You’ve mentioned the low VOC paint a lot and I have no idea what that is or why we need it. Could you do a little blog entry about it?
YoungHouseLove says
Hey Melanie,
You can google around for more info, but basically the term VOC stands for “volatile organic compounds” which are present in all paint, primer, caulk, etc that isn’t expressly marked as free of them. They’re linked to health problems in prego people, kids, pets, humans in general, and the planet, so we try to stay away from them whenever we can!
xo,
s
Jennifer says
Wow you inspire me!!!!! I am going to the paint store to pull an all nighter. Thanks
Christina says
Nice work guys!! The white trim really makes the gray walls pop! One question though, what happened to your glass coffee table? I scrolled through the past few posts, and it didn’t see it anywhere. I loved that table and have actually been trying to find a similar one in my area. Did you sell it to replace with something new to go with your new sectional?
YoungHouseLove says
Hey Christina,
We actually mentioned it back in the comments here, but it’s sitting in the future dining room since we don’t really have a place for it but love it too much to part with it. Maybe we’ll store it in the attic a bit until mobile Clara is less of a worry with the iron corners…
xo,
s
Dana says
i’m a big advocate of the dark grey beams. i love the mock up plan, the subtle drama it adds, and the uniqueness. that being said, if the grey beams don’t pan out the way you envision, this room would also look amazing with white beams and a painted ceiling.
Meredith says
Wow – what a tranformation. Great choice guys!
Jess says
Hey guys! The trim looks amazing! We have wood trim in our 1966 house that we have been debating on painting. We were putting it off until we got rid of the wood windows (I hate painting wood windows!!), which we finally just did. It’s such a big project and once we do it, it can’t be un-did! Seeing your results is definitely encouraging!
Katy says
Hey guys,
I love your blog. I love your amazing design choices. There’s just one little problem. With 340 comments I’m sure someone has mentioned this already, but in case they haven’t… The primer isn’t for color bleed through. It’s to make the paint stick. Oil (varnish and stain) and water (based latex paint) don’t stick together. At some point in the next two years your paint is going to start peeling.
Then you’ll have to sand it off and prime it properly. There’s really no way around that. In a low-humidity area like a living room it might take 3 years. If you did this in a kitchen or bathroom? It would look awful in 2 weeks.
Katy
YoungHouseLove says
Hey Katy,
We actually painted all of the wood trim in our last house (including the stuff in the bathroom and kitchen) using this method (no sanding or primer) and we luckily didn’t have any chipping or bleed-through issues after 4+ years there! Fingers crossed for the same luck here!
xo,
s
Kristin says
I only read through a couple of comments, & saw the response to the fans & the desire for better lighting for tge room which sounds ideal in my minds eye as well. I def think those fans don’t work w your overall look, but I’ve never seen 2 fans in a room like this. Do u think there is a “test the season of summer” before you remove? (just curious)
YoungHouseLove says
Hey Kristin,
We’re pretty sure those fans won’t make it til summer! But as we mentioned in a few comments now, we have central air and two sliders we can open for ventilation so it’s really just a personal preference thing!
xo,
s
Allison says
Hey —
Question for you guys re the grey paint. I tried out, like, 10,000 shades of grey in my bedroom and found that they all trended toward another color (blue, green, purple…). Do you feel like your grey is really a true grey, or does it look a little blue in some lights?
Thanks!
YoungHouseLove says
Hey Allison,
It’s less blue than Owl Gray but a smidge more blue than Collingswood (scroll back to see the post about our test swatches). We’d call it a very true gray once it’s dry (in our space, but of course paint reads differently in every home due to different lighting situations).
xo,
s
Melissa says
Good job! That task would have taken me weeks to complete. LOL
Question: where did you get the area rug in the living room? I’m in the market for one just like it. Thanks!
YoungHouseLove says
Hey Melissa,
Pottery Barn a while back. More info in prior comments. Hope it helps!
xo,
s
Miranda says
I wonder if you plan to paint the white of the ceiling, either in the same trim color or another color all together. In the photos, it doesn’t look as crisp a white as the trim color. Just the photos, or true?
YoungHouseLove says
Hey Miranda,
Scroll back for that info! We’re definitely planning to paint the ceiling.
xo,
s
kate in michigan says
I thought that part of the reason to sand/prime/paint was to give the paint longevity, especially on something such as trim. Are you not concerned about chipping at all?
YoungHouseLove says
Hey Kate,
We actually painted all of the wood trim in our last house using this method (no sanding or primer) and we luckily didn’t have any chipping or bleed-through issues after 4+ years there. Fingers crossed for the same luck here!
xo,
s
Miranda says
Oh, and looks amazing!
Lisa says
Another home-run! You two give us so much inspiration!
Heather says
Bravo you guys! Not only on the great DIY job(s), but in your willingness to share with the public. As I scroll through the comments, I get upset at the not-always-positive remarks and even the suggestions; and it’s not even my house! haha! I couldn’t take it! :) Thank you for opening up your home. I love reading and getting inspired! Everything looks great, looks like you guys, and is amazing considering you’ve only been there about a month and with an infant. Amazing!
Andrew says
As always, you two (well four with Clara & Burger) hit it out of the park with the white trim. The gray beams will look great too, but my back is already experiencing phantom pains on your behalf!
A word to the wise, do PLENTY of stretching beforehand!
Ashley says
Beautiful! I can’t wait to see the beams and learn how you’re going to stain them grey. That’s fabulous! Can you tell me what computer program you guys use to change your beam colors? I’m trying to show my fiancée how our horrible red spanish tiled fireplace would look painted white :)
Thanks as always!! I saw Martha Stewart do this very cool wax stain treatment to wood which gave it a nice grey cast. I can’t find it online, of course, but she rubbed a wax-based stain on the wood and it brought out the wood grain really nicely if you’re interested in looking for that. It was a very different look so maybe not what you’re going for, but very cool and drama. Good luck!
Jamie says
Love the white trim! Aren’t you worried about things being too cool with all that grey?
YoungHouseLove says
Hey Jamie,
We’re taking things one day at a time, but we have big plans to add in lots of pops of color, so it won’t be all icy and cold in there by the time we’re done. Slow and steady, we’ll get there someday!
xo,
s
Aurora says
Wow! Amazing!! I wasn’t sold on the Grey AT ALL! I guess I had to see it to believe it. I love me some color (My living rm is a sage clr and Bedroom is Tangerine Orange!!) But you have totally changed my mind on the Grey. I LOVE how clean it looks. Gonna show this to my husband. I have a feeling we are going to have a Grey living rm soon!!!
Holly Graff says
Good job guys! My first thought in seeing the finished pics was, why didn’t they paint the perimeter trim around the ceiling and leave the beams themselves to be the darker grey? I think this would reduce the feeling of having a “box lid” plunked down at the top of the room. Did you consider this and decide against it?
YoungHouseLove says
Hey Holly,
Yup, you can scroll back through the comments for our thoughts on that, but we definitely considered it!
xo,
s
Jill Stigs says
Hurry up and paint the beams before your sectional is here! Looks great. IDK about the corner round not getting painted white though. I am guessing when you refinish the floors you’ll go dark and they will be “that 80’s orangey oak” looking. Time will tell though. You guys just keep on keeping on!! Love the gray.
We went with SW Latte and Down Home in our living room (the Latte alone was too light for me and the Down Home was too dark) my sectional is a tan color called cobblestone. I would love to paint with a nice warm gray but I am not the painter. sigh. Oh and to find a color that can stand alone for me that I won’t get sick of right away.
Margaret says
Look at you kids having fun with paint colors! Just goes to show that “bold” doesn’t necessarily mean “overpowering” (In reference to the ceiling beams).
I’m noticing the parquet floor now- and I’m wondering if you guys are digging it? Is that something that you’re going to keep or do you have some plans for that in the future??
Keep up the good work!
Xo
Margaret
YoungHouseLove says
Hey Margaret,
We love that it’s real hardwood (along with a lot of the rest of the house) so we have big plans to refinish it down the line (just to eliminate splinters and even out the color- maybe make it deeper/richer while we’re at it).
xo,
s
Luisa says
Hi Guys –
Love the wall color. In terms of the quarter-round, I have had a lot of discussions about this with our floor guy and design-(vintage)builders in the area. We live in an old craftsman home with dark stained built-ins and baseboards and old (lighter) oak floors. The quarter round was stained the color of the floors instead of the color of the baseboards which took away from the length of the baseboards. Many folks agreed that the quarter round should match the baseboards and are really considered part of the baseboards, and not part of the floors. It might add more length and continuity to your baseboards if you paint them white … just an idea …
Can’t wait to see how your room evolves …
Cheers
YoungHouseLove says
Hey Luisa,
We actually agree with that argument but it came down to cohesion for us. As we mentioned a few comments back, the adjoined (and also gray) hallway has wood quart round, so we chose to keep the look the same in the living room since they open to each other (and didn’t want one to have it one way, and the other area to have it the other way). It’s definitely a personal preference thing though!
xo,
s
Adrianne says
The white trim looks terrific! So happy and cheerful. Your idea to paint the beams gray will look amazing! You guys have the gift of design for sure. I can totally see it with the dark charcoal sectional. It’s going to be a very attention-getting room. Well done you guys!
Diana says
Love the white trim, nice. Not so keen on the gray beams. I would vote to paint the beams the same white as the trim for continuity and paint the ceiling in between the beams the darker gray color. I think it would really pop and make the room look very sophisticated. Carry on!
Meredith says
The grey looks great, but the trim painting sounds miserable. I have to repaint the trim in my entire house, not a project I’m looking forward to.
I have a question for you guys that’s unrelated to painting. In my new house we have ceiling fans in the three bedrooms. The master has vaulted ceilings so we’ll be keeping that one, but I plan to remove the fans in the other two bedrooms. I’m debating what kind of light to replace them with. We’re bringing in an electrician soon to remove the fans and install the new light. Do you have any suggestions?
P.S. I’m amazed by the patience you have with reader questions. You guys are seriously the best! I look forward to reading your blog every day and am so impressed that you’re able to keep blogging while raising a baby, working on your house, and juggling the other side projects.
YoungHouseLove says
Hey Meredith,
Hmm, when it comes to lighting we just say do whatever you like! We always love pendants and chandeliers from West Elm and a local lighting outlet here in Richmond, so just stalk stores that you like and see what you find! Good luck!
xo,
s
Kim says
The room looks so much more fresh already! It’s amazing what a difference paint can make.
Marci says
I love the room. It looks great!!!
You said in a previous response “Yup, we actually plan to paint the ceiling a half-tone of the Mooshine walls (50% lighter) with the dark gray beams.”
How do you go about getting a half tone of a color for the ceilings? Do you just request it that way and they do the calculation or is it another color on the same swatch?
Also, we have a very open floor plan and vaulted ceilings in our living/dining room area. Would you suggest painting the ceiling the same color or would you do a 50% color like you are planning to do with the moonshine?
YoungHouseLove says
Hey Marci,
Yup, just ask them to add 50% more white so it’s a “watered down” version of the original color. Anyone at the paint counter should know how to do it for you! As for vaulted ceilings, we always recommend keeping the color the exact same, since it’s easier that way. But both can definitely work!
xo,
s
Sheryl J says
Fabulous! And I think the mock-up is the perfect cherry on top. I agree with other commenters about making the ceiling trim like your “crown molding” in white and just staining the actual beams gray. But I know that no matter what you do, it will be amazing.
Shannon says
My goodness! Totally amazing. I love your ideas. The gray is so sophisticated and so beautiful. I never would have thought gray would be beautiful! I love your idea about staining the beams. At first I thought I kind of liked them the way they are now, but compared to the photo-shopped pic. I can see that they don’t work. What are thoughts on light fixtures? Love it all!
YoungHouseLove says
Hey Shannon,
No idea! We just take things one day at a time. When it comes to light fixtures, we usually just buy what we like and put it up (lighting seems pretty “neutral” so we like to mix and match textures and colors and stuff without really worrying if it’ll “match” the room) but we definitely love the idea of a drum shade or pendant in there. Time will tell…
xo,
s
Kristy says
The trim looks fantastic – well done! I originally thought it might be nice to leave the beams as they are, but since the trim is painted now…not so much. But with a dark grey stain (or even with a dark grey paint), I think it’ll look fantastic.
Leah S says
I am sure I just suck at searching, but I have been trying to figure out where you guys bought your yellow and white living space rug. I would love it if you could end my suffering:)
Also, just wanted to say I love your blog…I’m addicted! My whole main floor is actually different hues of grey…it’s a tough one to get right! I really like the one you chose. Mine is of the same hue but about 1/2 the tint (I would guess). I have 20ft vaulted cedar ceilings that I just can’t bring myself to paint…living vicariously through you though!
Keep up the great work!;)
YoungHouseLove says
Hey Leah,
It’s from Pottery Barn a while back (called the Moorish Tile Rug). They no longer sell it, but maybe try ebay?
xo,
s
Lauren says
Ugh, this is a project my husband and I have been putting off. Our whole house has nice, white trim except for the basement that has dark wood trim/doors. I can foresee myself having a similar (very mature) temper tantrum when we finally tackle this project :-)
I’m sure you’re thrilled that it’s finished….looking forward to seeing everything else come together!
sarah@realestatestyle says
i think the gray beams will be fabulous!!
emily - thisisveryimportant says
whoa. i was cruising two of my favorite blogs today (you and designsponge) and did a double take. at first, i thought this was your before! but no! it’s yet *another* beams n’ ceiling fans makeover :). thought ya’ll might like the link if ya hadn’t seen it yet. http://www.designspongeonline.com/2011/01/before-after-careys-home-redesign.html
YoungHouseLove says
Hey Emily,
Haha, too funny! Love that after! Thanks for sharing!
xo,
s
Steph @ Birdhouse Family says
The gray looks amazing with the white trim! Based on the photoshopped image, I think the gray would look amazing too, although it would be great if you could stain them so that some of the wood still shows through.
Lauren says
Any chance you could take a video next time you are painting the trim (without taping) to demonstrate? I went out and bought that brush that you suggested in an earlier post, but still wasn’t able to paint without taping. I would love to see what I am doing wrong!
YoungHouseLove says
Hey Lauren,
Sure, we’ll do our best to remember next time! You can search “panting trim” on google or youtube to find a video close-up of someone doing it (which is exactly how I do it, I don’t hold the brush in a unique or special way or anything) in the meantime. Hope it helps!
xo,
s
Aimee says
Hey guys. Love the new look of this room. Do you guys not like ceiling fans? I was just wondering because I’m from SC and here they are pretty much a necessity, especially in the heat of summer. I just noticed that you have removed all of them from your old house. Just wondering :)
Aimee
YoungHouseLove says
Hey Aimee,
We’re definitely not anti-fan people by any means (we had one in our den and sunroom at the old house and plan to keep one in our sunroom here. We’re just opposed to the ones in our living room since they’re extremely awkwardly placed (not centered over the seating area or anything) and the room only has one tiny light fixture in the room (the ceiling pendant over the game table) so we’d rather use our central air and open the sliders for ventilation when we need it instead of having all these things hanging from the ceiling and no overhead lights! You can scroll back for more info about that in other comments (we chatted about it a few times today). Hope it helps!
xo,
s
Bethany says
I think it looks great!! and i am SOO glad you’re not painting the beams the same color. they bring in so much charm and i think the darker gray will look great. you guys sure are ambitious, keep it up :)
Beth
Tara says
We just started painting the trim in what is going to be a nursery yesterday and the thought of 4 coats makes me want to cry! How can an 8′ x 10′ room have so much detail?!?!
Sammy says
Love the white trim! I didn’t expect it to be much of a difference, but… WOW!
And your beam-painting-idea is great, too. It’s like the modern and airy version of the traditional Fachwerk-buidings over here in Germany:
http://www.denkmalpflege-hessen.de/LFDH4_DDM_2000-12/G-052.jpg
(isn’t this old house awesome? And the tiny hobbit-door?)
YoungHouseLove says
Hey Sammy,
Love that link and that gray painted trim against the white! Thanks for sharing.
xo,
s
Jessica says
I don’t believe anyone has asked you this (so sorry if they have) but are any of the ceilings in your home “popcorn” ceilings? I would love to paint all the ceilings in our home but I’ve been googling how to remove them and it DOES NOT LOOK FUN!
YoungHouseLove says
Hey Jessica,
Nope, flat ceilings seem to be standard for 50’s and 60’s ranches in our area, which we’re definitely thankful for! You can definitely DIY popcorn removal (just be sure there’s no asbestos in yours first!) though, so good luck!
xo,
s
Jess says
Jessica – We have popcorn ceilings in our 1966 home and wanted to remove them during some other remodeling projects… before you get too far into the process, make sure your popcorn ceilings have been painted on. Those are fairly easy to scrape off. Unfortunately ours are actual PLASTER which is horribly hard to get off and a real pain to work with. We ended up just repainting them a very bright white and now I don’t notice them! Not the ideal situation, but at least we’re not still breathing plaster!
Jenna says
The deeper gray beams will look great!! But then again I am a sucker for yellow and gray since they are going to be my wedding colors this summer. :)
Loving seeing all of your renos!
Akemi S. says
Looks great, so crisp and bright! P.S. Love the victory shot, heh heh.
Jennifer says
Looking better! I had imagined the beams to be white, so the grey idea threw me off. I think it’ll be neat w/e type of grey you choose :)
Sabrina says
I love the beams the way they are. I think it adds a real warmth to the room that the mock up beams lack. Again, it’s Photoshop so maybe my vision isn’t accurate. But I love the wood beams nonetheless!
The room looks fabulous!
Amanda S. says
I’m sure you’ve got all kinds of ideas for that ceiling, but I happened to be watching my DVR at lunch today — Sarah’s House on HGTV! Love that show. Anyhoo… it was this episode:
http://www.hgtv.ca/blog/archive/2010/04/14/discuss-sarah-s-house-episode-6-the-living-room.aspx
Have you considered something like that for the ceiling? :)
Whatever you pick, I’m sure it will be fantastic — can’t wait to see it. It’s amazing what a huge difference paint can make!
YoungHouseLove says
Hey Amanda,
That’s a gorgeous ceiling! Since ours is just standard height and isn’t peaked though, we’d love to work with what we have and try something new (hence the decision not to paint the beams white, since we did that in our last den). Here’s hoping it’s a risk that pays off!
xo,
s
Rachel says
Whew!!! I just finished reading your blog from September ’07 to January ’11. Thats alot of reading. I stumbled across your blog looking for ideas for my master bedroom and I was in love,er,like with your design style and get’er’done attitude. Before my husband joined the Air Force in ’09, we rented from my parents.(2006-2009) It was a manufactured home from the 70’s(wood paneling and all) and still looked like it was stuck in that decade. When we tackled trying to pull it into this millenium I thought that the end would never be in site.Three years later the house looked completely different,not by any means as great as your house,but I was pretty proud of myself. Thanks for all the inspiration. I look foward to reading about all the amazing renovations you guys will be tackling in the future.
Carol S says
geez, you guys get a lot of comments these days!? Good for you! It’s been awhile since I’ve commented, sorry about that. Love your new home, congrats on the trim. My sis in law white washed their dark beams…in their home…looked great. I’d be curious to see a photoshop version of a white wash on your ceiling…Good luck whatever you do.
April says
First of all, I absolutely love love love your blog! Thank you for all the inspirations and great ideas! I’m also in the process of painting my kitchen/living room a charcoal color and light grey color. I would love to tackle the project of painting my trim/cabinets a white color to update our house. It was built in 2005 and all the wood work is a honey colored oak. Not the prettiest with grey. Since I’ve never painted woodwork before what would be the best way to go about doing this? Would I need to sand it so that the primer and paint stick to it to prevent chipping? Thanks for your help!
YoungHouseLove says
Hey April,
Just follow the pro tips that we outline in this post (oil-based primer, then latex paint). You shouldn’t need to sand unless your trim is insanely glossy (if it’s just a bit shiny the primer should bond really well to it without that step). Hope it helps!
xo,
s