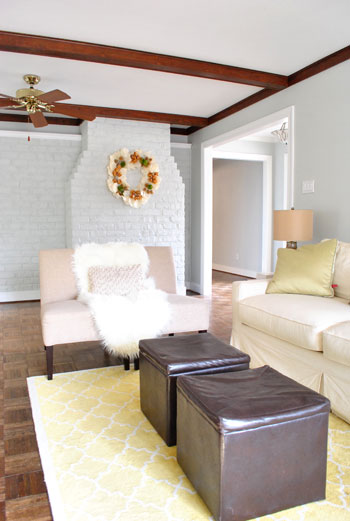
Glad that’s out of the way. Painting the trim was as long and tedious of a process as we expected. Maybe more-so actually, but it’s done! Wahoooo! And it feels pretty darn good. Seriously, there was more than one happy dance (one on Friday night when we finished, and another one in the morning when we saw the room in the light). What is it about certain annoying home improvement jobs that make you want to ugly-cry while doing them but happy-cry when you’re done? Talk about roller-coaster emotions. In the end, we never regret them, and we’re happy we got ‘er done. We’re just not ready to “do them all over again” the next day or anything. Haha. Anyway, it’s looking pretty good. Here’s the view in the living room now (ignore the beams, we’ll get to that later):
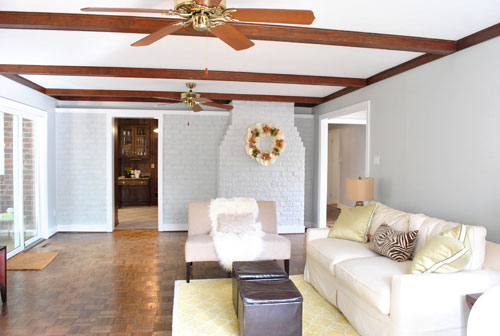
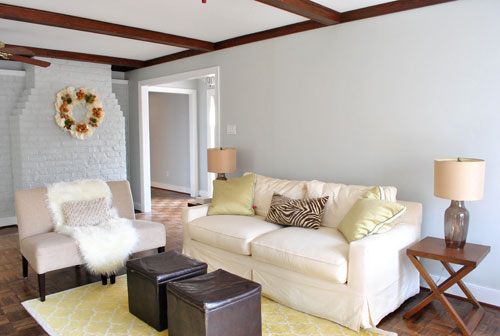
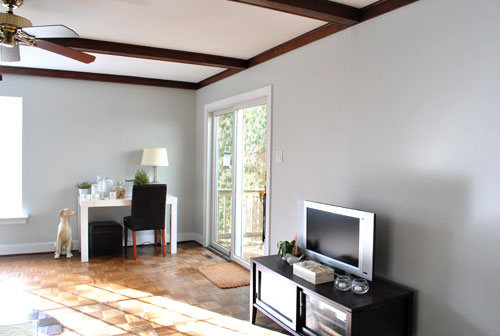
As far as the process went, experts recommend using oil-based primer to block potential bleed-through when it comes to painting wood trim (followed by latex paint). We threw caution into the wind and went straight to white semi-gloss latex no-VOC paint (Olympic Premium from Lowe’s). I had gotten some gray wall paint on the trim a few days back when we tackled that project, and it seemed to cover well without any signs of bleed through. So I went for it. Could have been a terrible plan. Could have resulted in having to go back and repaint all the trim with primer if I did see some bleed-through. And possibly pulling 60-80% of my hair out as a result. But it didn’t! Oh happy day.
So we saved the nastiness of working with oil-based primer and all the VOCs that come with it. Call it a baby-and-eco-friendly risk that happened to pay off. If it hadn’t we would have sought out the lowest VOC stainblocking primer that we could find, but it was pretty sweet that it didn’t come to that. That’s about where the words “pretty sweet” stop with regards to this project. We vowed to keep it real with you guys, so although we’re eternal optimists who generally love nearly every project that we tackle (even the ones that don’t work), we promised to tell you if something sucked. And painting the trim totally did.
It wasn’t that it was very hard (I used this brush, which I swear by for “staying in the lines” and going a lot faster that I used to move with a traditional long-handed brush). It was just that it took for.ever. I started at around 10am on Friday and went it alone until about 3pm (while Clara took her morning nap and then John watched her and tended the blog), then around 3, out of sheer desperation, I asked John to help while Clara was taking her afternoon nap (he traditionally rebuffs detail work since he’s the “big picture” guy who rolls while I cut in, so he claims he has less control when it comes to fine motor skills with a brush). At that point I was on coat #2 though, so I just asked him to go down the middle of the trim and baseboards with the second coat while I followed him and added a second coat to the top and bottom of the baseboards and trim (which requires a bit more control since that’s where the brush can meet the floor or the wall).
By coat number three it was around 7pm (thanks to a lot of blog, Clara, and food breaks among other things) and that’s when we realized that it wasn’t going to be a three-coat process like we thought. It was going to take four full coats to cover that dark dark trim. Boo to the hoo. There may have been a temper tantrum (not by Clara) but no actual tears were shed (which I consider to be a semi-mature response to such devastating news). But we pressed on. And it was actually past midnight when we finally finished (and snapped this victory shot of our paintbrushes “toasting” in front of the microwave clock). Klassy, right?
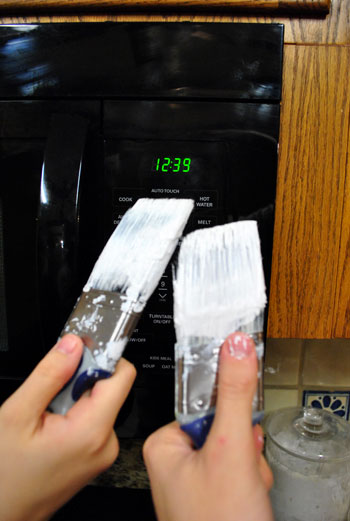
If we had used oil-based primer it definitely would have only been a 1-2 coat process (after the coat of primer was applied, which would add up to 2-3 total applications) so it may have taken us until 5 to 7pm instead of 12:30 in the morning. But those 1-2 extra coats were worth it to us in exchange for a completely zero VOC result. Even if it meant dragging a little bit the next day. So for those who are looking for the expert recommendation for tackling this project, use oil-based primer applied with a brush followed by 1-2 coats of latex gloss or semi-gloss paint also applied with a brush (and tape things off if you like to work that way). But if you wanna know how we did it, I used my trusty short handled brush and we applied 4 coats of semi-gloss latex paint (without taping off, since over time I’ve gotten nice and steady without tape). We actually painted all of the wood trim in our first house (including the stuff in the bathroom and kitchen) using this method (no sanding or primer) and we luckily didn’t have any chipping or bleed-through issues after 4+ years there. Fingers crossed for the same luck here!
As for the paint choice, we used the off-the-shelf white stuff that comes without any tint from Olympic Premium called “Base 2” (since “Base 1” is also known as “Ultra White,” and we wanted something crisp and white but not crazy white with a glowing blue tint to it). We love the color, and plan to use it for the rest of the trim in the house. When we finally work up the energy to tackle a project like that again in a few years. Har har.
Oh and the beams. We promised more details about those. We left them au naturale to be 100% sure that we don’t prefer them that way (we don’t). But now that the trim is all painted, we’ve decided that we definitely want to stain or paint them a deeper gray color for some richness and dimension. And of course those fans have to go. So for a vague idea of what that might look like, picture this…
… looking something like this:
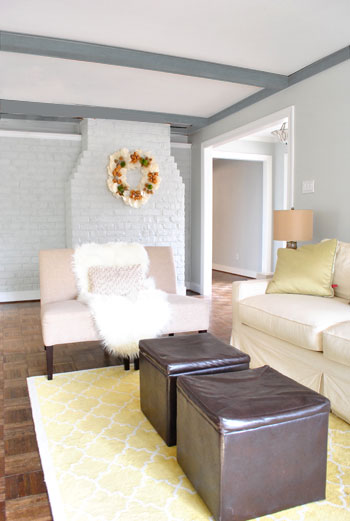
They definitely would have looked gorgeous in white just like the trim, but we want to take a risk and do something a little unexpected. We love that it’ll hopefully be just the right amount of drama without looking too heavy (we have standard 8-foot tall ceilings so we didn’t want them to feel like they’re closing in on you). But we think it’ll have a nice not-too-top-heavy look in the end, especially since we’ll be bringing in a large charcoal sectional to ground the room and add balance. Then we can start layering in some bold colors in the curtains, art, rug, accessories, etc. Should be interesting.
And why not end with a nice little flash-back to what the space looked like a little over a month ago when we moved in?
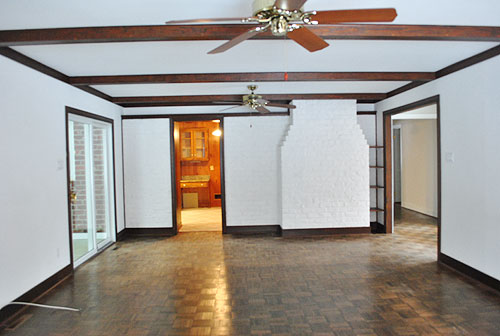
Oh the memories. Change is good.

Danette says
Hi guys, wow, you have been busy! Looking good, but if there are teams here, I am team “paint the beams white”! (in reference to the mirror teams youhad going on) Goodluck with it though!
Stacey P says
Wow! I love how updated the room looks already and think your idea to stain the beams is going to be absolutely stunning!!! Way to go!!!
Beverly says
Wow – the room looks great. I have to ask – where did you get the X-legged side table? I don’t remember it in your old house, but I love it!!
YoungHouseLove says
Hey Beverly,
Those used to be in our living room of the old house (with the white sofa and yellow rug) but isn’t it funny how you notice different things in different spaces? They’re from Target (the Victoria Hagan collection). Hope it helps!
xo,
s
Adam says
Wow, what a transformation! I hate painting trim also, but I have to share my experience with latex primer. About a year ago I spent an entire month stripping, sanding, and repainting a kitchen worth of cabinet doors. I used a high quality latex primer, two coats of a high quality latex paint, and for added kitchen durability, two coats of water based polyurethane. I was thrilled with the results, especially how durable of a finish the polyurethane gave.
After our extremely hot & dry Ohio summer, I noticed how a few of the doors seemed to develop “spots” where the paint began to discolor. After about a year, the “spots” have become more noticeable and taken the distinct shape of knots from the wood. Even though the wood in the cabinets was 30+ years old, I think spots bled through the paint because I stripped off the original varnish before painting. This gave me a much smoother finish, but obviously opened up the pores of the wood. I learned my lesson and now I always stick to the smelly primer. I’m sure the latex primer is adequate for wood that is already sealed (like your trim), but on any unsealed wood I use oil base.
YoungHouseLove says
Hey Adam,
Ugh, so sorry to hear about your wood bleed debacle! We will definitely still be using primer when it comes to painting our kitchen cabinets (we painted the trim of our last house without bleed through using the latex-paint-only method, but for the kitchen cabs we used oil-based primer). It was gross and stinky, but it worked like a charm!
xo,
s
Ilana says
Did you think about using AFM Safecoat- Trim and Door Enamel? Here’s the description-
Trim and Door Enamel – Semi-Gloss
A unique, highly durable coating for high abuse areas such as trim, baseboards, chair rails and doors. Available in eggshell and semi-gloss finishes. Safecoat is fully tintable using zero VOC tints.
SCS CERTIFIED – LEED QUALIFIED
http://www.afmsafecoat.com/products.php?page=1
I’m intrigued by this product and wondering if you considered it.
YoungHouseLove says
Hey Ilana,
Yes, we love Safecoat! We just wanted to save the 30-ish dollars and the brush washing so we went for the more coats with latex paint approach (we used the same approach in our last house and four years later it still looked great!).
xo,
s
DONNA says
Your living room looks WONDERFUL!!! Can’t wait to see what’s next!
Gretchen says
I never would have thought of painting the beams something other than white. I’ll be interested in seeing how it looks.
Coleen says
The room is looking great! I was betting that you’d go with white beams and color on the ceiling (since you enjoyed the color on the ceiling in Clara’s room at the old house so much). Can’t wait to see how the whole room turns out!
Taylor says
This looks beautiful! And I am so excited to check out the dark grey beams whenever you get to them.
Can you pretty please bring back the Show All comment button? They’re nicely threaded now, but it’s still easier to search for a specific word rather than scroll through each page looking for a response when you guys mention it’s already been answered!
YoungHouseLove says
Hey Taylor,
We’re doing our best! It took us longer to get threaded comments to work than painting that trim (it saves me hours of work each day since I don’t have to post date every single response so it’s near the question that’s asked) and the “show all” feature was crashing our site before and after we added them, so we had to take it down. Here’s hoping we can bring it back soon once we’ve solved the issue! We just figure scrolling back through pages of comments is better than going to a site that keeps crashing or doesn’t load at all!
xo,
s
Brenda says
No rush, but I’m dying to see the pillows you recently purchased for your bedroom. Thanks!
YoungHouseLove says
Hey Brenda,
We owe those pics to you guys for sure! Soon!
xo,
s
Jana says
Why don’t you paint the beams a darker color? I mean a really dark color, like charcoal or dark taupe or maybe even Dark Jungle Green (Hex: #1A2421) (RGB: 26, 36, 33)?
It would add a lot of drama and – well, at new years eve you promised yourself to go with bolder colors, didn’t you?
Alyssa @ Perpetual Blind Date says
The beams will look gorgeous in a dark grey! I don’t know how you did that but I can’t wait to see what you end up doing with it!
Julie Gilliland says
Love the room gray. Looks so modern and fresh. How about painting the beams black? I can’t tell if any of your other furniture is black, but it looks like the chair might be. Then you can add black accents.. Just an idea..
Ellen says
Looks great, and I like the way the mock-up of the charcoal beams looks. Much more interesting than white would be. Team Charcoal Beams! :)
leah loo says
Your room looks so great – well done you! The gray is so, well – chic! I did not read every one of the previous comments, and I don’t know if anyone mentioned this previously, but… if you are going for drama, have you considered painting the ceiling itself a darker gray, and painting the beams white to match all of the other trim in the room? I think you would get a LOT of drama with that contrast, and the architectural aspect of the beams would really pop against the darker ground of the ceiling. Just a thought… have fun – can’t wait to see what happens next!
YoungHouseLove says
Hey Leah Loo,
Yup, we considered a ton of options but since the room only has 8ft ceilings we didn’t want it to feel too closed in and heavy in there. By keeping the ceiling color light and just accenting the beams we think it’ll be the perfect amount of drama for us. Who knows where we’ll end up though!
xo,
s
Lauren says
It looks great! I think it’ll look even more fantastic with the beams are painted. Can’t wait to see more!
Twila says
SO on the beams painted pic (the last one pic) the ceiling fan is gone are you planning on removing then if if so what will be the replacement???
YoungHouseLove says
Hey Twila,
Yup those are outta here (such a weird placement – and they don’t have lights on them at all). We’re not sure what we’ll replace things with (although we’re semi-sure we won’t hang fixtures in those odd places – but we might add something over the seating area). Time will tell…
xo,
s
Candice says
Your trim looks great. What is it about white paint that makes everything look bright and shiny?
My twin sister and I spent Sunday afternoon on our hands and knees painting the new shoe molding and baseboards. We just had hardwood floors installed and we waited a week before doing the painting. So we can “feel your pain”. We are tons older than you two kids and our knees ain’t what they used to be. Oh yes, we also painted our laundry for the seventh (yes, we keep count)time. We paint it and hate it and paint it and hate it……so we really went out on a limb and painted it antique white like the cabinets and baseboards. Keep up the good work. I can’t wait to read your blog every day to what you have accomplished.
Liz says
Quick website question – Has anything changed with the location that you store/host the site photos in the last few hours? I’ve never had any issues viewing your site and it worked perfectly fine this morning, but now I’m getting the dreaded red x where all your pictures should be. Other sites seem to be working ok. I don’t see any other complaints in these comments, so maybe it’s just me (which would be a huge bummer because I’m used to wasting a lot of time on your site durring the day! haha).
YoungHouseLove says
Hey Liz,
Oh no! You’re the first to mention that issue. Maybe try viewing our site at home to see if your office has suddenly blocked our pics? They’ve been hosted in the same place for the past 2 years or so, so that shouldn’t be an issue unless they were down for maintenance for a minute or something when you happened to check. Hope things work out!
xo,
s
sue olson says
I have dark trim in my house too which I do love but am starting to like the white trim too. It looks so crisp and clean Have you ever seen rooms where the baseboards are white and the window trim is still dark or is that weird.
YoungHouseLove says
Hey Sue,
We don’t recall ever seeing that look. Usually you pick one color for all trim (around windows/baseboards/doorways, etc). Hope it helps!
xo,
s
Jacqui says
Ahh I know your pain! I am in the process of painting all the dark-stained wood trim in my 2 bedroom house white. I’m about halfway there – it’s a slow process as I only tackle a room every few weeks after summoning up the mental energy to do it! But once it’s done it really makes such a huge difference, the rooms look bigger even with just a coat of primer :)
Erin says
Painting trim is so tedious, but isn’t it rewarding? I’ve been slowly painting out the dark-stained trim in our house over the past year. So much cleaner of a look with it painted out! :) I love your idea of staining your beams gray – the photo makes it look dreamy! I’m anxious to see how it turns out – we have similar beams in our house (we have left them stained for now.) Is your ceiling in the room pitched at all? Ours is slightly pitched/vaulted toward the center of the house – it’s hard to tell in your pictures whether it’s the angle of the photo or if the roof is pitched.
YoungHouseLove says
Hey Erin,
Our ceiling is totally flat, but a slightly pitched or vaulted one sounds gorgeous! Have fun!
xo,
s
Cynthia says
Oh Yes!!!!!!!! Perfecto!!!! And the grey beams will be the bomb:) Way to go you guys for me being so innovative!!!!
I would of never thought of that:) What a wow factor!!!!
leah says
So what are your plans for the ceiling beams I am dying to know? I love the difference the white trim makes. It looks awesome.
YoungHouseLove says
Hey Leah,
The last few paragraphs of this post are all about the beams and our plans (complete with pics). Hope it helps!
xo,
s
Nichole Corley says
Love your blog and look forward to seeing all you accomplsh at your new house love! I managed a paint store back in the day, and you are correct in stating that the pros would tell you to prime. But, next time you take a short cut, try this: add just a touch of colorant to that base. Ask to have just a bit of umber added to your paint. It justs cuts the edge off the white and will help you get a little better coverage.
I’m not saying you could have gotten away with less coats without the primer, but it does help. That pure white base was made to have colorant added to it. That little bit of colorant can help with the “streaking” that I bet contributed to your needing that extra coat.
The beams will be more likely to bleed without primer BTW, so be careful. Might not matter as much with the dark gray vs. white. I like both and even the dark wood if you balance the wood with more dark woods to balance it in the room. But, I don’t think that is YHL style, so I say go for it!
It’s only paint. :)
Dion says
hi I’ve been following your blog for about a month and slowly going through your archive. I especially like all your little tips, the spackle a couple of weeks ago and this time the paintbrush. keep up your good work!
Julie says
I do NOT envy you that job, but it looks fantastic! I think that when the beams are done it will really look fresh and airy! I do have a Q about not taping… I’m also the cutter-inner and my husband the roller… We’re getting ready to paint our nursery, and while I think I could cut in without the tape, I worry about getting splatters from the rolling. Have you ever had that problem? If not, how do you avoid it? Thanks!
YoungHouseLove says
Hey Julie,
Never had that problem- not sure if it’s John application technique (not too much pressure, not too much paint) or our roller choice (high quality Purdy roller for flat surfaces). That’s all we can think of that might combat splatter. Hope it helps!
xo,
s
michelle says
trim looks great, have you guys thought about moving your sofa closer to the tv, and putting a sofa table behind the sofa? just a thought, love all you have done!
YoungHouseLove says
Hey Michelle,
Yup! The seating area is definitely going to evolve. As we mentioned in this post we’re actually going to be bringing in a charcoal sectional, which we plan to accent with a sofa table behind it (for a few lamps, storage, etc). Getting closer to the TV (and eventually upgrading to a larger media unit) will definitely fit into our large living area better. We’re just taking it one day at a time!
xo,
s
karen says
Looks so fresh! I really like your idea of painting the beams that grey colour. White would be stunning…but it would also be the obvious.
Hey..how come you didn’t paint the quarter-rounds? I think that would add height to your mouldings?
YoungHouseLove says
Hey Karen,
The adjoined hallway (also painted with Moonshine) didn’t have painted quarter rounds, so we decided to keep things cohesive and leave them au naturale.
xo,
s
Liz says
I painted my trim too this weekend! Saturday and Sunday. Saturday was spent painting around doors and windows and Sunday was the base boards. I also threw a mini temper tantrum trying to hang my Besta wall shelf yesterday (from Ikea) LOL
Wendy says
I love it! I can’t believe what a difference the white trim makes. I think the beams will look great with a dark grey. I could totally relate to the tedium of painting the trim. I’m in the process of painting the trim in our great room. I only have nine windows and three pocket doors to go…Ugh! I also decided to forgo the oil-based primer and instead opted for the Behr Ultra Latex with built-in primer. It’s still taking three coats. I hope to be done by the end of the year! :)
Megan says
What’s your opinion on painting doors? Do you treat them like walls or like trim when it comes to finish? Also how to go about best painting a door with detailing (recessed parts etc) Do you take the door off the hinges to paint it?
Looking great guys!
YoungHouseLove says
Hey Megan,
We usually treat them just like trim- white semi gloss paint. Although lately we’ve been loving dramatic door colors, like glossy charcoal or navy! We paint them in place with a roller and brush (for those details like around the knob or the hinge). You can tape those areas off if you’re worried about staying in the lines. Good luck!
xo,
s
Megan says
Thanks Sherry! I also noticed that you chose a different paint than usual for your trim this time, I thought you generally recommended BM Decorators White? I ask because I just went out and bought that one for all the trim I am painting and want to make sure that it’s still a good choice!
YoungHouseLove says
Hey Megan,
We love that color! We just went with something cheap and off the shelf this time. But Decorators White is still our favorite trim color (and door color) ever! The stuff we got is just no-VOC (and actually pretty similar, which we’re very thankful for).
xo,
s
Genevieve says
Those beams have GOT to GO! Trim looks awesome though. I feel your painting pain. We tackled our kids cubby over the weekend. Looks so much better but sometimes painting sucks.
Tarnya Cook says
If the beams turn out anything like they look in the photoshop version they will be fabulous.
xxx
netty says
The place looks AWESOME!!! I do have one question. How were you able to create the picture with the gray colored beams? I think that would be REALLY helpful in creating a look virtually before actually committing to it in real life to see if one truly does like it.
Thank you so much for any tips you can give along those lines :)
YoungHouseLove says
Hey Netty,
We used Photoshop, which is also the program that I use to whip up mood boards and put my face on celebrities bodies. Haha. It’s not too tough to use once you learn the basics. Hope it helps!
xo,
s
Anne says
Sherry,
I really got a kick out of your trim painting story. You see, about a year ago, I had written and asked you and John what to do to paint the dark trim in my daughter and son-in-law’s 70’s brick rancher (I had convinced them to do this to update their home, and I even volunteered to do the painting for them!) Well, your answer was that you never have used a primer but “always just use white latex paint, with no problems.”
However, I had read about using an oil based primer to prevent bleed through and was worried about skipping that step, even though the trim was being sanded before I tackled the painting. So, I planned to go ahead and use an oil based primer. However, my daughter tried some for test purposes and did not like the “thick” look oil based paint gave the woodwork. My husband and I were in the process of having our high ceiling bedroom painted by a professional (we normally do all our own painting), so we asked the painter what she recommended. She recommended Zinsser 123, a water based primer.
I used the Zinsser, and it worked well. I did not have to deal with the oil smell, toxins, etc., but I did have to apply two coats of primer to get rid of bleed through and then one coat of latex. On one set of windows, it actually took three coats of primer (ugh!!).
So, Sherry, it looks like a primer of one kind or another is needed to avoid having to do 4 coats of paint. If I had used an oil base primer, I probably would have done one coat of primer and two coats of paint. With the Zinsser 123, I did two coats of primer and one coat of paint. Just wish you had asked “me” for advice this time, before tackling your trim. We live, work, and learn, don’t we??!! : )
Fondly,
Anne
YoungHouseLove says
Hey Anne,
Yeah, as we mentioned in the post, we figured that using oil-based primer would definitely have eliminated the need for 1-2 of those coats of latex paint, but we wanted to avoid the whole VOC thing, so even though it took us a little longer, we’re really happy with the choice we made! Glad yours came out well in the end too!
xo,
s
Jen F says
So, when we moved into our place, we had trouble with a wall bleeding through. The previous owners had used a dark brown glue on the walls of the dining room, and we painted over it with coat after coat….but 6 months later it started bleeding through. My dad suggested that we shellac the walls, because he didn’t know anything that came through shellac. I believe it is a “natural” product (made from ground up bugs, actually) and after 2 coats of shellac and a few coats of paint….4 years later nothing has come through. Hopefully you don’t have trouble, but if you do, you always know you can paint again!
YoungHouseLove says
Hey Jen F,
Yikes! So sorry to hear about that brown glue that bled through! We’re crossing our fingers that our paint job works out since we used the same latex-only method in our last house and after 4+ years we didn’t have any bleed-through or peeling. Whew. Here’s hoping!
xo,
s
Jessica P. says
Love the gray, love the white trim. But guys, that brown quarter round HAS to go! Paint it white!
YoungHouseLove says
Hey Jessica P,
Feel free to scroll back in the comments for more info, but we intentionally left it au naturale since the quarter round in the adjoining gray hallway is also wood toned. When we refinish all the floors we’ll stain it to match (just like we did in our last house). We actually love the expansive and cohesive look! But it’s totally a personal preference thing.
xo,
s
mribaro says
This place is looking more and more YOU :) I like watching the process.
liz @ designing domesticity says
Love it. Love the beams! Great color choice, as per usual! liz
Melissa says
Looks great! Grey paint colors are so tricky, I’ve been surprised by their metamorphosis in different light so many times, but your choice is looking lovely! Not to imply that your room isn’t looking fantastic, but from being in a similar state in several rooms in my house I have to ask: does it drive you crazy when you’re slowly pulling a new room together with old & new stuff and you have to deal with the “off”-ness of the total color scheme until you can get all your pieces in place? Maybe I’m just a color nut… Anyway – looking good! (I’m on team Grey Beams, btw)
YoungHouseLove says
Hey Melissa,
Nah, but it used to. In our first house we scurried like crazy sometimes (especially if friends and family were visiting- we’d pull painting all nighters and buy a lot of items all at once, which always hurt a bit). Now we’ve learned that houses evolve over time, and rushing them does nothing except leave you with mediocre choices (both when it comes to purchases, paint color pics, etc) so we take our time. We know our family and friends won’t judge us for a slowly evolving house (we’re our hardest critics, everyone who knows us seems to not even care if a room is half done when they visit), so we try to enjoy the journey instead of focusing on the destination. Looking back, watching our house change and grow with us was the most fun part- not the end result!
xo,
s
emma says
my two cents, the beams as a nice charcoal complimentary grey will make the ceiling feel taller than the dark brown and will give it more character than just plain old white with the ceiling. Awesome design choices, you’re inspiring and truthful. so Fun!!!
T @ the peach chablis says
We’re getting ready to tackle the trim in our basement that the previous owners painted a darker green/grey color. Hopefully it doesn’t take 4 coats – but we’re going the same route as you with no oil-based primer, so we’ll see! I also fell in love with the shorty brush, too!
Lynn says
Love that you’re painting the trim white — that’s my
mantra! Have you considered dry brushing the beams in white or gray? I dry brushed the pine paneling in my family room, and it looks terrific. It covered the orange of the paneling but isn’t an intense color. You can do it
quickly. Try it, you might like it. The beams won’t be as obtrusive. If you don’t like it, you can just paint over it.
YoungHouseLove says
Hey Lynn,
Great idea! We’ll have to give it a try among a few other ideas and just see what we like best!
xo,
s
Anne says
Do you like this trim color better than the ready mix white you used in your old house?
YoungHouseLove says
Hey Anne,
Honestly it’s very similar so we love them both. Crisp, clean, not too stark or too yellow. Since they’re both “base coats” they’re made to be pretty classic.
xo,
s
Nicole Semple says
I think the beams would look awesome in gray – Great way to update without being all generic and white.
Mary of ScreenPorches says
John and Sherry,
I like your “stick-with-it-ness” attitude. That’s how you get so many things done. Fabulous job. Your new home is nicely shaping up! I’m excited to see how those beams will turn out. I love the “after” pics that you photo shopped. Gives those beams and your room a fresh updated look.
Kate says
White wash those beams! The changes look great.
Helen says
Congrats on toughing out the tedium of trim work ;) I saw your response to Leah Loo above and wanted to mention, on a related note, that we had some success with beams in or family room. We “freshened up” the white trim and painted the beams to match. Converting the beams from their darker version helped A LOT in such a large space; to make sure they still popped, though, we painted the ceiling using a mix of the wall color (lambswool -a grayish neutral- with white (half/half mixture)) so that it was same color, half the tone. The ceiling was warmed up just enough to make the beams dramatic and give the place a finished look. Just throwing it out there! I certainly know y’all are thorough and well-prepared, so I don’t doubt you’ve considered all options, including that oe. Best of luck! Can’t wait to see what your next steps look like – y’all have great design instincts!