So, remember that microwave that we got a great deal on a couple of months ago? Yeah. Well. We returned it.
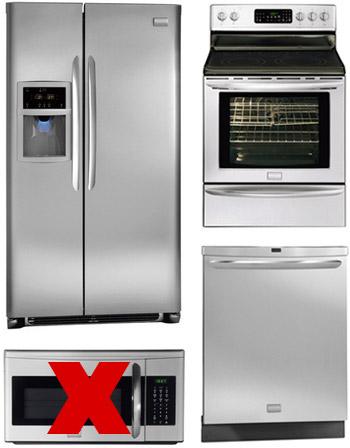
A few of you questioned why we needed “such a big microwave” when we originally posted about it, which did get us thinking that we don’t do all that much microwaving. A bowl of soup here. A bit of reheating/defrosting there. And when we took down the kitchen’s original black over-the-range microwave (which was just as wide as our oven – 30 whole inches)…
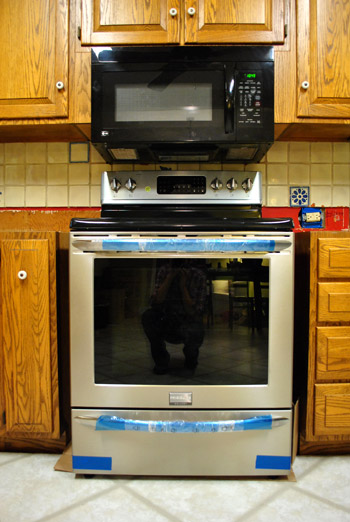
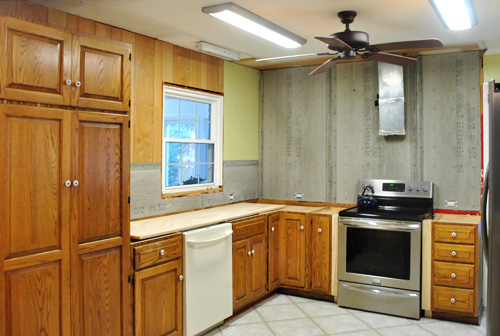
… we realized just how hulking the new 30″ one would look in its new home next to our pantry. See, we had originally planned to build it in there like the one in our first kitchen, but that meant that it would butt up right against the side of the window:
So two weeks ago (after seeing how nice and open the kitchen felt without a lot of those heavy, overbearing upper cabinets)…
… we returned it and bought this much smaller countertop one instead for $84 (it’s 18″ wide). He’s nice and “modestly sized” as Sherry likes to say. I even tossed a tea mug in there for scale:
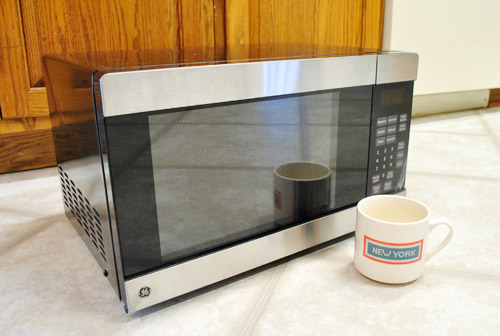
But much like the big original microwave that we got, we never planned for it to live on the countertop. Oh no, we got planz yo. This guy is getting built in…
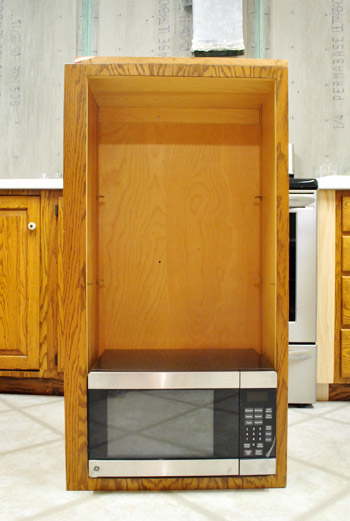
This is one of our old upper cabinets (it hung to the left of our old microwave when it lived above the cooktop) and it just happens to fit the microwave almost perfectly. It’s actually a bit snug around the frame, but the frame is built in around the front edge of the cabinet if that makes sense. So on the inside of the cabinet there’s about two inches of extra space on either side.
The only problem was that:
- the cabinet itself was too tall for its new home next to our pantry (it would hang oddly low as-is)
- it wasn’t deep enough for the microwave to sink back into it and look flush (with extra ventilation room for safety reasons)
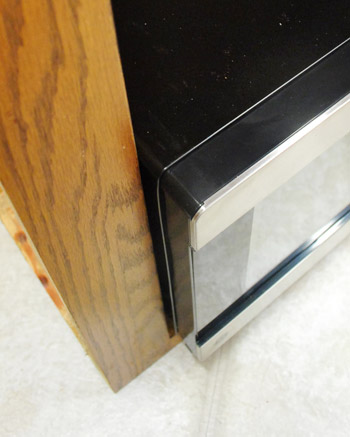
So we had some work to do. We had to adjust the height and depth of the cabinet, then hang it next to the pantry with a new door. That way the infrequently used microwave can be hidden away most of the time and when it’s needed we can open the door and zap our food while allowing the appliance to vent (more on that in a moment). Oh and we already had an electrician add an outlet where the cabinet will hang, so the microwave will have power.
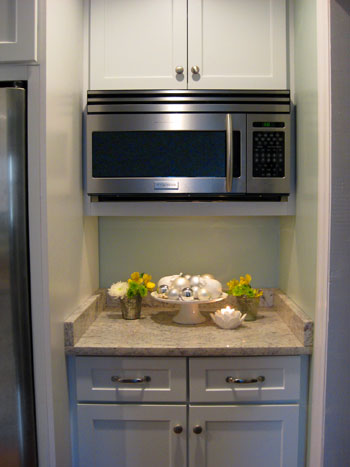
Many custom kitchens actually have built-in microwaves, like this one from here, and this one, from here. So we knew it could look great and actually be really functional (warning: read the paperwork on your microwave to see what type of ventilation it needs – some don’t need any except for the ready-made space under the little legs while some have a vent on the side or back that needs room for aeration, which is something we took into consideration as we went)
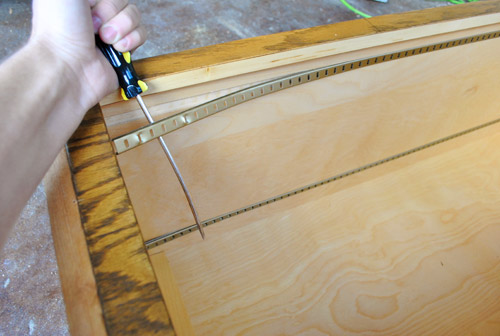
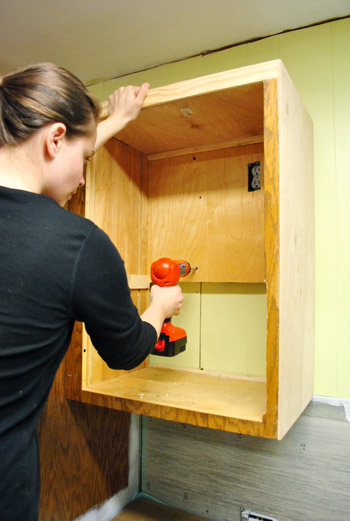
But back to the whole cabinet being too tall issue. First up was chopping that baby down to size. I started by prying out the metal shelf rails. Luckily they came out with almost no effort.
Then I measured, marked, measured again, leveled, measured again, double-checked my marks and leveled one last time…
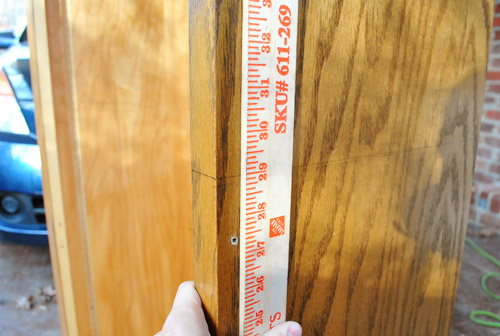
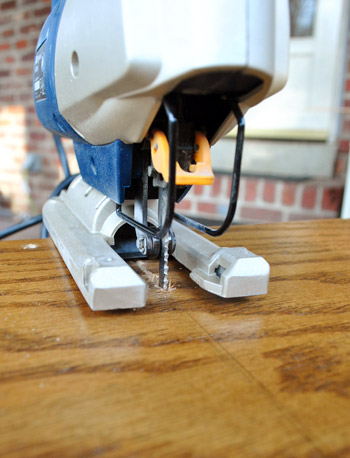
…before taking my jigsaw carefully along the lines I had drawn on each of the three sides.
What I was left with looked like a bad magic act. All that was missing was a lovely assistant chopped into two lovely pieces.
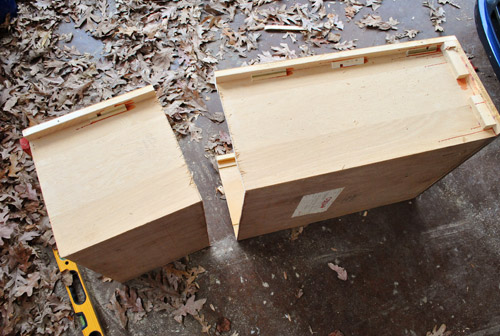
Are you nervous yet? I was. Although I felt a bit better because this was my second time doing this (I tested this method on another spare cabinet that we weren’t reusing first).
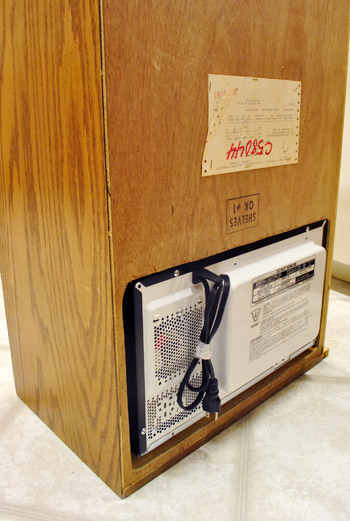
So that big cut started getting me to a better height, but I also had to cut a hole in the back to help with the depth/ventilation plan. Oh, and I had to put a slight notch in the bottom right side of the frame so that the microwave door could swing open more easily (this way we can shimmy the microwave over to the right in the cabinet, which gives the hinges on the left more room to swing so the door can open freely). Not to worry – it will later be concealed by a door.
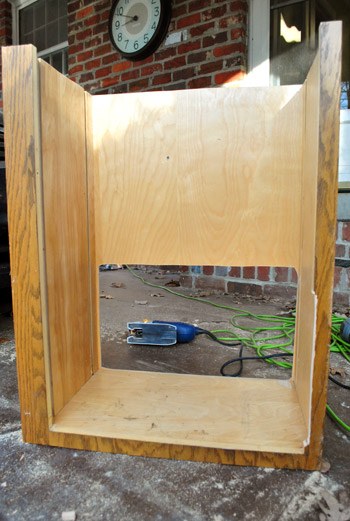
Here’s a shot to show how the microwave stick outs the back – which also helps it vent since there will be a column of “free space” behind the cabinet for aeration all the way up and out the top of the cabinet (more on that a bit later).
Enough looking at its backside. Let’s look at the front. Is this starting to make more sense? Remember once we add a door that small notched out area for the microwave will be concealed.
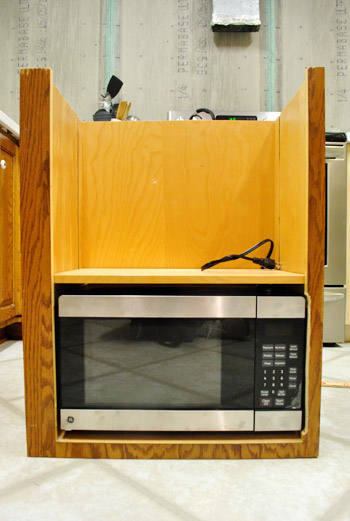
Oh, and I added that shelf above the microwave by nailing in some fixed ledges for the shelf (which we already had) to sit on.
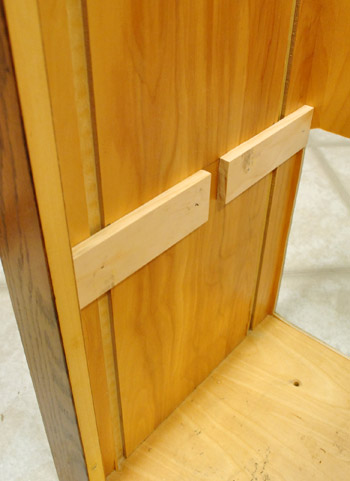
Obviously the cabinet was far from being ready to hang. It needed a top, for one. And it needed some extra support on the back if it was gonna sit away from the wall enough to let the microwave vent out the back.

So we devised a plan, I made a sketch (which I don’t expect anyone other than me to understand) and hit up the hardware store to grab some wood.
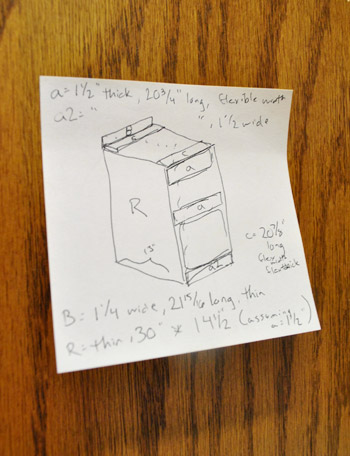
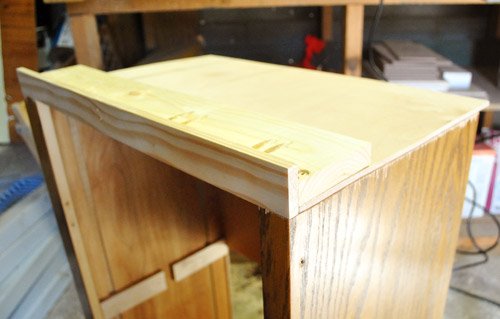
The new top was basically three pieces. A thin piece of plywood as a new top, a thin piece of pine on the front and a scrap piece of 2×4 to hold it all in place. It’s looking a bit rough at the moment, but bear with me…
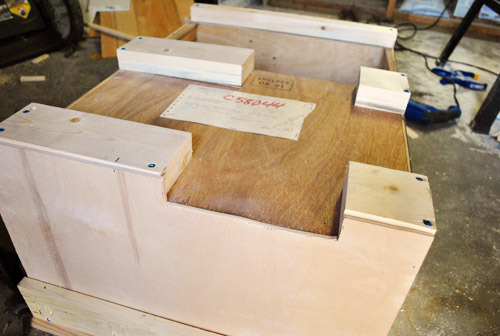
Along the back I screwed in a few blocks of 1 x 4″s doubled-up. This way the cabinet will sit away from the wall a couple of inches and I still have solid wood to screw into when we go to hang the cabinet. Oh, and we cut a wide channel in a couple of the blocks to (broken record alert) help the microwave vent up the back.
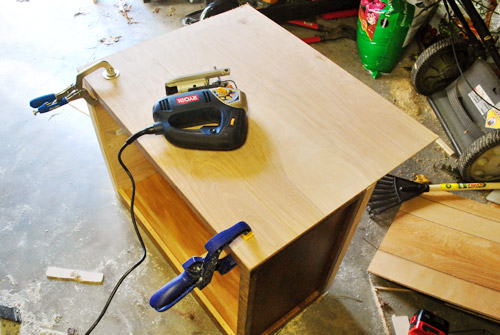
Last but not least was the side. For this I used another thin piece of plywood that I clamped on tight, cut to size, and then nailed in place.
After all that “fun” stuff, it was looking more like this:
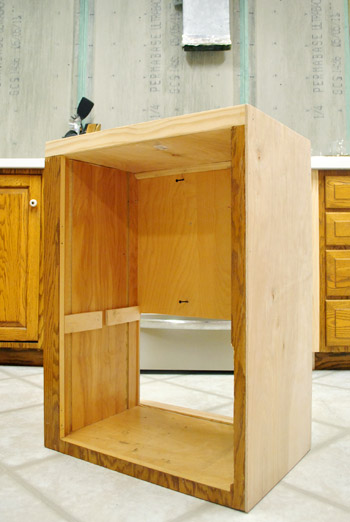
Significantly more cabinet-like if I do say so myself. Especially once it all gets painted the same color with a door in the front and some shiny new hardware.
Then with the help of my lovely assistant (nope, not the one I pretended to cut in half earlier in this post) we hung this Frankstein’d cabinet in place.
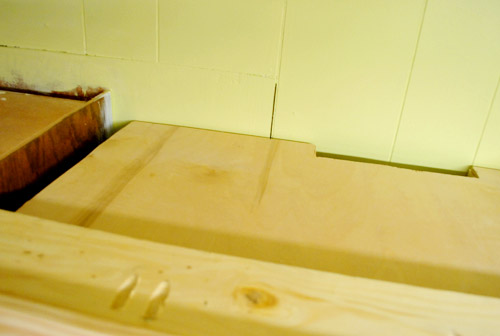
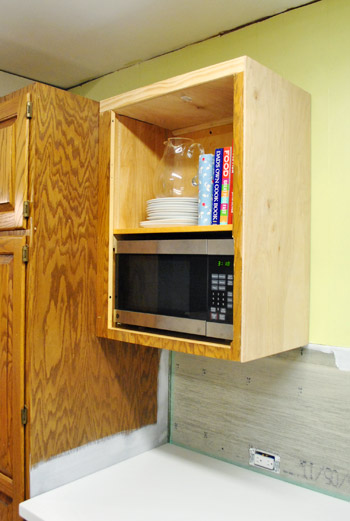
Here’s a view of the top so you get a sense of the venting on both the back and side. I drilled some holes in the left side of the cabinet to take advantage of the gap between it and the pantry (the gap exists because the cabinet frame was wider on that side).
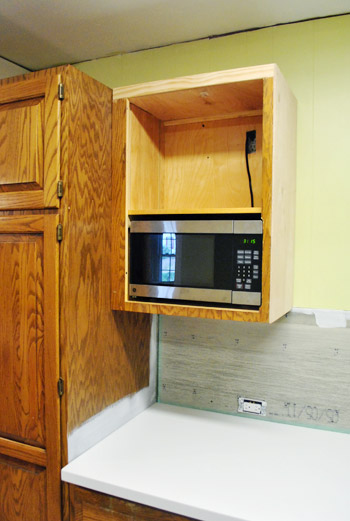
So with cabinet hung, we put the microwave in place and plugged it into the outlet that our electrician put in when he was here about a month ago (more on that here).
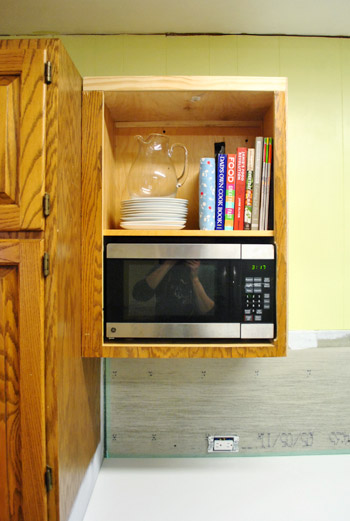
Of course it’ll look better once it has a door on it (and when it’s all painted) but even with the addition of some cookbooks and plates it’s starting to look more presentable. Even if just a little bit.
Update: as for that little routed out area that will only be visible with the door open, many of our cabinets are less than gorgeous when they’re open (picture them stacked high with cookware, blenders, tupperware, and all sorts of other stuff!) so we’re of the “what happens in the cabinets, stays in the cabinets” mindset. If the doors are closed and the kitchen looks good, we’re happy!
This makes us all the more excited to take care of the door situation – which we’ll hopefully be posting about later this week. Until then, allow this terrible photoshopped rendering to demonstrate how the added door will hide the little routed our area for the microwave when it’s closed (it’ll be open whenever the microwave is in use, of course).
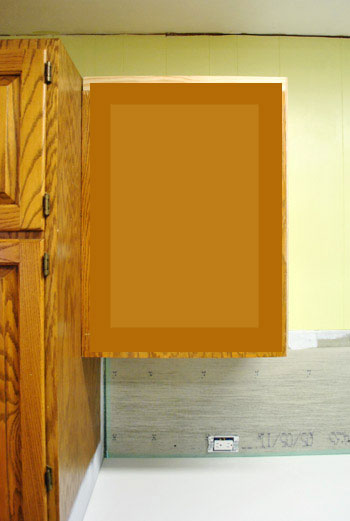
Oh and with this cabinet now hung next to the pantry it leaves us 14″ to the right of it (between the side of the cabinet and the window over the sink). And once the new 12″ deep floating shelves get hung on the oven wall of the kitchen there will also be exactly 14″ between the front of those floating shelves and the right of that window over the sink). So it won’t look crowded, and will actually be nice and balanced. Whew.
Getting the whole cut-down microwave cabinet thing done also makes us excited about our shrinking budget. Not only did we get $255 back for returning the jumbo microwave, we also sold our old over-the-range one on craigslist for $90 (which adds up to $345 back in the ol’ kitchen piggy bank). Plus, we craigslisted our old kitchen table & chairs for $120 and actually sold our old granite counters for $350! If my math is right, that’s $815 back in our pockets… well, it’s actually $731 after we take out $84 for the cost of the new microwave. Still, over seven hundred beans is definitely a welcome “kitchen refund” as we get to that hard “middle part” of the makeover that has us eager to reach some of the bigger changes that we’re slowly but surely inching towards.
No one wants those cabinets painted and the new backsplash hung more than we do, but we’re trying to be realistic about the timeline in here (we originally estimated that we’d be done sometime in January, which we still hope to accomplish). We don’t know how much we’ll have done for the holidays, but at the very least we’ll have our microwave concealed by the time company arrives (oh man, I first typed that as “by the time cabinets arrive” – clearly I’ve been spending too much time in the kitchen). And just to lay it out for anyone wondering what our next steps are, they’re a little unglamorous for a bit longer – and then they should get a lot more exciting:
- cut down all the doors for the cabinets that we added
- add window trim and build a window sill (we had to strip the window over the sink down here)
- add toe kick around all the cabinet bases to make things like the peninsula unified with the rest of the kitchen (we’ll hold off on adding shoe molding until after we do the cork floors later)
- remove all the cabinet doors (after making sure they hang straight and are fitted correctly) and wood putty and sand any gaps/cracks/old hardware holes, etc
- prime everything
- and then we get to paint – yeee haw! (we’re still torn between white and a soft tone like gray-beige, but we’ll share as soon as we’re sure!)
Continuing the list after that step gets us all clammy and overwhelmed, but a new lighting plan, cork floors, and backsplash tile with floating shelves and a built-in range hood are all on the agenda. One cabinet day at a time. What have you guys been doing in the kitchen? Demo? Holiday cooking? Painting? Microwaving?

Kristina says
The notch in the bottom right of the cabinet is really unfortunate. I know you’re adding a door to cover it, but you’ll see it everytime you use the microwave. Will you be able to live with that imperfection FOREVER? It would drive me insane, but to each their own.
Good luck finishing up the whole kitchen!
YoungHouseLove says
Haha, oh yes, we don’t mind at all. John worried that trying to notch a straight line all the way up the cabinet would result in a crooked jacked up looking mess, so we like that it’s a little custom curve around the microwave- and it’s really not noticeable next to a shiny stainless steel appliance, which is definitely what you’ll see first when you swing the door open! From our experience a lot of our cabinets aren’t always gorgeous when they’re open (there are usually hinges or ugly looking items piled inside anyway, so we’re just happy if a kitchen looks nice when the doors are closed, haha).
xo,
s
Gracie says
I was surprised y’all didn’t just take off the outer trim pieces in the front and replace them moving them a little further out so they line up with the lines of the cabinet ‘box’ instead (if that makes sense). That would allow you to move your microwave over and give you a little more space for your hinges without the notch.
YoungHouseLove says
Couldn’t get them off! Haha. That was our first idea but it didn’t work without a lot of force that we worried would compromise the cabinet and we decided that cutting them off was waay too drastic. So it just wasn’t worth it for us since once the door goes on it’ll look seamless! But we can completely appreciate that others would have done things differently! If that notch bothers you I would never suggest living with it. We just have tons o’ cabinets full of tupperware and platters and cooking supplies that’s not too pretty with the doors open, so as long as things look good with the doors closed we’re happy!
xo,
s
Brandi @ His Shabby Her Chic says
Looks terrific! That’s a ton of work you put in, but it definitely paid off!
Can’t wait to see more!!
Jen @ The Decor Scene says
you guys are getting there….your almost there…your almost there! ;) Love the updates!
Thais Bessa says
Our microwave is also petit as we make very limited use of it, like you guys. Have no complains about it.
One question: how are you going to conceal the microwave power cable to connect to the plug behind? Or will it be on display??
x
YoungHouseLove says
The plug will be in the back of the cabinet, so once we have a door on that cabinet it’ll be concealed! We had the same situation in our first kitchen since we had a built in microwave (when you open the cabinet door, you can see the plug on the top shelf).
xo,
s
denise says
Ah…very glad to see that it appears you’ll be doing a regular cabinet door (based on the photoshop representation) rather than one of those lift up doors like you pictured. We have that style for our in-cabinet microwave and I hate it! Although our cabinets are a medium cherry color, the mechanism that allows it to lift up and slide back has marred the finish on the front of the door in several places. Due to that, we rarely close the door, which I hate since looking at the microwave is unappealing. Based on my experience with white/painted cabinets, I would expect the results to be even more pronounced.
YoungHouseLove says
Oh, that’s really interesting to hear! We figured a regular door would be easier for us to DIY, but it’s nice to know those fancy lift-up ones aren’t something we’re missing out on! Thanks for sharing!
xo,
s
Deb says
Just curious as to why John didn’t take the notch all the way up the side piece or at least notched the bottom all the way to the bottom? It would have given it a much cleaner look. I know it’s going to be painted and all, but it would have looked more seamless instead of a patch job. Love the idea of the microwave cabinet!!!!!
YoungHouseLove says
John worried that keeping that line straight all the way up the cabinet would be a lot harder than just doing the small notch for the microwave, so instead of worrying about a crooked frame or a wiggly line, we’re fine with it being fitted around the microwave. It’s definitely one of those personal preference things though!
xo,
s
Laura says
hehe I was going to ask the same thing. That’s the only thing that’s bugging me, but I can see how it may be a bit scary to cut!! Now I want a smaller, concealed microwave!
Amber says
I don’t get the notch on the bottom right side, because it looks like the door is hinged on the left side..? Unless the microwave buttons are part of the door (which it doesn’t look like)..? Maybe I’m just overthinking this!
YoungHouseLove says
Yup, it’s notched to the right so we can shimmy the microwave over to the right in the cabinet, which gives the hinges on the left more room to swing so the door can open freely. Hope it helps!
xo
s
Sarah says
Nice work! A few questions – what side of the cabinet will the door hinges be? If on the left as you’re looking at it, be careful about choosing a pull that won’t slam into the side of the deeper cabinet. And, could you post a photo from further away, to see where this is in relation to the rest of your awesome kitchen?
YoungHouseLove says
Yup, we’ll definitely be careful about that (a cabinet used to hang there before and we didn’t have any issues about it slamming so we think we’ll be ok as long as our hardware isn’t super poky). As for some wider pics, we’ll have to share them in the next kitchen update, probably in a day or two!
xo,
s
Megan says
As much as I love my new kitchen I am happy to be through remodeling. Lots of work!
Anne says
Ooh! lovely, I wish I could hide more of our appliances but we use them so much. The kitchen aide and coffee maker live on the counters and some days the bread maker too.
Question: are you going to be doing anything about the gaps? For a few posts now I just can’t help but keep noticing the gap on the ceiling and beam. And now the gap between the cabinets. Sorry if I’m coming off as to perfectionist to you, its just been screaming gappy at me each time I look at the pictures.
Beautiful kitchen otherwise :)
YoungHouseLove says
Oh yes, those have to be dealt with!! We’ll be using wood putty to fix any issues between cabinets and trim/caulk to deal with ceiling gaps, etc. We hope to detail all that info as we go!
xo,
s
Missy G. says
It looks great! Just one question though… why did you notch the right side of the cabinet? It looks like the microwave door would open to the left. I’m sure y’all know what you’re doing, but it doesn’t look right to me. Maybe I’m not seeing it correctly?
YoungHouseLove says
Yup, it’s notched to the right so we can shimmy the microwave over to the right in the cabinet, which gives the hinges on the left more room to swing so the door can open freely. Hope that makes sense!
xo,
s
Missy G. says
Thanks for clarifying! And sorry for the same question as others. I should know to just hold off, and someone will ask my questions for me. Haha!
YoungHouseLove says
Haha, no worries!
xo,
s
Kasey March says
Just thinking about the amount of work you have left makes my stomach lurch. I’m certain it’ll be brilliant when you are done, but what a project!
I hope you’re still taking time to really enjoy the holiday. This is the first Christmas Clara can really get excited about and I hope you are having a blast.
What’s she think of the holidays? Other then the fact that she loves the table top tree.
YoungHouseLove says
She’s so in love with the holidays and Santa and all that! So many people in our neighborhood have decorated and one house has a tree that flashes to the sound of music and we stop and roll down the windows and she peers out of her little car seat at the musical tree. We even went to meet Santa on Sunday night at John’s parent’s development (an older gentleman in the neighborhood with a real beard gets dressed up and looks amazing). So much fun!
xo,
s
Alexis says
Wow! This is super impressive. John’s a cabinet maker! Any tips on how to hang upper cabinets so they support their heavy weights? My hubby has upper cabinet installation anxiety.
YoungHouseLove says
We were sure to use the same screws that were used to hang our cabinets originally (we saved them to reuse them once we cut down the cabinet). That way we knew they could hold the weight when we go into studs with them. Hope it helps!
xo,
s
Judith says
It’s amazing that you build this all on your own and I can’t wait to see more! I’m always excited when there’s a new kitchen-related post. :)
Our new kitchen will be delivered on the 27th and has a hidden microwave cabinet, too (above the wall oven):
http://kleinesgelbeshaus.blogspot.com/2011/10/kuche.html
YoungHouseLove says
Ooh, that’s going to be beautiful!
xo,
s
Stephanie says
Hi, I don’t usually comment on your blog but I have been following your kitchen renovations closely. I recently redid our kitchen (will send pictures soon!), which included painting the cabinets a soft-white. I HIGHLY recommend using a paint called “Cabinet Coat.” I did a lot of research on the type of paint to use, and I am glad I did. This stuff is great. People don’t even realize the cabinets are painted. It’s specifically designed to dry smooth, so there are very few brush strokes. And it’s still water based, so not very messy to clean up and not a lot of smell (and using white oil paint you need to worry about yellowing over time – which you don’t need to worry about with latex paint). It comes in many different light colors, including greige. Please consider this paint brand, you won’t regret it!
YoungHouseLove says
Thanks! You’re the second person to recommend that- we’ll have to look into it!
xo,
s
Lacey says
Good plan! Love the new microwave idea
Courtney says
So glad to know we’re not the only people with a house torn apart for the holidays. We have both bedrooms in our house completely emptied for repainting, trim painting and some other wall and ceiling repairs. Me, the hubs, and the dog are currently sleeping on the air mattress in our living room- where all of our clothing and other worldly possessions are stacked and stashed until both rooms get put back together!! Ah the fun of a DIY life! At least it is forcing us to get rid of the stuff we don’t need/want :-)
You guys are doing such a great job! Thanks for helping to keep us motivated over here.
YoungHouseLove says
Aw thanks Courtney! Sweet comments like yours keep us going too- so it’s a two way street of motivation! Haha.
xo,
s
sarah says
Yes! I rarely use the micro and was thinking of just sending it to the garage. Perhaps a little one is a good idea. Your cabinet idea is perfect. Now, I just need a saw!
Deena says
I can’t wait to see what color you went with. We debated for a long time and ended up going with a smoke gray and WE LOVE IT. So much more fun than white!
Katie says
You should totally do two tone cabinets a la Sarah Richardson!!! Or, you know, whatever floats your boat.
YoungHouseLove says
We love that look, but with only one upper (this one) and two super tall cabinets (the built-in around the fridge and the pantry) we don’t think it’ll look as nice as it does in a more standard kitchen with more uppers!
xo,
s
Suzanne says
Whew -so glad you said that! The two tone cabinets can be awesome, but I agree you don’t have the right set up for it. ;-)
Ashley@AttemptsAtDomestication says
How creative!! After touring some houses I have to say doing something like this is definitely on my agenda! The more I see it the more I hate the microwave over the stove look! lol
Tanja says
Ok, I totally suggested this when y’all first posted about new appliances! I don’t want to say ‘I told you so’ but, well, I did say it looks awesome to hide the microwave inside a cabinet- so chic and clean looking. Ok, so I guess I’m saying ‘I told you so’ after all. J/K! ;-) Looks great!
While you guys are at it, you should consider (if you have any extra cabinet doors) slapping a faux door on the dishwasher to hide him. Then the bottom cabinets would look really streamlined and seamless, too. Kind of like this:
http://www.traditionalhome.com/design_decorating/kitchens/savvy-kitchen-island-storage_ss12.html (minus the red, of course). Just a thought… :)
Awesome job there! Can’t believe how much y’all get done with a little one running around. Impressive. I can barely get the dishes washed!
YoungHouseLove says
Haha- you totally told us so. As for the dishwasher, I’d love to master that, but it looks like our current dishwasher (and new one) might be set too far forward for the door to be flush (the current one sticks out about two inches beyond the cabinets without any wood front on it, so it would stick out even more if we added it). Would have been really fun though! Maybe in our next kitchen. Haha. Kidding, let’s hope we get to enjoy this one for a good long time.
xo,
s
Sarah says
Might I suggest you do white uppers and grey-beige lowers? Full disclosure: I’m biased because that’s what I did in my kitchen.
I hated living with white lower cabinets because they showed every.single.freaking.splatter.or.drip. Now the grey-beige really cuts down on my OCD cabinet wiping.
YoungHouseLove says
We love that look but with two tall built ins (one around the fridge and the pantry) and only one upper shelf that’s truly an upper (this microwave one) we don’t think it makes as much sense as it would in a kitchen without so many double height things and with more upper cabinets to feel balanced. Hope that makes sense!
xo,
s
Laura (Blogging Over Thyme) says
Not sure if this is a silly question, but is that microwave a standard size and dimension? What if it dies and you no longer can get a microwave that will fit the custom cabinet? Just a thought!
YoungHouseLove says
It’s a pretty standard size for a counter microwave. They have some that are taller, but we figure we can adjust the shelf above if it need be – but many others are the same 18″ width so we hope we’ll be ok for the long haul!
xo,
s
Sandy says
Im with you! I put two ovens and a microwave all under counter. So I dont have anything cluttering up my kitchen counters and walls, I LOVE IT!
Katie says
OH EM GEE!!!! We are in the midst of a kitchen remodel (Please MAKE IT END!) and I hate seeing my microwave, this is the answer to my prayers. Passing this on to the “honey do” list for my hubs for sure. You guys are chock full of awesomeness just so ya know :)
YoungHouseLove says
Aw, happy to help! Hope your hubby doesn’t want to kill us!
xo,
s
Lynn @ SafeBeauty says
Everything is really coming together guys. The waiting for the finished product gives me agida at times I’m not gonna lie, but the progress is always well worth the wait. Nice New York mug. It gave me one of those moments like in Ratatouille when the mean food critic eats the food and it transports him back to his childhood in France. Know what I’m talking about? Yeah, you know.
My best, Lynn
*and why were you guys in my dreams and we were all remodeling old bunker apartments in Pre Cold War Romania? John was even in a Groucho Marx nose and glasses get up. No more NyQuil for me!
YoungHouseLove says
Oh my gosh- that’s hilarious! Sorry for bombarding your dreams, but at least John was sporting something festive!
xo,
s
IkeaKitchenDesign says
Microwave cabinets are great! They’re great to free up your counterspace. You did a really nice job there! And what are your thoughts on microwaves in base cabinets, those are great too. Here’s one we worked with a couple months ago: http://www.ikeakitchendesignonline.com/images/Ikea_adel_beech_rec.JPG
Ruthy T. says
This is such a great idea!! currently our microwave is sitting on top of our dryer because there just isnt room for it!! I’m going to show this to the hubs to see if he can build the shelving for us!
Jessika says
Based on photos from previous owners, we know we have nice, maple kitchen cabinets. But, the previous owners realized how much the color was dragging the room down, and they painted them white (professionally, thank goodness, since we know the previous owners were not the best at painting). They are so bright and cheery. I do wish that they had a tad more gloss on them, since white shows EVERY.SINGLE.THING and that is my only complaint. All that said, my vote is for white, as much as my vote doesn’t count!
Ooh, and we recently hid our microwave too in a cabinet! Love it! Will you walk into the open cabinet door at all? We’re lucky in that the microwave’s cabinet door opens against a wall so we don’t run into it. I really like how the cookbooks look open.
YoungHouseLove says
Thankfully the pantry is deeper than the microwave door, so when it’s open half of it is aligned with the pantry, so only about 7″ of the door will hang over. And since we usually don’t hug the cabinets so closely when we walk (we’re usually a foot away or so) we hopefully won’t walk into it! Hopefully we will remember to swing it shut whenever the microwave is in use anyway. I’ll have to keep you posted!
xo,
s
kaylan says
i have never, even in all my hours of pinterest-ing, seen a microwave built into a cabinet they way you’ve done it. and i LOVE it. i really dislike appliances sitting out on my counters and the microwave is no exception. now i’ve dreaming of the day when i own my own house and can banish it behind a cabinet door.
Kate says
First things first, your entire blog is so awesome and inspiring, you’ve completely changed my feelings about mid-century brick ranchers and I kind of really want one as our next home as a result :)
Secondly, for the cabinet paint, I would like to put in my vote for the soft tone/grey-beige!! My mom’s house had white Corian in the kitchen and the bathrooms… while it is no longer in the kitchen, the bathrooms still have white Corian countertops and sinks, as well as white-painted cabinetry. Now, granted, we didn’t spend much time choosing the white (I’m sorry!)… My last home had an all-white kitchen (well, the walls were really the palest of yellow, but it pretty much looked all white)… I wanted to keep it that way, loving the whiteness of the cabinets, but my friends convinced me to paint the walls slate blue, and it made the white really pop! I’m by no means skilled or educated in art/color, but I would imagine that painting your cabinets a soft beigey-grey could only do the same for your countertops :) Oh, and I love the thought of a microwave cabinet!
I’m sorry for the super-long comment!
YoungHouseLove says
We’re loving all the votes for cabinet colors and promise we’re taking all of your suggestions into consideration! Can’t wait to finally land on something! We’re still bouncing back and forth but will have to make a decision sooner than later!
xo,
s
Kristin says
Love the smaller microwave!
We have a tiny, tiny apartment kitchen (something around 43 sqft, but with a slanted ceiling), so even a small microwave would have robbed us of too much storage space. We have 2 1/2 upper and 3 lower cabinets. After some research, we found an oven at IKEA which has a built-in microwave function. For the occasionally heated cup of milk, that’s perfectly enough.
YoungHouseLove says
That’s a really smart solution! Love it.
xo,
s
Pamela says
Maybe it’s already posted but what about just a half door or garage style door to just cover the microwave and leave the top part as open shelving?
YoungHouseLove says
We actually heard from someone who said they hate their lift-up garage door (it scratches up the front of the door so they have to leave it open all the time to hide the marred finish). And since we’re adding open shelves over the entire stove wall, we think we’ll appreciate some concealed storage too. Hope that makes sense!
xo,
Gabbi says
You guys are so creative. I love what you did with the new, smaller microwave!
Liz says
Looks awesome! Does it leave enough room for the door to open? I’d be interested in doing something similar at my house. Y’all are just too cool!
YoungHouseLove says
Yup, both the microwave and the cabinet door have room to swing open! We’ll share more pics when we finish hanging the door!
xo,
s
KLL says
Do you ever worry that making the microwave built in this way limits you in the future? Would this hidden microwave creation hurt you down the road if you decide at some point that you need a differently sized microwave or are you confident that this is the microwave size for you?
YoungHouseLove says
It seems to be a pretty standard size for countertop microwaves (some are taller, but we can easily adjust the shelf above it to account for that).
xo,
s
Kate says
Such a great idea. I’m not a big microwave person either, so hiding it away is a great solution.
You guys are doing such an amazing transformation on your kitchen, and seem to be doing it for WAY cheap. I’d love to see how it improves the value of your home when you are all done. kind of like that hgtv show, bang for your buck. just a thought, if you have any friends in real estate or whatever who can advise. i know that’s not always a point of a reno, it’s about making your house your home, i’m just curious because i bet your return on investment is huge.
YoungHouseLove says
Yes, we think it would be really fun to have the realtor who sold us our house a year ago come back and tell us what she’d list our house for after our changes!
xo,
s
Jess G. says
I know you guy’s have had a game plan since the beginning of this kitchen remodel. But how did you come to the steps? Like painting the cabinets before putting up the tile? Is there a general rule of thumb for steps, or have you guy’s just create your plan based off of your last kitchen? I am so loving what has happened so far!
P.S. One of my “before I am 30 goals” is to knock down a wall. So then I can say “There used to be a wall here, but I knocked it down.” – then in reply people can say “Yeah! It feels so open now!” You guy’s are living my dream!
YoungHouseLove says
Yup, there’s a general rule of thumb for most things (ex: finish the cabinets before painting, put in counter before backsplash, etc) so that guides us pretty well along the way. Otherwise we try to think things through and use common sense (and tackle things in an order that seems to work for our specific situation). As for knocking down a wall before you’re 30, I wholeheartedly recommend it! Haha. Have fun!
xo,
s
Devon @ Green House, Good Life says
Knocking down a whole house (it had been destroyed by a fire) was an awesome experience, and something I recommend everyone do once in their life. I missed “before 30” by a couple of years, but it was still a total trip.
erin says
I love the idea of a hidden microwave! It makes the kitchen as a whole so much more calm and un-cluttered. If I ever get to do a kitchen re-do, I will definitely remember this!
jeannette says
i’m pretty excited.
and i have to confess you are perhaps the only reno bloggers i follow, who, after i have accompanied them like a sherpa on a daily basis huffing up the everest of some terrifying demo and reno — you’re the only ones who don’t kill me by choosing bad paint colors. when i say bad, i mean disfiguring.
i followed one guy through the months it took him individually to clean, with a toothbrush, each antique floor tile he’d liberated from the demo site of a gold rush era bar in northern cali. he hand tiled his gorgeous new bathroom with them. then he painted this awesome victorian bathroom he’d fabricated a sort of …dirty diaper green. oh man, i still feel bad about that one.
thank god for your good taste. merry christmas.
Amanda C says
“accompanied them like a sherpa” I literally LOL’d. People in the office are staring. I vote for comment of the day!
P.S. I totally agree!
Karina says
Wow!! It is looking great!!! I am following the kitchen progress as a Novela!!! Great job!!!
Allyn says
Lookin good!
We’re still using the microwave I bought to go off to college.
It’s just about time for a new one I think.
Seriously.
Marisa says
I do have to say I’m super impressed by the woodwork and… Well… Thinking that went into this! My husband and I actually got rid of our microwave over a year ago, and have found so much joy (and space) in living without it!
Amy @ this DIY life says
It’s looking great! All your cuts look nice and straight which isn’t always easy with, but my dad (the contractor) taught us a little trick for easily cutting straight lines without a table saw. Measure the distance from the blade of your jigsaw or circular saw to the edge – on ours it’s 2 inches. Clamp a scrap piece of 1×4 onto what you’re cutting the same distance from your cutting line – so we clamp ours 2 inches from where we want to cut. That way we don’t have to worry (as much) about making sure it’s exactly on the line, we just make sure the side of our saw is up against our 1×4 (or whatever we have on hand). Sooo much easier! My daddy’s a genius!
YoungHouseLove says
Such a great tip! Thanks for sharing!
xo,
s
Amanda- Hip House Girl says
We did the same type of thing in our kitchen. In a small space, I can’t stand to have something big like a microwave taking up valuable counter top, especially when you don’t use it all that much. Ours is just sitting in a regular, non-custom cabinet, though. (I’m so glad I thought to have an outlet installed in there!) http://hiphousegirl.wordpress.com/2010/05/17/somethings-missing/
YoungHouseLove says
Yes, that outlet was so smart!
xo,
s
Cher says
You dont need a microwave. We had one when we were first married, and it started sparking and smoking, so out to the trash it went. We always thought we would get another one, but 15 years, 2 kids, 2 cats, and 1 dog, and a total kitchen remodel, we still have not felt like we need one. Everyone thinks we are crazy. Maybe we will live a few seconds longer, but I am not too sure, since my husband lives on his cell phone.
Amy @ this DIY life says
Not crazy!!! When we moved, the microwave didn’t move into the house with us and it’s not going too. I’m so glad to know someone else doesn’t use a microwave!
Staci says
We don’t use one either!! Woo-hoo!!
Dave says
maybe it is just me and my anal architect nature but You may want to re-think the one side of the cabinet where the profile (curve) of the microwave has been cut into the side piece of the cabinet side…maybe build out the one side so there is an equal amount of wood on each side without that curve in it…..right now it looks forced in rather then build in. Sorry i fret over the details. Overall looking good. Props to johns ever growing woodworking skills.
YoungHouseLove says
Haha, oh yes, that’s definitely one of those personal preference things. We don’t mind that little routed edge at all because it’s really not noticeable next to a shiny stainless steel microwave, which is definitely what you’ll see first when you swing the door open! From our experience a lot of our cabinets aren’t always gorgeous when they’re open (there are usually hinges or ugly looking items piled inside anyway, so we’re just happy if a kitchen looks nice when the doors are closed, haha).
xo,
s
Dave says
OHHHHH so sorry i didn’t realize you were putting a door on it, as in cover up the microwave completely……makes more sense then. I thought that was always open and you saw the routed edge day in day out…..OK still would bother me knowing it was there but at least i wouldn’t have to look at it everyday because it was hidden
YoungHouseLove says
Oh yes! A cabinet door is going up for sure!
xo,
s
Katrina says
We are on the same page! I have one of the same idea pics saved! :) We plan to hide out microwave in a cabinet with a door on just like the pictures….this looks so much nicer! Love seeing your kitchen DIY projects
Dave says
oh and you should use an electrical box extender and bring the microwave plug forward and put a plate on it.
YoungHouseLove says
Yup, we’ve since finished off that outlet! Slowly but surely we’re moving along…
xo,
s