Hood, there it is. Well actually, for the last couple of weeks it has been more of a “hood… there it isn’t” situation in our kitchen.
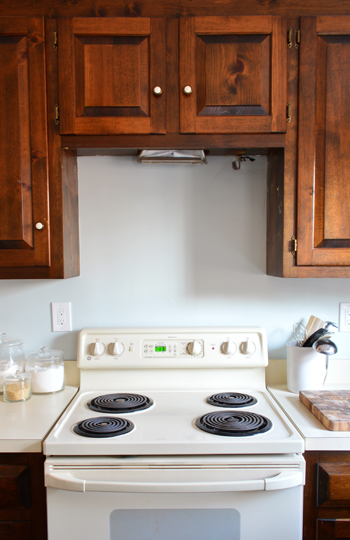
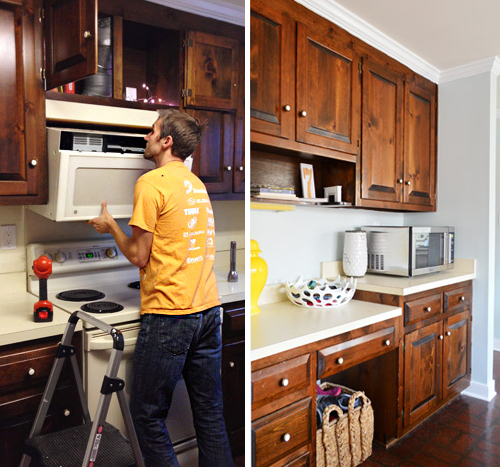
You may remember that we removed our over-the-range microwave before painting the kitchen and were thinking to get a 30 inch gas cooktop. Microwave’s the only appliance we’ve planned to replace as part of our Phase 1 kitchen makeover, since it was so front & center in the room, it crowded our stove, and we always seem to prefer range hoods over microwaves with vents when it comes to performance. So we replaced it with a stainless countertop microwave (more on that here) which we’ll eventually get “installed” into our pantry for the long haul (even into Phase 2) – we just need an outlet to be added in there so we can plug it in. But that still left us lacking in the over-the-stove ventilation department.
We knew whatever hood we bought would be just a temporary solution – since we’ll probably ultimately go with an exposed hood or something in Phase 2 – so we didn’t want to spend lots of money, but we had seen a bunch of options pop up on craigslist over the last few months for under $30, which is exactly the right range for us (we figure we can just resell it for around the same amount when we’re onto Phase 2 if we keep it nice and clean). So when this $25 option popped up, we were ready to make the move.
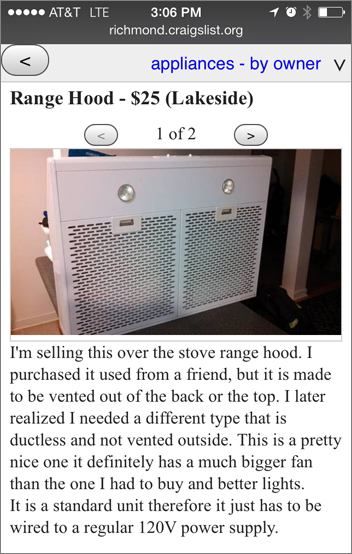
We liked that it was a crisp white color, that it was the right size for our stove, and that it also had the right type of top-ventilation setup that we needed. The only issue was that it was giving me flashbacks of the last hood we bought off Craigslist (apparently it’s our go-to source) and how much work went into hanging that one. Since it didn’t come with any of the mounting hardware that’s usually sold with the hood – and was meant to hang under a cabinet – we had to engineer our own solution.
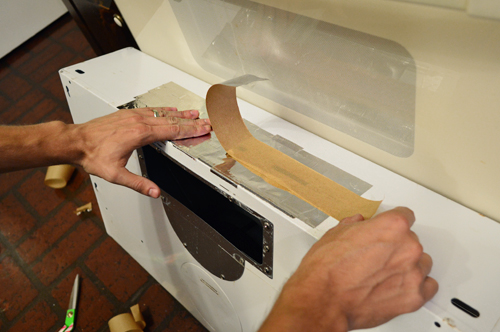
But guess what guys? This time around it was so much easier! I’m way too excited about it, but I’m just so relieved that I want to shout it from the rooftops – especially to anyone who’s nervous about making their own hood swap at home. We were lucky in that most of the stars aligned. And by stars, I mostly mean the duct work and the electrical. The hood we bought could be vented out the top or the back, and the existing rectangular opening on top lined right up with the rectangular vent already in our cabinet. So I just used silver duct tape (note: not the Duck brand tape that’s more common, since that’s not meant for actual ductwork) to seal up the second-option opening in the back.
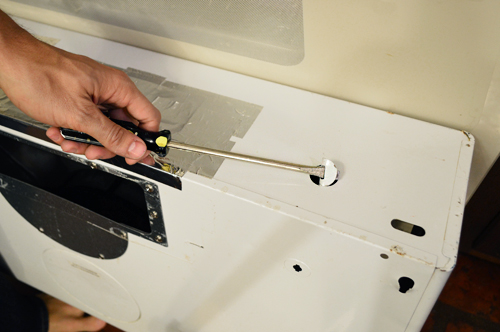
There were already wires in our wall right where they’d need to snake through to connect within the hood itself. So we didn’t need to call an electrician, I just had to pop out this metal tab with a screwdriver to create access for those wires to be pulled into the hood and connected.
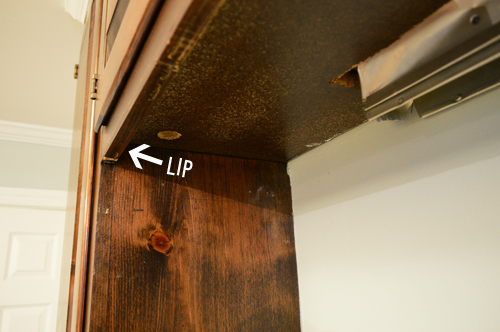
The only slight complication was that there was a lip under the cabinet, which got in the way of me screwing the hood directly into the bottom of the cabinet.
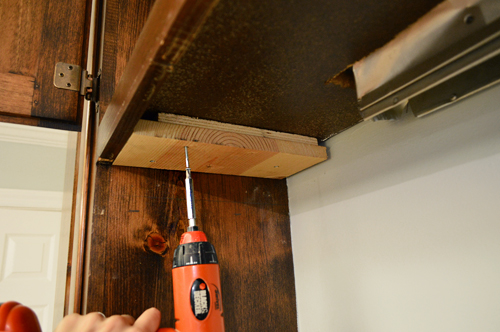
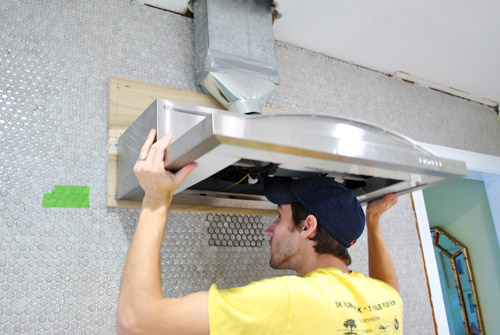
But thanks to a little scrap wood sandwich that I put together, I was able to screw blocks into either side of the cabinet so that the hood could be attached firmly while still being flush looking from the front.
The part I actually feared most was holding the hood in place while trying to perform tasks like screwing it in and wiring it together. I pictured some comical Cirque du Soleil style contortions between me and a certain pregnant lady as one of us hoisted it up and the other tried to screw it in. This dream sequence involved a lot of sweat and more than a couple curse words. And then I discovered this how-to video with an ingenious trick. Maybe everyone else would’ve thought of this on their own, but for me it was DIY gold. I clamped a thin 1 x 2″ scrap board across the opening so that it could help support the weight of the hood while I worked. It involved taking off one cabinet door temporarily, but it was soooo worth it.
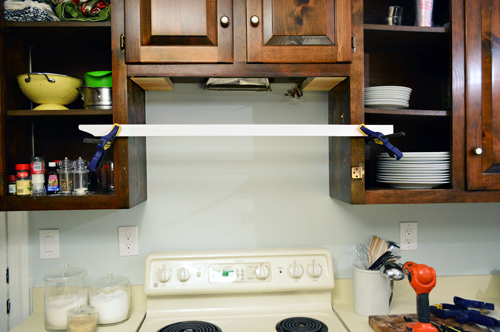
The man in the video also temporarily screws a brace into the back wall to support the hood, but mine seemed to rest in place without it (which saved me from making a few unnecessary screw holes).
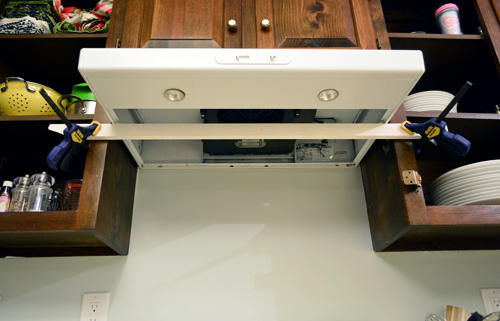
So not only were Sherry and I spared my hypothetical sweaty-tangled-curse-fest, I didn’t even have to steal her away from the stuff she was working on in Clara’s room (I believe we’ve dubbed it The Wall O’ Fun, which she hopes to share with you guys tomorrow).
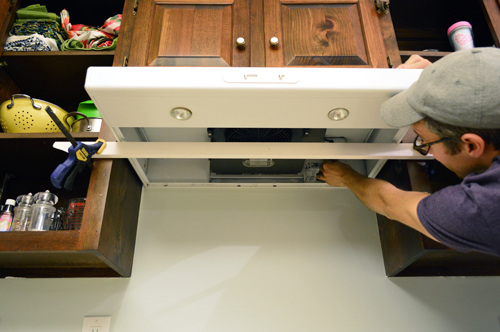
With the hood resting in place, I was able to shimmy the clamps up until the top of the hood sat flush against the wood blocks – and I checked within the upper cabinet to make sure the duct settled nicely into the open exhaust hole on the hood (it did, but later I sealed it up with some more duct tape to be sure). Then I was able to screw them tightly together using a screw + washer through the keyhole opening in the hood. All of this was accessible from within the hood itself just by removing the two filter screens.
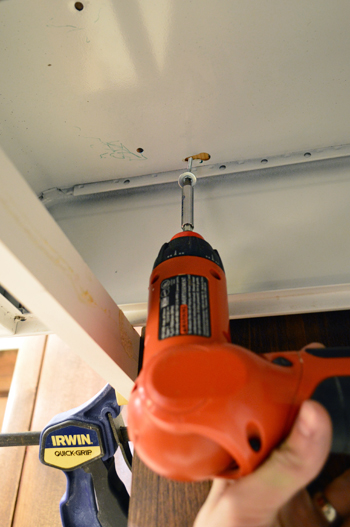
With all four screws in place (front & back on each side) I could attach the wiring into the electrical box within the hood itself.
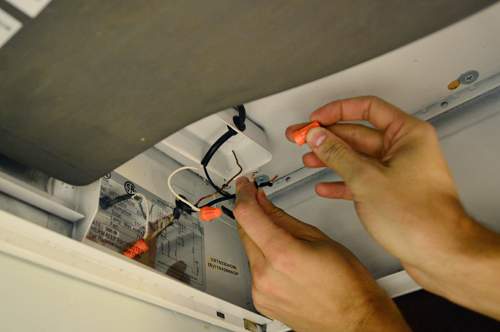
The whole process (minus picture taking time) was probably 45 minutes total, and most of that was finding and cutting scrap wood to make my mounting blocks. It’s not the prettiest solution the Internet has ever seen – but for $25 and less than an hour of work, we’re just happy to have ventilation back above our stove. And a lot less of a cramped feeling now that our hulking microwave has been replaced. Plus we’re planning to craigslist that for at least the cost of this hood, so this little Phase 1 switch won’t be breaking any budgets.
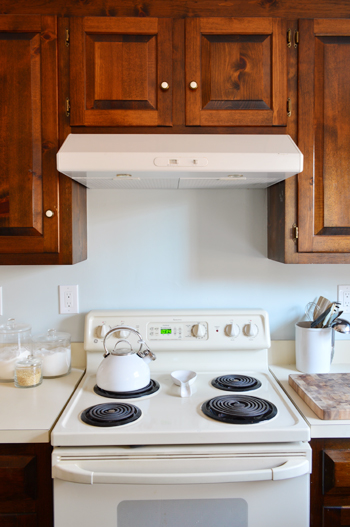
Both Sherry and I have declared the cool little halogen lights our favorite part. Until we have a kitchen with under cabinet lighting, these throw off a nice shiny glow in the meantime.
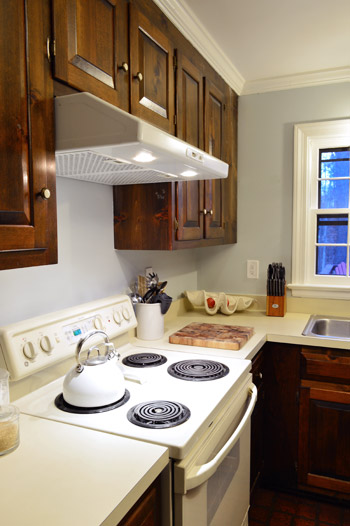
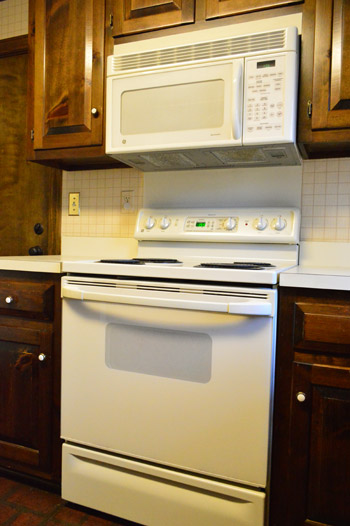
In summary, it’s a welcome change for this sliver of the kitchen to go from this…
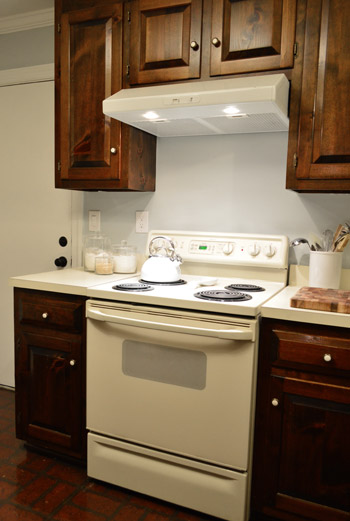
… to this.
Next up on our to-do list in here is to hang our floating shelves along the sink wall, and then we’re diving into cabinet painting. We thought that could be a good project to tackle over the holiday break, and maybe we’ll get to ring in the new year with some new looking cabinets!
Has anyone else switched out a vented microwave for a hood? Was it crazy complicated or blissfully uneventful? Don’t you love when you worry about something being full of challenges and then it ends up being fairly straightforward? It sure beats those “this should be easy” projects that somehow implode mid-way through…

Jeff says
Do you do anything special to protect the wall behind the stove since it’s just painted and doesn’t have any tile/stainless steel/laminate? I removed the laminate backsplash from behind my stove and painted the wall with a paint in an eggshell finish and I’m starting to notice little grease spots from the times we’ve cooked with oil. I was thinking of cleaning it, repainting it and then going over with a few coats of clear sealer in a semigloss to make it more cleanable. Thoughts?
YoungHouseLove says
We actually had no backsplash in our fully renovated kitchen (just semi-gloss paint, no sealer) and even after years of cooking, the grease/splatter could just be wiped right off. Didn’t even need any paint touch ups when we moved! It was super durable.
xo
s
Carla says
The white hood looks like a nice temporary option.
We just bought a house and just like it was in our rental home, the hood doesn’t actually vent to the outside. It sucks the steam up from the stove and blows it back out into the kitchen. So when we’re boiling water and making soup, our windows steam up.
Do you know if this is common? I thought it was a code thing that stoves vent outside. When we buy a new hood someday, we need to decide if we’re going to make it vent outside, or just do an air recycle vent like we already have.
Oh, by the way . . . I’m not sure how to find any responses to my comments. Is there a way to track my comment? Thanks!
YoungHouseLove says
Hmm, it sounds like an unvented option, which isn’t usually supposed to steam up windows (it should work relatively well, albeit not as well as a vented one). Anyone have tips for Carla? Is it malfunctioning to blow it back into the room? There’s another thread in the comments with tips for how to convert an unvented hood to a vented one, if that helps (on the first comment page). As for tracking your comment, if you note the last page of comments when you leave your comment (ex: page 2) then you can come back to page 2 and just look for your name (or do a command-F search for your name on that page). We had a box you could click to tell you when we commented back to you, but it kept crashing the site. We’re still working on getting it back someday though!
xo
s
thedogsma says
I have a recirculating hood that is about one degree from useless. My house is just as steamy–& the smell of sautéd onions just as pervasive– if runs or if it doesn’t.
It’s on my list to change it to an outside vent asap. The house was a gut rehab, & I have no idea why it wasn’t vented outside to begin with, since the kitchen’s on an exterior wall & it’s a 1-story house.
If you have the choice, go for an outside vent, especially if you have a gas stove and/or cook a lot.
There is no national code; it’s all local & can vary wildly.
Carla says
Thanks! I just searched for my moose icon and found your reply. :)
Testing another smiley option . . . :o) Let’s see if it’s an Edvard Munch screamy thing.
So it seems that most people opt for a vented option that vents outside, not back into the house. It would take up some space in the cabinet above the stove, but we have a one-story home and a rather shallow roofline, so it shouldn’t be a big project.
Evie says
Carla, +whenever I post a comment, I just put a bookmark on my desktop by dragging the little gray Firefox circle (at the beginning of the url) over to my desktop. When I click it later or the next morning, it takes me right back to the part of the page where my comment is. Then I just delete that bookmark since I won’t need it anymore. Hope this works for you!
YoungHouseLove says
So smart!
xo
s
Evie says
Your new hood looks great, but ugh, hood has a verrrry negative connotation to me today. (weak grin) I got shocked by my vent hood yesterday!! I was washing it off with a wrung out sponge…no problem there…when I noticed that a tiny piece of cellophane-ish stuff was peeled back from the knob that turns the light on. Just figured I’d snip it off and it would “look better.” Ha. Wedged the end of the scissor in there, touched the damp(…n) hood, and YIKES, the kitchen lights went off instantly and I was tingling and glowing in the dark. Breaker’s off and the electrical wizard is coming today. ~~~~~~Took me 68 years to learn that MOM WAS RIGHT about mixing water and electricity…
YoungHouseLove says
Oh my gosh, that’s so scary Evie! I’m so glad you’re ok!
xo
s
Carla says
Sorry, Evie, but that’s kind of funny! :)
Evie says
Carla, LOL!! Yep, sometimes I do feel like I’m living an “I Love Lucy” kind of life…
Koliti says
“I pictured some comical Cirque du Soleil style contortions between me and a certain pregnant lady as one of us hoisted it up and the other tried to screw it in.” – John Petersik
HEY! I thought this was a PG blog! ;)
YoungHouseLove says
Hahahah! That’s what she said!
xo
s
Carley says
This summer we painted and raised our kitchen cabinets. We NEEDED and wanted a microwave so bad we removed the hood and raised the two small cabinets where the hood was. The microwave suggested the BOTTOM of the microwave be 30″ from the stove top. We measured and measured. I wanted ample space to cook. 16″ from the bottom even 18″ is too crowed. We got the bottom to be 24″ from the stove top. It’s perfect. It’s roomy for cooking and can still reach the microwave. However it’s another story for the two cabinets. Lol there might be some climbing on the counters. Thank you for all of ya’lls inspiration and esp the posting on painting cabinets! :) saved us $5700 (quoted at $6k!)
YoungHouseLove says
Holy cow, that is some awesome savings Carley! I’m so happy for you!
xo
s
Christy says
Hooray for this change, it’s so spacious now! I love having a hood, and no matter how many folks tell me to buy a new microwave and install it over the stove, I worry that it’ll cut down on the light and manueverability there. No matter how “trendy” it might be to have the micro overhead, I like a hood instead.
Kate says
We did the exact same thing in our house: I hated the microwave/hood combo that was there when we moved in. We weren’t planning on replacing it right away, but I conveniently broke it a little over a year ago! Score! I was also conveniently pregnant when the new hood had to go in (double score!) Love the new hood, best outcome of me breaking something ever.
Lynn says
Talk to me about the stove. It’s electric, right? Any chance of you trading it for gas? I have an electric stove, and wonder what it would take to use gas instead. What I am saying is that I could use a guinea pig…:)
YoungHouseLove says
Haha! We have heard that gas is so much better, so I think we’d heavily consider that for a Phase 2 upgrade, although we’d have to get an estimate to see how involved that would be. We have natural gas heat, but no propane here (although we’d love to add a gas fireplace someday) so maybe we could bundle that somehow? Not sure!
xo
s
Starr @ The Kiefer Cottage says
We switched our electric stove for a gas one. It cost $250 to put in a gas connection in the kitchen. We already had gas in the house for our furnace, dryer, fireplace, and hot water heater, so that helped. It would have been cheaper, but our pipes were very old and the plumber wanted to put in a new pipe to that side of the house.
I love cooking on a gas stove (although I might have gotten a dual fuel model if I had the dough). Worth the money!
YoungHouseLove says
Thanks so much for the info, Starr!
xo
s
Rachel says
Looking much better and much more functional now – I guess John can see what he’s cooking a lot more easily?
We’ve got an over the range hood (much like your new one) which just vents back into the kitchen, plus a wall extractor fan to the outside. Anybody know what the UK rules are on having to have the extractor fan? We’d like to remove it (and long term upgrade to a hood that vents outside). Do we have to keep it til we have the new hood? Can I take it out beforehand? How do I go about patching the giant hole in the outside wall?!
Ideas gratefully received. Thanks guys!
Rachel
YoungHouseLove says
Good question! I can’t imagine that one that vents back into the room would be that much better than not having one at all (especially if you crack a few windows) but I’m not sure what the rules are. Anyone know, specifically about the UK?
xo
s
Maria B says
Oh man we have a giant microwave over our stove that the previous owners of the house installed. Worse, there’s a huge empty shelf BUILT IN to the cabinets that is where the microwave should go. Lawd. I hate it, but we’ve just been dealing with it until we get to kitchen reno time…(hopefully next summer.) I’m hella jealous over your hood. ;)
Tyson says
Hey – Where did John score that sweet grey hat?
YoungHouseLove says
That’s from The Gap. He loves that thing.
xo
s
Starr @ The Kiefer Cottage says
We switched out an old old hood for a new one–our big problem was that they were not the same size so we had a hole in the wall we lived with for over a year. We covered it up with faux tin tile and it looks much better (works better too…the old one sounded like old lion roaring on repeat).
YoungHouseLove says
That sounds awesome!
xo
s
Stacy says
I love it already and you haven’t even painted yet! The new hood definitely opens it up. Our kitchen was sadly only redone by the previous owners in the past few years so it is silly for us to redo it, even if there isn’t a pantry and the microwave is over the range. We will have to replace our appliances over the next year or so though. Everything is at least 11 years old and some things aren’t working properly. Our stove started beeping incessantly last night for no reason. We tried unplugging it but it is still doing it. Thankfully someone is going to look at it tomorrow. I have a terrible feeling it’s going to be costly. Our dishwasher doesn’t actually clean the dishes so everything has to be hand washed first and then run through the dishwasher – so really, what is the point? And the fridge has a ton of it’s own issues. I just have to love how all of this is working out right in time for the holidays… btw, my daughters favorite movie is The Sound of Music too. She sings “Do a Deer” constantly while running around in circles.
Timothy says
for a phase one project it looks great! i personally like white appliances as long as their nice and not just some kinda cheap white appliances like older homes usually come with. it gives a very clean look in my opinion but of coarse next in line are stainless steal, they are so nice. and since im talking about this, black appliances are the ugliest thing thats happened to houses. lol. im 13 and raging about appliances…what do you know!!
Steph Nelson says
I am painting my kitchen cabinets right now! I have VERY limited space so it is going to take FOREVER to get them all done. I have to work in sections since I can’t take the doors all off at one time. It is doing the front and back of the doors that seem to take so long. I’m just going with white although I have been loving the two tone kitchens as well.
Jenny says
Steph, I just wanted to say you’ll be so glad you took the time…5 years ago I painted our condo kitchen cabinets a happy spring green. With no garage or basement, I had to do it in the condo’s living area a few at a time, and it took forever. But they still look great and even make the “bisque” appliances and countertops look better too!
Kayla Coe says
Right after we bought our house three years ago one of the first things I insisted we do was switch out out our bisque colored behemoth of a microwave for a range hood. It had to gave been up there since the house was built in, in 1980, because the amount of grease caked between the cabinets and the microwave actually held the thing in place after we had removed the hardware that was holding it up! Then we realized the previous owners had duct tape rigged the ventilation, which made for even more of a mess. Find the right replacement ventilation tubing was the hardest part, since they don’t make that size anymore, hence why the last owners just duct taped one onto it. After all of the old stuff was removed it made installing the new one seem like a breeze. Can’t wait to see what you do to the cabinets! I’m fixing to refinish mine right after the holidays as well.
Lisa says
It is looking great! For some reason I was expecting the cabinets to be painted prior to installing the vent… Don’t you normally detach the cabinet to prep, prime and paint them? How will that work with the vent already attached?
YoungHouseLove says
We will just tape off things like the sides of the stove and the vent hood and paint the frames of the cabinets in place (the doors will come off and be sprayed outside most likely). The reason we wanted the new vent in before we painted was in case we had to build out the cabinet in any way to work with the hood (ex: if we added a 1″ trim piece to the bottom above the hood, we’d want that to get primed and painted to blend into the cabinetry when we tackle that).
xo
s
Annelise in Edmonds says
Thank you for posting this! I actually had no idea you could get duct-less hoods! My boyfriend’s house has absolutely no hood over the range. When cooking bacon, I make him close the doors to the kitchen and open the windows to vent out the place (even though I love the smell of bacon, just not for days all over the house). It actually deters me from wanting to cook in there! And at his rate, getting a hood installed would never happen. So…guess what I just bought for him for Christmas?! I brand new duct-less (duct compatible) hood for his kitchen!! If it doesn’t fit, he has 90 days to exchange it at Home Depot. I will be sure to show him this handy post to guide him through the process! :) Merry Christmas!
Heather MacFeather says
That range hood looks awesome! I love the support bracket trick. Ingenious and I probably wouldn’t have figured it out either. DIY Gold indeed!
My only range hood tidbit worth sharing has to do with lighting. Some of the Broan models accept incandescent floods and have a low and high setting. LED floods on low setting has a funny refresh thing going on so I only ever have the lights on high. The incandescent floods, on the other hand, were super bright so the I reserved the high setting for interrogating my food (gotta keep boiling eggs in line don’t you know).
The kitchen is really looking so great. Another fine example of how some spackle and paint can do wonders to a room.
Happy holidays!
YoungHouseLove says
Great tip Heather! Thanks for sharing!
xo
s
Nichole says
I have hood envy! We have the microwave over the stove and I DESPISE it for all of the reasons you guys have mentioned. Replacing it with an actual hood is on my list of things to do!
Bailey says
Yayyyy – what a great change! It opens up the stove area so much! So awesome that the Craigslist option worked out so well :)
Bailey
http://akabailey.blogspot.com
Susan says
Sherry & John, I LOVE your blog and read it every day without fail. Please will you reconsider the pop-up ads that just appeared this week? I realize the importance of advertIsing to keep the blog going (and I do click on the ad links in the right column) but the pop-ups ruin the reading experience. Do others feel this way?
YoungHouseLove says
Oh Susan, we HATE popups and they’re never authorized. We have been fighting to block them and get them gone. If you ever have a screen grab to share, or even the name of whatever’s popping up, that definitely helps us get them gone! Again, so sorry for the trouble!
xo
s
Susan says
The last one I saw featured a Jennifer Aniston photo…I think it was for that body lotion that she promotes? I’ll make a point to remember them from now on and report back to you. Sorry to add a downer topic to your friendly posts and comments!!
YoungHouseLove says
Thanks so much for the heads up Susan! We really appreciate the tips because we don’t always see them on our end. Has anyone else seen a pop up for Jennifer Aniston? Are you using a mobile device (ipad? tablet?) or a laptop? We had an Aveno pop up issue on iPads/tablets last week but we thought we had that taken care of!
xo
s
Penny says
I also saw the Jennifer Aniston pop up yesterday while using an iPad.
Susan says
I’m using an iPad. Saw about six different pop-ups (this week only). Don’t see any tonight. Sorry I can’t remember what the other ones were for!
YoungHouseLove says
Argh, thanks so much Susan! We think they’re all coming from the same place, and they all seem to be targeting people on a tablet! We’re hopefully getting to the bottom of it so it stops happening to you! So sorry for the trouble!
xo
s
Celia @ Life on Maple Street says
Ha, Ha! I totally had to listen to that song otherwise I would not be able to get it out of my head!
So can we just agree that Craigslist is the best thing ever?! We’ve been remodeling our house for a while now and I have finally convinced my husband that most of the stuff that we are getting rid of can be sold on Craigslist. My husband was hesitant to believe me at first but after saving up enough money to purchase a new coach he has become a believer!!!
YoungHouseLove says
Yes, it’s such a good resource!
xo
s
todd says
Have you considered using the “nook” where the current built-in desk area is (where the microwave now sits) for a built-in banquet seating bench that you could slide your table up to?
I don’t know if it would work with the future layout when you guys will open up the kitchen/living room wall and add the french doors, but could be a cool use of that space if the desk area doesn’t make sense for you.
YoungHouseLove says
Never even thought of that! I’m worried it would block the flow a lot since we walk through there (having the peninsula and table on the same side helps create a path to walk on the left, so if the table went left and the peninsula remained on the right where it is, it might be a zig-zag pattern to walk all the time). It’s definitely a new idea that we’ll think more about though! Thanks Todd!
xo
s
todd says
kind of like these:
http://2.bp.blogspot.com/_9VoSAmYB6E0/S8sUXoT-v_I/AAAAAAAABkE/N_Pq0uKDtxo/s1600/Breakfast+Nook.jpg
http://3.bp.blogspot.com/-o95Au2zNoWM/UFval91yoWI/AAAAAAAABBs/RxRdkOmx9ts/s640/46bf84bd1247-1.jpg
Liz says
Hey guys,
Just so you know- I just ran into the League of Angels ad under the Google search bar. I see from the comments y’all have tried to block it twice, looks like its getting extra tricky!
YoungHouseLove says
OH MAN! That one is killing us. I got it once and was scandalized, even though it’s a cartoon! We definitely are on the case and hope to solve this pesky issue once and for all! We also heard from someone today that there’s a pop up? We haven’t seen one on our end, but we’d love a screen grab and a name of what ad/link it’s for so we can try to block that too!
xo
s
lisa says
Great job on the phase 1 remodel so far.
This is going to sound really weird, but do you have any use for some brushed nickel door hardware after you paint your cabinets? Not sure if you’re keeping the knobs you have, but I’ve been hanging on to some brushed nickel knobs from our our last kitchen that I will probably never use…I have a ton (20-25+) and they are the standard Home Depot type. Any interest?
YoungHouseLove says
Aw you’re so sweet Lisa! I think we’re leaning towards oil-rubbed bronze, and hope to find a big contractor pack so they’re nice and cheap, but that’s such a thoughtful offer! I’d craigslist those babies so you can make some money… for pie! Haha!
xo
s
Barbara Bee says
Without reading too much of the most, I began scanning the photos. Almost though that the Craigslist photo was a radiator cover. That sure would be a cool design for one.
YoungHouseLove says
So funny! Totally would be!
xo
s
Diana says
We’ve never had a vented microwave or vent over our stove. I really like the look of a big vent like you had at your last house, just not willing to lose all the cupboards to make that happen here!
Dana@chocolateandsunshine says
I did my kitchen in phases, too and removed the built-in microwave, too,but I replaced all of the cabinets on the far end wall with white, open shelving and white subway tile. Now, the smaller stainless steel microwave sits on the counter. I really don’t have a place for it, but it’s the most used appliance in the space. I like your idea with the pantry. Nice! Good luck with the painting. I did that, too, and even with proper preparation I have to re-paint every few years as it still chips. It made all of the difference in the world going from an ugly wood to white. What color are you painting yours?
YoungHouseLove says
That sounds awesome! We’re still debating whether we should go with the colors we originally mentioned here in this post, or go with something else. I think no matter what we’re set on dark lower cabinets and light uppers! Should be fun to see where we end up…
xo
s
Shelley @ Green Eggs and Hamlet says
Wow, what a difference getting rid of the microwave above the stove makes! The hood looks great, nice work.
This update of yours has me brainstorming how we can get rid of our upper oven. We have a double oven in our kitchen but it’s not a wall oven. Rather, it’s like your stove/oven and then another oven above that (same placement as your former microwave). It’s nice to have two ovens but the upper one is SO low that I can barely fit a tall stockpot on the stove. I’m dying to get rid of it and open up the space a bit but it’s all one unit so I think we have to save our pennies and swap out the whole thing.
Cindy @Made2Style says
I mean is it normal how excited I get when you say painted cabinets by the new year?? I think not! #somuchloveforya
xo
YoungHouseLove says
Wahoooooooo!
xo
s
Erin C says
I’m excited to see what you do with appliances and various things with this kitchen layout since its much more similar to my house then your last kitchen was. Definitely loving the openness of the vent over the stove. We could never put a microwave above our stove because the height isn’t up to code or whatever they call it.
KarenH. says
Wow! so much nicer and now you can see what you’re cooking :) And what a handy tutorial. I don’t have a venthood microwave; but I have a really awesome olive green venthood. I think it’s powered with a small jet engine–it’s powerful and loud! But the green has GOT to go :) Now I think I can see my way clear to looking online for a replacement.
As you can see here:
http://i29.photobucket.com/albums/c290/jzygail/Kitchen%20before%20for%20Lee%20Wood/kitchenremodel004.jpg
the green kind of stands out :) After that, I’ll be ready to paint my cabinet in a really light grey to play against the counters–which while laminate, are in amazing condition for being 40+ years old. That will be the extent of my Phase 1: Kitchen for this winter. It was going to be the final step, but you guys inspired me with your new lighting :)
YoungHouseLove says
That’s going to look awesome Karen! Good luck!
xo
s
Bethany @ Dwellings By DeVore says
Who knew changing that out could make such a difference? Love it!
Karissa says
Love the look of the hood vent. I would love to do this in our kitchen but as of now I have no where else to put the microwave. I am curious, where did you end up putting your microwave??
YoungHouseLove says
That’s on the counter across from the dining table (there’s a desk area with a counter next to it) but we’d love for it to end up in the pantry eventually!
xo
s
Vanessa R says
Love your blog and how informative it is! FYI for the past couple of days when I click on the next page of comments a survey pops-up in another tab. I just realized after other comments that it might be something with your site. Here is the link http://survey.suitesmart.com/survey.sp?PAG=H;GID=29891;SID=119770;CRE=null;PLA=470481534;ADI=312794402;REF=;DOM=view.atdmt.com;PAT=/AVE/iview/470481534/direct;wi.300;hi.250/01/484021721;SEA=click=http://at.atwola.com/adlink/5113/3004661/0/170/AdId=5045721;BnId=1;itime=484021721;nodecode=yes;impref=1387484020990017678;link=
YoungHouseLove says
So sorry about that Vanessa! Thanks for the info! We hope to get this all squared away! Everyday it seems like something new is sneaking in there, but we’re closing in on it! Haha!
xo
s
Jill says
We installed this exact same hood last christmas and the hardest part of the install were the tiny halogen lights. It did require a second set of hands for 5 min but otherwise was extremely easy for any level DIY-er. Also, when we took down the noisy old vent we found scraps of the original wallpaper tucked behind it which we saved a piece of. One year later and we still love it, hopefully you will too!
YoungHouseLove says
I love hearing that! So glad, Jill!
xo
s
Rhiannon says
Haha, oh wow, just caught a pun that John (and none of the other readers) didn’t point out. In the third block of text right about the craigslist photo of your range.
“under $30, which is exactly the right range for us”
Ah? Get it? Cost “range” while you’re talking about range hoods? Haha sorry, I’m still working on my coffee.
I don’t know if that was a accidental pun or an intentional one, but either way, I thought I’d point it out and internet high-five John since no one else has. :)
YoungHouseLove says
Ha! Accidental pun for the win.
-John