How much wood could a woodchuck chuck if a woodchuck could chuck wood? What do I look like, a woodchuck expert? I have no idea. But I do know the answer to a related yet far lesser known riddle: how many pallet planks could a Petersik pry free if a Petersik could pry free pallet planks? You practice saying that five times fast while I walk you through the answer.
You know by now that the plan for our mondo 12′ long DIY console table (last shared here and here) was to build a rustic weathered-looking top out of some old pallets left in our yard by the previous owners (spotted in the background of this post).
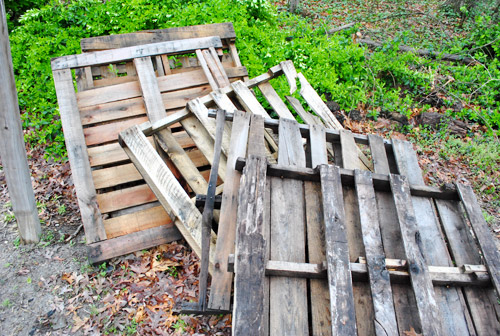
So last week I lugged them into my basement lair workshop so they’d dry off (“lugged” is the operative word because after a few days of rain, the heavy soaked wood made it quite a back-breaker). But since rain this time of year is frequent and sometimes unpredictable, I wanted to get them inside so I didn’t have to worry about a sudden spring shower thwarting my plans and soaking them all over again.
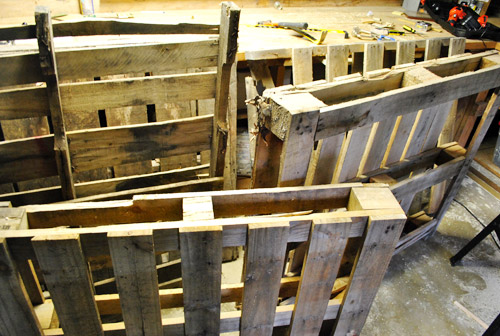
There were five pallets in total. Considering how much wood is on each one, I quickly thought to myself “self, this is way more material than I need.” Somewhere in the distance the universe began laughing at me behind my back. Hold on, we’ll get to that.
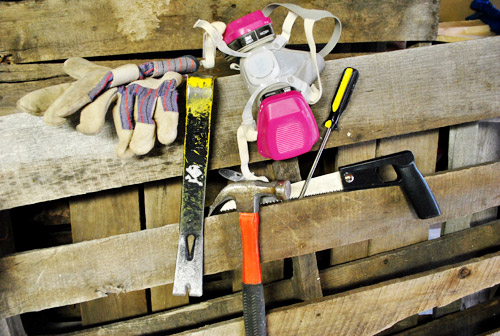
After a few days of drying out, Clara went down for a nap and I took my cue to start breaking down the pallets so I could start building our giant 140″ long console table top. My tools included work gloves, a crowbar, a hammer, a hand saw, a flat head screw driver, and a mask (since pallet sawdust isn’t thought to be part of a healthy diet and my wife is a worry wart like that).
It didn’t take long to figure out this would be harder than I thought. Mostly because each plank was nailed (or stapled) in three spots, and each spot apparently required 3 – 5 nails or staples to keep it in place. I first attempted to cut boards off with a hand saw, but since they were stapled on each end and in the middle, it left me with dinky little unusable pieces, so prying was a better bet. But it took a lot of effort to pry off a piece – and the process frequently resulted in cracking the wood (which pretty quickly rendered the entire piece useless since we wanted long-ish boards to work with and not small slivers).
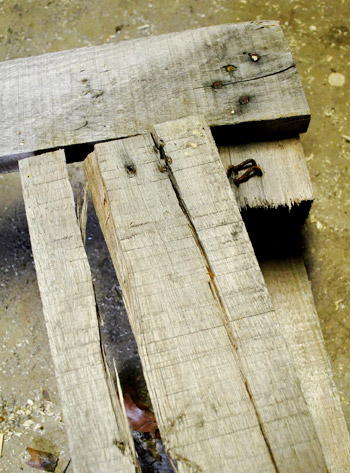
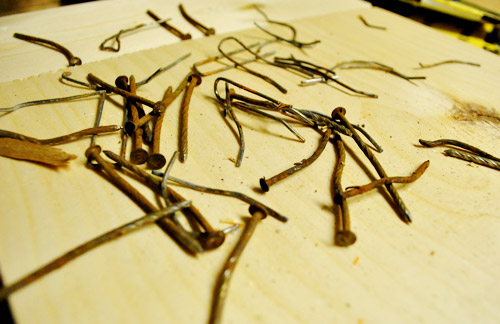
I’m no stranger to elbow grease so I stuck with it for the length of Clara’s nap (about 90 minutes). In that time, my nail and staple pile grew to look a little something like this:
And my pile of usable pieces of wood looked like this:
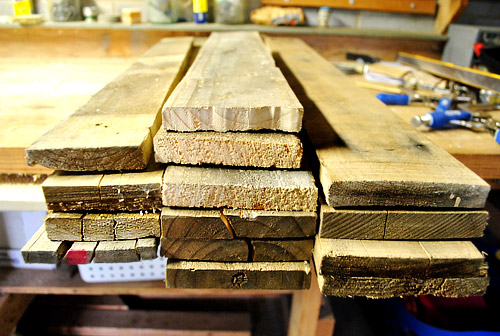
Fourteen usable pieces in 90 minutes wasn’t that discouraging at first… but then I looked closer at my definition of “usable.”
Notice how each piece of wood is a slightly different width? Since my tabletop would be comprised of 4 or 5 planks laid side-by-side, I realized that inconsistency would make achieving a consistent width across all 140 inches of tabletop very difficult – especially when I was looking for a very specific width (and don’t own a tablesaw to help me achieve that width artificially by cutting the boards lengthwise).
But I gave it a try and was able to find 5 pieces that gave me exactly what I was looking for (16 and 7/8″ of consistent width if you’re wondering):
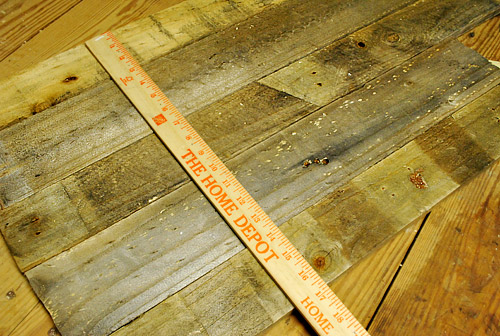
But only 5 pieces of the 14 that I fought tooth and nail (literally) to free would work to create that width. Meaning that in one and a half hours I had only wrestled enough wood to make about two feet of tabletop. Wop wop. By my math, that means it’d take me about 9 hours to get all 12 feet of tabletop free. And that’s only if my 5 pallets actually contained enough “perfect” pieces to provide all of the wood I needed to get the exact same width all the way down the 140″ countertop (an unlikely scenario considering I had already stripped one palette entirely to get these 14 5 usable pieces).
So as much as I loved the whole “reclaimed pallet wood” idea, all signs were pointing to “give up on it already.” And when I told Sherry about my doubts – how much time it would require, how much wood was cracking and breaking, how difficult it was to achieve the right width (only around a 33% success rate), and how I was running out of material – she basically said the same thing: “oh well, you tried – give up on it already so we can figure out a plan B.” Plus she added that it might have been a sign from the universe since there are more and more health concerns over the sometimes-toxic chemicals found in pallet wood (some contain formaldehyde, which is a known carcinogen) so although we planned to seal the wood with an eco-safe poly (by Safecoat) to keep things baby-and-rest-of-the-family friendly, the whole leave-the-pallets-alone-and-move-on-to-Plan-B thing was probably for the best.
And happyily, Plan B is already underway. We’re hitting up a few local places in search of reclaimed wood and might even use store-bought white wood like we did for the entire console base if our search for something “recycled” backfires (hooray for consistent sizes and no prying necessary!). Heck, if we went with the same wood that we already used for the console base, we could even beat the heck out of it distress it ourselves (I’m not gonna lie, the idea of “testing” a number of techniques involving hammers, screws, and crowbars appeals to me). It’s not quite as cool – or as free – as the original plan, but at least we gave the pallets the ol’ college try. And who knows, I might end up using them for something else or giving them a second life thanks to freecycle or craigslist.
Update: We’ve made great distressed wood progress in lieu of pallets for the console top. Here’s a quick sneak peek. We’ll share waaaay more info/details/videos about that process when we put everything together and reveal the finished console. Hopefully before Christmas. Just kidding, hopefully by early next week (is it just me or is this project taaaaking forevvvvvver?).
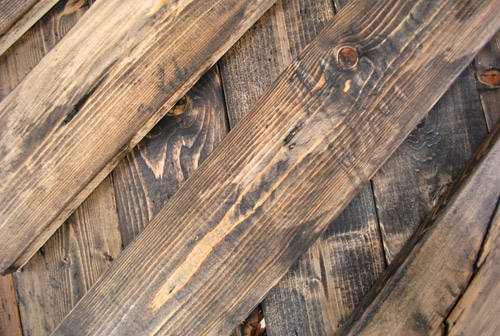
In other news – we (and by we I mean Sherry) finished staining the exposed sides of each console. You know the ones that have little shelves for easy-access storage that were last seen here.
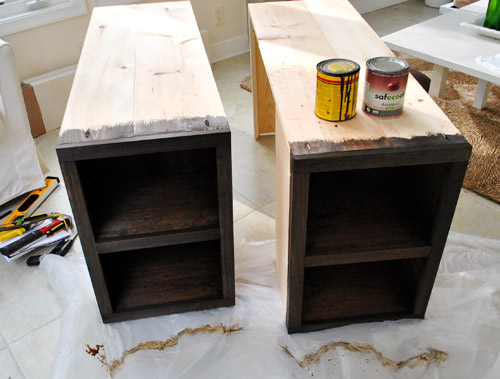
That picture above is a little dark just thanks to the angle. Here’s a more true to life shot. Yummy and warm, right? Wait, are grown men allowed to say type yummy?
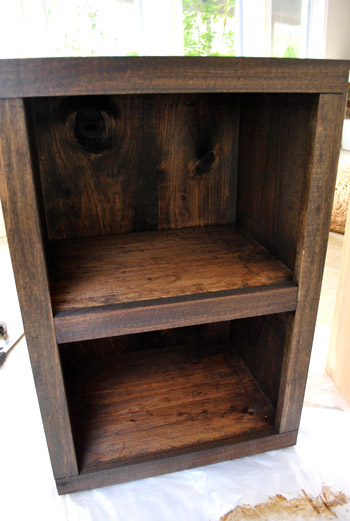
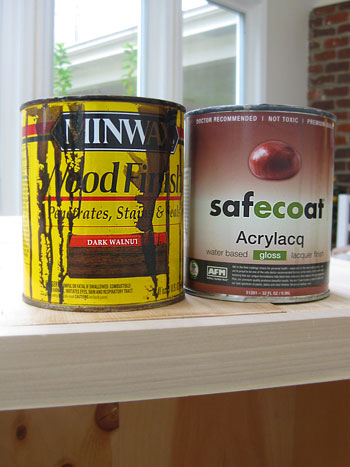
The staining part of the project was 100% free since Sherry was able to use leftover materials that we already had on hand: Minwax stain in “Dark Walnut” and Safecoat Acrlacq (which is basically the water-based eco version of polyurethane).
Since most of the console will be hidden behind Karl or under the eventually-completed tabletop, the only thing that needed to be stained was the shelves on the two exposed ends (once it all gets put together all the other exposed parts will be stained as well). So Sherry parked herself in the sunroom – which is sealed off from the rest of the house so she doesn’t have to worry about Clara inhaling anything – and did two coats of stain (which she applied with a foam brush and wiped off five minutes later with an old rag). Find more how-to-stain details here.
Then the next day she added two “thin and even” (her favorite words to describe anything involving paint or stain – she stressed them like you wouldn’t believe because they can make or break things) coats of the Safecoat Acrlacq with a brush. This seals in all the gross stain fumes and creates a water-based low-VOC and non-toxic “shell” that protects the wood and blocks off-gassing (as opposed to high-VOC oil-based poly) so it’s nice and kid friendly. You might remember that we (Sherry) also used it to refinish Clara’s dresser here.
We’re glad that the wood grain shows through for a varied and rustic look. Since the living room is a bit more modern than we’d like, adding hefty pieces with “authenticity” like this will help balance things out.

So we’ll hopefully be back with a big the-console-is-fiiiiiiinally-finished post as soon as we make some headway on the top. In the meantime I can be found murmuring sweet nothings at those freshly stained shelves. Seriously, can my wife work some serious magic with a rag and some stain or what?
Pssst- Confused by the console? Learn how we built it here and here. And of course we’ll share even more details when we finally piece this thing together and call it done. Soon hopefully, because I am so ready to stick a fork in this baby.

ALittleBite says
I love the stain color of the shelves!
Too bad the pallets didn’t work out, but it looks like you’ve got it under control.
Emily says
Aww, shucks. I’ve often thought I would become a pallet hoarder once I had a barn or some place to store it all. Nice overview of your efforts. Staining still looks great, but man, palette wood is so cool.
Cait @ Hernando House says
I completely agree. We have a stack of pallets in our tiny backyard, I can’t imagine how many we’d hoard if we had a barn!
Toni says
I SO wish y’all had your own HGTV show. I love to get on here for ideas and inspiration, but more than anything, y’all make me laugh!!! Keep up the good work!
Amanda says
I think you might have a typo…You know by now* :)
YoungHouseLove says
Thanks! Fixed.
xo,
s
Corrie says
the stain on the shelves is beautiful! the house we are moving into next week has it’s original crown moulding, trim and chair rail (in the dining room) all in that wood tone. love it.
also, i think your new reclaimed wood (“new reclaimed”…hmm, kind of an oxymoron) is even prettier than the pallets! it’s going to look gorgeous when you’re done with it! good work, as always, you guys.
Corrie says
“its* original”
…oops! grammar fail!
Toni says
BTW- I’m sure Sherry doesn’t remember months ago about giving me advice on whether to sell or stay, but after a lot of thought and prayer, my hubby and I decided to sell, move to a REALLY small, cheap apartment and pay off about a jillion dollars in student loans, and then search for a really good house to rehab! Wish us luck!
YoungHouseLove says
I do remember! Good luck in everything you do!
xo,
s
Logan says
What about cutting each pallat piece to your desired length and then setting them side by side until you get to 140 inches? so then the varying width wouldn’t matter as much and give it some character.
Just a thought…
Oh, nevermind…looks like you have it figured out…excited to see the table.
Jo says
Good idea, I would have cut them, too, just inside the nails. I don’t think you’d lose much that way. Just love the thought of using something up.
YoungHouseLove says
Good thought guys – I actually did that on a couple of the pieces (which is why I had the small saw handy). But I was ending up with really short pieces because they’re nailed on both ends and in the middle, leaving me really small chunks.
Honestly I could’ve dealt with that in the long run, it was just the varied widths that put me over the edge on this one.
-John
Bree C. says
I love the look of old pallets, but I know all too well how hard they are to take apart. I just used them to make rustic wedding signs, so they didn’t need to be perfect, but I can imagine it would be an impossible feat for your project.
I love the idea of doing something like this with them:
http://www.housetweaking.com/2011/01/12/up/
Leah says
Bree, do you have a post or picture with those pallet wedding signs? My soon-to-be sister-in-law and I were just talking about signs for her wedding and we have lots of pallets we could use, so it would be nice to see something for inspiration!
annabelvita says
Looking good! On the “thin and even” point – I think of Sherry every time I paint my nails thanks to how often she says this!
Robin @ Our Semi Organic Life says
lookin’ good! Can’t wait to see how it comes out. Hope everything isn’t too dark in that room. I loved your light/bright/airy old jams – hope you get a good mix of it all for your liking!
YoungHouseLove says
We have white trim, soft grey walls, white frames, a white desk and a white table & chairs along with a light ottoman so it should end up being a nice balance. We hope. Haha.
xo,
s
Nikki says
oh how I love the Petersik’s, and their crafty, crafty ways :)
Cait @ Hernando House says
Looks great so far! Can’t wait to see it finished!
Wendy says
So awesome. I think the value of pallets is so overlooked. I just posted yesterday on an art display wall we made this weekend from old wood pallets (cause we didn’t have any money to build one!). Love the bookcases!
Kristina Strain says
Distressing tip: use chains. My dad is a cabinet maker, and my mom and I had great fun one summer banging the hell out of a to-be-painted kitchen for a customer who wanted the “distressed” look. Cheers!
Amanda says
Do you all have any stains you love? We are looking for a stain to use on some nursery furniture we are building. We really wanted something with no VOCs, but aren’t having any luck finding one. Any suggestions?
YoungHouseLove says
There are some water based stains that are eco friendly on sites like greendepot.com. Or you can just use an eco sealant to safely seal things like we did (we love SafeCoat). Hope it helps!
xo,
s
Amanda @ Our Humble A{Bowe}d says
The ends do look yummy and warm, John. And, I think the top looks promising, too. Super excited to see the final product.
Also, I’m guessing you’ve seen the Geico woodchuck commercial,right? If you haven’t, here’s a link: http://www.youtube.com/watch?v=DjGwusHrOtk I just think it’s funny. :)
YoungHouseLove says
Hilarious.
-John
Julianne says
Have you seen this? http://www.apartmenttherapy.com/la/diy/diy-small-space-pallet-garden-life-on-the-bacony-143775
That would be great for any pallets you have left over!
YoungHouseLove says
Love it!
xo,
s
Paige says
I love how the stained pieces came out; it will definitely tie in with your rustic console top. After seeing the title of the post I was so excited (I thought this was the finale post!), but alas, DIY projects can really kick you in the arss sometimes. Good luck this weekend with the rest of the project…I’m sure it’ll turn out perfect.
Erica says
My grandfather actually holds the US patent for a palate break-down machine…Wish I could have helped ya out!
Here is a picture of it!
http://patimg2.uspto.gov/.piw?Docid=04241495&homeurl=http%3A%2F%2Fpatft.uspto.gov%2Fnetacgi%2Fnph-Parser%3FSect1%3DPTO1%2526Sect2%3DHITOFF%2526d%3DPALL%2526p%3D1%2526u%3D%25252Fnetahtml%25252FPTO%25252Fsrchnum.htm%2526r%3D1%2526f%3DG%2526l%3D50%2526s1%3D4,241,495.PN.%2526OS%3DPN%2F4,241,495%2526RS%3DPN%2F4,241,495&PageNum=&Rtype=&SectionNum=&idkey=NONE&Input=View+first+page
YoungHouseLove says
Woah that’s fancy!
xo,
s
karen says
looking good. i really like the colour of the stain!
karen @ our slo house says
Good try John. (strong pat on the back to you.)
I love the color of stain you used, and the *teaser* photo of distressed wood that you found is beautiful!
p.s. John, I’m surprised you don’t own a table saw. Don’t you think you’ll use it enough?
YoungHouseLove says
I most likely would, although I’m pretty surprised that I’ve built everything from a desk to some shelves and this giant console without one. Maybe Santa will bring me one…
-John
L says
You had me at lair. Oh my gosh. You guys are too funny.
Angie says
What–pallets have chemicals in them??? We were going to remake some into raised beds for the garden!! I researched it, and even found tutorials on how to–everything I read indicated pallets were untreated! :-(
YoungHouseLove says
Only some, just google “pallet chemicals” and see what comes up. You also might be able to seal them with SafeCoat like we were planning. Hope it helps!
xo,
s
Elisa says
Some are, some aren’t. If you can get some pallets from a big company they might be able to tell you whether they are treated or not.
Andrew the Wholesale Flooring Guy says
What a saga! So, did you ever find something to do with the old pallets? Bree’s idea is cool (although I’m not sure I’d want treated wood over my bed). I wonder if you could use it for some kind of decking in the garden. http://www.gardenzine.co.uk/pallet-deck.html
Still a lot of work but you get to re-use!
Andrew
YoungHouseLove says
Not sure what we’ll end up doing with them bur you know we’ll post about it!
xo,
s
Sarah says
I was just looking through pictures of things made with pallets… what about a bench? (as in: http://www.recyclart.org/2009/02/pallet-chair-2/)
That way you could keep it outside, and the possible chemicals in the wood would be less of a concern.
YoungHouseLove says
Fun! Thanks for the link.
xo,
s
Kathy says
If freecyle or Craigslist don’t work out to recycle your pallets, we ended up taking ours to our Home Depot. They will get reused there, no worries!
YoungHouseLove says
Ooh that’s a good tip.
xo,
s
Ted says
When I had pallets, I dried them out, broke them up (I wasn’t worried about “nice” pieces, so fast and easy with hammer) and used them for kindling for the fireplace. Once dried out, that wood is thin and catches fire easily and burns hotter. Put a plank or two under your logs and they’ll burn just enough to get the log to catch and burn. For those worried about ones coated in methyl bromide, those pallets are supposed to be stamped with MB on the boards. If there isn’t a stamp, it should be safe to burn.
Kari says
I know you’ve given up on the pallet wood idea, but I thought I’d send you a link to this video I found a little while ago when I was contemplating some re-purposed furniture. I haven’t used it myself, but it seems promising. Might come in handy for your readers or another project down the road that doesn’t require such particulars.
YouTube video
(This was my first attempt at some code to insert a link to comments–if it doesn’t work, here’s the plain text link: http://www.youtube.com/watch?v=ZtPmUZ-k3aI)
Bob says
This is starting to come together. I didn’t think the pallets would work, but you’ve come up with a good solution it looks like.
Looking forward to seeing this complete.
Jany Claire says
I can not wait to see this finished! I made my husband keep a pile of old pallets that they have at his work to make something out of. I just love the look of the wood. He doesn’t get it, thinks you can’t make anything out of it. Can’t wait to show him your finished product. Looks great so far!
Lindsey says
Love the color of the stain…Can’t wait to see the finished product!
Wom-mom Ethne says
Looking forward to the finished product. ~Ethne
Beatrice says
It bugs me that you’re not staining the whole thing just for good measure even if it will be ‘hidden’.
Michelle says
Right there with ya, Beatrice! I’m all about saving time and money, but it would bother me knowing that it isn’t really “finished”. Plus, it’s limiting if you ever move furniture around. I’d want to do it all at once rather than down the road if needed.
But I’m sure it will look great in its designated spot! Excited to see!
YoungHouseLove says
Once it’s put together all the exposed parts will be stained (when the top goes on you won’t see a lot of the raw wood that would take time and materials to stain), so I guess we just think that’s standard practice (when we built our crib some parts weren’t painted or stained since they were “non see interior pieces”). I guess it’s one of those to each his own things. Of course we can always go back and stain anything if it bothers us!
xo,
s
YoungHouseLove says
Once it’s put together all the exposed parts will be stained (when the top goes on you won’t see a lot of the raw wood that would take time and materials to stain), so I guess we just think that’s standard practice (when we built our crib some parts weren’t painted or stained since they were “non see interior pieces”). I guess it’s one of those to each his own things. Of course we can always go back and stain anything if it bothers us. Hope it helps!
xo,
s
Lauren says
An awesome idea for those left over pallets:
http://amandacarverdesigns.com/?p=1446
YoungHouseLove says
Love it!
xo,
s
Georgia Rowe says
Love it!
I was going to suggest before i read the whole post, why didnt you saw the wood off just after the nail? but heck the wood you have done your self looks super!
YoungHouseLove says
Hey Georgia,
I did do that for a couple of pieces but it was time consuming and since it’s nailed on both ends and in the middle, it was leaving me with really weird pieces. In the end, it was the varied widths that pushed me over the edge.
-John
heather says
I see only one solution to this pallet issue, it’s time to slowly start building up a real woodworking shop. As I see it, a table saw and joiner are necessary, right off the bat, for this project. ;) I mean, think about it – with all the projects you do, it will surely pay for itself over time.
Okay, so I’m the wrong woman on this one. I may be a rare breed of lady in that I have no issue with, and in fact encourage, my fiance to keep his wood shop top notch. I’m still debating on purchasing a lathe to boot. I also am on board with the logging winch we’re getting. What can I say. Sometimes you just need to have these things. :)
I vote wood shop. Sherry likely votes telling me to shutttt uppp. ;)
YoungHouseLove says
Haha no way – I’m all for more tools to get ‘er done! I’m amazed John has built a desk and a giant console without a table saw!
xo,
s
heather says
My kind of lady! He mentioned the mask for pallets so I wasn’t sure (though I knew you most certainly weren’t the “can’t do the dishes without gloves” kind of girl. I know a few ladies who like dirt but grumble at more woodworking tools. As far as I’m concerned it’s simple math. Decked out woodshop = higher quality furniture & cabinets & house = happy Heather. I’m lovin’ it!
Val says
Oh well, good try! Now we know why those “reclaimed” coffee tables cost a bajillion dollars…
Tracy Bryan says
This project is looking amazing! I never knew how stain could transform something. Now i am looking around my house in search of something to stain. Hmmm…I think the master bath needs a makeover and beautiful walnut stain just might do the trick! You mentioned that you use a rag. Do you use a brush at all, or just rub it on?
Thanks!
YoungHouseLove says
I use a foam brush to put it on and a rag to rub it off five mins later. But I’ve used a cheap brush before too (and that works just as well). Good luck!
xo,
s
Rachel says
The stain looks great! I’m looking forward to seeing the finished console. :)
Karla says
Hey! This is turning out great already! I was just wondering if you ever thought of using old gym floor for the top? I know Kevin and Layla from The Lettered Cottage used it in a bedroom and it turned out amazing! I don’t know if it is as rustic as you want but it could be a cool look!
Keep up the good work! You guys are inspiring!!
YoungHouseLove says
We love that project so much! It all came down to what we could find for the top, but it’s already coming along. Can’t wait to put this thing together and call it done!
xo,
s
laura says
I absolutely LOVE the color and “look” of the shelves on the console! I love the rustic “mysterious” type look it brings. I might have to give staining a whirl…it’s always sort of intimidated me. :s
caree says
Former Customs Inspector here. You are correct in worrying about the chemicals in those pallets. If those pallets were ever used in overseas shipping, there’s a good chance that they were gassed with Methyl Bromide or just plain ole Heat Treated, to get rid of any pests that might want to hitchhike on over. In the past few years, instead of gassing the whole shipment, they just gas the pallets (which are typically the pest carriers) and then stamp the pallet with an MB (methyl bromide) or HT (heat treated); and either will have a tree-like symbol next to it. Before all these regulations came into pass, who knows what it could have been treated with? I have no idea what the hazards of MB is in the home, but better safe than sorry is my guess. I think they might be ok for an outdoor project? Maybe raised garden beds?
YoungHouseLove says
Our only question about using them for garden beds or a compost pile would be if the chemicals could leech into the herbs/veggies in the garden bed (ew, poison plants) or into the compost soil that we might later use on herbs/veggies in the garden. Kinda scary when you let your mind wander about stuff like that. Maybe it’s best to use it for non-edible things like compost soil for shrubs and trees.
xo,
s
denise says
Totally love your console idea! Might I also add that you always keep me entertained with your titles and blog writing. I cannot miss a day!
Denise
Extreme Personal Measures
Alexandra says
Oh man do I have a thing for pallets! I’ve always had big dreams for the ones tucked by our garbage bin at work. My first goal has been a compost bin. Is this where I mention I drive a mini cooper? I have to figure out how to get pallets on one side of Dallas to the other. ugh
while you already have your plan B, I happened to think of old fence pannels — was that considered? Thanks to mother nature that wear and tear would be provided! My neighbors have their old fencing nicely bundled and tied in groups of 8 or so pannels for easy grabbing and those wheels start turning again: I’ve stuffed a 9′ kayak in the back of my car, that fencing would be nothing!
So a true story: I work for a nail company and we buy by the pallet. All around the department I’ll hear “*grumble grumle* pallets *grumble grumble*” but funny enough pallets sounds like Alex, which has turned me into a slightly paranoid employee.
YoungHouseLove says
Yes! Old fence posts would have been awesome! Just couldn’t find ’em! It’s harder than you think to find amazing reclaimed wood in the width that we needed – probably because it gets snatched up right away because it’s so cool looking!
xo,
s
Ashley @ DesignBuildLove.co says
Lookin’ good guys! The stain looks great and I can’t wait to see the top of it all!!! :)
rachel says
Ok, a few things… A. Love the idea of John wearing a pink mask and B. I laughed out loud in the office when he mentioned “murmuring sweet nothings” to the stained shelves. Way to get me in trouble at work, John!
libby whiting says
Even though it is going to be hidden, I think you should stain the entire console table. Someday you may want to rearrange or you may move again…just feels unfinished.
Carolyn H. says
I’m totally being bossy and, of course, do what’s right for you, but I think you guys should stain the entire console table — even though it won’t show behind the couch. You might want to repurpose it someday (or donate it to someone else who could use it, who knows) and that’ll be a lot easier if it’s finished. You know, if it’s a piece of furniture that actually is what it appears to be.
YoungHouseLove says
Once it’s put together all the exposed parts will be stained (when the top goes on you won’t see a lot of the raw wood that would take time and materials to stain), so I guess we just think that’s standard practice (when we built our crib some parts weren’t painted or stained since they were “non see interior pieces”). I guess it’s one of those to each his own things. Of course we can always go back and stain anything if it bothers us.
xo,
s
Teresa says
Just an idea- if you do want to use the reclaimed wood later on down the road, you might try just using a Skil saw to cut the ends off of the pallets- you lose a few inches, while still getting a good volume of usable wood.
YoungHouseLove says
I probably will do something like that if needed in the future. I actually did cut some of the pieces pictured, but since the boards are nailed/stapled on both ends and in the middle it still wasn’t straightforward – unless I wanted really short pieces. Plus, for this project at least, the varied widths was really the main problem.
-John
Elizabeth says
Those look great! I think console tables are in my DIYing future!
mere... says
I’m moving in a few months and hoping to make a headboard out of distressed wood, but have been a bit worried about what residue would come along with old fence posts or pallets. I’ve spent quite a bit of time googling things like “how to make wood look old” all the while hoping you all would tackle it on your blog for some reason before I actually need to do it myself. I was so, SO excited o read your post this morning. Sorry that the pallets didn’t work out for you all, but I can’t wait to see how your Plan B turns out!