Ever since we spotted a rain barrel in action on our visit to Matt & Kristin’s house last fall, Sherry and I have been itching to harness the power of our own otherwise wasted rainwater. So we participated in a recent rain barrel making workshop offered locally and we’re here to pass along the play by play.
First things first – why rain barrels? Well, placed under one of your downspouts, rain barrels conveniently collect rainwater that you can use to water gardens and lawns, wash cars or even fill birdbaths and ponds. A 1000 square foot roof yields about 600 gallons per inch of rainfall, so that’s a lot of water (and money) to be saved. We’ve even seen ’em hooked up to a soaker hose for easy and free garden watering. Novel idea, eh?
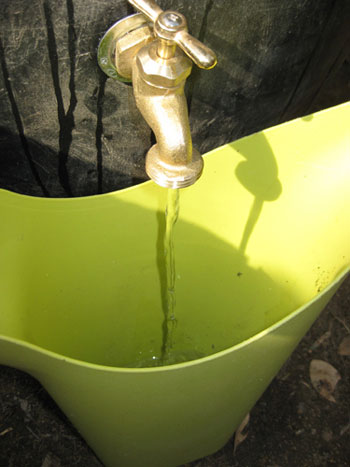
Rain barrels are relatively easy to make, but finding the barrel can be a challenge. Which is why many people will purchase them already assembled for upwards of $120. Needless to say, we were thrilled to find a local workshop that provided the tools, equipment and instruction for only $40. They provided everyone with a 50 gallon food grade plastic barrel… that just happened to have a previous life as an olive shipping vessel. Funny, huh? Sherry said it made her mouth water.
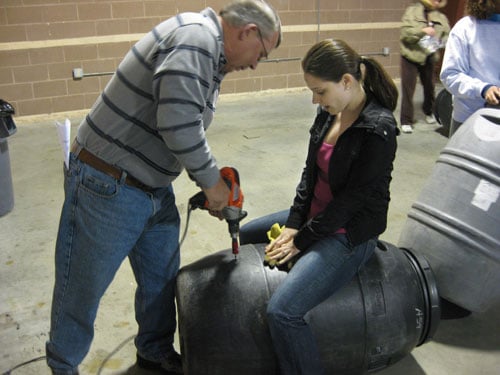
The first step was drilling the hole for the faucet. You’ll want to drill it as low as possible (since the water below the hole won’t flow out) but not too low that you can’t attach a hose or place a watering can under it (which obviously would be no good). Here’s Sherry sitting on our barrel to keep it from rolling while one of the volunteers operated the hole saw (a regular drill with a hole-cutting attachment). In less than 20 seconds, we had a hole for our faucet.
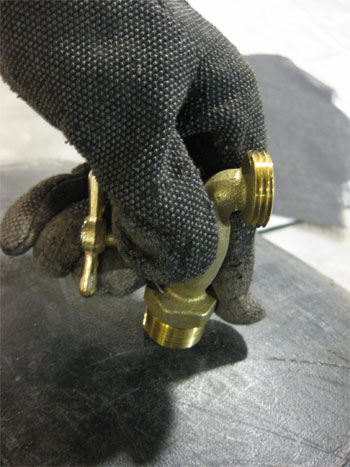
You’ll want to keep the barrel on its side and then use your faucet (or “hose bibb”) to thread the plastic edges of the hole. You’ll do this by screwing it all the way into and back out of your newly made hole once. It may take a little bit of force to get the faucet threads to catch, but be careful not to push it so hard that you damage the plastic threads you’re creating. In under a minute we had made our threads and removed the faucet for the next step…
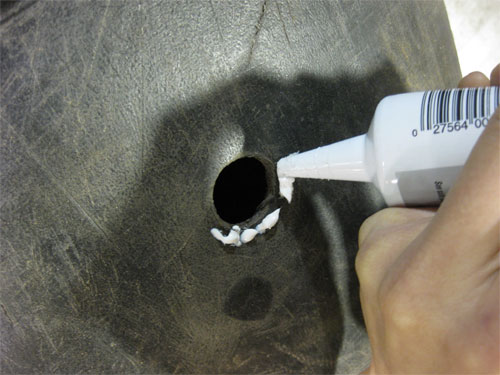
Once you’ve unscrewed the faucet, you’ll want to apply a thin line of caulk around the edge of the hole:
Then you’ll place a reducing washer over the hole, with the caulk acting as the adhesive. Reducing washers have a raised lip on the inner rim, and that raised portion should go against the barrel.
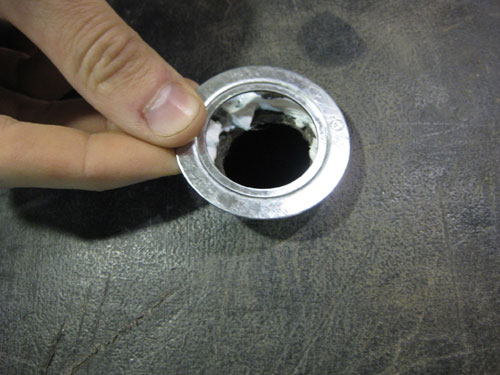
With the reducing washer firmly in place, you can screw your faucet back into place for good (this will be a lot easier since you’ve already created threads by screwing the faucet into the hole and removing it a few steps back). When it’s firmly in place, it should look something like this:
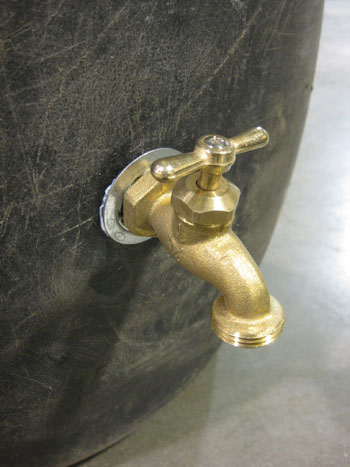
Now that you’ve created a watertight seal on the outside – here comes the fun part – you’ve gotta do the same on the INSIDE. Yep, time to crawl inside the barrel. You’d think this would be the perfect job for a petite person like my 5’2″ wife. Nope, somehow I got that assignment (and Sherry kept her job as barrel sitter to keep me from rolling away).
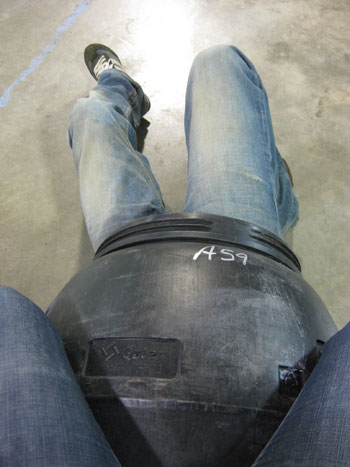
Inside the barrel, you’ll be repeating the process with the caulk and reducing washer – so remember to bring those with you when you go in. You’ll also want to bring a flashlight, because it’s dark in there (and it may smell like olives). Once you’ve got your washer caulked in place, you’ll screw on a locknut to secure the faucet. You’ll probably need the help of some pliers to ensure you’ve got the locknut on there nice and tight.
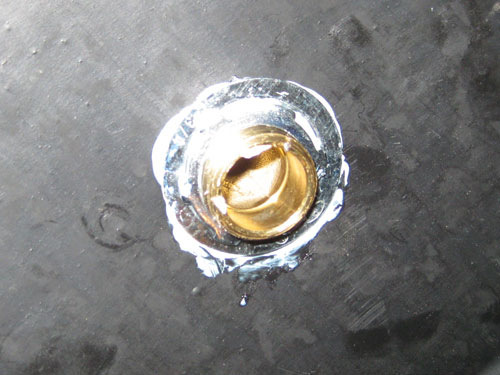
Your partner should stay sitting on the barrel to keep it from rolling away throughout the process. Or if you’re Sherry, you could use the opportunity to snap photos of your husband looking like, and I quote, a “California Raisin.” All I needed were some oversized gloves and a saxophone.
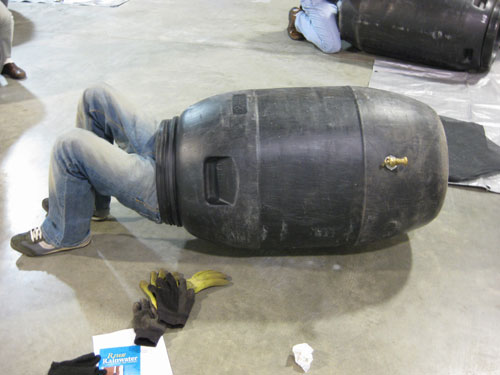
That completes the process of attaching the faucet. We did have the option of repeating the process at the top of the barrel with a “rigid nipple.” Basically, it’s an overflow spout that you could use to connect multiple barrels together. Since we’ll be a one barrel family for now, we’ve just opted for the overflow to come out the top (meaning when the barrel fills up with water, the excess spillover will do just that- spill over the top).
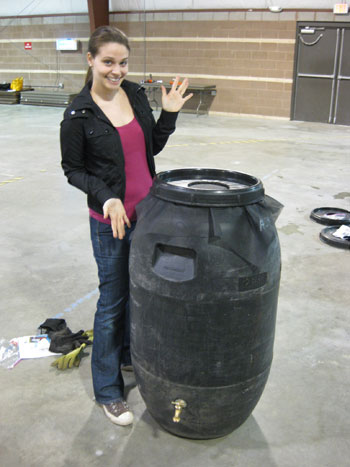
Speaking of the top – the barrels we were provided already had 6″ holes drilled in their lids. So all we had to do was screw the lid on over a tight mesh mosquito screen to keep any standing-water-lovin’ bugs out of our barrel. Here’s Sherry with our finished product:
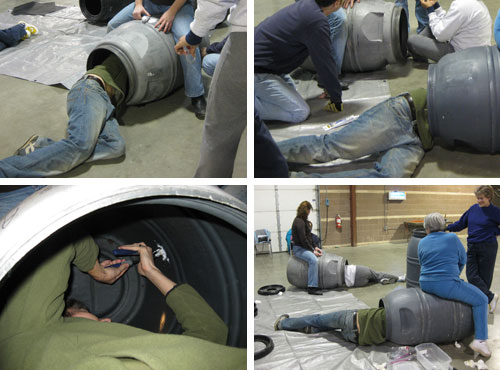
That would’ve been the end of our workshop adventure, but I guess some other people working near us took note of my locknut-tightening skills. Before I knew it I was climbing into not one, not two, but three other barrels to help other barrel-makers ensure that their faucets were secure. And should we be surprised that Sherry seized the opportunity to take more photos of me in those barrels?
Once I finished barrel diving, we got the thing crammed into the backseat of our car and took it home for placement in our backyard. We picked a downspout at the edge of our driveway that was completely hidden from the front of the house, and mostly hidden from the side (let’s be honest, rain barrels don’t scream curb appeal). Luckily the placement will be super convenient for Sherry’s new back garden (stay tuned to see what sorts of edible goodies and purty bloomers she’s planning to grow).
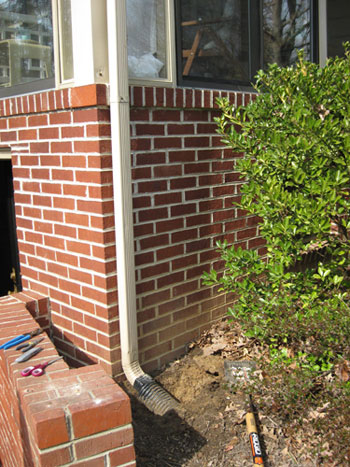
Then we just had to adjust the height of our downspout so it would spill into the top of the barrel. We detached the elbow at the bottom of the spout and dug out the underground plastic tubing that had been in place (and because we didn’t have any fancy metal snips with us, we broke out a box cutter once we figured out our desired height). Here’s Sherry making the cut while I stood by and watched. She’s hardcore. Maybe she was trying to make up for all the barrel-crawling I did?
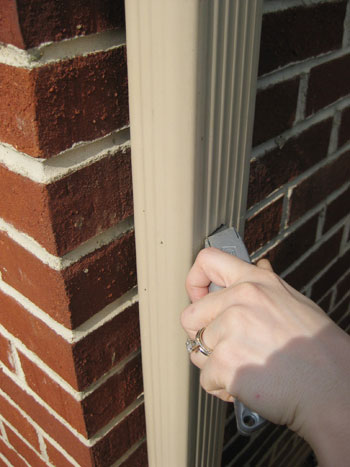
It did the trick, and with the gutter cut to the right height we just reattached the existing end spout and slid the barrel into place underneath it. Voila. Bring on the rain.
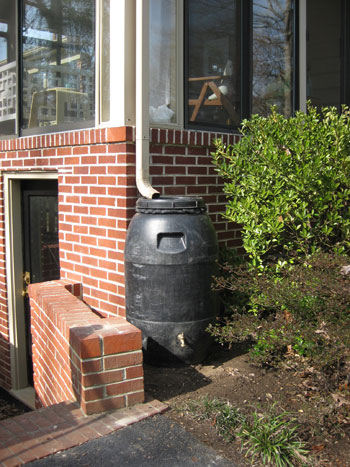
We should note that it’s extremely important that the barrel sits on level ground (you may want to use a shovel to level the ground and even lay some sand to be sure). A full barrel can weight up to 450lbs so you don’t want it tipping over on you. Of course we’re going to have to do a few more rain dances before ours will get that heavy. Bring it on Mother Nature.
Do any of you guys already use rain barrels? Any advice or tips for us newbies?
If you’re in Richmond and are looking to make a barrel of your own, check out upcoming workshops through Chesterfield County ($40) and Tricycle Gardens ($75).

Kate says
John, you’re a really good sport to climb into those barrels for Sherry and for those other folks. Think of the pictures as proof of your kindness, not anything like how silly you look with your legs sticking out of the barrels. ;-)
Jackie says
We love rain barrels! We got three, and all working great!
I would add one more tip – Install 3/4” spigot instead of 1/2”. They are $7-$9/piece, but it will totally worth it!!
When we bought our first rain barrel, it had 1/2” spigot, and it drains REALLY SLOW! Beside raising the base to create more water pressure, 3/4” spigot will definitely add more water pressure for you.
Alison says
I have never heard of this! We just bought a house. Literally! We just heard work today that it’s all yours and I can’t WAIT to learn from you two. This is one project hubby and I will be taking on :)
Carol says
Look at your local Craigslist for rain barrels. You can usually get them quite inexpensively,
Jen says
Hey,
I live in Chesterfield County and went to a rain barrel workshop last year. It was so great because they made it so simple.
I havent’ read the other responses, so please excuse me if I repeat what someone else says. It’s a good idea to elevate your rain barrel on a couple of cinder blocks, for example. That way, the water comes out of the spigot easier (something to do with gravity and physics…).
I’m so glad you got your rain barrels up!
Jen
r8chel says
A California Raisin?? That’s hilarious!
caitlin says
actually, rain barrels do scream curb appeal! there is an entire neighborhood in pittsburgh that is devoted to rain barrels and they are awesome to see in the front yard. I would be thrilled to buy house that came with one.
if you wanted to though, the organization in Pittsburgh that builds and distributes them (Nine Mile Run Watershed Association: http://www.ninemilerun.org/) has in the past auctioned off painted and tiled rain barrels that are beautiful. I am suprised you guys–with all your painting and beautifying skills–did not decorate yours!
Meredith says
I searched for a similar program local to me, and discovered one in Cumberland County, yay! A local high school’s ag department makes them and sells them every spring. I’ve signed up for one!
If anyone’s interested, here’s their website, which has DIY instructions and a handy parts list with approximate prices: http://www.cumberlandcd.com/rainbarrel.html
Good luck, everyone!
Cindy says
What a great idea guys!! I will definetly have to look into creating one of these when we move into our house this summer!! I think my bf’s work even has tons of old barrels, we might be able to use! Good on you for another eco-friendly tip!
Rob says
John,
One trick I had to make the barrel a little more appealing to the eye was to use spray paint for plastics to have the color blend a little more with our house. This is the paint I used, the project turned out great.
http://www.krylon.com/products/fusion_for_plastic/
jeannine says
awesome! we’ve been collecting rain in 5-gallon buckets for a few years, but this is much better looking!
geek+nerd says
Thank you for posting this! :)
Emma says
I’ve seen these rain barrel workshops up here (Minnesota) and they had an additional section; where, at an addition cost, you could paint your barrel to match your yard decor. They used the new spray paint for plastics and stencils to create all kinds of cool designs.
I haven’t made mine yet, but I plan on using a leaf design to camo it into my woodland garden (overlapping leaves in shades of green).
I just thought to pass that along :)
Jorge says
Excellent write-up and we really enjoyed the photos. Our family will soon be adding a rain barrel, and this has helped us visualize the process. Thanks!
Gravity Gardener says
I made a rain bucket out of a $10.00 Trashcan. So far so good.
I have step by step pictures if interested.
Not as fancy as yours, but it does the trick
http://gravitygarden.com/rainbucket/?page_id=46
YoungHouseLove says
That’s so great! Thanks for the link.
xo,
s
Kim says
Two suggestions:
You don’t want the spill-over to end up next to your foundation or you’ll have moisture problems in the future. You want a diverter port toward the top of your barrel (that extra nipple you didn’t get) then attach a garden hose and have the run-off emerge farther away from your home. (Maybe into the flowers nearby?)
Your spigot is pretty high on the barrel. If other do this project, consider making the spigot lower and setting the barrel on landscape stones or timbers. You’ll be able to access the water at the bottom of the barrel and fit a watering can beneath the spigot.
Nice job, otherwise!
YoungHouseLove says
Thanks for the tips Kim! We’ve been loving our rain barrel and using it often!
xo,
s
Susan says
Check the water laws for your state also. It’s a PITA, but we live in CO and the water laws/rights here are such that we are not supposed to have rainbarrels. I am sure there are many around, but as the government (local/state/federal) become more restrictive and invasive, do not be surprised if certain areas end up with ‘water police’, snooping over fences and behind homes. They are not sold in any nurseries and there are no classes for making your own. And we have classes for EVERYTHING green or environmental.
There are severe fines for ‘circumventing’ this law. It doesn’t matter if the rain falls on a house that you own and rolls down your drainpipe into your water barrel, you are not allowed legally to ‘divert’ that water into a rainbarrel so you can use it to water your yard, your garden or anything. You cannot divert water in such a way that prevents it from soaking into the groundwater system. Period. End of discussion. Friend of mine recevied his engineering degree a few years ago, civil engineering and he is involved in water law here in CO and I got the whole lecture ;D
Allison Bryant says
This may be a stupid question but what do you do with the water during the winter or in seasons when you are not going to need to water your garden etc?
YoungHouseLove says
No it’s a good question! We actually had the same one when we made it. We learned that in our climate (which only has a few deep freezes a year) it’s safe to leave it outside year-round with the spigot open in the winter (so it drains) to avoid any freezing & cracking. You can also drain it each winter and bring it into the garage if you’re dealing with colder winters (it’s not very heavy when it’s empty). Hope it helps!
xo,
s
Allison Bryant says
Good to know we live in Richmond too so I think its safe to say we have a similar climate : )
Rowan says
For all the Colorado folk who have commented on the illegality catching rainwater there is an article in the New York times that indicates the Colorado legislature finally figured out that law needed to be changed.
http://www.nytimes.com/2009/06/29/us/29rain.html?_r=2&ref=todayspaper
Caitlin says
This is too smart!
Lauren says
I am going to make my own rain barrel today! Here is the link for all your Northern Virginians..
http://www.fairfaxcounty.gov/nvswcd/rainbarrels.htm
flame821 says
We live in Pennsylvania and rely on well water, rainbarrels are wonderful!!! My husband is a department head in a large nursing home and they get detergent sent to them in 35 and 55 gallon plastic drums and he brings them home and I bring out the power tools. Because I have a fairly large vegetable garden I use the extra connection at the top and make a ‘string’ of hose to keep them flowing from one to the next. I drain them around the first frost (my gardening is long done by then) and I get them ready again once Spring thaw hits. They really are a huge benefit, I can keep a nice, productive garden and I don’t need to worry about my well level dropping over it.
Nancy says
Thanks for the instuctions. The only additional thing I might add is that you may want a second lid to keep the water from evaporating between rainfalls. I live in Texas and it doesn’t rain here very often but when it does it is usually a torrent. But if I leave the barrel open, much of the water evaporates before I need to use it.
Tricia says
Hello!
We purchased our rain barrel about a week ago. We dug a hole as deep as we could, filled it with rocks and sand. I’m watering the area to let it settle, then I’m going to add a base of unused bricks to create a level base. Then the barrel on top.
We did this because ours is only 65 gallons and might overflow, so we wanted it to go straight down, not out to our foundation or patio.
We are connecting a soaker hose to the spout that will be on all the time, unless there is rain in the forecast. I planted a shade garden next to the area (ferns, heuchera, hosta, japanese forest grass, hellebores, etc.) that will appreciate the slow trickle of the hose. Ours also has an attachment so I can use it to fill up watering cans for potted plants or my compost bins.
Thanks for your blog, it’s pretty cool!
sje says
Tricia: We took control of our overflow by using the largest overflow port and flexible hose we could find – now we easily and safely re-route ALL the excess/overflow after the barrel fills – we got the parts from Aquabarrel: http://www.aquabarrel.com/product_rain_barrel_plastic_parts.php
rp says
I was all set to constrict one when I went to my local barrel recycling facility in Chicago and they had pre made rain barrels they we selling for $45 (I managed to get 2 for $85 since that’s all the cash I had). Anyway I think it was probably worth it considering the cost of materials and labor to construct one. Not to mention looking looking a CA raisin. After 3 weeks of waiting we got a downpour last weekend that filled the 55 gallon drum in an couple of hours. My problem now is trying to get the water pressure up to a point where I can use it effectively. I attached the overflow spout to a soaker hose and had nothing come out. I plan to elevate it from the inch cinder blocks to maybe 18 or 24 inches by adding on a few more. Lastly I have a small water pump for a water feature (fountain) in my back yard which i may resort to using if all else fails
erin says
Sherry,
I love the idea of a rain barrel to save water to water plants, wash the car, etc. However, I live in southern California where it does not rain much!! Is it worth it to make one if it will not have much rainfall to get water from??
Thanks :)
YoungHouseLove says
Good question, Erin. You may want to consult with someone local, but it sounds like to us that any way to hang on to what little rain you get is worth your while. Hope that helps!
-John
Nichole says
DO NOT water your vegetable gardens with roof water. Asphalt chemicals and others are present. Use this water for only plants and grass and other grey water uses, NOT for human consumption.
YoungHouseLove says
Good to know! Our city actually recommends that you avoid using rainbarrel water after you’ve had your roof treated for algae, etc (we don’t do that though) but otherwise they says it’s ok for use in herb, veggie and container gardens. Of course if anyone would rather be safe than sorry they can use it to wash cars or water non-edible gardens and just rely on hose water for the edible stuff.
xo,
s
renee says
Hey Youngsters-
Are you able to hook up a hose and get decent pressure? I’m having trouble with that. It works great for filling up watering cans, etc. but I’d love to be able to spray my flower garden with a hose, ya know?
I guess it’s a problem of low pressure…(I bought mine through my recycling company and the spigot was already attached)
Thanks from the Twin Cities :)
YoungHouseLove says
Hey Renee,
We’ve never tried to hook ours up to a hose, but are pretty sure we’d have the same issue of not getting enough pressure for a good spray. But we do know a friend who has attached their rain barrel to a soaker hose with good success. Other than that, the only thought we have is if you raise it up on blocks you might find gravity helps to increase the pressure a bit. However you end up using it, enjoy your barrel!
-John
Rain Barrel Diverter guy says
Raising the rain barrel is a good idea to get some pressure. I have also seen someone using a pump with their rain barrel, worked quite well but is expensive. If your diverter is not handling overflow, I suggest to align the top of the barrel with the middle of the rain diverter. This equal level will give good pressure and will allow overflow water to back up into and out the downspout.
Megan says
My husband is from Saint Lucia and the first time I visited there I learned about rain barrels. They have giant ones at most homes and sometimes they have to live on boiled barrel water for days at a time during water shortages. I never thought of doing it here but we live in Seattle! Just discussing it now, my husband said that when it rain, as it does often, he always thinks of how much water is going to waste!
Rob - @formerfatguy says
I love step by step “how to” articles with pictures. I’m on my way out to buy 4 barrels for our front and back yard and your how to page made my day.
I plan on turning our front and back yard from grass into an edible landscape. Berries, fruit trees and the veggies I eat the most of.
Thanks again.
chob says
I’ve had 9+ rainbarrels for going on 3 years in So. Oregon. I have always thought they were really cool. Even though our water is not even close to the price of So. CA water; last year was a “dry” winter for us. I saved $45 from the previous year.
It doesn’t take much rain to fill a 55 gal. barrel. It sure is nice to water the lawn, flower bed with “USED” water!!
I put a double hose connecter on each barrel; as they fill up I attach a hose to one connector, which is connected to another faucet on another barrel. Be sure the connecter is ON, the empty barrel will fill from that hose connected to the full barrel. If it doesn’t rain enough to fill both barrels, the new barrel and the old barrel will be level, as “water seeks it’s own level.” I can then attach a hose to #2 drain and water, or attach it to another barrel.
Steve says
Very nice write up and pictures on making a rain barrel. I made a few using similar, but not quite as straight forward directions last year. Best change I could have made, and my water bill during the warm months dropped considerably. Not enough to make a huge difference, but every little bit counts, right?
I’m printing your directions off, though, for future builds. A lot easier than having text only directions. Very cool that you put the pictures in there to help out.
I’ve been hooked since making my first rain barrel and have become a bit of an evangelist for it. I was intimidated when I first started, as I thought I’d have to hook up a whole underground system, etc… After seeing how easy it was, though, it made the whole concept a lot easier to jump on board with.
Stephanie says
http://www.springfieldmo.gov/stormwater/rainbarrel.html
Greene County Missouri residents can get info on water barrel at the website listed above, hope that helps anyone who lives around here :)
YoungHouseLove says
Sweet! Thanks so much for sharing that link!
xo,
s
garden goddess says
We’ve done rain barrel constructing demos and classes in our city–they’re very popular! Our version is quick, easy, and affordable. And, best of all, the overflow and multiple barrel connector are optimized to avoid wasting water.
BTW, we haven’t found sealing the faucet to be necessary in the Midwest.
Here’s a link to our version: http://tylertork.com/diyrainbarrels/construction.html
Craig says
I can’t find the washers or locknut to save my life. I have another couple of places to try, but I might have to find alternative plans.
YoungHouseLove says
So sorry Craig! Maybe try a local hardware store (as opposed to a chain) – sometimes they have more hard to find parts. Good luck!
xo,
s
VickiB says
not sure if anyone is still looking to acquire barrels, but if you can contact someone at a nursing home/hospital with in facility laundry, their detergent comes in very large barrels! wash them out, and you’re ready to *not* roll!
Valencia says
I am printing this out as we speak because I am determined to create this. Thank you for this! :)
oh did ya’ll bring this with ya’ll to ya’ll new house?
YoungHouseLove says
Nope we sadly sold it with our old house, but we plan to hunt down a new one asap!
xo,
s
Bruce K says
I’ve made a similar rain barrel but tie two barrels together and added the overflow tube to take the extra water away from the foundation of the house. There are pictures here:
http://greenterrafirma.com/DIY_Rain_Barrel.html
Thanks, Bruce.
Meghan says
Remember reading this a while back and am interested in making my own. Any feedback on how the process is going now?
YoungHouseLove says
Still love it! We have one at our new house and use it to water stuff that we plant (new shrubs, herbs, etc) pretty much from spring to fall!
xo,
s
The Twisted Tine says
This is absolute genius, and I think we may have to give this a go out here for our own watering needs… thank you for the post. :)
Karima says
I am planning to make a rain barrel after I read your post. I have a huge roof and there is so much water that is wasted during the rain season. And I have a pond!!!
Here I found a picture on the web about a chain to guide water into rain barrel. I am not sure it will work with a mosquito net, but here it is:
http://7thhouseontheleft.com/wp-content/uploads/2011/04/rainchains2.jpg
YoungHouseLove says
Oh yeah – we love rain chains! We don’t have one ourselves but have always wanted to put one somewhere.
-John
biodynamix says
You can use a tablespoon of vegetable oil in the full barrel to prevent mosquitoes laying eggs…..works on my four barrels! Also, there are many non-food barrels on CL, ebay etc….make sure you CLEAN these glycol barrels before use or you’ll kill plants/grass quickly
YoungHouseLove says
So smart! Thanks for the tips!
xo,
s
Sisters Playing House says
We have just posted about our rain barrel project. We put two together last year. This year we added a third barrel and a solar powered pump – we’ll be blogging about that for sure. It was quite the task to put together.
http://sistersplayinghouse.blogspot.com/2012/04/water-barrels.html
YoungHouseLove says
Amazing! What a great project!
xo,
s
Manali says
Do you think one can use a regular flat washer in place of a reducing one? I cant seem to find one in my local hardware store…
YoungHouseLove says
As long as everything is screwed on tightly enough, it probably could do the trick. We have only done it this way so we can’t say for sure. The benefit of the reducing one is that it sit inside the hole for a tighter seal, but you may be able to get a good enough seal with a flat one if everything is secured tightly. Sorry to hear you’re having trouble finding one!
-John
Linda Bradshaw says
Thank you for this post. We’ve been having issues with too much water around the house from the rains, even though we have gutters etc., drainage has become a problem. Also we have issues with being on a well, having enough water to take care of the lawn and garden. I’ll be showing your post to my hubby later today and hopefully we’ll be making/using rain barrels PDQ.
Alexis says
What kind of hose do you have attached to the overflow spout of your rain barrel? Not sure if there’s something wrong with our hose, but after two weeks, it’s sadly crimped from falling from such a steep angle so constantly. We’d like to attach a soaker hose into the mix somehow, but not directly since we obviously want water to fall away from house. Do you have any tips on this?
YoungHouseLove says
Hmm, we have a regular short hose connected to a soaker hose. Hope it helps!
xo,
s
Sisters Playing House says
We have rain barrels and love them. I blogged about it. We even added a solar powered water pump this year. Check it out:
http://sistersplayinghouse.blogspot.com/2012/07/solar-powered-water-pump.html
YoungHouseLove says
Cool!
xo,
s