Update: We have a much newer cabinet-painting post with more photos, details, and even a video for you here.
If you can paint a wall (and even if you can’t) you can paint your kitchen cabinets. There are just a few tried and true rules when attempting this project, so if you follow the simple steps outlined below it’ll be pretty hard to screw things up. And although you’ve all seen our newly renovated kitchen, we actually painted our previous 50-year-old knotty pine cabinets right after we moved in (to tide us over until we had the funds to replace them altogether). Check out the dark and dingy kitchen that we inherited with the house:
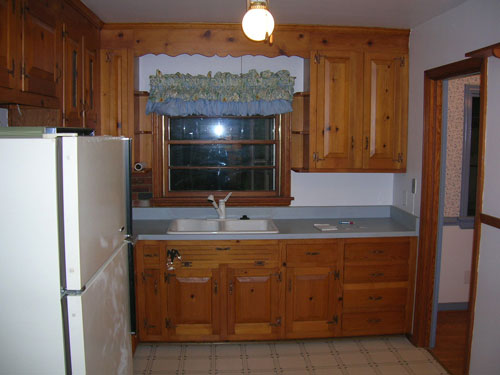
And the refreshing “after” thanks to only a few hours of prepping and painting:
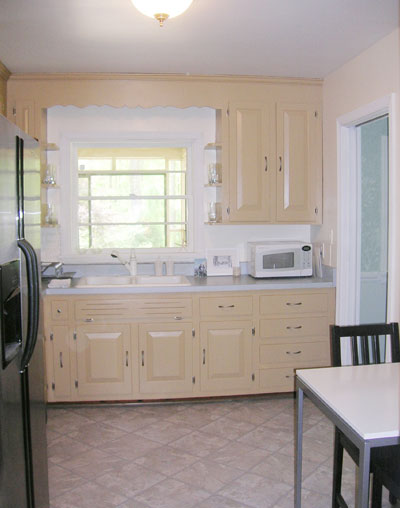
So how did we do it? Easy peasy.
Step 1: Figure out what you want. Bring home paint swatches and select the perfect palette, and if you’re planning to replace your hardware, purchase some before you move on to the next step. Because most old hardware is a different size than newer hardware (the holes are further apart or closer together), it’s important to know if your new door and drawer bling is spaced differently than your current hardware before you begin. Then it’s nice to wash everything down with a little soap and water to cut the grease and the spills that have built up on the doors and drawers over the years. Nothin’ like a little sponge bath to get you in the mood to makeover your kitchen…
Step 2: Take it off, baby. Now it’s time to remove all of your hardware and your hinges (regardless of whether you’ll be reusing it or replacing it- and it helps to store everything in a big ziplock bag so you’re never short a screw). Of course by removing the hinges you’ll be removing all the doors, so finding a place that you can lay out a big fabric or plastic drop cloth (which are about $2 from Home Depot or Lowe’s) is a good idea. Once you have your drop cloth in place, lay out all your cabinet doors and drawers so you can paint them all together in one convenient spot (and have full access to the frames of the cabinets in the kitchen).
Step 3: Fill ‘er up. Then if you’re replacing your hardware with something that won’t fit the existing holes in your doors and drawers, you’ll want to pick up some wood filler (it’s around $6 a tube, which is all ya need) and fill those existing hardware holes in all of the doors and drawers. There are many different colors of wood fill, but since you’re painting your cabinets, matching the tone isn’t really a big deal (although it can’t hurt to grab the one that most closely resembles the color of your current cabinets).
Step 4: Get sandy. The sanding process isn’t always necessary (for example, our cabinets weren’t glossy so we skipped it and went straight to priming) but for some people with super shiny cabinets (aka: lots of polyurethane) it can’t hurt to run an electric sander over everything- or take a bit more time to hand sand things- with fine grit paper to rough everything up for maximum paint stickage. Not sure if yours need to be sanded? If they feel matte like a cutting board (a little absorbent) then they shouldn’t need it, but if they feel shiny like a laminated piece of paper or a glossy credit card then sanding is your best bet. Note: lead paint is a serious health risk when sanding, so if you have an older home with already-painted cabinets that look decades old it’s worth testing for lead with a $6 lead test kit from Home Depot. Safety first!
Step 5: It’s prime time. Due to all the grease and even just the wood stain that often coats kitchen cabinets, it’s über important to get down and dirty with oil-based primer (even if the water-based equivalent claims that it works just as well on cabinet surfaces, we’ve seen stains seep right through that stuff, so oil-based is the better-safe-than-sorry alternative). One coat of primer applied with a decent quality roller should do the trick (then just use a brush to get into those tigher spaces and the grooves in the doors). We prefer wool or polyester rollers (Purdy’s a great brand) over foam ones as we’ve found that they rile up the paint and cause bubbles. Oh and it doesn’t matter if you can still see the wood tone underneath after one coat, the primer’s main job is to make your cabinets sticky and the paint will do the rest. You’ll probably want to snag an extra brush just for priming since they’re usually pretty messed up afterwords (it’s best to toss it or save it for other priming projects and use a pristine new one for painting). And ditto with the roller. We usually don’t even try washing the oil-based paint out of it- and prefer to replace it with a fresh new one before painting for a seamless result (reused rollers and brushes can often compromise the smooth finish that you’re going for when it comes to your cabinets).
Step 6: Get your paint on. You’re in the home stretch, so just two coats of latex paint (in a semi gloss finish for easy wipe-ability) are next on the agenda. You’ll definitely want to wait a few hours after applying primer, but I actually primed and painted my cabinets (two coats!) all in the same day. When it comes to applying the paint, a high quality wool or polyester roller makes for the sleekest application. A mini foam roller can also help since it’s smaller and easy to control. You’ll also probably need to use a brush sparingly, just to get into those little cracks and crevices that your roller can’t reach. Do yourself a favor by buying an angle-tipped brush as opposed to a flat-tipped one- they make staying in the lines a lot easier.
Note: We didn’t prime or paint the inside of the doors, but our approach would be to prime/paint them first and then wait five days and turn them over and prime/paint the outside (that way if anything got a bit imperfect after being flipped face down, it would be on the inside- an therefore less noticeable).
Step 7: Wait for it. After two coats of latex paint you now have to practice patience. Most experts advise waiting at least three days to rehang or begin using your doors and drawers (especially since the rehanging process involves lots of holding and pressing and drilling which can muck up anything that’s not 100% dry). We actually advise waiting five days if ya can (it beats doing the whole thing all over again and guarantees a totally seamless finish even in high humidity).
Step 8: Hang in there. Then all you have to do is rehang your doors (either using your existing hinges or new ones), slip in your drawers, and add your hardware. If the hardware is new, take time to measure twice before you drill to avoid any annoying mistakes that will make you want to putty and repaint, which never looks as good as the flawless finish that you get the first time around. John actually took his sweet time drilling all of our holes for the new hardware (to the tune of about two hours) but it was well worth the assurance that everything was perfectly centered and right where it should be. In this case slow and steady wins the race.
*Oh and it bears noting that if your cabinets are anything but solid wood (laminate, veneered, etc) you should definitely take off a door or a drawer and bring it with you to your local hardware store and ask the paint pro there what they recommend. There are some great oil-based primers and enamel paints out there so it might be possible to get a semi-durable finish (although none as long-lasting as solid wood paint jobs). The key is really roughing up the surface so it’s less glossy and then priming and painting with the best stuff they have (usually oil or enamel based). Oh and don’t forget to let everything dry for a while so things can cure up and get super durable for the long haul.
So that about does it for our cabinet painting and refinishing tutorial. Of course Step 9 is to invite all of your friends over for celebratory margaritas or to do the happy dance every time you walk into your amazing new space. We hope this will help you completely transform your kitch on a dime and in a flash. And just in case you need a few more before & after pictures to convince you, here are two clients of ours that we helped transform their rooms with painted cabinets:
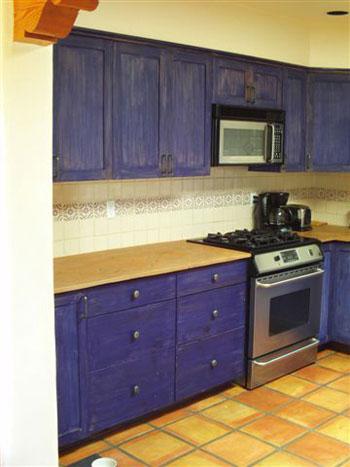
Here’s Kim’s crazy blue kitchen that she inherited with her home:
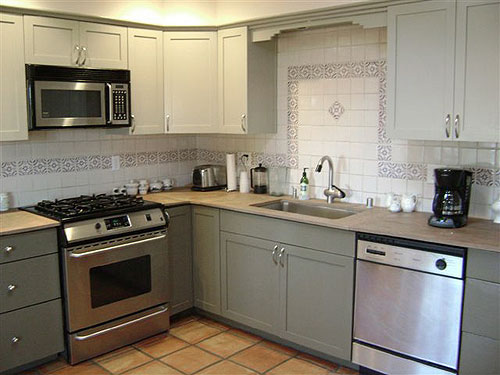
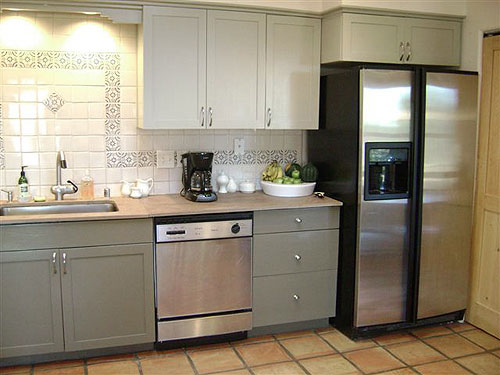
And here’s her two-tone masterpiece after a quick paint makeover (we suggested slightly different colors for her upper and lower cabinets):
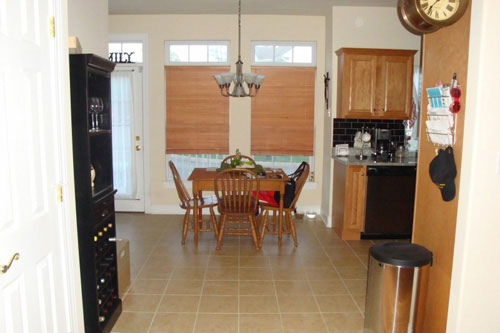
And here’s Carla’s kitchen before she came to us for help:

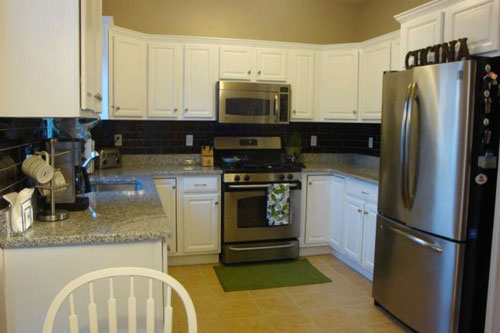
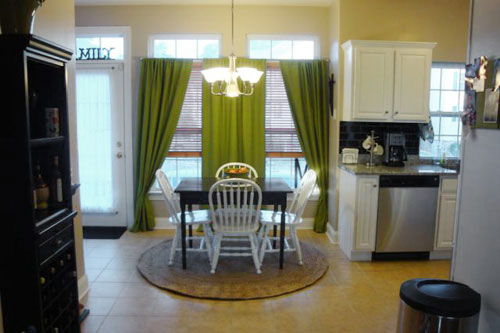
And here it is after we encouraged her to paint her cabinets a crisp glossy white tone (along with her dining room chairs) while the dining table went black to mimic the backsplash:
Amazing what a little paint can do, eh? And if they can do it you can to! So if you have a spare weekend or even a few week nights you’ll be well on your way to a totally new room. Happy painting…
In need of a furniture painting tutorial? Fret not, we’ve gotcha covered.
Update: We have a much newer cabinet-painting post with more photos, details, and even a video for you here.

kathy says
Hi, The transformation of Kim’s crazy blue kitchen to gray is beautiful. Can you tell me the paint colors that were used in this kitchen?
THANKS!
YoungHouseLove says
Just click the link in the sentence above the after photo of that space for that info! Good luck!
xo
s
Lou Skoff says
Hi Guys, I’d like to redo our kitchen cabinets. They are real wood (cherry) but over the years have become dull and the clear coat finish has worn off. I’d like to keep the original look and just redo the clear coat. What do I need to do to prep the wood before I apply a clear coat. Polyurethane or lacquer . Spray or brush. matt or semi gloss. what about an automotive clear coat, would it have a harder finish..less wear. Thanks!
YoungHouseLove says
Hmm, I’d stop by a specialty paint shop (like Benjamin Moore) and see what they recommend. Newer stuff comes out all the time, so they’ll know about the latest sealers and materials! Good luck!
xo,
s
Justin says
Hi.. I didn’t want to read through 10 pages of comments. So I wanted to ask myself.
I Stained my cabinets last summer and now I want to paint them white!! I know crazy..
I sanded them all, which i will prob do again just because I like to work.
I was wondering what method you use to paint cabinets, do you spray or paint by hand??
YoungHouseLove says
By hand! Haha. I’m old school. Check out the video in this post for a step by step rundown. Hope it helps.
xo,
s
Justin says
Maybe I’m blind but i’m not seeing a video on this page!! Anyway you can point it out to me??!! ;)
YoungHouseLove says
Oohh, I thought you were commenting on our most recent cabinet painting post here (complete with waay more pics and a video). The posts have the same name so I was confused. Haha.
xo,
s
Rhonda says
I have been reading your blog for over a year but this is my first post! My husband and I are renovating a family member’s house for resale. Due to limited funds we are hoping to paint the kitchen cabinets but not paint the door/floor trim etc in the kitchen due to it connecting to other rooms. I know white is more universally flattering for resale but would you recommend a light tan or light charcoal gray instead to better match the standard wood trim in the room? We have not picked out floors or countertops so the options are still endless. Any ideas will be appreciated!! Keep up the great work!
YoungHouseLove says
Hmm, that’s a toughie. I think you can definitely do white cabinets with wood trim (I think our Reader Redesign last week had wood window trim with a white cabineted kitchen) so you still might want to go that route since it’s classic and usually pretty well liked. Sometimes trying to paint something to match stained wood just looks flat next to it (since it’s paint and not stain) but it could work too!
xo,
s
Kayla says
I have ivory colored cabinets that I would like to paint a crisp white. Will I still need the oil-based primer, since I’m not going from a very dark color to white? I was thinking about using the paint with the included primer….thoughts??
YoungHouseLove says
Oh yes, you always want to sand and prime so the paint sticks. Otherwise it can crack and peel right off months after doing it!
xo,
s
Katie says
Great tutorial, the one thing that I wish it had said was to tint your primer to match your paint. This way if you do get a ding (bound to happen)the blaring white doesn’t show. I painted mine a slate grey and boy you can tell if you have a little chip.
Also, while re-hanging the doors some of them didn’t quite line up correctly, (they weren’t perfect when we started either) but a rubber mallet and a towel helped us a ton! If the doors were rubbing we would put the towel on the edge of the door and pound it into place, was a life saver!
Other then that my kitchen looks great!
YoungHouseLove says
Great tips!
xo,
s
Lauren says
Hello,
Thank you for your site..I just love it!
I am about to start a cabinet painting project. The cabinets are pine or birch and will be painting them white. I’ve got a question though regarding the hinges. What is your opinion on replacing the current hinges with concealed hinges….do you think it’ll help to make the cabinets look a little more modern?
I’d love to hear your insight!
Lauren Kelly
Dorchester, Ontario Canada
YoungHouseLove says
Oh yes if you can it’s a great way to modernize!
xo,
s
Melissa says
Hi there,
My husband and I will be moving into our first home in a month and a half. It is an old house (1900) with tons of character, but needs work. We’re starting with the kitchen and I plan to redo the cabinets. They are painted green right now. :( I’m planning on refinishing them. I’d like them to be a glossed dark wood, to match the dark wood in the rest of the house. How would I go about refinishing them, seeing as they have already been stripped and painted (poorly at that)?
Thanks!
YoungHouseLove says
I would check out this post and follow the directions (it’s the same whether they’re painted or not since you still need to sand and degloss and prime to make the new paint stick): https://www.younghouselove.com/2012/01/how-to-paint-your-cabinets-aka-hallelujah/
Hope it helps!
xo,
s
Natasha says
Hi! I couldn’t read through all of the posts since I’m on my phone, but could you do this with bathroom cabinets, and if so, what would you do differently? I can imagine humidity would be a problem.. thoughts? :) Thanks guys, LOVE this blog!!
YoungHouseLove says
Same way! Hope it helps!
xo,
s
Donna says
Hey there, I was hoping you could give me your opinion on my dilemma. We’re planning on moving our kitchen to the center of our house (open floor plan!), and I’m debating selling the existing oak cabinets on Craigs List and buying a new set of cheap-o’s, or just trying to paint the existing ones like you did. We want it to look like a cross between espresso and cherry, and I think we could get away with it. The issue is that we would have to purchase more of these oak cabinets (new kitchen will be larger) only to cover the new ones with paint. It will be a lot cheaper that way, and I think I can pull it off to look just as good as new ones, but I can’t wrap my mind around buying new ones to paint. What do you think? Thanks so much!
YoungHouseLove says
We actually needed more cabinets to reconfigure our kitchen so we went to the Habitat For Humanity ReStore and got some that would work! Maybe that’s an option for you? It saved us about 1K and we didn’t feel weird about painting them or anything!
xo,
s
Mary says
Hi
I am painting my kitchen cabinets in a white satin finish both inside and out but I am finding drip marks on the edge of the inside. What can I do to prevent this and also cover the door completely.
YoungHouseLove says
I would just keep an eye out for them and brush over them to eliminate them. Using very very thin and even coats is the key. You can also wait for things to dry and sand them down afterwards for a more sleek look.
xo,
s
Sandy says
Just found this site and I LOVE LOVE LOVE IT!! I have read tons of comments and suggestions, I do believe I have decided to paint my kitchen cabinets rather than stain. My kitchen is old, orange Formica counters (that I actually like) wall paper that has already come down and yellowish/gold flooring which wont be replaced just yet. I plan to do a glass back splash but I’m wondering if you have any idea’s on a kitchen with orange counter tops that isn’t to retro or contemporary. I would be happy to send “now” pics but don’t see where to submit them.
Your idea’s are super, loved looking thru your homes! Thanks so much :)
YoungHouseLove says
Hmm, I would just bring home lots of paint swatches and hold them up and see what you like with the orange. And you can troll sites like google, pinterest, and houzz for kitchen photos that might help!
xo,
s
Joe in Carlsbad says
Hi There – Thanks for sharing the great experience and motivation. I just finished creating some built in cabinets for either side of my fireplace, which is painted a high gloss white. Just curious if you have any recommendations on whether I should go high gloss or semi gloss on my cabinets … I am planning on going white with them as well. I have a friend who is a professional painter who is going to bring his sprayer over and spray them with me.
Thanks in advance – Joe
YoungHouseLove says
Either one would work so there’s really no going wrong! If you want a shinier outcome, go high gloss (it can emphasize imperfections though, so just be smooth with the application) or go with semi-gloss for a still-glossy but not quite-as-shiny look. Good luck!
xo,
s
fida says
hello ,i’m palning to repaint my kitchen cabints ,do u think i can paints the doors without taking them dawn because i have kids and no space to put them .thank you.
YoungHouseLove says
Hmm, I think you could try but it might be hard. You wouldn’t want them closed while they’re drying so if you think you can keep them all open to dry (maybe by gating off the room) that could help!
xo,
s
donna perrett says
hi i think your tutoril is amasing, i have wanted too paint my kitchen a nice duckegg colour instead of a horibble pine for years but diddnt think it possible. but just one question do you really have too take of the doors couldnt i just paint carefully with them in situ
YoungHouseLove says
I haven’t seen anyone paint them without removing them just because there might be areas that you missed when the doors are closed (small slivers of wood might be exposed). I would definitely recommend taking the doors off for the best result, especially if you’re going to be spending all that time priming and painting. Good luck!
xo,
s
donna perrett says
thank you for your reply, if my non decorating husband can take them off ill go down that route many thanksx
hi sonia kircher says
I love those pics of the kitchens. we are about to do an old tassie oak kitchen a white with not too much gloss as apparently it shows more marks. The swatches are a great idea and I really wanted black tops but feel its going out of fashion fast what do you think? Would love to have any hints thanks sonia
YoungHouseLove says
I think they can look classic and timeless! Maybe bring home some samples and just see what you like best?
xo
s
Jan Watts says
I just love reading these posts, and am so impressed with all the cabinet makeovers and ideas. We just bought a 1950’s house with aqua blue tile in the kitchen, and we’re stumped about a color for the cabinets. They are very plain; I think they were handmade by the previous owner. Can I post a picture of the kitchen so that I might receive some much needed suggestions? (Kim, I think your kitchen looks fabulous!)
YoungHouseLove says
Feel free to post a pic on our Facebook page so folks can weigh in with suggestions for ya!
xo,
s
kevin says
Anyone have any experience with black cabinets? I saw them and it looked great, but I am still a bit nervous to do it myself. I have the common off white ceramic flooring with light countertops and really want to try the black cabinetry. Can anyone encourage me?
YoungHouseLove says
I think it’ll look amazing! Head over to google images or pinterest and search “black cabinets” to hopefully turn up a bunch of inspiration images!
xo,
s
JennaBerthoud says
Is there a place I could upload a photo of my kitchen to ask you a question about it?
YoungHouseLove says
You can post it on our facebook page for advice from everyone over there! Hope it helps!
xo,
s
Jen says
What color did you use on the bottom cabinets in the 2nd reno picture. With the green/cream/stainless. Looking for a good green for our cabinets and this seems PERFECT!!
YoungHouseLove says
Just click the link that says “a quick paint makeover” to see that info!
xo,
s
ora braun says
Great tutorial, very informative and detailed. Thanks
Lindsay says
I have a feeling you’ve probably answered this, but I really don’t want to read though the 852 comments to find it. I’m lazy like that. But I was wondering if you remembered the colors that were used in the “crazy” blue kitchen. I’d love to do those color combos (both uppers and lowers) in ours this winter!
Thanks,
Lindsay
YoungHouseLove says
So sorry, we don’t know those before blue colors since she inherited them from the previous owners. Good luck with everything Linsday!
xo
s
Hope says
Love your tutorial. Question: how can I get a stainless-steel or chrome-looking finish? I want a metallic finish so my kitchen looks Puritan and sleek. Would you consider me for a before and after?
YoungHouseLove says
Hey Hope, we’ve actually never attempted that so we’re not sure how to pull it off best. Maybe check pinterest for a tutorial or bring a door or drawer from your kitchen to the paint shop (Benjamin Moore stores have some great pros behind the counter) and ask them what primer + paint they’d recommend for that look? Good luck!
xo
s
Nate says
I used the Rustoleum Cabinet Transformations dark-tint kit to paint my bathroom cabinets in both bathrooms a dark espresso color. They turned out great and look much better than the old worn oak color. It looks good enough that people think we got new cabinets. See pictures and how I did it here: http://www.squidoo.com/how-to-paint-cabinets-using-rustoleum-cabinet-transformations
Denellda says
was just wondering if melamine paint would cover better than a latex? i am planning to redo mine but am waiting for the weather to warm up a bit more so i can leave the windows open while working as oil base and melamine are very smelly
YoungHouseLove says
I would just ask a paint pro what they recommend since we’ve only used this method (but are very happy with it years later!)
xo
s
Curlee says
I like the before 50 year old knotty pine much better. “Dingy”? I prefer warmer looks than colder. A pity someone would feel compelled to paint over such good wood that has aged wonderfully. A few years now, you will be sick of all the white. And adding new stainless steel appliances and a new floor would help “transform” any old kitchen; I’m calling you out here; not as miraculous as it seems.
YoungHouseLove says
Here’s a post about how our kitchen evolved. Of course home renovation is hugely personal (and 100 people would make 100 different choices) but we sold our house within two weeks, so it seems that there was a nice demand for an upgraded kitchen. No need to pity us :)
xo
s
Kyle Hannah says
This article and your latest article on cabinet painting “How To Paint Your Cabinets (aka: Hallelujah!)” has inspired me to paint my cabinets. I noticed that your kitchen from the 2008 article had the same external hinges (the black iron strap style hinges) that I have. I’m having issues finding replacement hinges that work. Can you tell me what type of hinges you used and where you purchased them from?
YoungHouseLove says
We actually found some that worked at Home Depot! We just brought one of the old ones with us to see what it looked like and found a newer version of it in silver. Hope it helps!
xo
s
Jeanne says
I’m so happy that I found this! My husband and I have been fixing up an outdated home from the 60s and the kitchen/dining room is so ugly that we hate going in it! We cannot do the complete overhaul on it yet, so I began researching the best approach to painting our hideous cabinetry and found your site. Thank you, thank, you, thank you! I am very motivated now that I have found your very detailed tutorial!
Jenine says
So you do not use a polyacrylic over the last coat of paint??
YoungHouseLove says
Nope, we chatted with a ton of pros and they don’t use that (poly can crack/peel/discolor) so the recommended method is sanding, good quality primer, and a good quality paint. Bonus points for BM Advance, which is formulated for cabinets and doesn’t need a topcoat!
xo
s
Jeep says
I really love your website. Now I’m planning to makeover my kitchen. The kitchen cabinets are honey oak but in a good condition. The walls are all read which is I don’t like it. I think I will absolutely paint the walls and change the countertop. But not sure what to do with the cabinets. We have 2 kids (6,3) and afraid that white cabinets might show a lot of marks. Do you have any suggestions? Should I paint the cabinets in gray or brown? And if I keep the cabinets in oak, which paint color will go well with them? Our kitchen gets a lot of afternoon sun. I would like to attach the picture but couldn’t. Sorry for asking so many questions.
Thank you so much.
YoungHouseLove says
If you keep the cabinets oak I’d do a soft sage or celery color on the walls. So pretty! If you paint them, either gray or brown could work beautifully, and you could even do white uppers if you’d like (or the same color uppers work too).
xo
s
Jeep says
Omg! You are awesome! Thanks for your advice.
Homeowner Vic says
Really too bad that you would paint over gorgeous, natural wood.
http://www.youtube.com/watch?v=JTS3Oqp1_3U says
I have been surfing on-line greater than 3 hours these days, but I never found any attention-grabbing article like yours.
It is pretty price sufficient for me. Personally, if all site
owners and bloggers made just right content material as you
probably did, the internet will be much more helpful than ever before.
Kristina says
Why ruin those beautiful knotty pine cabinets in the top picture. So sad. Before it had character and now it looks cheap and boring