Update: We have a much newer cabinet-painting post with more photos, details, and even a video for you here.
If you can paint a wall (and even if you can’t) you can paint your kitchen cabinets. There are just a few tried and true rules when attempting this project, so if you follow the simple steps outlined below it’ll be pretty hard to screw things up. And although you’ve all seen our newly renovated kitchen, we actually painted our previous 50-year-old knotty pine cabinets right after we moved in (to tide us over until we had the funds to replace them altogether). Check out the dark and dingy kitchen that we inherited with the house:
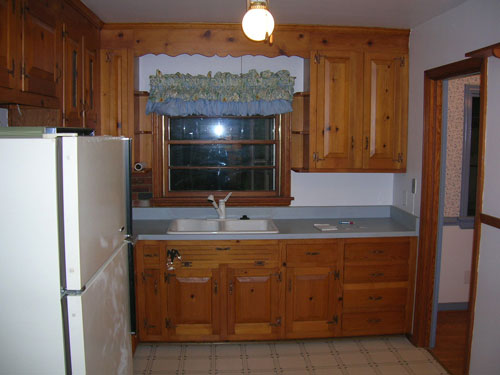
And the refreshing “after” thanks to only a few hours of prepping and painting:
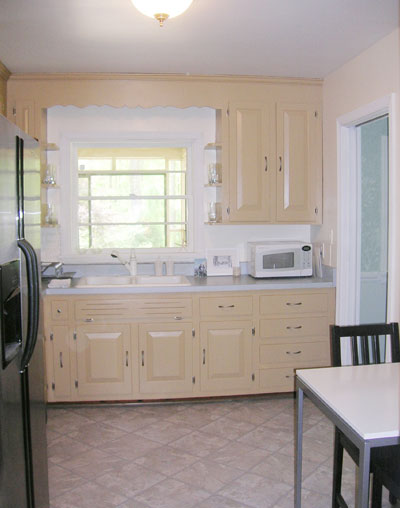
So how did we do it? Easy peasy.
Step 1: Figure out what you want. Bring home paint swatches and select the perfect palette, and if you’re planning to replace your hardware, purchase some before you move on to the next step. Because most old hardware is a different size than newer hardware (the holes are further apart or closer together), it’s important to know if your new door and drawer bling is spaced differently than your current hardware before you begin. Then it’s nice to wash everything down with a little soap and water to cut the grease and the spills that have built up on the doors and drawers over the years. Nothin’ like a little sponge bath to get you in the mood to makeover your kitchen…
Step 2: Take it off, baby. Now it’s time to remove all of your hardware and your hinges (regardless of whether you’ll be reusing it or replacing it- and it helps to store everything in a big ziplock bag so you’re never short a screw). Of course by removing the hinges you’ll be removing all the doors, so finding a place that you can lay out a big fabric or plastic drop cloth (which are about $2 from Home Depot or Lowe’s) is a good idea. Once you have your drop cloth in place, lay out all your cabinet doors and drawers so you can paint them all together in one convenient spot (and have full access to the frames of the cabinets in the kitchen).
Step 3: Fill ‘er up. Then if you’re replacing your hardware with something that won’t fit the existing holes in your doors and drawers, you’ll want to pick up some wood filler (it’s around $6 a tube, which is all ya need) and fill those existing hardware holes in all of the doors and drawers. There are many different colors of wood fill, but since you’re painting your cabinets, matching the tone isn’t really a big deal (although it can’t hurt to grab the one that most closely resembles the color of your current cabinets).
Step 4: Get sandy. The sanding process isn’t always necessary (for example, our cabinets weren’t glossy so we skipped it and went straight to priming) but for some people with super shiny cabinets (aka: lots of polyurethane) it can’t hurt to run an electric sander over everything- or take a bit more time to hand sand things- with fine grit paper to rough everything up for maximum paint stickage. Not sure if yours need to be sanded? If they feel matte like a cutting board (a little absorbent) then they shouldn’t need it, but if they feel shiny like a laminated piece of paper or a glossy credit card then sanding is your best bet. Note: lead paint is a serious health risk when sanding, so if you have an older home with already-painted cabinets that look decades old it’s worth testing for lead with a $6 lead test kit from Home Depot. Safety first!
Step 5: It’s prime time. Due to all the grease and even just the wood stain that often coats kitchen cabinets, it’s über important to get down and dirty with oil-based primer (even if the water-based equivalent claims that it works just as well on cabinet surfaces, we’ve seen stains seep right through that stuff, so oil-based is the better-safe-than-sorry alternative). One coat of primer applied with a decent quality roller should do the trick (then just use a brush to get into those tigher spaces and the grooves in the doors). We prefer wool or polyester rollers (Purdy’s a great brand) over foam ones as we’ve found that they rile up the paint and cause bubbles. Oh and it doesn’t matter if you can still see the wood tone underneath after one coat, the primer’s main job is to make your cabinets sticky and the paint will do the rest. You’ll probably want to snag an extra brush just for priming since they’re usually pretty messed up afterwords (it’s best to toss it or save it for other priming projects and use a pristine new one for painting). And ditto with the roller. We usually don’t even try washing the oil-based paint out of it- and prefer to replace it with a fresh new one before painting for a seamless result (reused rollers and brushes can often compromise the smooth finish that you’re going for when it comes to your cabinets).
Step 6: Get your paint on. You’re in the home stretch, so just two coats of latex paint (in a semi gloss finish for easy wipe-ability) are next on the agenda. You’ll definitely want to wait a few hours after applying primer, but I actually primed and painted my cabinets (two coats!) all in the same day. When it comes to applying the paint, a high quality wool or polyester roller makes for the sleekest application. A mini foam roller can also help since it’s smaller and easy to control. You’ll also probably need to use a brush sparingly, just to get into those little cracks and crevices that your roller can’t reach. Do yourself a favor by buying an angle-tipped brush as opposed to a flat-tipped one- they make staying in the lines a lot easier.
Note: We didn’t prime or paint the inside of the doors, but our approach would be to prime/paint them first and then wait five days and turn them over and prime/paint the outside (that way if anything got a bit imperfect after being flipped face down, it would be on the inside- an therefore less noticeable).
Step 7: Wait for it. After two coats of latex paint you now have to practice patience. Most experts advise waiting at least three days to rehang or begin using your doors and drawers (especially since the rehanging process involves lots of holding and pressing and drilling which can muck up anything that’s not 100% dry). We actually advise waiting five days if ya can (it beats doing the whole thing all over again and guarantees a totally seamless finish even in high humidity).
Step 8: Hang in there. Then all you have to do is rehang your doors (either using your existing hinges or new ones), slip in your drawers, and add your hardware. If the hardware is new, take time to measure twice before you drill to avoid any annoying mistakes that will make you want to putty and repaint, which never looks as good as the flawless finish that you get the first time around. John actually took his sweet time drilling all of our holes for the new hardware (to the tune of about two hours) but it was well worth the assurance that everything was perfectly centered and right where it should be. In this case slow and steady wins the race.
*Oh and it bears noting that if your cabinets are anything but solid wood (laminate, veneered, etc) you should definitely take off a door or a drawer and bring it with you to your local hardware store and ask the paint pro there what they recommend. There are some great oil-based primers and enamel paints out there so it might be possible to get a semi-durable finish (although none as long-lasting as solid wood paint jobs). The key is really roughing up the surface so it’s less glossy and then priming and painting with the best stuff they have (usually oil or enamel based). Oh and don’t forget to let everything dry for a while so things can cure up and get super durable for the long haul.
So that about does it for our cabinet painting and refinishing tutorial. Of course Step 9 is to invite all of your friends over for celebratory margaritas or to do the happy dance every time you walk into your amazing new space. We hope this will help you completely transform your kitch on a dime and in a flash. And just in case you need a few more before & after pictures to convince you, here are two clients of ours that we helped transform their rooms with painted cabinets:
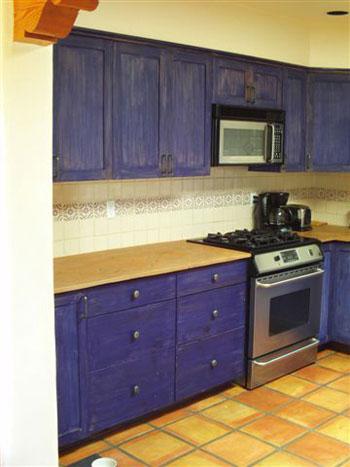
Here’s Kim’s crazy blue kitchen that she inherited with her home:
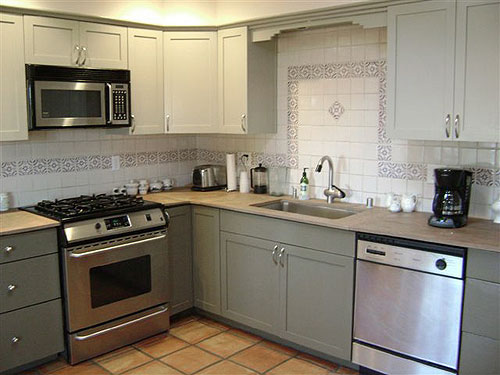
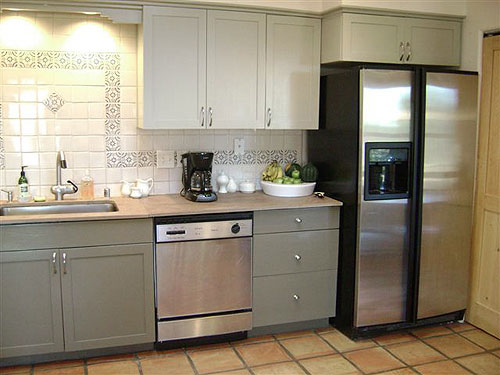
And here’s her two-tone masterpiece after a quick paint makeover (we suggested slightly different colors for her upper and lower cabinets):
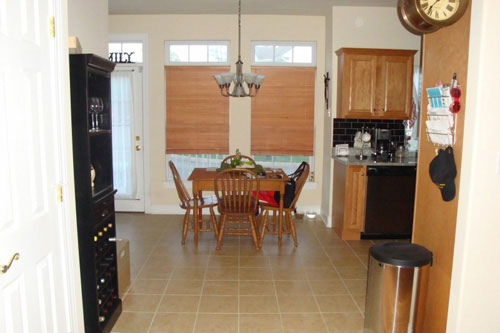
And here’s Carla’s kitchen before she came to us for help:

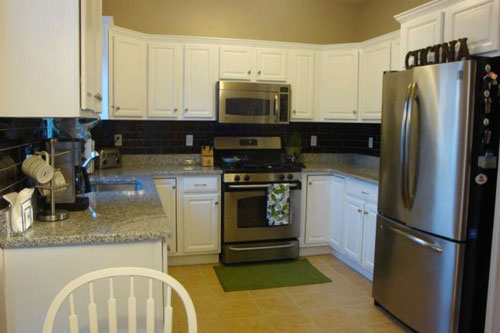
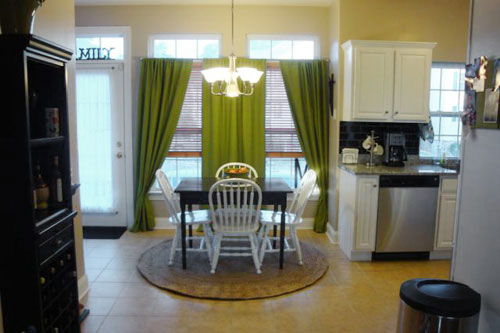
And here it is after we encouraged her to paint her cabinets a crisp glossy white tone (along with her dining room chairs) while the dining table went black to mimic the backsplash:
Amazing what a little paint can do, eh? And if they can do it you can to! So if you have a spare weekend or even a few week nights you’ll be well on your way to a totally new room. Happy painting…
In need of a furniture painting tutorial? Fret not, we’ve gotcha covered.
Update: We have a much newer cabinet-painting post with more photos, details, and even a video for you here.

stephanie says
I have white laminate cabinets in the kitchen, I want to repaint them, they have partical board under the laminate. How would you paint them? What type of paint? Should I sand the laminate? Please help, I have 5 more years in this house and all the white needs to change, some of the cabinets also have cracks, I actually thought about peeling laminate off and then paint, I did do that to one of the cabinets, it worked, I used latex and its holding up, but if there is an easier way I sure would love to know.
YoungHouseLove says
Just take off one of those doors or drawers and bring them to your local hardware store or paint store for advice on the best products to use. Hope it helps!
xo,
s
Val says
I am planning on painting my golden oak cabinets. My concern is the wood grain showing through. A girlfriend bought a house with painted oak cabinets & you can definitely see the grain underneath…Is there something I can do to prevent that from happening or am I just destined to having the grain show through? Thanks–I love your work!
YoungHouseLove says
It definitely won’t show through if you use oil-based primer first. Our knotty pine cabinets had so much grain but none of it showed through since we followed the steps in this post. Hope it helps!
xo,
s
Barbi says
The first two are clearly not the same room. Within a few hours, you changed the floor tiles too?
YoungHouseLove says
Yup, the first two photos definitely are the same room- we just updated the tiles on the floor during the second stage of our mini makeover. And they were just a buck a piece! Here’s the link to that post (where you can see the old floor and the new floor).
https://www.younghouselove.com/2009/04/its-a-stick-up-er-down/
See? It IS the very same room!
xo,
s
T says
We asked the paint clerks in Home Depot about oil based paints and primers for our kitchen cabinets. They insist that a couple coates of the new Behr paint with primer already in it will work just as good. Are you familiar with that paint? What are your thoughts?
YoungHouseLove says
Hey T,
We know of those new paints but haven’t yet used them ourselves (probably because water-based primer has bit us in the past) so we can’t vouch for them completely. Our guess is that they could work out okay (assuming you don’t have any stains that bleed through, which must be blocked with oil-based primer), but it’s probably still safest to follow the steps that we outline above for a foolproof approach. Oil based primer followed by latex paint is the industry standard for durability when painting cabinets and it definitely worked out well for us. Good luck!
xo,
s
Janet says
I just discovered this site, thanks to Stumble. Our cabinets that we inherited with the house, (15 years ago), are a dark, brown, dog scratched (inherited again), mess! The laminate countertop is not much better. That fake wood look. Yuck! My question is this…when painting the cabinets, do you also paint the inside, or just the outside? May seem like a “duh” question, but this inquiring mind wants to know.
Thanks for all your inspiration on this site.
Janet
YoungHouseLove says
Hey Janet,
Nope, we just painted the fronts of the doors and the frames, but you can scroll up to see how we recommend painting the backs of the doors and the inside of cabinets if you’d like to be a bit more “thorough.” We’ve definitely addressed that a few times! Hope it helps!
xo,
s
Lisa says
I’ve hated my kitchen since we’ve moved in and would love to paint the cabinets. One thing that I’m curious about is the safety of using oil based paint/primer while pregnant? I’m 15 weeks pregnant and have heard that latex paints are safe to be around, but I got the impression anything oil based is bad.
(Of course, by the time I pick a color, I might not pregnant anymore! Our walls are a light beige color, and we’re going with a floor tile that is a gray & brown mix. Normally I’d say white cabinets, but our appliances are back, so I’m thinking maybe a yellow undertoned dark gray?)
YoungHouseLove says
You definitely want to avoid oil-based primer when you’re prego, or you can grab a heavy duty gas mask to keep from inhaling any of those nasty fumes. As for the color, a warm undertoned gray would be lovely, just grab a ton of swatches and hold them up to see which one looks best.
xo,
s
George says
Hi guys,
Just wondering how you painted the wooden pieces that aren’t detachable? I have a wooden kitchen that has lots of little ‘bits’ that are in hard to reach places, which cannot be removed and painted separately, and I’m worried that while the cabinet doors might look professionally done, these bits will be harder to prep and prime and finish to the same standard. Did you have any similar worries? I would find more detailed photos of your kitchen cabinets very useful.
Thanks!
YoungHouseLove says
Just use a small brush without too much paint on it. Thin coats are key to keep things from getting drippy!
xo,
s
Kristen says
hi! This is a great tutorial! I read through this one and the How to Paint Furniture Tutorial and the biggest difference that I notice is the furniture tutorial recommends a paint brush for best application and the cabinet tutorial says to use a roller. Am I missing any other differences? I’m trying to paint a wall unit that is composed of cabinets on the bottom and bookshelves on the top– is it better to use the roller whenever possible? I just primed with oil-based primer and you can definitely see the brush marks (used a brush for most of it, took forever!). Thanks in advance for your advice!
YoungHouseLove says
We also don’t recommend poly on the cabinets (ever!) but it’s optional in furniture painting (as it’s a lot less prone to error in that situation). Oh yeah, and primer always shows brush strokes and goes on in a rough and uneven manner, but paint is a lot smoother to apply (and looks great with thin thin thin and even costs). However to cover that much area we would recommend a roller. Just remember to still go slow and steady and not to put anything on too thick. Good luck!
xo,
s
Kristen says
Thanks for the advice! Generally, what is the benefit to painting with a roller vs. a brush? Does one go on smoother than the other? Or is it more a matter of how much space you have to cover and the time it will take? And have you ever tried paint extender? I’ve heard it makes it easier to do thin layers of paint (particularly for first-time furniture painters like myself), but wasn’t sure it would work.
YoungHouseLove says
A brush (if used properly to apply very thin and even coats) is the way the pros do it, and the smoothness is amazing and unparalleled. But if you’re a novice you might even get a smoother look with a roller. Just remember to go slow and steady and apply thin thin coats no matter which tool you choose. And as for a paint extender we don’t use ’em- we don’t like to mess with our formulas because it can compromise their performance. Good luck!
xo,
s
suzy says
Hey there – the kitchens look gorgeous. My cabinets are already painted white – but it looks like they just used either white primer or flat, flat white. Should I still used an oil based primer? Does that help with durability v. a latex one? One last one – does two tone make a kitchen look bigger or smaller?
Thank you!!
YoungHouseLove says
Yes- definitely still use the oil-based primer! We never recommend anything else since it’s not nearly as durable. Do it right the first time for a great result! And as for two tone, it can look bigger or smaller depending what colors you choose. If they’re close in color (ex: light gray uppers with dark gray bottom cabinets) they look cohesive and expansive but if they’re too high contrast (ex: black bottoms with white uppers) it can look a bit busier and more closed in. Hope it helps!
xo,
s
Vanessa says
I am so glad I found this, I love your blog BTW. What if the sides of my cabinet are laminate, how do I paint that? Could I sand them… what would you recommend?
YoungHouseLove says
Just visit your local home improvement center and see what they recommend. There are a lot of new products that might help. Good luck!
xo,
s
T says
We thought we caught everything on your instructions but now that i look back, i see you said to primer with a roller. Well, we didn’t and we can see the brush strokes. Now we’re worried about the strokes showing through the paint. How do we fix this? Do we resand and reprimer with the roller?
YoungHouseLove says
Hey T,
Primer always looks rough whether you use a roller or a brush, and we only suggest a roller because it goes on faster, so you should be a-okay. Just remember to apply the paint in thin and even coats. Good luck finishing the job!
xo,
s
Andrea says
Hello!
Do you know what colors Kim used on her cabinets? I absolutely LOVE the two-tone idea!
Thanks!
YoungHouseLove says
Here’s the post with that info: https://www.younghouselove.com/2008/10/kims-color-conundrum-solved/
Hope it helps!
xo,
s
Nicole says
Hi guys,
We just bought our first house and our kitchen cabinets look very similar. We would like to paint them the same color. Do you know the name of the paint color? Thanks.
–Nicole
YoungHouseLove says
It’s Brown Bag by Glidden although we don’t know if they still make it anymore. Hope it helps!
xo,
s
Jleighlee says
Hi, Family member sent me your blog….LOVE IT! It is so my style and what I like to do. I’m about to paint my kitchen and was so glad you said to use oil based primer as I didn’t on the bathroom cabinets and the stain is dripping through. For the kitchen, a friend suggested using a plastic putty knife and joint compound to fill in the oak grain. It works beautifully! Question for you…I want a really durable finish (and can’t afford boat paint as some friends suggest). Can you use oil based primer then oil enamel over it (instead of Latex). I would think oil based paint would hold up better than latex in a kitche. What are your thoughts? Appreciate your time!
Thanks,
Jenny
YoungHouseLove says
Oh yes, oil enamel would wear amazingly. The only thing is that it takes a loong time to dry, so be sure to give it lots of time so it doesn’t get marked up. Good luck!
xo,
s
Sara says
Hey guys,
I have the same cabinets as Carla above and I’m having trouble with stain seeping through making tanish steaks. I used one coat of Kilz oil-based primer and two coats of Valspar Medallion tuxedo white latex paint (semigloss). Only the back of the cabinet doors are done so far, but I’m scared to start on the fronts because I don’t know how to prevent the stain from seeping through. Any suggestions?
-Sara
YoungHouseLove says
Yikes! Is the Kilz oil-based primer that you used the one that says “stainblocking” on it? If so, try one more coat of primer after the first one dries since your cabinets have a tendency to bleed so much. And be sure to let each cost of paint dry before adding the next one. Good luck!
xo,
s
Antonia says
Do you know of any products that simply lighten the color of varnished wood cabinets? Someone recommended a product called “grez-off”, but I can’t find it anywhere.
YoungHouseLove says
Antonia,
Sorry, we don’t know of anything off the top of our heads. We would just recommend visiting your local home improvement stores and asking the pros there what they have. I’m sure they’ll have a few suggestions for you!
xo,
s
Antonia says
Ok, thanks!
mark daniel says
hey there. i am finally getting ready to tackle this exact project in my house. my cabinets look almost the same as the ones you used to have. i was hoping to just wait until i can update the kitchen, but it’s still going to be a while, and i just can’t take the golden pine color any longer.
i have a question about the cabinet hardware. i would like to paint it a simply black, but a friend of mine who’s also done a lot of home renovation projects, advised against it, saying it can often peel and crack. what do you think? what kind of paint should i use if i go for it? i’m going to paint the cabinets a rich dark brown to match the hardwood floors.
YoungHouseLove says
If your hardware is metal, it should take spray paint beautifully (metal loves spray paint) so we would recommend laying all of it out on cardboard and spraying a few light and even coats of black spray paint on there (matte or glossy depending on your preference). The Rustoleum stuff with the trigger spray (around $7 a can) is the best we’ve used so far, so that would be our recommendation. Good luck!
xo,
s
mark daniel says
excellent! thanks so much!
oh, i don’t think i ever shared pictures here of my bathroom redo from months earlier, but thought people might appreciate it… =)
http://tiny.cc/58fbf
YoungHouseLove says
Thanks for the link! Off to check it out…
xo,
s
Suna Cho says
Hi,
Love your blog!!
I’ve already done many projects thanks to your step-by-step tutorials and very satisfied with the results.
Now I’m one of those who love shop at lowes or homedepot and discover new world that I didn’t know before.
Now I’m trying to paint the cabinets in the kitchen and read your instruction and comments several times not to bother you. But here’s a question regarding the roller that I’m really confused. I prefer purdy brand brush and roller and wanted buy the same brand wool or polyester roller for smooth surfaces. But I couldn’t find the one. If it is wool or polyester, it’s for rough surfaces. And if it is for all smooth surfaces, it doesn’t say it is poly or wool. Do you think I just can go with the roller for smooth surfaces?
I already put some white color swatches on my current cabinets(I’ll decide either swiss coffee(valspar) or simply white(BM)and can’t wait to be thilled again. Thank you so much!! Suna
YoungHouseLove says
Yes, we love Purdy rollers for smooth surfaces. Definitely go for it! Good luck.
xo,
s
Suna Cho says
Thank you so much for your quick response. :) Now I’m heading to Lowes.
Katie says
We’re about to begin our DIY kitchen renovation, but can’t decide what order to do everything in… what would you recommend?
Here’s what’s on the to-do list: repaint cabinets, install flooring, new countertops and sink, install wainscoting backsplash, switch cream outlets & light switches to white.
Thanks for the help!
YoungHouseLove says
Here’s the order we’d tackle things in:
-repaint cabinets
-new countertops & sink
-install wainscoting backsplash
-install flooring
-switch outlets and switches to white
Of course it’s totally personal preference so feel free to alter it to whatever works for you!
xo,
s
brilliantblond says
Great site can you share the colors suggested for the putty kitchen reno. I was looking at BM Decorators white. I have white appliances and darker wood floor but have been stumped on the cabinet color to go with and I think this kitchen cabinet color would work great. Thanks.
Rachel says
I am sooooo in love. This has become one of my new favorite blogs. We’re starting the process of redocorating and I totally lack expertise in this department, but now … wait for it … yes! I think I am excited to get started! Thanks!
leslie says
I want the”crazy “blue kitchen! What’s that paint?
YoungHouseLove says
Hey Leslie,
Unfortunately we don’t know what that color was since it was done by the previous homeowner, but Benjamin Moore’s Santa Monica Blue might be similar. Hope it helps!
xo,
s
JoLynn says
I’m so glad I stumbled across your blog. We are in the process of re-doing our office. We have a built in oak desk with floating shelving above. It’s the same oak cabinets that are in our kitchen from the 70’s with a very light layer of sealer on it. Anyways, I was wondering if I should paint it with the directions for the kitchen cabinets or like the pedestal table you painted?
Rachel says
I love all of these ideas. I am so excited to get started on our kitchen cabinets. I was curious as to how much repainting and adding new hardware generally costs. I love your blog so much, but have noticed that not many of the projects have price estimations with them. That might be helpful for those (like myself) who are just starting out. Thanks so much for all of the helpful hints!
YoungHouseLove says
Repainting (including primer) was about $40 and the hardware was probably around $40 or so (for a grand total of $80 spent). Hope it helps!
xo,
s
Chris says
Thanks for this tutorial! I’m in the middle of repainting our 1960’s cabinet doors white and really excited to see how they turn out. Next on our kitchen-redo-on-a-shoestring-budget project is the formica countertops complete with cosmic swirls and gold flakes. Have you ever done any projects involving painting over formica countertops, say with the kits available? We really don’t mind the shape, just the color.
YoungHouseLove says
Hey Chris,
We actually haven’t tackled that yet but we’re crossing our fingers for you. We’ve heard that they can be hit or miss (some just aren’t durable when it comes to holding up to the daily wear and tear) but we hope that the newer formulas and kits have better hold! Good luck.
xo,
s
Sharon says
I have a 1950’s kitchen with knotty pine cabinets… I hate them.. I am so glad I found your blog and I love your kitchen make over !! What color did you paint your cabinets ?? I am not sure what color I want to use.. My appliances are white and I have a 50’s counter top in yellow with pale blue & tan small swirly lines in it… My floor is light tan tile and I want to paint the walls also..
YoungHouseLove says
We painted the Brown Bag by Glidden. Any sort of sand or tan color would look great on your cabinets, and white or soft cream would also look great. Hope it helps!
xo,
s
Amber says
I just wanted to say I LOVE your blog!!! You both seem like very nice and warm hearted people. I enjoy reading and looking through your pictures and ideas. This is now a website that I visit on a daily basis (thankful to have found you through a google search) I just purchased my first home about a year ago. It is very very similar to yours. It is a brick ranch home from the 50’s and the rooms look very similar to your “before” pictures. It is my baby that I’m proud to say I own. However, this blog has given me hope that I can make my home look as beautiful as yours. Thank you for showing how to paint kitchen cabinets. I’m looking into doing this very soon. However, I do have my first question for you. What is your opinion of refacing the cabinets with new doors and painting the rest? I can’t decide between that or just painting everything. I would love new cabinets but it is not in the budget right now. Thanks!
YoungHouseLove says
It really depends on your budget, the shape of your current cabinets, and the overall effect you’re going for! If you have the money for refacing your cabinets and think that will add a lot more value to the space (maybe your current cabinet doors are a dated shape or in bad shape) then we say go for it! If you don’t have the money and would like a quick paint makeover in a weekend, then painting your existing cabinet fronts is the way to go. Good luck!
xo,
s
Kathy says
I’m finally ready to paint my kitchen cabinets white this summer (after reading your very helpful tutorial carefully many times and taking notes! ha!)
I have stock cabinets (probably from Home Depot) that seem to have a wood surface, but I doubt that they’re solid wood(?). Anyway, the doors have interior panels that are sort of “loosey goosey” – and I’ve heard that these gaps should be caulked prior to priming and painting; otherwise, they’ll “read” as black spaces when painted white. What type of caulk do you recommend for this project? Thanks so much!!
YoungHouseLove says
We like Dap caulk, just ask the pros at your local home improvent store which kind will work best for your cabinets. Good luck!
xo,
s
Ruth says
HI
Nice website, got some good ideas. I am curious about the kitchen cabinets. We had ours painted a little over a year ago. In some areas there is some chipping.. mostly in the high use areas around the sink, etc.
The painter used a decent primer and high quality paint. We think it is just wear and tear. We will retouch it up sometime, any suggestions on minimizing the chipping?
BTW we use our kitchen a lot–we love to cook.
Thanks
Ruth
YoungHouseLove says
Hey Ruth,
Other than painting it to touch it up we’re not sure there’s much more you can do. Perhaps you can hunt down some white touch up crayons or markers (visit a kitchen store and ask around). Hope it helps!
xo,
s
Stacy Rackley says
I am officially addicted to your blog. :) I love it! We are going to paint our cabinets white now after seeing how beautiful it looks in the before and afters. Your blog has also inspired me to do a few other updates throughout the house. Keep up the great work guys!
Amie says
Just found your blog and am starting to tackle painting our cabinets. They are similar to the ones you inherited. My question is, did you paint the inside of the cabinets too? It seems like a lot of work, but it probably not look right if the insides were still the wood, right? Thanks for your advice!
YoungHouseLove says
Hey Amie,
If you scroll back through the comments you’ll see that we didn’t but it definitely can be done if you’d like. We thought ours looked just fine with just the fronts painted though.
xo,
s
Fran says
I want to repaint melamine kitchen cabinets. Do I follow the same guidelines as the one for wood cabinets? Thank you so much for your help. Great work you have done!
YoungHouseLove says
Hey Fran,
Those can be a bit trickier. We suggest removing a door or drawer from your kitchen and bringing it to your local home improvement store to see what they recommend (or googling around for a melamine cabinet painting tutorial). Good luck!
xo,
s
Ricky Powell says
Read your blog and all used rollers to paint can you use a sprayer to do the same job. My house is empty.
YoungHouseLove says
If you’re an expert with a sprayer we say go for it. If not, the pain of cleaning it out and the steady-hand that it calls for when you use it might leave you with a drippy mess. Hope it helps!
xo,
s
Jen says
We just moved in and we want to ad onto the kitchen eventually but that won’t happen anytime soon. So, we are going to do little projects to make it look nicer for now. Our cabinets are those cheap ones with the white vinyl coating – not a real wood cabinet. How would you suggest prepping them and painting them? Thanks!
YoungHouseLove says
Hey Jen,
We’d suggest removing a door or drawer and bringing it to your local home improvement store for help. You can also google around for “laminate cabinet painting tutorials” – good luck!
xo,
s
Esther says
Hi Sherry! First of all, I LOVE your beautiful home!
I am planning on painting our cabinets a lighter color (top: Coastal Beige Behr Premium Plus, bottom: French Silver Behr Premium Plus). Do you have any suggestions on what color/type of Backsplash I should use? My bf and I have gone to home depot so many times but we just can’t seem to find “the right one”.
We also have horrendous wallpaper all around the kitchen so I’m in the process of taking that down and repainting the walls. Any suggestions on the wall color?
I took a before shot so when we finish everything I’ll share the before and after shots :)
w/ lv,
es
YoungHouseLove says
Check out our How-To page (under the painting category) for a post called “Pick the Perfect Paint Color” that’s full of wall color ideas for you. As for the backsplash, just bring home samples (or buy a few tiles of each and return the “losers”). It’s definitely the best way to pick something you’ll love for the long haul. And you might want to wait until you paint both the cabinets and the walls if you have that luxury- then it’ll be even easier to find the best backsplash for the job. Good luck!
xo,
s
jodie says
We are about to repaint our kitchen walls, cabinets, & counter tops. Our cabinets do not go all the way to the ceiling, but, there is a built-in wood space filler above them. My question is, “Should I paint the wood section between the cabinets and ceiling the color of the cabinets (Dark brown)or the color of the wall(cream)?”
Thanks for any suggestions!
YoungHouseLove says
Typically that area is painted the color of the walls, but if you painted your cabinets and added trim or molding to the wall above them you could make them appear to be cabinets that extend to the ceiling (so painting that space the same color as the cabinets in that scenario would be great. Good luck!
xo,
s
Natasha Rathbun says
Can you use just a regular old can of spray paint to paint the cabinets after they are properly prepped? I just dont like the brush marks I get.
YoungHouseLove says
We don’t recommend using spray paint from the can as your finish most likely will not last as long or look as good. You can use a professional paint sprayer if you have experience with one (if not you’ll probably be left with bubbles and drips). If you’re unable go avoid brush strokes (which is usually possible if you apply things thinly and evenly) then you can try a foam roller and be sure to keep things nice and thin. That’s the key to a great finish. Good luck!
xo,
s
Stacey says
We would like to repaint kitchen cabinets. The house we bought has painted cabinet but they are already starting to chip and peel. What do you reccoment for that, is there a special primer we should use?
YoungHouseLove says
You’ll have to sand down the paint that’s chipping until it’s smooth and even again (any slight imperfections will be magnified when you repaint). Then just go with the oil-based primer we recommended in this write up (we like Kilz). Hope it helps!
xo,
s
Laurel Farney says
Ok guys, I’m such a fan! I mean, fan feels like an understatement, but I LOVE your stuff and the positive personality you put all over your blog!! I have used so many of your ideas, and have been so pleased with the outcome. You give me confidence to try it all (after you do, and then tell me how : ).
Anyhow, even though I have been a follower over a year now (the first year in our first house… Perfect!!) I have never contacted you. Now I think I have finally convinced my husband to help me paint our oak kitchen cupboards white. It seems like an easy decision to me, but I had to coach him into it. I would also like to know if you have any other suggestions, and how we go about starting. Is there anyway we can paint without sanding down the entire surface?
I have pictures of our kitchen right now ( it’s a little cluttered, but you’ll get the point). How do I send those to you?
Thanks So much for all the time and effort you put into the blog. I hope you guys are still enjoying it as much as the readers do.
Laurel in Kansas
YoungHouseLove says
Hey Laurel,
When it comes to getting started, just dive in! Using the steps in this tutorial it should be no sweat! As for sanding the entire surface, you only have to do that if it’s super shiny and glossy to begin with, so if your wood doesn’t seem extra shiny you can go straight to the oil-based primer (or use a bit of sandpaper to rough things up just to be safe in about 20 minutes total- it really goes fast!). Good luck!
xo,
s
Matt | Tonka Park says
I remember seeing something about you not painting the inside of your cabinet doors. But if you are painting the entire cabinets do you paint the shelfs and the inside as well? Where do you stop? No one seems to ever have a picture of the cabinets open after painting them.
YoungHouseLove says
It’s all about personal preference! You can go as far as you’d like. That’s why we preferred to just do the doors though- so we didn’t have to get into painting the insides of each cabinet and the sides, tops, shelves, etc). Hope it helps!
xo,
s
Joy says
Hi! I LOVE your site! It’s so inspiring, and I love seeing the before and after pictures. I’m considering painting my kitchen cabinets white to lighten up the room. I’ve got a child who has asthma, so I try to avoid sanding whenever I can (oh, and I like the easy way). I’ve read about liquid sandpaper; have you ever tried it? My cabinets are from the 1950’s, wood, but very shiny. I was thinking of using the liquid sandpaper, priming with good oil-based primer, and then covering with a white paint (you recommend semi-gloss, right?). Do you have any suggestions or recommendations? (Oh, also, we’re renting. We have permission to paint, and I want light–white or off-white. The fridge is an old cream, as is the countertop. Is white going to look ok? I just need it to look decent while we’re here. If it were my house, I’d consider changing MUCH more than just paint color.)
Thanks!!!
Joy
YoungHouseLove says
Hey Joy,
If the cabinets aren’t super glossy (and feel matte) you can go straight to primer without sanding. If they feel shiny and covered with poly, you might be able to use some chemical deglosser like Liquid Sandpaper instead of sanding, but I’m not sure it’s any better on the ol’ lungs (might actually be more of an irritant actually since it’s a chemical sort of like bleach or acid). We always avoid those nasty chemicals when we can, and prefer to sand. So maybe you could do the sanding while your child isn’t home and then just wipe everything down (which you have to do in order to paint anyway) before the child returns? Otherwise you could use the chemical options instead but we’ve never used them so we’re not sure if they’ll compromise the oil-based primer or latex paint process (we follow our steps in this post to the letter every time, so any deviation might yield different results).
As for the color, we’d suggest something in the same cream family as the fridge and countertop (not matching at all, preferably about two shades lighter but with the same creamy undertone if that makes sense). Just bring home a ton of swatches and hold them up to the fridge and the counter to see which one looks best. Good luck!!!
xo,
s
Andrea says
Love your easy to follow tutorial. Quick question for you. What about the frames? Do you just follow the same steps? I noticed that the sides of my cabinets (not the face) appear to be a veneer. What would be the best way to handle that? Would you paint right over it? Also the center of my cabinet doors are very thin, would you suggest hand sanding? Maybe they are a composite wood.
YoungHouseLove says
Yup, the same steps should work for veneer frames. Just lightly sand them (to remove the shine but not go through the veneer) and then move on to the oil-based primer. Hope it helps!
xo,
s
Crystal says
Recently found your site and I LOVE IT! Thank you for sharing all your knowledge! I have been so afraid to start painting our kitchen cabinets but this has given me the confidence to just go with it. My question is that the doors are solid wood, along with the frame, so I now know how to handle that part. But the sides of the cabinets, the actual storage part of the cupboards, seem to be made of a fiber board or something similar. So the “oak” look is coming from a printed paper that actually peeled off on a small part when my son taped something up there. What would we use on the few sides that are “fake”? Thanks a ton!
YoungHouseLove says
Hey Crystal,
Hmm, we never tackled that personally but our instinct is to have you sand it all down so it’s all down to the bare surface that you found when the tape peeled off that small area – then the primer and paint process detailed here should produce the best results. Of course that’s just our best guess so feel free to ask around at the home improvement center! Good luck!
xo,
s
Funmilayo says
Hey there,
I enjoy your site every time I visit. We’re thinking of staining our cabinets to a darker stain than it’s blah basic color. Would we be following the same process of sanding(if needed)and everything else listed here, besides the paint? Neither one of us has stained or painted any kind of wood before. thanks!
YoungHouseLove says
It’s a bit more involved than that, and you’ll have to choose the right stain (gel stain vs. liquid, etc) so it’s definitely worth googling around for a specific staining tutorial or asking the pros at your local home improvement store what they recommend. Good luck!
xo,
s
Funmilayo says
thanks! will do!
Meredith says
This is by far the best painting cabinets tutorial I have seen. My question is this: What about a high quality satin finish instead of semi gloss? I have a Dunn Edwards paint I really like (they call it eggshell but it is more like a satin finish to me) that I used in a bathroom re-do with beadboard on the walls and then I used it to paint the door and door trim. I really like the finish. What is your take on this?
YoungHouseLove says
The higher the gloss, the more flexible (and therefore durable) your finish will be. So semi-gloss is generally a lot easier to wipe down and has more flex which means it’ll grip the cabinets well and take a bit more of a beating than something with less flex that could flake off with wear and tear. Does Dunn Edwards make a semi-gloss finish that you might be willing to try? It could last longer and shouldn’t be that much shinier (sometimes people picture this high gloss glare but it’s really a very “wearable” finish without any over-the-top sheen). Hope it helps!
xo,
s