We’re back with another handy dandy tutorial, and this time it’s an exciting lesson in chair covering. The main takeaway should be that this is a super simple way to completely reinvent a chair. Seriously. It’s a snap. So let’s get stapled, er started.
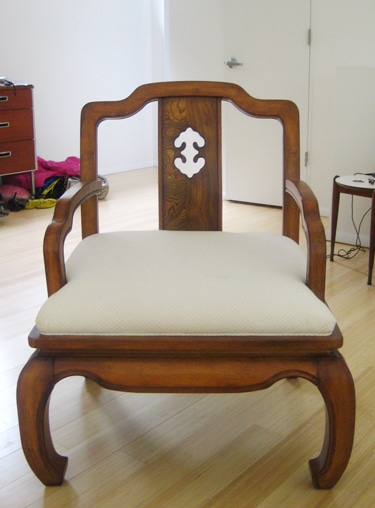
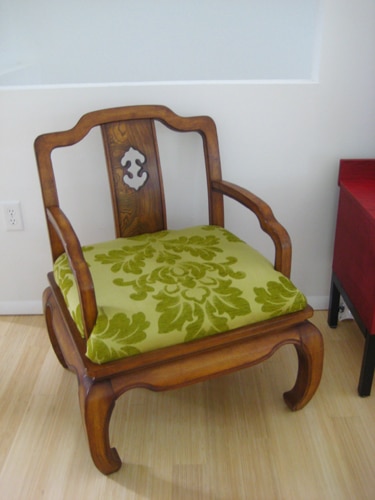
The white fabric on this antique chair was a little yellowed and stained from years of use. So Emily (John’s frequently mentioned sister in law) and I hit up a local fabric store to grab something funky and fun to update this family hand-me-down of hers.
After we scored two yards of sateen & chenille fabric with a fun and dramatic oversized damask pattern (for just $18!) we whipped out a pair of scissors, a screwdriver, and our $12 staple gun and we were in business.
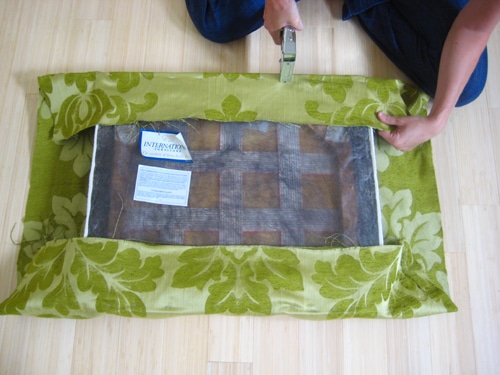
Step 1: Remove the chair’s seat bottom with the screwdriver, and strategically lay the cushion upside-down on the upside-down fabric so that the pattern is straight and centered. Then get to work stapling the new fabric right over the old stuff. Be sure to pull the fabric tight and keep it straight as you work your way around the seat, adding a staple every two inches or so for a secure hold and a pucker-free result. It also helps to periodically check that the front of the cushion looks tight, centered, and wrinkle free by peeking under the cushion as you go (so there’s no big surprise when you flip it over 40 staples later). Also remember that if you think it looks loose or crooked, it’s easy to pop out a few staples with a screwdriver and re-do ’em. So there’s really no possible way to screw this step up. Promise.
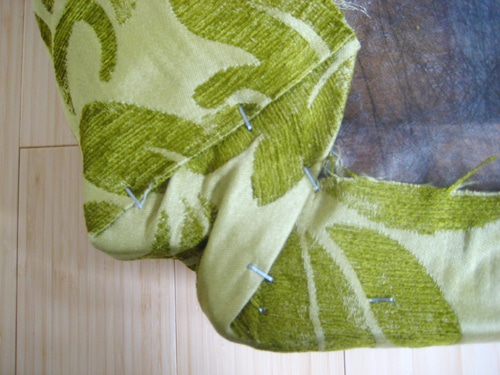
Step 2: Take special care when stapling the corners. It’s the only semi-challenging part of the process (and when I say semi-challenging I don’t mean hard, I just mean that you can’t totally be on auto-pilot). This chair was particularly angular (most dining room chair cushions are square or rectangular) but it was still pretty simple. Just pretend you’re wrapping a present. Tuck the fabric to create folds that are hidden under the seat so that the front of the cushion is snugly wrapped and wrinkle free. It also helps to flip the cushion over as you hold the fabric (before stapling it into place) to be sure that you like how everything looks in front before you pull the trigger.
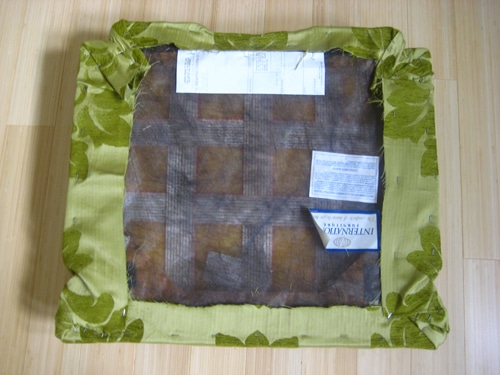
Step 3: Continue to staple the perimeter until you’re left with a securely covered seat cushion that looks something like this. You can trim the excess fabric if you’d like, but I usually just leave it alone since it’s hidden once the seat’s in place.
Step 4: Screw the cushion back into the chair and do a spirited victory dance as you admire your handiwork. We just love how the patterned fabric is perfectly centered- it looks like a professional upholstery job and it took ten minutes! The total chair transformation will truly be complete with the addition of a few plush tan and green pillows to cozy up the wooden back of the chair and complement our new patterned cushion.
Oh and for an even bigger presto-change-o, you can also paint the chair when you remove the cushion. How cool would this baby look with a coat of crisp white paint, glossy black paint- or even pale sage green paint to play off the patterned fabric? The possibilities are endless. So go ahead and get stapling- and don’t forget to send us your before and after pictures! We’re total suckers for a fabulous chair.

katie says
You inspire me! I just picked up a long fabric covered bench from a a free pile in our neighborhood. It’s bones are amazing and I want to use it as an ottoman or a bench at the foot of our bed, but it needs to be recovered. Can’t wait to go to the fabric store and get started- especially after reading this! Thanks!
Trixi says
What a great transformation.
Blessings~~
Corey says
Looks great! Why paint good wood? It’s amazing what a little refinisher and wipe on poly can do…
ann says
Great tutorial! thanks!
Cindy says
Very cute guys!! I am currently working on a storage ottoman, so when I finally get around to tackling the sides, I will send you pics!
Sarah says
I loooove that fabric! And where did you find a $12 nailgun?
Jess says
Love the cute fabric!! And a steal, at that.
Thank you, also for your last moodboard tip on the dining room rug issue. I have been going round and round trying to figure out if it should be big enough for two or four legs of each chair when they’re pulled out! You answered the question :)
YoungHouseLove says
Hey Sarah- We snagged our $12 staple gun at Lowe’s (it’s manual because a plug-in one is more expensive and just a little too intense for us). We were sure to pick up one that was labeled “heavy duty”, which works really well for projects like this (and just about everything else).
We’re so glad everyone’s enjoying our little tutorial. It’s really a super easy project with a huge payoff. Send us pics of all your chair transformations!
xoxo,
Sherry
Erin says
It is absolutely one of the easiest DIY projects ever. I’ve reupholstered (wow, that looks wrong) the vanity bench that came with my antique vanity set. It certainly didn’t take much time and was fun because there were several layers of old fabric underneath, so it was kind of like being an archaeologist! Thanks for the pictures- very easy to follow. Love your blog.
MaryB in Richmond says
You left out one step. Step One: Inherit really cool antique family hand-me-down chair.
THAT part I missed out on. (What’s WRONG with my FAMILY!??!?!)
Ok, but seriously, once again you’ve taken something I would never have even considered trying, and convinced me it’s do-able, even by me. All I need now is a cool chair!
Thanks, as always!
hsp says
The recover looks really beautiful but painting wood that beautiful would be insane.
Also, when stretching fabric, it’s best to start from the center of one side, then alternate with the parallel side, repeat with the perpendicular side and work your way around the frame in diagonals. Just like stretching canvas. http://painting.about.com/od/oilpainting/a/stretch_canvas.htm
Tiffany says
Great post! I’ve printed this out to put in my inspiration binder!
Toni says
I’ve done the exact same with 4 dinning room chairs and they look AMAZING. This chair looks great!
I love hunting old secondhand shops and repairing stuff…no one ever has the same furniture as us ;)
Jessica says
I want to go home right now and find something to recover! :D
Amanda says
Love it! Somehow though I always end up with the chairs that do not have easy screw off cushions and I’m bleeding with the staple gun in one hand and fabric with blood dots in the other. I need help.
Tamara says
Any advice if you need to replace the padding as well? I figure I need upholstery foam, but how to cut it?
All the DIY sites seem to skip this and I have chairs that definitely need new padding. Any advice welcomed.
YoungHouseLove says
We have heard a scissors or even an electric carving knife works wonders. Hope it helps!
xo,
s
casey says
I’m totally going to try this myself this weekend. I had intended to take a couple of old chairs in to have it done, but it’s about time I start a little DIY project. I’ll send you some before/after pics. :)
Stephanie says
I love your tutorials! I have always hated my ugly kitchen chairs and this post really inspired me. So I went to Ikea on the weekend, bought some fun fabric and upholstered my chairs! I love them now, so thanks for the how-to!
YoungHouseLove says
So glad our little tutorial helped you Stephanie! Enjoy those Ikea chairs- they sound customized and made with love!
xo,
s
Stephanie says
I didn’t even notice that you guys replied to my comment… Awesome! Here’s my after http://greeneyedgirlsgems.blogspot.com/2010/01/kitchen-overhaul-part-2.html
Saranna says
Hey, just wanted to say that I’ve found a lot of your tutorials super helpful, especially this one. I also really like the way they’re written. It’s almost like having someone standing next to you saying: Don’t worry, you won’t fail.
Tori says
I’ve just discovered your blog and LOVE the confidence it gives me to try all these things I’ve been too scared to attempt! I’m commenting on this post because I was searching your blog for tips on repairing/replacing an old woven chair seat. There’s a great chair valet that I purchased on Craigslist for a song, but the seat is in ruins. Have you guys conquered this before? Tips? Thanks!
YoungHouseLove says
Hey Tori,
We haven’t personally tackled that project yet but perhaps you can google around for a tutorial online- or even visit a local home improvement store to see if the experts there have any ideas? Good luck!
xo,
s
Tej says
Your website is awesome and definately inspiring. My dinning room chairs have cushioning on the backrest as well as the seat. Is there a way to upholster cushion on the backrest of a chair? Thanks!
YoungHouseLove says
Unfortunately that’s usually a job for the pros, but you can google around to see if you can find a tutorial. Good luck!
xo,
s
Allison says
Hi! I am loving all of your ideas and can’t wait to incorporate them into my house/classroom! Speaking of classroom, I have a rolling chair that I would like to reupholster to give it a more updated look. The only problem is I don’t think the cushions are removable. Do i give up on it and find a new one, or is there some way I can salvage this one?? Thanks so much!
YoungHouseLove says
It sounds like either a job for a professional or something you can google around and find a tutorial for if you’d like to do it yourself. It’s a bit more complicated but if you set your mind to it and do some research we’re sure you can do it! Good luck!
xo,
s
Katie says
I’ve been on the hunt for a pair of bargain chairs to update for a couple of months now. Hit the jackpot today with a matching standard chair and rocking chair that have beautiful details and lines for $50 at a garage sale. Cant wait to use your tips to update the cushions! Love your site, and all your ideas!
Lisa says
I was looking through your projects for guidance on reupholstering. How do I know if a sofa is worth reupholstering? My grandma has an old one she’s getting rid of with great lines and I’d like to consider having it reupholstered but I don’t know what to look for (in terms of quality) and what kind of cost I’m looking at.
Thanks,
Lisa
YoungHouseLove says
Hey Lisa,
Getting a sofa reupholstered usually costs around $600 or so, which is definitely a lot that you could put towards a new sofa. So the most important thing would be to make sure you love the lines of the sofa, that it’s well made, and that it’s comfortable and worth the investment. Perhaps you can google around for other tips (or ways to tell if it’s well made, since admittedly we’re not experts in that area). Good luck!
xo,
s
Kathleen says
Can’t wait to get started…though any suggestions for a kid-friendly, easy-wipe fabric? Would vinyl be just as easy for recovering my dining chairs?
Thanks so much,
Kathleen
YoungHouseLove says
Yes! It’s thick so you want to take it slow when it comes to folding and stapling the corners, but it’ll be nice and durable!
xo,
s
andrea says
Kathleen,
You might want to look for mexican oilcloth as well. Sometimes the patterns are a bit bold and loud, but it’s even sturdier and in my humble opinion even nicer than vinyl.
My sister recently redid an entire chair and even did the back. The chair has beautiful lines. The bonus was it was out on the trash in front of the girls dormitory near her home. Here is the before
http://www.flickr.com/photos/7165635@N04/5375208934/
She said for the top/back she used good scissors to remove the fabric ( she used the pillow to give the seat some more cushion). Then she positioned the fabric on the front( with enough fabric so that it is all hidden by the back piece), pinned it to the chair, tucked in the bottom in the crevice of the chair. Pinned that in and left the pins. Then she made corners at the top sort of folding in and pulling etc. Stapled the corners, taut, but not too taut so that the fabric does not pull from wear/tear and sitting. Then cut the back piece so that you fold in the edges ( you could use a little no-sew tape here if you really wanted to be a perfectionist, pin it in place and then you could staple if you do not mind the look of staples and no one is ever going to see the back or you could invest in some pretty nail tacks or upholstery tacks, In this case the chair had tacks so she just removed them and because they were burnished bronze-ish they went with the new fabric.
and here is the after
http://www.flickr.com/photos/7165635@N04/5375208948/in/photostream/
Annie says
Whoa, that chair is awesome! Is it an opium chair?
YoungHouseLove says
It definitely has legs like one!
xo,
s
Melanie says
Thought you might want to know that the first & last pictures in this post are sideways.
YoungHouseLove says
That’s just a smart phone glitch- if you clear your cache/cookies/data it should be all fixed!
xo
s
Megan says
I’d love to tackle this for my dining room chairs (I’ve been inspired by your book, it’s great!), and am about to buy a staple gun on Amazon. What size staples do you recommend for general reupholstery stuff? I see 1/4″, 5/16″, 3/8″, etc. Any advice? Thank you!
YoungHouseLove says
We use 3/8″ ones and they seem to work well. Hope it helps!
xo
s
Andrea says
Hi guys! I just started reading this blog yesterday and I’m totally obsessed. We desperately need more seating so I found a chair that needs some TLC on Craigslist for 35$ and I’m going to reupholster it…in fairy tale dreamland…because I don’t have a sewing machine and even if I did I wouldn’t be able to thread it. I thought it was a chair that was simple pimple to redo and it turns out the back of the chair is fabric too? Ever run into that problem? There’s no wood to hide the seam so it’s probably going to sit and stare at me for a while until I figure it out!
YoungHouseLove says
Hmm, maybe just staple it neatly and hide that Sean of staples with trim you can glue on… or secure it with nailheads?
xo,
s
Elnaz says
I noticed some of the pics in older posts like this one & the headboard one is flipped the wrong way, not sure if you noticed it.
BTW over years you have become a pro in photography & taking more detailed pics, well done :)
YoungHouseLove says
Thanks Elnaz!
xo
s
Allison says
I know this post is older, but I specifically looked it up on your site because I completely trust you guys! :)
Anyways, I’m planning on re-upholstering some seat cushions this weekend for our kitchen table chairs and I’m not sure what type of fabric to buy. What do you typically use when you upholster chairs? Any suggestions would be great!
Thanks!
YoungHouseLove says
We like “upholstery grade fabric” so if you’re on a site look for that category, and if you’re in a fabric store, ask for that section. Hope it helps!
xo
s
Barbara says
Random question about recovering chairs: If the chair currently has piping do you have to reupholster with piping or can you staple gun over it? Just wanted to check since the chairs I want to recover have piping but is not important for me to keep. Thanks in advance!
YoungHouseLove says
If you pull the new fabric over the piping and still see it sort of bunching or showing through in the shape, you should remove the piping and either try to learn how to add piping back or recover it without it. If you hold the fabric over the piping and pull tightly and you can’t even see it, you should be able to go over it. Hope it helps!
xo
s