Even though I’m sure you figured we’d just grow to love the look of our crazy exposed hood (“oooh, it’s so unfinished chic”) we were ready to get this hood-covering train in motion. Oh and as for the height of the range hood, we just followed the manufacturer’s recommendations (the JennAir website offered a range and we went right in the middle of that range at 34″ above the counter).
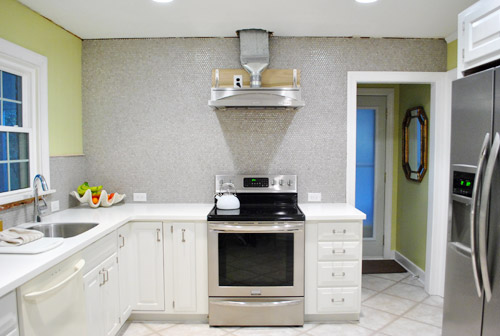
As for the hood cover, the first thing we did was use photoshop to mock up two different options to figure out what we thought would look best. This was our original thought, since it looks most like a lot of the hoods in our inspiration pictures. The squares on the front are supposed to be panels we’d make using trim.
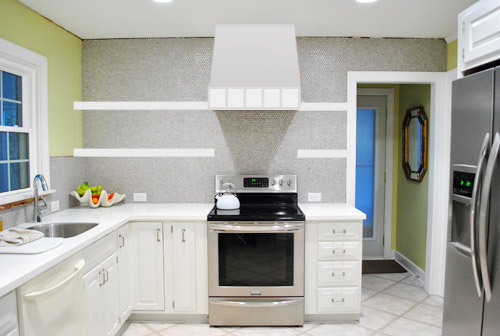
But it looked a bit top-heavy to us, so we tried this version instead:
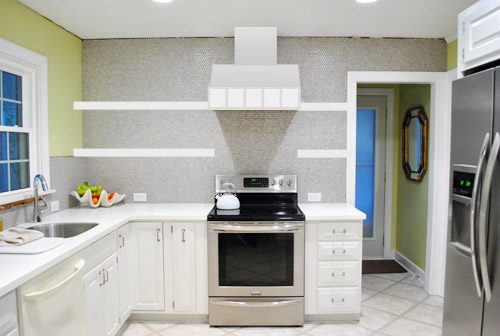
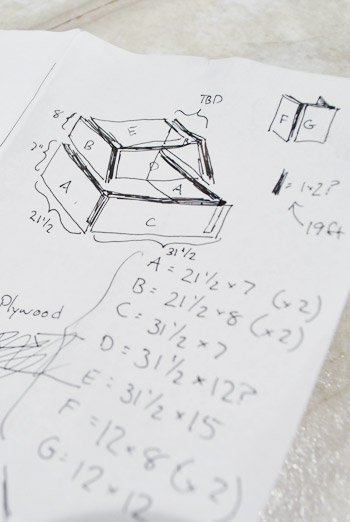
We liked that much better, so I took some measurements and drew up a “technical” drawing of the plan. I roughly sketched the hood to scale (using some graph paper under this white sheet) with pen and then used a thicker marker to design the cover around it.
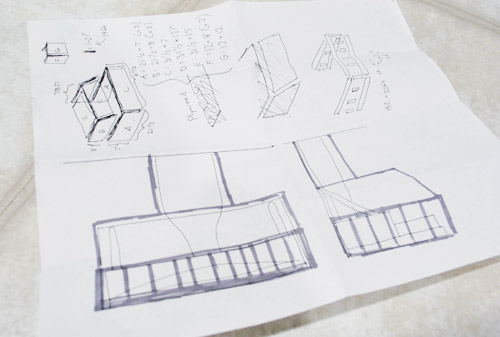
And in the other corner you can see where I started to figure out what sort of wood I would need to actually build this thing. I’m not going to even try to explain what this means now, since it will become clearer as you see the actual cover come together. But just know my goals with this thing were to:
- Make it sturdy (and use moisture/steam/grease resistant plywood so it would last)
- Make it as light as possible (I didn’t need worry about another heavy thing falling off of the wall)
- Make it pretty
When I returned from the store with some plywood panels and 1 x 2″ boards in hand, I got right to building. I was going to build from the bottom up so I started off by building a frame and cutting some plywood panels to size:
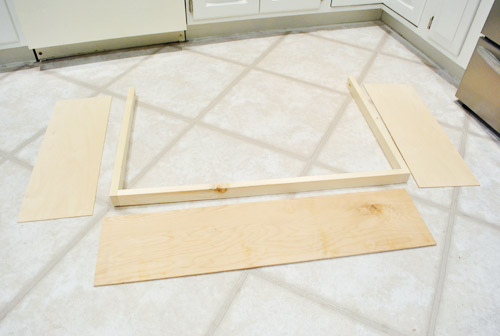
The frame is basically three pieces of 1 x 2″ screwed together in a U-shape using my Kreg Jig. To attach it to the wall, I made a couple more holes with my jig so that I could screw it tightly to the wood plank that we used to mount the hood (see, I told you that weird overhang would make sense!).
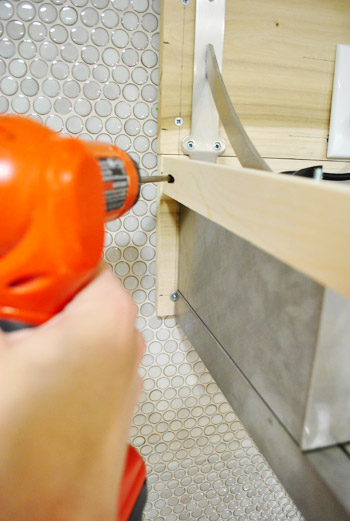
It looked a little something like this. Note that it’s not touching the actual hood at all, so our cover will essentially float around the entire thing (our high-efficiency range hood should have no issue directing moisture/steam up into the hood and up the vent, and our wood surround should stand up to everyday use like many wood hood surrounds built by various cabinetmakers and handymen/handywomen). We’ve heard from a ton of folks in blogland who have built or hired out wood covers since revealing our crush on them and we’re happy to report that everyone seems to have had a great experience with them (no moisture or steam issues with the wood around the hood). It actually makes sense since non-covered range hoods usually have wood cabinets against either side of them and they don’t typically have issues with those sort of things either.
Note: these pics were taken before we realized we should use metal foil tape and not duct tape for those vent joints, but we’ve since swapped it out and will share those pics in another update post about other things we have to share, like how we patched our giant honking ceiling holes, etc).
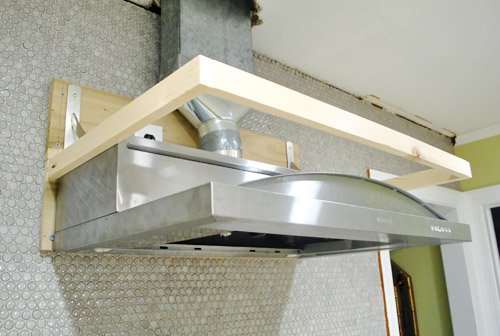
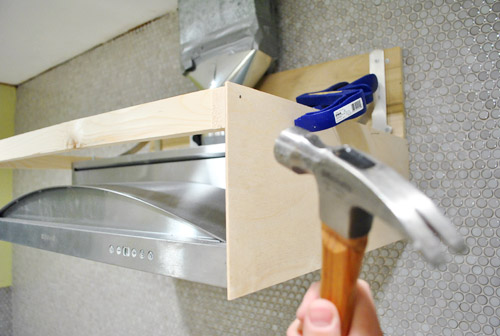
With the frame in place I started nailing the thin plywood panels in place.
Here’s what it looked like with the first three sides done.
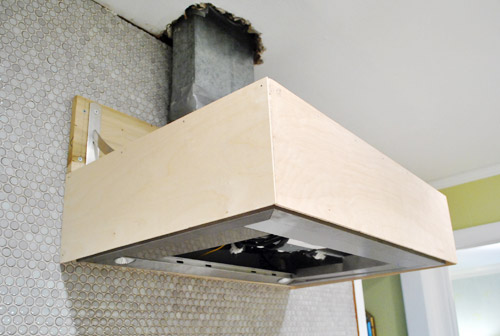
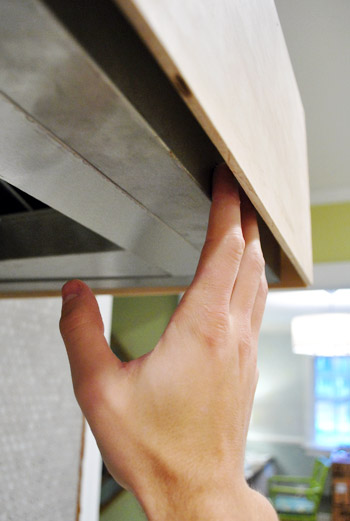
Remember the reason that there’s a small gap around the outside is to leave room for us to reach the control buttons on the front of the hood. There’s enough room for our fingers to slip in, without being a totally garish amount of space.
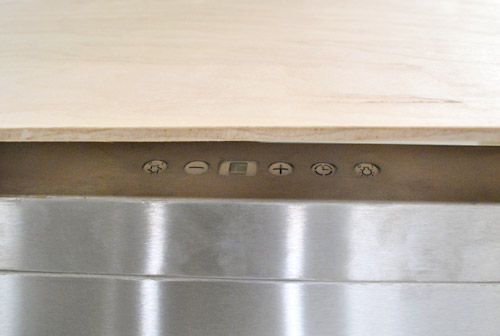
And if you’re Sherry’s height (or me slightly ducking) you can even see the buttons so you don’t have to wonder what you’re pressing (to see any buttons on the underside of a hood you usually have to duck a bit to see them, so we like that ours are just as accessible, albeit slyly hidden).
To add the next “tier” to our cover, I had to build a slightly smaller version of the previous 1 x 2″ frame. Since this would be the one against which the sloped part of the cover would sit, I ran it through my table saw at an angle to make it easier for the angled piece of plywood to lay against it. I didn’t measure or anything to make the angle perfect – it was just an educated guess since I figured anything would be an improvement over it meeting the original square edge.
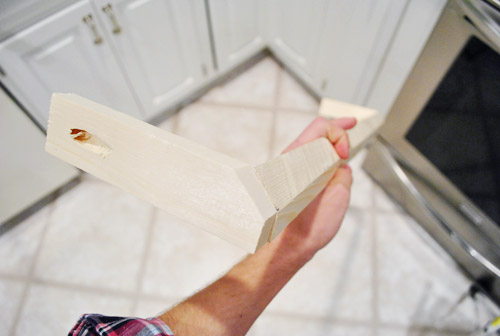
Here it is attached to the upper portion of the hood.
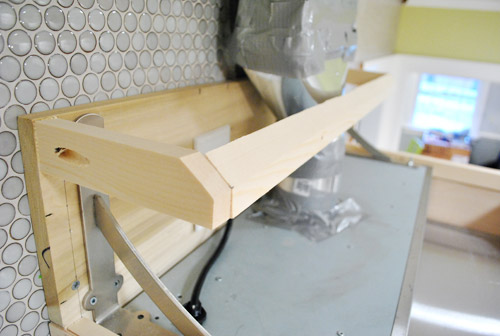
Even though the next set of plywood panels would sit just fine on the top edge of the previous set, I did add a small piece of 1 x 2″ to give me a place to secure them with a nail. And yes, I gave it another guesstimated angled cut to help that sloped piece sit better.
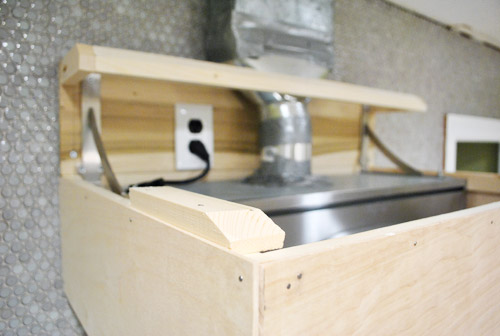
This picture should help make more sense out of this. See the sloped plywood panel in place?
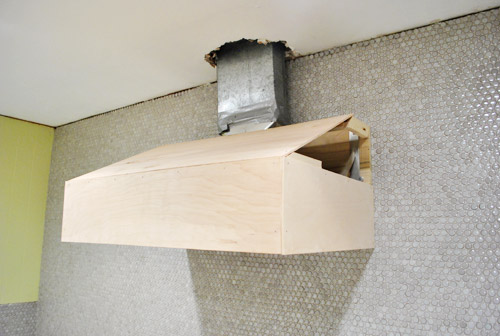
The next two sides would be on only non-rectangular pieces of plywood. Since this angle had to be exact, I held the piece in place so I could mark the exact line that I had to cut.
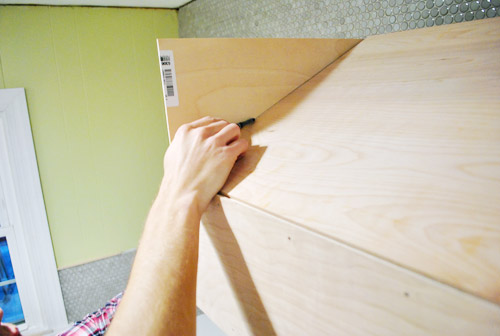
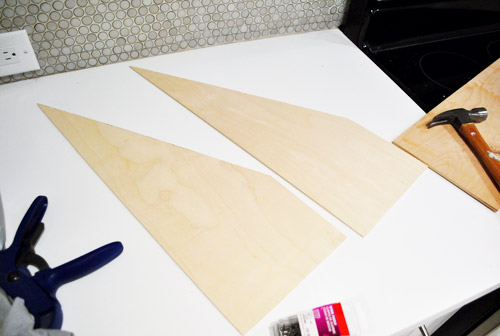
Then I ran them through my table saw to get these fun little quadrilaterals. Wow, I don’t think I’ve used that term since Mrs. Miller’s 9th grade geometry glass. That’s the class where I decided I should wear my glasses during tests because they would help me feel smarter (even though I just needed them to read the blackboard). Nerd alert.
Anyways, here are those two panels attached on the sides. It’s starting to look like something, no? Of course it’s still very clunky and unfinished looking without trim, but we’ll get there in a minute…
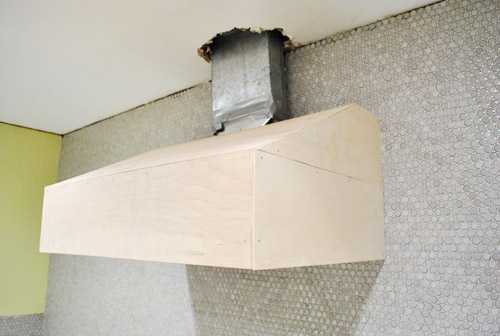
For the third and final tier, we had to cover the vent pipe with the section I affectionately called “the chimney.” First I cut my tiniest 1 x 2″ frame to date. Ain’t he cute?
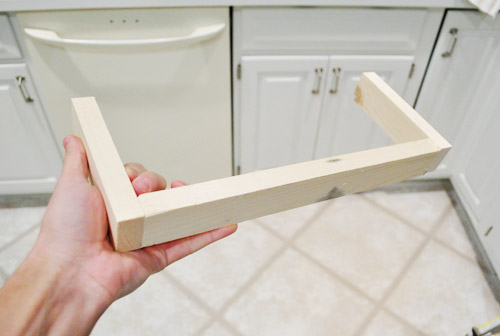
And then I screwed him straight into the ceiling (hitting nice firm wood that I knew would hold it nice and snug – you never want to drill up into nothing- that hollow feeling is the worst). The only problem was that I hadn’t accounted for how gargantuan the hole was for that vent pipe. Guess we’ve got more patching to do (Sherry’s my spackling queen). And we’ll eventually be installing crown molding around all of this too, so it’ll look nice and polished in the end.
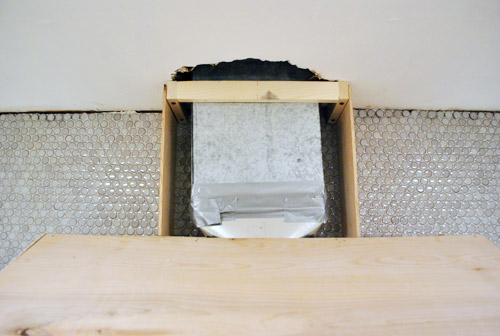
Here’s the chimney covered with the plywood panel, essentially completing the major construction phase of this project.
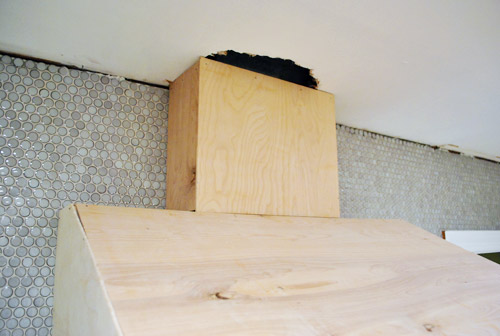
So here’s what it looked like at that point. Hood is sufficiently covered. We still have access to the buttons. It’s plenty secure and we’re happy with the shape of it. It’s just looking a smidge unfinished. Okay, maybe more than a smidge.
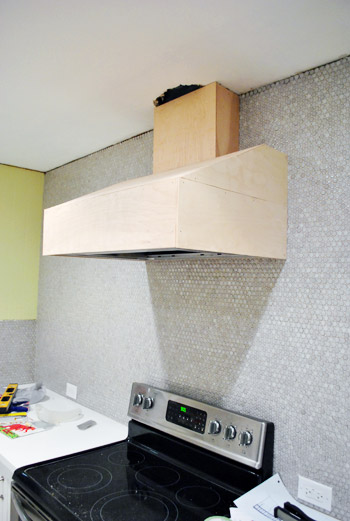
This is where trim comes in. And I’m telling you, it’s one of those “details make the difference” things. I decided to make the trimming portion on this fairly easy on myself. In keeping with the theme of “make it light weight” I decided to use some super lightweight plywood. And to minimize nail holes (and having to hammer against the cover) I opted to glue everything in place. This method should definitely hold up to heat and moisture and all other kitchen loveliness (grease!) – especially once it’s primed and painted with the same super durable Benjamin Moore Advance paint that we used on our cabinets – so we’ll keep you posted.
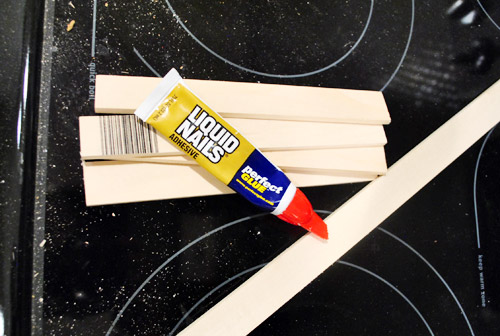
We also ditched the idea of doing panels across the front and sides (as shown in our original renderings) because we kinda liked the clean look better (and worried smaller boxy panels might not jive with our existing cabinets). It also made my job a bit faster, meaning I had the first row of trim cut and glued into place in no time.
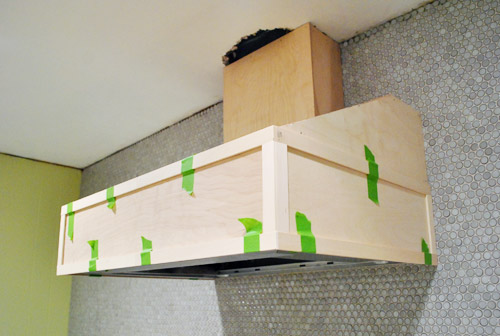
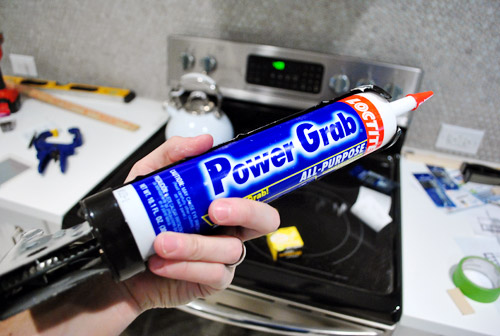
I did like working with the LiquidNails because it gave you a bit of play for the first 10 minutes (hence the tape above to stop it from moving when playtime was over). But I ran out about halfway through (it was an old tube leftover from something else) so I started using this leftover tube of Loctite instead… and kinda wished I had used it from the start. I wasn’t able to wiggle things into place as much (I had to peel it off and restick it instead) but things really stayed in place – meaning no more green tape was needed.
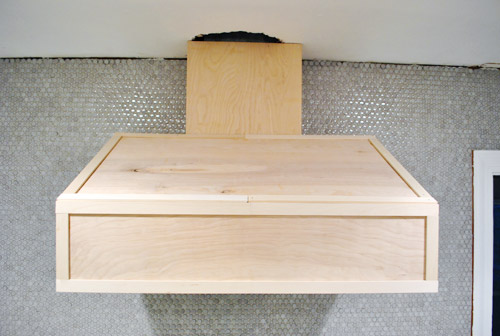
The top portion of trim took me a bit longer (especially because I ran out of wood and had to run out for more in the middle of everything), but by the end of the day I had it looking like this:
The angled cuts on the side took a bit of time too. We opted not to put trim on the chimney part because it’s not really supposed to be a “decorative” part of the hood. Plus there weren’t any open seams between the plywood or anything that needed “finishing.” Once we patch that ugly ceiling hole and add crown molding around the entire top of that wall (and hood) we think it’ll look swankypants indeed.
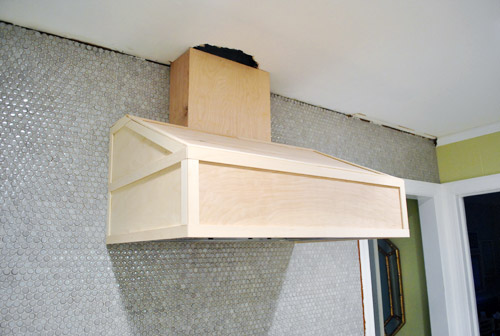
It’s not 100% perfect. For one, it needs to be primed and painted (we’ll do that when we prime and paint the open shelves we’re about to build) and it needs some caulk in a few places just to make it 100% seamless. But I’m just proud that I accomplished my three goals. It’s sturdy and durable. It’s lightweight. And it looks pretty (if I do say so myself).
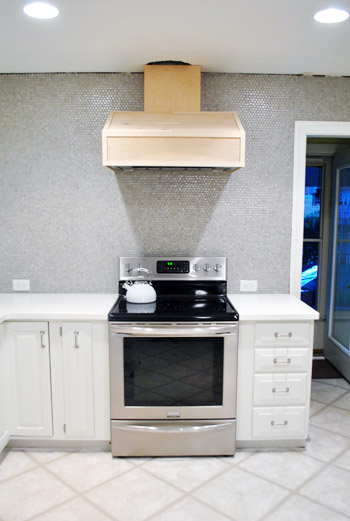
Now of course it doesn’t have some of the bells and whistles that a professional hood might have, but once it’s primed and painted it should perform just as well as a painted cabinet would next to or above a hood. And it certainly was cheaper than the $3 – 4K price tag we saw some places (check out this post to see a price that had Sherry spitting liquid at her laptop). In the end it cost me about $90 to complete, mainly because I didn’t realize how much wood/trim I’d need. So I think that brings our total for the hood up to $150 (since the hood itself was $60 thanks to craigslist). Wait, that doesn’t include brackets/wood to hang it, so make that around $175. Still not bad considering we paid $250 for our last kitchen’s stainless steel hood (and it wasn’t an industrial strength JennAir one like the beauty we scored this time).
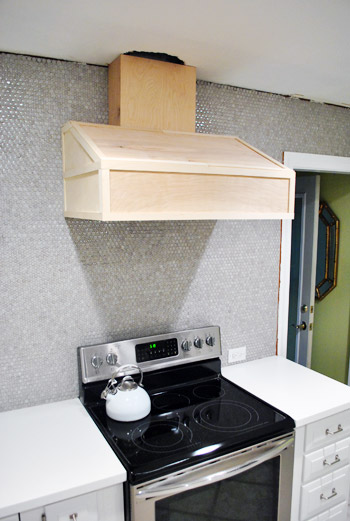
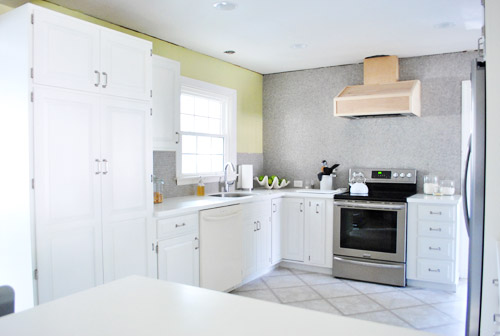
Even though it’s still a big, tan-colored box on the wall – I did take some “after” photos of the kitchen for ya. Mainly because with book photoshoots starting in our house this week I wasn’t sure of the next time our kitchen would look this clean again. It’s definitely still looking pretty raw in there (we need crown molding, shelves, a ton of color that Sherry can’t wait to add with art and accessories, new floors, an installed dishwasher, a light over the sink, etc) but we’re getting there.
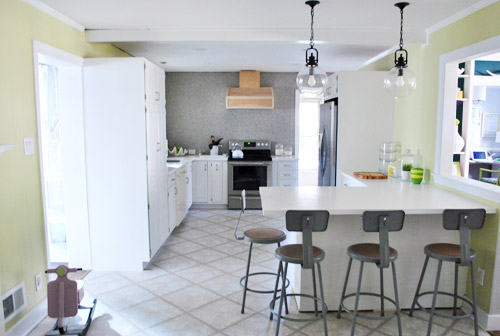
As much as it’s kinda weird for us to see something hanging from this wall that’s been empty for two months, we do like that we’re starting to break up the sea of tile a bit. In some ways it just draws your eye more to that wall so you can stand there drooling. Not that we do that. Much.
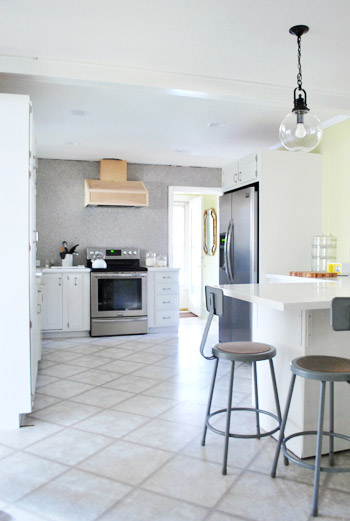
It mainly just makes us eager to get that thing painted, get the ceiling patches sanded and painted, and get those open shelves hung. Sounds like a good project to talk about next, eh?
In the meantime, let’s talk about range hoods. Ever built one? If not, I never had either until a few days ago, so you never know what you might find yourself doing down the road…

keri says
Major props to J-Boom, the man with a plan. and a jig. this post basically made my day, seeing something so simple (plywood) become something so polished…
Tara says
It looks fantastic! Did you consider using something like a wainscoting panel to add some texture before starting to build?
YoungHouseLove says
We did think about that but wanted it to tie into our cabinets without being too busy once we added shelves so we thought keeping it simple would be the best for us!
xo,
s
Frances Bentley says
I really liked that post. Great job John! We were just at Home Depot this past week looking for an adheasive for a project and Power Grab was recommended to us. Good to know it works so well.
Donna says
The kitchen looks flippin’ amazing!!! There is really no remodel task you guys can’t do! Great job, John.
CATHY says
i love it! i love how you decided not to go along with the wainscoting-ish-ness. love the simple lines (and how amazing it’ll look after). i would never have had the gumption to do that but now i think i would be able o do it too! i love you guys!!! (*sending hugs!)
veronica says
looks great!
any word on what day you will be at the portland home and garden show this month?
YoungHouseLove says
We’ll be there all day on the 22nd (Wed) and will post more info as soon as we know more!
xo,
s
Brenda says
It looks great! I think you made a great choice making the top part smaller than originally planned. Almost makes me wish I had a hood to cover. :)
jana says
How exciting to be getting so close to the end. I can’t wait to see how those darker floors enrich the room-bet you can’t either. Thanks for the daily dose of inspiration-you have me looking at my dated, but full-of-potential kitchen in a whole new way.
Krista Haws says
That looks awesome! I wouldn’t have thought of doing the hood myself. By the way, I my weekly “BHG” email today and it was about bathrooms and guess who’s bathroom was featured?!?! Yours…from the old house! So cool!
YoungHouseLove says
No way- that’s so funny!
xo,
s
Alexis says
I’m so impressed! Seriously don’t know how you guys do these things! Most days, I barely have time to shave my legs!
-alex says
Fabulous building job! I have to admit I was hoping for a bit of “stainless peek show” around the box. Is that weird? I totally thought you might leave a band of stainless showing below the wood cover. Of course, I really loved it when it was “ooh, so unfinished chic” so perhaps my design eye leaves something to be desired. :-)
YoungHouseLove says
Haha- it’s just a little scratched up (hence the craigslist deal) so we like tucking him away!
xo,
s
Stephanie says
You never cease to amaze. The kitchen is looking mighty fine. In fact, we installed a glass subway tile backsplash last year, which I loved until seeing that gorgeous penny tile you have going on. Why couldn’t you have done the kitchen reno last winter?! :)
YoungHouseLove says
Aw, so sorry Stephanie!
xo,
s
Amelia @ House Pretty says
“unfinished chic” made me laugh out loud – you guys could have started a trend there! Love the DIY hood, it’s going to look fabulous once painted!
Lauren says
I think the whole kitchen looks great! The hood seems high to me. Maybe I am just used to seeing them with a microwave underneath? You’ve said that Sherry is pretty short though, and (honestly dont mean it as an insult), but can Sherry reach the hood buttons? Is my perspective of the scale all off?
YoungHouseLove says
Haha, oh yes! The buttons are about 2″ above my head, so it’s just like raising my hand slighly (it’s the same way I work the stacked dryer in the laundry room). We just hung it according to the manufacturer’s recommended height!
xo,
s
Bethany says
super cool- you are fearless to tackle this project!
Diana says
I’m so impressed! It’s beautiful!!
Barb says
I’ve recently stumbled upon your Blog and I have to say I’m completely inspired. My kitchen is <> me out so I’m on pins and needles as I watch you transform your abode…my husbands “Honey-Do-List” has now reached 3 pages :)
Ashley says
Love what you guys are doing to the place! As a daily reader, you now have me obsessed about whether things are centered or not. You made such a big deal about the vent being off center over the stove, but it looked to me you framed the chimney cover right over it. Are you not concerned about this being off center? I can’t imagine it wouldn’t bother the two of you. I would have never noticed had you not put the idea in my head. Just thought you may want to address it before painting.
YoungHouseLove says
Oh no, we shifted the vent hood over in the ceiling before building the hood around it! Must be the angle of the pics because the “chimney” part is dead center when you stand right in front of it!
xo,
s
Laura says
Bravo Petersiks! It looks great. When are you going to install the floors? I really like the stools, but for some reason every time I see them I think you are going to surprise us one of these days by painting them turquoise or bright orange or some other lovely color. It’s really coming together!
YoungHouseLove says
We’d love to do the floor asap but it’s one of our last steps (just so we don’t ding it up installing shelves or crown) so we’ll do that in a few weeks. Can’t wait!
xo,
s
Kate says
Hi,
quick question. Did you guys do a mock up with the bottom floating shelf extending all the way across the wall (and under the hood)? I was thinking it could turn out really great or really bad. It could be really great and give some vertical “weight” to the area under the hood. Or it could be really bad and look like a bulky “stripey” wall from across the room and extend too far over the range. If the shelf is too deep to go across the stove then maybe making it a more shallow shelf across the stove would work. It’s still one piece of shelving but it’s notched in across the range. I’ve seen a similar concept executed in some vintage kitchens. The shelf is just deep enough for some white ceramic Jonathan Adler style style animal salt and pepper shakers. ;) I saw some on sale at a Saks Fifth Avenue outlet recently (just so you know that they are out there…)
Oh..maybe a small square framed photo of a green apple too. Or red to contrast with the awesome green walls. You could change out that photo every so often with another photo of some other seasonal fruit or vegetable. Hello small pumpkin.
Oh again! What about those little white ceramic vases that Ikea has? Maybe mixed in with one or two of the clear glass vases as well for some height and visual interest. Then pop in a few seasonal blooms from your garden. Or pipe cleaner art made with Clara.
Or, instead of a shelf in the space between the hood and the range, maybe some art work.
I’m sure I sound like a nutter butter with all my talk of vertical “weight” and seasonal fruit photos. Your room just inspired me all of the sudden.
I’m sure it’s all going to look awesome no matter what you decide to do. And I can’t wait to see more of your “coq aubergine” standing guard.
YoungHouseLove says
We actually did play around with shelf placement both with tape on the wall and in photoshop, but we’re thinking we like the two shelves on each side the best! We’ll have to see where we end up though!
xo,
s
Dean says
John,
How did you cut your angles? Mitre or table saw? Also, how did you pick the spot where you started your cuts? Did you do some dry fitting first or just cut the block and moved it based on where the “chimney” front layed?
Thanks,
Dean
YoungHouseLove says
I used a table saw and just guessed with the angle and the placement and adjusted it as I went so it would hold nails and keep that front part on. It’s not exact, but it’s rough enough that the nails held and it’s all covered up anyway. Hope it helps!
-John
Heidi says
I love the hood but more importantly I have the same tea kettle (but in Green Apple) and I say that is swankypants indeed!!
YoungHouseLove says
Hahahah, I love that adjective. Go John for coming up with the word of the day.
xo,
s
Kelly says
I LOVE IT! Now I want to destroy my kitchen!
Julie says
I can’t wait to see the darker floors. It will ground the whole space!
Nicki says
I was looking over the pictures again and it dawned on me that you didn’t build a frame at the bottom of the fan. In this case how are you keeping the plywood from flopping about if the corners are not attached at the bottom ends? Just curious :)
YoungHouseLove says
I slid small blocks up at the bottom on the corner so that they’re held and nothing can slip down. They’re just pushed up far enough that you can’t see them. Hope it helps!
-John
Nicki says
Oh, okay thanks. It is looking good. I just build a lot of things too, and was taking in everything thoroughly in case this project is in my future :)
Tirsa says
I really, really like the simple clean lines of the hood cover. I can already picture it all painted and finished. Way to go John!
Here’s hoping you guys are getting some decent amounts of rest with all the projects you have going on for the book plus the daily progress in the house and the blog, and…. just thinking about all you do makes me tired. :-)
Erin says
That looks great! I always wanted a hood like that and was also blown away by the expense of them. We’re planning a kitchen remodel this spring and the first cabinetry/contractor quote included a built in looking hood and yes- it was like $3,200 for a simple, shaker style to match the cabs we were considering. I couldn’t believe it and had figured that instead I’d do the stainless steel like in your last house. But I think that is actually a project I might be able to tackle if I want the built in look afterall. Your kitchen is just coming together so quickly and looks beautiful! :)
By the way, I didn’t get a chance to comment on your post about negative criticism but wanted to say way to go for that post. I think almost 100% of mean/snarky comments on the Internet come from people either being jealous or maybe because they are pushed around in “real life” themselves. Not that it excuses such rude behavior though, I mean, seriously, why can’t people keep their mean thoughts to themselves? Anyhow, keep up the good work!
YoungHouseLove says
That’s so crazy! $3,200 for a simple shaker style one? I wonder why they’re so expensive?! Maybe it’s just a lot of detail work with trim and stuff?
xo,
s
Debbie @ My Little Mess says
In all honesty, when I first saw that you two had picked out for your kitchen I didn’t like it at all and couldn’t figure out how it could be pulled off. Now, seeing everything put together, I LOVE it!! The wood range cover is just amazing! I can’t wait to see it finished.
YoungHouseLove says
Aw thanks Debbie! We know it’s so hard for people to picture things when we’re in progress (we wish we could share a key into our crazy minds as we go! hahah).
xo,
s
Dean says
Did you guys think about cutting a hole in the face of the hood and use pegs to push the buttons behind it? I know it sounds a little strange, but if you can remove the original buttons, place them on pegs or round pieces of wood with a metal strip on the back, you can use them as “extenders” and not have to put your hand up the front of the hood to turn it on.
Just a thought.
YoungHouseLove says
Didn’t cross our minds! Sounds really cool, but this simple tuck-your-fingers-under method doesn’t seem to bother us! If it does that’s always a possibility!
-John
James says
does that make John a hood rat? if it falls will you be hoodwinked. Jeez I didn’t realize you guys were so hood!
YoungHouseLove says
Hahahah, all of the above. Welcome to Pun City, population three (me, John, and you).
xo,
s
snosie says
I dreamt about y’all (again) last night. The bean was adorable. And your house didn’t look like the photos (Sherry you were ironing, and we were discussing when I iron!?). It was the strangest thing, thinking, I should know what they house looks like, why can’t I recognise anything? Perhaps a little too much blog reading?
YoungHouseLove says
Haha, so funny!
xo,
s
Tracey says
Looks great! I know you probably already have a plan for your hood,but check out these cool overlays that you could use.
http://www.myoverlays.com/
YoungHouseLove says
Oh man I love those! Might be too busy with our cabinets but maybe once the room comes together more we can make the call! Would love to do something like that!
xo,
s
Katherine says
I would never have thought to do this project. And although I can tell it is a lot of work, you make me feel as though it is do-able. Like, if I really put my mind to it, my husband and I could do this, too. Thank you for that!
YoungHouseLove says
You can totally do it!
xo,
s
Lara says
I’m not sure if someone already asked this since you have 256 comments at the moment, but I was just wondering if you’re planning on painting the inside of the hood cover since you can see it a bit from below. If so, how are you planning on doing that without taking it off the wall? Wondering if you have any painting tips for tricky situations like this for a novice painter like myself.
Thanks!
YoungHouseLove says
We’ll just get as much as you can see by sticking a small brush in there. I can get into little cracks like that cause I’m sneaky. Hahah.
xo,
s
Leah C. says
Looks great so far guys!
It’s so exciting to see how far you have come.
Can’t wait to see it all come together :-)
Lisa Bump-Riley says
Amazing! It looks great! Quick question though, I’m curious about how you will patch the hole. My first attempt at patching was awful. (I googled how to do it until I reached the end of the internet but it didn’t help me). Will you use metal patches and/or tape? some kind of blue board since its a larger hole? What are your preferences for patching? Thanks!!!!
YoungHouseLove says
We actually have a post about that in the cue for tomorrow!
xo,
s
Jessica says
It’s queue not cue ;o)
YoungHouseLove says
Haha- you’re right!
xo,
s
Jessica says
Ha, was just coming back to write: oh my word, you don’t have to publish that, I don’t know what came over me! I have a love/hate relationship w/ the grammar police.
YoungHouseLove says
Haha, too funny.
xo,
s
Nicole says
It looks amazing! I can see it all coming together :)
Robin O says
This looks awesome! Is it weird that I was so excited to see the hood cover go up? Very exciting! :) But you know, I have to say that even as I was reading, all I could think about was how busy you guys are and I can not believe you’re tackling a kitchen re-do at the same time. I just can’t imagine you guys dealing with all the book stuff and having to pause to go build a hood cover. Don’t you guys feel unbelievably overwhelmed?
YoungHouseLove says
It’s weird, it’s like we’re flying at this high speed and it’s terrifying and exciting all at the same time! We’re sleeping very very hard these days, that’s for sure.
xo,
s
Jamie says
It looks great!! You always make your projects look so easy! I can’t wait to see what it looks like when painted and your floating shelves are up!!
Jamie
BeccaK says
I can’t wait to see the post on how Sherry spackles up those holes. My husband tried to “fix” a large hole in our bathroom. And now I get to fix his fix (a definite spackle job), so I’m anxiously awaiting some guidance – mostly, granted, so I can do it right the first time and start a happy dance in front of him when his jaw drops open with jealousy…
pam says
I didn’t read thru all the post so I don’t know if this was asked. Since you have space between the jenair hood and the wooden hood, are you going to have to try and paint in between?
I love your whole kitchen!
YoungHouseLove says
Nah, we’ll just paint up a bit so when you duck to look at the buttons it looks nice and painted in there, but the rest won’t be seen!
xo,
s
Jennifer says
It looks great! I can really imagine what it’s going to look like now when it’s finished. I noticed when we made over our kitchen it was the details that made the difference. I also wanted to take down our microwave and cabinet above it to put in a wooden range hood. I told my husband he could build it, but he looked at my like I had two heads. I can’t wait to show him this! Technically, we still could do it…:)
laxsupermom says
It looks amazing! I love that you just made it up on your own. Can’t wait to see it all painted out.
Kelly W. says
Ok…love you guys and always enjoy reading your posts but today’s was riveting! Ok…I must be a nerd but I was so excited to see the hood come to life! Thanks for the entertainment!
I mean build a hood…you are amazing!!
Kelly
Cassidy says
I’m impressed!
I think an awesome blog feature down the line would be Sherry writing about something she built and you writing about something you sewed. Because role reversals are always high-larious :)
YoungHouseLove says
Haha- no way! John would sew something awesome and I’d build some wonky bird house. Haha. Actually I loved wood shop as a kid so it could be fun! And I’ve built some secret book projects so I’m getting my feet wet…
xo,
s
Libby says
We love, love, love the hood, and your entire kitchen renovation…it’s serving as inspiration for us as we plan our own renovation at our Texas farmhouse. We especially enjoy seeing your progress, and every day look forward to seeing what you’ve done next. Can’t wait to read the new book, too.
Bretta says
I have been reading your blog for the last 6 months and I just realized I have NEVER left a comment! Boo me. Just wanted to let you know that you guys are awesome and I look forward to your posts daily!! :0)
High five from Cordova, TN!
YoungHouseLove says
Aw thanks Bretta! High five back.
xo,
s
Cara says
Funny – something about today’s photos has me eager to see the dark floors. I feel like the room needs them. And then, I read Alex’s comment about how they make him think nicer grey floors would be the way to go. I guess you can’t go wrong!
liz says
Love the hood! I hope you don’t find this offensive but it looks so much better done than what I thought it was going to look like from the drawing!
This is kind of a random completely off topic question, but I was wondering how you guys are liking your KARLSTAD sectional? We’re about to bite the bullet and buy a new sofa, and that is on the top of our list. Are the fabric and the frame holding up well? How are the back cushions holding up since they’re not connected to the back of the sofa? Do you have any complaints? Thanks!!!
YoungHouseLove says
No complaints! Still looks good and is comfy comfy. On him right now. Haha.
xo,
s
liz says
Thank you so much!! You guys are awesome! I have to say what you have done with your new house is gorgeous (I seriously have loved every thing!) and has completely inspired me to be more bold with color and I love it – so thank you!
YoungHouseLove says
Aw thanks Liz, so sweet of you!
xo,
s
Hannah says
Whew! I’m glad you learned about using the right kind of tape. The stuff you had on there first will dry up and fall off in a few years. Also, hopefully when you patched the hole in the ceiling, you took the opportunity to seal the drywall to the exhaust duct with fire foam or caulk. Any gaps in your ceiling material allow heat to rapidly leave your home. Not ideal, since you pay $$ to heat your home in the winter. The ENERGY STAR website is a great resource to help you know how to energy efficiently do reno projects in your home. I’ve been chinking away at my home’s energy bills for 5 years. Now I’m a HERS Rater aka “Energy Rater for New Homes.” I love what ya’ll do. I can’t wait to see you seal your duct work or tackle energy projects.
YoungHouseLove says
Oh yes of course we’re spackling all ceiling holes! Posting about it tomorrow actually!
xo,
s