“I’m Blue Da Ba Dee Dabba Da-eeeeee” (anyone remember that song?). Picture us maniacally singing it while priming and painting trim for hours days. We’re slowly losing our minds, but we’re having fun doing it. Please feel free to click over and jam out so we feel less alone (and slightly less certifiable).
Ok, so when we last left our hero, er, our foyer, he was sporting some snazzy blue trim.
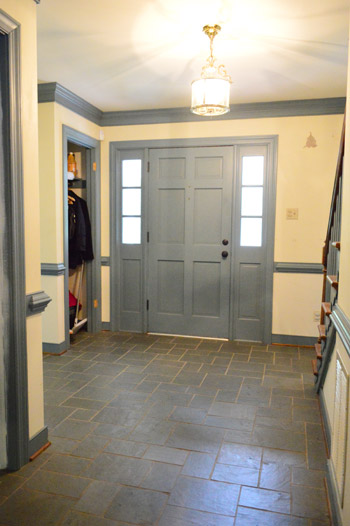
We had stripped down all the wallpaper, and had also removed two closet doors and the bathroom door so we could take them out to the garage and use our paint sprayer to apply a coat of primer and two coats of white semi gloss paint.
As for how we like our paint sprayer, it has definitely been a huge help in these two scenarios:
- when we can remove something and lay it or lean it on a drop cloth and spray it (like doors, cabinetry, or crown molding before it’s installed)
- when we don’t have a ton of other rooms/floors/areas to tape off (like when we had removed the carpeting upstairs and could quickly spray all of the trim and doors without worrying about getting it on any of the floors upstairs)
We’ll still definitely roll walls and ceilings (we think the sprayer is best for when we tackle trim, doors, cabinets, furniture, etc). Like how you wouldn’t spray paint walls but you might spray paint cabinets, doors, or furniture.
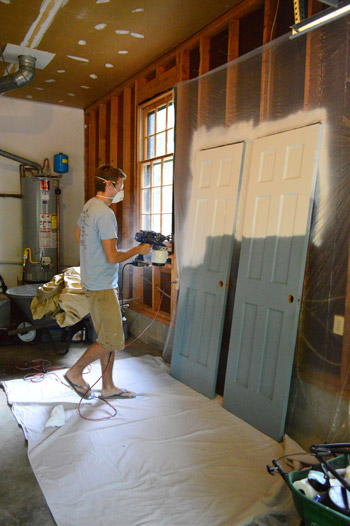
Here’s a video of it in action, just in case watching the motion of someone using it helps you picture things. John’s moving a little slow here, so for an even smoother finish we learned to go faster (it lessened the chance of drips).
The pros that we’ve found to this particular model (we had a Graco True Coat II – but we’ve since switched to this Wagner model) are:
- great coverage (it goes on thicker and smoother than a brush or roller for a faster finished result)
- you don’t have to water down the paint with anything (many sprayers require this, and it’s nice and easy not to have to worry about it)
And just to be balanced, here are the cons:
- as with every paint sprayer, there’s overspray, so it’s not as controlled of an application as using a roller or brush since you get paint flying around outside the item you’re sprayer (check out the image above – all the paint on the plastic drop cloth behind the doors is overspray)
- you have to learn how to control it so you don’t get drips – spray quickly and don’t hold the sprayer too close to the surface (this just seems to take some time to master, so it’s not as much a shortcoming of the sprayer as it is a skill that the operator has to hone)
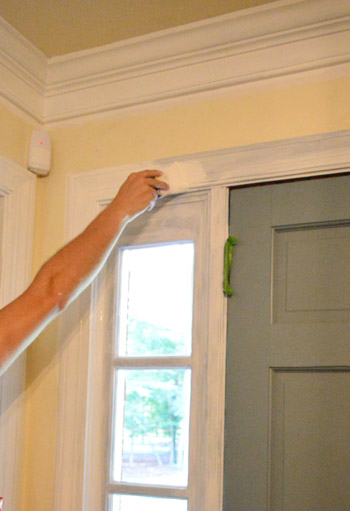
So with the doors out in the garage being primed and painted with the sprayer, we dove into priming and painting the rest of the trim in the foyer by hand.
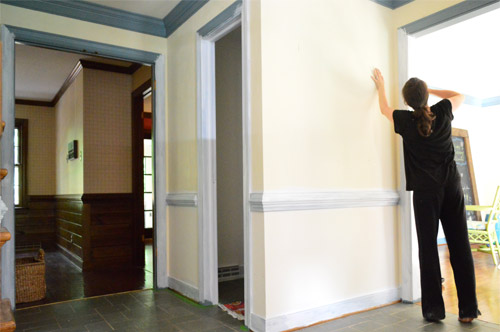
As for why we didn’t remove the trim and spray it in the garage like the doors, we were all for using it on the doors that way (which were easily removed and brought out to the garage) but removing and reinstalling all of the baseboard, chair rail, and crown in the foyer, as well as the trim around the seven doorways (!!) in there would have taken forever. We also considered taping things off and then spraying while standing in the foyer, but it leads into the kitchen, the dining room, the office, the portico, two closets, and the bathroom – so taping those all off to protect them from flying paint would have taken about a million years.
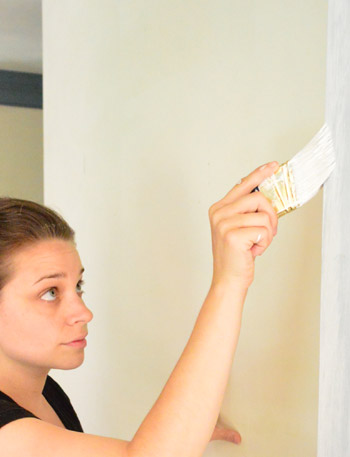
So we primed, and we primed, and we primed, and we primed (two coats on all of the blue baseboard, trim, chair rail, and crown). This is my tired of priming face.
If you have shiny wood trim or glossy painted trim, you’ll want to rough it up with sandpaper and wipe it down with liquid deglosser before moving on to the primer and paint step (be sure to use a stain-blocking primer if it’s raw wood). But since ours was chalky and matte painted wood, we didn’t need to sand or degloss it, and we could skip right to applying a primer followed by some semi-gloss paint.
It really depends what color you’re starting with when it comes to how many coats you’ll need of primer and paint, but in our case it was four coats (so after two coats of primer we could move onto two more coats of paint). We used Benjamin Moore’s Simply White in semi-gloss just like the trim and the doors upstairs. Here are some other designers’ best white paints you could use instead.
Finally after everything dried we could rehang the doors (with the new knobs that we ordered to match the ones upstairs).
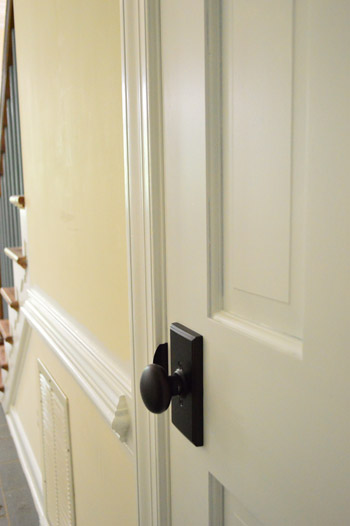
We have yet to paint the back of the front door in the same teal color as the front of it (or ebonize the stair railing and paint those blue spindles white)…
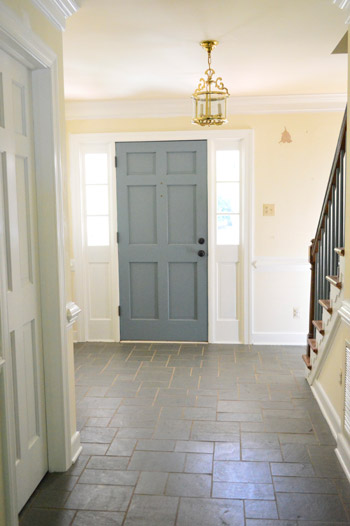
… but it’s already a lot lighter and more open than it felt when we inherited it with blue trim and wallpaper aplenty.
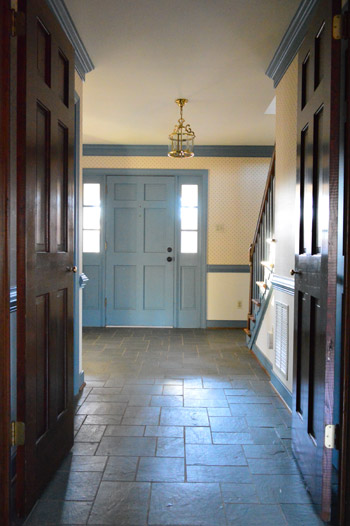
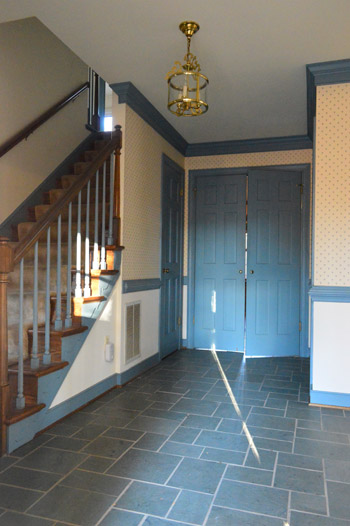
Here’s a before picture from the other side.
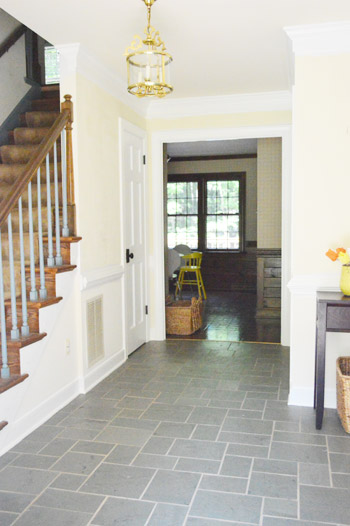
And a now shot with the white trim and doors. It’s also funny how much less blue the slate looks now that all the blue trim isn’t reflecting on it. It definitely still has some blue undertones, but it feels more neutralized now that we de-blued the trim.
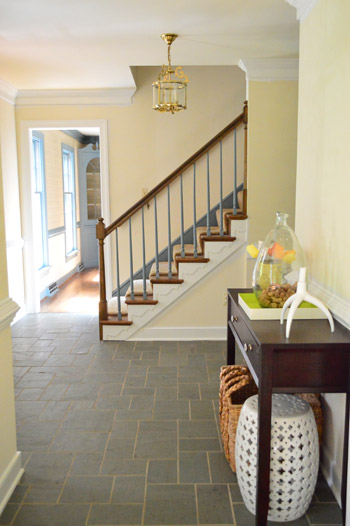
So while the stairs are still quietly mocking us, we’re slowly inching towards a fresher looking foyer. We can’t wait to paint those yellowed walls.
And just in case you’re worried that we might be close to done painting blue trim, you’ll be comforted to know that it’s still hanging out in our office and our dining room – both of which not only have window trim and baseboards, but also have crown molding (along with blue chair rail and built-ins in the dining room). So there’s a fair chance you might be reading about us painting blue trim for the next decade or so. While we softly cry into our paint brushes.
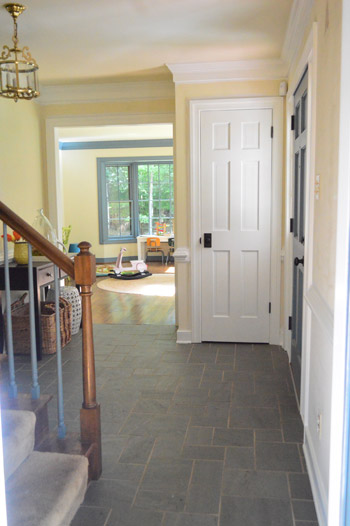
But man oh man, does the glossy white result make us happy. The things we do for love.
Psst- In family news, here’s what we did for the Fourth of July and here’s how we spent our sixth anniversary.

Winter says
Random question: up close can you see streaks or tell that the doors are painted? Same with trim etc of places you paint…your projects always look PERFECT via the pictures you post, and I have painted cubbords, trim, doors in my house, and I just can’t get them to look so perfect and clean! And it seems like I do 4 coats of paint because I can’t seem to hide the wood…even after I prime…maybe the wood grain should show and I am trying to hide that…not sure but it just seems likeo n the doors I can see lighter areas and I don’t know if this is normal? Thanks so much! I am just in aww of all your projects and ideas, it has really helped motivate me to keep plugging away on my house projects! :)
YoungHouseLove says
Up close they look great – like how a white painted door or cabinet from the store would look. It really really helps to do super thin and even coats (or to use a sprayer and work fast so there aren’t drips). If there are lighter and darker areas, it just sounds like you just need another coat or two. Four of them applied by hands on doors or trim that once was wood or painted dark is normal- even up to six is! So I’d say keep going and do thin and even coats with lots of drying time between them.
xo
s
Roxanne M says
I LOVE it you guys! This especially makes me happy because we just purchased a fixer upper home in a great neighborhood, like you guys. The home needs a lot of work but your blog will get me through my work as well! And I love that you do the wallpaper steps before I will have to do it, haha :)
We are inheriting a very similar foyer to yours (though you guys have better trim than ours, so we’re just going to replace it), so it’s fun to see your changes!
Emma says
I just want to pop in and say that as a reader, I truly appreciate everything you guys do to maintain YHL! When I saw this post get cut off in my Feedly reader, I was pretty annoyed. That’s an automatic unfollow for most blogs in my book. But I clicked over and saw your little disclaimer and it really warmed my heart to know that you guys are really conscious of us followers and that you do everything you can to make following YHL easy and enjoyable :) So, in short…Thank you! (And good luck on the rest of that trim, haha)
YoungHouseLove says
Thanks Emma! We’re panicking like crazy over here trying to get it figured out. Hope this afternoon’s post comes through just as it should :)
xo
s
Lauren says
Have you had any trouble with your newly painted doors sticking when you close them? We painted doors and trim in our house over a year ago, and some of the doors just don’t seem to “fit” or close right anymore. It’s so irritating! We’ve had to sand down spots on the doors and trim and repaint them to get them to close better.
YoungHouseLove says
We feel a little more resistance with our front door (that one swells from the heat since it’s half-outside) but the inside ones seem ok. Anyone have tips for Lauren?
xo
s
Alex the airhostess says
Rub a dry bar of soap over the sticky spot, it will act as a lubricant and let it slide better. This works really well on cabinet drawers and old-style chest of drawers that don’t have mechanical slides.
Hope it helps!
Trekker says
The formal term for the sticking that you describe is “blocking”. Another, somewhat related problem, is “printing” (when objects leave marks). Higher quality finishes resist both blocking and printing.
Assuming that you used a high-quality finish, you need to allow more time for the paint to cure before closing doors or windows.
If I spray finish (with an HVLP system), I like to use commercial products like General Finishes Pigmented Poly or Sherwin-Williams Kem Aqua Plus. Both are waterborne pigmented finishes that dry to the touch in fifteen minutes, can be sanded within an hour, and three coats can be added in a day.
Lauren says
Wow, I actually like the slate now…it’s amazing what a little paint can do!!
I noticed you’re painting the trim first. I was always told to paint in this order: ceiling first, then walls, and trim last. Have I been doing it wrong all this time?!
YoungHouseLove says
That’s funny! I’ve always heard ceiling, trim, then walls. We’ve done it all sorts of different ways, so I can vouch that they all seem to work, although ceilings first makes sense if you’re messy and drip all over the walls (we try not to do that, haha!).
xo
s
Lauren says
I guess it doesn’t really matter as long as it looks good in the end :) And if I lived in your house I’m pretty sure the trim would be done first, too! It’d be hard to pick a wall color without being able to see what it would look like up against white trim.
Marie says
Hi guys
Love, love, love it and can’t wait to follow you on your journey of DIY in this house…
Love your blog and I stop by every day.
Marie
Rahway, NJ
YoungHouseLove says
Thanks Marie!
xo
s
Elizabeth says
Nice side-stepping in the video John! Haha gave me flashbacks of marching band. The place is really looking beautiful, you guys motivate and inspire!
YoungHouseLove says
Haha! He was in the marching band, so there’s a good chance those skills came in handy.
xo
s
Sarah says
It’s such a huge improvement! Kudos to you guys for not trying to tackle all the trim (dining room and office) at once. It’s so easy to get to a point where you are overwhelmed and unenthused, and then the projects aren’t fun anymore.
Angel says
You know, I was super anti-slate when you first moved in and thought all the people saying it looked nice were crazy.
Kinda have to admit though, it does actually look good now! More cool and gray, less dingy blue. Who would have thought!?
The grout still seems icky though.
Haley says
Weird. We were just having a debate Saturday about whether it was “I’m blue dabadeedabba” or “I’m blue if I were green I would die”
The entry way is starting to look good. I didn’t think it looked too terrible before, but I’ve changed my mind after seeing the ‘before’ and ‘in progress’ pictures.
Gabby says
What a difference! Looks SO much brighter and you’re right about the tiles – they look so much better too. Keep going guys – it’s going to be so worth it!!
morgan says
Looks great! I actually really like the butter-color that’s on the walls currently, but it doesn’t seem very Petersik-y, so I’m sure it’ll change. :)
Martha says
The slate does look pretty great now! It looks distinctly gray instead of blue.
Skittle says
Honey, I feel your pain on the blueness. It was all over our kitchen when we moved in, on baseboards, chair rail & crown moulding, as well as covering all 30 of the kitchen cabinet doors plus 8 drawer fronts AND the inside of the cabinets, the window trim & all the little panes, the plantation blinds, 2 folding doors to the laundry room & one exterior door as well. I have conquered most of it, but there’s still a section that is blue because at some point I just gave up, probably in tears & moaning “no more blue.” It’s a section that isn’t seen as much & I have become quite blind to it actually. :) I am hoping before the summer is over that I will be able to de-blue the entire kitchen area. Then I’ll probably throw a party where no one is allowed to wear or even SAY the word blue. ;)
karen says
just wondering.. after you sprayed the doors, how long of a wait was it before you sprayed the other side?…i;m thinking with drying time, primer and 2 coats paint it would be days.??
after you sprayed the primer…did you have to clean out the machine before spraying your white paint?
sorry if these are stupid questions!
YoungHouseLove says
I usually judge coats of paint by feel (does it feel tacky still) and I haven’t used my sprayer enough to know what a standard dry time is yet (since it applies thicker coverage than my roller, I know it’s longer than a roller dry time). Since it was so humid when I painted these I gave it about 12 hours between coats (spraying one in the morning, another in the evening) so it did take me a few days to get these puppies done. And yeah, I cleaned out the primer before putting the paint in. It wasn’t the fastest process, but definitely worth it!
-John
Trekker says
There are options for much higher productivity. An example is using a commercial pigmented finish (an example is General Finishes White Undercoat primer and General Finishes Pigmented Poly tinted to whatever fan color you desire) with an HVLP sprayer setup with 3M PPS (picture an industrial Playtex baby bottle with liner).
Basically, you should be able to spray a waterborne primer, toss the PPS liner, flush the sprayer in five minutes, then spray three coats (using a fresh PPS liner) onto a door within a full day. You can put screws into the top and bottom of the door and hold the door on sawhorses horizontally (with the added benefit of no sags or runs) and then flip the door when it’s dry to the touch (less than a half hour).
karen says
thanks so much!!
and your tips about the shiny wood trim or glossy painted trim are so thoughtful. like pretty much all of your posts.
Jen@The Decor Scene says
It really is amazing what “white” does for a room. Your foyer looks so much bigger and brighter now. Love it!!! And once you paint the inside of the front door, your foyer will really be smiling. Can’t wait to see how that turns out. Love the color of your front door. Gorgeous color!!! :)
Sammy says
Thumbs up on all the hard work!! Hope all four of you are enjoying the summer between coats of paint =)
Kay says
Oh my gosh, the spindles are even blue!? I’ve said it before but I just love the previous owners’ total commitment to their design scheme :)
Vicky H. says
Just a side note, but in middle school, we had to sing that song during a choir concert. We were so hip.
Jill says
The change is absolutely amazing. But what stuns me is that someone chose that wallpaper and blue trim ON PURPOSE.
jeannette says
it’s amazing how the dark woodwork lowers the ceilings and narrows the space. painting it white is kind of like a prison break. (and will prolly take that long, jeez. vaya con dios.)
Yvonne says
Oh no. Seeing all this paint going up is actually making me miss painting our house. Then I look at all the things that should be painted, and turn back to my laptop. Hah. If you keep these painting posts up, I’ll probably eventually go find a roller. =D
Kristen says
Looks so great! Do you find that the doors swell when you paint them?
We are painting all of our doors/trim right now (by hand with brushes tho) and they have all gotten really snug.
Maybe we should try spraying them and then just doing 1 light coat at the end to get the brush strokes (so they all look the same) for the last few???
Thoughts? Suggestions?
YoungHouseLove says
Our front door is a little tighter feeling since we painted the front, but the interior ones seem ok. Anyone have tips for Kristen on her swelly doors?
xo
s
Kristin C. says
Definitely looks lighter and brighter! Oh, the joys and wonders of paint =)
Emily @ imperfect says
Huge transformation! Well worth the hand cramps and layers and layers of primer I’m sure. And the sprayer rec is super helpful – we have cabinets to paint and trim to replace (and paint the color of the cabinets) in the next year, and I’ve been doing lots of sprayer research – will check it out.
Rachel says
Wow. That’s incredible how different the slate looks without the blue trim! It comes off much more neutral. Are you thinking of keeping it? Or, do you have plans to replace it?
YoungHouseLove says
We’re hoping to keep it if we can repair/replace a few damaged spots and solve the grout issue :)
xo
s
Amy says
Ahh, nothing feels cleaner than crisp white trim! What a difference :) Great job!
Ps. Guess where I spotted your amazing book today?
http://www.anthropologie.com/anthro/product/home-office/27210285.jsp
Thought I’d share!
YoungHouseLove says
Isn’t that crazy!? It was such a surprise to see it there!
xo
s
HK says
This one area of your home is why y’all are so inspirational. Simply seeing the change (like Michelle said above) is so motivational.
The question is how are you going to cope with arthritis when using that sprayer in a few decades? I can see y’all turning to investment property makeovers (rentals or flips) when you get your forever home where you want it. Or before that time would be smart thing to do to… Take those checks to the bank!
HK says
PS Don’t worry about time to live in a house. We’ve been here 10 years and I just found the floor I want. Granted it didn’t exist until last year, but still… Decisionphobic.
rachel says
Sherry… you are lookin’ thin, girl! You drinking some kind of green bad-tasting good for the body shake we need to know about?!!
YoungHouseLove says
Haha! There’s nothing like a new house with lots of stuff to move, peel, and paint to get you sweating ;)
xo
s
Julia at Home on 129 Acres says
You have my sympathies. I started a mudroom makeover many months ago, and I’ve stalled at trim painting. The baseboard is done, the window frame has one coat, but I still have two door frames and one closet with their original flesh tone trim (it’s almost as lovely as your blue). My questions is are you cutting a nice edge between your trim and your wall? Or are you not worrying about it knowing that you’re going to be painting the walls down the road? My walls are all painted their pretty new colour, and I’m finding cutting on the trim much harder than cutting just on the wall (if that makes any sense). I’m wishing I painted the trim first.
YoungHouseLove says
Not worrying about it really, although when we go back and paint the walls we’ll be careful not to get the trim all ganked up.
xo
s
Carly says
What are you doing with the light fixture? ORB it or a new more eye-candy-fied one? I love the white! It’s so bright and open feeling now.
YoungHouseLove says
We’re thinking ORB for now and then eventually we might find something special for that spot (capiz changelier?! dark star pendant? sky’s the limit).
xo
s
Misty says
Hi! I’m sorry if you’ve already answered this question (there seem to be a million comments to scroll through)..but what product are you going to use to “ebonize” your banister and railing? I’m getting ready to do that in our house and after three coats of stain it is just not dark enough. Thanks!
YoungHouseLove says
No idea yet! But when we research/tackle it we’ll share all the details :)
xo
s
Laura says
Oh my goodness – even if the walls are yellowed, it looks so much better with the fresh white trim and the wallpaper removed! Seriously, the “after” photos are like a breath of fresh air!
McKenzie says
I am curious what you will do eventually with the off white vent covers. I had a bunch of U-G-L-Y beige/rusty vent covers in my house. The more I painted trim white, the worse they looked. I ended up simply brushing them up and spray painting them white. I felt that was a very YHL type of thing to do (:P) but I am curious as to what your eventual solution will be!
YoungHouseLove says
Haha, sounds good! I think we’ll paint ours to match the wall for now but might upgrade to a prettier grate someday!
xo
s
Alyssa says
I wondered this too, especially with all the beige light switches & outlets. I’ve had success spraying outlets & switches with white spray paint (the stuff made to bond to plastic) and then just replacing the covers with new white ones. No one can ever tell & it holds up great! Wondering if you guys have a plan for yours though.
hillary says
My SIL/BIL just replaced some of their vent covers with new decorative ones and they are INCREDIBLE. Their house is 70’s but with a craftsman vibe and they went with that style for the vent covers and it looks so upgraded and interesting.
Alyssa says
I wondered the same thing, especially about the beige outlets & switches. I’ve always spray painted mine with the white plastic spray paint & just replaced the covers/plates. Nobody can tell they’re painted & they hold up great! But wondering if YHL has other ideas.
Karen says
This may be a dumb question … do you wash the baseboard and trim before you prime, or just brush it over the dirt and dust? That’s the part that wears me out to think about it. Not only the prime step and the paint step, but the wash step.
YoungHouseLove says
We wipe them down with a damp rag since dust and stuff can collect on them but it’s fast! Don’t despair. It’s the priming and painting that’s tiring. Haha!
xo
s
Samara @ Layer Jewelry says
Much much better!
Emily says
OMG! I love how a little white paint can completely transform a room! Can’t wait to see when the walls are painted!
julia says
when we moved into our apartment last summer there were dark brown baseboards everywhere and browney-beige doors. 4 coats on those baseboards nearly drove my fiance crazy! doors took about 3 i think. luckily our apartment is 850 sq ft, not nearly as bad as your situation!
xo julesinflats.com
Alyssa says
Bahaha, i feel you on crying into your paintbrushes!:) but what an improvement! It already feels more modern and light. Your house had the “blues” but now its really “lightened up”!
Dont give up!
Alyssa
Lynn @ Our Useful Hands says
I guess that I was fluent in gibberish back then because it’s non-words made total sense to me. Haha! I love how good that foyer is turning out guys. I totally thought that mellow yellow is what you went with and I was over the moon in love. But then realized you didn’t put that on there purposely. Womp, womp…but…wouldn’t yellow look so great? Eh, eh? I’m just sayin’…..
My best, Lynn
YoungHouseLove says
Haha, it’s always an option!
xo
s
Mia @ how to find a man says
It looks great!
I can’t imagine myself doing this but I really want to try it with someone who has some experience.
Maybe I’ll find a hunky handyman?
MIa
YoungHouseLove says
Haha, just hang out in Home Depot and see who you find…
xo
s
hillary says
As usual I am in awe of your steady hand. I hate cutting in! I need to get over it though because this summer we’re going to paint the living room ceiling (one of those slanted open-beam kind). It has been grey since we moved in and I can’t wait to paint it white! Tired of feeling like I’m living under a cloud. It’s going to require a ton of brush work, though, ugh. Hopefully we’ll see the same kind of transformation that your foyer is getting. So light and bright in there now, even without a new wall color yet!
Natalie says
Yay! It looks so much better already!
I’ll bet you guys thought of that post title the second you set eyes on all of that blue trim! ;)
Linda says
SO happy to see I am not the only one who suffered through 4 coats per trim area… I’ve redone almost all of my husband’s house (ok, it’s house now too); and trim took crazy forever and everyone kept wanting to know why I was “still painting”!!
Eva says
Wow what a huge difference!!! The house is already looking so much more like it belongs to you with the crisp white trim and the dark doorknobs!! I love it!
Whitney Dupuis says
Whoa! Looks amazing already. It is crazy how much a little bit (ok a lot) of paint can change a space.
Jennifer says
I know you guys have mentioned several times that when painting glossy trim, you need to rough it up, etc… and I am wondering if you have ever used this little paint beauty called ADHESION PRIMER?
Sherwin Williams (my go-to paint supplier) sells it (used to be called bonding primer). I learned of it in our last house, which had all the trim painted in OIL BASED PAINT! I tried to paint over it with regular paint, and the paint just peeled off, so I went to SW and the man there introduced me to my best friend Adhesion Primer. You just paint it on over whatever (oil based-paint, press-board, PLASTIC even) and it allows the latex top coat paint to adhere to the formerly unpaintable surface. I’m serious… the stuff is the bomb. We painted a coat over our gross brown paneling in our current house, and it worked like a charm. Just thought I’d see if you knew about this stuff, and maybe get the word out to others. I always avoided painting projects that required “roughing up” and this stuff avoids that step. I swear I don’t work for Sherwin Williams, although I sound like it! lol.
YoungHouseLove says
Who knew?! Thanks for the tip Jennifer – that sounds awesome!
xo
s
Carolyn says
PTSD! We had similar blue trim in our entire house when we moved in, and similarly, spent days priming, priming again, priming again, and then painting white, and painting white again. Luckily, that was 8 years ago so we’ve almost forgotten, ha.
Anna says
It’s funny- I’m actually in the middle of almost the reverse process- painting my white trim a green-toned grey. It’s not blue though. That blue is pretty atrocious.