This kind of spoils the whole “wait for it… here it comes…” build-up, but I had to lead with an after picture for you guys.
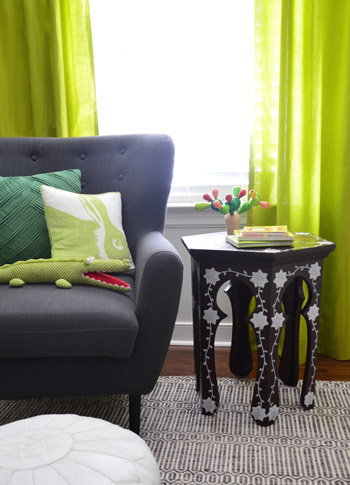
It’s a super affordable, deceivingly simple thrift store table upgrade. Seriously, don’t tell me you can’t do this. You can.
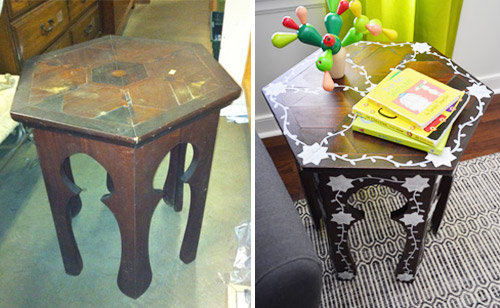
And I’ll give you one of these if you say you can’t.
Do you remember the $25 thrift store Moroccan table that I brought home nearly two years ago?
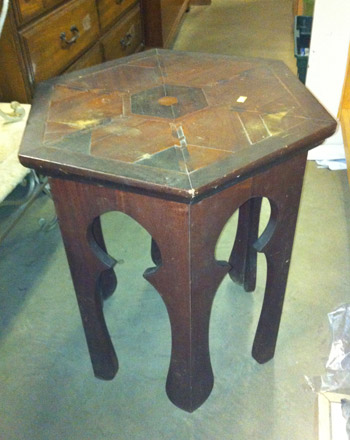
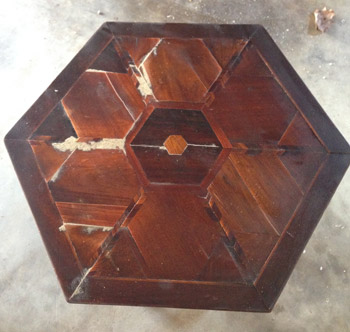
Even after cleaning it up, the top still had a few issues, but I didn’t want to rush into altering it right away (like attempting to putty, sand, prime, and stain/paint it) so I just tossed a few things on the top to hide those cracked and water-stained areas. John and I really liked the wood tone and the cool interlocking shapes on the top anyway, so we thought living with it as-is for a while was the way to go.
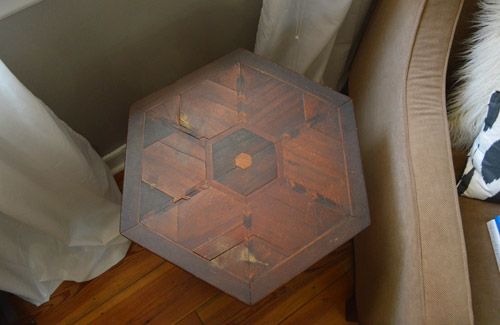
Fast forward nearly two years, and well, we’ve definitely lived with it for a while. No sir, there was no rushing into anything with this guy. But the years haven’t been very kind to the top of the table. And by “the years” I mostly mean Clara, who figured out that she could pull little wood shapes out of it like a puzzle.

Some areas were a lot looser than we thought, and a few pieces even started to pop out and get lost in the shuffle.

The temptation to paint our bedragged little table definitely came back full-force as it continued to fall deeper into despair. Especially when we started noticing sweet little versions like this and this popping up. Meanwhile, our old thrift store find was giving off that “uh, you don’t really have much to lose at this point” vibe. So we thought “let’s just try refinishing it, and if that backfires we can always paint it as a backup.” The first step was sanding it and adding some wood filler to those cracked, broken, or uneven areas.

We had luck using this same type (and tone) of wood putty with our dark-stained kitchen cabinets (more on that here), so although we debated running out to buy some darker wood putty for this project, we figured we’d have the same luck with being able to even things out with a little more stain on those puttied areas. That last sentence is foreshadowing. Feel free to read into it.
After everything was dry, we sanded those areas, and then it was stain time.
We wanted the same rich reddish-brown tone that it had always had, so we went with Red Mahogany stain by Minwax (we’ve had the same can since using it on Clara’s two-tone dresser four years ago). After two coats – applied with a brush and wiped off, per the instructions – it was clear that those wood puttied areas were being a lot more stubborn than they had been when it came to our kitchen cabinets. Bummerz.
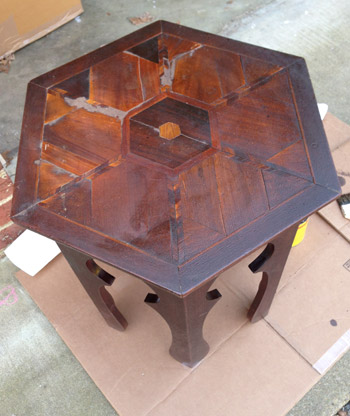
So I did what I usually do whenever a project goes wrong. I stepped away from it for a while and John and I started working on something else and ran to Home Depot for some other materials. In other words I just tried to forget about it for a little while – hoping some solution would come to me. Honestly I expected the solution to be “well, we said painting was a backup plan and it sounds like that’s the best option.”
Then as we pulled into our garage after returning from Home Depot, stain markers popped into my head. I knew we had one in a dark color since I occasionally use it to touch up the dark wood furniture items that we have (like our foyer console table, Clara’s dresser, our sofa table, etc), so I figured I could just give that a go on the wood puttied areas to see if it might darken them up so they blended better.
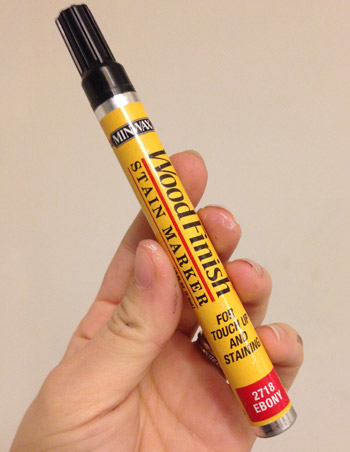
Miracle of all miracles, it worked. I just scribbled it on and gently wiped it with a paper towel to blend it all in.
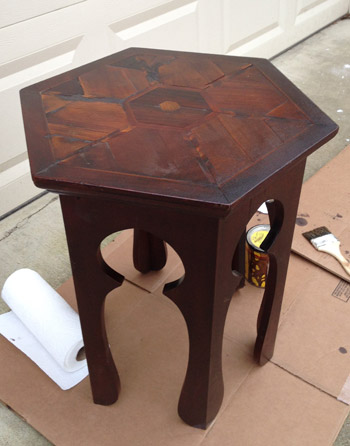
It didn’t completely hide the putty (you still can see those spots when you stare at the top in this picture) but it definitely was a nice leap closer to the not-as-obvious effect that we were going for.
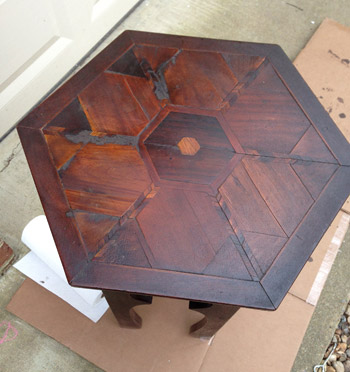
And that’s when I had another idea to completely obscure them. What if I didn’t paint 80% of the table, but I added some interest in a few areas with an inlay inspired detail? I figured that might draw the eye away from those patched spots while adding some fun detailing without completely robbing the table of the wood look like a full-on paint job would. I even found this example in an binder full of magazine tear sheets since I vaguely remembered thinking about that as a “down the line” idea a year or two ago. Turns out I had even written myself a little note so I wouldn’t forget.
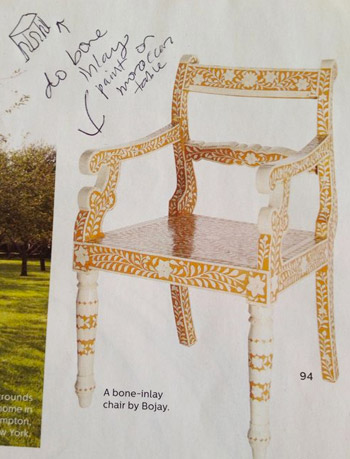
It’s definitely not a tame idea (ok, maybe it falls into the “kinda crazy” category) but I figured we didn’t have much to lose, and John was down with the idea too. So with his blessing it just came down to the “how” of the project. I considered everything from stencils and stamps to attempting to freehand the whole thing, and landed on a combo move: freehanding the leafy vines that connect everything but creating a cardboard template for the star-like shapes that seem to be on a lot of Moroccan designs.
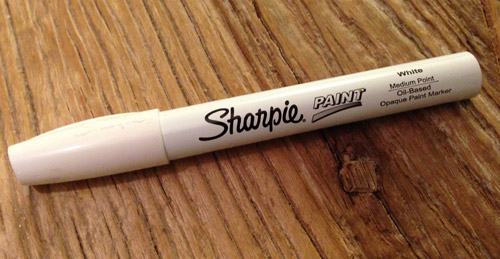
I thought a paint pen would give me more control than a paint brush, so I decided to try that first. Thankfully this Sharpie paint pen worked well, so I’d recommend it – but be sure to use their oil-based version (they also have a water-based one that I love) if you’re using it on a stained piece of furniture to avoid any bleed-through. To avoid fumes, I just opened a bunch of windows and Bane-d things up with my respirator so I wasn’t breathing anything in that I shouldn’t be.
To make my cardboard stencil I found a seven pointed star online, printed it out onto card stock in a bunch of different sizes, picked the size I liked best, and cut that one out. As for how I landed on seven sides for my shape, I noticed some Moroccan designs that had five, six, seven, or eight pointed stars – so because seven is our favorite number I went for that.
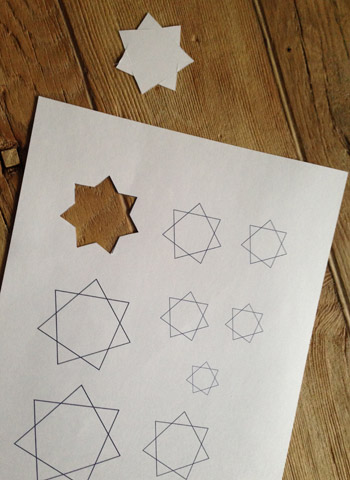
I traced that onto a piece of cardboard and cut it out. Then it was as simple as tracing around that like a template right onto the table, and filling it in (it took a few coats of “filling in” for things to look nice and solid, so pardon the sketchy look of these progress pics). Note: in hindsight I wish my stars were a smidge smaller, so choosing a star printout that’s a little smaller than the one you want will probably yield the perfect size since the traced outline makes it slightly bigger.
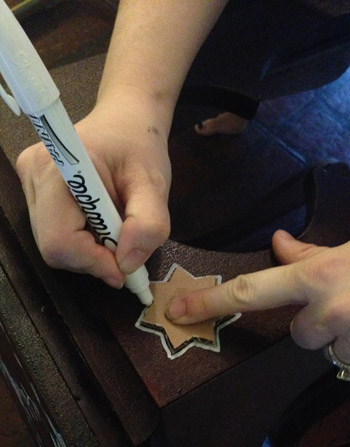
I drew one of them in the middle of the top and one on each of the corners, and then I just made random sort of wavy lines to connect them all.
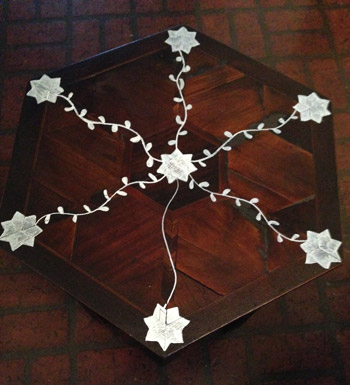
Those were the simplest part, and adding little leaves on alternating sides turned those squiggles into vines. If you tell me you can’t do this I’ll challenge you to a duel with a paint pen, because you can. Anyone can. Just practice with a marker on a piece of paper, and make some wavy lines and add some leaves. It’s crazy easy, I promise.
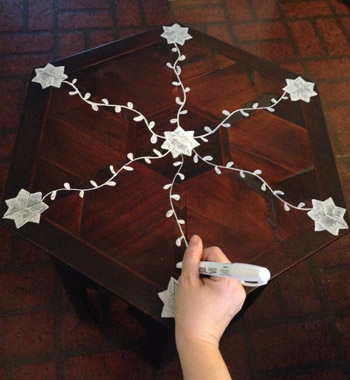
Then I just added more vines to connect the outside edges. This is before I did one more “coat” for the stars, so it’s still a bit sketchy looking in a few places. The cool thing about adding the faux inlay detailing was that it made the puttied parts virtually invisible, thanks to adding a lot more contrast with that white detailing. Can you even tell where the putty is anymore? It’s amazing what a little “look over here” diversion can do for a cute-but-flawed patch-job on an old secondhand table.
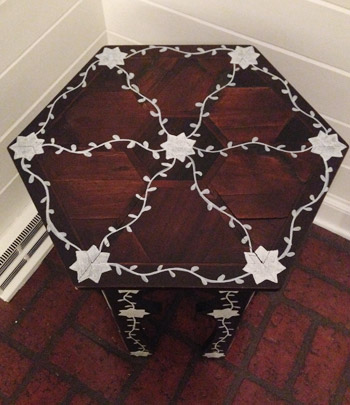
To do each of the six sides of the table, I laid it down on its side and worked on each one at a time – adding a star to the top, middle, and bottom of each leg, and connecting those with a hand-drawn leafy vine.

As I mentioned, the paint pen filled those stars in sort of sketchily, so I went back over all of them with another “coat” to make them look more solid. The vines were fine with one coat though, so it didn’t take too long. I actually might do one more star coloring session to make sure they’re solid looking before I use Safecoat Acrylacq to seal it all in (that’s our favorite non-toxic poly alternative).
Overall this entire refinishing process took a few hours and the inlay inspired stenciling/freehanding probably took two more, so it wasn’t as fast as painting it a solid color, but it was really fun to try something new – especially since this design is so common on Moroccan tables, and we still get to enjoy that pretty wood tone coming through.
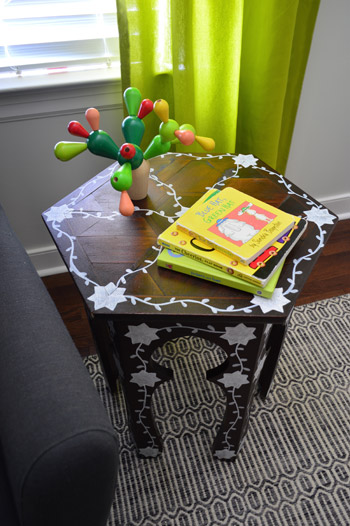
Considering that some of the real-deal mother of pearl inlay tables sell for over $1000 (!!!) I’m cool with this $25 “look for less” result with some paint on our sweet little thrift store find. We had everything that we used in our arsenal already, but even if you had to buy wood putty, stain, a stain pen, and a paint pen, you’d only spend around $25 on materials.
It’s definitely one of those bolder furniture moves, so it’s probably not for everyone, but it was fun to try something different. And the nice thing is that it’s not too much of a commitment, so if we tire of it down the line we can always sand it down and re-stain it, or even paint it a solid color someday.
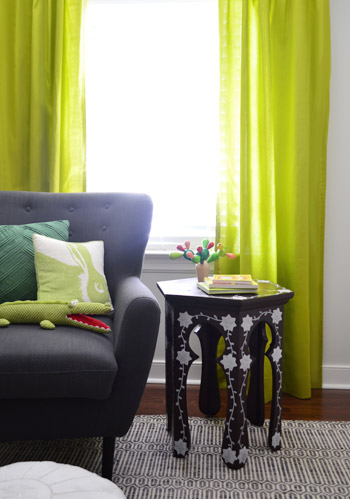
Right now it looks pretty sweet in the nursery since there are other wood elements in there (the built-in dresser tops, the crib drawer, the wood wrapped toy cabinet, the wooden bike frames) but we’re not sure if it’ll stay there for the long haul. You know we’ll keep you posted!
Were any of you making over any furniture this week? Have you ever tried one of those stain pens on wood putty? Or a Sharpie paint pen? I was so relieved that the stain pen helped and the paint pen actually worked (I think my lines would have been a little harder to control with a craft brush). When a project stalls out, how do you deal with it. Do you walk away and work on something else? Google around for ideas? Consult your all-knowing chihuahua?

Evelina says
It’s only 9:20! Thanks for a great (early) start to a cold Monday :)
YoungHouseLove says
Aw thanks Evelina! We’re trying to get posts up a little earlier so it frees up more time to do all the crazy showhouse/book/secret project stuff that’s going on these days. We figure if anyone notices it’ll be a nice little surprise. Haha!
xo
s
Evelina says
Wonderful surprise!! I feel like it’s our little secret until 10am when the others tune in.
SW says
I noticed too – thanks for starting my Monday off with a fun surprise!
Paige @ The Room Kit says
That’s right, you guys have ANOTHER secret project! When do you get to spill the beans on that one?
YoungHouseLove says
Last we heard we had approval to spill the details on March 17th, so just a few weeks from now! Ahh!
xo,
s
Melanie says
Cute project!
For some reason when you wrote “[whenever a] project goes wrong”, my brain switched into Happy Gilmore mode and read “the price is wrong, b****”. Hahaha!
http://www.pisymbol.com/images/bob_barker.jpg
I need coffee. I had to re-read it like three times before I got it right :)
YoungHouseLove says
Hahahahahaha! Oh man, I haven’t thought about that movie in too long. Time to rewatch it…
xo
s
Angela says
Oh this looks amazing!!!!!! What a genius solution. Love it in the nursery.
YoungHouseLove says
Thanks so much Angela!
xo
s
Lauren says
I completely agree. Early YHL posts is akin to getting out of school early when you were a kid! And the table looks so wonderful. Who knew Sharpie paint pens were a thing?!
Emmy says
Happily surprised by the early post. I don’t even know why I came to check early…I was very aware of the time and thinking “if I work 30 more minutes I can take a break for some YHL.” But here I am. :)
This post totally makes me think that I need to check out thrift stores/flea markets more frequently. I love old, dark wood pieces and we need a little table for our little one’s room. Everything else is going to be pretty modern, so an older piece might add a nice eclectic touch. Love all the YHL inspiration!
Heidi says
I love that you guys kept something for 2 years before remaking it. With the sheer amount of projects you do it must have been really difficult to just “make it over already!”
http://jax-and-jewels.blogspot.com
Heidi says
Great job on the table, glad you were able to repair it!
We made these super rustic chunky picture frames, which are stained and painted turquoise and then sanded down.
http://www.krusesworkshop.blogspot.com/2014/03/we-been-framed.html
YoungHouseLove says
Those are awesome Heidi!
xo
s
Mary | Lemon Grove Blog says
Way to bring that baby back to life! Love the little details like this – they totally make a room :)
YoungHouseLove says
Thanks Mary!
xo
s
Analise says
Ooh love it! My fiance and I recently built a headboard out of reclaimed crown moulding pieces and pine boards from Home Depot. It’s unstained / unpainted for now (darn snow keeps foiling my outdoor attempts at DIY! Small apartment with carpeting = probably not painting or staining inside …), and I’ve been debating how to move forward with it. This is such a cool idea! Thanks, as always, for the inspiration. :)
YoungHouseLove says
Good luck Analise!
xo
s
kris says
Maybe it looks better in person, but it’s just too busy and it looks like you just drew on it, which I guess you did. Sorry, not a fan at all–it takes away from your gorgeous nursery–I vote paint!
YoungHouseLove says
Thanks Kris, it’s definitely “a lot of look” and we could end up painting it someday. As for the nursery placement, we mentioned that we just put it there to shoot it, but I’m not sure it’ll stay there (our living room is super neutral/bland right now without any pattern anywhere, so it could be a fun accent in there).
xo,
s
Lisa says
I agree with Kris. It does look a little too frou frou on a lovely old-timey piece.
Could you have tried to make little cuts to put pieces in the bald spots instead of wood putty?
YoungHouseLove says
We thought about trying to make tiny pieces of wood to slide into those missing spots, but some were just low points/cracks and some of the missing pieces were too small to tackle on a saw without risking fingers, so we would have had to whittle them or something. Someone else left an awesome wood putty tip that we’ll have to try next time though. You essentially save the sawdust from the table and sprinkle it on top of the putty and then it matches the wood tone of the rest of the table better. I can’t wait to try it!
xo
s
Susan says
Balsa wood is easy to cut with an exacto knife and comes in small strips. It would fill those imperfections perfectly and then take a stain nicely.
YoungHouseLove says
Great tip! Thanks Susan!
xo
s
Maya says
I disagree– I love the table!
Susan says
That’s an interesting solution. We had a table in college with similar missing pieces woe. I was able to cut popsicle sticks (college student budget) to shape and fill the pieces, sand, and stain.
YoungHouseLove says
So smart!
xo
s
Anele @ Success Along the Weighn says
When a project stalls out for me, I usually find it 3 years later in a bag or box and I’ll either decide to finish it or donate it because my tastes have changed.
Obviously this has never happened before.
At all.
YoungHouseLove says
Haha!
xo
s
lizzzzy says
Do you have a few of those cactus toys in your house? (Much like my candle obsession.) I swear I see them every few days on your blog! LOL!
YoungHouseLove says
That’s my favorite thing! We recently put a little table fan on the Expedit for the baby (where the cactus used to live) so that freed him up for this table – although I’m sure he’ll migrate to the built-ins someday. He’s on a whirlwind tour of every surface of our house!
xo
s
Rebekah says
Who makes those amazing little cactus toys?!?
YoungHouseLove says
It’s from Plan Toys through amazon.com. We love their stuff!
xo
s
Annie says
Just wanted to point out that table fans are terribly dangerous for little fingers. The baby won’t be climbing out of his crib any time soon, but big sister Clara will be able to reach it. The air circulation method of choice with small children around is a ceiling fan. You could get one for as little as $100 in Lowes or HD.
Bonus is that the breeze from the fan lets you set the A/C at a higher temp to save on greenhouse gas emissions.
YoungHouseLove says
Thanks Annie! We have a narrow grate on our tabletop fans so even the littlest fingers don’t fit inside the cage (Clara’s small tabletop fan has one as well). That would be my mommy nightmare! Although we do love overhead fans as well – we even added an extra one to the back porch so we have two in there now. If only this snow would go away…
xo
s
Susan says
Looks great! I’m wondering – did you do this all with the same paint pen? I can’t believe it didn’t run out? I have thought of buying one of those for a project but I was afraid it wouldn’t have much paint in it…
YoungHouseLove says
All the same one – with paint to spare! There were some times it felt like it was running out but I closed it and shook it a bunch and more came out. It was some sort of paint pen miracle.
xo
s
Mel says
Sorry, Sherry. This project gives me the sads. All that doodling totally ruins the table’s personality. Seems there could have been many better solutions to fix the issues the table had without resorting to Sharpie.
Not my jam is an understatement.
YoungHouseLove says
Oh no, Mel! It’s definitely not one of those universal choices that we thought everyone would love, but it was fun to take a risk and try something new. Never meant to give you the sads though. Maybe we’ll end up sanding it down or painting it someday (it’s a nice flexible piece, and the table is really solid – especially with the repaired top – so we hope to have it a nice long time).
xo
s
Rachel says
Major sads.
Lo says
I agree major sads. It was such a beautifully crafted and unique table! You covered up all the awesome woodworking. I realize it wasn’t in perfect condition, but it doesn’t seem like you did any research on how to properly fix it? Maybe an actual woodworker can pop in with some tips, but I have at least a few that will hopefully help someone else with similar table issues!
Trying to stain wood filler isn’t usually a good idea. It’s usually a bad idea. (The reason it may have worked with your PolyBlend stuff is because that stuff is basically just paint and not actually stain that goes into the wood.) A better idea would have been to try to find a filler in a color that actually matched from the start (only for the gaps). Or recoloring with a crayon or marker (not Crayola, but ones made for this purpose). You could have also tried making a filler using the sawdust from sanding the table mixed with glue or other adhesive so it would be the right color. (I would have just left the gaps alone)
Did you use a palm sander? If so, I’m surprised it didn’t flatten out the pieces that were raised up??
Lastly, and I’m sorry to be rude, but it was a terrible idea to try to fill the slots that had missing pieces of wood with filler. That was never going to look good. A big blob of putty on a tabletop does not look like wood. I’m actually kind of flabbergasted by this. (People! Only use wood filler in inconspicuous places!) This part, you should have just left alone, missing pieces and all. That would have looked much better. Just glued in the loose pieces, accepted the way it was and left it alone. OR cut out tiny parallelograms (or at least one long one) to fill the missing ones!! Don’t craft stores sell little wooden shapes? Maybe popsicle sticks?
YoungHouseLove says
Thanks for the tips Lo! John debated trying to cut tiny shapes but we didn’t think we could use a saw without risking fingers since they’re so tiny, and went the wood filler route since it worked on the cabinets. We got an awesome tip from someone about saving sawdust from the top and sprinking it onto wood putty so it’s the right shade, which sounds really smart so we’ll have to give that a try!
xo
s
Heidi says
I think it’s more important to experiment and try something new to give an old piece more life, than to let it sit around. At least Sherry is making use out of something that would have otherwise sat in storage. Thanks for being bold and trying something outside the norm, Sherry – I love it!!!
Christine says
I’m with the sad ones on this. :(
This table would have looked nice in the nursery as is. A nice element of “old”
One needs to know WHEN to be bold and experimental…that’s what makes a good designer…less is more
Jennifer says
Yeah, sorry, I kind of have to agree with Mel. Major sads. When I was in 7th grade I took my stash of Sharpies to my laundry basket in almost the exact same pattern. This doesn’t look anything like inlay to me, it looks like white out on a formerly gorgeous table. Sorry, but I think this is a big miss. :(
bella says
It would have been cool to see you or John tackle that inlay. They make veneer just for this purpose. You would use an exacto knife to cut it, not a saw, and then wood glue to secure it.
Otherwise, personally, I would have just painted the top a solid color, maybe even something kidsy and colorful, and left the bottom pretty and wood stained.
YoungHouseLove says
That would have been fun too! I wonder how the side would look finished if you used veneer since you’d just see the raw sides of it if you didn’t finish that in some way? Would you get one of those iron-on wood side pieces like they use for laminate counter sides and use that around the edge? Sometimes those look plastic-y to me, but veneer itself looks so nice – and I love the idea to use that on the top!
xo
s
Criss says
I think a smaller star with a darker color (less contrast) would have made it look better. But you don’t know unless you try!
YoungHouseLove says
Thanks Criss! That does sound really pretty!
xo
s
Kate C says
Yep, sorry but I’m in the ‘whomp whomp’ club on this one. The free hand curves contrasting with the beautiful angles of the top really bug me. I hope you choose to restore it fully one day.
Thank being said, I hope *you* love it. I hope you love it and use it. Because it’s your table and what you think is really the only thing that counts.
bella says
Sorry, maybe I was not clear. I didn’t mean veneer the entire top of the table. I should have used the correct terms regarding repairing marquetry, i.e., inlay. You can buy woods meant to cut (with an exacto knife) and glue into those spaces that are missing pieces. =)
YoungHouseLove says
Love that idea! Thanks Bella!
xo
s
Maureen says
I like when you guys put the finished product up as the first picture! And , this table came out very cute. I would love to do a stencil with some old German folk art on it.
YoungHouseLove says
Thanks Maureen!
xo
s
Dana says
That table is so cute! I feel motivated to do more DIY projects after seeing how cool yours turn out. Just curious, where did you guys purchase your white pouf?
YoungHouseLove says
Thanks Dana! That’s from Joss & Main. I’ve purchased two of them (they’re so versatile, and now I get one in each kids room) but I watch the prices since they tend to go up and down (and only pounce when they’re nice and low).
xo
s
Sarah says
I love me some sharpie paint pens! I’m working on a nursery at the moment too, and this is inspiring me. I used one to trace a monogram onto my wedding aisle runner, I’ve used them for craft projects, and I’ve used them as fabric paint to add a little detail or monogram to a project, but I haven’t tried them on furniture before. Looks great!
YoungHouseLove says
Sounds really cool, Sarah!
xo
s
Anna // Gone Banannas says
This looks fantastic! I actually JUST put together a blog post with my success using a stain pain. They work absolute wonders.
YoungHouseLove says
So funny! They’re the unsung heroes of DIY!
xo
s
Anna // Gone Banannas says
I would LOVE to know what a stain pain is :P Stain *MARKER*. Oye. I am glad you at least knew what I was saying haha.
YoungHouseLove says
Haha! I knew what you meant ;)
xo
s
Laurie says
Bless Sharpie for those paint pens. They sure open up the possibility for a whole lotta kinds of projects I wouldn’t have tried before! Detail painting on furniture is a great idea! I love those sweet little details.
Jackie says
Although it’s not my taste, I think you did a good job accomplishing what you were going for.
I think it would look better if it were painted a metallic silver.
Best,
Jackie
YoungHouseLove says
Thanks Jackie! That’s a fun idea too!
xo
s
Annie T says
*gasp*
I love this!
I never even knew about Sharpie paint pens. The table looks absolutely AMAZING in the room. Isn’t it amazing how much pattern adds to a room?
xxx
YoungHouseLove says
Thanks so much Annie!
xo
s
Gabrielle C. says
Well as a huge fan of anything even slightly middle eastern/African I am a huge fan of this. It looks a bit like a mandala too. Barnacle will love the details later when he notices them!
YoungHouseLove says
You’re so sweet Gabrielle! Thanks!
xo
s
heyruthie says
Looks great!
When I was at Joanne’s the other day, I noticed in the button section that they had Mother-of-Pearl “medallions” (just little round pieces) that were super cheap. But they were real Mother-of-Pearl. They were basically buttons without holes in them. They were really cheap–like 12 in a pack for $2.oo or something. Your “stars” might look cool with one little circle hot-glued in the center of each one! It’s worth checking your craft store :-)
YoungHouseLove says
Those sound fun! I’ll have to check them out!
xo
s
Carolyn says
Awesome creative juices at work! I’m glad I never have to think, “why didn’t I think of that?!” because I know you guys did! Great ideas! Question: what does Clara do while you craft away? I need more ideas for entertaining my toddler so I can tackle some projects myself!
Anyway, Barnacle’s room is turning out GREAT!
YoungHouseLove says
She’s at that awesome age where she can help sometimes (she completely made that sweet narwhal for her brother with a little help from her old mom, and also helped me paint the mobile for over his crib). Whenever we’re doing something bigger or messier (like painting a room, or using something stinky like stain out in the garage with a respirator) we still prefer to tackle those projects when she’s napping, asleep for the night, or off at preschool three mornings a week – just because it feels like a rough juggling act to be torn between a three year old who wants something and a project – so we’d rather not multi-task those things if possible.
xo
s
Barbara says
I think it’s perfect in the nursery! A very whimsical and creative solution that looks darling!
YoungHouseLove says
Thanks Barbara!
xo
s
AliceB says
No fun furniture projects for us, but we did finally tackle a very boring, but necessary, project. We put plywood flooring down in the attic so we could store Christmas decorations and tubs of off-season clothing up there. Trying to free up more garage space for parking a car in there and to create a good work area so we can do more fun projects like yours :)
YoungHouseLove says
I know what you mean about boring but necessary projects. Sounds like you got a lot of added storage though, so that’s awesome!
xo
s
DKL says
It goes so well with the pattern on the rug. Nice tie in.
YoungHouseLove says
Thanks DKL!
xo
s
Alison says
Sherry you are so good with communicating very nicely when you receive negative comments. It amazes me. I am glad that you are starting to keep wood tones instead of paint, paint, paint. Cute after on the table!
YoungHouseLove says
Aw, thanks Alison! Sharing our house updates with the internet for 6+ years has definitely taught us that everyone would do things differently in their own home, but we love that! One of our favorite things about House Crashing is seeing a giant range of ideas, styles, preferences, and points of view. It’s pretty awesome that everyone makes different choices and we don’t all have clone houses ;)
xo
s
Alison says
Even when it does not relate to diy or decorating I am amazed at how you deal with confrontation and negativity. That potty post about Clara for example. Your a kind person through and through. I bet your Mother is proud of you. And your right if we were all the same and did the same things, what a boring world it would be.:)
YoungHouseLove says
Thanks Alison, you’re so sweet.
xo
s
hjc says
I’m pretty sure that in the most recently published dictionaries, if you look up the word “gracious” there’s a picture of John and Sherry. :-).
Alison says
haha agreed hjc!
Lilly says
I was inspired by your post about putting a mirror in Clara’s room to add one in my mini’s room. She’s always running into our bedroom to look in ours, too.
So over the last week I’ve painted three coats of primer on a black mirror with a craft brush, and have already completed two coats in Honeysuckle pink from the Pantone paint line. One question though — I’ve been going slow and easy with the craft brush, but I’m afraid I’m leaving too many visible brush strokes. Is there any way to eliminate their visibility? I was thinking of running a small roller on the face for the last coat, and only using the brush for the bevelled sides and inner frame.
YoungHouseLove says
That sounds like it could work out well! I also have noticed that when paint dries the brush strokes tend to look a lot less visible. And using a flatter finish (ex: satin or eggshell over semi-gloss or high gloss) seem to make them less obvious as well. Good luck Lilly!
xo
s
Isabel says
Very cute! I am currently mulling an update to a very old IKEA round side table and this is definitely some nice inspiration :) I’m like you and usually walk away when I get stumped. My bedroom curtains are the perfect example – a too-close-to-the-wall window and a tight fit of the bed in between said and other window have me stumped on how to add curtains since October. We’ve been sporting mismatched curtains ever since. I finally decided on a course of action this weekend, to which my husband promptly replied: “that’s what I had originally suggested but what do I know, harrumphhh!” I have 0 recollection of that of course!
YoungHouseLove says
Haha!
xo
s
Jadie says
it’s 7:30 here on West Coast so you’re super early over here :)
YoungHouseLove says
Woot!
xo
s
Amy Bull says
I think it looks awesome! I loved that you used a seven-pointed star. Personal touches that only you would notice are my favorite ones! Question for you guys on Safecoat Acrylaq – I have these wooden blocks my uncle made for my daughter that my family wrote a bunch of love notes on in Sharpie. Would you recommend the product to seal those? I bought spray poly but haven’t been able to pull the trigger (get it??) because I’m worried about her chomping on them.
YoungHouseLove says
Yes, I’d use Safecoat for that! Many Etsy shops and local eco places use it for anything kids will gnaw because it’s non-toxic.
xo
s
G says
Sorely disappointed! Based on your intro, I was really excited to hear about DIY inlay! I don’t think you can call stenciling with a sharpie paint pen a faux inlay “look for less”. It looks like what it is, a stenciled table. That being said- your table, your rules :)
I’m glad you’re happy with how it turned out!
YoungHouseLove says
Point taken! I thought using terms like “faux” and “look for less” indicated that it wasn’t a true inlay detail (along with sharing the whole process with photos and an inspiration picture of a chair that’s painted as well) but you’re right that it’s definitely more of a stenciled/freehanded design than a real DIY inlay. I’d love to see a tutorial on that if anyone has attempted it though!
xo
s
Jennifer R. says
I really love this idea! I have a chair that some simply painted details would be adorable on. Do you plan to do a few coats of poly on top? I would just be afraid that the sharpie paint wouldn’t hold up to water spills, etc. and that wood would be very porous. IDK, I over think these things!
YoungHouseLove says
Yes, some sort of sealer will make it nice and durable. We love Safecoat Acrylacq (it’s a non-toxic poly alternative and it never yellows like some of the other stuff) but you have to order it online since most home stores don’t carry it.
xo
s
Crystal says
Just thought I’d leave a note on my experience with the durability of the paint sharpie (at least so far) – I used a white paint sharpie to draw burners on my kids play kitchen. Toys/metals pans have rubbed over those fake burners, they’ve even been “cleaned” with water by my 2.5 year old, and they look just as new as the day that I painted them.
YoungHouseLove says
Really good to know Crystal!
xo
s
sarah m. dorsey says
Love this! I wouldn’t of thought to use a Sharpie paint pen, but that’s a great way to get extra control!!
YoungHouseLove says
Thanks Sarah! At first I thought it was a weird idea, but since there’s oil paint in there, I decided to give it a try!
xo,
s
kathyg says
Have you ever tried dry-rubbing some stain (I often use Golden Oak for this) over the top of painted things to give them more of an aged look? It works wonders! I have done it numerous times. Maybe just toning down the bright white like that would help.
YoungHouseLove says
That would be fun! Like a glaze! Never even thought about that.
xo
s
Lisa says
I have to say when I saw the first picture I had to check if I was on the right blog! While it is different and a neat way to add a little interest to a piece, I’m just not feeling it, in the nursery anyway. Doesn’t scream John and Sherry to me like everything else does. Could be just me though!
YoungHouseLove says
Oh yes, I mentioned we just took photos of it in the nursery, but we’re not sure it’ll stay there. I keep thinking that our living room is pretty bland & bare right now, so it might be a fun accent in there since the rug is just jute, the sofa is gray, and the walls are neutral too. Needs some pattern I think!
xo
s
Vivian Foster says
Cute idea! Sometimes we just need to do something for the fun of it …. whether it’s long term or not!
I might be tempted to use tinted wax as the finish … like Annie Sloans, just to tone down the white a little bit and add to the Moroccan-ness of the whole thing. But, whatever you decide to do … enjoy it!
YoungHouseLove says
Thanks Vivian! Someone else just mentioned a glaze and I had never thought of that! Might be really fun – especially since I’ve never experimented with anything like that!
xo
s
Jessica Leonard says
Speaking of chihuahuas: http://www.bing.com/videos/search?q=chihuahua+takes+over+town&FORM=VIRE8#view=detail&mid=6FC02F5FA77C5D3723816FC02F5FA77C5D372381
YoungHouseLove says
Oh my gosh, no way! I’m glad they’re rescuing them and spaying/neutering them. Chis are such sweethearts, maybe just not when they run in packs and harass school kids…
xo
s
Dawn says
LOVE it…great free hand detail! The perfect place to set your cup of tea when you are snuggling your little man! :)
Elizabeth says
Those Sharpie paint pens are awesome! I used a navy one to do some touch-ups on a mirror I found at TJMaxx for our nursery. I was mentally high-fiving myself as I drove home (because I did the repair in the trunk of my SUV…couldn’t wait a half hour:)
YoungHouseLove says
Haha, I love it!
xo
s
Mary Kaye says
How fun!Nicely done. The fun thing about this piece is that it is so versitile! When you tire of the Morrocan look, you can paint it and use elsewhere! Great price, great find, great opportunity to use else where in your house down the road!
YoungHouseLove says
Thanks Mary Kaye! I think so too – this little guy got to be plain wood for two years, now he’s a little spicier, and he might end up a solid color down the line. He’s the thrift store table that keeps on giving ;)
xo
s
Nikki H says
What a fun idea for the nursery! You made it look so easy–like something I could actually do. Thanks.
YoungHouseLove says
You can do it Nikki! It’s really easy!
xo
s
Nicole says
Just no. I feel really bad for that beautiful table.
Reenie says
How cute!!
Sandy says
I think you did a great job on this and that it looks really good in the nursery! I’ve seen other free hand faux inlay painted stuff on the blogosphere and I have to say yours is by far the best. I like that you didn’t try to overdo the pattern and let a lot of the wood show through. Nicely done!
YoungHouseLove says
Aw thanks so much Sandy.
xo
s
Maria says
Don’t listen to the naysayers, Sher! (I feel close enough to you to call you that. Sorry if you’re just now finding our were best friends lol) but I LOVE the look, it feels so fresh and ethnic and exotic all at the same time. It kind of reminds me of my Pakistani background, and small fold out tables my husband bought for me when he went over there!
YoungHouseLove says
Thanks Maria! It’s definitely not for everyone, but it was fun to try something different – especially since it’s such a light commitment (we can always sand/stain it or paint it down the line).
xo
s
allison dirk says
Hi!!!
I love your table! I love your creativity and problem solving skills!!!
I just wanted to share a tip that I recently discovered myself…. I read it on This Old House.
My husband and I recently were refinishing a piece and we were having the same problem with matching the wood putty and stain. We didnt have the option to add an inlay though.
After searching for tips for using wood putty… I found our answer!
The secret: before you apply the wood putty, sand your piece. In a cup add some saw dust from that piece along with some wood putty and the stain color you will be using. Mix it all together really well. Then apply the putty as usual to the cracks. Let dry. Give it a very light sanding and then stain your piece.
It worked brilliantly. It gave the illusion of some wood grain because of the saw dust. You could barely tell where the putty was but there was a little variation but it just blended so well!
Anyways…hhope this helps in the future!
YoungHouseLove says
OH. MY. GOSH.
Best tip ever!
xo
s
Lisa@Double Door Ranch says
I wish I could Pin this comment! Such a great solution!!
Sharon says
My husband also does this some with wood glue that needs to match. He’ll save sawdust from cutting pieces, then mix it in with the glue. Instant match!
YoungHouseLove says
It’s so smart! How have we never heard of this before?!
xo
s
allison says
It is a good tip!
and I lied… I found the tip at the family Handyman and also some other place on pinterest. the family handyman one is pretty thorough.
http://www.familyhandyman.com/woodworking/furniture-repair/how-to-refinish-furniture/view-all#step6
YoungHouseLove says
So smart!
xo
s
Mel says
That. Is. Amazing. Looks so great!
YoungHouseLove says
Thanks Mel!
xo
s