This kind of spoils the whole “wait for it… here it comes…” build-up, but I had to lead with an after picture for you guys.
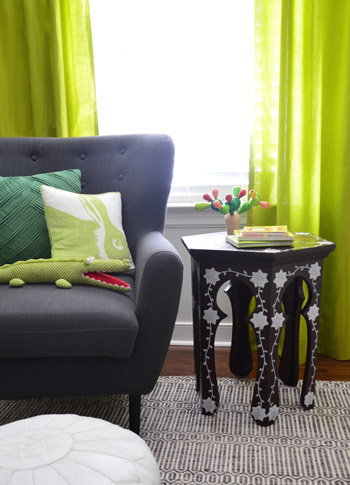
It’s a super affordable, deceivingly simple thrift store table upgrade. Seriously, don’t tell me you can’t do this. You can.
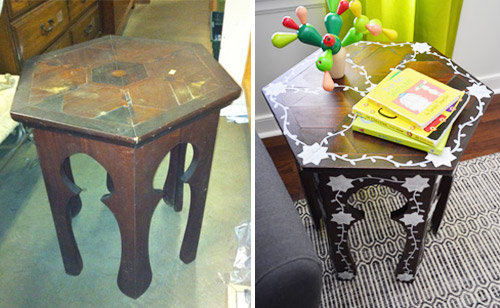
And I’ll give you one of these if you say you can’t.
Do you remember the $25 thrift store Moroccan table that I brought home nearly two years ago?
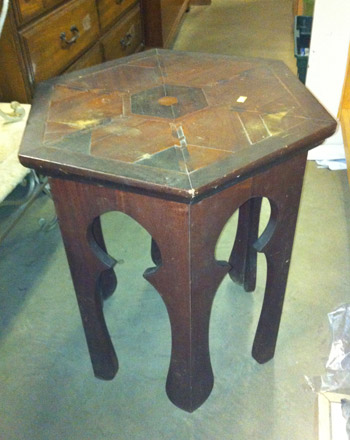
Even after cleaning it up, the top still had a few issues, but I didn’t want to rush into altering it right away (like attempting to putty, sand, prime, and stain/paint it) so I just tossed a few things on the top to hide those cracked and water-stained areas. John and I really liked the wood tone and the cool interlocking shapes on the top anyway, so we thought living with it as-is for a while was the way to go.
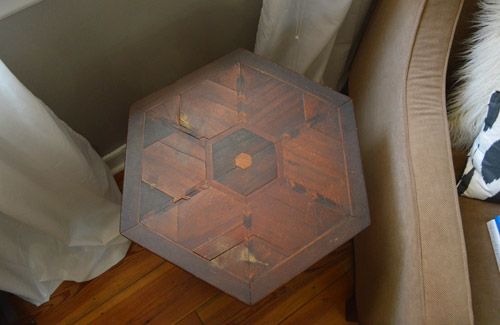
Fast forward nearly two years, and well, we’ve definitely lived with it for a while. No sir, there was no rushing into anything with this guy. But the years haven’t been very kind to the top of the table. And by “the years” I mostly mean Clara, who figured out that she could pull little wood shapes out of it like a puzzle.

Some areas were a lot looser than we thought, and a few pieces even started to pop out and get lost in the shuffle.

The temptation to paint our bedragged little table definitely came back full-force as it continued to fall deeper into despair. Especially when we started noticing sweet little versions like this and this popping up. Meanwhile, our old thrift store find was giving off that “uh, you don’t really have much to lose at this point” vibe. So we thought “let’s just try refinishing it, and if that backfires we can always paint it as a backup.” The first step was sanding it and adding some wood filler to those cracked, broken, or uneven areas.

We had luck using this same type (and tone) of wood putty with our dark-stained kitchen cabinets (more on that here), so although we debated running out to buy some darker wood putty for this project, we figured we’d have the same luck with being able to even things out with a little more stain on those puttied areas. That last sentence is foreshadowing. Feel free to read into it.
After everything was dry, we sanded those areas, and then it was stain time.
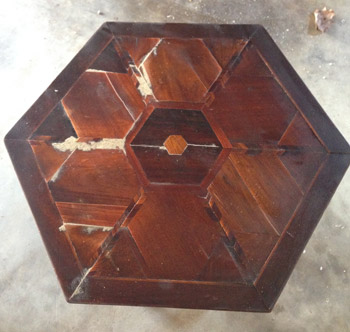
We wanted the same rich reddish-brown tone that it had always had, so we went with Red Mahogany stain by Minwax (we’ve had the same can since using it on Clara’s two-tone dresser four years ago). After two coats – applied with a brush and wiped off, per the instructions – it was clear that those wood puttied areas were being a lot more stubborn than they had been when it came to our kitchen cabinets. Bummerz.
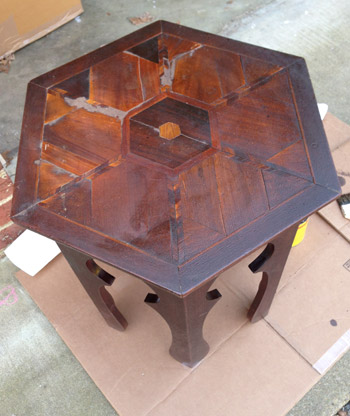
So I did what I usually do whenever a project goes wrong. I stepped away from it for a while and John and I started working on something else and ran to Home Depot for some other materials. In other words I just tried to forget about it for a little while – hoping some solution would come to me. Honestly I expected the solution to be “well, we said painting was a backup plan and it sounds like that’s the best option.”
Then as we pulled into our garage after returning from Home Depot, stain markers popped into my head. I knew we had one in a dark color since I occasionally use it to touch up the dark wood furniture items that we have (like our foyer console table, Clara’s dresser, our sofa table, etc), so I figured I could just give that a go on the wood puttied areas to see if it might darken them up so they blended better.
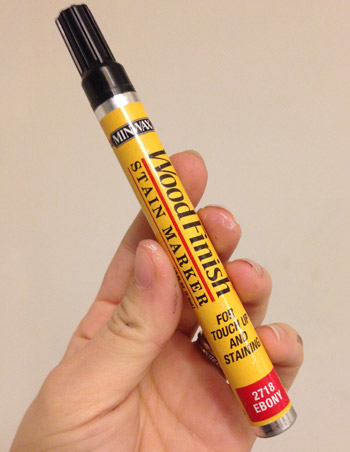
Miracle of all miracles, it worked. I just scribbled it on and gently wiped it with a paper towel to blend it all in.
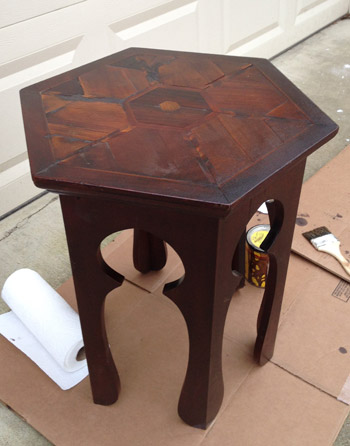
It didn’t completely hide the putty (you still can see those spots when you stare at the top in this picture) but it definitely was a nice leap closer to the not-as-obvious effect that we were going for.
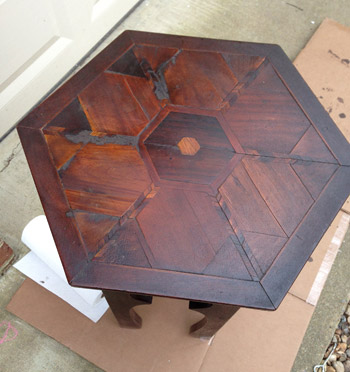
And that’s when I had another idea to completely obscure them. What if I didn’t paint 80% of the table, but I added some interest in a few areas with an inlay inspired detail? I figured that might draw the eye away from those patched spots while adding some fun detailing without completely robbing the table of the wood look like a full-on paint job would. I even found this example in an binder full of magazine tear sheets since I vaguely remembered thinking about that as a “down the line” idea a year or two ago. Turns out I had even written myself a little note so I wouldn’t forget.
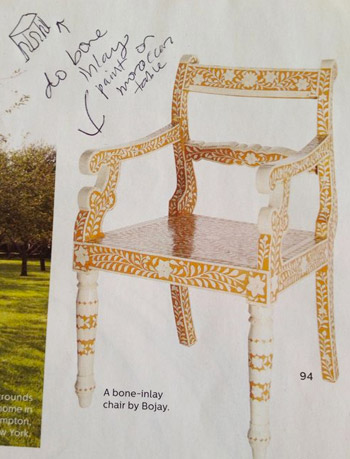
It’s definitely not a tame idea (ok, maybe it falls into the “kinda crazy” category) but I figured we didn’t have much to lose, and John was down with the idea too. So with his blessing it just came down to the “how” of the project. I considered everything from stencils and stamps to attempting to freehand the whole thing, and landed on a combo move: freehanding the leafy vines that connect everything but creating a cardboard template for the star-like shapes that seem to be on a lot of Moroccan designs.
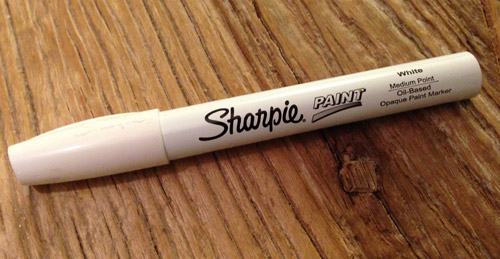
I thought a paint pen would give me more control than a paint brush, so I decided to try that first. Thankfully this Sharpie paint pen worked well, so I’d recommend it – but be sure to use their oil-based version (they also have a water-based one that I love) if you’re using it on a stained piece of furniture to avoid any bleed-through. To avoid fumes, I just opened a bunch of windows and Bane-d things up with my respirator so I wasn’t breathing anything in that I shouldn’t be.
To make my cardboard stencil I found a seven pointed star online, printed it out onto card stock in a bunch of different sizes, picked the size I liked best, and cut that one out. As for how I landed on seven sides for my shape, I noticed some Moroccan designs that had five, six, seven, or eight pointed stars – so because seven is our favorite number I went for that.
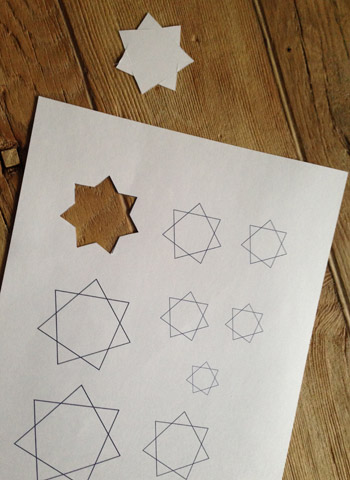
I traced that onto a piece of cardboard and cut it out. Then it was as simple as tracing around that like a template right onto the table, and filling it in (it took a few coats of “filling in” for things to look nice and solid, so pardon the sketchy look of these progress pics). Note: in hindsight I wish my stars were a smidge smaller, so choosing a star printout that’s a little smaller than the one you want will probably yield the perfect size since the traced outline makes it slightly bigger.
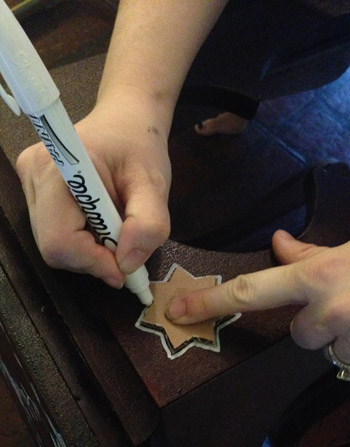
I drew one of them in the middle of the top and one on each of the corners, and then I just made random sort of wavy lines to connect them all.
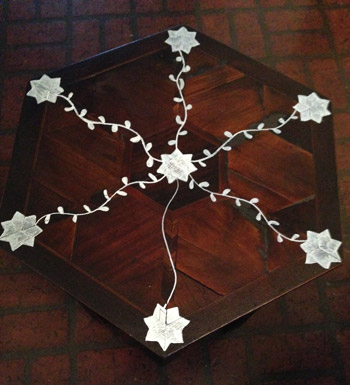
Those were the simplest part, and adding little leaves on alternating sides turned those squiggles into vines. If you tell me you can’t do this I’ll challenge you to a duel with a paint pen, because you can. Anyone can. Just practice with a marker on a piece of paper, and make some wavy lines and add some leaves. It’s crazy easy, I promise.
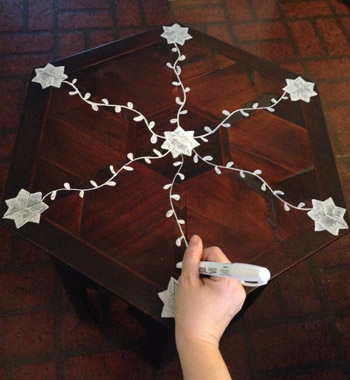
Then I just added more vines to connect the outside edges. This is before I did one more “coat” for the stars, so it’s still a bit sketchy looking in a few places. The cool thing about adding the faux inlay detailing was that it made the puttied parts virtually invisible, thanks to adding a lot more contrast with that white detailing. Can you even tell where the putty is anymore? It’s amazing what a little “look over here” diversion can do for a cute-but-flawed patch-job on an old secondhand table.
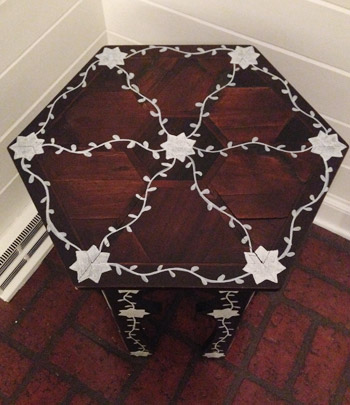
To do each of the six sides of the table, I laid it down on its side and worked on each one at a time – adding a star to the top, middle, and bottom of each leg, and connecting those with a hand-drawn leafy vine.

As I mentioned, the paint pen filled those stars in sort of sketchily, so I went back over all of them with another “coat” to make them look more solid. The vines were fine with one coat though, so it didn’t take too long. I actually might do one more star coloring session to make sure they’re solid looking before I use Safecoat Acrylacq to seal it all in (that’s our favorite non-toxic poly alternative).
Overall this entire refinishing process took a few hours and the inlay inspired stenciling/freehanding probably took two more, so it wasn’t as fast as painting it a solid color, but it was really fun to try something new – especially since this design is so common on Moroccan tables, and we still get to enjoy that pretty wood tone coming through.
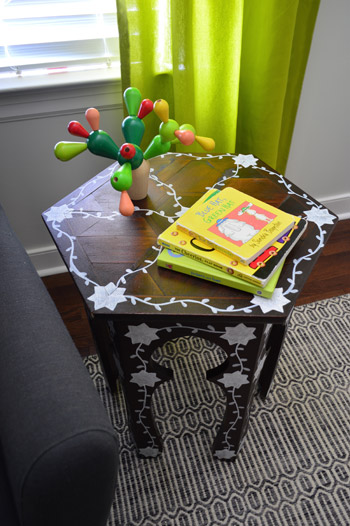
Considering that some of the real-deal mother of pearl inlay tables sell for over $1000 (!!!) I’m cool with this $25 “look for less” result with some paint on our sweet little thrift store find. We had everything that we used in our arsenal already, but even if you had to buy wood putty, stain, a stain pen, and a paint pen, you’d only spend around $25 on materials.
It’s definitely one of those bolder furniture moves, so it’s probably not for everyone, but it was fun to try something different. And the nice thing is that it’s not too much of a commitment, so if we tire of it down the line we can always sand it down and re-stain it, or even paint it a solid color someday.
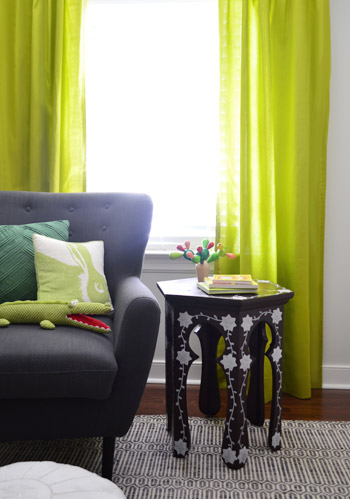
Right now it looks pretty sweet in the nursery since there are other wood elements in there (the built-in dresser tops, the crib drawer, the wood wrapped toy cabinet, the wooden bike frames) but we’re not sure if it’ll stay there for the long haul. You know we’ll keep you posted!
Were any of you making over any furniture this week? Have you ever tried one of those stain pens on wood putty? Or a Sharpie paint pen? I was so relieved that the stain pen helped and the paint pen actually worked (I think my lines would have been a little harder to control with a craft brush). When a project stalls out, how do you deal with it. Do you walk away and work on something else? Google around for ideas? Consult your all-knowing chihuahua?

Lisa@Double Door Ranch says
I’ve been using my Sharpie paint pens on everything lately! I even made custom martini glasses for my Galentine’s Day party using them. The colors are so vivid when baked. Even moreso than glass painting pens.
http://doubledoorranch.com/2014/02/18/galentines-day-party/
YoungHouseLove says
That’s fun Lisa!
xo
s
Jessica says
You guys are so awesome! While I’m not sure what I think about the table, I just love all the creativity you have!!! I might try this concept on a nightstand that I just found in my neighbors trash can(it amazes me what people throw away!!!!) for my daughter’s room! Keep all the creative juices flowing :)
YoungHouseLove says
Wahoo! Send us pics, Jessica!
xo
s
Allison says
I think the design and the idea are really neat, but perhaps some of the negative comments are due to the fact that the WHITE paint pen just cheapens it a bit – especially with the gorgeous detail in the wood. Maybe a different pen color (gold? brownish?) would make it look more like an actual inlay and less like a “stenciled table art project.” Great idea; not-so-great outcome.
YoungHouseLove says
Thanks Allison! A few others have recommended rubbing a tinted glaze over it to tone down the white, which sounds awesome (I’ve never experimented with that, so I’d love to see how it goes). I originally thought about painting the table soft gray and doing the “inlay” part in white so it was a lot lower contrast, but John and I liked the idea of maintaining the wood tone, and thought the white could be sort of a crisp take on a more traditional look. It definitely came out bold though – so I love the tinted glaze ideas coming in :)
xo
s
Stephanie says
It looks so cute in the nursery! Love it!
Nicole says
I’m going to be honest, i don’t LOVE it. I really wish it was a bright cheery color…don’t know if i’m IN LOVE with it, but maybe it has to grow on me?
YoungHouseLove says
I love the idea of a bright cheery color too! I will definitely keep you guys posted if it gets painted down the line – we just really liked the wood tone too, so we didn’t want cover it all up right away. Maybe we need baby steps, haha!
xo
s
Crystal says
Good for you for finally “getting on that” table after two years! It takes me that long all the time. And projects that take you in a new direction or out of the box are always good.
On another off-topic note, I’ve been studying your deck posts from the old house (can’t believe it’s almost been two years since you started that project) because we’re finally going to do it this year!!! We’ve got an appt with Lowe’s to help us do the drawing of our plan to figure out what materials we need and hope to do the same with HD too.
YoungHouseLove says
That’s so exciting Crystal! Good luck with everything!
xo
s
Karen says
This is off topic, but I’ve searched your archives and can’t find where you bought that awesome armchair. I love it and I’m hoping it’s not secondhand!
YoungHouseLove says
Thanks Karen! It’s from Joss & Main a while back (it used to be in our last kitchen across from the fireplace).
xo
s
Misty says
Oh no. This does not work at all.
etcetera says
Sherry, Would you mind telling me the source for that adorable wooden cactus? I just love it! I have a set of the wool/crochet ones you got at the craft fair a few years ago. My family is from Arizona so I can’t help myself.
Thanks! ETC
YoungHouseLove says
That’s made by Plan Toys and we got it from amazon.com. Hope it helps!
xo
s
erin @whalingcitycottage says
Super cool project! It looks great and so does the whole room!!!
YoungHouseLove says
Thanks Erin!
xo
s
Ann Marie says
Hey Guys! This might be a question that you’ve answered before (I don’t always read the comments) but I love your blog and I’m worried! I think I read a while ago that this house is your forever home, sooo what happens eventually when all your projects are done? I mean I know it will be a while but eventually you guys will run out out of stuff to re-do/re-decorate/re-model, right?
YoungHouseLove says
Our to-do list for this house is still crazy long (our first home took 4.5 years and was half the size, so we think this one should keep us nice and busy for a while) but once we’re “done” with most areas, we’d love to invest in a rental house or even a vacation rental or something fun (owning rentals is how John’s dad sent four kids to college). We also like to take on outside projects (like our current Habitat showhouse, or the hospital makeover we did this Christmas) so there could be other makeovers in the mix too!
xo
s
Lisa says
This is adorable and oh so clever! Those little wooden shapes made out of balsa wood from Michael’s are perfect canvases for Sharpies – I affixed some hearts (colored with a pink regular Sharpie) to a finger-knit Valentine’s “wreath” I DIYd. Also “recovered” two mid-century vintage Edward Wormley Drexel chairs (my inherited grandma’s bedroom set) with two velvet European pillow shams (easy and free!)
YoungHouseLove says
Sounds like fun!
xo
s
Tracy W says
I love this! Also, have you seen the lastest issue of Flea Market Style magazine? There is a gorgeous photo on page 7 that shows your book!
YoungHouseLove says
No way! Thanks for the tip Tracy!
xo
s
Tracy W says
I posted a photo of it on your FB page. :)
YoungHouseLove says
Thanks so much for sharing it Tracy!
xo
s
Callie says
I don’t normally post here but for some reason was reading comments today. I lovelovelove 95% of everything you guys do but of course not everything will be everyone’s jam. I am going to put myself in the not-sure-this-table-is-my-favoritest-thing-ever-that-yall-have-done camp. But I still read every word and enjoy the inspiration. I like that you push me out of my comfort zone and sometimes I’m so pleasantly surprised–finding myself considering Petersik-inspired ideas that I wouldn’t have otherwise. (case in point: your stairs–I LOOOOOOVE them but when you started I was skeptical. Now I wish I had stairs of my own so I could copycat you guys exactly. Also, all your homemade art. And your covered porch. And the wood wrap-around of the expedit shelves in the Barnacle’s room. And I could go on and on.)
But more than an actual compliment on yalls projects or tastes, I wanted to compliment you on your ability to handle comments so graciously. Even when people tell you they don’t like something you’ve done, I really like how you guys don’t ignore the comment or delete the comment but respond to it and so graciously. You aren’t holier-than-thou and you don’t take yourselves so seriously that you get all bent out of shape with comments. THIS is why (plus your adorable Clara and Burger and zany similar to my own weirdness and sense of humor) I read your blog everyday. I can imagine if you were my real-life friend that you’d give me real-life feedback and ideas on my decorating choices/quandries too.
Well…. that was awkwardly mushy….
Tootaloo!
YoungHouseLove says
You’re so sweet Callie, thanks!
xo
s
ErinY says
I agree, great job on trying something new. You’ll never create anything new or cool if you don’t try things out, even the things that don’t turn out like you thought they would. You have to try first to keep moving. Imagine how boring life would be if we all just kept trying the same things over and over again. Yay for creativity, inspiration and moving forward!
Elizabeth G. says
I would like to second this comment!
Thank you, Sherry and John, for setting an excellent example of how to interact with others. In addition, your positivity is infectious! Thinking of how you have handled Murphy’s law situations has helped me keep it together here on our own home renovation.
With respect to today’s project (which I like – you maintained the look of the inlay, while giving the piece a fresh look), I have been in a similar quandary lately. I have a couple of thrift store chandeliers that I would love to give a modern touch, but am I risking ruining a gorgeous brass chandelier? It can be a tough call. I am reminded of a home profile in Martha Stewart a few years ago, in which the owners lacquered their grandparents’ antique mahogany table. Talk about taking a risk!
YoungHouseLove says
Oh man, that’s a toughie! My advice is always to avoid doing something that’s hard to undo (like painting a brick wall or a room full of wood trim – which is a lot tougher to sand out than this table for example) until you can’t stand it another day. Like, literally, until your body is aching/yearning/raring to go, I wouldn’t pick up a paint brush. So if you still sort of like the brass, I wouldn’t paint it… but if you’re completely convinced it’s not your style, I say go for it!
xo
s
Anne says
Yeah, I’m definitely not feeling it. Makes the table look cheap. Thanks for the marker idea on the putty though!
Sharon says
What is the best place to get the Sharpie paint pens? I’ve never seen those before.
YoungHouseLove says
I usually find them at JoAnn or Michaels. I think most craft stores will have them (they come in water-based options too, which I love for crafts since they’re less stinky).
xo
s
Kristin says
The table makeover is so cute! I love me some Sharpie paint pens, too. I copied Pinterest and made a couple of coffee mugs for my fiance’s Valentines gift using the oil based metallic ones. The first one had a little owl that I sketched (and he laughs at every time he sees it) that said “owl always love you.” The other had a fox with the bushiest tail in the world and said “You’re so foxy!” He even told all of his buddies about them. You *know* that’s a win in man-land!
YoungHouseLove says
Haha, so cute!
xo
s
jackie says
Sherry, You are amazing! I remember being pregnant, and feeling very short-tempered. No way I would have been capable of responding so graciously and kindly! Give yourself a pat on the back, and some ice-cream for you in the baby. :) Thank you for taking risks and doing a huge variety of cool stuff to your house.
YoungHouseLove says
Aw, thanks Jackie!
xo
s
Jennah says
Oh man. Count me in with the dissenters.
I loved this table before (I actually kind of obsessed over somehow finding one for myself), and I know it had a few issues, but…I could tell from the tiny FB preview pic on my phone that it was sharpied. Looks way too busy to me. The table is already interesting because of its shape. I loved the wood detail before, even with the issues, and I think all this busy takes away from the table’s beautiful shape. No bueno.
To each their own?
Tamara says
Looks great! Let’s be real…there is nothing you do that isn’t amazing!
I hate to be THAT person, because I am sure you have already covered this somewhere, but I cannot seem to find the details on that chair?!?!? (Believe me, I have tried…aside from reading all the comments)
Can you tell me where you got that bad boy? I really want a similar chair from West Elm, but am looking for a way to get something for less :)
Thanks!
YoungHouseLove says
You’re so sweet Tamara! It’s from Joss & Main a few years ago (it used to be in the kitchen of our last house across from the fireplace).
xo
s
Martha says
I’m not crazy about the finished look; it seems too high-contrast or too busy or something to me. However, I AM crazy about your ingenuity in coming up with this idea and your talent in executing it! Great job!
YoungHouseLove says
Aw, thanks Martha!
xo
s
Alexa says
Sherry,
I’m not sure if I’m liking the table in the nursery it is a great refurbished piece, and I’m sure would be awesome in another part of the house. While creeping through comments I could not believe some of those harsh comments from other followers. If you can’t say anything nice don’t say anything at all! I am an absolute fan of yours and the work you and John do! Keep doin’ your thang girl!
Xo
Jen says
And here I thought the 7 pointed star was some sort of subtle nod to Game of Thrones.
YoungHouseLove says
Haha! Now I have the theme music in my head. Have you heard that audio of the kids from the show singing the intro song? It’s hilarious.
xo
s
Kate says
Love the table. Great solution. Wondering where the rabbit pillow is from? Maybe I missed it in a previous post?? Thanks!
YoungHouseLove says
That’s from HomeGoods a while back!
xo
s
Kristen says
Gotta be honest – I’m not loving this.
I think a fun idea would be to leave the legs wood toned, and just paint the tabletop a bright fun color :)
Kristen says
I would even leave the table top border wood toned, just paint the middle center a fun color.
YoungHouseLove says
That could be fun too!
xo
s
sara says
To each his own, but yuck. Love everything else about the nursery though!
Kristin says
Love the early post! I’m 6 hours ahead here in germany, so that moves your “morning” post from 4 to 3 p.m. around here!
I’m also not a fan using Sharpies on this particular table, but I will surely keep this in mind for something like a cheap IKEA table to spice it up a bit. However, if you personally love it – it’s your decision!
Mamaw03t says
Love what you did with the table. I was thinking about that table the other day. Hadn’t seen it in any pictures and wondered if you still had it. It turned out great! Good job.
Alice says
So many critics! You are really good at your job, Sherry.
I think your table looks sweet, and I love the contrast between rich wood and milky white. While I may not go for the exact same look, I enjoyed reading your post and seeing your idea come to life, and I can definitely take inspiration and pointers away from your experience. I’m clearly not alone!
You’re not coming across as defensive or discouraged at all, which is awesome, but just in case some of the comments are getting to you, please keep sharing these “may-not-be-for-everyone” projects. They give me ideas, and if there is the occasional “eh, not for me” moment, that only helps me figure out what I really like for my own house.
<3 you guys
YoungHouseLove says
Love you right back Alice!
xo
s
Megan says
I LOVE it! I did something similar to this (but with more of a French Flea feel to it) about a year ago. It took longer than I normally like to take on furniture make over’s, but it was so much fun to do!
http://applehouserevival.blogspot.com/2013/02/leena-hand-painted-two-tiered-table.html
YoungHouseLove says
Really sweet! I love how that came out Megan!
xo
s
Debbie says
Wow I really am scratching my head at this one and just can’t get behind it. It looks terrible, in my opinion. I would sand it down and just paint it at this point.
Jill says
Here’s to faux techniques! I recently used a regular black Sharpie on a buffet that I “distressed.” I didn’t think the scratches and dings showed up enough after staining, so I colored them with a black Sharpie. If you rub it right away with a cloth, the black smears a little and looks old. Then I stained a 2nd coat. Here’s before & after photos:
https://plus.google.com/u/0/photos/104498112094866883397/albums/5986605412949265185
YoungHouseLove says
That looks awesome Jill!
xo
s
bfish says
I really like your table project — but am so old that I loved all kinds of boho/Middle Eastern/Indian furnishings the last time they were a big deal (the 60s). And I’m crazy about bone-inlaid furniture, but as you noted it’s very expensive. I corresponded with a guy in India about getting something made and it turns out a large part of the cost is shipping/importing it into the US.
The Minwax stain pens get a heavy workout here. We have a couple of pieces of dark-stained bamboo-inlaid furniture and the little pieces on the legs frequently come off (with help from cats). The base wood is lighter so with the pens to cover that up the damage is pretty well camoflouged.
Leisa says
Hey guys,
First of all, I really like the table.
But I have to say, I can’t really understand why people post negative comments. Ok, not everything you do will be loved by everyone. And that’s cool. But why do people have the need to send out the negative energy? All that matters is that YOU love it.
But I LOVE that you always answer with such a positive spin.
In other news, I am currently OBSESSED with inlay furniture!! SO this couldn’t come at a better time.
I would love to get my hands on some, but it is so expensive.
I am going to India at the end of my week and have made it my sole mission to find a beautiful inlay piece to send home.
…. Oh and some hand block-printed fabric. And maybe some silk pyjamas. And a tea set. Perhaps a silk rug.
Ok, I admit it – I might accidentally buy everything I see.
I may need to bring a bigger suitcase. And a bigger wallet!
Wish me some good-shopping Karma :)
x
YoungHouseLove says
That’s so exciting, Leisa! I hear there are awesome deals to be had and such gorgeous things there. Have the best time!
xo,
s
Britt says
I think that people are being respectful in how they word their comments, even if they aren’t loving the project. I didn’t comment, but I thought about it, and the reasoning for me was that this isn’t a personal blog where Sherry and John share with their family and friends. It might have started that way, but its now their business and both of their full time jobs. I think people want to see them succeed and improve as designers, and if all they hear are comments about how everything they do is perfect, they’ll never know when there are areas they could improve on. Maybe they love it and don’t see any need to change. That’s fine. But providing them with truthful feedback gives them valuable information and perspective as they make those choices for themselves/their business.
Susan says
Re: the comment about negative comments:
I think this blog is a business and we visitors are its customers. If you’re not pleased with the services and/or products you receive in a brick and mortar store, don’t you let the owners know so the problems can hopefully be fixed?
Definitely, it’s a little stickier when the services in question are projects related to a blogger’s own home. But if someone (like Sherry and John) chooses to put it out there, I think they probably assume that not everyone will like everything they post. And constructive feedback, when considered, can help a blogger continue to offer their readers info and content that they will appreciate and can use.
Let’s fact it, w/o happy readers, a blog is pretty much out of business. Comments help bloggers pinpoint what is working and what is not.
YoungHouseLove says
We certainly love and value all opinions that are constructive and respectful, even if folks aren’t into a certain table update or paint color choice. That definitely happens in design, and it would be a pretty crazy world if everything we shared was universally loved by all!
xo
s
BrookeJ says
Super cute! I’ve pinned a lot of stenciled furniture and I love your half stencil/half freehand version. Also, I can’t believe you bought that sidetable 2 years ago, I remember that post–where did the time go???
YoungHouseLove says
I know, right?! It feels like we just found that guy!
xo
s
Shannon says
Hi Sherry and John, I have a question about the Safecoat Acrylacq sealer you guys always use. We have unfinished oak stairs that we just installed leading to our newly finished basement, and we haven’t stained them yet because we’re having a hard time finding an actual stain that is low or no VOC. I’m wondering if we use the minwax stain and the Safecoat sealer, does it actually do a good job of sealing in the fumes from the stain?!
YoungHouseLove says
It’s what the pros use to block toxic things (even lead paint) so it’s great for sealing in stinky stain as a top coat. I’m just not sure if it’s meant for floors/foot traffic though. We used it to seal our stenciled subfloors in the bathroom, but have never tried it on stained wood floors – although it works well on stained wood furniture!
xo
s
Joy says
Though the Acrylacq probably wouldn’t be ideal for what you’re needing, Safecoat makes other products that I’m sure would work for you. They have both a stain and sealer you might want to check out. Unfortunately, I’ve found the products can be pretty pricey, though I think it’s worth it. http://www.afmsafecoat.com/products.php?page=2#40
Reshma Sanjeev says
I like the inlays on the table. And you worked your magic on it, spending almost to nothing.
Aurora says
At first I was like, “NO.. Not a Sharpie!!” But it looks so Cool &Cute”!! You guys are Gooood!!!
Kristina says
Love, love, love Barnacles nursery. The table is a very clever idea and will be so handy to have for those feeds!
Kristin H. says
Why do I remember you guys painting the inner edges of the table legs on this?! I loved that and have been keeping my eye out for a table to do that to ever since, but I’m thinking it was all in my head?? (In your 2nd houses bedroom, next to the chair.. Was that this table??)
Anyway, looks different and fun! Who knows where this table would have ended up if you didn’t rescue it. I love that it’s got a jazzy new life now :)
YoungHouseLove says
Oh yeah! We mentioned that in the original post we linked to about getting it (didn’t have the guts to do a thing because we just wanted to live with it for a while, but we tossed out that idea initially). We just realized that wouldn’t solve the issue with the top, so I think that’s how it evolved into this update!
xo
s
rachael says
I would’ve loved a shot from the doorway! This little table has grown on me in the last 3 hours and now I’m wondering what I have in my house I can paint with a pen too!!
YoungHouseLove says
Aw thanks Rachael! We’ll definitely be sharing more wide shots of the nursery as we finish things up in there, so if the table stays (the other spot I’m debating is the living room) it’ll be in those photos :)
xo
s
Karen says
No. Nooooo. Someone did not write “major sads” in regards to your adorbs table!!! Please ignore the naysayers, Sherry. It’s art and it’s personal style/taste. If it makes you happy when you look at it, that’s all that counts!!
That’s why it’s YOUR blog; it’s about you and your family’s journey in your home. Thank you for letting us peek in!!
Robin W says
I like it! I have a similar sized side table in my living room that has been waiting for something (paint, stain, tile on top?)so I can appreciate stalling out on a project. Being able to try something new and fun to refinish it is the benefit of finding something for cheap (if I ruin it, oh well), but it can also make the choices seem endless!
Tina says
I know you’re busy with Clara and secret projects and a baby on the way so I try to cut some slack, but it’s mind boggling that two people stay at home full time and churn these kinds of projects out. I used to adore you and read you religiously, I modeled some of my own rooms in our house after things you’ve done, and you and John seem like adorable people and I like you both, but it feels like you’ve been phoning it in lately and it makes me sad. This table doesn’t seem to go with the nursery and it doesn’t look like inlay, it looks like white sharpie, because thats what it is. Hoping to see where you guys end up and I look forward to your future projects, I was just disappointed today.
YoungHouseLove says
Sorry to hear that today’s post didn’t do it for you, Tina! We certainly have learned that every post won’t be everyone’s cup of tea, and I think one truth to our lives is that no matter how hard we work or how much we’re juggling behind the scenes (like the things you mentioned plus a charity showhouse and a second book) there are always going to be folks who wonder what the heck two people who stay at home and write this blog do all day.
xo
s
rachael says
LOL. I stay at home with a 3 year old and a 1 year old and people wonder what I do all day too. I don’t even go anywhere, let alone do secret projects, or design showhouses or respond to comments, or work on re-designing blogs, or set up giveaways, or write a book, or rest because there’s baby-cooking going on. Lord love a duck! Where’s compassion and understanding, readers?
Megan says
The first picture really got my attention, in a good way. I love the bright contrast next to the white poof and the curtains. Yum. But as I scrolled down I started to not be so sure about it. I think it’s because in the first picture it kind of looks like the white is only on the legs. As I see the top and the legs both with the white just changes it for me. My vote would be to white wash the top or somehow stain it all dark while leaving the legs as they are.
But regardless, you executed it really well. I’m always impressed by your free hand designs.
YoungHouseLove says
Thanks Megan!
xo
s
Nally says
Sweet Sherry & John…..you’ve got hearts of gold and it’s evident that the 2 of you are wonderful people! I love how you respond to the yucky comments with such kindness. What a wonderful example you are setting for your kiddos! Couldn’t be more excited for the two of you about baby boy and equally as excited for Clara about becoming a big sis… too fun!! Bloggy hugs, sweet friends!
Karen says
Nally, that’s a very kind post! And I agree with you.
Holly says
As a mom with a toddler, I was wondering about your baby-proofing plans for the table. Are the corners not as pointy as they look in the photo? Full disclosure: my husband and I are crazy, overly-cautious baby-proofing machines. We’ve ordered so many supplies, Babies R Us thinks he’s a professional baby-proofer.
YoungHouseLove says
We never really had to put those corner protectors on things for Clara so of course it matters how this boy is once he’s mobile, but I think we’d just be tempted to take the table out of his room if we thought it could hurt him. I’m also debating it for a spot in our living room so it might not stay in the nursery anyway :)
xo
s
rebecca smith says
I liked the table better before you sharpied it to be honest, but then I generally love the rest of the things you guys do so I guess the odds are good ;) I think it would look nice with a painted top and natural legs. Maybe in another couple of years eh!
YoungHouseLove says
Haha, thanks Rebecca! We’ll take those odds ;)
xo
s
Rachel Laree says
okay so you know I love you, but….I think I would have gone more tribal, to fit in with your room. Anyways to show how much I do love you all, yesterday I rocked and nursed my little one all through her nap, and I was surfing all your old posts for two hours!! I saw the post where you all ate in cinci at graeters. Isn’t that the best? It’s at kroger’s here and it’s 15.00 for a half gallon :o, but we love the black raspberry for special occasions.
YoungHouseLove says
Mmm, yes it’s so good! We hear some grocery stores sell Graeters now, which is crazy exciting.
xo
s
Carolyn Williams says
This looks great! I love all your ideas to make old, unloved things look great.