Drywall mudding and taping in the laundry room is going (I think) well. We’re two coats in and past our first bout of sanding (we tried wet sanding so I’m excited to share how that went) but I’m still holding my breath a bit to get through the third (and hopefully last) coat and onto primer to be sure it looks as good as we think it does, since it’s that last step that tends to be the real test. So rather than split up our mudding and taping tutorial into two posts, I’m holding off until Monday to cover the process from start to finish (with video). So today we’re talking about money and insulation with Insulation Company Mclean VA.
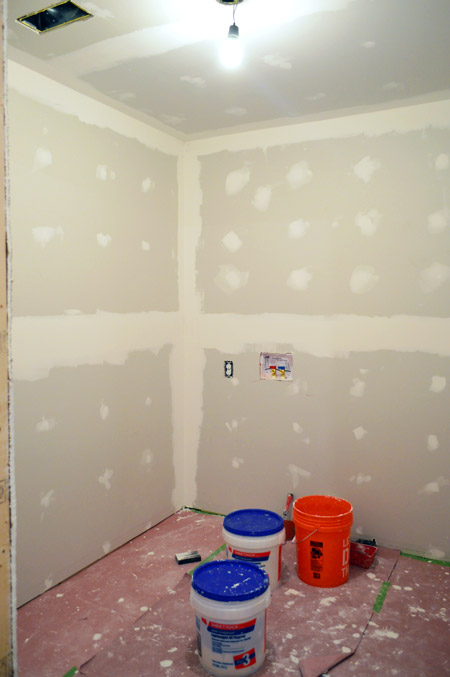
Drywall completion will actually mark the end of the tasks that we had gotten quoted by two contractors, so we thought this was a good budget check-in point to see what sort of savings we got by choosing to do more ourselves and hiring out sub-contractors directly. Here’s where we’re at:
- Framing (labor & materials): $360
- Electric (labor & materials): $400
- Plumbing (labor & materials): $375
- New dryer vent (materials & tools, since we did the labor): $87
- New HVAC vent (materials only, since we did the labor): $59
- Drywall & insulation (materials & truck/tool rental, since we did the labor): $298
- Drywall mudding (materials only, since we did the labor): $84
- Sub-floor (materials only, since we did the labor): $30
- TOTAL: $1,693
Our wallets are definitely feeling good about not having spent twice that on the contractor bids that we got (the first one was nearly $5K, the second was $3250). Looking at the line items on those estimates, it looks like we scored the biggest savings in two areas – framing and drywall. Together they accounted for over $2,000 in both contractors’ estimates, but we spent less than $750.
Of course our drywall is lower because we chose to do it ourselves (we did get a separate bid from a subcontractor and it was right in line with the contractors’ line items). Framing came in lower for a couple reasons, I’d guess. One just being that David is super nice, quick, and affordable. But also because we suspect that it’s the line item where the contractors put most of their fees and miscellaneous costs into. Because when you look at our plumbing and electrical costs, they’re not wildly cheaper than the contractor’s estimate (both were about $150 less). So still lower, but not as dramatically. Our other savings came from doing smaller tasks they worked into their bids, like laying the subfloor, redirecting those vents, adding the insulation ourselves, etc.
Long story short, we’re very grateful that the first half of the project clocked in at significantly less than we originally thought it would… because we still have lots of costs ahead of us: floor tile, cabinets, shelving, etc. Oh and one other benefit to the do-more-and-subcontract-a-few-things method is that we got to jump start the project much sooner, rather than waiting for an opening on the contractors’ schedules.
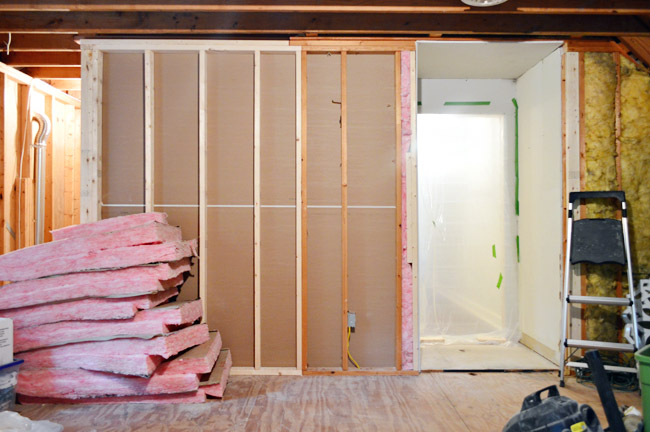
While we waited for my most recent coat of joint compound to dry, I took care of hanging the insulation around the outside of the laundry room. My understanding is that insulation on interior walls isn’t really required, but since this room is backed by an unfinished, unheated/cooled and otherwise uninsulated storage room (for now at least) we figured it was a good extra step to take. Plus it could help cut down on a little bit of the noise of running the washer & dryer once there’s a finished bunk-room behind it. So I watched this how-to video and got ready to get my install on.
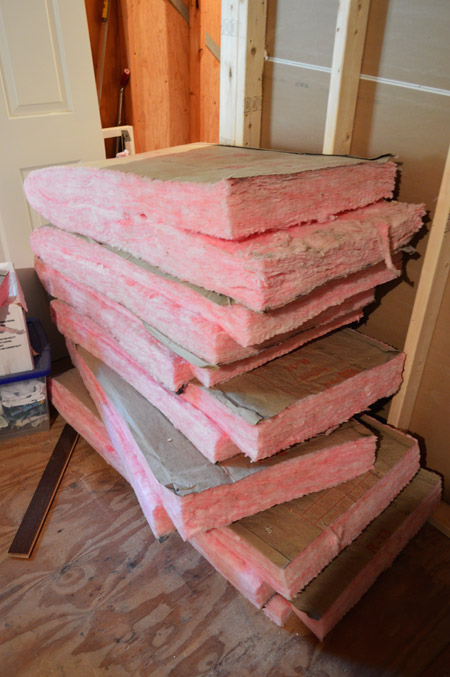
I picked up the above batts of insulation at Home Depot on my material run a couple of weeks ago. I chose batts because they come pre-cut for 2×4″ depth walls and 8ft tall ceilings like we have. They also come 15″ wide for 16″ studs, but I accidentally ended up bringing home the 23″ wide kind. ::smacks head:: And I didn’t realize this until I’d already unwrapped a package. ::smacks head again::
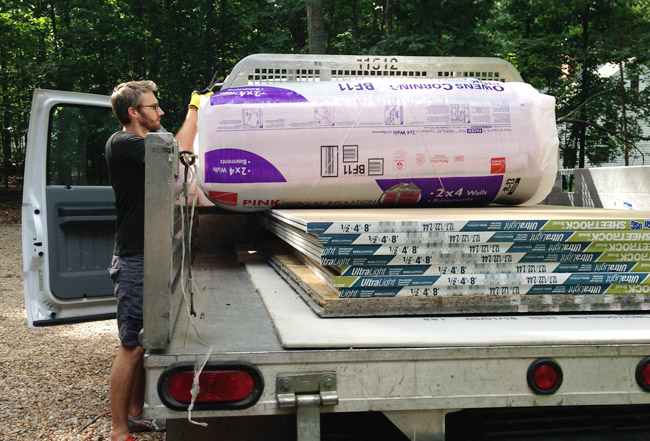
No biggie though – it just meant some more cutting, which is pretty straightforward. Although it does require a uniform of protective gear, including pants and a long-sleeve shirt to keep the itchy fiberglass off your skin. It’s a really fun outfit when working in an un-air-conditioned space in the summer. Dead eyes optional, btw.
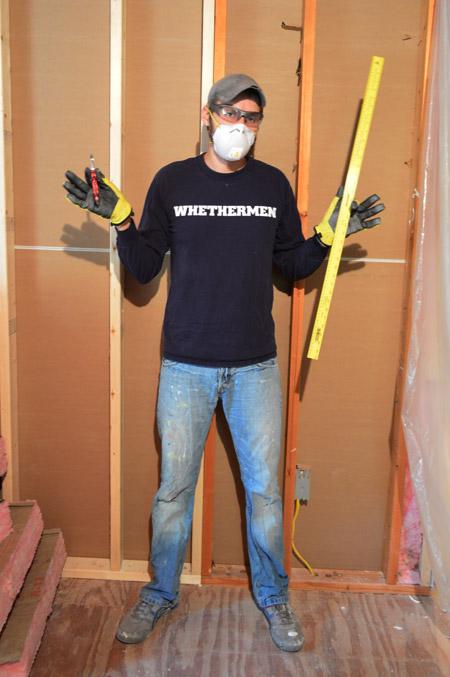
To cut them, I laid a batt facedown (i.e. paper side down) and pressed a straight edge into the pink insulation along the line I wanted to cut. Once compressed, it’s pretty easy to cut it with a utility knife.
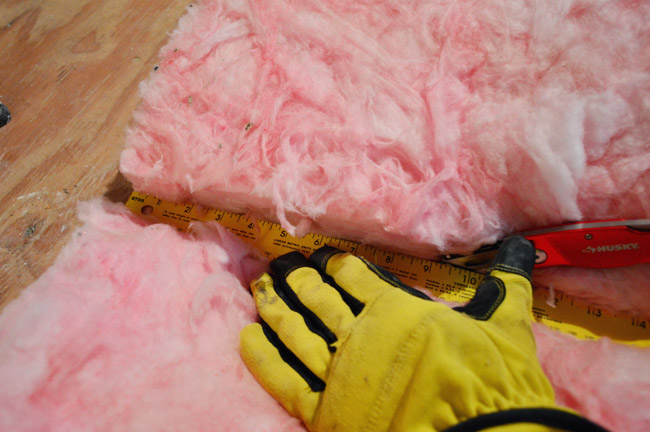
You can tell that the cut is working because the side you’re not pressing down with the ruler puffs back up. Sometimes I did have to flip it over and cut the paper a little in a few spots where my knife didn’t make it through on the first try.
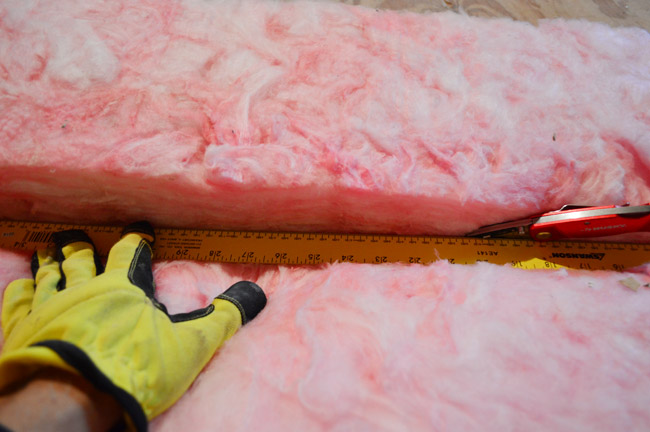
The facing on the batts does have a bit of an overhang to help you staple the insulation in place. But facing is apparently highly flammable, so it says all over the place that it should not be left exposed. So I placed the batts face-side in (since we’re not sure when we’ll get around to finishing the storage room). Since I was careful not to cut mine too narrow, they held in place by themselves just fine, all it took was a gentle push into place.
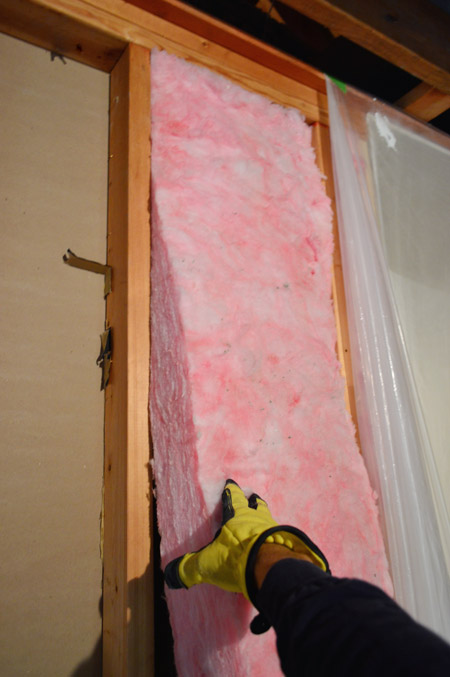
Occasionally I did have to cut around obstacles, like electrical boxes or laundry pipes. But I just tackled those as I went.
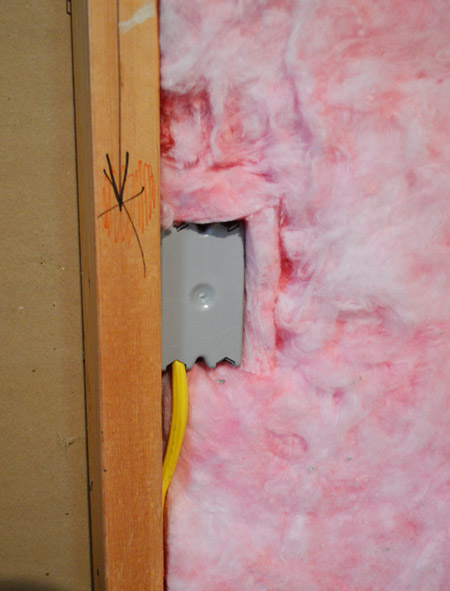
It was a pretty easy task – just a wee bit warm thanks to the conditions in the room and my sexy outfit.
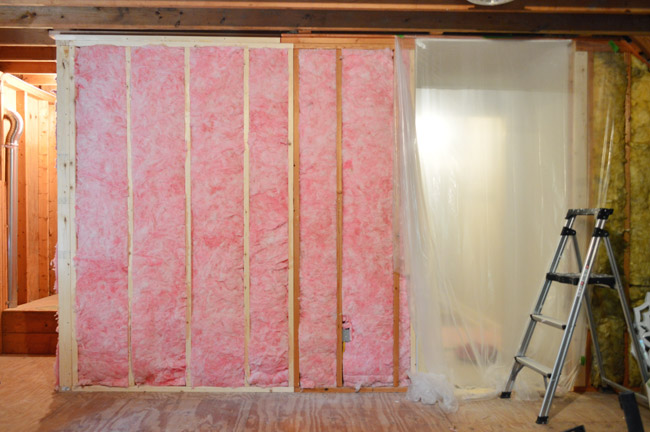
Although my adventures in insulating aren’t complete, since I still have to do something with the ceiling. I can access it somewhat easily from the stairs that lead up to the third-story attic space, so my first instinct was to do more rolled insulation or batts, rather than mess with blown insulation (which was up there originally over the old laundry area). The Jury’s still out though.
Now we’re going to return our attention to mudding and taping (and hopefully priming) so we can get this room ready for some flooring… which then makes it ready to get appliances plugged back in. I can practically smell the detergent!
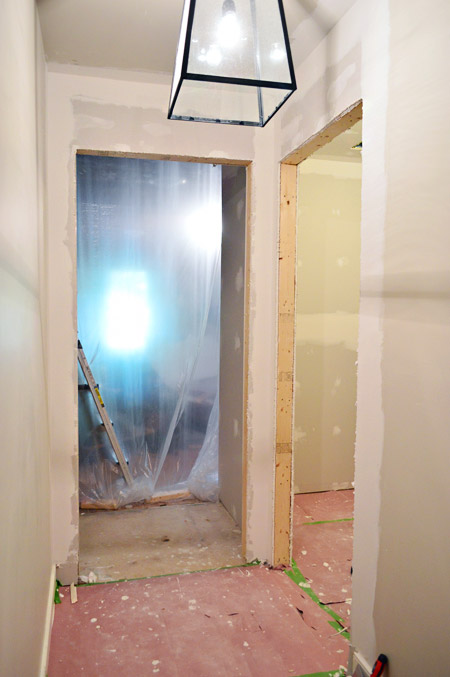
Does anyone else have any fun weekend plans? Wait, don’t tell me if it’s super fun, because I might fling some drywall compound in your direction.

Kathy says
Have you ever thought about using the recycled denim insulation, instead of the fiberglass? We love it in our house!
YoungHouseLove says
That sounds awesome! Thanks for the tip!
xo
s
haverwench says
What makes it better (aside from just being recycled)? Is it easier to work with than fiberglass? Less toxic? Does it insulate better? How does the cost compare?
Jessica says
I used this on a Habitat build. It was easier to work with in that it didn’t shred up my arms however I wouldn’t recommend it for ceilings if you are doing a self install. It is heavy and didn’t stay up on its own very well.
Marisa says
We used Roxul insulation as part of a Habitat build. It’s WAY less itchy than the pink stuff and it’s Eco certified.
America says
Recycled denim is awesome. I switched about 8 years ago and have never looked back, it is more expensive for sure, but SOOOOO much easier to work with (I am super sensitive to fiberglass and even if I wear long sleeves I end up itching for days after installing it). No long sleeves, though I still recommend a mask if you have to cut it since sneezing blue fuzz is highly overrated.
One benefit aside from the ease of working with it (which we DIYers might be tempted to muscle through to save some money) is that the denim is a way better sound insulator than fiberglass. I am in the process of doing a soundproofing retrofit between floors and I am replacing all my pink fluff with denim. There are also wool batts at Lowes that are supposed to be easy to work with and good for sound, but the blue stuff was what they carried at the soundproofing experts I went to.
Louise says
On the subject of eco-friendly, non-itchy materials, there is also flax insulation. Really good thermal capacity, renewable resource, and is good for adding on insulation since it can take some moisture from old houses without molding.
YoungHouseLove says
Sounds cool, Louise!
– John
Lilly says
Yeah progress!! Cant wait to see the outcome. Hope laundry by hand is not so bad, ha ha!
Laura @ Rather Square says
I think putting up insulation was a smart idea, even for this interior wall. Our (old) house is not well insulated, and we are going to have to retrofit that into the walls somehow down the road. Doing it while the walls are open anyway can’t hurt and will definitely help with soundproofing the laundry machines. Do you just push it into place, or is it attached somehow with adhesive or nails or something?
Our weekend plans lately and for the next few weeks involve getting our soon-to-be-born baby’s room finished before s/he arrives. Not as intensive as framing and building a whole new room like you’ve been working on… but I want to get everything in place since I know things will come to a halt once we have a newborn to care for!
http://www.rathersquare.com/2014/08/ceiling-fans-curtains-shades/
YoungHouseLove says
Since I cut them snugly I could push them into place and they were held nice and firmly. They can be stapled if they slip around or don’t fit tightly, but some people don’t even use faced batts (they use them without the paper facing on the back) and as long as they are a snug fit they stay nicely in place).
-John
Emily says
Impressive!
Meredith says
Can you discuss how you go about finding sub contractors to do small jobs like framing a wall? We’re considering tackling a significant job in our house and want to do as much of it ourselves as possible. The issue is, it’s working with taking down a portion of a load-bearing wall, which, to me screams, “Danger! Get a professional opinion!”.
I just don’t know how to go about a. finding a subcontractor that is good and affordable and b. what subcontractor wants to “waste” their time on small projects where we want to do most of the work ourselves?
How do you guys narrow down your professionals and convince them it’s worth their time to take on a teeny weeny job?
YoungHouseLove says
Oh it’s hard! There is a lot of legwork for sure! We usually get 2-3 estimates on almost everything, and when we opened the wall to merge our kitchen and dining room in our last house it was quite a process. Here’s a post we wrote about it that hopefully helps. We usually rely on recommendations from friends, and have even been known to post on Facebook or ask neighbors to get some leads for people to call. Most will come out for an estimate or tell you over the phone if the job is too small. Oh and we hear Angie’s List is helpful to find well-rated pros in your area. Hope it helps!
xo
s
lizaanne says
Meredith – Call your local Better Business Bureau – they can tell you if a contractor has any complaints listed against them as well. And they don’t charge you anything for the information as some online referral sites do.
Kelly says
I really like Angie’s List. The cost of membership easily pays for itself when you get good work that’s reasonably priced. And if you do have a bad experience, AL will actually put pressure on the contractor to resolve it for you (they know a bad mark on AL means they’ll lose future customers).
Susan says
Hi,
Just curious as to why you put the paper side of the bats in (since both rooms will eventually be heated)?
I would have thought the paper out to the storage area would keep fiberglass exposure to that room down.
Thanks.
YoungHouseLove says
That’s in the post, but these had notes all over them that for safety (the paper is flammable) it must be put in this way if it’s exposed in the back like our storage room is. Who knows when we’ll drywall that area, but we wanted it to be safe/to code until then.
-John
Susan says
oops, sorry I missed that explanation in the post… I was mesmerized by the photos! Thanks for the duplicate explanation.
YoungHouseLove says
No worries!
xo
s
Isabel says
Great progress guys and kudos on tackling the drywalling. We did a tiny bit of it when working in the kitchen and we also had to skim coat the powder room after taking down the wallpaper from h-e-double hockey sticks and I think I’m done with all that sanding for a while (forever preferably!). We do have plans for the weekend but they involve some tedious have-been-meaning-to-tackle-for-months yard tasks so no need to fling compound this way ;-) Do you guys have any more yard plans for this summer?
YoungHouseLove says
I’d love to plant some more privacy/border plants around the back when the temps cool (fall). I also dream of a little “secret garden” looking fenced area that could function for Burger to go out with boundaries (we chase him around sometimes, ha!) so it would be so much fun to do that!
xo
s
Isabel says
Secret gardens are the best :) We added some picket fencing in the back this spring and I can’t wait to fill both sides with plants and add an arbor.
Sarah A says
Secret gardens for the win! I grew up with a big back yard bordered by a heavily wooded cliff down to a swamp. My parents put up a little fence around the patio and patch of grass big enough for a swing set, sand box, and playing – which kept three toddlers from toddling into danger, and kept the random wildlife from bothering us. The fence was taken down when we were old enough to use common sense outside alone. Doing a decorative fence with plants would be a fun place for Burger and the kids to play!
YoungHouseLove says
Sounds so sweet!
xo
s
Casey Atterbury says
The room looks amazing! It’s awesome to actually see the hallway with some definition! I’m excited to hear about the mudding process! We are going to re-do a small bath and it will need some new drywall in some areas, so thanks for being the guinea pigs for us!
Holly says
So how are you dealing with cloth diapers through this renovation? Are you allowed to wash them at a landromat?
YoungHouseLove says
We debated washing them at Grammy’s house but realized that not everyone is into that (ha!) so we’re back in disposables until the washer & dryer are plugged in – hopefully in less than a week!
xo
s
Erin says
have you picked out your frosted glass door for this space yet?
YoungHouseLove says
Ack, not yet! We are in the middle of some crazy book projects/shoots and keep meaning to go to Home Depot (we want to see the different glass options in person). Soon I hope!
xo
s
Mesha Kendrick says
Are you worried about mold or condensation from the paper being on the inside?? It is your moisture barrier … Without it, the insulation may absorb water over time, and rot. Especially against the paper on the inside of the wall.
YoungHouseLove says
I watched a ton of videos and read about it and many people did it this way (even while doing a laundry room) so we think we’re all set. We also can turn the batts (they’re just pushed into place) so the papered side is on the outside once we’re ready to drywall the storage room – we just didn’t want to do anything against code by having that paper out in the back since it’s flammable and has warnings all over it that say ‘this side can’t be exposed’. Since they’re already cut it would be really simple to flip them when we drywall the back of that wall though!
-John
Hillary says
I’m just curious and may be completely off base but when John installs drywall on the attic side (assuming he flips the drywall to have the paper side exposed) won’t it be the same situation with the moisture battier/rotting? The paper side will then be up against the attic wall instead of up against the laundry wall. Either way, the paper will be against the inside of a wall. We recently insulated our attic ceiling so the situation was different but I can’t understand why it matters which way he has has it facing when the paper will be up against drywall either way?
YoungHouseLove says
We are having the same confusion (there apparently are a lot of schools of thought on this stuff)! Will definitely do a bit more research and ask a few experts so that we can share all the details when we drywall that other side!
xo
s
Sarah says
I would never install a moisture barrier on an interior wall. Moisture barriers, like Tyvek, are applied to exterior walls underneath your siding. You might be thinking of a plastic vapor barrier that is commonly stapled over batt insulation (at exterior walls) before the drywall is installed. There are different schools of thought on how your building “breathes” and this vapor barrier is certainly optional. Building Science is certainly fascinating!
YoungHouseLove says
Thank so much for the clarification Sarah!
-John
Heather says
Weekend Plans: I’ve made a list of all the houses in our 1970’s neighborhood that look like they might have the same split level floor plan as ours (7 of 330. I plan to call the owners to see if a) they have done any renovations and b) can we come see? Creepy? no, I’m saying “I learned about this thing called House Crashing from my friends John and Sherry!”
YoungHouseLove says
Haha! Have fun!
xo
s
Shayna says
Looks great!! Y’all are almost to the fun part – painting & having a laundry room!! Can’t wait to see more!!
Amanda says
I still can’t get over the fact that the laundry was put in a closet when all that space was available to build a proper laundry room.
What you guys are doing just looks right!
Gilly says
Exciting! Can’t wait for the mudding video.
I wouldn’t have thought to protect the sub floor during this step…what was your mindset behind that? Was it just for easier clean up?
YoungHouseLove says
We wanted the subfloor to stay flat, so big globs of mud would have made it a bumpy base. Laying down paper we could rip up seemed to be the easiest way (rather than scraping those bumps off later).
xo
s
Gilly says
Brilliant!
Anele @ Success Along the Weigh says
I learned the hard way as a child about insulation. Whilst insulating my uncle’s house, I thought it would be fun to jump on the fluffy pink stuff. Mmm hmm. No one warned me and my dad and uncle’s just laughed when I began itching. My mom scolded them all properly and chucked me in shower.
Lesson learned. Insulation does not equal fluffy play clouds.
YoungHouseLove says
Oh no! I’m itchy just thinking about that!
xo
s
keri says
I learned recently that if you get fiberglass stuck in your skin, use some tape to pull it out! Just stick it down, rub it in, and pull off! It’s not a perfect method, as you might get a free hair removal as well…but it’s better than itching :)
YoungHouseLove says
Great tip!
xo
s
Marisa says
Another good tip is to take a cold shower. It closes your pores so that the insulation will rinse off instead of staying stuck to you.
YoungHouseLove says
Smart!
xo
s
Kay says
Having been a DIYer for many years, I do know that if you do not staple the insulation in (at least at the top) it will tend to sag in the wall over time. The top 6-12 inches will be uninsulated after a few years.
YoungHouseLove says
Thanks for the tip Kay! We’ll go back in and do that before we add drywall to the backside (we might flip it then too).
xo
s
Sarah says
It’s called “friction fit” for a reason. When properly installed, it should not sag. Professional insulators do not use staples. Energy/sustainability programs, like Energy Star and LEED do not require it. I imagine if it were an industry-wide problem, they would specifically call for a stapled installation.
It looks like John did a really great job fitting the batts in the cavity, making flush, continuous contact with all 5 surfaces, which is excellent!
Pam Gereau says
Looking good and cant wait to see it done! I was wondering if you chose formaldehyde free insulation. It’s something I always think about because of the chemical sensitivities I live with (which started after we moved into our new home 14 years ago).
YoungHouseLove says
We were surprised how little variety there was for this stuff at home improvement stores, so after some research about thickness and grade and stuff like that we just went with this because it was well rated. Formaldehyde free sounds awesome though! Someone else recommended denim which sounds cool!
xo
s
YoungHouseLove says
Apparently I didn’t pass this detail on to Sherry – the ones we purchased are formaldehyde free! You can see more in their listing on Home Depot: http://www.homedepot.com/p/Owens-Corning-R13-Insulation-Kraft-Faced-Batts-23-in-x-93-in-BF11/202585859
-John
Lindsay @ The Newlywed Notebook says
I’m getting so excited about seeing the end results of this project it’s not even funny!! And thanks for the tips – my husband and I are thinking of finishing off our basement on our own soon, and I know we are going to have to deal with a lot of this same stuff. :)
Stacy says
Did you have to get building permits for the room construction? I would think you would have had to since you’re making a pretty big change, and if it’s required but wasn’t obtained you could be looking at increased costs down the road in the form of fees or penalties.
YoungHouseLove says
Oh yes, permits are necessary for this type of work! Thankfully when you use subs you can negotiate who pulls them, so we had our licensed and insured electricians, framers, and plumbers pull the permits they needed. Some sub-contractors are more likely to make you do all the permit work (which really isn’t too bad, we did them ourselves when John built the deck). You can usually check your county’s website for a list of things that require permits and give them a call if you have any questions.
xo
s
Theresa says
Looking good! We used this insulation wire supports on several projects and liked the piece of mind they gave us. Plus the leftovers got used for all kinds of projects when you needed a strong piece of wire — speaker wire hole poking, hole placement before drilling, etc.
http://www.homedepot.com/p/Simpson-Strong-Tie-16-in-Insulation-Support-100-Qty-IS16-R100/100375163
YoungHouseLove says
That’s really cool!
xo
s
Jesika Davis says
Did you have to get permits to add a laundry room? Or, since it was already there is it just considered a modification?
YoungHouseLove says
Oh yes, permits are necessary for this type of work! Thankfully when you use subs you can negotiate who pulls them, so we had our licensed and insured electricians, framers, and plumbers pull the permits they needed. Some sub-contractors are more likely to make you do all the permit work (which really isn’t too bad, we did them ourselves when John built the deck). You can usually check your county’s website for a list of things that require permits and give them a call if you have any questions.
xo
s
Megan says
Weekend plans: bowling and increasing the inventory in my shop. So fun times and then fun/businessy times.
When my house was being built, I paid extra to have all the interior walls insulated to help with sound proofing. SO glad I did because the layout of our house creates these odd sound tunnels. From the master bedroom, I can hear perfectly what’s happening on the opposite side of the house. Can’t even imagine how loud it would have been without insulation.
Jo @ Let's Face the Music says
Hey this weekend we’re drywalling! And adding Hardie backer to unfinished shower area. Jealous? I hope we can find a freelance mudder but if not I look forward to your hints and tips. Jo @ Let’s Face the Music
YoungHouseLove says
Good luck Jo!
xo
s
Kristina says
Hi there! Nice job so far on the laundry room. I think the new layout will be a big improvement!! One thing to watch out for… the kraft paper on the insulation is a vapor barrier. You did the correct thing and placed the paper on the “warm” side of the wall (since for most of the year, the interior of the house is warmer than the unheated space). However, if you finish the attic space in the future, it would have been best to have used unfaced batt-insulation. It’s not great to have a vapor barrier in an interior wall. I’m an architect so I’m pretty particular about this stuff. Some will tell you it doesn’t matter, but as houses get tighter and tighter, with better windows and insulation, the incorrect use of vapor barrier becomes a bigger deal than it was in decades past and houses can end up with moisture and mold problems. Just wanted to give you some information… you may want to do some research yourself to decide what you are comfortable with.
All the best,
Kristina
YoungHouseLove says
Thanks so much Kristina! GREAT tip! We will definitely look into that before closing the wall!
xo
s
Christina says
Looks good! I cannot believe how much you guys get done with two littles. Impressive!
As for weekend plans, my husband and I are celebrating our 6th anniversary. We got eachother new bicycles and will probably go out to lunch then hit a local bike trail while the grandparents watch our two little ones.
Have a good weekend!
Emily says
We added insulation to our new house’s attic before this past winter (What polar vortex? Just kidding, our windows are 100 yrs old.)
We already had insulation and were just adding more. We were debating blown-in vs rolls and went with the rolls. We were able to buy unfaced rolls at home depot with R-30, really cheap! I mean, mind-blowingly cheap. $13.50 for 25 ft roll.
http://www.homedepot.com/p/Owens-Corning-R30-Unfaced-Continuous-Roll-15-in-x-25-ft-RU70/202585906
If you don’t need a moisture barrier on an interior ceiling (do you?) then I highly suggest going this route. Even if we needed a moisture barrier, then I think we would have gone with plastic and still used this. It is so much cheaper to go that route.
YoungHouseLove says
Thanks Emily! So smart!
xo
s
Emily says
I should add, that b/c we already had insulation in our attic, the moisture barrier was already there and when we inspected it, it was still in-tact. We just wanted to add another layer, since they used R-15 in the freezing cold North!!
YoungHouseLove says
So smart!
xo
s
Louise says
I saw this and had to jump in, on exterior walls and roofs, the moisture barrier needs to be directly behind the drywall. If you put it halfway inside the insulation you will get damp staying on the barrier and a potential cause for mold. If you retrofit insulation from the inside you need to remove the moisture barrier before you ad on insulation. When it comes to drywall in bathrooms and laundry room there are non-organic options available, so you will not have to worry about mold, fex glasroc sheating.
Evelyn says
John always looks like he’s standing in the same spot, in the same pose by the HD truck. I always imagine an excited “Home Depot Haul!!! So guys, check out the cute packaging on the drywall compound and if you blend it into your skin, you get a nice mud mask effect. Also, I know someone will ask about today’s look: I’m wearing a balled up shirt from the back corner of our closet because I’m not allowed to wash renovation clothing in the same load as normal clothes but I make it work. Hair color is a misted application of dust and cobweb held in place by sweat. Finally, check out my manicure. It’s a nice sanded finish at an odd angle.”
YoungHouseLove says
Haha!
xo
s
Ryan says
You may never experience this, but wanted to share. In my last house, the sunroom was renovated and the insulation wasn’t tacked into place because it was such a tight fit. A year later, we had to open a wall to make a repair to the window. All of the insulation had slumped and was half way down the wall. The contractor we brought in (who specializes in insulation) said there has to be something tacking it to the top on the alcove, or it will settle with time, vibrations, etc. and end up slumped half way down the wall.
YoungHouseLove says
Thanks Ryan! Someone else gave us that tip! We’ll be sure to tack it up at the top before we drywall the back.
xo
s
Ryan says
I saw that after I posted – sorry for the duplicate! Nothing better than someone critiquing your work than getting duplicate critiques right? :) Hope you are all well!
Karly says
A tip for drywalling….when you get to the priming step, do two or even three coats of primer on your mudded seams and areas, feathering out the primer. Then do a primer coat over the whole thing. Then paint. Learned that from a drywaller and it helps cover up any little imperfections if there are any!
YoungHouseLove says
Thanks Karly!
xo
s
Olivia says
Very impressive – to do all of this with a newborn and book projects on top of it all – wow!
One small correction: “Plus it could help cut down on a little bit of the noise of running _and_ washer & dryer…”
YoungHouseLove says
Thanks Olivia!
xo
s
Reenie says
Looks like cotton candy! :)
Katie B. says
I mean, I just see these reno posts and go “no, no, no, no, aaaaannnndddd NO.” I am so not a DIY-er (when it comes to big projects) and neither is my husband… but gosh darnit y’all make it look so easy and fun!!! I can’t wait to see the finished project!
Janette@The2Seasons says
We learned through experience that the fiberglass insulation provides more sound proofing than the spray in type. We discovered this too late. Whomp, whomp.
Randi says
We were also a bit put off by the blown insulation in out attic. We had some “energy assessment” done by a company trying to sell insulation. He did some measurements and calculated the R-value based on the thickness and identified areas that needed some attention due to previous installation being uneven. We thanked him for his time and turned down the $2000 estimate.
Then, we did it on our own for less than $500. They rent the machine at Home Depot and sometimes you can get the rental free by purchasing so much in insulation. The R-value you get with blown-in insulation is so much better than the batts. In face, if you put batts on top of the blown insulation, you’ll decrease the R-value because you’re compressing it.
I definitely encourage you to check it out. While it seems daunting, it really is a very simple DIY and a rather quick project that has a lot of impact. The only downside is that it is a bit messy and does require two people (one to handle the hopper, one to direct the flow.
YoungHouseLove says
That’s awesome!
xo
s
Kelly says
Energy audits are great, but I highly recommend having it done by an independent auditor, meaning the auditor is not associated with any business that does insulation or any other work that the auditor might recommend. It’s a conflict of interest. An independent auditor has nothing to gain by recommending certain upgrades over others, so he/she will tell you what are the most cost effective things to do.
Aislynn says
It’s interesting to see the difference between your area and here in Ontario!
We have to have vapour barrier with the joints taped and sealed (with sealant) anywhere there is insulation.. to prevent any moisture from getting to the insulation. I haven’t seen the paper backed up here either! We use a lot of Roxul in our area (green insulation).
Looks awesome – can’t wait to see the finished product!
Kelly says
Hey guys, I just wanted to say that I have really appreciated this project. I feel like you are getting back to your roots of DIY. Lately (and it may have been due to pregnancy and new baby) it seemed you were always hiring stuff out and buying expensive items. I was having a hard time relating. So I really appreciate this project. Though it is not cheap, it has more of the DIY feel of home renovation. On a side note we tackled renovating a small closet into an office and it surprised me how expensive small spaces end up being. (We put in wood floors and built ins, along with tearing down old paneling and putting up drywall)
YoungHouseLove says
Thanks so much Kelly! And your reno sounds awesome! We are SO GIDDY about this whole thing over here. I can’t stop telling neighbors and friends how exciting it is. I can practically see their eyes glaze over. Haha!
xo
s
Alexandra says
Great job, guys! (As usual)
May I just say that I totally like the “Whethermen” shirt? :D Actually I find the whole outfit weirdly hot, but I guess that’s because I really need a handy guy in my life (I’m good at DIY, but I’d love to have someone for the heavy lifting and for doing the stuff I’m too short for)!
Peggy McKee says
Any comments on why you chose “pink fluffy” as opposed to rigid foam board insulation?
YoungHouseLove says
I had used this in the past and it was used elsewhere in the home, so it felt like the most natural choice.
-John
Erin @ The Impatient Gardener says
You’re making such amazing progress and how nice that the budget is in your favor too! But I have to wonder … how in the world are you surviving without a washer and dryer? You must be going to the laundromat or a friend/family member’s house, right?
YoungHouseLove says
We have taken a big load of laundry over to John’s parents’ house a few times. Thank goodness for Grammy & TomTom!
xo
s
Suzie says
Sorry to be a downer here, but I can’t help but feel that you absolutely hate doing anything DIY, as of late. Y’all call yourselves, “DIY enthusiasts,” but seem so far from that, now. :( It makes me sad. I have been reading your blog since the very beginning and I just don’t feel that you are enjoying yourselves anymore. I know that not everyone loves every second of their job, but the constant whining and complaining about every step of this home renovation process certainly does not make me want to do any DIY project. I used to get excited about your post and ideas, but now I am just starting to feel sad for you…sad that you no longer seem to love what you do, sad that that DIY spark seems to be gone, sad that this is your job and it seems to be making you miserable.
Hoping I am wrong here and have just misunderstood the tone of the posts lately. I have three boys under 5, so I get how tiring that can be. I just miss the old self-proclaimed “DIY dorks.” :(
YoungHouseLove says
Oh wow, really? I’m sorry if it’s coming across that way. We’re SUPER excited about this project – and I in particular am glad to be getting my hands dirty and learning new things. Like always, we do try to be honest and realistic about certain steps being more fun than others.
-John
Paige @ Little Nostalgia says
Weird, I don’t get an unhappy vibe from them at all! Not every project is fun (we HATED fixing our deck, ugh) and I like that they’re honest about it. Some blogs just show the sparkly, happy parts of DIY and they get old really fast. I’ll take the occasional “complaint” any day. :-)
Amanda says
I just wanted to let you guys know that I don’t get an unenthusiastic vibe from you at all. I’m a fairly new reader, young, and a renter, so lots of the projects you tackle really aren’t that relevant to my current life situation. However, what keeps me coming back and (somewhat obsessively) checking for new posts every single day is the wonderful spirit and attitude you guys show. It’s so obvious to me that you are fully aware that you’re living out your dream, and I find that really inspirational. You’re both seriously so fun and dorky and upbeat that it’s impossible to not love you!
I understand that not every step of every project is the most fun, but I really appreciate that you can stay real to your readers and that you always mask the “unfun” stuff with jokes or more positive material.
Keep up the great work!
Kelly says
This comment surprised me. Recent posts haven’t come across as unhappy to me at all. I reread this post and can’t find a single instance of whining or complaining. Maybe she thought the mention of having to wear long sleeves in the hot garage was complaining, but I thought it was a good natured acknowledgement that sometimes there is discomfort involved.
Kathleen says
I gotta say, I love the tone of the blog, and this post in particular. I have no intention of building a room (framing/insulating/dry walling/mudding), but it’s your writing that keeps me coming back. I love the truthful comments – not all DIY projects are glamorous. My husband and I do more than our fair share of complaining, but there is still nothing better than the feeling of accomplishment after finishing a project. Y’ll always keep it real, and we appreciate that! Keep up the good work!!! And thanks for taking us on the journey with you!
Suzie says
I appreciate you allowing the comment to come through and taking the time to respond to it!…I really do. I stand by my original comment, though. If I had written what I wrote on a post of yours two years ago or even one from last year, then I would agree with what everyone said below my original comment. As a loyal reader for so many years though, I have to say there has been a noticeable change…I can’t be the only one who has noticed that. And I don’t mean just because you have decided to put family first and are doing less projects. I also don’t mean that you have to pretend that a project that sucks is fun and amazing. I know we all change over time…especially throwing kids into the mix, but I am having a hard time believing that y’all are really enjoying this house the way you claim to be. I guess I just don’t deal well with change and this blog isn’t what it used to be. :( Just being honest.
Jennifer says
I completely agree, Suzie. I’ve been a loyal reader for years, and there has been a noticeable change of tone. It’s not fun to read anymore because I get such a strong burnout vibe and a general sense of feeling obligated to the blog but resenting what it has become (which indirectly makes me feel resented as a reader). It makes me sad because I do want you guys to be happy. I’ve enjoyed following along with all of your adventures, but I keep getting the feeling (through comments like, “you may just want to tune out”) that you would just rather we stop reading completely.
MC says
I don’t get a burned out vibe, but I think the posts are less sparkly, perhaps more sterile. I’m not sure. I think it’s more a change in writing style than anything else, though. I keep coming back for more anyway because the content is still high quality :)
Marisa says
I have to agree. I’ve been reading since almost the beginning and it’s not as much fun to read. Maybe it’s just because you guys are so experienced with most things that some of the adventure is lost. Even your posts about the tough parts of your first bathroom reno seemed happy despite the hard work. I still love coming here for advice when I’m starting a new project.
Leslie says
I’m with all the people above who love the way you write. It’s clear that you’re grateful for the life you created and love what you do. Since Teddy was born I actually get a happier vibe from you and I have really been enjoying this project and your humor. My favorite blog title of all time was ‘The Mighty Ducts’ last week.
Hilary says
So, I definitely don’t get any unhappy vibes from your posts, but I would agree that there is a different writing style compared to posts from way back when. BUT, I think that is completely normal! You have grown and changed since you first started this blog and I think it would be unnatural if your writing style hadn’t changed somewhat in the past 7 or so years. And I would say this is something I have noticed on other blogs I follow. If you go back 3 years or more on any blog I think you would notice a writing style change. Hope you are having a good weekend!
Leigh says
Can I just say how much I appreciate you including the fact that you purchased the wrong size insulation? This type of thing is something I seem to do regularly (whether it’s for baking a cake or some home reno project). It is so frustrating and adds so much time to a project. But somehow knowing that DIY pros like you do the same thing makes me feel so much better. Thanks for keeping it real!
YoungHouseLove says
Thanks Leigh!
-John
Kelly says
You are most definitely not alone! That seems to happen to us at least once per project. Yesterday my husband made two trips to the hardware store because he bought the wrong kind of nails the first time.
Kara says
Kudos to you for taping and mudding yourself. My do-it-all father-in-law hired out exactly one job when he did a massive home renovation several years ago, and it was that.
Interestingly, the sub who did his taping and mudding also worked on an Extreme Makeover home in the area and said that you never want to go back and see how those houses hold up. It’s neat that they use volunteers and get the work done so quickly, but some parts of construction just can’t be rushed, and mudding is one. He said they had paint up before the walls were set.
YoungHouseLove says
Yikes! That’s crazy!
xo
s
Kaija says
That insulation looks nice and cozy! Can’t wait to see the finished room!
Any tips for sound insulating piping that goes from closet water heater to shower which is in the bathroom (duh) right next to it? The closet has to have louvered doors because it also houses the furnace, so the doors don’t help much.
There’s no insulation inside the wall. I would like to get it done without taking all the drywall down. Some sort of expandable spray-in insulation?
YoungHouseLove says
Anyone have tips for Kaija?
-John
marjorie says
at home depot they have foam boards, 4’X8′ i think, that are about 2″ thick that you can cut to the shape you want. you can cut it the shape of your dry wall and put it just around the pipe (you are not supposed to have a lot of bulk in a furnace room)
YoungHouseLove says
Great tip!
xo
s
Lo says
Kaija, I heard you can put blown insulation into interior walls through a small 1″ hole.
Caitlin W says
While I have not personally done this, I have heard of people using blown in insulation in such cases. You cut a small hole in the drywall at the top of the area needing drywall and use blown in insulation to fill the space.
That being said, blown in insulation does compact itself down fairly quickly. There is also a possibility that a professional could come in and use spray foam insulation.
Kaija says
Thank you everyone! Making a small hole sure sounds better than moving the water heater out of the way, removing drywall, installing insulation, replacing drywall, muddingsandinginstallingwaterheater…
This may become a 2-prong approach. I’ve been eyeing some acustic foam for the inside of the said closet to absorb some of the furnace noise as well. But you’re right, Marjorie, there’s limitations what you want to put in your furnace room.
Thanks again!
Jen @ The Decor Scene says
Oh it brings back crazy memories of when we redid our whole Family Room. The room is about 25L x 16W. We redid that room from top to bottom with the exception of electric & new cement floors we needed poured (1st floor Hi-Ranch). It took us about 1 year (weekends only) to finish that room ourselves, but every time I walk into that room I think “we did that”. It still cost us a lot but it cost us a lot less since we did it all ourselves. All labor, removal & install of insulation, drywall, flooring & ceiling. Then decorated it all too. ;)
http://www.thedecorscene.blogspot.com/2011/04/our-family-room-tour-big-reveal.html
YoungHouseLove says
SO cool!
xo
s
Karin says
We are currently (i.e.. VERY slowly) getting 3-4 layers of densely closed cell foam cut and installed in both the attic ceiling and walls of our remodel room, which backs up to 3 different attics as well. It has expanded to our putting foam over the 3rd attic as well, since we won’t be able to get into that attic again. The great thing about the foam is that we don’t have to wear the fun fiberglass outfit (I lost 5 pounds while taking out the fiberglass while in a tyvek suit!). We did a test run, and it’s SUPER easy!
My husband is just starting to work on the electric so we can finish up the insulation. :D
Years ago, we had a pro come in and work on the rest of the houses walls since we had to punch through every wall while updating the electric to code. He didn’t sand – not once. Seriously a drywall artist. We took notes, and hope we can replicate.
Your space is looking great! :D We are in envy of how much is getting done so quickly!
YoungHouseLove says
That’s amazing!
xo
s
marjorie says
when my dad built our house he put plastic (probably the same kind you are using on your door) over the insulation. as a temporary protector from moister, dust, critters etc. just tacked it down with small nails and plastic washers. just thought i’d throw that out there :-)
YoungHouseLove says
Thanks for the tip!
xo
s
Emiles says
Looking good. Are you going to put any texture on the walls or just flat?
YoungHouseLove says
The walls are just flat here, so smooth it is!
xo
s
Claire says
This is really interesting, I’m British and I was amazed that you were going to take on plastering… now I have seen the top photo and googled a bit it seems like you guys hang drywall/plasterboard then just tape & mud over the joins/fixings… in the UK we hang plasterboard and then skim plaster over it all, well I say “we” but nobody does it themselves cos it’s a really highly skilled job to get a perfect finish – we are in the middle of having all our ceilings and some walls skimmed at the moment and it is costing a bomb! I love reading about the differences between the two countries :)
It’s looking great – good work!
YoungHouseLove says
So interesting! That sounds really hard!
xo
s
Kathy G says
Mine are skim coated too – in AZ. It makes for a very velvety finish as opposed to straight drywall (everybody touches them)…BUT not for the novice.
Great progress!
Mandy says
Here in Oregon, newer builds aren’t textured either, but still skimmed. Interesting to see how different states can even be! The skimming is expensive because it definitely takes skill but the finish on skimmed walls versus drywall is a huge plus!
YoungHouseLove says
I love learning this stuff!
xo
s
Jessica says
Hey guys
Curious if you have to put something to push the insulation away from the electrical bit. We have to in Australia because these points can overheat and cause fires.
Also re the insulation there was a UK based program recently about repurposing an aeroplane and recycling the bits. The insulation is something like 15 times better than what we can get at the hardware and can’t be recycled. It becomes landfill. So if there is an aeroplane scrap yard near anyone next time go for it!
A link here http://home.bt.com/pictures/tv-features/kevin-mcclouds-supersized-salvage-recycling-an-entire-passenger-plane-41396932242199
YoungHouseLove says
Wow, that’s really cool!
xo
s
Sarah says
I was wondering the same thing about the electrical – because of the flammable comment in the post on the paper……
YoungHouseLove says
From what I understand (from the videos I’ve watched and tutorials I’ve read) all electrical work has to be sealed within a box (the wire itself doesn’t heat up, and the metal junction box is there to contain heat or sparks, so nothing should escape and hit the wood beams or the insulation to cause any safety hazard). Anyone else know more on this for Sarah and Jessica?
-John
Kelly says
Yeah, the electrical stuff is all contained. The wires are insulated so the metal isn’t touching anything flammable, and the exposed parts of the wire where they’re connected to switches or receptacles are int the boxes. The only thing that could cause a problem is if you accidentally cut the insulation on the wire, which is why you should check for wiring before cutting into a wall or driving in a screw or nail.
Sara says
I really enjoy reading about this project! Are you going to spray any texture on the walls before painting?
YoungHouseLove says
Thanks Sara! Our walls here are just flat (they were at our last two houses as well) so we’ll keep things smooth and just go right into priming and painting once we’re done.
-John