First of all, thanks so much for the unbelievable outpouring of well-wishes for our announcement yesterday. It was great to share our news with you guys. While madly trying to keep up with the 3,000+ (!!) comments, our afternoon post sort of fell by the wayside, so we figured we’ll share an afternoon one today with you instead. In the meantime, Sherry is cutting and pasting a ton of questions from yesterday’s comments and working on Friday’s Q&A post for you, and I’m here to shake my tail feathers about managing to cross a few more things off our sunroom to-do list in this week (yes, feel free to picture that).
So let’s talk about three steps that have taken our sunroom from half-baked to feeling a lot more finished: adding trim, caulking, and painting. They’re not always glamorous project steps (especially installing trim and caulking) but details like those tend to make all the difference (wonky trim and messy caulk can add up to a shoddy looking finished product, even if a room is furnished really nicely). I originally planned to gloss over the trim-hanging part and dive more deeply into caulking and painting, but then I messed something up and, voila, it felt like info that might be helpful to share. Nothing like celebrating your screw ups, right?
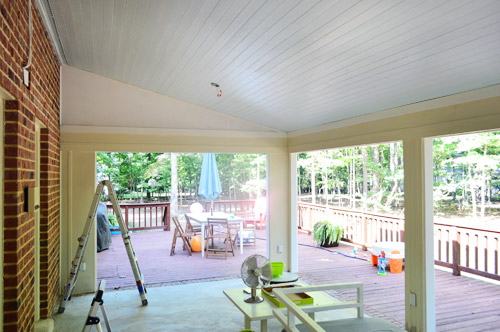
Ok, so we had to add trim to polish off our recently tongue-and-groove planked ceiliing. Originally I was just going to toss out a quick mention like: “We installed trim to bridge the gaps around the ceiling and the new triangle panels we added. To match the other simple lattice-like trim around the rest of the room, we opted not to use typical crown molding. Plus, it spared us from having to calculate how to cut all of tricky crown angles against an angled ceiling.”
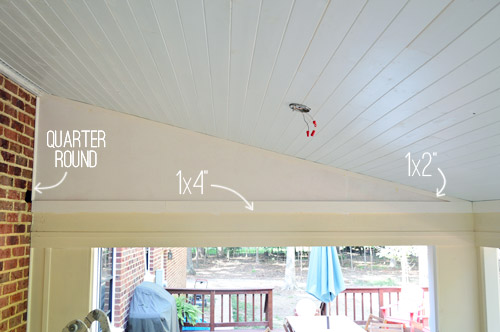
But after the trim was installed, we both stepped back and decided it didn’t look good. Not because it wasn’t crown, but because the 1 x 2″ against the ceiling and the quarter-round against the brick were too puny compared to the heft of the nice chunky 1 x 4″ trim piece along the bottom of the triangle.
I had chosen the 1 x 2″ trim piece to run along the freshly lofted ceiling because it most closely resembled the lattice in the rest of the room. The bigger 1 x 4″ trim piece was only there to cover some leftover rough patches from where the previous trim was removed (so something thicker was necessary). But we decided the 1 x 4″ board looked much better than any of the skimpier stuff, so suddenly Sherry and I found ourselves removing trim again… just 24 hours after putting it up.
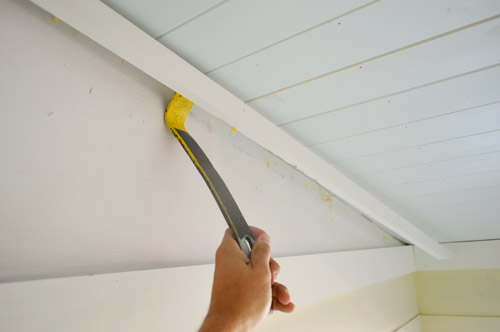
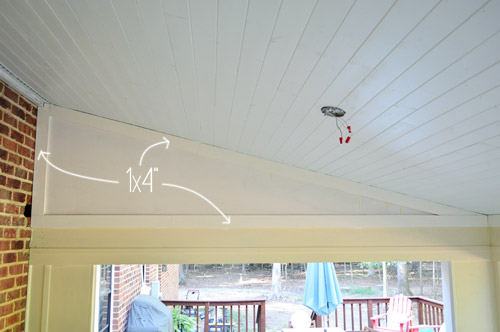
We each pried off a side and decided to install 1 x 4″ all around each triangle, so the trim near the ceiling carried all same visual weight – rather than the trim closest to the top looking chintzy. It’s hard to judge from this picture below (especially since it’s not caulked or painted) but trust me, it looks waaaay better. As for how we hung it, it’s mostly a two person job when you’re working with such long pieces up on a ladder, so one of us held it in place and the other worked the nail gun (I slipped some wood glue behind each piece for extra hold too).
And while we’re on the topic of the trim, it was a bit more challenging than a usual trim project – just because we were dealing with some angles. Fortunately we had the angle finder handy from the Kreg Crown Pro that we bought to do crown molding in our last house (though I’m sure any angle-finding tool would work). So we just set it in the nook of the triangle to find our angle.
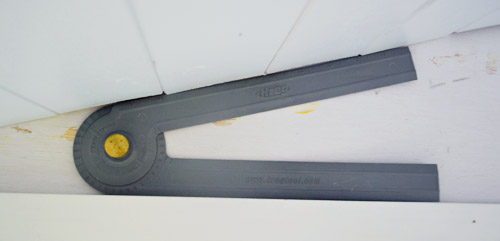
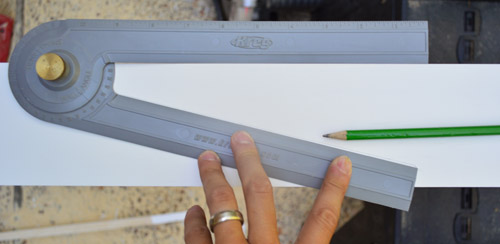
Then I marked that same angle on our board.
And then I used a circular saw to cut along the line.
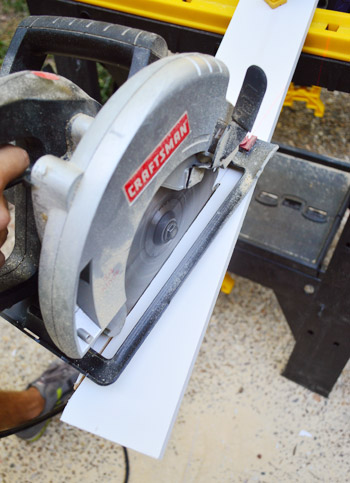
Most of the cuts weren’t 100% perfect, but it wasn’t anything that caulk wouldn’t fix. So as trim jobs went, it was a relatively speedy one – even if we did have to do those two triangle sections of it twice.
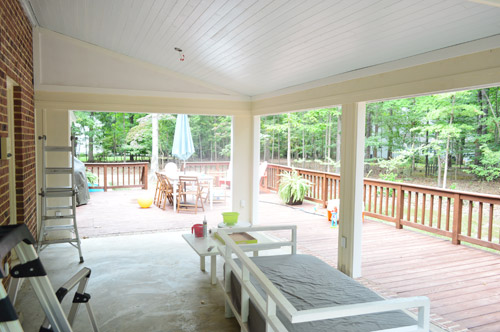
With trim up, it was time for caulking. Sherry and I usually tag-team steps like this, but outdoor caulk is too VOC-filled to inhale while carrying my baby, so I gladly flew solo. In addition to caulking all of the seams around the trim, there were also a bunch of touch-ups that I wanted to do on the ceiling itself. Call me crazy for taking the time to caulk all of our nail holes in each ceiling plank, but it was totally worth the couple of hours it took for the peace of mind that everything was sealed in and nothing would warp/rot due to the elements or the changing temps outside. Eventually I came up with quite the efficiently system: squirt a dot of caulk in each spot, smoosh in with a finger (dipped in water to help keep caulk from building up on my skin) and then smooth that over with a damp sponge. The sponge step was the key to a nice finish, and it made it go faster too.
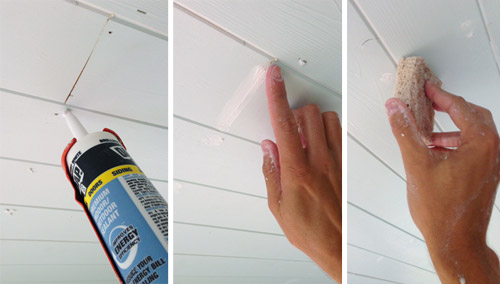
None of our before-and-after shots of the caulked holes really demonstrated the difference (it’s one of those things you have to see in person, I guess) but having all of the little distractions taken care of was actually a big move forward in this ceiling feeling finished.
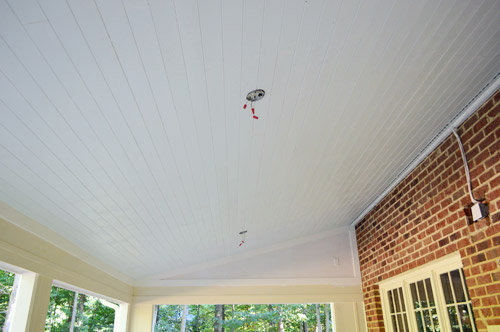
Then there was painting to deal with. Not that the cream + white + blue + primer + brick combo isn’t totally the rage these days.
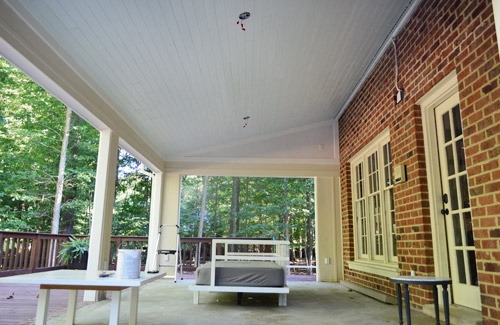
In our heads painting this room wasn’t a big deal. There’s like 0.003 square feet of walls, after all (I may have rounded down a smidge). But then we remembered the 15-paned door and the three giant 15-paned windows. URGH. That’s a whole lotta mullions.
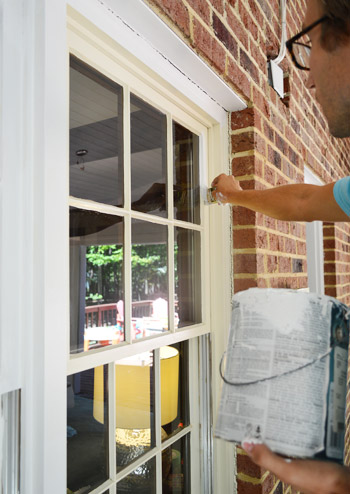
Okay, I’m being dramatic. It wasn’t that bad. It took me about four hours total to apply two coats for full coverage – but I wouldn’t call it an exciting job. Oddly enough Sherry loves to be the cutter-inner, so she was sad that exterior paint is on the no-no-pregnancy list. Did I hit the jackpot with my trim-painting wife or what? Oh and as for the color, we used Snowbound by Sherwin Williams, since the rest of our white exterior trim is painted that color.
I did my best not to get too much paint on the windows just to save ourselves time on the back-end from having to scrape all 60 of those window panes with a razor to remove the paint (we learned on the windows upstairs that scraping was a pain whenever primer was involved, so we figured exterior paint would be just as difficult since it’s a more intense formula with a built-in primer). I also tried out a new brush that’s specifically meant for this type of job – just in the name of seeing if it made things easier. In the end after both of us tried it (Sherry for just a second with a gas mask on because the girl couldn’t resist) we actually found it harder to use than our usual short-handled brush, but we’re glad that we gave it a shot, just to be sure there’s not some magic bullet out there.
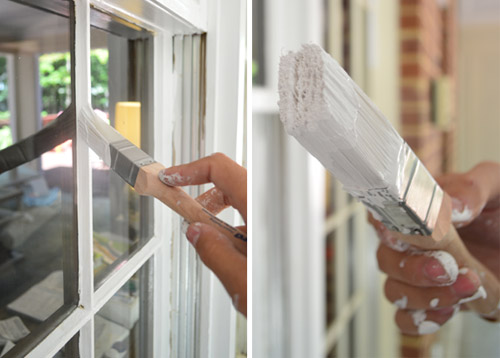
With the windows and the door done, it seemed like a cinch to finally get to painting the walls, which I did with a small foam roller for the most part (I did use an angled brush to get into some of the cracks and tight spots but it was mostly a roller job).
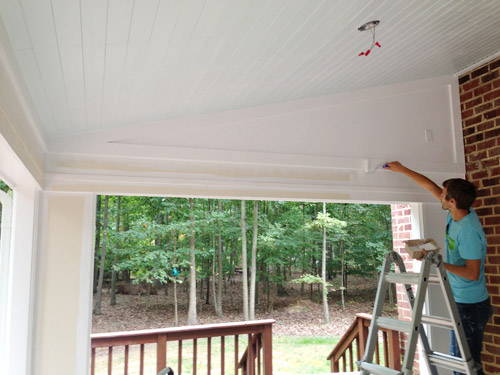
With that done, I still had one last paint job to complete: a final coat of blue on the ceiling to hide all of the caulking I’d done. Even though the white caulk blended pretty nicely with the light blue ceiling, it was still noticeable. Unpainted caulk tends to “flash” so that it’s visible at certain angles, like the row of caulked nail holes you can see below looking sort of dusty.
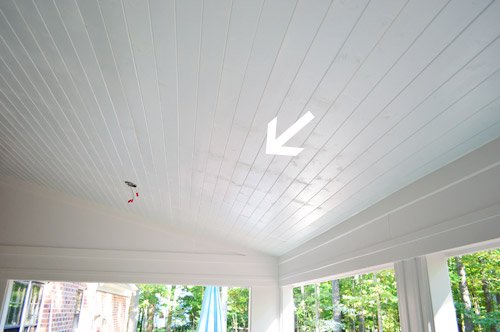
Painting a ceiling is one of our least favorite tasks, but since I didn’t have to edge this one (and it only needed one coat) it was actually pretty fast. I knocked it out in a hour while Clara was at preschool.
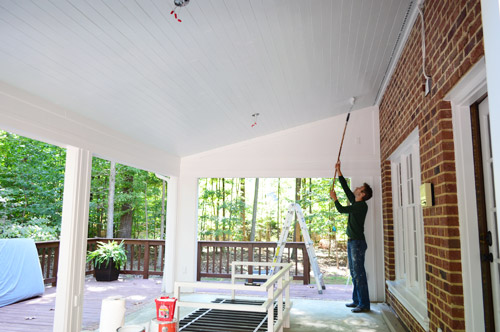
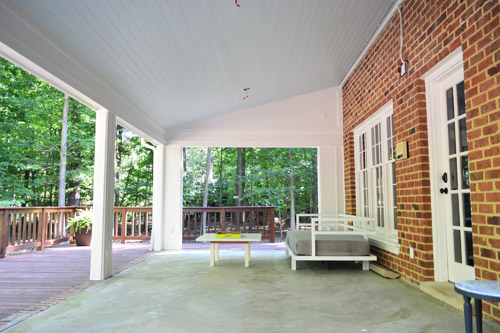
So yeah, not the most exciting updates in the world – but these little fixes really helped take our “completed” ceiling to being an actual completed ceiling. Oh except for maybe the missing fans part. Ignore that for now, and let’s just appreciate the difference between how it looked before trim/caulk/paint…
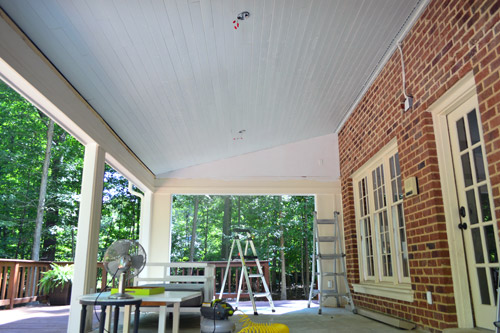
…and after.
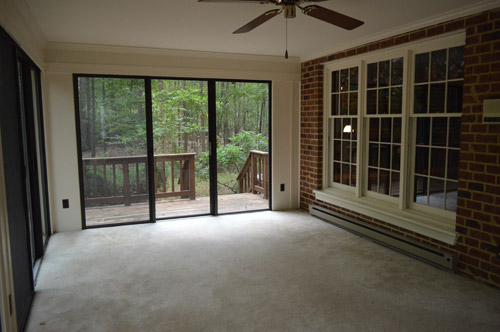
And of course I’d be remiss to leave without a before picture of the room when we started.
So we got to cross two more lines off of our to-do list, which puts us that much closer to the part that we’re looking forward to the most: the tile floor! Hopefully that’s on the docket to get done (er, well, started) this week so that we can have a update for you next week.
Rip up the old carpeting(more on that here)
Remove the sliding doors and tracks to open things up(more on that here)
Convert outlets to outdoor-safe rain-proof ones with covers(more on that here)Add fresh casing to the openings and caulk like crazy to waterproof everything(more on that here)
Demo the old ceiling in hopes of possibly lofting it (get a pro in here for advice)(more on that here)
Remove old beams, reinforce ceiling stability, and re-route electrical for two fans instead of one(more on that here)Prime, paint, and install our beadboard ceiling(more on that here)
Add trim around the ceiling and caulk/paint thatRepaint the columns & interior of the sunroom with white exterior paint (it’s currently cream)- Hang two ceiling fans
- Tile the floors (we bought something that’s outdoor safe and less slick than the glue-stained concrete here)
- Get a rug, furniture, and maybe even add some outdoor curtains and lanterns/sconces?
- Build an outdoor fireplace like this down the line
It’s funny how going into this reno we thought “well it’s not a kitchen or a bathroom so it probably won’t take that long” – yet it involved ripping out eight doors and a ceiling, adding all new electrical, installing a new ceiling plank by plank, painting a whole bunch of trim and windows and doors. And there are still fans and tiling to be tackled, as well as the dream of adding a fireplace someday. Turns out sunroom renos can be just as involved as a bathroom or a kitchen makeover. Who knew?

Courtney says
shake your tail feathers lol!
Misty says
This sunroom project gives me chills. It is beautiful! Seriously. I looove this house and all its potential. Don’t ever stop blogging you two!! Your my daily guilty pleasure.
YoungHouseLove says
Thanks so much Misty!
-John
Elaine - visual meringue says
I agree! I read your blog everyday! Love it – and love following along with your little (expanding) family. Thanks for the awesome blog and for letting us all into your ‘day-to-day’. You guys are great! xo.
Anele @ Success Along the Weigh says
Ugh, we hate painting ceilings too but at least it’s relatively smooth compared to doing the whole stippled ceiling on interior ones. (Bright side?) It looks much better all painted up (especially the windows and door!) so hopefully that’s satisfaction enough. :)
Mary | Lemon Grove Blog says
Nothing better than crisp, white trim! It looks awesome against the brick! Congrats again on the little bean – SO exciting!! :)
rashmi says
Very Nice! Its a going to be a great place to relax with the kiddos. Congratulations again !
Kelly says
Looking good!!! And of course, congrats on the baby news! So just curious – once all is done, are you planning to keep furniture and a rug out year round? Or just seasonally, and you will store during the winter?
YoungHouseLove says
I think since it’s under an awning and more protected than furniture would be out on the deck, we’re hoping to leave some of the core pieces out all year, but might bring in things like pillows or small accent tables and stuff that we might not want getting battered by the colder temps. We’re definitely planning to use outdoor furniture to help things hold up!
xo
s
CohoesMom5 says
Be careful leaving out soft items on the floor. We left our cushions out for two winters on our covered back porch. The first winter, they were piled on a small table and had no problems. The second winter, they were stacked on the floor and something nested in them. Did’t chew them but used the small warm cushions as walls for their nest.
Congrats on the new bean.
YoungHouseLove says
Oh no! Great tip!
xo
s
Amy says
LOVE the blue ceiling and the crisp white trim! It’s almost there guys!
Wendy @ New Moms Talk says
We de-trimmed our little girl’s room yesterday and it made a huge difference! All of the trim was uneven and left us wondering, “why did they put that up that way?”
Thanks to our fire pit, we then burned all of it. The joy of seeing bad trim burn yesterday was awesome.
Of course now we have to re-trim the room…once we paint it.
Roo // NEON FRESH says
Dang, Petersiks. That looks so good!
Kara says
Yesterday’s comment section was BANANAS so I’ll offer my congratulations again!! You guys are the sweetest and it’s been a joy to read you over my breakfast every day for so many years. I’m so happy for you and I’ll be praying that everything goes smoothly for you. Congratulations!!
Stefanie says
What a great space this is turning into. Perfect for these cooler evenings we’ve been having lately. Throw in an outdoor fireplace and you’ve got yourself a party!
Can’t wait to see where this room ends up once it’s finished. Having this kind of outdoor space is really a privilege that I hope you guys and your family are able to enjoy for many many years.
Also, another congratulations on the new addition. Another spring baby! Was it planned that way? My daughter was born in February…not ideal for birthday parties. I wish I had planned that a bit better. Haha
Rene @thedomesticlady says
I LOVE this “new” outdoor space. I would live out there.
http://thedomesticlady.com/2013/09/28/home-improvement-hollys-desk-makeover/
Kim says
LOVE it! After all summer spent adding beadboard and trim and painting our porch ceiling, I feel your pain!! Looking forward to the rest of the project – and congratulations, by the way!
Dusa says
Yes, I can totally see how the wider trim makes it look intentional and finished! Good call! And I’m loving that blue.
Abby says
Beautiful work and such a great idea for this space!
katie {deranchification} says
All of those finishing tasks make such a big difference. It’s looking great!
When I saw painting was involved, I was hoping y’all might have some super-duper-pregnancy-safe painting mask to recommend since I’m pregnant too and totally hate having to rely on my husband to get around to painting everything around here :)
YoungHouseLove says
I just use a heavy duty gas mask for quick outdoor projects (ex: spray painting something small). If it’s a longer project I just can’t deal with the mask (it feels like it inhibits my breathing after a while) so I just throw my hands up and admit it’s a job for someone else while I’m baby-baking.
xo
s
Embeth says
I use this respirator:
https://www.google.com/shopping/product/15879983304948134188?q=vapor+mask&client=safari&rls=en&bav=on.2,or.r_qf.&bvm=bv.53537100,d.aWc,pv.xjs.s.en_US.qH4g2czDPNQ.O&biw=1160&bih=873&dpr=1&tch=1&ech=1&psi=eYRNUpvIC4LQyAHp2YCgCg.1380811897781.3&sa=X&ei=fIRNUtG_J6S6yAHv5ID4AQ&ved=0CKcBEPMCMAg
We do a lot of renovations, so I already had it before I was pregnant. (We also have separate particle respirators.) My current filters claim to remove 99.97% of VOC’s, as well as a number of non-organic compounds. I’ve worn it so much over the last couple of years, sometimes I forget I have it on! (I have 5 weeks to go, and I’m getting tired enough now that it sometimes feels like my breathing is a bit harder with the respirator on. I just take a break then.)
YoungHouseLove says
Thanks so much for sharing the link! So helpful!
xo
s
Brit [House Updated] says
I totally agree that filling all the holes might not be glamorous, but it makes everything look so polished. What makes you guys use caulk for nail holes instead of wood fill?
YoungHouseLove says
We’ve heard from a few experts that wood fill can shrink up and for exterior stuff caulk (exterior paintable caulk – that’s important) tends to stay in place without “sinking” as much. I bet wood fill would work too as long as you built it up to be flush and then painted!
xo
s
Jayme says
It looks beautiful!! Congrats on the baby :)
Manda Wolf says
Thank you for the motivation. I have a ton of bead board, trim, chair rail, baseboards, and crown to caulk. I know things look so much better, but it is such a boring and picky job! We build a row of shelves in our living room last weekend and caulked it and while I had it out and did just a little bit of the bead board under it. What a difference! Now I just need to put on HGTV, pour a glass of soda (or wine) and had a date with the caulk gun, lol.
I am still so impressed on how far along the sun room is. What a difference. Are you guys planning to have an outdoor party sometime?
YoungHouseLove says
We’ve been having people over a lot (even with it half-done) but we’ll need to throw an official party once it’s finished! Although we’re not sure it’ll be all furnished until next year…
xo
s
Angel says
Love it, and seriously who can blame you for the project taking a little longer when you are working on it pretty much by yourself lol. Not that Sherry isn’t working hard – they say the first trimester uses as much energy as if you ran a marathon every day so…
Anyway one question, are you going to paint that little gray box/tube on the wall orange to match the brick, like you did at your first house?
P.s. love the new comment moderation – THANK YOU
YoungHouseLove says
Thanks Angel! We’re going to box little wire-fest out with trim! Can’t wait to do that since I keep worrying some bird is going to come along and chew on those wires or something. Every time I hear a squirrel run by I’m all “this is the enndddd!” in my head.
xo
s
Christina P (NS) says
It is all in the details, such small things go so far to making things feel complete!
It looks awesome though I hope I’m not the only one who initially very interested in your using a piece of bread in your caulking technique?!
YoungHouseLove says
That’s hilarious. Also…. mmmm, bread.
xo
s
Marissa says
Sherry,
I have been a long time reader and now a first time commenter, first let me start with saying that I am so truly excited for your now growing family! These are the milestones and memories that are the most important in you’re lives before best selling books and dream home purchases. I don’t read your comment feeds although this morning I was led to do so and what I read about your baby bump and photoshopping was absolutely repulsing. My heart hurts for John and yourself that your eyes would have to read such hurtful words. We are newlyweds and just recently first time home buyers and can I just say that allowing us into your home has opened up opportunities of ideas and traditions into our new home. You and John are the kind of people this world needs more of. Please don’t stop doing what God has led you to do in this blog and I beg of you that you not allow one of those degrading words become more to you than a giggle for the immaturity. Your family rocks!
-Marissa of Florida.
Alissa says
If there’s one thing you guys have taught me via this site it’s that it’s those finishing touches that really take a project from okay to amazing. Thanks for the reminder that putting in a little more work and elbow grease can have AWESOME and PRO-LOOKING results. Looks beautiful! Hope winter holds back a little longer so you get some chances to enjoy it this season. :)
Bethany says
Did your heater fall off the side of your house? In the “after” photo, it doesn’t look like it’s in the best shape ;) Do you plan to paint it, or do something different? I’d love any heater-painting tips, if you have them – we’re painting all of the baseboard heaters in our house – a slow and tedious process!
YoungHouseLove says
Haha! It was never functioning (the inspection also pointed out that it was teetering off the wall) so whenever we move the daybed out it would flop onto the floor. Poor guy. We’re going to be removing it since it’s not a working heater, but for painting them I’d imagine high heat paint would be important. Anyone know?
xo
s
Rachel says
My parents house had baseboard heat in all the rooms and my mom always painted it with the same paint as the walls. They’ve been in the house for about 25 years and paint has never peeled off any of the heaters, and there have been no issues (though some have been repainted as room color changes). I know she would sometimes buy spray paint in the same color (or have it color matched) to make the process easier, but never used any sort of heat safe product. Hope this helps!
Leah says
We have radiators in the work-provided housing where I live. People just always use normal paint to paint them, and it seems to hold up just fine.
What doesn’t hold up fine, however, is the paint on the hot water pipes that go to the radiators on the next floor (true facts — we have hot pipes in almost every room. Thank goodness for insulation). Those pipes must get a lot hotter, and the paint sometimes bubbles. We just paint over it anyway and try not to look too hard.
YoungHouseLove says
So interesting!
xo
s
Jessica says
Rustoleum makes an oil-based paint for metal that works great. You don’t even need high heat for baseboards.
Renee says
With most heaters (at least with forced hot water), the baseboards aren’t in direct contact with the boiling water, so you don’t need to use a high heat paint. Any oil-based rustoleum product will work. I used Sherwin-Williams’ equivalent, tinted to my trim color.
Mara says
Looks amazingly awesome. The white really finishes it off. Can’t wait to see what lights/fans you guys picked out!
And John, you photoshopped that belly, didn’t you?! :)
schmei says
OMG! SecretBurrito??
Kimberly says
Lookin’ good, lookin’ real good. :) As annoying as I’m sure re-trimming was, the large trim looks so much better! And the light blue ceiling really pops now that you’ve painted the sides.
Amy Shaffer says
Just stunning. Love this space! I wish I had your eye. :)
Shannon Rode says
Nice work! You guys just make me happy reading about your posts. Let’s just be friends, m-kay? Keep being you and doing the things you do, you are all great!
kami says
It’s so pretty!! Now you need to have a party!!!
Also, happy congratulations on your new little kiddo that’s on it’s way. I’ve never been so excited for strangers to have a baby! That translates into super weird or super cool. I’ll let you decide…
Stephen says
Do you have any plans or ideas to hide that wire that extends up between the door and windows? I have a similar situation (even exterior brick) and I figured I’d wait and see if yhl tackles it :)
YoungHouseLove says
Oh yes, we’re going to box that in with trim! Can’t wait to do that since I keep worrying some bird is going to come along and chew on those wires or something. #paranoidpregnantlady
xo
s
Stephen says
I look forward to seeing it! Haha your blog is so great and funny! Keep up the great work!
Laurie says
You’re right, these are those little details that make a huge difference in the end to “finishing” the work.
It is looking beautiful!
I’m so impressed that you patiently caulked the ceiling and then painted it. Anything on the ceiling makes me whine uncontrollably.
kate says
this is one of my favorite projects that you guys have tackled thus far, just because i never expected that space to be transformed in such an awesome way. my in-laws have a patio space that’s similar in concept and it’s my favorite part of their home — we spend all of our time there when we visit. you will totally be able to continue shaking those tail feathers every time you’re out there!
Jade Payne says
Dude! Love this ceiling so much more than a ceiling should be loved!
Georgia says
I missed out on the congrats yesterday. My new job as a teacher is really messing with my blog reading hours! So congrats! Clara looks ecstatic. I had a suspicion…
Loving this sun room John. I hate painting ceilings too, but I love a freshly painted one! The trim looks great. The whole room looks great…can’t wait to see the floor. I can’t believe how pink those triangle areas look with the reflection off the bricks. I’m sure the colour of the floor will change the ceiling somewhat.
Kimberly @ Turning It Home says
Brownie points to John for the “while carrying my baby” comment. My husband would give me a hard time if I lifted anything remotely heavy (a plastic lawn chair, specifically) while pregnant. And Sherry, I wouldn’t (and couldn’t) hold back doing projects either while pregnant. Picture a goofy looking gal with a big belly and a gas mask on white painting in the front yard. I even got caught attempting to mow the lawn once. Ha!
Super excited for you guys! :) Oh yeah, and the sunroom looks AWESOME.
Maggie says
you guys are just amazing. I love how you bring your ideas to life in such a real way, and the fact that you share it all with us is just awesome! I have been reading your blog since you lived in your first house and it has been so inspiring for my husband and I to see everything you have done. I also really appreciate how graceful and kind you are, even when people are being disrespectful to you and your right to privacy. You set such a positive example for your daughter (and baby bean!) and for everyone who reads your blog. Congratulations on your amazing baby news, and thank you for being so lovely! :)
YoungHouseLove says
Aw, thanks so much Maggie!
xo
s
Kelsey says
Ah, it looks so good to finally get rid of that cream! I bet you’re breathing a sigh of relief to have everything painted nice, clean white. In the photos it’s hard to tell much of a difference between the blue ceiling and the white walls. Is it more noticeable in person, or is it a pretty subtle difference?
YoungHouseLove says
It’s pretty clearly a different color than the walls, although we didn’t want anything too heavy/blue because we thought it would reflect into the adjoined living room (didn’t want that room to get a blue cast).
xo
s
Tina says
You guys are my inspiration. Our house is pretty similar to yours. I whitewashed my fireplace last week (although i didn’t care for the end result–yours looks amazing though–so I just straight up painted it.) Can’t believe I lived with that dated brick for 9 years, it really brightens up the room now Now I am dying to take a sledge hammer to our dingy, dusty screened in porch to make it more usable. What do I do?!
YoungHouseLove says
Hmm, I’m always of the what-can-I-remove, what-can-I-paint, and what-can-I-redo mindset. So try staring at your screened porch and seeing what you want to lose, what can stay and get painted/altered, and how you can redo things (ex: adding outdoor curtains and a cozy outdoor rug, etc).
xo
s
Amber says
Loving the updates. The trim and paint makes a huge difference. I keep telling the hubs when we update the doors in our house, we are replacing all the builder grade trim. I finally got him onboard last night with the huge difference it makes.
So…How much of a relief is it now to openly talk about Sherry’s pregnancy? Must feel like a breath of fresh air.
YoungHouseLove says
OH MY GOSH! We can breathe again! And I felt a kick for the first time last night. It’s like the baby said “ok, the secret’s out – I can get crazy”
xo
s
Laura @ Rather Square says
I’m really impressed that you had the fortitude to take apart the trim work when you decided it wasn’t working, after taking the time to put it up in the first place. I agree it looks so much better. Sometimes it’s hard to know if something is worth the effort to re-do, or just try to live with it.
GreenInOC says
So glad you switched out the trim – it looks soooo much better! This is the part of actual DIY that would make me cry, doing all that work only to have to start over. My speed of DIY is paying someone (yes, I know that negates the DIY but let’s play along!), so that when something like that happens, there are no tears!
The whole project looks amazing!
Tricia Cartner says
When I saw the first photo, I thought, “Man they should have gone with the thick trim on all 3 sides of the triangle.” I’m so glad you guys agreed! :) It looks wonderful and I picture this being one of your favorite spaces when it’s finished. Nothing like an outdoor dinner party!
Katie says
You guys are amazing and such an inspiration to me to do DIY on my own house to make it a home! My husband and I decided we are going to pait the trim around our windows inside our home. They are a natural yellowy wood and we want to paint them white for that clean crisp look to update the home. Do you have any recommendations on how to go about doing this? I realize you painted the outdoor windows that were already painted but just thought I’d ask to see if you have any ideas.
Also, Congratulations on the wonderful news yesterday about your growing family!! I’m so happy for you both. Thank you for all you do with this blog. Like I said its truly an inspiration for DIY and basically life in general. You guys are the best!
Thanks :)
-Katie
YoungHouseLove says
Aw thanks Katie! I would sand them gently and use a liquid deglosser if they’re super shiny/sealed but if they’re dry and sort of chalky you can go right to primer. I’d go with a stainblocking primer (Kilz makes one that’s water-based which is less fumey than the oil-based stuff) and then just use latex paint in semi-gloss. Good luck!
xo
s
Jess says
Dude. The white windows/door are SO much nicer! I didn’t even think they looked bad before, but man – that before & after proved me wrong :) Nice work!
Tonja M says
The magic of white paint!! Even if you did nothing else it still looks 100% better!! Congrats on the new bean!
Carrie -WorthPinning says
Ohhh…outdoor curtains and sconces. It’ll be so cozy! Congrats on the baby news.
FR says
This seems to be one of the most transformative (apparently that isn’t a word)makeovers you have undertaken. Talk about creating a beautiful and unique space. Can’t wait to see the finished product. I’m envisioning it as a great birthday party space for Clara and future bambino!
Alison McP says
It is seriously looking so great, you guys! We are in the final stages of painting our kitchen cabinets and can so relate to the “I thought this would be done by now” feeling. Like, we are ONLY slapping on some paint (really carefully… and sanding took for.ev.er since we had knotty pine cabinets that had a super shiny finish). Each step we finish, we celebrate then realize that we still have so many tedious steps to go! Love your space though! <3
Michelle | Birds of Berwick says
Good call on the beefier 1×4 trim. Going back and redoing it bites, but to me it’s really noticeable how much better it looks. The white looks amazing too. You can tell you guys are really going to enjoy this space when it’s done!
Steph says
“Sherry and I usually tag-team steps like this, but outdoor caulk is too VOC-filled to inhale while carrying my baby, so I gladly flew solo.”
Adorable. You guys are adorable. You got a good one, Sherdog.
The sunroom looks so good. Such a cool project. :)
Larissa says
That was my favorite part, too.
Janelle @ Two Cups of Happy says
Swooning over here at that line!