Isn’t it strange how you can start a project (in this case the gallery of frames that we wanted to “wallpaper” our hallway walls with) and then just leave the other half of it undone for a month. Not weeks. Literally a month. What’s wrong with us? And it’s not like we weren’t obsessed with the results of the first half of the project (recounted here):
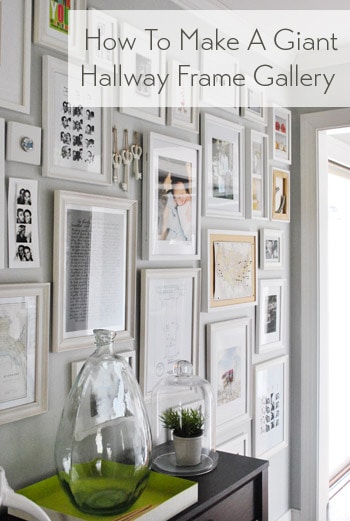
We just ran out of frame gas or something, so we switched over to console building and chair painting and closet organizing and ceramic dog gluing and tree trimming and sectional leg spray-painting and all the other odd things that we’ve tackled since our little wall-hole-making spree. It’s so weird. What possesses DIY folks to work in fits and starts like that? Oh well, who cares, we’re back on the frame-hanging bandwagon now. All is right with the world.
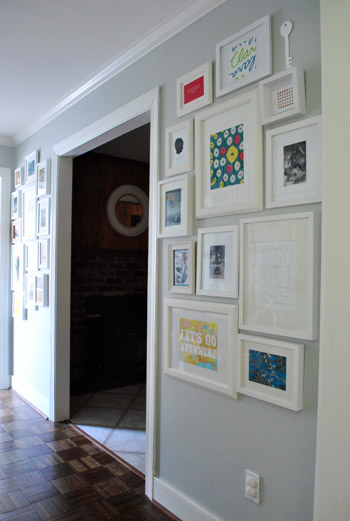
Yup, after a month of staring at taped up newspaper templates and a big ol’ stack of frames on the floor we finally mustered up the motivation to hang them up, thereby completing the big hallway o’ frames. Booyah. Here’s the whole shebang:
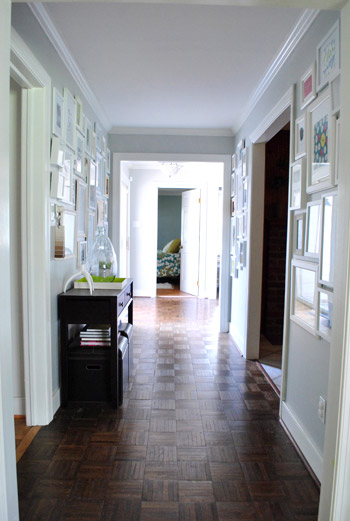
It’s everything we imagined and then some. And it only took a few hours of hammering and hammering and hammering and framing random sentimental objects (and my birthday prints) that I lurve. As for where the frames came from, we already owned around 10 (originally from Ikea and Target on clearance) and we also picked up 14 new ones from Ikea (thanks to a sweet b-day gift card from the fam). Although all of the frames aren’t the exact same shade of white, it’s a soft layered look with some creams and other more crisp white tones that just seem to work even though they don’t match perfectly. We even embraced the whole “layered and different” theme and picked new Ikea frames in varying styles (some more modern and some more decorative or traditional).
We already explained the template-making process of creating a frame wall here, but John thought we should throw in a tip about where to put the nail (with pics, because that’s how my brain “eats” info). First John measures down from the top of the frame to see how many inches below the top the nail will actually sit.
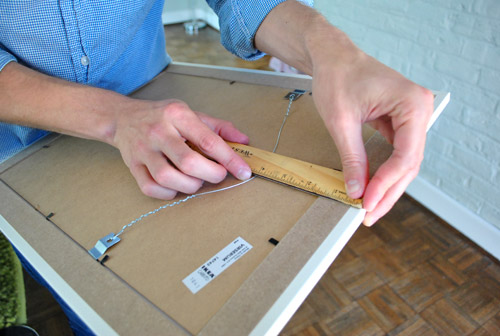
Then he finds the center of the newspaper template and measures down the same amount (4″ in this instance).
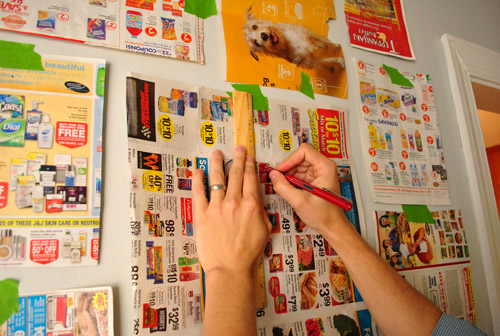
He marks the template with an x, and then just hammers right into that x and through the template.
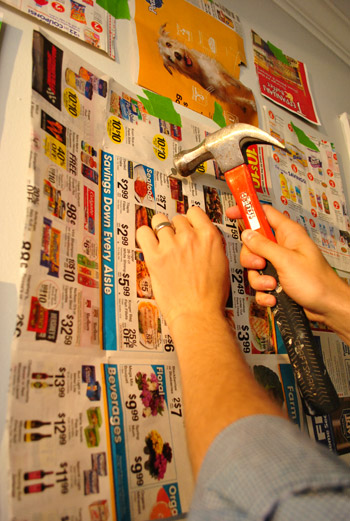
Once the nail’s in the wall in the right place, he rips the paper template from the wall and slips the frame onto the nail. Bam, a frame in the exact spot that we had the template. Yay math. Or yay rulers. Or more accurately, yay smart hubby.
Oh and you’ll notice that we started with the big frame in the middle of the arrangement (which we intentionally planned for that spot to sort of balance and ground things) so that’s another tip. If you start from the center and work out from there all the frames won’t migrate left or right or up or down as much since you’re starting in the center. And choosing a big frame for the middle should help things feel kind of balanced and well-planned (even if the edges of the smaller frames around it don’t line up and it’s more of an asymmetrical layout from that big frame on).
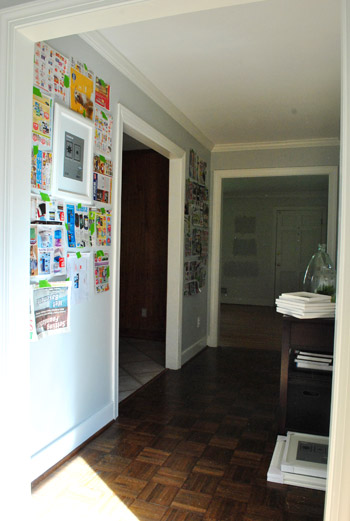
Here we have all of the frames hung without any art. Except for that backwards canvas on the left. Yup I hung it with the wood on the back exposed instead of the front canvas side (I taped a pic of J & I into it a while back and liked the raw kind of rustic look). You’ll also notice a few black and white photos that we used to have hanging behind the sofa in our old den in 8 x 10 frames (some of them were now hanging sideways though, so there was still some work to be done on those).
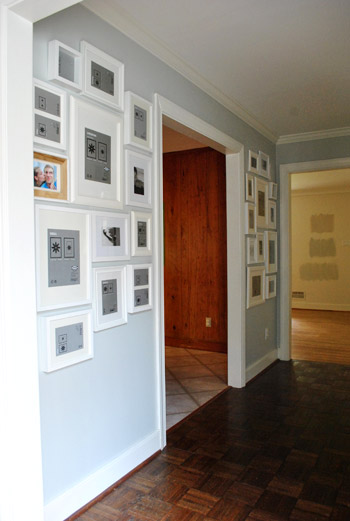
Here’s another angle, just because I like to pretend I’m fancy with the camera.
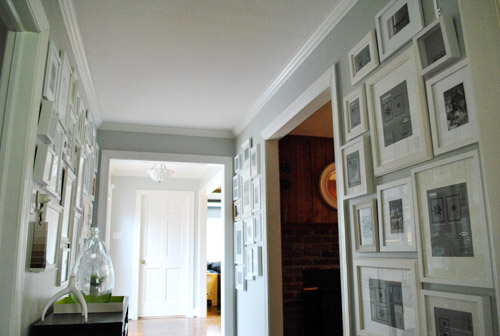
And yet another art-less frame POV of the whole hallway:
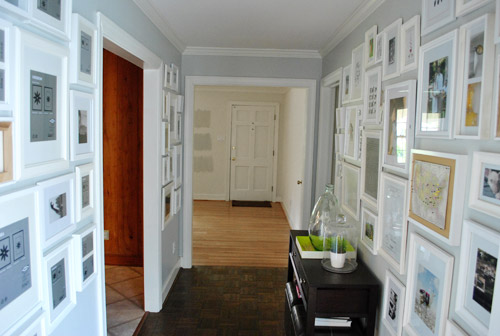
Oh and when it comes to babyproofing, we do plan to add heavy duty Command velcro to the lower frames that may be within Clara’s reach when she starts toddling around. She’s a pretty docile girl who definitely seems to listen when we ask her to be gentle (when petting her big brother Burger for example) so our plan is to sweetly request that she be nice to the frames and “look with her eyes.” But of course if we think those few low frames ever start to pose a safety hazard (or even just become too high maintenance for the way we live) we’ll definitely just get rid of them until the bean is a little older.
Anyway, back to the after pics. Here are those frames full of stuff that we already had (from these sweet birthday prints that I got last month to a ton of sentimental keepsakes, photos, and even some pretty non-traditional items that we’ll get to in a minute).
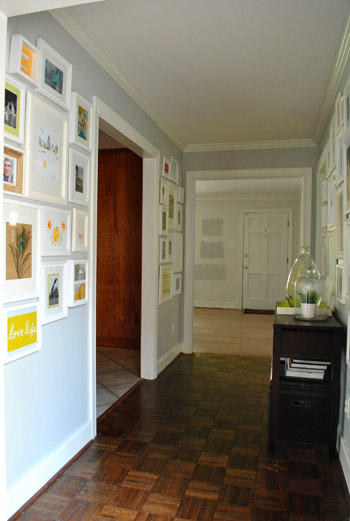
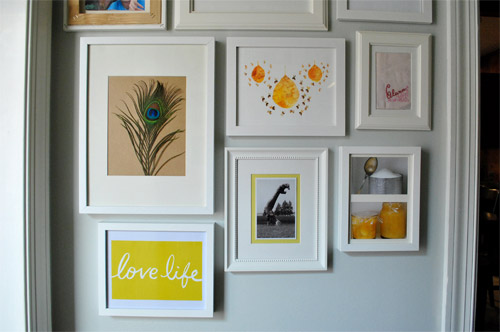
Here’s a closer look at the little gallery on the left side:
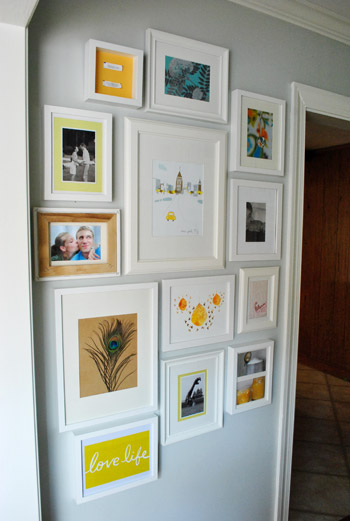
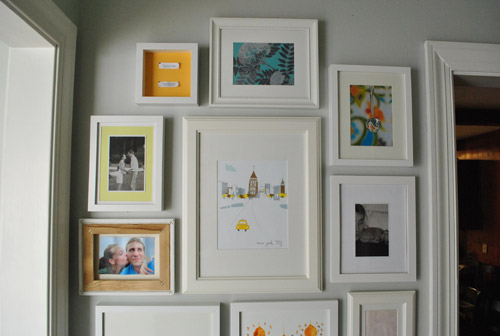
It’s full of everything from craft paper with two fortune cookies taped to it (top left) to a black & white wedding pic and even a sweet artsy photo of a water droplet in front of some patterned fabric (top right) that was snapped by my friend Laura.
The bottom half of the arrangement has an old craft store peacock feather (I didn’t even put that on paper, the tan color is just the naturally-toned-frame-back showing through the glass), my sweet Etsy bee-day print from John, and even a book cover (remember he also got me a book called Love Life for my b-day? I just took off the paper dust jacket to reveal the pretty cloth cover beneath it, and then decided to repurpose the paper cover as art).
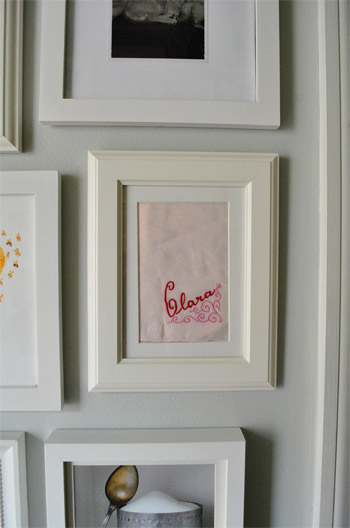
And see that light pink rectangle with Clara’s name on it? That makes me melt. It’s a cute vintage hankie that happened to be embroidered with her moniker. A good friend of ours (thanks Terri!) couldn’t help grabbing it when she realized it was such a coincidence to find something with her name on it. It’s actually really rare to see Clara on anything (they never sell Clara magnets or keychains in stores). I love it so much, and framing it is perfect since the bean doesn’t exactly grasp the whole nose blowing concept yet.
Now we’ll move over to the little gallery on the right side.
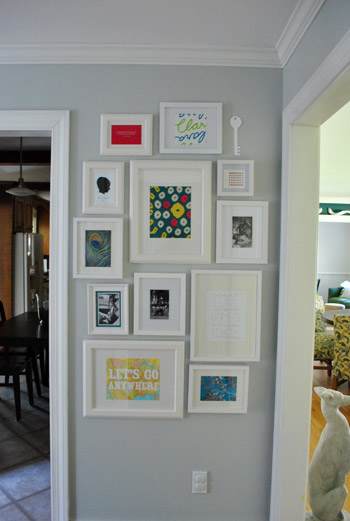
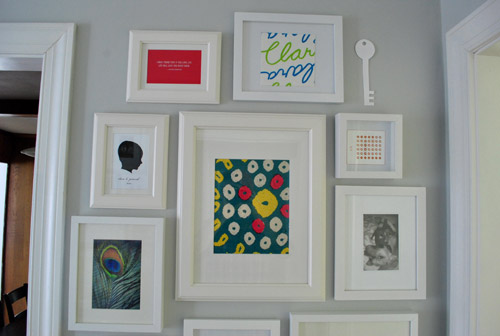
The picture below makes me realize that if I’m ever bored I want to move every frame about an inch and a half to the right. Never noticed it “in person” but it seems to hug the doorway on the left a bit more closely. Isn’t it funny how photos make you see things you can’t ever see right in front of you? Anyway, on this side we have our card stock place-holder key that used to be taped up on the other side of the wall, which we have big plans for (someday I want to DIY a white-ceramic-looking key with clay from the craft store). We also framed everything from an old fabric swatch, a quote that I wrote out by hand, more black & white family photos, and even a silhouette of our bald girl.
Here’s a closer shot of the handwritten quote. I love how soft it looks while other things on the wall jump out. It makes you want to lean in and read it (kind of like how you lean in and pay close attention when someone whispers a secret to you).
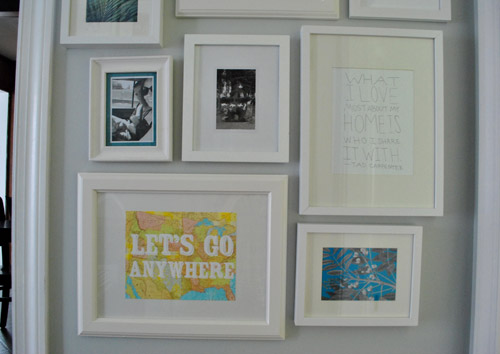
It’s a quote by Tad Carpenter that I found on Pinterest (where I’ve been living lately, haha) that’s originally from here. I loved the idea of penning something that meaningful in my own chicken scratch handwriting and glorifying it behind glass for all to see (although I spaced it out a bit differently – in 7 lines instead of 8 – to better fit my frame). And yes, that’s a Burger foot (and somebody needs to get his nails cut). He likes to sneaking in photos any way he can. I can’t tell you how many dog-butt-in-the-background shots don’t make the blog.

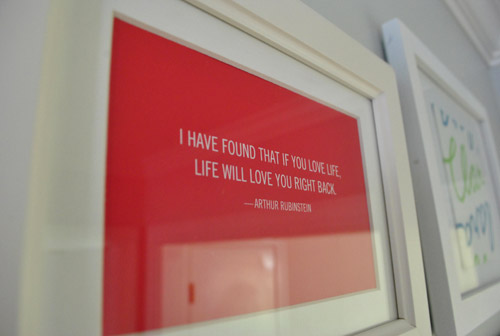
Oh and here’s the back of the Love Life paper book jacket that I also decided to frame. Waste not, want not, right? Only the tiny spine of the book cover was tossed into the trash since I used “all other parts” of it for the frame wall. Haha. It’s a quote by Arthur Rubenstein that says “I have found that if you love life, life will love you right back.” It’s true I think.
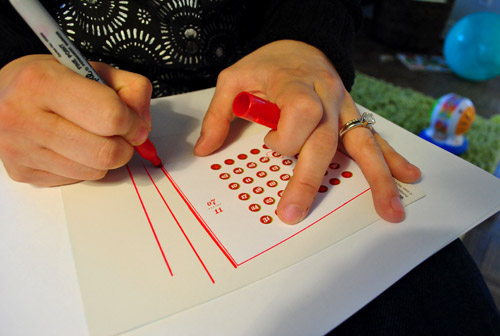
Here’s another quick little making-art-from-something-else adventure. We had these charming little desk calendar pages around for each month of the year (from here) but we always deferred to our day planner and my iPhone instead of using/enjoying them. So I took the one for July and drew a thin red frame around the outside of it with a red Sharpie. Remember when you used to color the edges of paper like that to make straight lines on other pages beneath it in grade school? I did that all the time. When I wasn’t doodling Steven’s name (my elementary crush, oh how I longed to hold his hand with my marker stained fingers).
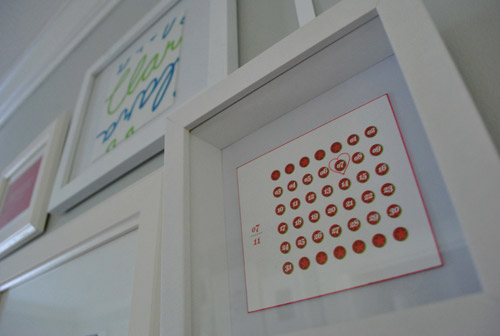
Then with a thin red pen I drew a heart around the 7th. Because we were married on July 7th, so it feels like a sweet way to honor that special day with something beautiful that we already had on hand (which was shoved into a drawer instead of being enjoyed).
And here’s a funny story about that fabric in the middle. It was actually used as “wrapping paper” from a friend (she didn’t have conventional stuff around but she had that fabric sample so she made it into a little gift pouch). How chic is she? I liked it so much I put a ring frame on it.
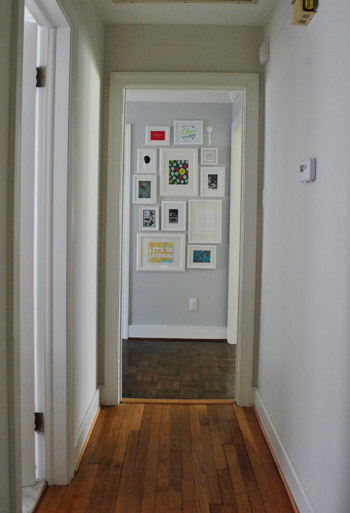
One of the fun things about the frame wall is that it’s visible from the hallway that leads to Clara’s room, the hall bath, the playroom, and the guest room. Makes me smile every time I walk back out towards the kitchen. Even when I’m carrying a bunch of laundry or happened to have just stubbed my toe on something. Seriously, the frame wall is like Prozac to me.
So there it is. One project finished.
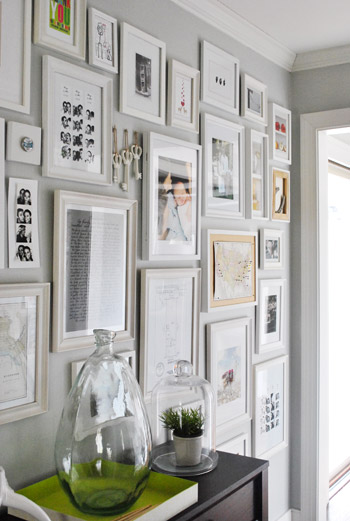
Except we’ve only just begun because I’m sure we’ll end up switching everything out a million times. But that’s kind of the fun of it. I can’t wait for Clara to make me some scribbly art for me to proudly display.

Have you guys framed anything unusual lately? Do you have special memories stuffed into a box or a drawer that you’re dying to get behind some glass? Did you have an elementary school crush on a boy named Steven? Are you Steven, my long lost love? Haha, just kidding. We’re friends on Facebook now. It’s all very PG and he knows I no longer want to hold his hand.

Becky says
Gosh you guys always do such beautiful work. And you’re adorable to boot! I have been wanting to do this in my house forever. Ikea is about to be depleted of its white frames! Do you mind sharing the name of the greyish paint on the walls behind the frames, too?
YoungHouseLove says
Aw thanks Becky! It’s Moonshine by Benjamin Moore. Good luck!
xo
s
Robin says
I found something new for one of your frames :)
State Pairings
http://www.designsponge.com/2012/01/state-pairings-by-jhill-design.html
YoungHouseLove says
So cute!
xo,
s
Robin says
NJ & VA? A match made in young house love heaven!
Abby says
Can you post your copy of the quote by Tad Carpenter (with your spacing)? Thanks.
YoungHouseLove says
I just sketched it out, so it’s not a photoshop file or anything! Hope it helps!
xo,
s
Claire says
Do you every wish you had hung all of the frames solely with Command velcro, or are you happy you used nails? It seems like just using the velcro could make switching things around really easy. I want to do a wall like this and I’m debating between Command or actual nails…
YoungHouseLove says
I think we like nails since it feels more secure over the long haul? And buying over 200 tabs of command velcro could get pricey (nails are like a cent each and you’d need at least two velcro tabs for each frame). Might just be personal preference though, so I hope it helps!
xo,
s
Lynn says
just found your blog through…Pinterest. Love your gallery wall, I am working on mine and found so much inspiration from yours! Thanks.
Sarah says
This is amazing! I’m def doing this..just need to get the motivation! Thanks for sharing! :)
Michelle Ha says
Hi! love this wall and I love the color. Could you please tell me the name of the paint. That is the perfect shade of grey that I want for my living room! Thanks!!!
YoungHouseLove says
It’s Moonshine by Benjamin Moore. Hope it helps!
xo
s
Michele says
Can I ask where you got the table you are using under all the pictures? Just what I’m looking for!
Thanks
YoungHouseLove says
That was from Target a while back. Called the Manhattan Console or something?
xo,
s
Adrienne says
Hi! I’m sorry if this was already answered in the comments, I tried to skim through, but didn’t see it. Did you guys spray paint the frames to all be the same colour of white? We bought those Ikea frames too, but have found they are more of an off white (which doesn’t match the true white wood of the crib we have – the same one you have :)). Did you get them all to a consistent colour or just go with the differences?
YoungHouseLove says
We embraced the layered tones and kept them as is! They aren’t all the same white but it’s charming that way. Hope it helps!
xo,
s
Erin says
I love this idea! We have a HUGE wall in our dining room, and wanted to use it to hang family photos, but were at a loss as to how to go about it. Now I see – just wallpaper the wall with ALL our photos, and we don’t need to hide any away in a box! Now we just need to pick a frame color. Hmm…. peachy/orange walls, maybe a natural wood frame? Or basic white… Or spray paint them all a teal to contrast (lots of Mexican art on other walls in the room) Can you guys come over and give me some ideas? :)
YoungHouseLove says
Haha, sure, be right over! All of your ideas sound fun, I’d just bring home swatches and see what you like best!
xo,
s
Jessica L. says
Oh my word! I love the little hanky with Clara’s name on it. I love uncommon names, except for when trying to find items with my son’s name- we named him Oscar because I adore that name….but, like you, I struggle to find anything with his name already on it. Cheers to uncommon names! :)
Victoria B. says
i love your gallery wall, it’s inspired me to create my own on a big blank wall we have in our family room, thanks!!
Pri says
I love this idea – you guys have done a great job!
I especially like the hankie with Clara’s name on it, very sweet. It’s inspired me to do something similar, but I’m going to incorporate a few old mirrors that I have… They’re too small to be of functional use, so I figured I’ll just dot them here and there in amongst everything else. Also, that gorgeous hankie makes me want to take up needlepoint! : )
Love reading your blog, thanks for the ideas!
Tara@StopandGoDriving says
Another great tutorial for us. Thanks a lot!
Melissa says
Hi! I recently discovered your blog and I am addicted! I now have a wall full of white paper templates and frames all over the floor of the dining room! I have a question though. You mentioned a future DIY of a faux ceramic key thing and In the more recent pictures you do have some cute little white keys there. I can’t seem to find a post about how you made the keys though. Is there such an entry? Or any ideas on something similar and non-frame-like that I can hang among the rest of the frames? My frames are all black since that is what I had on hand. Thanks!
YoungHouseLove says
Those were actually just keys we found at a secondhand store and painted white (they were black iron). Hope it helps!
xo
s
Alisha Luxford says
We were married on July 7th too… but in 2007. <3 Love the idea in it's entirety! You've got so many wonderful tutorials. We've just bought out first home, and I hope it turns out half as nice as yours! I've been pinning and reading your blog like crazy! Thanks!
YoungHouseLove says
Yes, we were married on 7/7/07 (first date on 7/7/05, first anniversary on 7/7/08). Seems like a really popular day!
xo
s
Alissa says
How on earth did you hang your smaller Ribba frames…The ones that don’t come with 2 clips and a wire? I’m trying to make a mini-collage wall for our soon-to-be nursery, and I can’t figure out how to hang the dang frames! I’ve googled but haven’t come up with much. Thanks in advance for your help!!
YoungHouseLove says
Two nails that the top rim hangs over (maybe 4″ apart) seems to work really well. Just make them level and hang the whole thing off of them. Hope it helps!
xo
s
Susan Benavides says
For the longest time, I have been planning to hang frames on my walls but don’t know where to start. How do you decide whether to use all white frames or black? Do I buy the frames first and then fit in the photos or do I group the photos and then buy the frames? Any suggestions would really help!
Cindy says
I want to hate you two, but you’re just so darn talented and cute! After several years of stalking your blog, I figured out the difference between S&P and most of the rest of us… you put the “do” in “do-it-yourself”. You may not know what your doing sometimes (as you’re usually quick to point out), but you set your mind and figure it out. Of course having an an art background -ahem- doesn’t hurt, but I won’t hold that against you. Thanks for all the amazing before and afters (so satisfying) and ideas. I can’t wait to see the book.
(ps-try actual picture hangers…!!! They really work!)
YoungHouseLove says
Aw shucks, thanks Cindy! You’re so sweet! We’re definitely into “if you don’t know what to do, just do something!” – it’s amazing how trial and error can get you somewhere amazing!
xo
s
Erica says
Thank you SO much for sharing this method!! I had wanted a gallery wall for so long but was so intimidated to try and this gave the courage to give it a go.
We just completed our gallery wall and are thrilled: http://patioliving.tumblr.com
Thanks again!! :)
Christine says
This looks amazing! how did you hang the smaller ikea frames? I notice it only comes with one clip on the back.
YoungHouseLove says
Sometimes we use the hanging wire they come with or just use nails and rest the back lip on them if it’s a deep hollow-back frame (two nails on the same horizontal plane keep it straight and non-tippy).
xo
s
Tenaj says
I love this post. We have been living in our apartment for just under 2 years. It wasn’t until 2 weeks or so ago that I FINALLY hung our first picture. Then I hung 2 on either side. I have a wall just at the beginning of my hallway that I dream of filling with pictures.
As this is a rental, and we’re hoping to not be here too much longer, I may never realize that dream. Plus, I don’t want to do too much damage to the walls.
Anyway, this is very inspiring. Makes me smile. I think I’ll begin a collection of things I’d like to frame. Maybe even purchasing a frame here and there to begin my collection.
Thanks!
Joan A Hamilton says
I loved the way you explained how to do this. It can be a daunting task for the art lover who wants to beautify their home with art. Eyeballing it does not work lol!
I have followed your blog for almost a year and have really enjoyed it. It always makes me smile! :)
I like it so much that I mentioned it in a blog post of mine today about “Another couple of options for people looking for inexpensive original art.”
Here is the comment: “My favourite DIY blog is Young House Love. Their new book Young House Love is very popular because of their engaging personalities (and those of their ‘children’ Clara their toddler and Burger the dog), their enthusiasm and sheer ‘down to earthiness,’ about them. You should check them out. They’ll either make you smile, or make you feel energized and creative.”
Thanks again and looking forward to hearing about your exciting projects, your house tours and about how family life is going.
Cheers,
Joan
YoungHouseLove says
Aw thanks so much!
xo,
s
Backie says
Hi guys,you’re always such an inspiration!
I planning on hanging frames and pictures a bit all over my house and cited your gallery here on my planning post http://pecionate.blogspot.it/2013/03/idee-sulle-pareti.html
I hope you’d be proud to land in italy :P
Thanks a lot!
YoungHouseLove says
So proud! Thanks so much Backie! And good luck with that gallery wall!
xo
s
Naomi says
Hi guys!
My boyfriend and I just bought our first house in Portland, Oregon (1939 ranch, adorable) and I am dying to do the frame collage. Inspired by your thriftiness, I scoured craigslist and found 111 frames for $35. That’s right 111 frames! All different sizes, high quality, perfect for the project! I had to drive 2 hours into the countryside to get them, but that is SUCH a deal! And I’ve spent the last 3 days spray painting all of them white.
Thanks for the inspiration!!!!!
YoungHouseLove says
So awesome!
xo
s
billie says
Here’s my question…..I love ikea frames but they are always weird dimensions. How do you compensate for normal American sized prints??
Thanks!
YoungHouseLove says
We use Ikea frames so often but I know what you mean about sometimes things being too big or too small. Generally if something’s a little too big you can just trim it to fit, like we did here. And the mats frame it out nicely for the most part.
xo
s
Marie says
I framed the Marshall Field’s (http://en.wikipedia.org/wiki/Marshall_Field%27s) logo from an old clothing box. When Macy’s bought the Chicago line about 10 years ago, all native chicagoland-ers were furious because they dropped the Marshall Fields moniker. We live in California now so it’s a special reminder of home and the rich history of it. It will soon again live on the wall with several other framed items, not unlike your wall, but in black. I never thought of that as a form of decorating until I read this post!
YoungHouseLove says
So sweet!
xo
s
chaz says
LOVE!!!
Lindsey says
How far up from the floor do you suggest the frames ending at? I wouldn’t want them too low but I also don’t want it to look incomplete. Your gallery wall looks perfect!
YoungHouseLove says
We ended ours about 12″ from the baseboards in most cases (although it was flexible, so some things went higher or lower). Hope it helps!
xo
s
Noonie says
Just found your blog, and I LOVE everything I’ve seen!! :) You’ve definitely inspired me to want to create my own little gallery! I love all the personal little touches you’ve added..so cute!! :) Thank you for sharing!!
<3 Noonie @ BSOM
YoungHouseLove says
Of course, thanks for the kind words Noonie!
xo
s
Julie says
I love your gallery and I love your website! My husband has this thing about finding the stud in the wall every time I go to hang something. So tell me – how does one little nail hammered into the X on your template hold up the picture? They can’t all be on studs! Please share so I can get started on one really blank wall crying for help!
Thanks!
YoungHouseLove says
We’ve found that we only need to hit studs if something’s substantially heavy (small frames can even be held up with 3M command strips). Even if something’s heavier, we can use heavy duty anchors if we don’t hit a stud (they sell those to hold heavy objects that can’t be aligned with a stud). Hope it helps!
xo
s
Kelly says
I apologize if this has been asked already…but this book you speak of…”Love Life paper book jacket”…is this a book full of quotes? Or is it a book by a different title? I LOVE both of those quotes. We are in the process of creating a forever-and-a-day wall too ;)
YoungHouseLove says
It’s a book called Love Life with that on the cover and it has other awesome quotes inside.
xo
s
Sara says
Where did you get or how did you make the frame with the map? I’ve been trying to do the same thing using pins in all the states I’ve been to. Thanks!
YoungHouseLove says
Here’s a post with that info for ya: https://www.younghouselove.com/2008/02/the-frame-game/
xo
s
marisa says
Sorry if you’ve already answered this – I looked for a similar question in the comments but didn’t see it.
Anyway, how did you hang the smaller Ribba frames (5×7 or so size) They don’t come with hanging clips and wire like the larger ones. Just wondering because I can’t figure out a safe way to hang them and thought you might have a good solution. Thanks!
marisa says
nevermind////i guess i didn’t scroll all the way through the comments. Just saw that you used two nails for the smaller frames. It seems like kids could easily pull them off, though? No?
YoungHouseLove says
Anything at kid-height we also added 3M velcro to the back of the frame and the wall. It made a nice tight bond, so an adult would need to really yank on them to get them off (Clara wasn’t strong enough to release them that way).
xo
s