Alternate punny post title: Joist to the world. (I’ll pause while you golf clap)
Good news! My dad made it back from my grandma’s house in West Virginia so operation double-up the girders and bolt them to the posts was able to commence with him at my side. As I started to tell my dad “Okay, you’re going to hold the board in place in the air while I drill pilot holes…” he cut me off and suggested we just put both girder boards on the ground, nail them together and that way they’d both rest on the notched posts – no air-hold required. Smart. I knew there was a reason I picked him as a father.
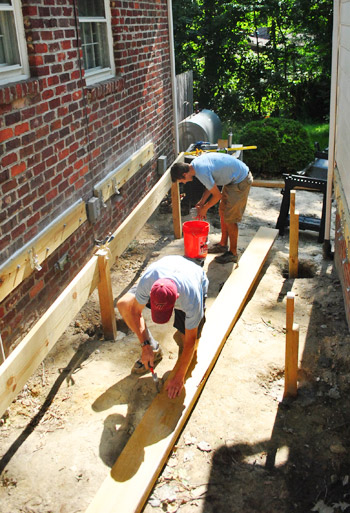
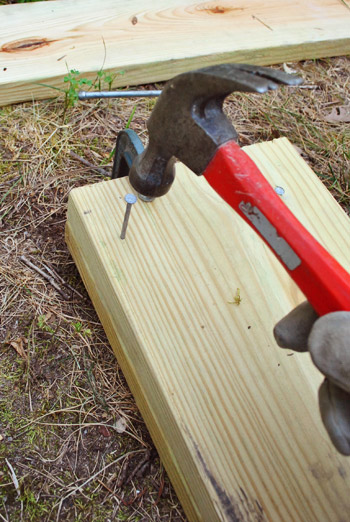
So we clamped the girder boards together so what-would-become-the-top-edge was perfectly lined up (boards are never perfect, so even two boards marked 2 x 10 might be slightly different widths). Then we nailed them together.
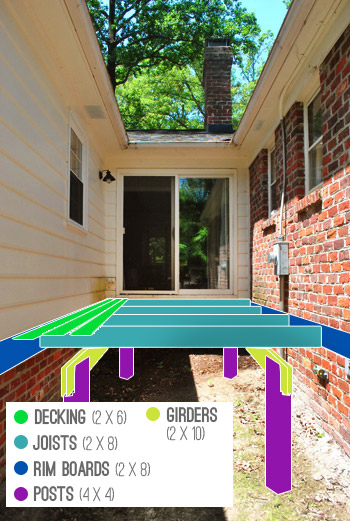
To refresh your memory about how this deck will come together, here’s this handy little graphic that hopefully makes it a bit more clear:
Next we were able to rest the now double-thick girder on the notches and proceed with bolting them together. Our county requires us to use “two 1/2″ through bolts” – which meant I had to drill 1/2″ pilot holes through about 4.5″ inches of wood – which was a little bit of a challenge since my longest drill bit was barely that long.
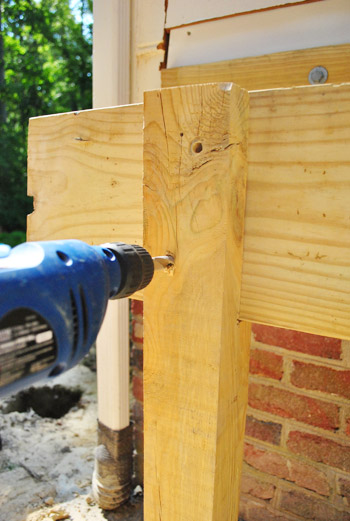
But we got it done and were able to slide the bolts through with a bit of hammering, and then tightened the nuts on the other end.
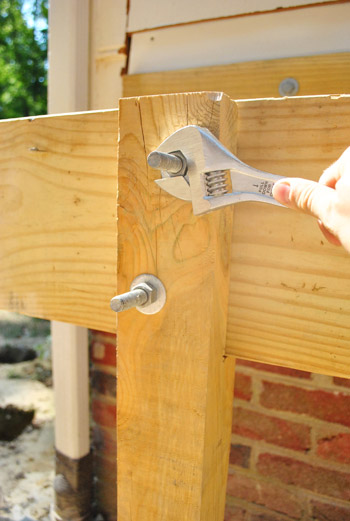
It was actually a remarkably simple process, and it probably took us about two hours to do the whole thing. Not necessarily a short time when you’re standing in 95-degree morning heat. But, I’d say it’s the first part of this process that has actually been faster than we anticipated.
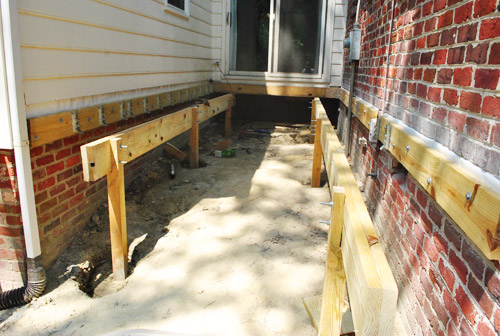
Oh, and here you can see how we joined the girders on the long side where it’s actually two sets of boards that butt up against each other on one post. It’s like a through bolt party up in here.
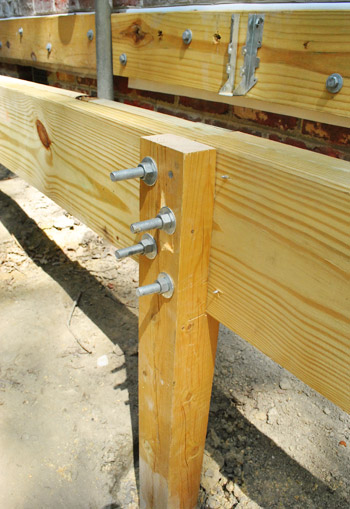
Since our morning was going so speedily, I even convinced my dad to help me go ahead and get the diagonal girder and posts measured, cut and set in place.
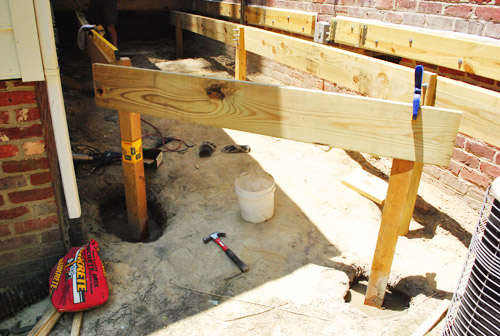
So by about noon we were looking at having accomplished pretty much our entire goal for the day.
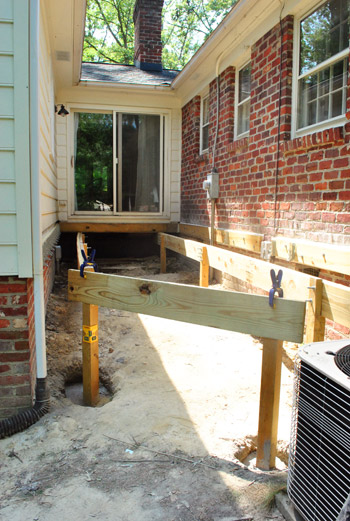
Does that mean we get to stop? Of course not. Well, it did for my dad since he had other things to do at home. But after taking a breather (by which I mean working on something else inside with Sherry for a couple of hours) I returned to my slowly-getting-completed deck for my next step: laying weedblock and gravel.
A bunch of you guys have recommended taking some weed-preventative measures and I figured this was my last chance to have easy access to the entire space under the deck (since adding joists will mean lots of new obstacles). So I removed one existing obstacle – the diagonal girder that we hadn’t bolted in yet.
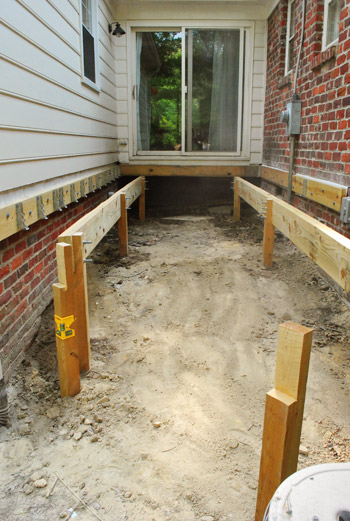
Next came the weedblock. Using some leftover from Clara’s rock box plus another $12 roll from Home Depot, I was able to cover the whole area without a problem. I have mixed feelings about weedblock (since my experience has been that some weeds just grow on top of it instead of under it) but I figured it’s better than nothing. And for about $15 (including the ground staples to hold it in place) it’s worth giving it a shot since it’s the recommended method in our area when it comes to dealing with the ground under a deck.
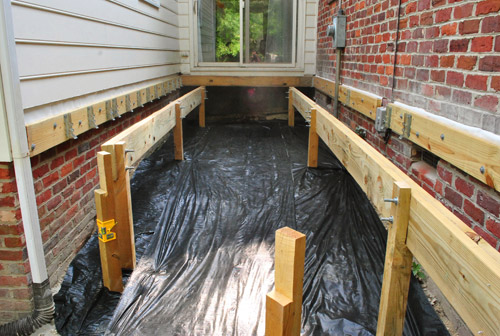
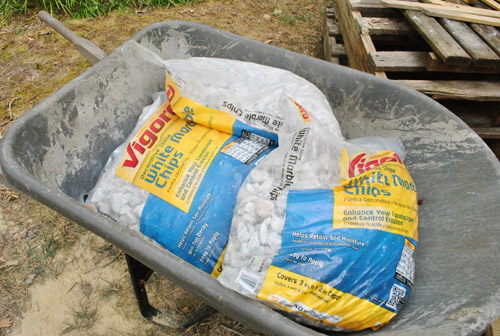
Next up was covering the area in gravel, since it’s harder for weeds to grow in a soil-less environment (and pests will like a weed-block-and-gravel-filled area a lot less than a damp-muddy-and-weedy spot to hide). My original plan had been to get a delivery of rocks from the same stoneyard where we bought the gravel for our DIY patio, but I forgot to place the order and then was too impatient to wait. So instead I picked up two car-loads of this bagged gravel from Home Depot (it was marked down from $3.38 to $2.50/bag, saving me about $35!).
It wasn’t necessarily easy hauling all of it from our driveway to the other side of the house where the deck is going in (again in near-100-degree heat) but by this point I had become pretty accustomed to being sweaty and gross (and the people at Home Depot were unfortunately accustomed to seeing me that way). So here’s the space slowly filling up with rocks…
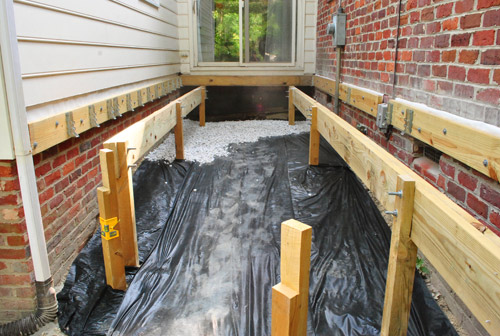
Almost there…
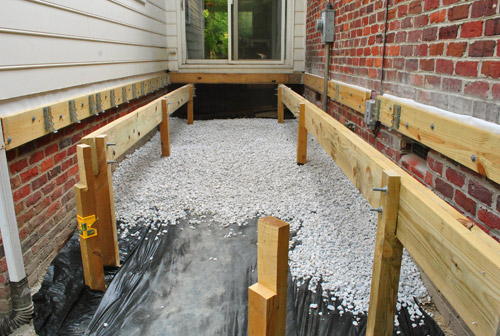
…and complete. It took me 40 bags total. I know I’ll need more once I put the stairs in, but for now I’m just going to cross that bridge when I come to it.
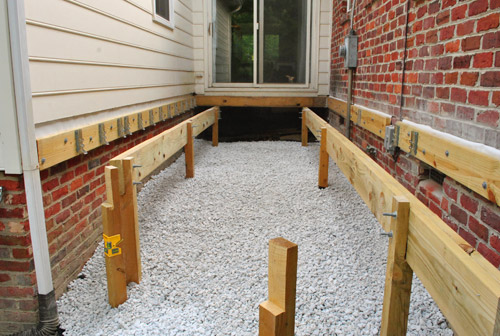
It was about 7:30pm by the time I finished getting my rocks down, so I called it a day. Though I was almost excited enough to keep going because my next step would be joists… which meant it would finally start looking like a deck.
So the next day – despite being more sore than I’ve been in recent memory – I bucked up and got my joist on. Each of my joists would be about 7.5 feet long, so it meant trimming a smidge off of my 8 foot long 2 x 8″ boards.
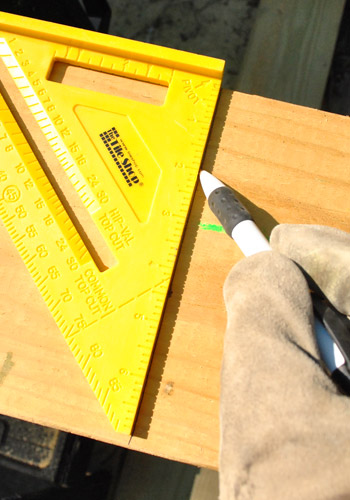
I mainly took this picture of me marking my cut because every time I did this my eyes kept catching the word “PIVOT” in the corner of my straight edge and this scene from Friends would replay in my brain.
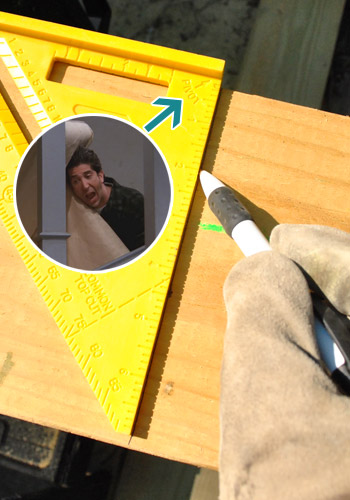
Anyways, once Ross was out of my head, I got to cutting with the circular saw – who’s like my new best buddy on this deck project.
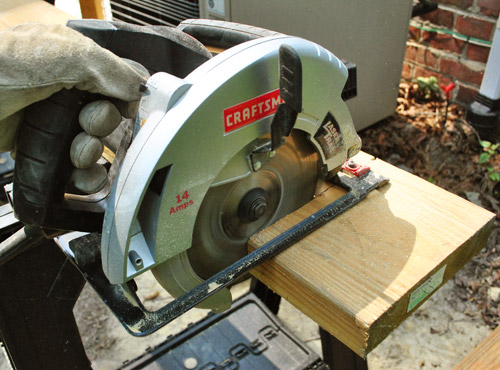
Once cut, the joists actually just rest on top of the girders – so there’s no additional support needed to keep them up. But I did have to add some hangers on either side to give them some stability side-to-side. I had already installed all of the hangers on the siding side of the house, so it just meant adding them on the brick side.
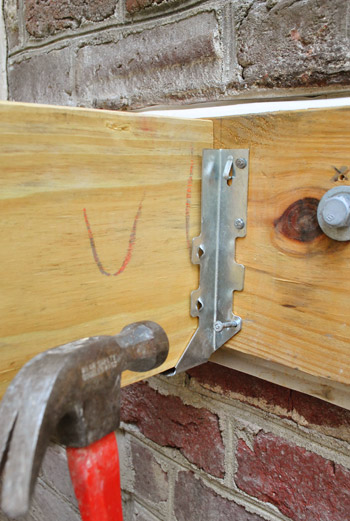
And since these hangers were no longer about keeping the hangers up, it was actually more critical that I nail them in on the side (thanks to the handy angled-nail guides already in the hanger).
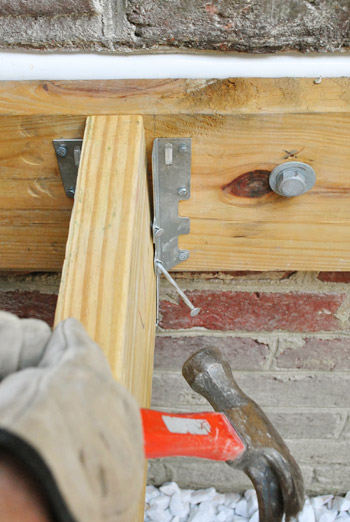
This was by no means a swift process (each hanger required 10 nails) and it didn’t take me long to wonder if I should’ve bought a nail gun for this project. It wasn’t much longer after that that I was actually pretty certain I should’ve bought one. But alas, I just kept plugging along – thinking of how I would look like Hercules when all was said and done (spoiler alert: this did not happen, strangely enough).
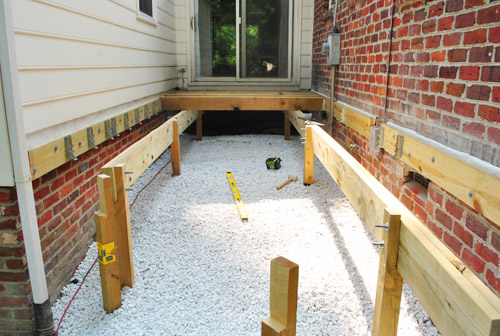
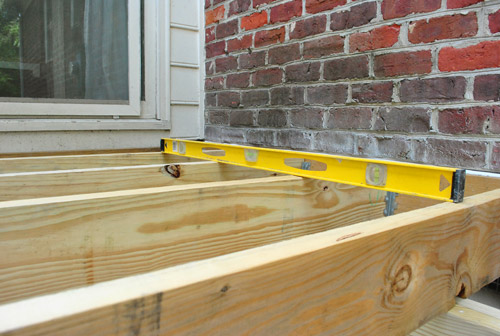
As I added each joist, I double-checked my level as I went. If they weren’t level (while accounting for a slight slope away from the house for drainage) there wasn’t a whole lot to be done since my girder was already set. But doing this did help me spot one board that was too warped to use (it curved up on one end). And had anything been too crazy un-level I could buy (or rent) a planer to scrape a bit off the top of the offending joist.
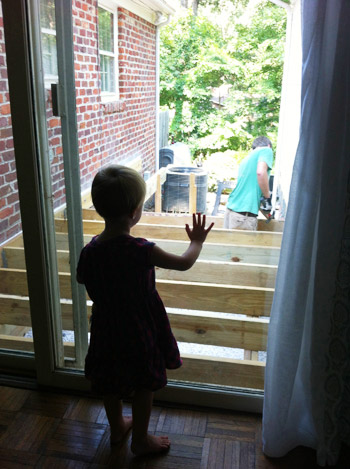
Here’s Clara watching me build what she now called my “pretty pretty deck.” Not the adjective I would choose myself, but as long as she’s showing interest in the project – I’ll take it.
Slowly but surely more joists joined their joist-y brethren and the space started looking more and more deck-ish.
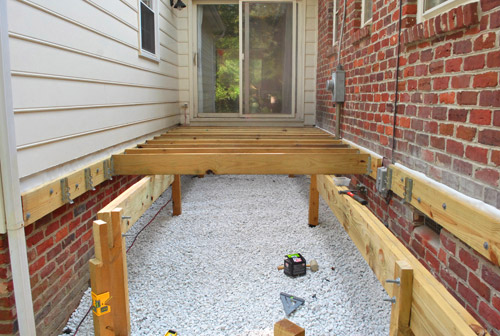
When I got towards the end I did have to go ahead and bolt the diagonal girder in place, since the joists on the end would need to rest on it.
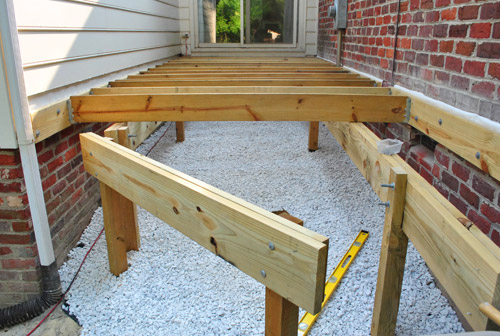
And finally, about four hours later – all of my joists were in.
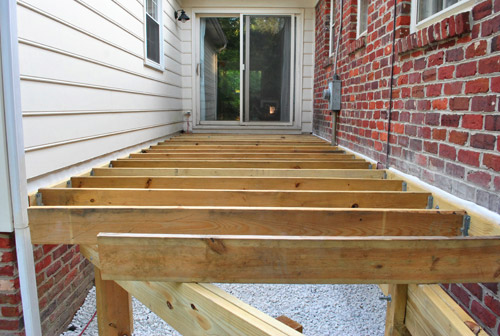
I still have to add the rim boards along the exposed edge. It will be a bit complex because this is where I have to be precise about the angle I cut, so I didn’t have the mental juice left to tackle it after such a long day. And for now I just left the joists on the end extra long (once I’ve determined my angle, I’ll use the circular saw to cut them more precisely).
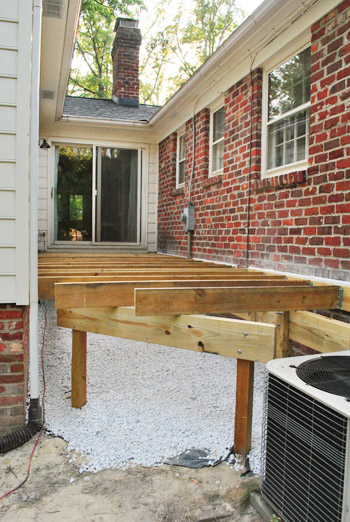
Not too shabby though, right?
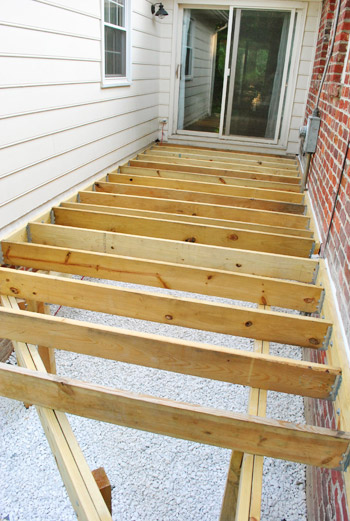
Before the day was through, I couldn’t help but test out my new creation a bit. You know, to make sure it actually could hold some human weight.
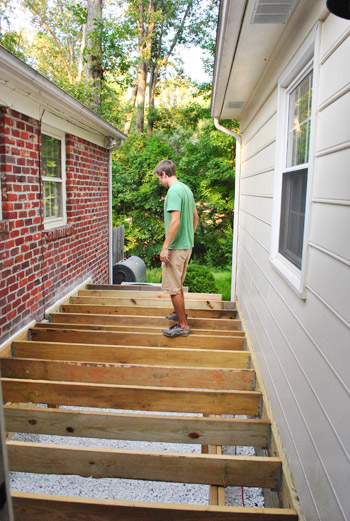
It did! So I broke out a little happy jig. Call it my “Happy Happy Joist Joist” dance if you will.
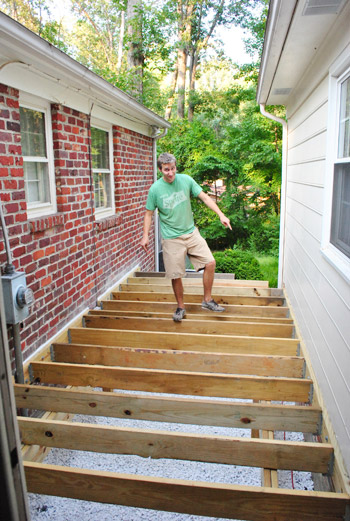
Once I get those rim boards in, my next step is deck boards. I can’t tell you how excited we are to finally be at this step. This project has taken much longer than we anticipated (for which I blame equal parts on ourselves, inspectors, heat, and the lack of an army of helpers to speed things along). Oh well, that’s DIY for ya. It’ll totally be worth it when we’re sitting out there sipping lemonade, right? What have you guys been up to this weekend? Any outdoor or indoor projects that are finally turning a corner and looking like they’re closer to done than undone?
Psst- Wanna catch up on all of the deck action? Here’s where we shared our vision for the space, then we removed the plantings and the old balcony, followed by selecting our materials and documenting our first day of building progress. Then we dug our post holes, and then learned that we failed our first inspection. We revised our plan and dug more holes (which got approved) and proceeded to set posts. Whew, all caught up.

Ola says
Amazing progress! Got tired just from reading about all the work you’ve done in one day :)
Brenda says
I’m so excited to see this progress! There’s just something about getting to the point in a project where it starts to actually look like something.
Brenda says
I almost forgot to add that the Ross reference was amazing. I love a good Friends mention!
Emma says
Wow! Looks so great. Good luck in the final stretch. I hope your supervisor Clara goes easy on you. Looks like she’s watching you very closely.
Kate says
Friends & Ren & Stimpy in one post! The word “pivot” always makes me think of Friends and it usually involves moving a couch too. And the Ren & Stimpy song I usually find stuck in my head involves logs, but Happy, Happy, Joy, Joy will work, too!
Kate says
I nearly died when I scrolled down to see Ross’ face on the straight edge… thanks for the laugh on Monday morning!
Amy @ a new old house says
Wow- looking great! So close now- you must be getting excited to get out there & use it!
We’re knee deep in renovating the bathroom. Certainly taking longer than I’d like- but I just keep trying to remind myself of the money we’re saving by DIY-ing it!
http://www.new1790house.blogspot.com/2012/07/bathroom-timeline.html
YoungHouseLove says
Love it!
xo,
s
Raquel says
Our outdoor project this season has also taken infinitely longer than planned. For all the reasons you list and some medical/physical woes added. We have built a water feature in our yard with left over rocks and boulders from a previous landscape project (imagine hauling what I’m sure is tons of huge rock), and have pulled all the sod from the backyard, re-leveled the entire yard and this week, modified our sprinkler system, and this week plan to (hope to?) lay new sod! I know, in the middle of the hottest part of the summer! Oh well, it was supposed to be done mid June, after having been delayed already a month. Sigh…DIYers are persistent creatures!
YoungHouseLove says
That’s so exciting! Congrats on all the progress so far!
xo,
s
feep says
That looks great! I do have some concerns about the Va Tech hat though. Wahoowa!
YoungHouseLove says
Haha, my dad tries to keep things even since one of my sisters went to Va Tech. Three of his kids went to UVa though, so he shows Wahoo love too!
-John
Patricia says
What are you doing to keep Clara (and Burger too lol) from going underneath when it’s built? I could see a child wanting to go under there but can also see them falling asleep and then everyone’s looking for said child! (something I totally would have done as a kid)
YoungHouseLove says
There’s going to be no way to get under it once the stairs are put in and the other edge is finished! We’ll keep you posted as we go for sure!
xo,
s
Iris says
Wow, I get tired just seeing all that work! Great job!
By the way, did Clara get a haircut?
YoungHouseLove says
Just a little mullet trim. It won’t grow on the sides, so I cut the back since it ends up looking kinda weird. Can’t wait for it all to grow! I have dreams of this girl with a bob! Haha.
xo,
s
Crystal @ 29 Rue House says
Our girls hair is short too. Trimmed literally just a few hairs once otherwise never cut in over 2.5 years. I see some kids her age with fuller/longer hair than me!
YoungHouseLove says
Yes, it’s so funny because John and I have really thick hair (and mine’s a bit wavy) so everyone we talk to who had kids without much hair at their age says they have TONS OF HAIR now! Apparently sometimes thick or wavy hair can take longer to come in? Can’t wait to see her with lots of hair!
xo,
s
robin @ our semi organic life says
Yes I agree with the hair statement! I was bald for 1-2 years, then it came in white/see through/blond and so little for years! It was fine and blond and short. Then I guess puberty kicked in and now I have much darker brown thick wavy long hair! Who knew?
YoungHouseLove says
That’s so exciting! Clara has such blonde hair now but I had hair that color at her age, so I think she’ll end up on Team Brunette. Haha.
xo,
s
amy c says
it may seem to be taking forever to you, but from my perspective you are moving right along! true, there was a little faltering there in the beginning, but now that you have your feet under you, you are flying!
Karen F says
“Pivot!!! Pivot!!!” oh man, I loved that one!
John, it’s really coming along. It must feel great to be at the point where the progress is so totally visible/apparent. Nice job!
Laura McClellan says
ha! Love the friends reference.
“This couch is cut in half…I would like a new one.”
“i’ll give you store credit in the amount of fo’ dollas.”
“I will take it.”
Sus says
After putting down money for a few packs of those weed barrier ground staples I realized they were basically just pieces of wire hanger, bent into shape, so I just raided my closets for the rest of the clips I needed to finish the job!
YoungHouseLove says
SO smart!
xo,
s
Stephanie says
I’d personally love to see the whole fame enjoying dinner on a piece of plywood over the joists. . .’cause I’d be so excited that’s what I’d do! JK, totally unsafe : )
Looks awesome, thanks for showing the nitty gritty details.
Ginny @ goofymonkeys says
I always love a Friends reference! The deck is really looking great!
Are you planning it as an outdoor eating space? Any thoughts on furniture yet?
YoungHouseLove says
Yup, a big table for eating since this deck is right off the kitchen! Will share plans as we go (need to have the deck boards in to really start space planning!)
xo,
s
Jackie E. says
Does cleaning out the fridge count as a weekend project? hahahaha
YoungHouseLove says
Totally counts! You’re a brave soul!
xo,
s
Gabriella @ Our Life In Action says
I always laugh hysterically when I see that clip; something about the look on his face and the way he keeps saying it is just priceless.
You guys are soooo close. Can’t wait to see the finished product and also how you decorate. Great job.
anne says
you guys are so funny with your puns and stuff. I loved the happy happy joist joist line (perfect strangers!) and of course laughed remembering Ross and the couch. great blog!
Cor says
I’m with Amanda, I am super impressed. I’ve been reading your blog since about a year before you sold the last house, and it gives me hope for us. We are pulling up our socks around here to get our home ready to sell so we can find our forever home. Your site is so inspiring!
YoungHouseLove says
Aw thanks Cor!
xo,
s
Heidi P. says
WOW!!! That looks amAAAAAAAAzing!! Way to be a beast!!
And thank you for that Friends reference. It’s my all-time favorite episode. I laughed so hard I cried. PIVOT! PIVOOOT! hahahaha
Lindsay says
Looks awesome John! This will be a fabulous reference for when we add our tiny side porch to our house! Or, if you all are ever in the Pittsburgh area…
:)
YoungHouseLove says
Be right over!
-John
Bonnie says
The deck is coming along beautifully! You guys rock. Amazing what you accomplishing despite this east coast heat. Today I’m orb-ing a cute little round metal table I found at Target this weekend on clearance for twenty bucks. The shape is much like one I’ve been eyeing at Ballard Designs for so long. Hard to explain but it has an straps that run vertically and criss cross, and it tapers in the middle forming an hour glass shape. I’ve never spray painted before but your posts (thin and even coats, arm swaying motion!) have been a huge help and inspiration. I am loving the Rustoleum Universal and the fact that it is paint and primer in one. Thank you for your awesome blog and de-mystifying DYI projects. My clearance find is transforming from avocado green to orb loveliness! Two coats down and one to go!
YoungHouseLove says
Sounds so pretty! Get ‘er done, girl!
xo,
s
Linda says
I’m totally impressed by John and his dad on this project – and even though I will never ever build a deck on my own, it’s been fascinating reading. BTW, you made the Sunday Chicago Tribune – although oddly the reporter missed the part that is key to all of your loyal readers – how your first house led to YHL!
http://articles.chicagotribune.com/2012-07-12/classified/sc-cons-0712-fixer-uppers-20120712_1_foreclosure-listing-service-short-sales-affordable-homes
Hope to see you in Chicago on the book tour!
YoungHouseLove says
Aw thanks Linda! We’d love to meet you in Chicago! We’re pretty sure that’ll be part of the tour since it’s a big city! Will share more tour details when we have them!
xo,
s
Essie says
Hahaha love the Friends reference! I cracked up out loud!
Anne says
Love that episode of Friends! It’s always good to bust it out when moving things, too. Perhaps I’ll do it this week when we move out of our apartment. PIVOT! PIVOT!
Micha says
You’re plugging along just fine :o) It’s starting to look like a real deck!
I blame HGTV on raising unrealistic expectations :o)
Jessica J. says
Looking good! In case any of your readers want to build a deck, a Palm Nailer is the tool of choice for installing all of those nails in the joist hangers. A nail gun could work but is difficult because you’re trying to hit the little pre-made hole. Bet John’s guns are looking pretty good after all that hammering!
YoungHouseLove says
Thanks for the tip Jessica!
xo,
s
Ally says
JBoom, when all this is said and done, I think you should frame your Jethro Clampett Deck-Buildin’ Shorts! (They look suspiciously similar to your Gettin’ Hitched to $herdog Weddin’ Pants? :)
Clara is such a sweetie watching over her Daddy…when she says “pretty pretty deck”, could she be referencing the way your family says grace?
“Thank you God for a pretty day.” Deck/Day? Either way, it works :)
xox
YoungHouseLove says
Haha- totally could be! Lately she calls everything “pretty pretty” – like a long shirt I was wearing to bed was referred to as a “pretty pretty dress” yesterday night. Haha.
xo,
s
Brandyn says
It’s starting to look like a deck! Looks great!
I finished finally finished stenciling this weekend. I started on June 10th (about the same time you started the deck) and then didn’t pickup a spouncer again for almost a month. Stenciling is tedious and I procrastinate. But after 15-18 total hours of stenciling I’m done (and won’t be stenciling again anytime soon). Thanks for the Pinterest challenge cause that’s what finally got me moving again!
Brynn says
Laughing out loud re: “PIVOT!” That scene is burned in my brain forever, and whenever anyone says “pivot” I want to respond by shouting “PIV-OT! PIV-OT! PIV-OT!” I’ve done it to my husband and he looks at me like I’m a mad woman (he might be right). That epiosode was randomly on Nick at Night or something recently and I made him watch with me. Love it!
The deck is coming along beautifully. You must feel so accomplished! I’m excited to see the finished product (as are you guys, I’m sure).
Tiffany says
Haha!! That totally got me LOLing, and now I have that scene playing over and over in my head.
Casey Pawelek says
Looking great! I always think of that Friends episode whenever I hear the word pivot!! Then I have to keep saying it over and over for effect:)Pivot! Pivottt! PIVOT!!! Can’t wait to see the finished deck.
Kate says
This is probably a dumb question, but because the joists are directly attached to the ledger boards, how do you ensure that the girders and posts are bearing the weight of the joists, as opposed to the sides of your house bearing that weight?
YoungHouseLove says
It’s hard to explain, but basically we made sure the weight was on the girders. In other words, we placed the boards so they fully rested on the girders and just used the metal hardware on the sides to brace the boards left to right (so they don’t support them, they just keep them from warping in one direction or the other). Hope that makes sense!
xo,
s
susan says
So close to being finished! Looks good in that space.
We are finally finishing a backyard fence addition-ugh. Taking way longer than expected, but like your deck, it will be awesome when we get it completed-hopefully later this week!
Did you ever think of adding a little bit of a roof/cover/arbor like thingy overhead? Even if it’s just over a part part of the deck…my last house had a covered deck and we loved being able to be outside even if it was raining.
I think you should add it, cause you know, you guys don’t have enough on your plate, LOL
YoungHouseLove says
Oh yes, we have mentioned in the planning stages post that we’d love to add a pergola and big bulb string lights overhead! Not sure if we’ll add any sort of umbrella or sail cloth to make it rain-proof, but a little shade of the pergola should be nice!
xo,
s
Megan says
And here I thought I was the only one who mentally replayed that scene (read: yelled pi-VOT!) in relevant situations.
Ross-on-the-straightedge up there actually made me snort pop out my nose.
Marla says
looking great! and yes, you really must invest in a nail gun and air compressor if you haven’t already! diy life will be so much easier!
Maureen says
I am so excited about this deck, like it was my own! LOL I am sure I will be pinning away once you guys are done and have all your finishing touches added. Really looking forward to what you do with the space!
Tiffany says
Yay, John!!! It looks great!! Just thought I’d chime in with a little encouragement.
Andy says
Tuesday Morning is having a 25% off of outdoor umbrellas sale. Incase you were looking for one.
YoungHouseLove says
Thanks for the tip Andy!
xo,
s
Mel says
i’m honestly surprised that you didn’t put down some big sheets of plywood that you had laying around (seriously doesn’t everyone have a few?) and make a little makeshift deck platform. when we finished all our joists we were so excited to see something that looked like a deck, that we put down some sheathing, a couple of camping chairs and even our GRILL just so we could sit out there.
https://lh4.googleusercontent.com/-v0slg3XLNBc/TEuSrcW7l5I/AAAAAAAAD0M/1cZnSk5W_Kc/s640/DSCN3729.JPG
YoungHouseLove says
Ooh fun!! If John weren’t so hot and sweaty we probably could have had some fun playing around like that. Haha.
xo,
s
Kate says
“PIVOT!” was yelled several times by my family and my roommates while we were moving into our new apartment last month. A little humor is welcome when you are moving furniture up 2 flights of stairs in the South Carolina heat! The deck is looking great!
emilymarion says
Ren & Stimpy AND a Friends reference in one post! That’s one of my favorite scenes from Friends, along with Ross & the leather pants (“It’s made a paste!”)
Fantastic work on the deck!
Teri says
You deserve a medal for choosing the hottest time of the year to build a deck :) (It’s looking great!)
Debbie says
Just wanted to let Sherry know that Joss and Main has a cute behive watering can that I think she might love.
YoungHouseLove says
Thanks! I’ll have to check it out!
xo,
s
The Mrs @ Success Along the Weigh says
It’s really coming along! YAY!
cheep3r5 says
Looking good!
Footing mounded tops? – I think you are going to put a finishing mound of concrete on the top of your footings right? Like a little mounding form so rain runs down off of it? http://www.sustland.umn.edu/implement/deck_footings.html
YoungHouseLove says
Great tip! We did add concrete before weed block and gravel, just didn’t get good photos to share (harsh shadows made it look crazy). Mounding the concrete definitely helps with run-off!
xo,
s
Gwenalyn says
I can’t read the word pivot without thinking of Friends. So glad I’m not the only one! The deck is looking great. I admire your dedication being out there in the heat. Keep up the good work and stay hydrated! :)
Meredith says
Hi guys,
I just started following your blog and I’m loving it! The deck is going to look so great! Another comment mentioned that the deck looks narrowish and I agree. Even though you pointed out that its 8 feet wide, I’m not sure I would have thought of a deck for that space. But that’s what I like about your blog…it makes me consider possibilities for my home that I wouldn’t have thought of on my own.
Anyway, looking great and I can’t wait to see the finished product!
-Meredith
YoungHouseLove says
Oh yes, it definitely looks long and skinny, but Ive played around with floorplanning sites and am confident it’ll be totally functional! Can’t wait until the deck boards are up to show you guys some stuff we have planned for furnishing it! Our old house had some tiny rooms and we made it really cozy, so we love making small spaces work and feel welcoming!
xo,
s
Larissa says
This is ridiculously impressive. In my brain it’s a whole ‘nother level of DIY (that I will certainly never attempt). However, the thing that impresses and stuns me the most is that you’re doing it in THE MIDDLE OF THE SUMMER. You guys have weird timing for your huge projects. Gluttons for punishment much? :) Anyway, I can’t wait to see the sparkly lights strung above the gorgeous new deck that you built yourself in THE MIDDLE OF THE SUMMER.
YoungHouseLove says
Haha, I know, right? We definitely wish we had started this sooner or pushed it back a bit into fall – but the thought of getting to enjoy the end of summer and this entire fall instead of having to work on it is the silver lining I think!
xo,
s
Heather @ What Does She Do All Day? says
You don’t know how many times I’ve yelled at my husband to “pivot” when working on a house project!! Sometimes pivoting is not even what I want him to do, but I can’t help it! I had a weekend of ups and downs. A sewing project finished, some cleaning done and some DIY in progress. http://whatdoesshedoallday.com/houston-we-have-problems/
YoungHouseLove says
Hahahha, I love it.
xo,
s