Let’s take some shelfies. You know, as opposed to selfies.
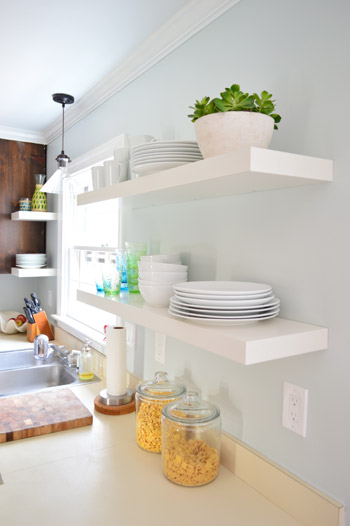
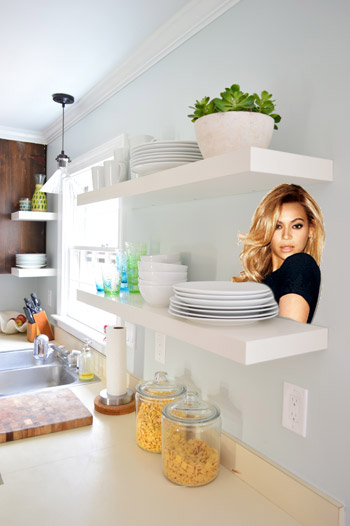
If only we had Beyonce around to photobomb them, they’d be the best shelfies ever…
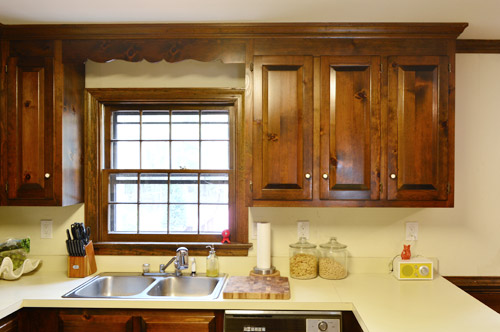
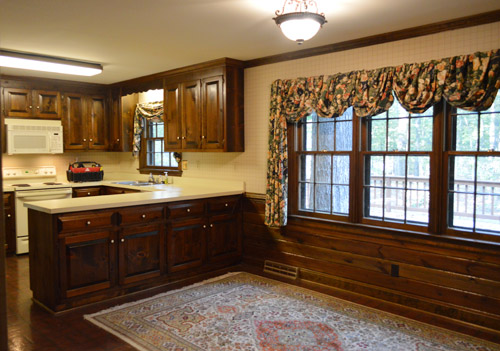
The no-Beyonce consolation prize is that we finally got the Ikea floating shelves up in the kitchen, and it suddenly feels like we’re turning a corner. We still have a few major things on the list (like painting those cabinets) but the shelves make such a gigantic difference as opposed to the dark cabinetry that used to hang on either side of that window. Here’s how it looked a few weeks ago after we removed the wallpaper.
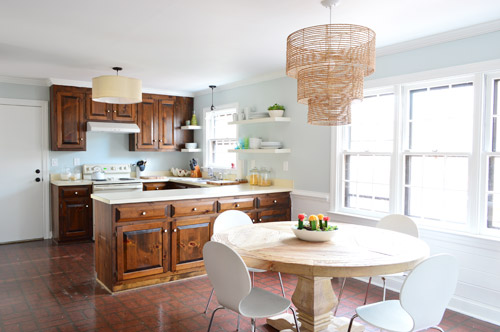
And here it is from the same POV now, after removing the cabinets, re-hanging the crown molding, patching/priming/painting the walls, trim, and ceilings, upgrading the lighting, and hanging those new shelves of ours. These pictures don’t even do it justice – it’s literally at least twice as bright and feels a lot bigger and more open as well.
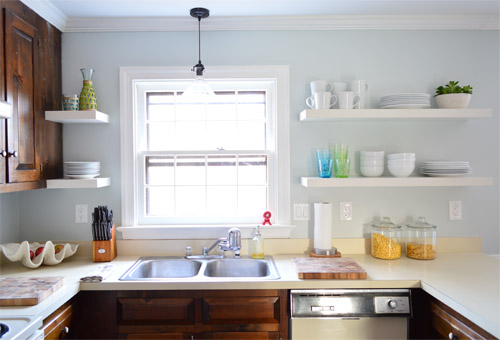
When it comes to how we hung them (they’re lack shelves from Ikea), we decided to line the bottom shelf up with the cabinet on the left of the shot above (18″ above the counter) so that they all related to one another. The pre-made sizes allowed for a couple inches of breathing room around the window too, which we liked anyways. We just spaced the height of the second shelf by eye and chose 14″ above the other shelf, which gave us enough room to load up the bottom shelf without things feeling cramped, but also allows a shorty like me to easily reach items on that top shelf.
As for actually hanging them, we held up the bottom shelf in place and made sure it was level…
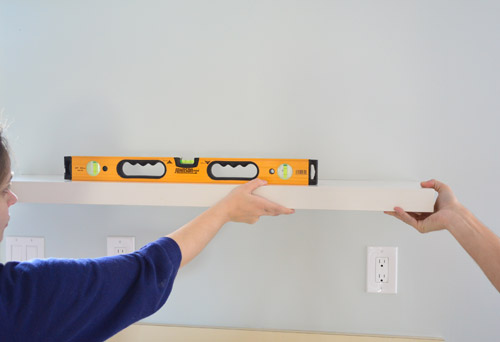
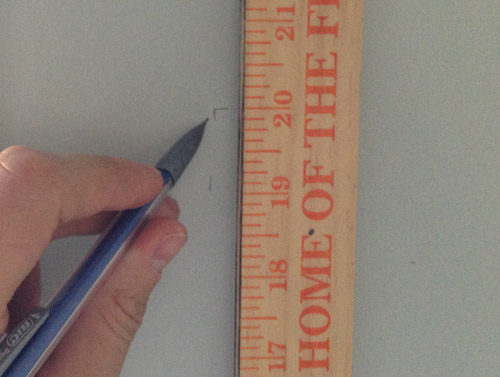
… before marking the top corners on each side and drawing a line across the top, like you see below.
These longer shelves come with a metal hanging brace and screw, so when you open things up, this is what you’re dealing with.
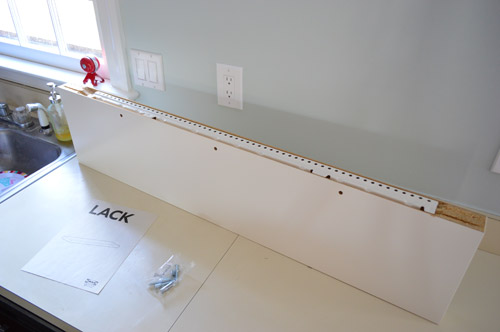
The metal brace is actually pretty smart. It has a bunch of holes all along it so you can just find a stud (we used a basic stud finder) and screw into at least two of those along the span of the shelf, so you know it’s extra secure. The instructions show a few recommended screw-to-stud placements.
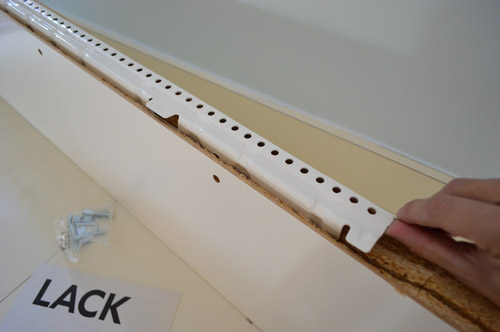
Next I placed the brace along the horizontal area where we wanted to hang the shelf. I just measured in a few inches on each side from our little pencil corner guides since the metal brace doesn’t run as long as the shelves themselves) and I used one screw into the drywall right in the middle, just to hold the brace in place.
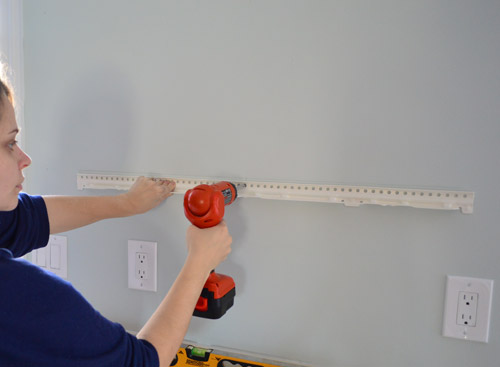
That freed up my hands so I could use the stud finder to find the actual studs, and drive two more nice long screws (provided with the shelves) into the studs on that wall, so it was held up really strongly (John aided me by holding the level to be sure it didn’t tweak up or down on a certain side as I went).
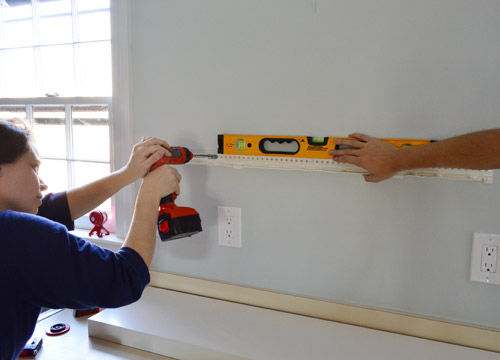
There are these little metal plates that you use when you drive the screw into the stud (they’re sort of like washers, they go under the screw and hold the brace even more firmly than a screw alone could), so those three metal rectangles that you see below are where two went into studs (we also added one more with an anchor for even more holding power).
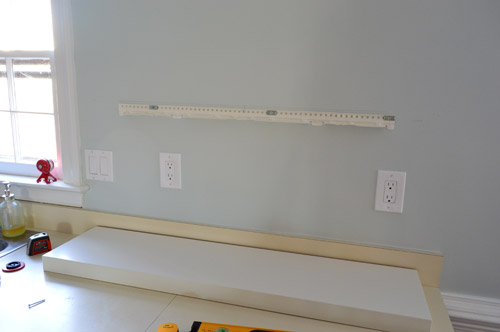
Then you just slide the shelf onto the brace and tighten the three provided screws that go into the three pre-drilled holes in the shelves. At first I did it by hand, all allen-wrench-style. That was for the birds (took a million years)…
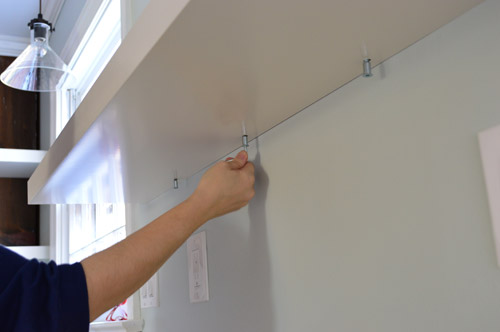
… so I broke out the power drill to drive those in a lot faster.
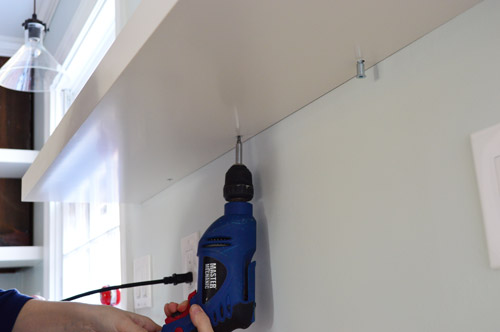
We repeated that process for the higher shelf, and when it came to the little side shelves, those were really easy. We just used heavy duty anchors driven into the pre-selected spots on the wall that aligned with where we wanted to hang each shelf. As opposed to the longer shelves, which are screwed into place pretty firmly in three places each, these can also be popped on and off easily, which is awesome because we’ll temporarily remove these guys when it’s cabinet painting time.
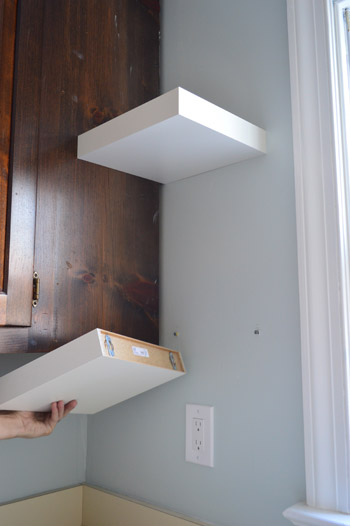
They’ve been really sturdy so far. The stronger the anchor you use, the more stable your shelves will be – and of course if they’re not placed perfectly level into the wall, they might wobble. So be sure to measure at least twice and break out that level for the best result. I think as the room evolves, the items on each shelf will too (for example, I might hang a small framed photo above that stack of plates on the wall, or place something taller on that bottom shelf for some fun color/height).
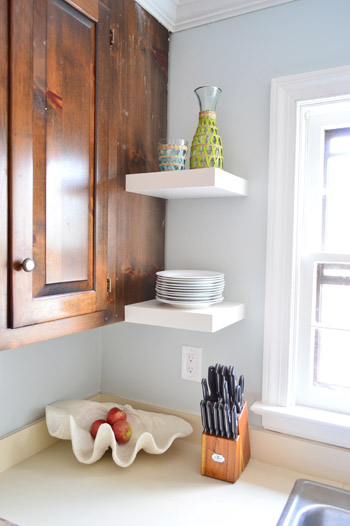
But for now they’re super functional – I just filled the bottom ones with the stuff we use all the time, and the top ones with items we just love to see. For example, things I might leave out on the counter to be decorative (like a potted plant or a pitcher-turned-vase) along with other items we use a lot that didn’t quite fit onto those bottom shelves (like more plates and mugs).
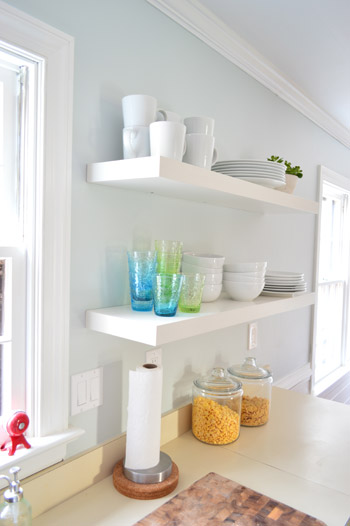
Here they are from the other angle. Oh man, it’s so much faster to unload the dishwasher again (we seriously missed that perk of open shelving from our last house) and we love that although they flank the window on each side, they don’t really block any light since they’re shiny and white (they bounce light around a lot themselves) and they’re not dark and solid like the old cabinets were.

Update: These longer shelves should each be able to hold 33 lbs according to Ikea if you go into studs (we went into two of them), and so far ours have been really strong no matter how much china we throw at them put on them. Giant upper cabinets full of dishes are held up the same way (screws into studs) so that definitely helps to ease our mind, along with the fact that we had good luck with the same type of Lack shelves in the dining area of our first house for 4+ years.
It’s certainly a far cry from the room that we started with around 6 months ago…
… and we’re crazy excited to lighten up those upper cabinets and go even deeper/richer with the lower cabinets. We’ve never had a tuxedo kitchen, but we’ve been such huge fans for a long time (just look at how gorgeous this one is). In fact we’re sanding and priming this week, so we hope to have a whole “new” kitchen for 2014!
Was anyone else doing last minute home projects this weekend in anticipation of the holidays? Do you have any big projects planned this week? We seem to have a tradition of doing something big and house-interrupting right in the middle of the Christmas craziness…
Psst- We’re taking more quizzes on Young House Life. And this one was crazy accurate!

Vanessa says
Looks fantastic. Can’t wait to see your painted kitchen cabinets. Did I miss pictures of what the wall(s) looked like after you took the tile off but before you patch/painted? We have this hideous tile in our kitchen but thought we needed to have a plan to re-tile before removing it. Also I seem to splash a lot near the sink – do you have a problem with water but no backsplash/tile? Thanks!
YoungHouseLove says
We actually didn’t have any backsplash tile to begin with in here, just wallpaper that we removed and a sheet of plastic that was behind the stove. In our first house we just used semi-gloss paint as a backsplash though (as opposed to tile, even with our fancy cabinets and counters) and loved how easy it was! It was a cinch to wipe down and before we moved we didn’t have to touch it up or anything, even over the stove!
xo
s
Sharon says
Holy Lighteness and Air, Batman! I cannot BELIEVE what ya’ll have done to the feeling of that kitchen with minimal dough. When I first saw it when you moved in, I knew the real renovation would be a while coming and thought “Ugh! I don’t know if I could live with that depressing darkness for a year or more.” And voila! Magic. Totally livable/non-depressing. Nice going! Love your `Phase One’ approach to bring the whole house up a notch!
YoungHouseLove says
Thanks so much Sharon!
xo
s
Rocky says
We have been priming and painting existing baseboard in an effort to spruce up our house/put the finishing touches on our kitchen laundry room redo. My hands are covered in primer and paint, I feel your pain. I hope sanding goes quickly!
YoungHouseLove says
Oh man, I raise my sandpaper-claw-hand to you! Good luck getting ‘er done!
xo
s
Sandy says
I’m so excited for you! I love that your house is starting to look more and more like you. We just finished painting our master bedroom (a quest to rid ourselves of builder’s beige.) Now every time I walk in the room I exclaim how much I love the color (BM Pale Oak) and my husband laughs, “Really? I would never have guessed that!” Ha ha. Evidently I get super excited over things like paint colors. I just can’t help myself…it’s so beautiful and it’s NOT beige!!!
YoungHouseLove says
I love that Sandy! Congrats on a color you love. That’s no small feat!
xo
s
Amber says
We’re finishing up a total kitchen remodel this week that started right before Thanksgiving. We are so happy with how things are looking and can’t wait to see the finished product!!
JenWoodhouse.com says
Looks great! Love those lack shelves, they’re the best!
donita says
What a big, bright, beautiful change. Your kitchen is looking great! Excited to see the cabinets all painted up.
*I just have to ask, is your dishwasher the original from the 80’s??*
Merry Christmas to your little family!!
YoungHouseLove says
I think it might be! Although the fridge is a french door one, and the microwave looked a little newer, so it’s possibly they all were replaced once, maybe in the 90s?
xo
s
Jessika says
Am I the only one who remembers when lack shelves came with the metal brace that only had a few holes? You were really limited with where you could hang the shelf since the holes had to pretty much line up perfectly. I remember being so frustrated. This is 10x better!
YoungHouseLove says
YES! That’s so funny! John and I were reminiscing about that too! The design of these to work anywhere your studs are = so smart.
xo
s
bfish says
All the changes you’ve made, especially over and flanking the kitchen window, look really great! The room has already been transformed a lot, and am looking forward to seeing the difference painted cabinets make. I’m pretty much with you no matter what you do with them, because dark wood cabinets (even the mega-fancy expensive ones) are just not my cuppa tea!
Abigayle C. says
Looks great!! So jealous of the light your kitchen gets. Our house is open and all, but we don’t have any windows directly in the kitchen area for me to look at while cleaning/cooking.
This weekend I painted one of the walls in our kitchen/dining area with navy chalkboard paint. I’ve been mulling it over for awhile now and finally gave in because I think it’ll be a cute wall for photos on Christmas. We’re hosting this year and will have 16 people over for dinner. I’m excited/nervous/overwhelmed to say the least, but at least we’ll have a cute wall to look at!
YoungHouseLove says
Ahh, that’s exciting! Good luck Abigayle! I bet it’ll be great.
xo
s
Kathy says
I spent the weekend painting our 320 square foot den’s paneled walls. They were a tan color, but now they’re a super duper light putty/geige-y white. It took forever, but I’m so glad it’s done. New grey carpet is getting laid on Thursday and then we’re putting in new baseboard. Now I just need to get it drawn out so I can submit it to you guys as a Design Dilemma (it’s a wonky L-shape that we just can’t get the layout right!)
YoungHouseLove says
That sounds awesome! Congrats on all that progress Kathy!
xo
s
Caitie says
You guysssss! It looks amazing! Your kitchen is really starting to come together! Love love love it!
dervla @ The Curator says
It’s incredible what you can do with some white shelving, eh? It’s looking ten times more open. I often wonder if the previous owners look at your posts and think “wow, wish i had done that with the kitchen!!”
KatieB says
Looks Awesome!! I can see it all coming together now!
We are in the middle of a full basement Reno! I’m watching a drywaller sand as I type!! Haha I cannot wait to begin on my blank slate down there!!
Sometimes it’s harder than having existing materials to work with!
Hope you watch for my email about my mudroom conundrum!! Coming to an inbox near you! (After we emerge from the drywall dust and my four kids get a visit from the big red guy)
YoungHouseLove says
Sounds exciting! I love a blank slate!
xo
s
Kelli says
Hey sherry and John,
What’s the color on the walls again in the kitchen? Do you think that color would work on the walls of our basement? theres not a lot of light and we wanted something light and bright and cheerful. The kitch looks so great! now!
YoungHouseLove says
Oh yes, I bet it would be awesome in there. It’s Nelson Blue by BM. Very soft and airy with a hint of green.
xo
s
meg says
It’s looking more and more like a Young House Love kitchen! I love how your design style is so recognizable and this transformation of your kitchen has been fun to watch. I love the open shelving but we unfortunately can’t add any in our home. We have almost 100 year old horse hair plaster walls and the anchoring and scribe to the walls irregularity isn’t worth it for us.
Mia says
For the lower cabinets facing the eat-in area, even though continuing the planking was too much for Phase 1, perhaps a solid sheet of plywood–or something better–painted the dark grey would be a nice look. If you don’t access the cabinets from that side, that is.
YoungHouseLove says
So funny! I keep telling John that but he doesn’t think it’s worth it! We never access the shelves that way, so I like the idea of a solid panel, but he things the cabinets add more dimension and look better than a big sheet of plywood. We’ll have to see who wins the battle (John will, he always does, haha!).
xo,
s
Sayward says
Beyonce’s photo bomb is all “If you like it then you shoulda put a floating shelf on it! Uh Uh Oh!”
Contractor boyfriend and I did a serious reno (well, he worked and I assisted/aggravated him) on my mom’s bathroom for Christmas. As I weakly spray painted her baseboards at 2 am in my Dexter kill zone, I knew I wasn’t really alone because I heard your soothing voice whispering “thin and even coats.” And when my sewing machine started making thread nests for no discernible reason whatsoever, I felt your solidarity way down in VA. I don’t think I can do another project like that so close to Christmas and keep my sanity, my holiday spirit, and my boyfriend. You guys are totally inspirational!
p.s. in regards to your dialect quiz, former Jersey girls represent!!!
YoungHouseLove says
Bahahahaha! That first sentence. I am crying.
And as for your progress – amazing! I’m cheering you on from here!
xo
s
Natalie @ Wipes Are Not Weapons says
Two things:
1)The more you add to your kitchen, the more I love the color of your cabinets! I saw the close-up of them, and I think it’s a bummer they’re so beat up. I’m sure that grey will look beautiful, though…you guys always make such awesome choices.
2)Am I the only one who makes the stud-finder joke with my husband whenever we use it? “Boop-boop-boop! FOUND ONE!!” Hahaha
YoungHouseLove says
I totally do that. Like, too often. As in, as I pick it up John says “nope, don’t scan me.” Haha!
xo
s
Stephanie @ Housewife Mama says
You guys! Seriously you make this home decor thing look so effortless (PSA:they actually put a lot of hard work into these projects).
What did you guys want to be when you grew up? Certainly you didnt think it was going to be this thingy you have going on. Congrats, you are nailing it.
YoungHouseLove says
Aw thanks! I wanted to be an art teacher and John wanted to be a video editor. Never could have guessed that seven years of blogging and 3,000 posts would lead us here!
xo
s
Ashley S says
As always, it look fabulous! I noticed your counter tops are sparse, and was wondering…
My biggest pet peeve with my kitchen is I can’t seem to keep the counters cleared. Between our spice rack, the coffee pot, the knife block, the toaster, the paper towel holder… our already limited counter top space is dominated by these things.
So…. where do you keep your toaster stashed? And is it easy to have to get it out every time you use it?
YoungHouseLove says
Yup, the toaster is under the cabinet next to the dishwasher, so we just break that out as needed (we usually do cereal so maybe twice a month we use that). Same with the blender :)
xo
s
Olivia says
Lookin’ good! We’re still trying to decide what to do with our ugly-old-1950’s-ranch-wood-paneled kitchen. Thanks for posting this idea!!!
Leah says
IKEA shelves are great. We have several in different sizes and a big, bright red one. Surprisingly strong! We’ll have to try cutting them down to make floating shelf tiers.
Theresa M says
Wow!! The kitchen is really coming together. Love how much brighter and fresher it looks. Can’t wait to see Phase 1 finished. Merry Christmas!!
Carisa says
Question: Have you ever used Annie Sloan chalk paint with their wax on kitchen cabinets or furniture? We just did our dining table, my brother just did his kitchen cabinets! THE BEST THING EVER! No sanding or priming! After you wax and polish it out….wow the finish is smooth as butter! Just an idea! Also, love what you did with the floating shelves, open shelving is my favorite. We did industrial stainless steel shelves for our everyday dishes as well. We love it and it matches the appliances. (Commercial grade, so they are strong)
http://www.abreq.com/catalog/Wall_Shelves-70-1.html
Love what you guys are doing, it’s looking great!
YoungHouseLove says
I used it on the back of chairs in a bright fun color. It was fun, although the wax was a little tricky for me. Will have to give it another try!
xo
s
Sarah Z. says
I LOVE the shelves – I’ve never been big on the “tons of cabinet space” thing. I would hoard junk in them probably. I know my Mom does! I think I will go with this idea when I buy my first home in a few years…Thanks for all of the amazing ideas!
HeatherM says
I know there are a lot of people griping on here that lack shelves like this are not durable, but we have found the opposite so far. We researched high and low for floating shelves, and these were the ONLY shelves out there we could find that gave you a lot of choices on where to put in your anchors so you can be sure to screw into a stud. The rest of the floating shelves we could find (at Home Depot, lowes, Menards, container store, Walmart, target, meijer…we looked at them ALL)…didn’t allow you to screw into a stud. We have two lack shelves. 74″ long and two that are 35″ long around our TV, and they are holding up great. We mostly have a few stacks of books and other knick knacks on them, but they still feel very sturdy. & solid. One thing to note is that different lengths of lack shelves have different types of installation hardware- our 74-inchers had to be installed a bit differently than our 35-inchers. We also put up painters tape before we hung the shelves so I could visualize the shelf positions better. I do have one question for you- why didn’t you paint the cabinets first? It seems like it will be tricky to paint the cabinet behind the shelves now.
YoungHouseLove says
We mentioned that in the post for ya (the little shelves next to the cabinets pop right off the wall, so we can easily remove them to sand/prime/paint). I just wanted to get them hung for company that was coming :)
xo
s
Brandyn | Southern Distinctions says
Love, Love, Love open shelving! Everything is looking beautiful. Can’t wait to see the cabinets!
Colleen says
They look great! If our 80 year old house wasn’t a dust trap, I would consider open shelving. Instead, I’ll live vicariously through you guys! We completed a long-overdue laundry closet renovation this weekend that included installing a tankless water heater, new flooring, and most importantly STORAGE! I told my husband it was my favorite part of the house and hugged the floor to ceiling shelves. No joke.
Lesley says
Just taking a lunch break from installing new oak floors in our living room/dining room… have my father-in-law tomorrow to exchange gifts. There is a slight chance we were over ambitious, but I hate using my summer vacation time on projects, so this was the weekend.
YoungHouseLove says
So exciting! Good luck getting it done!
xo
s
Marta says
Those look great. I love the look of open shelves, I worry about dust, without a porch or a garage to act as a buffer the dust gets pretty out of control.
Moll says
Love love LOVE!!
betty says
we’re having our floors refinished from a golden oaky color to a dark walnut the week after. merry Christmas to us! 4 days of living in the rec room should be interesting! haha
betty says
also, totally random question.. is that succulent planter real? and where did you get it? I have a strawberry pot type planter (looks like 3 pots leaned in together and one stacked on top) and I neglected those things so bad.. two are thriving.. one wilted up. so so weird.
YoungHouseLove says
It’s a faker! I got it from HomeGoods. Loved it so much I actually got two!
xo
s
YoungHouseLove says
That’s so exciting! I bet they’re going to look awesome!
xo
s
Kelly says
In the before and after photos at the bottom, it looks like there is a beautiful lightness seeping its way across the kitchen from right to left. Such a great transformation. Can’t wait to completely remodeled kitchen.
YoungHouseLove says
So funny about the lightness seeping across the kitchen! I wish it would just keep going while we slept ;)
xo
s
Karen says
Omigawd, I’m twerkin like a crack addict here: Paint those cabinets, paint those cabinets, paint those cabinets, paint those cabinets, paint those cabinets, paint those cabinets, paint those cabinets, paint those cabinets!!!!!!!!!! :-)
caroline [the diy nurse] says
I’m always so stunned with what paint can do. And to think that this is just phase one blows my mind and makes me way too excited about phase two.
Britt Tester says
I am LOVING the way this kitchen is turning out! In fact, I think I’m loving it even more than your past two houses– WHICH IS SAYING SOMETHING– because I loved those ones so much. (Is it creepy that I’m talking about loving YOUR house in all caps?!) Seriously, though, can’t wait to see how painting your cabinetry tuxedo-style transforms the space during Phase 1. We’re in the process of designing our new kitchen right now (!!!) and I really love the look of tuxedo cabinetry– haven’t been brave enough yet to try it myself! Thanks for always keeping me motivated/inspired :)
YoungHouseLove says
Aw, thanks so much Britt!
xo
s
Lindsay says
I’ve been wanting to hang shelves in my living room for décor so this post is perfect timing! I’ve been eyeing the Ikea shelves but weren’t sure how they would hold up, or how hanging them would go. Glad to see you love them!
Jill says
The way you convert a room is amazing. I love the step program. The only routine I have M-F is my 0900 check in on this blog.
I was on yahoo today and was like “OMG…I know that front door.” Glad you are getting so much press and more people are finding out about you. It is very easy to relate and I think there is a disconnect with living in your house and making a home. You bridge that gap and inspire others.
http://shine.yahoo.com/at-home/6-stunning-ways-spruce-front-door-170400429.html
YoungHouseLove says
Aw thanks so much Jill! We didn’t even know about that mention – what an awesome surprise! Thanks for the heads up!
xo
s
Sean Green says
Great read! I’m going to use this tutorial to set up some shelves in our antique showroom for our next estate sale. Very helpful pictures too, especially for someone who isn’t that handy.
Barbara says
Okay, I need help here. I want to do the exact same thing. However, my house was built in 1953 and I tried to put Ikea shelves up in my bedroom and ran into a problem. It appears that the holes from the shelving units (unless they’ve changed) would not conform to my studs. Do you have this problem? Or have the shelf supports changed? Or do you use different anchors? Please help, because I really want to do this!!
Barbara says
Dang it! I went back and looked at the photos and YES the hangers have changed! They used to be black with posts sticking out and only three holes. Now they have many! WOOT!
YoungHouseLove says
Yes, the new ones are so much better since you can catch studs through any of those holes now!
xo
s
Hayley says
As I was scrubbing the bottom cabinets this morning, I was thinking that my next project just might be painting the bottom cabinets dark gray or black. Or dark, dark navy? I just don’t know, but white on the bottom is just for the birds, with 2 small kids, I’ve decided. Their cup drawer (biggest bottom one) is so dinged up. Any tips on how to keep the dings from happening? Maybe I used the wrong primer.
Have you guys ever dealt with a faux wall thing above the upper cabinets? It’s like a long box of a wall above them? Curious how hard would it be to remove that and add small uppers?
YoungHouseLove says
We’re diehard fans of Ben Moore’s Advance paint for cabinets (with a good primer, sanding beforehand, etc – since prep is half the battle). It’s just really durable paint though, so the office cabinets in our last house and the kitchen cabinets there as well were painted with that and held up so much better than regular paint! It’s self-leveling and thick and durable, so they just seem to take a beating better than other formulas. We’re using it again on the cabinets here for sure!
xo
s
Ashley@AttemptsAtDomestication says
The more I see open shelves, the more I want them! I’m really starting to think they would look great in our kitchen!
Brittany says
I am a little frightened to put a bunch of dishes on our floating shelves but yours seem to do very well!!
Also, 2 tone cabinets are to die for. We painted our cabinets a year ago (a solid one tone), and I wish I had waited to marinate on the beauty of 2 colors, especially a grey with barely a hint of navy on the bottom. Next house!
Cant wait to see your rendition.
em says
This is a funny post for me. Our contractor REFUSED to install floating shelves when we did our kitchen remodel. He said they ALWAYS sagged. I proposed many ideas to him, from IKEA to what looked to be sturdier shelves with metal bars that are perpendicular to the wall and go out the whole depth of the shelf. He did put wood between the studs when he built our wall so I can install floating shelves myself one day. If we were still on speaking terms, I would forward this post to him and say “see, Sherry and John’s floating shelves have held up 7 years!”
YoungHouseLove says
Oh man! I’ve heard a range of experiences with them though, but I imagine going into studs is the best way to make them nice and strong! Will keep you posted on how these do for the long haul…
xo
s
Kacee k says
You guys. It looks great!! Can’t wait to see the next installment of how the kitchen turns. I can’t be the only one who totally thought you were talking about Beyoncé the chicken. I was kinda bummed she didn’t photobomb your shelves. Hahahaha. Hope you guy have a very Merry Christmas!
YoungHouseLove says
Bahahah! I totally should have photoshopped Beyonce the chicken in there. That’s still my favorite blog post of all time.
xo
s
taetae says
i’m loving phase 1 guys!! Way to go! Have you considered Jenny from Little Green Notebook’s ‘concrete countertop’ tutorial? She made it look SO easy and it seems like it would go really well in your phase 1 kitchen!!
YoungHouseLove says
YES! I loved when she did that in her laundry room, and the budget was awesome! We’re definitely considering that option for phase 1!
xo
s
Julia@Cuckoo4Design says
And then there was light! So much better!
Katherine says
The kitchen is looking amazing! (I don’t have the nerve to tackle projects before the holidays, too busy freaking out over all the other stuff that needs to be done…we usually cook Christmas dinner and have both sets of parents over.) Just wanted to say love I your blog, I look forward to checking it out every day and it is so inspiring! Have a wonderful Christmas!
YoungHouseLove says
Thanks so much Katherine! And Merry Christmas to you too!
xo
s