Updated 2019
We just swapped out two old fluorescent light fixtures in our kitchen and they each required slightly different techniques becausfe – surprise! – one of the didn’t have a fixture box in the ceiling behind it. Yep, just wires coming out of the drywall! So we’ll show you two ways to replace your fluorescent lighting with a more udpated pendant or flush mount fixture.
Removing A Large Fluorescent Light Fixture
First we replaced the big fluorescent light near our stove. It was incredibly simple to do so we’ve outlined a step-by-step process below:
Step 1: Turn Off The Power
Whenever you’re working with a light fixture, it’s always good to turn off the power to this light at the circuit breaker in your electrical panel box, not just at the light switch. Doing this will make sure someone doesn’t flip the switch back on while you’re working. And doing it first makes sure you don’t forget about it later. If you want to be super, extra careful, you can also use a voltage dector to make sure there’s no current running to any wires before you make contact with them.
Step 2: Remove the Plastic Shade & Light Bulbs
Next, I took off the plastic shade cover, which was just snapped into place. Then I took out the long fluorescent bulbs and placed them aside, just to make sure the fluorescent tubes didn’t get broken in the process.

Step 3: Detach The Metal Panel
Then we snapped out the metal cover that concealed all of the wiring in the back of the fluorescent fixture. We were very relieved to see that the wiring came through the center of the fixture. In our last kitchen, the wires came through the ceiling at one end of the fluorescent light. Had that been the case here, it would’ve required more complex wiring to move the fixture box to the right spot.

Step 4: Disconnect Wires In The Old Fixture
Then, with the power still turned off, I unscrewed the wire caps so that we could detach the fixture wiring from the ceiling wiring. You don’t need to mess with any of the wiring within the fixture itself (aka, those blue and red wires on the right side of the photo below). Also, you can see this step was actually done after we painted the walls.

Step 5: Unscrew The Fixture Box & Remove It From Your Ceiling
Now the only thing holding up the fluorescent fixture were two big screws on either end. Once I unscrewed those with my cordless screwdriver…

…I could finally remove it entirely. Apparently I was so excited to have it gone, I blurred my face.

If you’re old fixture is in good enough condition still, we highly recommend donating it somewhere like a Habitat for Humanity Restore.
Step 6: Spackle Holes & Paint The Area
Since your new light fixture likely won’t cover the same spot, you’ll need to spackle any holes (like the ones from the screws), repair any other hidden damage, and also paint to blend the area with the rest of your ceiling. You’ll see us get to that later in this post, but this is an important step to make sure there’s no lingering evidence of your old fluorescent fixture!
Installing A Pendant Light Fixture In Its Place
With your fluorescent fixture gone, now you can turn your attention to installing your new pendant, semi-flush, or flushmount light. We planned to install a burlap quatrefoil shade from our local Decorating Outlet that we mentioned here, which is hung from the dual-bulb pendant below.
Note: If you’re not comfortable with this step, you can always hire an electrician (and also pat yourself on the back for saving the cost of removing the old fluorescent puppy). But if you made it this far, it’s pretty straightforward to finish the job yourself.
Step 1: Trim Any Excess Wire
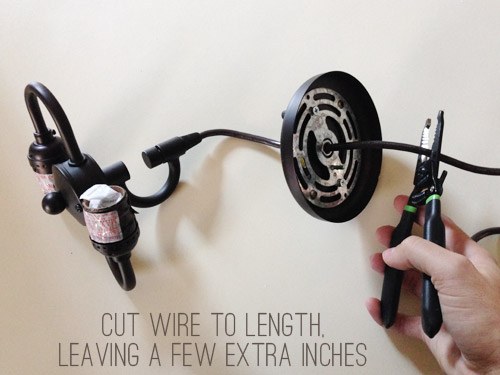
We wanted it to sit nearly flush to the ceiling so we had to cut off a lot of excess wire before hanging it. This can be done to shorten any pendant fixture, or even to convert a plug-in light to a hard-wired one.
Step 2: Use Wire Strippers On The Cord To Expose Wires
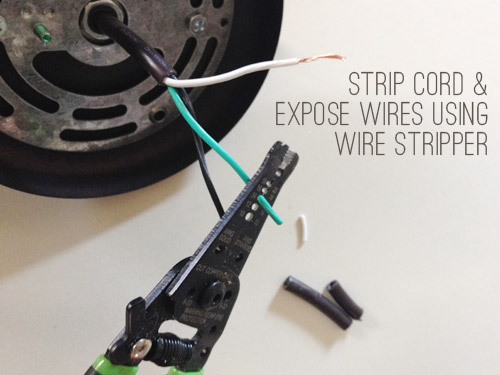
Next, I used wire strippers to expose the tip of each individual wire, creating a place for them to connect to the wires in the ceiling. This wire stripper I bought a while back (similar to this one) has been a great purchase, in case you’re planning to hang any light fixtures soon.
Step 3: Install Your New Fixture
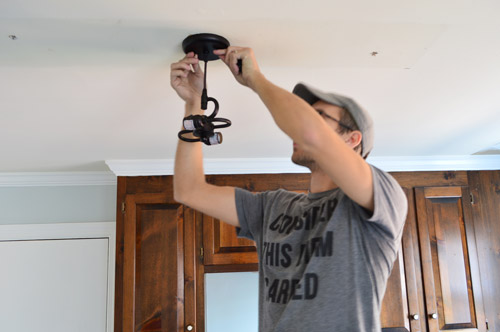
With my cord shortened and my wires ready, I could complete the installation per usual. First I attached the mounting bracket to the ceiling fixture box and then connecting the matching wires together with wire caps. Once those were secured, I tightening on the ceiling cover with the two small screws that came with it.
Here’s our new pendant once the shade was installed – and after we’d painted and patched the ceiling too (notice how the holes and discoloration are gone from the photo above?).
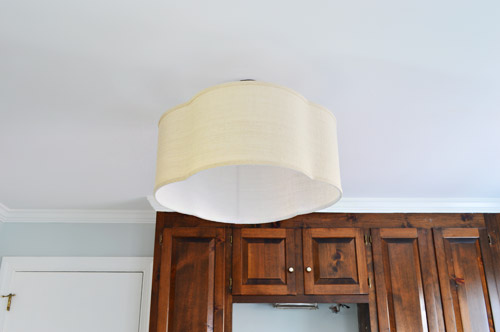
With that project completed, we turned our attention to the smaller fluorescent light above our kitchen sink. It had been hidden behind the cabinetry on that side, but now that we removed it (in favor of some open shelving that we can’t wait to add) – well, it’s super visible. So we repeated some of the same steps above, although this one didn’t even have a plastic cover to remove first.
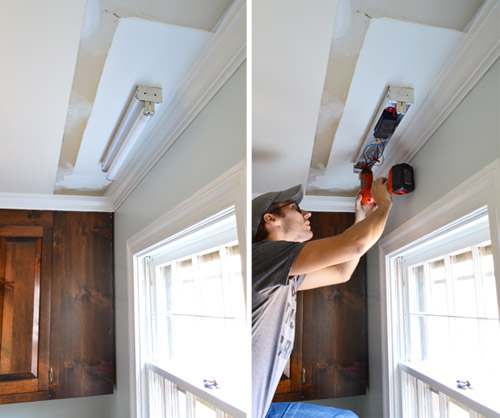
While it was a relief that the wires were centered over the window (again, this wasn’t the case in our last kitchen) it was kind of a bummer to take down the old light and discover that there was no fixture box in the ceiling. Just a big hole where the wires poked out.
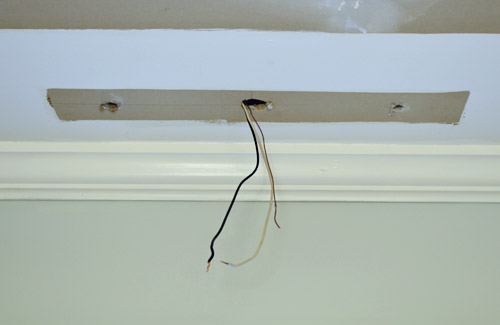
Installing An “Old Work” Ceiling Box
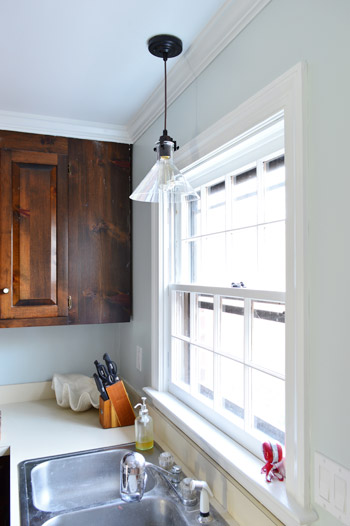
We’d need a fixture box to install the new glass funnel pendant that we’d planned for the space. I felt around near the wires to see if there was a beam that I could attach a fixture box to, but came up with nothing. So it meant installing one of these “old work” ceiling boxes. They’re designed to slide into existing walls or ceilings, where as “new work” boxes are attached to studs or joists before drywall is installed. Since we didn’t have a stud nearby, this old work box would just be held tightly to the drywall by three little wings on the side (see below). Once you’ve placed the box in your drywall, you tighten the screws on the face of the box which swing the wings out and pulls them forward – eventually hitting the back of the drywall and pinching the box in place.
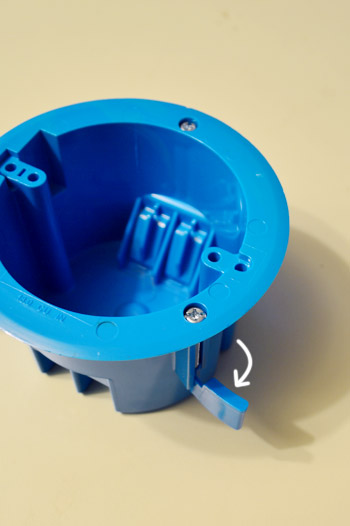
My research revealed that these aren’t technically meant to support light fixtures (something that nails or screws into the frame of the house is recommended), but plenty of reviewers on the Home Depot site reported using them to hang lightweight fixtures like ours, so we felt comfortable giving it a try. Update: It held in place with no trouble for a couple of years, at which point we finally remodeled the entire kitchen and replaced with with a recessed light.
Step 1: Make Sure Your Power Is Off!
If you hadn’t already turned off the circuit breaker at your electrical panel box, make sure you do it before you continue.
Step 2: Mark The Placement Of Your New Fixture Box
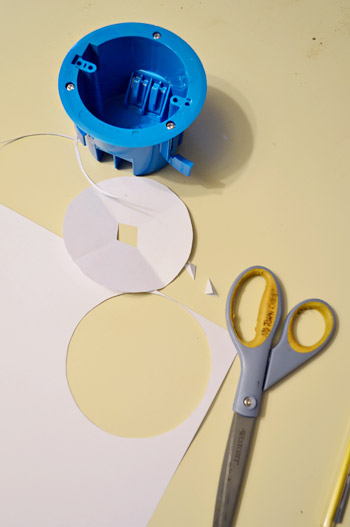
To install the box I first had to cut a hole for it in the ceiling. It had come with a template, but somewhere between checkout and home we lost the sheet. So Sherry made me one of my own – making sure it was a little bit smaller than the largest part of the box (since that’s a lip that needs to rest on the drywall).
Step 3: Cut Your New Hole
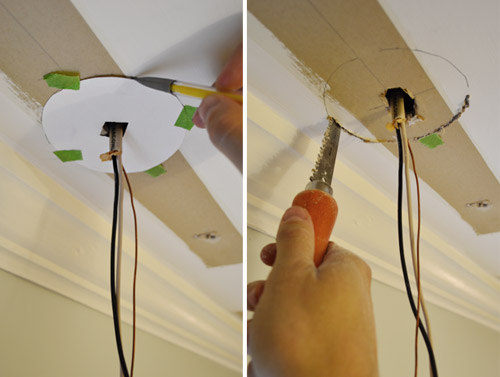
Next I traced that template onto the ceiling, making sure that my wires were coming out through the center. The I cut the hole out using a drywall jab saw. I kinda felt like I was in the middle of an old school cartoon where one character cuts the floor out from underneath another.
Step 4: Feed The Wires Through The Box
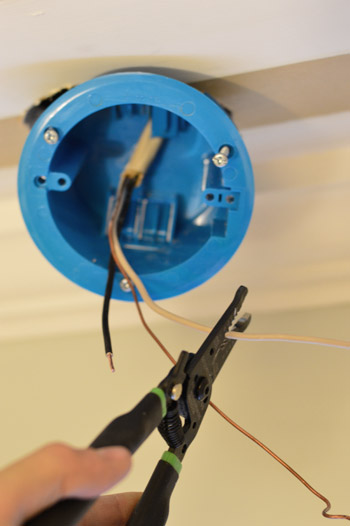
With my hole cut, I could feed my wires through the back of the box and trim them to size (they had been surprisingly long!). Again, make sure the power is off before doing this.
Step 5: Tighten The Screws To Secure The Box
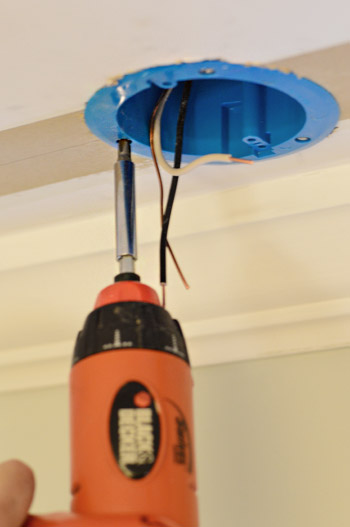
Then I tightened the screws on the face of the box with a screwdriver to secure it in place with those wings.
Step 6: Install Your Lightweight Fixture
From there, the actual fixture install itself was straightforward (connect the right wires, secure the canopy, turn on the power, and watch it glow). We like that it’s simple and doesn’t command too much attention visually (since the other two lights in the room do) and that the view out the window isn’t obscured by a big heavy shade.
UPDATE! We’ve finally transitioned our entire house to LED light bulbs (they save tons of energy & money, and they’re a lazy person’s best friend because you never have to change them). For anyone wondering, these are our favorite interior LED light bulbs. Their glow is warm & natural (not weird/blue like some of the others we’ve tried) and they use around 90% less energy.
With the fluorescent fixtures finally gone, we could finally break out the primer and paint to make the ceiling look new again. We just primed the areas that were raw drywall, then we painted the whole thing in BM Simply White (same color as the trim) in a flat finish. As is our usual MO, Sherry did all the cutting in around the crown molding, and I was the resident roller man.
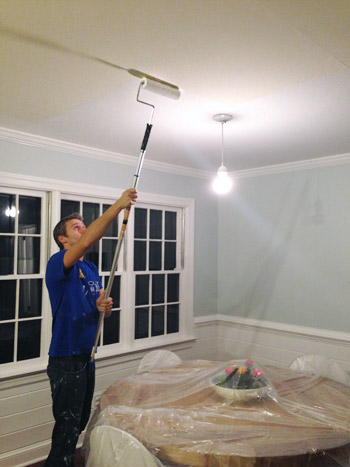
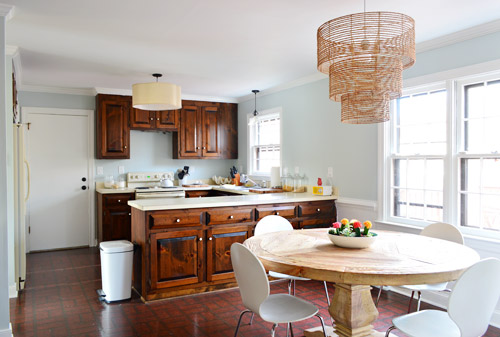
The difference of the painted ceiling is somewhat subtle in pictures, but in real life it makes the whole room look a lot fresher (the glossy white painted crown next to the old yellowed ceiling was no bueno in person, so we’re glad that’s gone for good). Oh and the two larger fixtures are sporting different colored cords at the moment, but we might spray the white one ORB like we did with this pendant in our previous kitchen if it bothers us after we paint the cabinets. We generally like an oil-rubbed-bronze cord for some visual contrast, but in this case we appreciate how the white one becomes kind of invisible over the dining area, so we’ll have to keep you posted if we alter anything as the room comes together more.

It’s nice to have three more items checked off the list, but it means we’re dangerously close to the task that we’re simultaneously psyched about and dreading: painting the cabinets. But man oh man, what a difference that will make (especially when they look like this up close).
Remove wallpaperMove fridge cabinet forwardRemove upper cabinets on window wall to prep for open shelvesReinstall crown molding(you can read about how we did those first four things here)Prime & paint the pantry and the door to the garagePrime & paint the trim, crown molding, & baseboardsPrime & paint the paneling(you can read about how we did those last three things here)Prime and paint the wallsRemove the existing microwave (craigslist it?) and get a countertop one we can eventually install in the pantry(here‘s the post on those last two bullets)
- Install a cheap range hood (we found one for $25 on craigslist that we can’t wait to hang) to lighten up that wall
Patch, prime, and paint the ceilingReplace the florescent light in the cooking area and the pendant over the sinkReplace and center the light over the dining table- Hang floating shelves on the window wall
- Paint the cabinets (you can see the colors we’re leaning towards here)
- Update the old cabinet hinges and knobs
- Get a rug for eat-in area? Possibly install peel and stick tiles everywhere?
- Curtains for windows?
Has anyone else checked off a few things on their to-do list? We know it was an interesting weather week for lots of you, so maybe you were able to accomplish your “drink hot cocoa” and “go sledding” to-dos? We’d be a bit jealous of that, considering that all that we got was ice and freezing rain.
Update – Wanna know where we got something in our house or what paint colors we used? Just click on this button:
*This post contains an affiliate link


Jenb says
We were actually doing the exact same thing this weekend. We removed a flourescent box fixture in our kitchen. (ours had a not-so-lovely stained glass look cover). I was only able to get the patching and sanding done this weekend. Painting the ceiling is scheduled for tonight and then we can hang our new island lighting. Can’t wait!
YoungHouseLove says
Woot! Good luck Jenb!
xo
s
Erika says
I am curious, when you put up the range hood, are you going to take down the cabinets above it?
YoungHouseLove says
We just plan to hang a cheap one from craigslist with the cabinets in place and then down the line for phase 2 when we get all new appliances and counters we’ll re-craigslist the one we are using for Phase 1 (we’re hoping for the same price we got it for since it was just $25) and then get a new one. Not sure what that one will be, but we might remove the cabinets for that one (ex: a chimney style metal one that goes to the ceiling).
xo
s
Katie says
It always surprises me when there is a simple solution to a problem. When I read that there was no electrical box I instantly thought that you would need an electrician to put one in. What a cool world we live in that there are solutions like the blue box you guys found. Amazes me every time.
Hilary says
The fixtures are lovely, but I think I’m most interested to see how the painted cabinets go with the faux brick floor. Can’t wait to see it.
Lisa says
Lovely!! Thanks for the step-by-step. :-)
Laurie says
Wow, that really does make a big difference. Shoot, I’d better get going and pick out some lighting options to get mine up. It has gotten annoying a few times recently not having a light over the sink.
I’m going to have to do it, aren’t I? Paint that darn ceiling. Ugh.
YoungHouseLove says
Do it, do it, do it!
xo
s
Lauren says
Once again, I’m super impressed with your skills.
I love the three fixtures, but something isn’t working about them for me…Have you considered painting the “hardware” darker on the rope light?
YoungHouseLove says
Oh yes, that’s in the post for ya! Right before the picture of all three of them in the room at the bottom we chat about that :)
xo
s
Lauren says
ooops…must read more closely:)
YoungHouseLove says
No worries at all! We spill a whole lotta words, so it’s easy to miss stuff.
xo
s
Patti says
You can stop right there and it would be better than my finished kitchen! Looooking goooood!
YoungHouseLove says
Aw thanks Patti!
xo
s
Alyssa M says
The transformation is amazing! I love your choice of fixtures — beautifully complimentary without being “match-matchy.” Such an inspiration!
I do have a question (and maybe you’ve already addressed this in any earlier response I didn’t see). Do you have any plans to move the pendant over the sink back a little bit when you make other ceiling changes in Phase 2? From the angle in the photo, the pendant seems to hang awfully close to the window. It could be that the perspective makes it seem closer than it is, but my first thought was that it would make hanging window treatments difficult.
YoungHouseLove says
Yes, we’d love to give that some air when we do other more major ceiling/room work for Phase 2.
xo
s
Tirsa says
Looking better and better in there – which seems to make the cabinets scream “paint me!” . So, will you guys spend the Christmas season painting cabinets? You know, so as to keep up with tradition. :-)
YoungHouseLove says
I wouldn’t be surprised… although with the sprayer we hope it’s faster this time!
xo
s
Lori says
Stunning. What a huge, huge difference. I want to steal that blue for something. :-)
stephanie @ Housewife Mama says
I have the we two kitchen light fixtures and they make we want to scream “serenity now” every time I look at them.
stephanie @ Housewife Mama says
*same not we
YoungHouseLove says
Haha I love it!
xo
s
Amy G says
I love love the light fixtures you guys picked out! the painted ceiling makes the whole room feel fresh and clean, great job! Back when I lived in an apartment we put down the peel and stick tiles for the floor and it held up great! I would recommend using them for your Kitchen Phase one. I had my tiles for a little over a year and there wasn’t a noticeable difference with wear and tear.
YoungHouseLove says
Thanks Amy G! They’re definitely on the maybe list, so we just have to be sure they’re worth the time/money when they’ll just get removed for Phase 2. Although we did them in our first kitchen for Phase 1 (and later removed them) even before we had a blog, so it was definitely an update we appreciated in there to tide us over!
xo
s
Amy J. says
The rope chandelier is so, so amazing. The ORB is a good idea, but I agree that it is nice that the rope is the star when it is white. I like how the sink light blends into the background, and the shape is chic. I am going to reserve judgment on the quatrefoil one until the cupboards are painted. The light itself is gorgeous, but I think my reservation is just because I am not used to seeing pendant lights in the kitchen. Still, you always manage to convert me in the end, and I look forward to it!
Christy says
I am sorry if this question has already been asked…are you happy with your new beautiful light fixtures light provided? (Say that ten times fast)I get super frustrated with low lighting in the kitchen and was just curious.
YoungHouseLove says
Thankfully we have more natural light in this room (four windows as opposed to one that looks into a sunroom, which was the case in our first and second house) so this room is actually super bright to have three fixtures and four windows (even at night the three fixtures are nice enough light that we usually don’t even turn on the sink pendant and we’re ok with just two). We’d also love to add under-cabinet lights down the line, just for prep reasons when we do Phase 2, so that’s another way to get more “functional” light without getting a super bright room in general.
xo
s
Jenny says
Everything looks great! I can’t wait to see how your painted cabinets turn out. I remember watching an episode of Ask This Old House a few years ago when they showed how to paint older kitchen cabinets and the difference was amazing. (I think the is the episode here: http://www.youtube.com/watch?v=VfD0dXdcNbw) Congratulations on your baby boy! We have a daughter a couple of months younger than Clara and just had our baby boy about two months ago. I kind of wish you’d had your boy first so I could have gotten some ideas for my baby’s nursery. I was so sure I was going to have only girls, that I already had a name and nursery planned. Then when we found out it was a boy I felt so stumped and had such creative block. We hadn’t even settled on a name before we went to the hospital (It turns out you don’t have to have a name picked out before you take the baby home, so Will and Kate aren’t the only ones who get to do that, I guess.) Anyways, I feel like my nursery is still evolving so I can’t wait to see what you come up with!
YoungHouseLove says
Aw thanks so much Jenny!
xo
s
Emily says
I will admit that I was not loving the woven chandelier when you first posted about it but now that it is up I am a huge fan! I am glad to see that Clara’s succulents are still in full swing! Loving the whole kitchen transformation! You must be so proud of the progress!
YoungHouseLove says
Aw thanks Emily! We’re so glad all the cacti are chilling in that bowl without dying on it! We haven’t watered them once!
xo
s
Renee says
We’ve been wanting to replace our florescent fixture in our kitchen. I am lucky to have 10 foot ceilings. However, I am worried about having enough light in the kitchen if I replace it with a normal light. Do you feel like it’s bright enough with a normal light versus a florescent light box?
YoungHouseLove says
Thankfully we have more natural light in this room (four windows as opposed to one that looks into a sunroom, which was the case in our first and second house) so the space is actually super bright to have three fixtures and four windows (even at night the three fixtures put out enough light that we usually don’t even turn on the sink pendant and we’re ok with just two). We’d also love to add under-cabinet lights down the line, just for prep reasons when we do Phase 2, so that’s another way to get more “functional” light without getting a super bright room in general.
xo
s
Ann says
Can you show us an evening shot (after dark) with your kitchen lights on? I am curious to see how much light they actually put out and how they look in action.
YoungHouseLove says
Yes, we’re going to try to take one tonight for ya, and hopefully can just toss that into the next kitchen update post!
xo
s
bekah says
Do you guys want to come and paint my ceilings for me? Ive been putting it off for…oh…8 months now.
Your updates look wonderful! I love that woven pendant so much. Like…so much.
YoungHouseLove says
Aw thanks Bekah! Painting ceilings totally sucks, but when it’s done.. ahhhh. So much better!
xo
s
Dawn Lowe says
I have a question, and not sure if you’ve ever done a post on this topic before but here goes. I see you guys talk all the time about using Craigslist, but I’m always hearing horror stories on the news of people being robbed or killed while doing Craigslist deals. Obviously many people use Craigslist successfully, and these bad incidents are the exception to the rule, but I just wondered what your tips are for using Craigslist safely. Especially since John is Captain Safety. Thanks! :-)
YoungHouseLove says
Here’s a post about that for ya! We generally have had great luck, but we have a few safety things we take into account too! https://www.younghouselove.com/2012/11/this-is-how-we-craigslist/
xo
s
Dana@chocolateandsunshine says
What a difference a new light fixture can make to a space!! I swapped out my kitchen chandelier with a vintage crystal one found used and love it. Yours is really pretty and unique! Nice choice atop that gorgeous table!!!!
As much work as it is, isn’t it fun to update your choices with each move? Good luck with everything you have going on.
YoungHouseLove says
Yes, light shopping is one of my favorite things! And it feels so sad to strip the lights out of a house before we sell, so we like knowing that we’re leaving “her” in all of her beauty instead of taking her apart and adding boob lights for the next owner. Haha!
xo
s
Samantha says
Looks great! You guys amaze me every day :)
Heather says
The rope light is beautiful, but I am not seeing how a single 60W bulb is going to provide enough light. I realize your kitchen isn’t massive, but a single bulb seems skimpy in terms of illumination. How do you determine how much actual light you need?
YoungHouseLove says
I think every house/room is different (the way it faces, the color of the walls, if there are windows and shiny appliances to reflect light, etc). Thankfully we have more natural light in this room than our last two kitchens (four windows as opposed to one that looks into a sunroom) so this space is actually super bright to have three fixtures and four windows – even at night the three fixtures put out enough light that we usually don’t even turn on the sink pendant and we’re ok with just two. We’d also love to add under-cabinet lights down the line, just for prep reasons when we do Phase 2, so that’s another way to get more “functional” light without getting a super bright room in general. In the eating area, the light we replaced only had one bulb (the other had been burned out for months) so that’s how we determined we’d be ok with one. And we can use an LED Or CFL to get more light without using more wattage (they use less energy but can shine brighter) so that’s another trick!
xo
s
Lauren says
This might be a silly question, but do you have to do anything special if you are replacing a fluorescent light fixture with a regular one?
YoungHouseLove says
Nope, just as long as there’s a fixture box back there you should only have to patch some ceiling holes and then rewire everything back up and the new light should work great in its place.
xo
s
JG says
All the “stuff” that makes it work as a fluorescent is inside the fluorescent fixture- so nope! It all comes down when you remove the fixture.
Robyn says
That chandelier is gorg!! Not something I would have initially gravitated towards, but I really like it! Def. makes me want to look outside my usual comfort zone when it comes to lighting :)
Shelly says
When you first showed the light fixture over the table I hated it! I thought to myself I normally have similar taste but not in this case. Now that I see it with the table and chairs I love it! I cannot believe what a difference it makes to see it hung and in correlation with the furniture. And I love the white cord in this case since it ties the chairs in.
YoungHouseLove says
Aw thanks Shelly!
xo
s
Thomas says
I have a florescent ceiling light similar to yours in my kitchen and I am itching to replace it! Does the new light you installed hang low so that people might hit their head on it? I can’t really tell from the pictures other than it looks so much better than before! I love it.
YoungHouseLove says
Thanks Thomas! John’s tall, so we always make sure there’s ample clearance. The drop from the ceiling is 17″ for that fixture, so unless someone’s 6’9′ tall, they thankfully can’t hit their head on it.
xo
s
Kathleen says
Hey guys! Beautiful job on the kitchen! The lights make all the difference! We have floresent lights in our kitchen right now and we can hardly stand it!
On a side note, I have long been curious about this, and I am not sure if you have already addressed it or would rather not, but…Your first couple of houses were somewhat modest when you bought them and you clearly increased their value (like 10 fold it looks like) with all of your updates. Now your new house is so grand! How much money did you put into each house and what was the return on your investments?
My husband and I bought a modest, 1950’s rancher that we plan to update with the idea that we could totally stay in it forever if we needed/wanted to, but it almost seems silly not to update and upgrade ourselves into something nicer down the line. Thanks and great work!
YoungHouseLove says
We actually have written a post on each house (how much we put in vs. how much we got out). So here are those links for ya!
https://www.younghouselove.com/2010/12/did-we-make-a-profit-selling-our-house-2/
https://www.younghouselove.com/2013/06/did-we-make-a-profit-selling-our-house/
xo
s
Kathleen says
You are the best! Thanks!
Kim says
This is totally unrelated to your post but I had a “must tell Sherry about this!” moment this weekend. I went browsing around Goodwill for some holiday inspiration and was just looking over some dusty ornaments when I turned a corner and, lo and behold, what should meet my eyes but an entire Nate Berkus display. Nate Berkus! In Goodwill! The clouds parted and angels started singing (though that may have been the music box in aisle 3) and I snatched up a gorgeous octagonal mirror STILL IN THE BOX for $10. I may or may not smile and pet it every time I walk by my living room…
YoungHouseLove says
No way! Such a lucky score!
xo
s
Laura says
Guys all the Selamat brand stuff at Wayfair is on sale now. Your link there shows the price of your light is only $235 now.
YoungHouseLove says
Someone else told me that! I’m so bummed that they don’t do price adjustments, but psyched if someone else snags things for a better deal!
xo
s
Megan says
Congrats on the BOY!!! You will LOVE having a little man in the house. :-)
As for the lights… amazing transformation. You guys make it look so simple. I know for a fact that patching/priming/painting over head is no joke! I adore the breakfast table light, definitely worth the splurge. And I agree with others that the cabinets are really starting to stick out (for the worse!)… excited for their facelift. However, in clicking back to your old kitchen pics you linked, I have to say, I miss more color on the walls. I know you’re going to the more tone-on-tone, layered look (which seems to be all the rage)… but don’t you miss the cheeriness/boldness of some of your previous colors? And I know you’ll bring in pops with accents and such… but I feel like different wall colors really make the space and give each room their own identity.
YoungHouseLove says
I think it all depends at what room you’re looking at. In our last house, Clara’s nursery seemed more subdued to us than her first one or her room at this house (her first room had green walls and a blue ceiling, in our last house it was soft pink, and in this house it has a pink ceiling with a bold pink door and colorful raindrops on the wall along with a bold rug). We also have bright teal on the back of our door in the foyer when the back of our front door has always been white in our other houses. And our bedroom is a deep blue color while the last one was a medium gray. So I definitely think we’re embracing splashes of color, but sometimes those tend to come in when rooms are a bit more finished (for example, when we have floating kitchen shelves we’ll have some bright color on those as well as potentially adding patterned window treatments and a textured/colorful rug under the table if we can find an indoor-outdoor one we love). I think rooms generally look a little basic until they come together more (it felt that way in our last house too, even though that one had lots of color by the end).
xo
s
Megan says
My impatience is showing… isn’t it? :-) Don’t get me wrong, I love the vibe you’ve got going on in this house, and I definitely love the idea of taking a new style approach instead of recreating the same thing with every move. It just seems the overall palette (in large areas) is so much more muted than I expected given your choices in the second house. I wondered if that was conscious decision and/or if the choices seem different to you guys or just us readers?
YoungHouseLove says
I think we just choose what we like best at any given time (so we didn’t move here and say “let’s use less color” or anything, especially since we see ourselves using it more in some places (like the doors and ceilings for example) but we do notice that we tend to subconsciously swing back and forth over time, for example the first house felt really safe/neutral (no dark walls, no pops of color in doors, hardly any bright geometric rugs, all white curtains without any color/pattern, etc) and then we played more with pattern and color in our second house, and then we moved in here and the style of this house (classic colonial) makes us still want to be playful but also makes us want to balance classic touches. So I definitely think our last house’s style (mid-century ranch) inspired us to use more color/pattern and this one still has us craving a happy home, but wanting to balance the whole timeless/classic thing that a colonial seems to command with all of the awesome moldings and extra thick crown :)
xo
s
Megan says
Oh… the extra thick crown! Be still my heart. Sooooo jealous of that! I hear what you’re saying and I really appreciate the feedback. I think I’m so curious because I too, am striving to find my own balance in our colonial. I am yearning for more playfulness with color and pattern but it needs to find “its place” (i.e. not forced or trendy). I’m not sure if I can continue to find ways to interject more fun within my traditionally styles spaces or I need a complete overhaul. Not a major life problem by any means, but one I am trying to figure out!
I do see the similarities between your current choices and your first home, each equally beautiful. :-)
YoungHouseLove says
Aw thanks Megan! I would just keep playing around! It took us 4.5 years to figure out our first house and 2.5 on our second (and that one didn’t even feel done when we left). It’s definitely one of those over-time-things-become-more-clear things! And there’s so much to be said for trial and error (over months and years it can be awesome at figuring things out).
xo
s
Christine says
Looks awesome! And you are so lucky to have such a helpful and handsome guy helping you!
YoungHouseLove says
Amen!
xo
s
Jenna says
I just had a question about the ceiling… apologizing if someone else asked… were they popcorn or plain? Just bought a house that was built in 79 and dealing with the popcorn ceiling issue… (along with a vaulted wood living room) Can you paint over popcorn ceilings?
YoungHouseLove says
They’re just flat, but you can paint over popcorn ceilings with a roller meant for textured surfaces (our den in our first house had these textured panels on the ceiling and they looked so much better with some fresh white paint).
xo
s
Susan says
Terrific transformation! I have one question for you: what brand of primer did you use for the raw drywall?
Go Petersiks! Thanks!
YoungHouseLove says
We have been using Kilz stainblocking primer (the water-based one is now no-VOC, but still works really well, so we’ve been really happy with it).
xo
s
Eilene says
It’s official. I’ve adopted your multi-phase project plan approach. I realized it yesterday after staring at my laundry/half bath and saying to myself – “That can be a phase one… that’s phase two” YHL is in my brain! The great part is that I feel like the pressure is off for everything to be “perfect” before I can start enjoying a space. Oh and I love the light fixture over the table… Do you find yourself just staring at it? :-)
YoungHouseLove says
Aw thanks Eilene! Good luck with everything! You’re right about just embracing that things will take time and many stages (always does seem to take the pressure off, and stop the bleeding of the wallet too). As for the light, oh yes. There’s a lot of staring. And a fair amount of sweet-talking when no one else is around. Ha!
xo
s
Sarah R says
Hi Guys! Oh my goodness, that looks so awesome, I love the chandelier over the table! When I was looking back at the post where you told the paint colors you were looking at, I saw that the top cabinets were going to be painted a light gray and the bottom ones a darker gray. See I love the bottom color, but don’t you think that it would look a little sterile to have a completely gray kitchen? Personally, I think that the darker gray at the bottom and white at the top would look super nice. Of course, I know that which ever you chose will look so much lighter and brighter than the dark brown, but I was just wondering!
Sarah
YoungHouseLove says
We just think white at the top will make the counter and the off-white appliances look worse by comparison, so we just held up swatches to those items to see what seemed to work better with them. The walls are blue and we’ll have white floating shelves, colorful items on the shelves, some art, window treatments, a rug in the eat-in area, etc – so it hopefully won’t be all gray in the end at all!
xo
s
Nilda says
I have a similar problem in my master bath with the “old work” not providing support for a vanity light. I was wondering if you think this would work for that being that it’s not on the roof but on the wall? I am anxious to change the lighting but don’t want to ruin the wall. I guess what im asking is what is a “light weight” fixture? I am loving the colors you’ve chosen.
YoungHouseLove says
Yes, it sounds like they work really well for the wall, so as long as something’s not too heavy I think it would work well. Maybe do a little more research to be sure, but from what we have read they’re especially good for wall-work.
xo
s
Elizabeth says
John in glasses. Meeeowwww.
YoungHouseLove says
That’s my favorite too. He’s so weird about them (prefers contacts most times) but I campaign for glasses day sometimes.
xo
s
clodia says
I know taking pictures of light is basically the most difficult thing in the world, but could you talk about or try to take a picture of the amount of light from the kitchen pendant versus the fluorescent? We’ve got one in our kitchen, which of course is totally thrilling, but I’m not certain exactly what I’d want to replace it with yet. I’m curious how much your solution lights (although it sounds like quite a bit). Thanks! And they all look beautiful.
YoungHouseLove says
I think every house/room is different (the way it faces, the color of the walls, if there are windows and shiny appliances to reflect light, etc). Thankfully we have more natural light in this room than our last two kitchens (four windows as opposed to one that looks into a sunroom) so this space is actually super bright to have three fixtures and four windows – even at night the three fixtures put out enough light that we usually don’t even turn on the sink pendant and we’re ok with just two. We’d also love to add under-cabinet lights down the line, just for prep reasons when we do Phase 2, so that’s another way to get more “functional” light without getting a super bright room in general. Oh and if your pendant takes CFLs or LEDs (ours takes two) you can gain more light without using more wattage (they save energy by glowing brighter while using less energy). Hope it helps!
xo
s
Ro says
I love all the lights separately but they seem off in this space because they’re all so different from each other. Maybe it’s because the space isn’t finished yet but it doesn’t feel “right”.
I think because there’s so much light coming from the window in front of the sink already, you can remove the light hanging in front of it and just leave the other two.
YoungHouseLove says
You’re totally right that the whole room looks off since it’s half done right now, but we hope it comes together as we go! We love a pendant light over the sink (we’ve had one with other lights in all of our previous kitchens) and we think once we add the shelves, paint the cabinets, add art & window treatments & a rug in the eat in area it’ll start to make a lot more sense. Here’s hoping!
xo
s
Kelly says
It looks beautiful! I have FOUR fluorescent fixtures in my small kitchen and I hate them. They’re recessed too! A nightmare!
CJ says
These look great! We are installing a hanging chandelier in our dining room and the new fixture does not have any white wires or other color wiring to indicate which is positive, etc., like most lights. Both wires are black – we googled and seems the one with white writing is positive? But we are not sure. Have you guys ever run into that when installing new lights? We like to DIY most things but get nervous with electrical stuff!!! Thank you!!!
YoungHouseLove says
So strange! We’ve never run into that. Anyone have tips for CJ?
xo
s
Amy says
One wire probably has a ridge that you can feel with your finger. This is the “white” wire.
http://www.apartmenttherapy.com/how-to-install-a-new-light-fixture-176074
minabey says
Your new lights are lovely and I love how bright and airy your kitchen looks now! Err, could you show a photo of the big chandelier lit up at night or evening? Sorry, just curious. If I were a cat, I’d probably be dead bec. of my curiosity. :)
YoungHouseLove says
Haha! John has actually planned to take some shots tonight and we’ll add them into a future kitchen post as an update for you guys!
xo
s
cora says
The room looks great, but I must know where John got his “Consider this diem carped” shirt! I must add it to my husbands T-shirt collection (and then secretly steal it as my own).
YoungHouseLove says
That was from fab.com with a birthday gift card from his sister. It’s totally my favorite.
xo
s
Rachel says
Hi there,
So we have horrible fluorescent lighting in our kitchen too, but it’s sunk into the ceiling in a recessed box. Any ideas for dealing with something like that (on the cheap)?
Your kitchen is looking fantastic!!
YoungHouseLove says
That sounds like you’ll need to build it out with lumber and drywall to get it to look flush. Anyone done that with tips for Rachel? Maybe try googling or even checking youtube.com if there’s a video tutorial?
xo
s
stephanie says
I like how you guys just DO s&*t. : )
Inspiring!
YoungHouseLove says
Hahaha!
xo
s
KarenH. says
The kitchen is looking more and more “you” every project. Especially the ‘eat in’ area. Very nice choices!
Angela S. says
We spent the weekend moving our kitchen around. We’ve been working on a remodel (FOREVER) and this weekend was pretty monumental, as in we moved stuff and got a sink installed! http://instagram.com/p/hrDtU7nH0i/
YoungHouseLove says
Wahoo! Feels so good to get the sink!
xo
s
Manda Wolf says
Looking good! I know you guys don’t like it but I am digging the dark wood cabinets. I understand they need updating but to me a nice dark cherry wood or espresso color would look awesome in there!