Updated 2019
We just swapped out two old fluorescent light fixtures in our kitchen and they each required slightly different techniques becausfe – surprise! – one of the didn’t have a fixture box in the ceiling behind it. Yep, just wires coming out of the drywall! So we’ll show you two ways to replace your fluorescent lighting with a more udpated pendant or flush mount fixture.
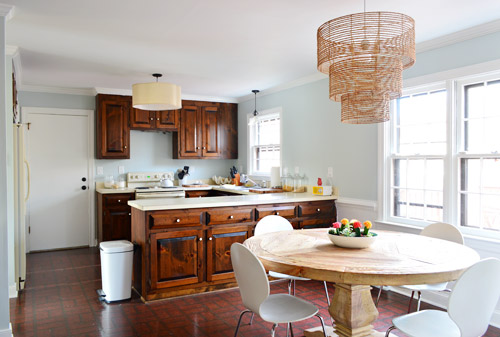
Removing A Large Fluorescent Light Fixture
First we replaced the big fluorescent light near our stove. It was incredibly simple to do so we’ve outlined a step-by-step process below:
Step 1: Turn Off The Power
Whenever you’re working with a light fixture, it’s always good to turn off the power to this light at the circuit breaker in your electrical panel box, not just at the light switch. Doing this will make sure someone doesn’t flip the switch back on while you’re working. And doing it first makes sure you don’t forget about it later. If you want to be super, extra careful, you can also use a voltage dector to make sure there’s no current running to any wires before you make contact with them.
Step 2: Remove the Plastic Shade & Light Bulbs
Next, I took off the plastic shade cover, which was just snapped into place. Then I took out the long fluorescent bulbs and placed them aside, just to make sure the fluorescent tubes didn’t get broken in the process.

Step 3: Detach The Metal Panel
Then we snapped out the metal cover that concealed all of the wiring in the back of the fluorescent fixture. We were very relieved to see that the wiring came through the center of the fixture. In our last kitchen, the wires came through the ceiling at one end of the fluorescent light. Had that been the case here, it would’ve required more complex wiring to move the fixture box to the right spot.
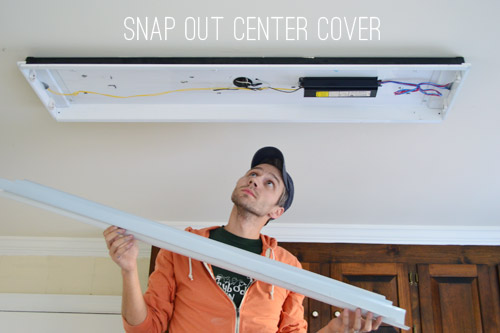
Step 4: Disconnect Wires In The Old Fixture
Then, with the power still turned off, I unscrewed the wire caps so that we could detach the fixture wiring from the ceiling wiring. You don’t need to mess with any of the wiring within the fixture itself (aka, those blue and red wires on the right side of the photo below). Also, you can see this step was actually done after we painted the walls.

Step 5: Unscrew The Fixture Box & Remove It From Your Ceiling
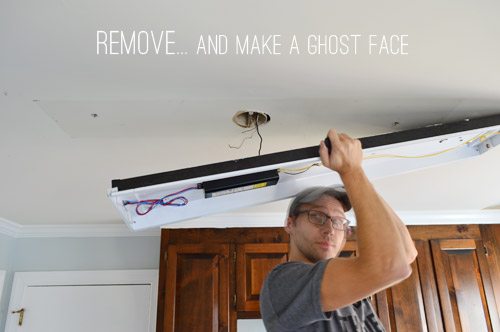
Now the only thing holding up the fluorescent fixture were two big screws on either end. Once I unscrewed those with my cordless screwdriver…

…I could finally remove it entirely. Apparently I was so excited to have it gone, I blurred my face.
If you’re old fixture is in good enough condition still, we highly recommend donating it somewhere like a Habitat for Humanity Restore.
Step 6: Spackle Holes & Paint The Area
Since your new light fixture likely won’t cover the same spot, you’ll need to spackle any holes (like the ones from the screws), repair any other hidden damage, and also paint to blend the area with the rest of your ceiling. You’ll see us get to that later in this post, but this is an important step to make sure there’s no lingering evidence of your old fluorescent fixture!
Installing A Pendant Light Fixture In Its Place
With your fluorescent fixture gone, now you can turn your attention to installing your new pendant, semi-flush, or flushmount light. We planned to install a burlap quatrefoil shade from our local Decorating Outlet that we mentioned here, which is hung from the dual-bulb pendant below.
Note: If you’re not comfortable with this step, you can always hire an electrician (and also pat yourself on the back for saving the cost of removing the old fluorescent puppy). But if you made it this far, it’s pretty straightforward to finish the job yourself.
Step 1: Trim Any Excess Wire
We wanted it to sit nearly flush to the ceiling so we had to cut off a lot of excess wire before hanging it. This can be done to shorten any pendant fixture, or even to convert a plug-in light to a hard-wired one.
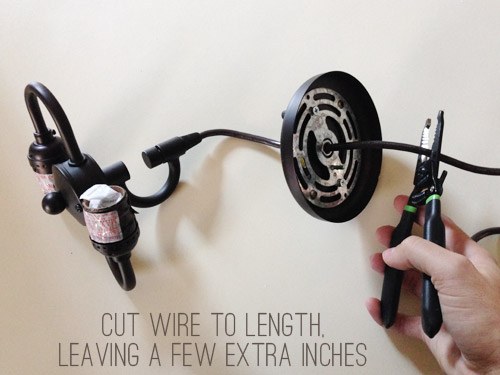
Step 2: Use Wire Strippers On The Cord To Expose Wires
Next, I used wire strippers to expose the tip of each individual wire, creating a place for them to connect to the wires in the ceiling. This wire stripper I bought a while back (similar to this one) has been a great purchase, in case you’re planning to hang any light fixtures soon.
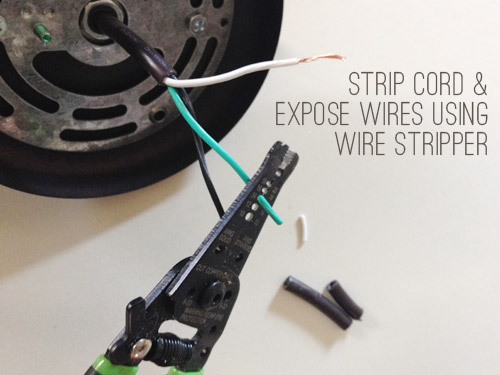
Step 3: Install Your New Fixture
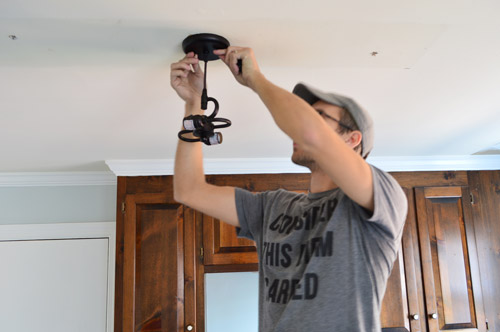
With my cord shortened and my wires ready, I could complete the installation per usual. First I attached the mounting bracket to the ceiling fixture box and then connecting the matching wires together with wire caps. Once those were secured, I tightening on the ceiling cover with the two small screws that came with it.
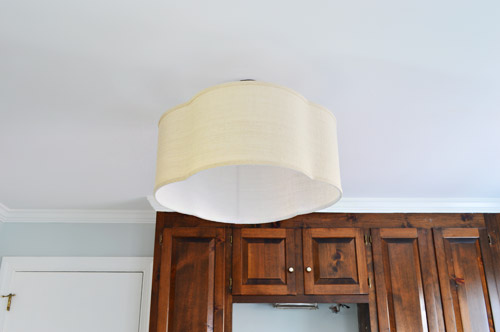
Here’s our new pendant once the shade was installed – and after we’d painted and patched the ceiling too (notice how the holes and discoloration are gone from the photo above?).
With that project completed, we turned our attention to the smaller fluorescent light above our kitchen sink. It had been hidden behind the cabinetry on that side, but now that we removed it (in favor of some open shelving that we can’t wait to add) – well, it’s super visible. So we repeated some of the same steps above, although this one didn’t even have a plastic cover to remove first.
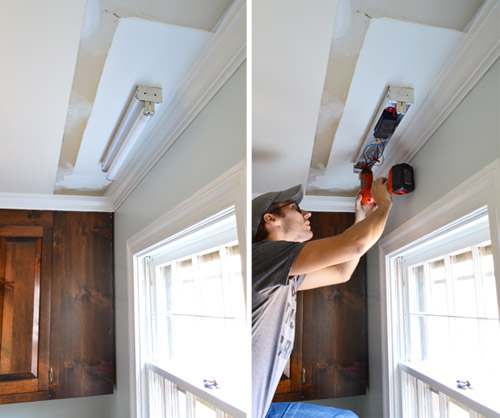
While it was a relief that the wires were centered over the window (again, this wasn’t the case in our last kitchen) it was kind of a bummer to take down the old light and discover that there was no fixture box in the ceiling. Just a big hole where the wires poked out.
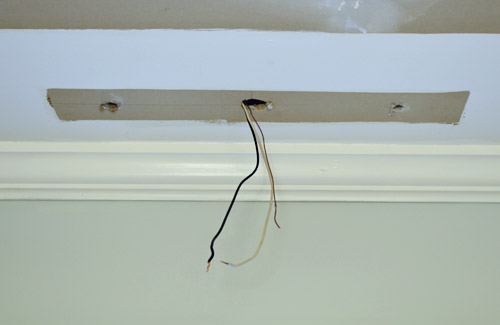
Installing An “Old Work” Ceiling Box
We’d need a fixture box to install the new glass funnel pendant that we’d planned for the space. I felt around near the wires to see if there was a beam that I could attach a fixture box to, but came up with nothing. So it meant installing one of these “old work” ceiling boxes. They’re designed to slide into existing walls or ceilings, where as “new work” boxes are attached to studs or joists before drywall is installed. Since we didn’t have a stud nearby, this old work box would just be held tightly to the drywall by three little wings on the side (see below). Once you’ve placed the box in your drywall, you tighten the screws on the face of the box which swing the wings out and pulls them forward – eventually hitting the back of the drywall and pinching the box in place.
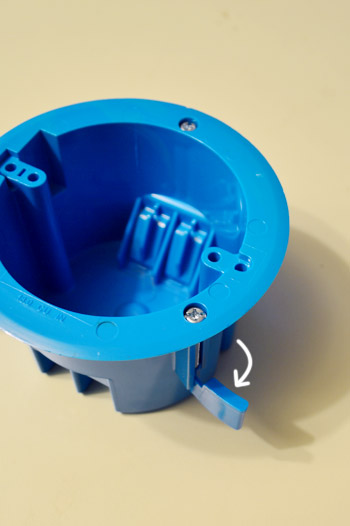
My research revealed that these aren’t technically meant to support light fixtures (something that nails or screws into the frame of the house is recommended), but plenty of reviewers on the Home Depot site reported using them to hang lightweight fixtures like ours, so we felt comfortable giving it a try. Update: It held in place with no trouble for a couple of years, at which point we finally remodeled the entire kitchen and replaced with with a recessed light.
Step 1: Make Sure Your Power Is Off!
If you hadn’t already turned off the circuit breaker at your electrical panel box, make sure you do it before you continue.
Step 2: Mark The Placement Of Your New Fixture Box
To install the box I first had to cut a hole for it in the ceiling. It had come with a template, but somewhere between checkout and home we lost the sheet. So Sherry made me one of my own – making sure it was a little bit smaller than the largest part of the box (since that’s a lip that needs to rest on the drywall).
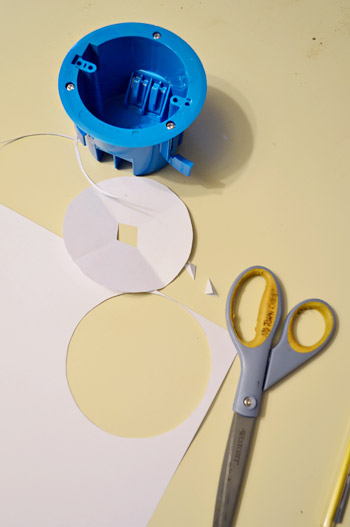
Step 3: Cut Your New Hole
Next I traced that template onto the ceiling, making sure that my wires were coming out through the center. The I cut the hole out using a drywall jab saw. I kinda felt like I was in the middle of an old school cartoon where one character cuts the floor out from underneath another.
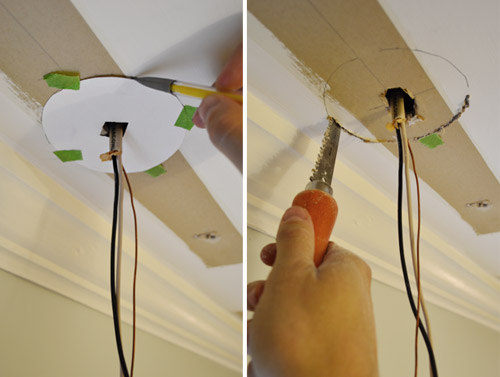
Step 4: Feed The Wires Through The Box
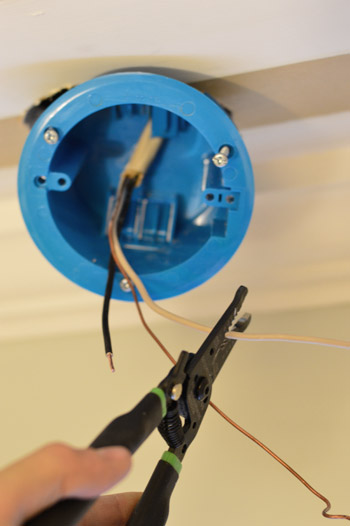
With my hole cut, I could feed my wires through the back of the box and trim them to size (they had been surprisingly long!). Again, make sure the power is off before doing this.
Step 5: Tighten The Screws To Secure The Box
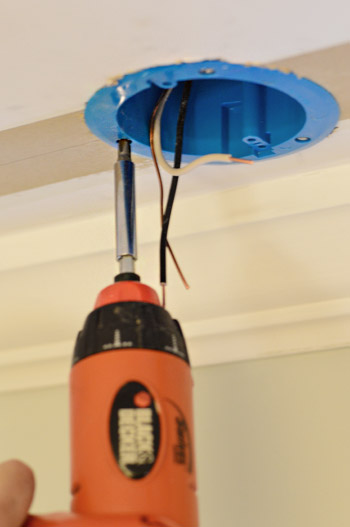
Then I tightened the screws on the face of the box with a screwdriver to secure it in place with those wings.
Step 6: Install Your Lightweight Fixture
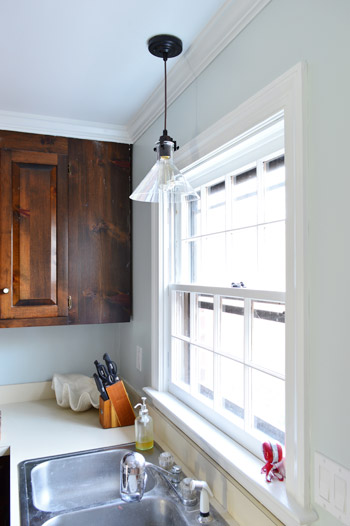
From there, the actual fixture install itself was straightforward (connect the right wires, secure the canopy, turn on the power, and watch it glow). We like that it’s simple and doesn’t command too much attention visually (since the other two lights in the room do) and that the view out the window isn’t obscured by a big heavy shade.
UPDATE! We’ve finally transitioned our entire house to LED light bulbs (they save tons of energy & money, and they’re a lazy person’s best friend because you never have to change them). For anyone wondering, these are our favorite interior LED light bulbs. Their glow is warm & natural (not weird/blue like some of the others we’ve tried) and they use around 90% less energy.
With the fluorescent fixtures finally gone, we could finally break out the primer and paint to make the ceiling look new again. We just primed the areas that were raw drywall, then we painted the whole thing in BM Simply White (same color as the trim) in a flat finish. As is our usual MO, Sherry did all the cutting in around the crown molding, and I was the resident roller man.
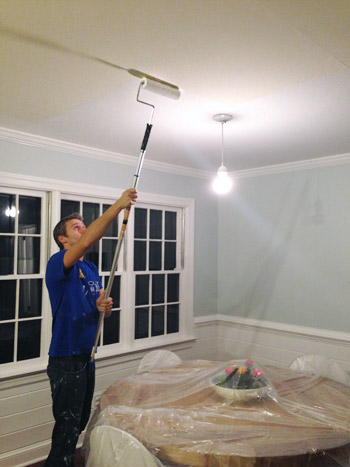
The difference of the painted ceiling is somewhat subtle in pictures, but in real life it makes the whole room look a lot fresher (the glossy white painted crown next to the old yellowed ceiling was no bueno in person, so we’re glad that’s gone for good). Oh and the two larger fixtures are sporting different colored cords at the moment, but we might spray the white one ORB like we did with this pendant in our previous kitchen if it bothers us after we paint the cabinets. We generally like an oil-rubbed-bronze cord for some visual contrast, but in this case we appreciate how the white one becomes kind of invisible over the dining area, so we’ll have to keep you posted if we alter anything as the room comes together more.

It’s nice to have three more items checked off the list, but it means we’re dangerously close to the task that we’re simultaneously psyched about and dreading: painting the cabinets. But man oh man, what a difference that will make (especially when they look like this up close).
Remove wallpaperMove fridge cabinet forwardRemove upper cabinets on window wall to prep for open shelvesReinstall crown molding(you can read about how we did those first four things here)Prime & paint the pantry and the door to the garagePrime & paint the trim, crown molding, & baseboardsPrime & paint the paneling(you can read about how we did those last three things here)Prime and paint the wallsRemove the existing microwave (craigslist it?) and get a countertop one we can eventually install in the pantry(here‘s the post on those last two bullets)
- Install a cheap range hood (we found one for $25 on craigslist that we can’t wait to hang) to lighten up that wall
Patch, prime, and paint the ceilingReplace the florescent light in the cooking area and the pendant over the sinkReplace and center the light over the dining table- Hang floating shelves on the window wall
- Paint the cabinets (you can see the colors we’re leaning towards here)
- Update the old cabinet hinges and knobs
- Get a rug for eat-in area? Possibly install peel and stick tiles everywhere?
- Curtains for windows?
Has anyone else checked off a few things on their to-do list? We know it was an interesting weather week for lots of you, so maybe you were able to accomplish your “drink hot cocoa” and “go sledding” to-dos? We’d be a bit jealous of that, considering that all that we got was ice and freezing rain.
Update – Wanna know where we got something in our house or what paint colors we used? Just click on this button:
*This post contains an affiliate link


Lori Anderson says
So exciting to see more progress being made on your kitchen! And yes, the weather this weekend encouraged us to get something done. A rainy day in Southern California encouraged us to go to a local antique mall and look for a small china hutch for our new house. And we found one!——a 1930s or 1940s Queen Anne piece. We got a discount because of some scratches. But my dad show us how to buff them out. So fun!
YoungHouseLove says
Wahoo! I love when you actually find something. I always tell people that it might look like we have all the luck finding things, but for every item that we find and blog about there are usually 100 trips to shops that yield nothing, so it’s so nice when you finally hit the jackpot!
xo
s
Amy says
Love the lights! We are planning to paint our kitchen cabinets in the near future and I was wondering if you are going with the Benjamin Moore Advance again or trying something new? Our cabinets are in great shape so we’re hoping that painting them will be a permanent solution. Also we have a hideous faux brick tile backsplash (that will be replaced with the counters, sink, and flooring in the future)that I am wanting to paint but I wasn’t sure if I could use primer and regular paint or if I needed to use a special product. What would you recommend?
Thanks
YoungHouseLove says
Yes, advance all the way! We were so happy with that on the office cabinets and the kitchen cabinets that it’s our go-to choice for those jobs.
xo
s
Iris says
Hmmm…I think this is not a winning combo, sorry.
Bethany W says
LOVE the lighting! Accessories make all the difference. We just got done painting our wood cabinets white and I am obsessed with how fresh our kitchen looks now. New goal = keeping them sparkling white!
YoungHouseLove says
Congrats! That’s such a big job!
xo
s
Charity says
Can you pretty please rotate your table and chairs 45 degrees?? I promise you will love it and it will make it flow better! It will give it more of a round look than trying to make a “head of table” look with it on the square.
YoungHouseLove says
We actually used to have them that way and then tried this way and liked it better this way! So funny! Might have to try spinning it again to check!
xo
s
Kelly says
Yep, finally getting back into my long ToDo list. Assembled my new glass side table for next to my couch. The box sat on the living room floor forever. But finally busted that puppy out.
Oh I wish I could paint my kitchen cabinets (my next door neighbor did and they didn’t kick her out of the complex, so…hmmm.) They are about in the same condition as yours and I would love a fresh coat of paint on them. Would transform the place tremendously.
Really enjoying all of your progress around the house. Still love the new place. So pretty. :)
YoungHouseLove says
Aw thanks Kelly! I love that your neighbor didn’t get kicked out, so it has you saying hmm! Haha!
xo
s
Emily says
This weekend we took the branches from a pine tree that had fallen down in our yard and made a wreath, fireplace mantle garland and lighting decorations similar to this (http://www.pinterest.com/pin/263671753155006028/)
We also installed a new 5-2 programmable thermostat and finished painting the window, chair rail and baseboard trim in our dining and living room. The crown molding and ceiling will have wait until we get the tall ladder set up. We also start prepping our attic for blown-in insulation that we hope to accomplish next weekend.
YoungHouseLove says
So awesome! Sounds like you got tons done!
xo
s
Elizabeth says
Would you all mind doing a post showing how you’ve got all your cabinets arranged on the insides? Where do you put all your stuff? You’ve got lots of cute dishes and glasses, so where do they all hide?
Cool lights, btw!
YoungHouseLove says
That would be fun once we have the floating shelves up (since everything will shift again when that happens!).
xo
s
Isabella says
I think curtains wouldn’t be the right approach (at least for the really big windows over the dining table). May I suggest white shutters? I think they would rock in this space!
YoungHouseLove says
That’s fun too! We have thought about patterned roman shades as well, so we’ll have to see where we end up!
xo
s
denise says
I am in LOVE with the rope chandelier. Its all starting to come together bit by bit.
My husband and I are just finishing up a kitchen remodel and I am purchasing pendants for over our island. I found some on shades of light and was getting ready to place the order when I remembered that you guys usually have a discount code for them. I have searched your blog for that code but I’m not finding anything current. I can find older codes (do those still work?).
I’d love to get a working code so that I can make my husband happy with the savings..I think he’s sick of spending money on this project haha
YoungHouseLove says
They only have them sporadically so I don’t think any codes are running right now. So sorry Denise!
xo
s
JG says
If you google “shades of light coupon” you should find some codes. I see at least one for 5% off…
Lauren says
“Remove…and make a ghost face.”
I LOLed there a bit more than I should have.
Karen says
Stuh-ning!! You guys have such great taste!!
Question: Is it too early to say yet if they give off enough light at night?
YoungHouseLove says
Thankfully we have more natural light in this room than our last two kitchens (four windows as opposed to one that looks into a sunroom) so this space is actually super bright to have three fixtures and four windows – even at night the three fixtures put out enough light that we usually don’t even turn on the sink pendant and we’re ok with just two. We’d also love to add under-cabinet lights down the line, just for prep reasons when we do Phase 2, so that’s another way to get more “functional” light without getting a super bright room in general.
xo
s
Meg says
That space is looking so great!
I got to work on insulating the rim joists in my basement this weekend, which meant cleaning out the basement and filling a car for the dump before I could get anywhere near the joists. I only moved about 6 weeks ago and the home had been owned by the same family that built it in 1935. The basement is full of treasures (and also trash, but TREASURES!) so it will be an ongoing project. So far it’s been not nearly as much work as I feared, even without a power saw to cut the foamboard. I wish I was off work today so I could get down there and finish it up!
Izzy says
Really love that combo of light fixtures. So worth the time, effort, and money.
I’m psyched because this weekend I scored a 3′ tall potted hibiscus tree for $7! It was 75% off because it’s left over from the spring.
I’m going to decorate it and use it as a proxy Christmas tree this year, since we’re still furnishing the house, we’re low on money, and to me, a new house plant wins over the traditional tree :)
YoungHouseLove says
That’s awesome!
xo
s
Cheryl says
I think a Photoshopped pic of the cabinets in their projected colors would be an excellent early Christmas present for your readers. And it would serve as some good motivation for getting the task done, amiright? See? you should totally do that.
YoungHouseLove says
Haha, that would be fun! Although sometimes when we photoshop things like cabinets in a different color they look super fake (when I do dilemmas, I’m mostly adding items in front of images, like built-ins or flowers or house numbers or art) so when you’re altering what’s already in a photo (not adding new cabinets, but trying to change the color of the existing ones) sometimes it looks pretty bad/fake. Will have to see if we can pull it off without them looking weird!
xo
s
KC Saling says
Love the new light fixtures! We have the same awful light fixture over our table as you had over yours before you replaced it, and we’re debating what to replace it with. We’re in Hawaii, so ceiling fans throughout the townhouse are a must, so it will probably be something along that line.
JennP says
Does your peninsula have doors and drawers on both sides or just on the outside? I’ve never seen that before!
YoungHouseLove says
Yup, both sides. Although we never access them from the outside (all the prep and stuff is done in the dining area, and half of the peninsula is taken up by a broken old trash compactor). Haha!
xo
s
Michelle @ A Healthy Mrs says
Looking good! It’s starting to look like a totally different room!
Mindy says
I can’t wait to see the cabinets painted! I am itching to paint ours white, but we have off white countertops too, so I’m trying to hold out and see how yours look! I have no doubt they will be fabulous!
Barbara says
I have almost the same kitchen configuration except that I have cabinets over the long counter and either side of the sink. I like the look without cabinets, but I can’t imagine not having those cabinets! Where do you keep your dishes, glasses, mugs, pots & pans, etc.?
YoungHouseLove says
We have cabinets across from the dining table, so that helps too (although they’re mostly full of books and craft stuff these days). We just don’t have much kitchen stuff (no extra gadgets really), so we’ll be adding shelves on either side of the window for plates and glasses and mugs (they’re in the upper cabinets next to the stove right now) and the pans/pots are in the lowers next to the stove and the stove drawer itself.
xo
s
Victoria says
I love the three lights! They look so good together. My favorite is the rope chandelier over the table. The white mod chairs, the rustic table, the rope light all look fantastic together. The quatrefoil light is gorgeous too. IMO, a diffuser would give it a more “finished” look – just for designs sake not function necessarily. The simple pendant over the sink is perfect as well. I think I will get the same one for my Florida house.
I like the white cord for the rope light – it disappears and doesn’t interfere with the design.
What a beautiful kitchen you are creating. It is fresh, inviting, airy, and chic.
Just a side note – I don’t think you have to share your “baby bump” with us unless you feel completely comfortable doing so. I am happy you guys have invited us into your life – we learn so much from you (and not just decorating). However, you are entitled to some privacy as well. So please only do what you want in this regard. It is ok to have boundaries and we will respect them.
YoungHouseLove says
Aw thanks Victoria, you’re so sweet!
xo
s
Miranda says
Are you guys planning a his, her, and kid Christmas list again this year? I loved the ideas last year and look forward to your “favorite things” post.
YoungHouseLove says
Thanks Miranda! We’re aiming for this Friday with that!
xo
s
Tara C. says
This could not have come at a better time! After the holidays the hubby and I will be doing the very same thing! Thank you so much! Looks wonderful as always!
luckythreads says
One of the first things my husband and I did when we moved into our house was upgrade the florescent light in the kitchen. Ours had a frame constructed around it out of crown molding that was foam taped to the ceiling and had to be pulled off by force. Once we got that off and started taking apart the fixture, we found that the builder had attached the fixture into the ceiling using wing nuts. Sounds benign, except that the wing nuts were INSIDE the ceiling. I have tiny hands and even I couldn’t fit my hand into the ceiling to unscrew them. I have no idea how they were able to install it that way. The only thing I can think of is that they installed it before finishing the floor in the second story…weird. After trying for about 30min. to figure out a rational way to get them out, my husband Hulked out and just ripped the darn thing out of the ceiling. Oh DIY, you fickle friend. Luckily it was nothing a little spackle couldn’t fix!
YoungHouseLove says
Oh man, that sounds annoying yet triumphant in the end! Haha!
xo
s
JG says
Okay, maybe I am being overly cautious, but could you consider bolding the “with the power turned off” part! And I would also suggest adding that power should be turned off at the electrical box / circuit breaker, not just the switch. (Sometimes the switch could be fine, but especially in older places it sometimes isn’t- and no one wants to find out the hard way!)
Also, for excess wiring coming out of the wall (like on your over-the-window fixture)- it is better to keep the extra, and fold or coil that extra into the blue box in the back (instead of cutting it). That way if you or a later owner decide to move the light a few inches or so in the future, it is much easier to shift the box because you have the slack! Obviously cut it if it is longer than a foot or so though.
Also, they sell these great things for about $10 that look like a pen, and will make a chirping sound if you hold it near wires and they are live. It is called a non-contact voltage tester. And it is great as an extra check if you are at all nervous or cautious about working on wiring!
YoungHouseLove says
Thanks for the tips JG! We have found that bolding items can confuse people on our site (they think it’s a non-working link) but we altered the copy to add a note about turning off the power at the breaker, not at the switch. Not only is that step about turning off the power in the copy, it’s also in the image, so we hope that helps as well. We often blog about how we turn off the power to the entire house, just to be safe! Can’t be too careful. Thanks for the tip about the excess wiring – and we actually have one of those chirping line-checking tools and love it.
-John
Annie says
Love the lights over the table and the sink. The other one. Not so much. Maybe it looks better in person? I think it looks just randomly placed in the pictures of the whole room and felt you needed a flush mount there.
I do agree that the cabinets will look better painted.
Annie says
No words. I am in love with this transformation, you guys! I really hated your kitchen before. I know you didn’t love your kitchen either, but I thought as readers we’d be looking at it for a year! This is amazing and SOOOOOOO inspiring.
Did you decide on a lightbulb for the fixture over the table. (sorry if I missed that in the post!). I have a capiz chandelier in my dining room and I love it but have never gotten the exposed bulb to look right. The light is either too harsh or too dull – even with a dimmer.
Ok, if you guys can do this I can surely finish painting my bathroom! I’m doing it tomorrow!
I can’t wait to see what it looks like with the cabinets painted.
Carry on! :)
YoungHouseLove says
Aw thanks Annie! As for the light bulb over the table, so far we have been using a frosted globe one (clear glass was really bright but the nice round frosted one looks nice and isn’t as piercing to stare at – but still provides a nice amount of light). Hope it helps!
xo
s
Kelly says
I love what you are doing to your kitchen! You have inspired me to make the kitchen that we have livable while we save up to renovate it. It might take me some time but I think I have also convinced my husband to let me paint the cabinets, now we just have to agree on a color scheme….
cat says
Hey guys,
This looks amazing. I live in a four square in Richmond and was wondering what you ultimately did with the original light over the kitchen table. Are you planning on selling it? I have an odd hallway in my house that is screening for something similar!
YoungHouseLove says
We have it! We were planning to craigslist it, but I’ll shoot you an email because maybe you can just grab it from us!
xo
s
Carla says
I love new lights more than anything! I had my fluorescent changed out this summer (didn’t do it myself because I had some recessed lights installed at the same time….my kitchen isn’t bright like yours!). I absolutely love the change. Bad thing though…I have popcorn ceilings (UGH) and the part that was under the fluorescent is dingy. Haven’t taken the plunge yet to paint or scrape them so I’m pretending that dingy rectangle is a shadow. haha
Karen A. says
I don’t know if you could do it, but I would love to see a shot of the kitchen at night. The kitchen is very light, as you’ve said — in the day. But, I’m skeptical that the 2 fixtures in the kitchen would be enough light in the dark for me. Not second guessing your choice, just trying to make my own, as I have the exact same setup as you, space-wise.
YoungHouseLove says
We’re planning to shoot it at night for you guys and share that photo in the next kitchen update post!
xo
s
Alicia says
Wow, the kitchen is really looking great! Thanks for letting us come along on your kitchen adventures.
Now that you’ve done it both ways, do you have any advice on deciding to install hanging lights versus recessed pot lights in a kitchen?
YoungHouseLove says
We have really loved can lights too (they’re usually around $700-1K to buy/add/install assuming you don’t have any already and are hiring it out like we’re known to do, so this is a more budget friendly approach). You can always try an inexpensive overhead light (like from the ReStore or Home Depot for under $40) and then if you aren’t happy with that you can save up your pennies for can lights and hopefully craigslist or donate the inexpensive fixture (it’s worth a try with those first in case you love it and it ends up saving you a lot of money/time that you might have spent on can lights).
xo
s
Aubrey says
Do you have to use anything else besides spackle to fill in super large holes?
YoungHouseLove says
Ah, yes. We’re a fan of these round mesh patches. They’re awesome! There’s a detailed tutorial for using them (and even a video) over here for ya: https://www.younghouselove.com/2012/02/holey-mole/
xo
s
mp says
It wasn’t on my to-do list, but my entire electrical panel (and some other wires) are being replaced Wednesday after a couple of recent electrical incidents revealed that my circa 1975 box is in BAD shape. Not a pretty update, but my house won’t be in danger of burning down (the main cable going into the box from the meter actually caught on fire once, a sight the electrician couldn’t adequately prepare me for, although he tried. I turned many whiter shades of pale). Also a tree came down in my yard during the ice storm — no damage, just pine branches all over the yard – so I’ve called a tree service as well.
YoungHouseLove says
Oh no! Hope it gets a whole lot better MP! Nothing glamorous about those things, but it’ll hopefully be so nice to have them done!
xo
s
Bailey says
I AM TINGLING WITH EXCITEMENT over how close you’re getting to painting those cabinets!! It’s going to be such a game-changer! And I especially love the hanging fixture over your table – it looks perfect!
Bailey
Jen W. says
Oh how I wish I could replace our flourescent light this easily! We have those hideous popcorn ceilings and the light is flush to the ceiling so it would take de-popcorning the whole room as well as re-dry walling the big hole for the light. Sigh. Your new fixtures look gorgeous though!
sarah m. dorsey says
LOVE all of the pendants – they look perfect together!
thedogsma says
Got a lighting-related question for you. Over my kitchen peninsula is a ceiling fan (MUST stay–Indiana summers, no a/c) with a 3-bulb fixture, butt-ugly, fluted-glass shades & all. I would love to suspend a drum shade. I looked at your archives, & saw how to suspend one from a single-bulb fixture, but this is much wider.
I do need to keep the 3 bulbs, as I have 100W eqiv. CFL bulbs in them, & need the very bright light since this is my primary work surface (putting IKEA furniture together, baking, sewing) & I have cataracts. This is the middle fixture in an open-plan kitchen living room; there are 2 boob lights which I’m planning to replace with center-mounted track lights.
Any ideas? Or maybe I should just go ahead & have cataract surgery!
YoungHouseLove says
Hmm, I would try to grab the widest shade you can (something too narrow won’t accommodate those bulbs) and also look for something that’s not too long (it’ll be a head-hitting issue) and then just see if you can somehow suspend it – maybe with some metal chain from the hardware store hanging down and catching the “arms” of it if they come out on three sides? Good luck!
xo
s
Stacey says
Those light fixtures look amazing! We have two flourescent fixtures in our kitchen as well… and I have hated them since we moved in! I love the clear glass shade on the one over your sink. Our sink has a window above it too (along with the flourescent fixture). But it also has a piece of wood between the two cabinets (not the country-looking ones that are scalloped)- does that make sense? I’d love to replace that flourescent light but I’m wondering if a pendant light like yours would look strange with that piece of wood there. I’m going to try and add a picture so you can see what I’m talking about. Any suggestions?
https://lh3.googleusercontent.com/-USarP2drTJM/UaQUTUYJe-I/AAAAAAAAAMg/ZGaHdwnJ8Dg/s640/blogger-image-1739569584.jpg
http://www.misadventuresofthecranes.blogspot.com/2013/05/kitchen-reveal_27.html?m=1
YoungHouseLove says
Hmm, maybe try grabbing one and holding it up and taking a photo to see what you think? I bet it could still be cute, you just wouldn’t see the canopy, but a pretty pendant hanging down could still look nice!
xo
s
terry lewis says
Thank you for your posts. Excited to see you painted cabinets. We are right behind you!
Yvonne @ Dress This Nest says
Love love LOVE the light above the dining table!!! And mad props for your electrical skills. It makes me nervous every time.
Emily says
Have you ever considered removing the garbage can before you take your photos? The ‘after’ pictures are so wonderful and you obviously take your time (tripod, waiting for good lighting, using good equipment, touching up photos) so why not remove the eye-sore in the middle of the room to really make it perfect?
YoungHouseLove says
Ah yes, every time we shoot pics I’m sizing them and saying “we need to stick a can under the sink and call it good” – maybe after we paint the cabinets!
xo
s
-alex says
I don’t know if you’ve answered this somewhere in the comments, but did you clean the ceiling before you painted?
Our ceiling has 60 years of non-ventilated kitchen grime on it. (I exaggerate, I’m sure it was painted sometime in the last 30 years…)
I have TSP’d the walls before I painted them in this house, but the thought of scrubbing that ceiling makes me want to weep.
YoungHouseLove says
Oh man, that makes me want to cry too. We didn’t scrub ours, but it didn’t have any noticeable shine/grime/oil etc. The paint seemed to go on well. Maybe try a paint + primer to block the grime instead of scrubbing? Or use some sort of mop while standing below on the ground with TSP to save your back a bit from being up on a ladder and bending backwards?
xo
s
paintergal says
We just did the same thing in our kitchen and dining area. Unfortunately, under the fluorescent light boxes were more fluorescent fixtures, about 5″x18″, recessed into the ceiling. So once we removed that, we had to patch it with drywall and add electrical boxes for the wires. I have painted one coat of paint on the ceiling and it still needs another before we can install the new light fixtures. But it looks so much better already!
YoungHouseLove says
That sounds awesome!
xo
s
Lindsay says
Literally everything you do is brilliant. That “new favourite view” is also my new favourite! It’s perfect. Great job!
Sarah says
This room has come such a long way already! Love all the natural light it gets and love the new fixtures, especially the breakfast pendant. Meanwhile, on pinterest, I came across this kitchen (http://www.decorpad.com/photo.htm?photoId=109611&index=8¤tPage=5) and immediately thought of yours. Very similar layout, so purrrrty!
YoungHouseLove says
So pretty! Thanks so much for sharing the link!
xo
s
karen says
the light over the peninsula looks very out of place to me. it’s not centered…i think there should be two lights to balance it. not even sure i like that style in a kitchen. i think another pendant light like the one over the sink would have been better suited.
z says
Yes I agree. Love the dining light and sink light but the island bench light I would have suggested a simple thin style horizontal pendant that provides light rather than be a feature…..the dining light should be the hero in the room. But nevertheless the transformation is amazing!
Autumn Beach says
Be still my HEART! My goodness…I am in LOVE with that new chandy! How did I ever miss her debut?! And hanging above that fabulous kitchen table…well, I can see why it’s your new favorite view.
caroline [the diy nurse] says
I commend you! I switch out one light and I’m done for like, a month at least. You make my inner electrician shameful ;)
I’m still in awe of your chandy. It so sexy.
Mrs. Paulsen says
I just finished updating our hall– the last room to be painted. I took down a 1980’s vintage ceiling fan and replaced it with a beaded fixture– I made the shade myself out of beads I had leftover from other projects. I am in love with how it turned out–http://prairieblueshed.blogspot.com
Thanks for the inspiration with your clothespin shade!
YoungHouseLove says
That sounds awesome!
xo
s