So sorry to everyone who requested an update on this sooner! We first shared our new house to-do list back in May and later updated it at the end of July, so this check-in is well overdue. But one fun thing about going longer than you meant to before updating a list is getting to cross things off like crazy. Picture me grinning maniacally for a far too extended period like the people in this video who think they’re getting their photos taken while the camera’s really on video mode.
These posts came about when people asked us how we organize all the stuff that we have on our to-do list and we explained that we basically have one long run-on document that we update as we go. They said “share it!” and I said “aight, boo” and now we update it every few months, just to see where we’re going and to take a moment to appreciate what we’ve accomplished. I love lists like this because even when it feels like we’re all over the place and some projects are taking forever, seeing nearly 90 things crossed off after five and a half months of living here is pretty dang exciting. And addicting. Just looking at this list makes us want to dive into about five more projects simultaneously.
– The Front Yard (20% Complete) –
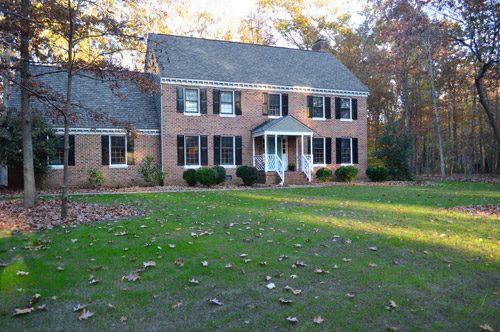
To Do:
Remove the trees that are dead/decaying/diseased beyond repair (an arborist and a home inspector helped confirm which ones should go)Get all exterior siding and trim repainted (there’s peeling paint, some rot, etc)Dig up all the quickly spreading ground cover(we still have some mulch beds to tackle, but the parts we graded and seeded are groundcover free)Aerate, level, and seed the yard- Make planting beds up front and mulch and plant them
- Transplant some of the crowded/overlapping boxwoods on either side of the portico (around the back or into other planting beds out front?)
- Redo old cracked concrete walkway from the driveway to the front door (add curves and pretty planting beds on both sides)
- Add some nice hard-scaping around the front (we’re so inspired by this house’s landscaping – so we’d love to add some raised stone beds)
- Plant a few green dwarf maples (it’s our favorite thing that we planted one at our previous house – you can see it in this post under the window on the right)
- Add low curved brick borders on either side of the driveway wired with lights (some of the houses nearby have ‘em and we love them)
- Get the driveway paved
– The Portico (25% Complete) –
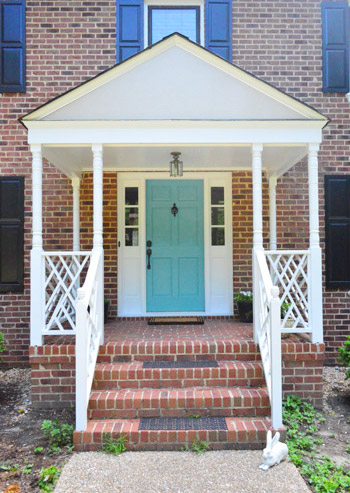
To Do:
Repaint the portico and sidelights (peeling paint = everywhere)Paint the front door- Arch the portico ceiling (it’s low and one house up the street has an arched ceiling with a gorgeous hanging lantern)
- Add a few planters, a new double-wide door mat, new porch lighting, etc
– The Garage (3% Complete) –
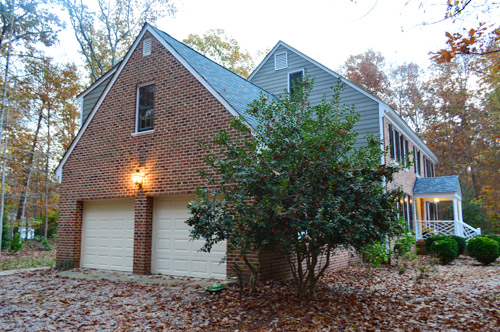
To Do:
Change out the tiny/rusty light over the garage doors(we attempted this, hence the 3% ranking, but we’re not sold on it, so we might return/replace it)- Repaint garage doors and add some nice hardware to beef them up
- Add a pergola over the double garage doors with vines creeping over it
- Finish the interior of the garage with drywall to create a workshop on one side and storage around the perimeter (add pegboards, shelving for paint and tools, etc)
- Reuse kitchen cabinets in the garage (they’re dinged up in a bunch of spots around the doors and frames, but would be great for the garage)
- Redo the four steps that lead from the garage to the kitchen (remove old carpeting and paint them? rebuild them completely?)
- Build a box on casters for scrap wood storage in the garage (we need a system to keep it from being all over the place)
- Maybe we should get old lockers and paint them fun colors and remove some of the doors for storage? (love these!)
- Possibly add plumbing for a utility sink out there (we’ve always wanted one in our “workshop”)
– The Foyer (70% Complete) –
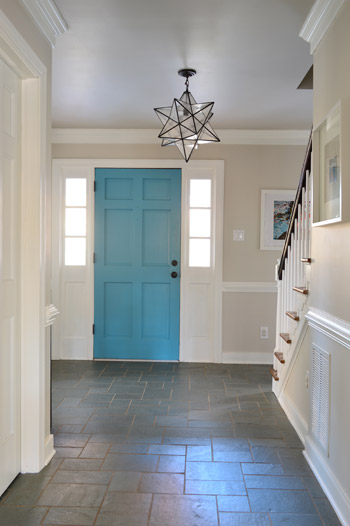
To Do:
Remove the doors that block the flow into the kitchen (and the pretty view out the back windows that will someday be french doors)Paint blue trim, doors, and sidelights
Remove wallpaper and repaint the wallsReplace the old foyer lightTurn the extra toy closet in the foyer into a craft and toy closet for Clara- Repaint the foyer ceiling
- Replace tile? (only if it’s unsalvageable – there are a few areas where it’s pretty beat up)
- Turn the other foyer closet into a shoe/coat closet with some functional built-ins
– The Stairs (90% Complete) –
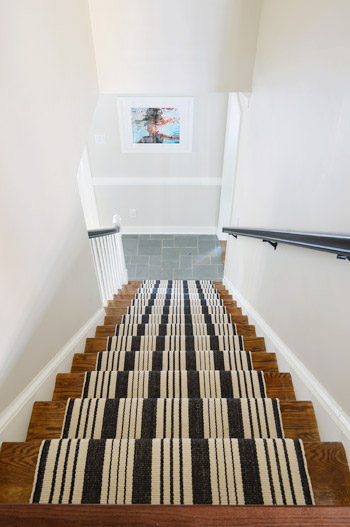
Remove the old carpet from the wood stairsPaint blue railing spindles and trimStain the top rails dark to match the runnerPaint the walls and ceilingPaint the stair risersInstall new striped runner with a rug pad under it- Hang some art
- Possibly hang a big chandelier overhead since the ceiling is so lofted above the top of the stairs
– The Half Bathroom (35% Complete) –
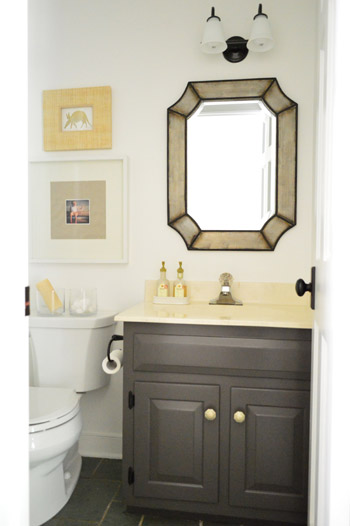
To Do:
Remove wallpaperRepaint all blue trim (and door)Upgrade door hardware & hingesPaint wallsNew mirror (something larger and higher – John can only see up to his shoulders now)Paint vanity (use odor blocking primer)Upgrade lightingReplace leaky faucet- Replace vanity & seashell sink (Phase 2) Note: We like to live with kitchens and bathrooms (and give them smaller budget-friendly updates) for at least a year before doing any major gut-jobs or renovations (this helps us get a better feel for how we use the space, and allows us to save our pennies for something thoughtful that we won’t regret (more on that here)
- Replace unsalvageable tile floor? (Phase 2)
- Here’s a shocker since this house is covered with old wallpaper, but we’re actually flirting with adding some cool new wallpaper since there’s no tub/shower in there (grass cloth? something charming like this or this?). Could be fun! Or a tiled accent wall could be fun. (Phase 2)
– The Dining Room (7% Complete) –
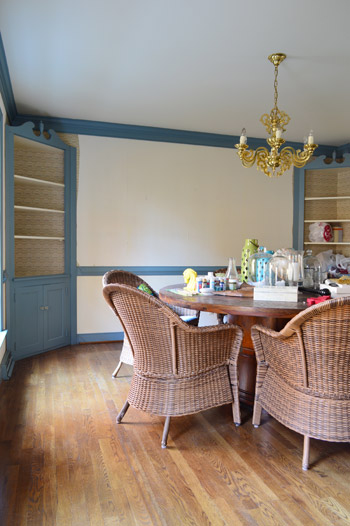
To Do:
Clean and reseal the wood floors- Upgrade built-ins (remove scrolly tops? build up to ceiling? paint white?)
- Paint all of the blue trim
- Remove
the wallpaper(I’m about halfway done, hence the half-crossed off line) - Repaint the walls
- Upgrade lighting and curtains
- Add
furniture, a rug (?) and art
– The Living Room (10% Complete) –
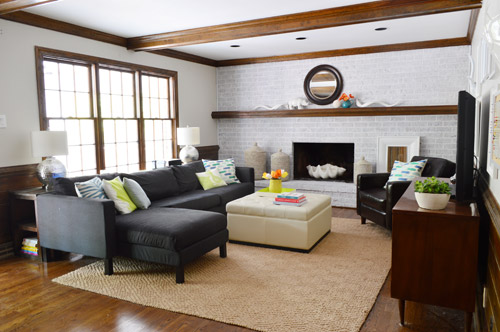
To Do:
Clean and re-seal the wood floorsPrime and paint the bright pink wallsTake down the old curtainsWhitewash the brick fireplace wall- Prime and paint the thick woodwork that wraps around the bottom half of the room’s walls (we LOVE it, and think it’ll be gorgeous in white)
- Figure out window treatments (bamboo blinds + curtains? printed roman shades?)
- Add more recessed lights to evenly light the room (there are just three near the fireplace)
- Turn the overhead beams into a coffered ceiling (like this)
- Build/find a nice big built-in-looking cabinet that holds the TV?
- Get gas logs after we save up our bucks (Phase 2)
- Add stacked stone or built-in molding around the fireplace? (Phase 2)
– The Office (7% Complete) –
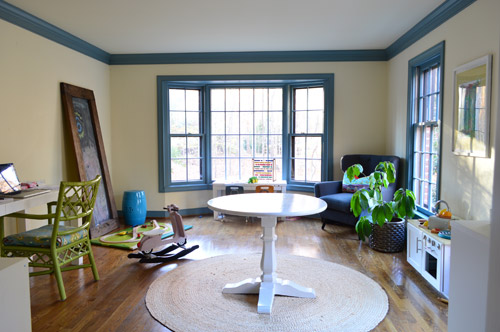
To Do:
Take down the old curtainsClean and re-seal the wood floors- Paint walls and trim and ceiling (don’t mind that little white table in the middle of everything, we were using that to shoot something)
- Add a double desk work area somewhere – perhaps coming out from the middle of the left wall like a peninsula (or the right wall between the windows)?
- Bring in storage (bookcase, file cabinet, etc) – possibly cool build-ins around the bay window?
- Add curtains/window treatments
- Hang art & create a brainstorm-zone on the walls (bulletin board? chalkboard?)
- Add two large potted plants (lemon trees? fiddle leaf figs?) in front of the two front-facing windows
– The Kitchen (7% Complete) –
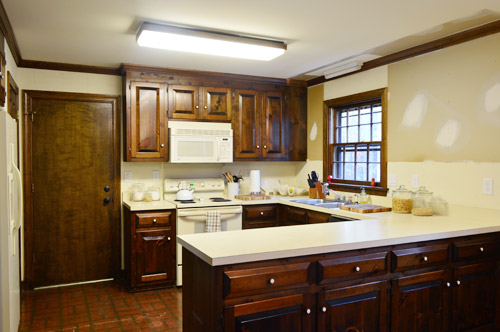
To Do:
Take down the old curtainsRemove the wallpaperRemove shelves thank flank the sink windowand add shelves thereMove the cabinet over the fridge forward so it’s accessibleGet a table for the eat-in area- Paint the walls
- Update the old kitchen lights
- Paint the pantry door and the door to the garage
- Prime and paint the woodwork and trim
- Paint the cabinets (they’re too beat up to keep forever, but they’ll eventually end up in the garage when we do a full kitchen reno)
- Remove almond microwave over stove and add an inexpensive vent (put microwave in pantry?)
- Convert giant triple window behind table into french doors leading onto the deck
- Open the wall between the kitchen & living room and add built-ins on either side (sort of like the dining room built-ins in our last house)
- Full kitchen reno for Phase 2 (replace the faux brick vinyl floors, damaged cabinets, laminate counters, old broken appliances, etc)
- Perhaps try our hand at heated floors under some fresh tile (that might spill into the foyer and hall bath if we can’t salvage that tile)
- Organize the pantry with pull out drawers and bins and containers (and replace the door with frosted glass?)
- Amp up the “command center” area across from the triple windows
- Paint the new kitchen french doors and door to the sunroom (black? charcoal? soft turquoise? white?)
– The Sunroom-Turned-Veranda (80% Complete) –
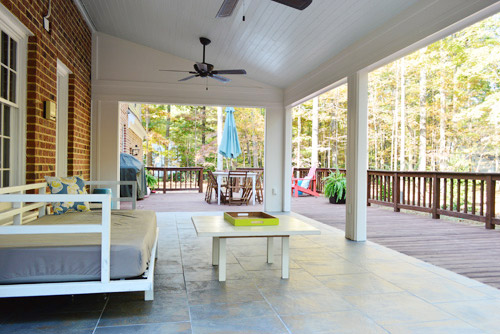
To Do:
Rip up old carpet and paddingPermanently remove the broken base heaterConvert sunroom to an open covered porch with new columns and no more sliders (many of the sliders are bad and the posts are rotten)Loft the ceilingAdd beadboard to the ceiling and paint it soft blueRedo the electrical to get two fans in therePaint all the trim, window trim, walls, and the french door into the living roomRetile the floor with outdoor-safe stone to upgrade the old concrete floors so they’re less slick, more level, and less stained- Add sconces to the posts around the room
- Build a box to hide the wires that creep down the brick wall near the french door
- Furnish the room with deck-friendly outdoor furniture
- Build a brick outdoor fireplace off of the sunroom after we open it up? Kind of like this, but different…
– The Master Bedroom (15% Complete) –
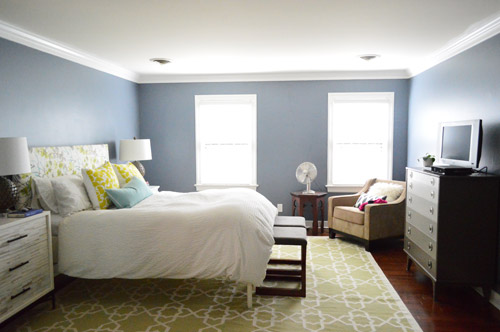
To Do:
Remove old carpeting and install hardwoodsRepaint all of the cream trim and doors white
Add faux wood blinds to all windows for privacy/light blocking
Repaint the walls- Repaint the ceiling (or even plank it or wallpaper it like this for texture?)
- Add built-ins along the entire bed wall (with an integrated window seat, hidden storage, and a nook for the bed to tuck into)
- Add a ceiling light fixture (there’s nothing in there)
- Bring in art, curtains, etc.
– The Master Bedroom Sink Nook (50% Complete) –
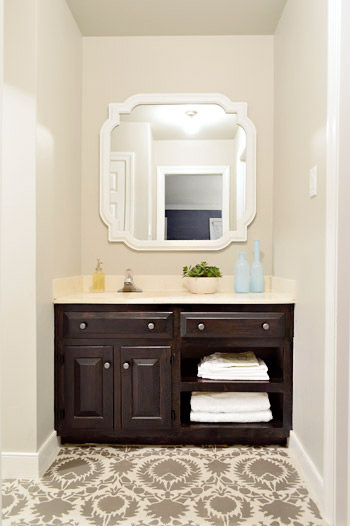
Rip up the carpet in sink area (we didn’t put hardwoods there because we eventually want to tile it)Replace the mirror over the sink for something biggerPaint the walls and the trim and the ceilingStencil and seal the subfloor (to tide us over until Phase 2)Add some simple shelves to the empty side of the vanity for balanceStain/paint the vanity and add new hardware- Phase 2 (a full reno where we knock down a wall and combine the master bathroom with this sink nook area)
– The Master Bathroom (15% Complete) –
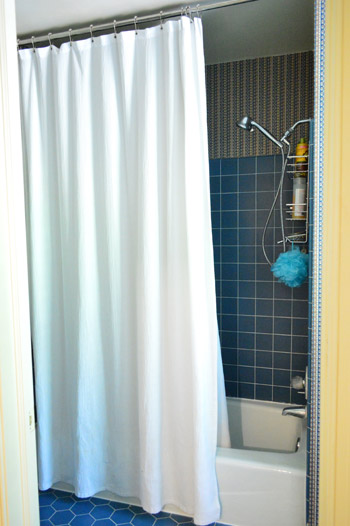
To Do:
Remove the glass shower doorBring privacy to the window with some blinds
- Remove the wallpaper
- Paint the walls and trim and ceiling
- Replace the bathroom mirror & upgrade the lights
- Completely redo the master bath down the line for Phase 2 (the fun blue hex floor tile is in rough shape and we want to expand the footprint into the sink nook area so it’s all one space (soaker tub? tiled shower as well? double sink? should be fun!)
– The Master Closet (40% Complete) –
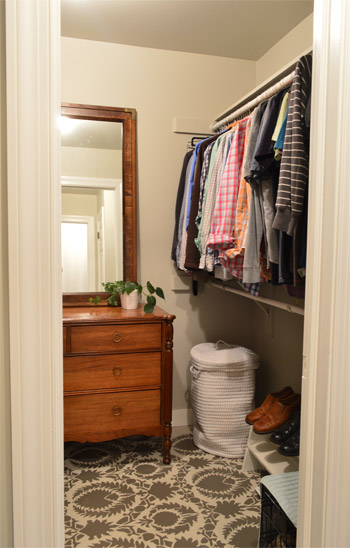
To Do:
Repaint all of the cream trimPaint the walls and ceilingRip up the carpet and stencil the subfloorPhase 2 (we’ll either extend the tile from the bathroom or the hardwoods from the bedroom into here, just have to decide if we’re moving the door or not)- New light fixture
- Organize/build out/pimp the entire space (we’re envisioning cabinetry with drawers, shelves, rods at different heights, etc)
-Upstairs Hallway (60% Complete) –
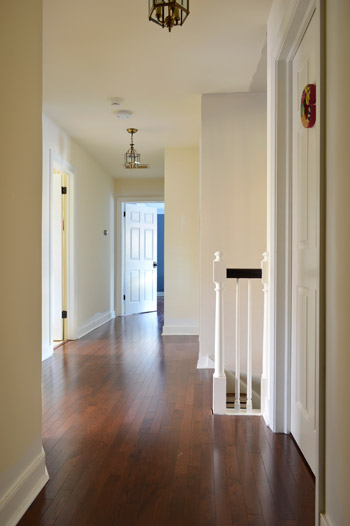
To Do:
Remove old carpeting and install hardwoodsRepaint all of the blue trim and doors glossy whiteGet all new hinges and door knobs (they’re not only bright brass, many of them are rusted/corroded so they can’t just be sprayed)Upgrade to a Nest thermostat (we hear nothing but great things about them, and John is drooling for one)Stain/paint the bannister and posts- Paint the walls and ceiling
- Replace the old hallway lights (or paint existing ones? not sure)
- Convert hallway linen closet into built-in open shelves or cabinets with shelves over them (sort of like this?)
- Add crown molding
- Add thick wood wainscoting (like we have in the kitchen and living room) to the upstairs hallway to break up the long space?
– Clara’s Room (50% Complete) –
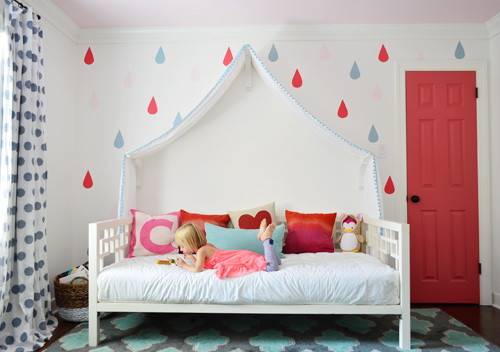
To Do:
Remove old carpeting and install hardwoodsRepaint all of the blue trim and doorsAdd window blinds & curtainsPaint the walls and ceilingMake a canopy wall for Clara’s bed (with lights)Paint the door to her closet bright pinkAdd crown molding- Hang art & bring in things like her play kitchen when the crib moves to the nursery
- Make entire wall of built-ins somewhere?
- Build a bench seat in Clara’s deep sloped ceiling-ed closet nook with beadboard or shaker shingles on the ceiling and wallpaper on the back wall (we want it to feel like a little playhouse within her room)
- Add a ceiling light fixture (boo! there’s nothing in there!)
– Future Nursery (10% Complete) –
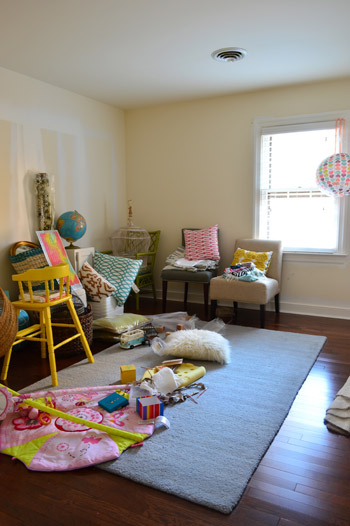
To Do:
Remove old carpeting and install hardwoodsRepaint all of the mauve trim and doorsAdd wood blinds (for light blocking)and hang curtains- Furnish the room (we’re going to hold off on major decorating decisions until we find out what this bun of ours is in early December)
- Repaint the walls and ceiling
- Add crown molding
- Add a ceiling light fixture (boo! there’s nothing in there!)
– The Guest Bedroom / Craft Room (10% Complete) –
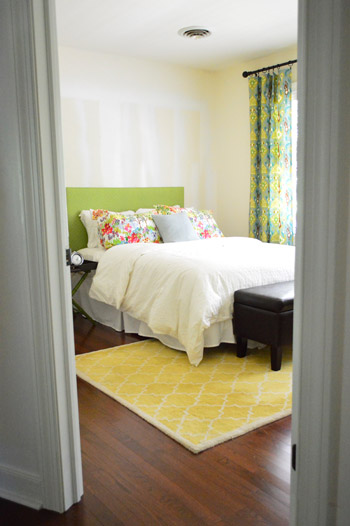
To Do:
Remove old carpeting and install hardwoodsRepaint all of the cream trim and doors- Paint the walls and ceiling
- Bring in
a bed anda dresser/desk that can accommodate my sewing machine & crafting stuff so this room can multi-task (it has the prettiest view/light – I’d love to creep in there and sew/paint on Sunday afternoons) - Organize and build out some craft/gift wrap shelving in the closet (lots of shelves and bins, etc)
- Add crown molding
- Add a ceiling light fixture (nope, there’s nothing in there either!)
– The Hall Bathroom (5% Complete) –
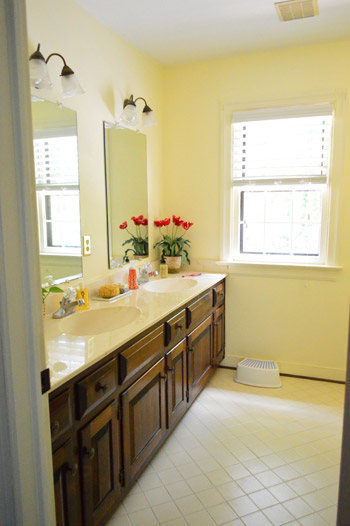
To Do:
- Paint
the door andtrim - Paint the walls and ceiling
- Replace the faucets and mirrors and lights for a mini-update (Phase 1)
- A complete redo is in order (Phase 2) since the old tile is stained/cracked and the tub & fixtures leak. Maybe we’ll do herringbone slate? Marble? Extra long rectangles of tile like this?
– Laundry Nook (10% Complete) –
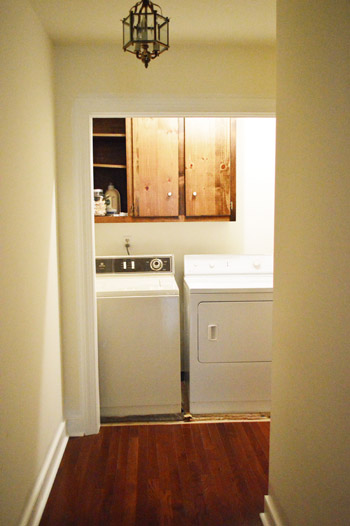
To Do:
Remove old carpeting and install hardwoods- Lay a more washer-proof flooring under the appliances like tile (we ended the hardwoods right in front of them so we could use something more water-safe in there)
- Completely redo the nook (new doors for noise control, updated energy star appliances, new counter, new cabinets – or more cabs if we re-use the existing ones)
- Add a swanky tile backsplash and some great art/lighting (I want to make it a fun little surprise jewel box at the end of the hallway)
– Unfinished Storage Room (0% Complete) –
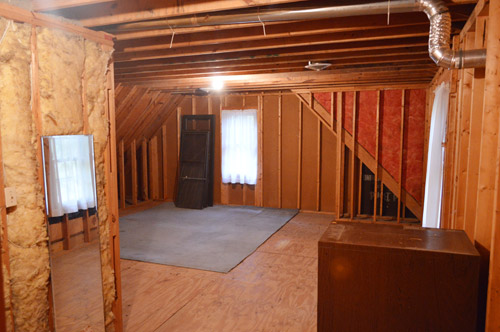
To Do:
- This will serve as an awesomely large storage room for a while (we have no current need for additional finished rooms), but down the line we’d love to finish it – maybe as a movie room / bunk room for older kiddos? This’ll be waaay down the line, but we dream of:
- Adding drywall
- Getting flooring
- Adding lighting
- Possibly enlarging the windows to let in more light
- Building out the closets (so there’s still some storage under the eaves)
- Furnishing the space with built in beds, a TV, a big sectional for lounging, etc – wahoo!
– General Whole House Ideas (7% Complete) –
To Do:
- Slowly upgrade all lights in the house to LEDs to save energy
- Replace all of the gold/wallpapered/off-white switchplates and outlets in the house (we’ve replaced around 15% of them so far)
- Upgrade to nicer frames, drapes, sheets, and curtain rods over time (they’re not cheap, but we’d love to be “grown ups” someday – even if it takes us 10 years or so to get there!)
– The Back Deck (50% Complete) –
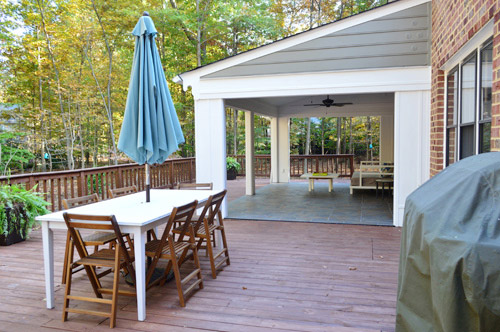
To Do:
Remove the giant oak tree that’s practically growing into the housePatch the deck hole after the tree is removedStrip and stain/seal the entire deckReplace any rotten/ warped boards as we go
- Add double wide stairs off the back of the deck that line up with the new french doors that we’ll add off of the kitchen
- Possibly build a pergola for more architecture and shade off of the back of house where the future kitchen french doors will be (square to the sunroom)?
- Build outdoor furniture like a table or lounge chairs for the deck
– The Backyard (15% Complete) –
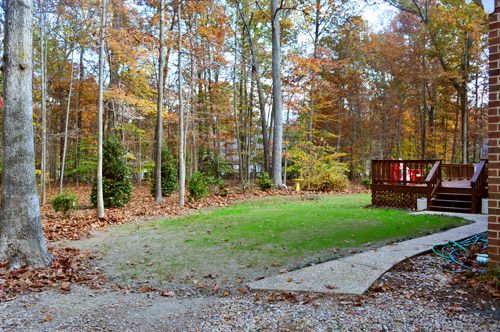
To Do:
Remove random slate pieces from the backyardAerate or level the yard
Seed the yard in the fallPlant large holly bushes for privacy from the other houses that our wooded lot backs up to- Transplant a few things for a better layout, like the pretty peony bushes in the middle of nowhere (not pictured)
- Reseed again in the spring/fall
- Build a fun wooden playhouse for Clara
- Plant an edible garden (not sure what the deer won’t eat, so I’ll have to do some research)
- Build a swing set
- Redo the old cracked concrete walkway between the garage and the deck
- Add more privacy plantings around the rest of the yard – tiered trees, bushes, and flowers (we plan to save up for these and add more each year)
- Build some raised planters and hardscaping
- Possibly add a patio area somewhere around the deck?
- Make a wooden lean-to in the corner of the backyard with Clara and then plant some vines to grow around it to make a cool little hideaway
- Build an air conditioner cover with wood boards like this
Thankfully the journey is a lot more exciting than the destination is for us (more on that here), so if our list makes your brain fog up: 1) sorry about that, and 2) we’re a weird breed of human who actually loves stuff like this (we upgraded our house for fun for years well before this ever became a job of ours). We’ve also learned that taking things one day/project/victory at a time keeps us from getting too overwhelmed, so if you’re wondering how we choose what to do next or how we avoid getting overwhelmed, we just do whatever sounds fun and whatever works with our current budget (barring anything that needs to be moved to the top of the list for safety or other extreme-urgency reasons). We also jump around a lot, which seems to keep our momentum up. For example, right now we’re:
- halfway done peeling wallpaper in the dining room
- just getting our Phase 1 kitchen makeover rolling
- contemplating wall colors for the hall bathroom upstairs and the guest room
- beginning to brainstorm what we want in our office to make it functional for two people (and to add a lot more storage/work space)
So that’s what’s next on the agenda. How do you organize your house-related to-do lists? Do you use your smart phone? A good old fashioned notepad? Is it all up here (points to head)?

Priscila says
Arch the portico ceiling sounds easy after the sunroom ceiling :)
YoungHouseLove says
I know, right?!
xo
s
Alison says
Long time reader, first time commenter. You mentioned grasscloth wallpaper in the bathroom and I wanted to let you know how pleased we are with our Philip Jeffries VINYL hemp wallpaper. We considered traditional grasscloth, but liked the more uniform color & smoother seam transition better with this product after seeing 10 (yes, 10…) samples in the space. You really can’t tell it’s vinyl unless you touch it and we’ve received TONS of compliments on it! Perfect for a humid bathroom or house with small kids!
-Alison
http://www.bonvivantdc.com
YoungHouseLove says
Thanks so much for the tip!
xo
s
Erin @ house envy says
Your “done” list is very impressive! The house looks incredible!
Carolyn says
I’m blown away at how organized and diligent you are, ESPECIALLY when you have a child under 5 and preparing for a second! You are my home improvement idols! Keep up the good work!!!!
Jenny says
It looks like most areas of the house are much more liveable now. It’s amazing what white trim and a light, fresh coat of paint will do to a room! If I might make a request, I’d love to see what you do for a swingset for Clara. I have a daughter a few months younger than her (and a six-week-old) and next spring we will have to put in some sort of swingset for our daughter. We’ve casually looked around but haven’t found much we love, at a price we can live with yet. Can’t wait to see what you decide to do!
YoungHouseLove says
We’d love to tackle that next spring too!
xo
s
Elle says
I love that the two spaces you probably spend the most hours of your life in (your bedroom and your office) are also two of the least completed spaces. Isn’t that always the way, it seems like.
Also, thanks for showing the overall house. Even though it seems like you guys have done so much that you must nearly be done, that’s just because we see the “done” (or partly done) stuff. I had actually forgotten about the storage space, the hallway, the nursery…
YoungHouseLove says
It’s so true! It’s amazing how we save the most-used spaces until the end for some reason! It’s funny to walk around our house because some many “glimpses” like the stairs and the sink nook look so different, yet there are full rooms we have hardly touched like the dining room and the kitchen and the hallway and the nursery – not to mention the storage room!
xo
s
Katie says
Wow, you guys are amazing! I have to say that I absolutely love all the updates you guys have done so far my favorites being the bathroom and the stairs! You both have such great tastes. I am loving watching the updates you are making in your “forever” home.
YoungHouseLove says
Thanks so much Katie!
xo
s
MLB says
Great progress, guys. Can’t wait to see how it all shakes out for you. Just wanted to add my 2 cents on that storage room and finishing it at some point. I 100% vote (since I don’t live there, so this is sort of a moot point) to leave it unfinished as long as possible. It was SO MUCH FUN growing up with an unfinished basement that we could sort of destroy/make a mess in and not have our parents care. Sidewalk chalk on the concrete floor? No big deal. Masking tape lane lines for roller skate races? No problem. That blank slate that kids can’t hurt is priceless!
YoungHouseLove says
Never thought about that! It does sound like fun!
xo
s
threadbndr says
Your list encouraged me to revisit and update the version I keep for THE Bungalow. I’ve done better over the last couple of months than I realized!
Every little bit helps. And after the holidays, my sister is coming over to help me paint!!! She painted the ceiling in my dining room a couple of years ago as a birthday gift. I’ve talked her into the master BR as my Christmas gift this year LOL.
YoungHouseLove says
Love it! Get those family members in there in exchange for holiday gifts!
xo
s
Emily @ Life on Food says
This post makes me happy for two reason. the first is that our crazy long to do list is not usual. Two is that it takes time to do it all and we are not slacking by still having a ton to do after two months.
Lisa says
Amazing progress! But I am still stuck on that awkward video, lol…o m g that was so awkwardly hilarious.
ashley @ sunnysideshlee.com says
ahahahahaha! i immediately shared that video like 4x already! hilarious!!
Melissa says
Have you considered putting french doors or folding french doors between the foyer and the office? I can’t exactly remember the layout, but wouldn’t it be great to leave the work at work at the end of the day and close some doors but still let light through?
YoungHouseLove says
That would be pretty!
xo
s
Susan J says
That list, with all those the checked off items, is so incredibly impressive. I want you guys to know how much you are inspiring me to try new things and do them myself. My hubby and I have started to tackle things at our house that we never would have tried before. You are even seeping into my subconscious: you were literally in a dream I had the other night, which involved spilling paint all over my laundry room. Please don’t be alarmed that I’m dreaming about you. I realize it sounds a little weird :/
YoungHouseLove says
Haha, thanks Susan! You’re so sweet! Best of luck with everything!
xo
s
Meredith says
Love these lists! I’m a total list-er and there’s nothing better than crossing off a to-do! Now that you’ve had your fireplace whitewashed for awhile, are you still loving it? I have a really dark brick fireplace that I think would look so much better if it was lighter, but I wasn’t ready to make the commitment to full-on painting it. I loved how you whitewashed yours and I think it’s a great idea! Now I just need to sell my husband on it…
YoungHouseLove says
After living with it a while one thing we both wish it had more of was inconsistency. It’s almost too uniform, so unlike a cool old whitewashed brick wall, it’s sort of all the same degree of distressed/washed color, so the variation would have made it more interesting. I think down the line we still dream of a big gorgeous accent wall of stacked stone or some awesome molding and a rebuilt super chunky mantel, so we’ll have to see where we end up! For some leftover paint and some water and a few hours it really did a ton to lighten up the room in the meantime though!
xo
s
Joan says
We also live in a 80s-built Colonial in Richmond, and I definitely see a lot of similarities between our homes. We also had no ceiling fixtures in the bedrooms (which we’ve rectified, thankfully), mauve trim in our bedroom and bath, and so on and so on. I’d like to start some Phase 1 upgrades in our kitchen and, like you, I have a wonderful 1980s trash compactor in my kitchen! Will you do anything with your trash compactor during Phase 1? I’d love to hear some ideas. I’d love to get it out, but want to do something that will look seamless with the rest of the cabinets. Thanks! P.S. I think you underestimate the % done for most of your spaces – it seems like you’ve completed a lot more than you give yourself credit for!
YoungHouseLove says
Alas, ours isn’t functional, so although it doesn’t do a thing for us, I think we’ll just work around it (we don’t plan to update any of our appliances until Phase 2 since that’s when we might reconfigure a few things, and we don’t want to buy anything too prematurely and then have them not fit into the new spots.
xo
s
Lisa says
Great progress guys!
I’m still so impressed with the stencilled floor in the sink nook every time I see a photo of it. I love it.
And that video is so good! It’s a bit like the one I put together of my friends always doing a similar thing. Check it out for a giggle.
http://youtu.be/zcc4h0Wx0Fg
YoungHouseLove says
So funny! Love the accents!
xo
s
Andrea says
I totally just noticed we share the lovely light hanging in the dining room. We inherited ours from the previous owners as well! Ack! Luckily it is one of the few remaining leftovers…there was some real doozies! But with a vaulted ceiling and off-centered fixture (the swag chain centers it) its been a challenge to replace… if only spray paint could save it!!
YoungHouseLove says
No way! I haven’t seen any other lights like that one! So funny to know he has a twin!
xo
s
Lauren D says
We have started to make a list but have a hard time remembering to go back to it to update or add.
I love the yellow rug in your guest room. Where is it from and what size? Trying to find one for our newly renovated bedroom that is yellow without breaking the bank!
YoungHouseLove says
That’s a 5 x 8′ rug from Pottery Barn about 5 years back. I don’t think they sell it anymore but maybe try ebay?
xo
s
Audrey says
I always wonder if your previous owners ever check your blog… and then if they kick themselves after seeing all the awesome updates you’ve done.
YoungHouseLove says
We were lucky enough to hear from the previous owners of our first and second house, so we’d love for that to happen here someday! It’s so cool to look at old photos and see how another family used the house back in the day!
xo
s
Bea says
Joan, I have a friend in Atlanta who wanted her trash compacter out, but like you, wanted a seamless look. She was able to replace it with a wine frig that was the exact size. It looks great!
YoungHouseLove says
Really smart!
xo
s
Erin P. says
I have an image in my Entryway moodboard on pinterest of a large orb pendant (EXACTLY like the one you guys did for Shades of Light) hanging in a stairwell and it looks awesome! image below:
http://www.pinterest.com/pin/195906652513787037/
I have your wire globe pendant on my wishlist to put in our entryway! …which reminds me, do you guys know how long Shades of Light will be carrying your line?
YoungHouseLove says
Aw thanks Erin! I hope for a nice long time! We have also been talking to them about possibly developing some more over time, but we’d keep the first collection in rotation and just add newer ones.
xo
s
Michelle @ A Healthy Mrs says
Whew, that is a long list! But I have complete faith in you guys — everything you do turns out so beautifully!
Erin P. says
Wow, now I feel like a huge dork, because I just noticed the image I posted (the wire orb hanging in a stairwell) is from one of your House crashing posts and you probably already know about it! Sorry, I saw your stairs, and read that you guys wanted to out a chandelier and I immediately remembered that image!
YoungHouseLove says
So funny! I thought it looked familiar but wasn’t sure it was a picture from that house crashing! Love it!
xo
s
Alicia M says
Loving the progress and can totally see your vision for the house! You guys are so inspiring and many of the projects we’ve tackled in our home have been inspired by you over the years (dedicated reader since 2008ish!)
A while back another reader made a comment about opening up a chunk of the wall between the staircase and the dining room (like this: http://www.pinterest.com/pin/112378953171430876/) I think it’s awesome and am curious if you’ve given it any serious thought at this point?
Can’t wait to see what you guys do next!
YoungHouseLove says
We’re definitely giving that some serious thought since it looks so good! John actually likes the fact that this house isn’t too open (so sound doesn’t carry throughout all the downstairs rooms, thanks to some strategically placed walls) so he worries we might lose the private and cozy feeling of the dining room if we open it up to the stairs like that, but it’s definitely something we’re still considering!
xo
s
Annalea says
You know, that chandy in the dining room could look awesome with a few coats of glossy paint . . . the structure is pretty cool, imho. ;)
YoungHouseLove says
I keep thinking that too! And if it doesn’t work in there, maybe in Clara’s room eventually sprayed glossy red or something!
xo
s
Courtney says
I love when you do these lists- it makes projects seem more do-able when they’re broken into pieces like this. Gives me great ideas!
Also, can’t wait for Phase 2- sounds exciting!!!
Rachel says
Will you tell us (or remind us) where you buy your rugs? I particularly love the one in your master bedroom. Thanks.
YoungHouseLove says
Thanks Rachel! The bedroom one is from Joss & Main, the rug in our guest room is an old Pottery Barn one on clearance, and the one in Clara’s room is from a local shop called The Decorating Outlet.
xo
s
Andrew says
This brings to do lists to a whole new level!
Enjoyed this,
Thanks.
Alyssa says
Did I miss the name change from mclisterson to mclisterface?! I’m sort of obsessed.
YoungHouseLove says
I’ve been slowly shifting it to see who notices. Last time it was Listy VonListerson, and this time I went Listy McListerface.
xo
s
Jessica R. says
Thank you! I feel much less weird for noticing that, too. ;)
Audrey says
Aaaaaaagh! I see 2 Petersik’s in the Richmond’s RSVP Home & Living magazine/flyer. And they’re going to be at the Richmond Home & Garden Show…yay!
YoungHouseLove says
Wahoooo! We haven’t seen that yet!
xo
s
Tamara says
I know you still have a while, but I’m curious if you would think about having the kiddos room together down the line. We recently bought our first house and were about to plunge into decorating the kids’ rooms but now at 6 months and 2.5 years old we’re tossing around the idea of having them share a room. They’re already sweet to each other but we’re thinking it might help cement that sibling bond!
YoungHouseLove says
I think we would definitely consider it down the line! We both grew up with our own rooms but knew lots of friends and relatives who shared rooms and had very close relationships, so it can definitely work I think!
xo
s
Fahlon says
I know you guys are considering ORBing your upstairs hall light fixtures. Maybe you could do a frosted glass or tinted blue paint on the glass panes for fun! Kind of like this: http://www.prettyhandygirl.com/2012/09/circle-diamond-pattern-light-fixture-updating-a-brass-light-fixture.html
YoungHouseLove says
Such a cute project!
xo
s
Laura says
Last week, someone suggested I check you out for pics of paint colors, and I have been prowling around ever since! I feel like your homes, and the changes you have made to them, mirror those my husband and I have lived in since getting married in 2007. Kindred homeowner spirits! Current home is a true work in progress – slow, slow progress. Excitedly following your process, as our to-do lists share many items: shell shaped sinks (why oh why was this ever popular?!?), trim in any-and-every-color-but-white, brass switchplates, switchplates with MALLARDS on them, oddly placed master br vanity nook, den with dark wood paneling and brick fp – mallards show up again on ceiling fan in this room, painted over wallpaper in a few rooms, funky hanging brass and glass lantern light fixtures in hallways, etc. All that to say, I feel like I have found an absolute gem of a resource in Young House Love!! Y’all are awesome!
YoungHouseLove says
Aw thanks Laura! So glad you’re enjoying our blog. Your house sounds like a diamond in the rough! I was laughing out loud at the mallard switchplates. All the best with everything!
xo
s
Courtney says
I love that you guys enjoy the journey! I always dream of getting an older house so that I can make it my own! You guys are such an inspiration to me! You give me hope that it can be done and that the journey is what makes you appreciate it even more when it is complete. I enjoy reading your blog everyday! Keep up the awesomeness!!!
YoungHouseLove says
Thanks so much Courtney!
xo
s
cassie says
Wow, it seems our lists overlap a fair amount. I cannot wait to have ceiling lights on any of our rooms. But for now, I look forward to getting done with the boring parts, like replacing windows…
Still I’m hoping you’ll get there first so I don’t have to do as much research ;)
Victoria says
Wow! I am exhausted just reading your list.
I appreciate your thoughtful, detailed list based on location. I am going to adopt this strategy for my Florida house. Breaking the projects down in this manner is so smart. Thank you for the road map.
YoungHouseLove says
Good luck Victoria!
xo
s
janice says
Keep up the good work! You are getting there. Looks exceptionally beautiful.
Michele says
I don’t know if you have plans for the wood sorter yet, but I made the small unit from this link (http://images.meredith.com/wood/pdf/dp-00438.pdf) earlier this year and it has worked great for our small scrap. Of course, I modified the basic idea… the uneven bottoms of the vertical bins would have driven me crazy, so I used only three horizontal sections. But now I know quickly what pieces are roughly 6″, 8″, 10″, 14″, 20″ and 30″ long – so I grab the right piece for the job. :) I also expanded the base ~6″ to one side and put three 1×2 U-shaped braces so there was a section for sheet goods up to 18″ wide too.
YoungHouseLove says
Sounds really functional! Thanks Michele!
xo
s
Casey says
So glad you guys are going to do a pergola! I absolutely loved how the last one turned out. Will you keep the one centered light over the garage doors or
relocate so there is one on each side?
YoungHouseLove says
I’m not sure, since when we build the pergola we could hide wiring in it, so it might be an easier time to relocate things when we’re actually building it!
xo
s
Crystal says
You inspire me. What a massive difference already! I just spent an hour after my kids went to bed creating a 5 page list for our place and gleefully striking through dozens of completed projects. Ahhh. Satisfying!
http://memegenerator.net/instance/43150414
YoungHouseLove says
Woot!
xo
s
Avone says
The area where you’ve removed the wall paper between the built-ins in the dining room is screaming chalk board at me. I actually thought it looked like a white board at first and I wanted you to switch rooms with the office.
YoungHouseLove says
That could be fun!
xo
s
Anna Sebok says
So here’s a question for you…and forgive me if it’s already been asked –
How long do you estimate your laundry list of changes, upgrades, renovations, etc. to take? I still remember being in awe of how quickly you reno-ed your last kitchen (though obviously we’re seeing it quickly when it’s only through blog eyes).
I ask because I LOVE this new house of yours, and I think it’s a great great fit for your family for all that you’ve said. But if you’re done with all of these projects in two years…does that mean it’s time to move?
YoungHouseLove says
That’s such a good question! Our first house took us 4.5 years and our second house was a lot less of a fixer upper but still took us 2.5 years and we easily could have done more projects if we decided to stay there longer, so I think since this house has so many big projects (three bathroom redos, a kitchen gut-job, a full unfinished storage room, etc) we assume we’ll be busy for a nice long time. When we’re done here, we have no plans of moving AT ALL (this is the house I want to raise kiddos in and live forever) so at that point we can either take on other projects (more charity showhouses, help others in the community, take on family member challenges in their spaces, etc) or who knows, maybe blogging won’t even be a thing anymore! We never guessed we’d be here 6 years ago, so it’s hard to project where we’ll be in 6 more, ya know?
xo
s
Jessica A says
I think that this should be added to the list
-Buy Clara this awesome hoodie: http://www.goldieblox.com/products/more-than-just-a-princess-hoodie
As a science teacher, I got really excited about the GoldieBox products, but when I saw the clothing I immediately thought of your daughter. And if another girl is on the way, the onesie should be given immediately: http://www.goldieblox.com/products/more-than-just-a-princess-onesie
YoungHouseLove says
Oh yeah, they’re really fun! Have you seen the commercial? We actually invested in GoldieBlox when they were a Kickstarter project, so she has had the game for a while now! It’s an awesome company.
xo
s
Jessica A says
No way! That’s so cool that you invested in the company. I’m glad to hear that you think they are awesome – I’m considering the game as presents for my little cousins this Christmas!
*And I may or may not have geeked out with my students and showed them the commercial (tying it in by talking about Rube Goldberg machines, of course)!! Definitely a winner of a commercial!
YoungHouseLove says
Oh yeah, it was just a tiny donation through Kickstarter but it meant if they reached their goal they’d send us the game and they did and it came in the mail! Such a fun surprise!
xo
s
Erika says
Silly question probably…but I notice in your bedrooms you use what appears to just be a down comforter and then add fun colorful pillows. I am seriously struggling to figure out how to do a white bed with a down comforter?!?! Can I add a folded up duvet or quilt at the bottom for texture and color? Can the down comforter be THE comforter or does it need something overtop of it? I know this is silly…but for some reason it’s not clicking with me and I LOVE your spare room…it’s serving as inspiration right now! Thanks!
YoungHouseLove says
We actually prefer a white duvet over a comforter, we just haven’t grabbed one yet for Clara’s room (we have one in our master bedroom and the guest room though, just a basic white duvet). That way you can clean just the shell of it and it’s nice and soft without looking so quilted and unfinished.
xo
s
Lee Ann says
Love your lists! I have a bound journal for my house renovation to-do lists (and cost accounting). Looking through the book, seeing all I’ve accomplished and the small amount I’ve paid for all the work (“sweat equity!”), makes me smile. Now a question: Can you suggest a source for a great timeline or order sequence for a DIY kitchen reno? I want to do the kitchen reno myself (as much as possible), so want to work smart. The work will include new stove and hood/microwave install, updating and painting the existing cabinets, installing new overhead and undercounter light fixtures, new countertops, adding backsplash tile, painting walls, and new flooring. All work materials and appliances will have to come in through my narrow townhouse entry way and dining room before it gets to the kitchen, so I want to be as gentle as possible on that part of the house. Thanks for any suggestions of sources you think are reputable for someone with a DIY budget!
YoungHouseLove says
That’s so hard because I truly believe every kitchen reno needs different things in different orders! Our first house’s reno was so different than our first, for example. Does anyone have a resource for Lee Ann? I would write everything you want to do down on different slips of paper or post its and just rearrange them in an order until it makes sense (some things have to be first, some make sense to go last, and you can just shift them all around until the order that’s the most workable makes itself known. Good luck!
xo
s
Chelsea says
How do you decide on which project you will tackle next? I typically try to work on one project until completion, but often find myself waiting months while I save up the funds!
YoungHouseLove says
We like to bounce around a lot to keep our momentum up. Check out the last few paragraphs in this post for more about what projects we tackle and how we pick our order. Hope it helps!
xo
s
kate obrien says
Just moved into a “new to me” home on Saturday. House is still in the box and bin stage. Can’t wait to walk through all the rooms and create a similiar list.
Eileen says
You guys are amazing! INCREDIBLE all that you do! Thank you for always sharing details!(Also– Just a heads up that the photo you used for the powder room doesn’t show your updated faucet. I am totally nit picking by even pointing it out… and obviously have too much free time at work this morn… but wanted to let you know since y’all are always so thorough and it looks all the lovelier for the updated hardware!) Cheers.
YoungHouseLove says
Oh yeah! Gotta fix that!
xo
s
Kim says
Hello guys!
I am so happy and proud of the progress ya’ll
have made so far!
I am really eagar to see the Jewel at the end of the hallway, that is the Laundry nook.
I have a similar one with those pinch doors that you pull and they slide open. I don’t particularly like it, and they aren’t sound proof. So I am so excited to see what ya’ll do!
Keep ’em coming
-Kim in San Antonio, TX