Alternate post title: Look how domestic my wife is.
I don’t know why I’m writing this post since Sherry is the mastermind/executor of this project. Maybe just to brag about her mad ironing skillz? I just watched the baby and approved comments while she did her thang for the better part of the day yesterday. The first step was cutting our 12.5 yards of our on-sale $8.49/yard yellowy green fabric (more info on that here) into perfectly sized panels for each side of the two bedroom windows (leaving enough leftover for one closet panel). Lucky for us, the living room rug made a great guide for keeping our cuts straight and our corners square. Especially since it’s 8′ long – so it was easy to lay a tape measure next to it so Sherry could cut five 90″ panels without breaking a sweat. As for the width, we left them the same width as the bolt itself, which was around 61″ wide. This means two panels can easily be drawn to cover each of our 39″ windows without feeling too taut or stretched.
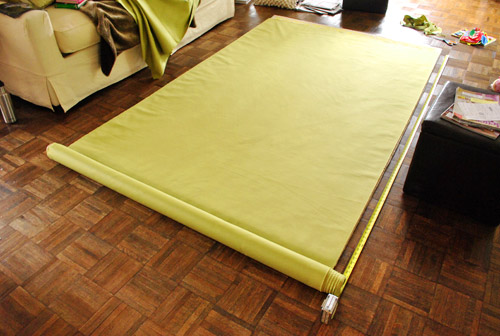
Within about fifteen minutes she had cut all five 90″ x 61″ panels (two for each window and one for the closet) and we realized that we apparently cut it very close when buying those 12.5 yards (pun intended). This is all that we had leftover:
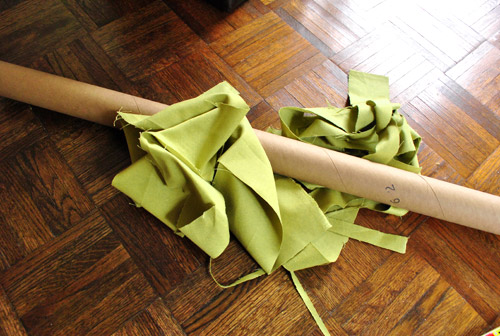
Not necessarily a bad thing (since we’d hate to dole out cash for more yardage than we needed).
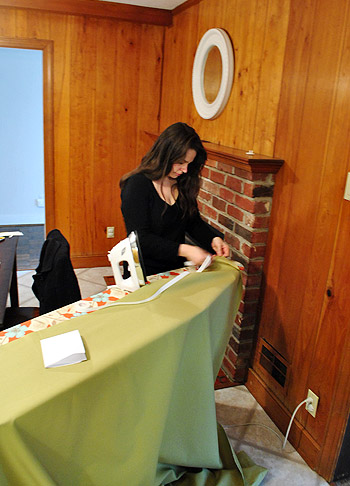
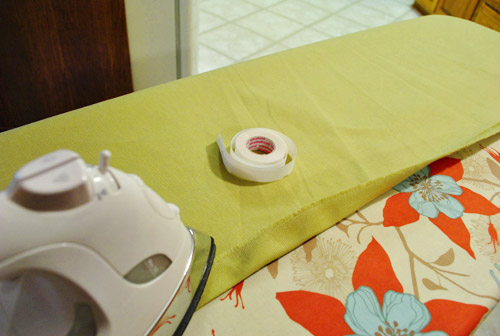
Then came hemming, which Sherry tackled using her favorite trick: heavy duty no-sew hem tape. Read more about that process and learn how to make DIY curtains in general right here (for even more iron-on hem tape info, we made a video of the process here and we have even more in-depth pics of its use here). It basically involves ironing, peeling, folding, ironing, and moving onto the next seam.
It wasn’t exactly a quick task to hem all four edges of all five panels (Sherry kept yelling out “1 down, 19 to go” which got old by about “3 down, 17 to go”) but getting that nice finished edge is certainly worth it. Plus, Clara and I kept the ol’ ball and chain company in the kitchen by singing, approving blog comments, and, um, eating while she ironed the day away. Quick, everyone freak out, Sherry’s hair is down:
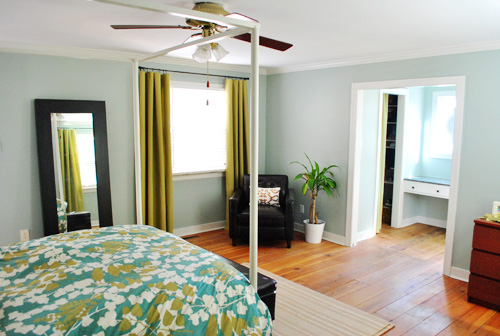
But let’s fast-forward through all of the tedious stuff (the ironing, the clipping of curtain rings to each panel, and the hanging of all three curtain rods, which you can learn more about in this post of yore) and get to the fun stuff: the finished product.
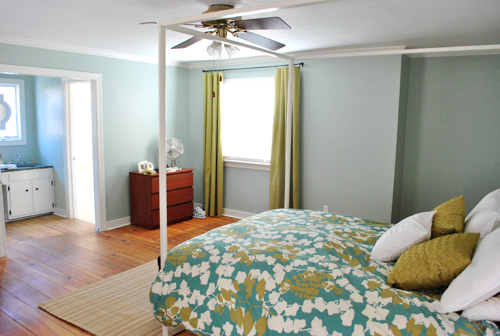
Oh and don’t mind the dresser or the fan or the lack of wall art and everything else that’s amiss. This room is definitely one of those works-in-progress that we’re taking one day at a time.
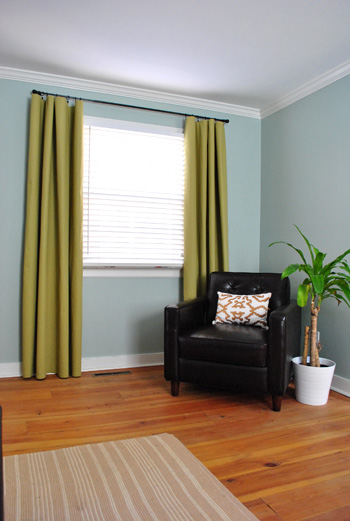
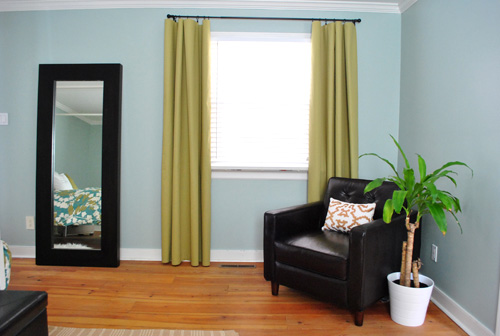
We’re really happy with how our DIY curtains turned out. And it should be no surprise that we chose to hang them higher and wider than the window itself to give the whole thing a bit more height and presence. We’ve actually had a reader tell us that she dreamed about us and Sherry mentioned something about hanging curtains “high & wide” in the dream. How crazy/hysterical/awesome is that? Nice catch phrase, babe. Who wants a “high & wide” bumper sticker?
Sometimes we like curtain fabric to “pool” a bit on the floor, but after looking at it both ways we decided to let these babies barely graze the floor boards. It kept them looking crisp and modern (and created that cool loopy draping effect, which didn’t happen as much when I held the rod lower and they bunched up on the floor). So that would be our tip. Clip your panels to the rod and then move the rod around on the wall to pin down the perfect placement. That way you can raise it and lower it by hand and eye everything until you find the perfect height. Then just mark your curtain brackets and hang them right where you like them best – so your panels graze or pool to your heart’s content. It definitely beats hanging the rod and then clipping up the curtains only to find out they look all dorky and short.
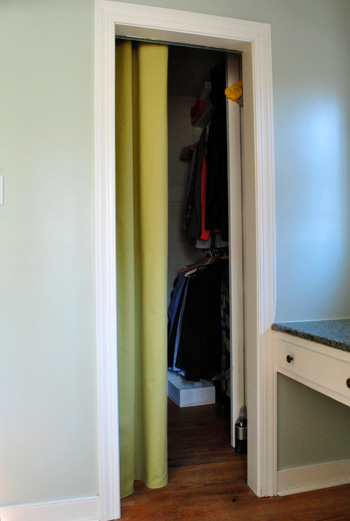
We also hung one panel on the inside of our closet to act as a less-intrusive alternative to the bi-fold door that used to be there. Most of the time it’ll sit pulled to the side like this:
But if we ever need to conceal our mess (or duck in there for privacy if someone’s over but we need to make a quick change) we can pull it closed like this:
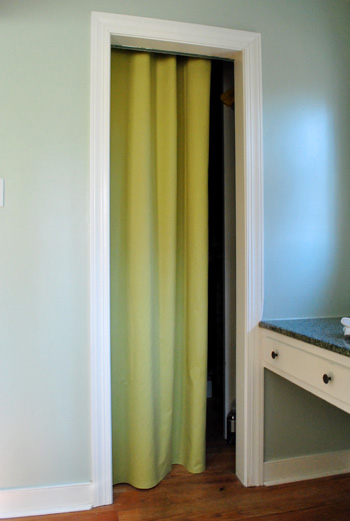
It’s kinda like a mini dressing room in there now- there’s even a light. And Sherry gets a kick out of picturing Clara doing puppet shows and other stage-related things from within the closet when she gets bigger and has that amazing imagination that only kids have.
Oh and if you’re wondering, here’s how it’s hung from the inside. We placed the rod high enough so that it’s not seen from the outside, and wide enough so the curtain can be completely closed (for privacy) or fully opened (so it’s not in the way of anyone walking in or out). It’s kinda the best of both worlds.
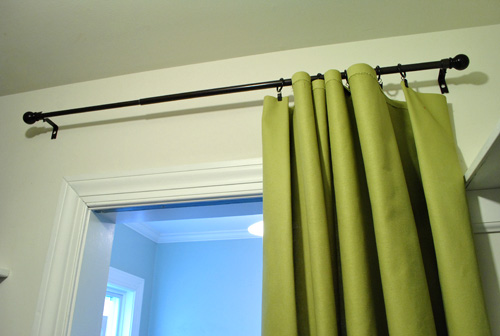
Oh and we got our oil-rubbed bronze curtain rods and ring clips from Target (aka Tar-hay) for cheap. It was around $40 for all three rods and all five packs of ring clips thanks to a few sales going on in the curtain aisle (and the 5% off we get for using our Target card). We love ring clips because they make curtain-creating a lot easier (no grommets or sleeves or pleated details to deal with, so you can literally clip up bedsheets or tablecloths as curtains if you’d like, or just hem fabric on four sides like we did). We also like ring clips because they’re particularly kid-safe. Should Clara decide to go crazy and try to swing on them like a monkey, the clip will release the fabric, which will fall to the floor while the rod and the rings will remain on the wall. Gotta love a safety feature that looks this good.
As for the finish, Sherry prefers oil-rubbed bronze rods (even in a nursery) because she says they’re “like eyeliner for the window.” And I have to agree that I like the look too- especially with the deep wood furnishings that we gravitate towards (along with some white things and even some painted pieces). But again I ask, why am I the one writing this post? Makeup references & hemming aren’t exactly my forte.
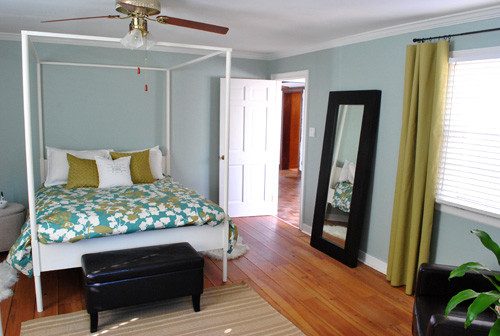
Anyway when it comes to the panels, beyond the function, height, and softness they add, we’re really happy with the color. Which means those three days of fabric hunting were all worth it. The yellowy green tone does exactly what we wanted it to do – it brings out the golden-green color of the bedding without matching it exactly (Sherry has this song she likes to sing called “Matchy-Matchy, Tackly-Tacky” which came about when she was imitating her sweet Italian mom, which is always amusing). But getting back to the curtain color, we’re glad we went a bit greener (instead of browner or yellower) than the bedding, because it looks nice and fresh against the Caroline Went Clubbin’ Aqua Carolina Inn Club Aqua wall color (get that joke here) while still obviously relating to the color in the duvet.
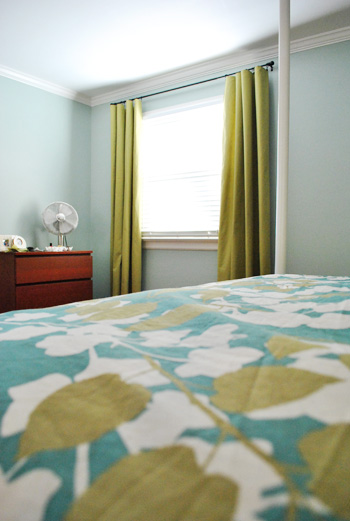
The curtain color also goes nicely with the new pillows that we snagged purloined for the bed too. So between them, the curtains, and the bedding we feel like we’ve got that golden green color sufficiently injected into the room. Now we can start layering in some other colors and textures for a little dimension and interest. Eggplant? Navy? Charcoal? Inky blue? Who knows where we’ll end up. But let the fun begin. Oh yeah, and pardon the missing nightstands, bedside lamps, etc. They’re also on the ol’ to-do list.
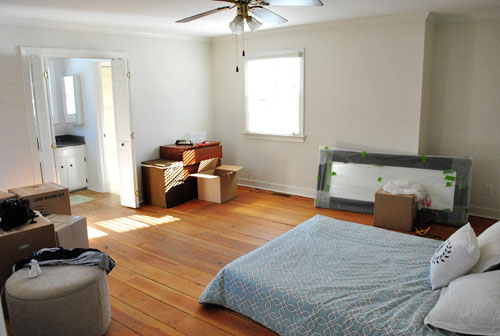
We definitely still have a lot more things to do in here (and we’re happy to take our time), but it really has come a long way in the past seven weeks or so. We almost don’t recognize this bedroom shot taken right after we moved in:
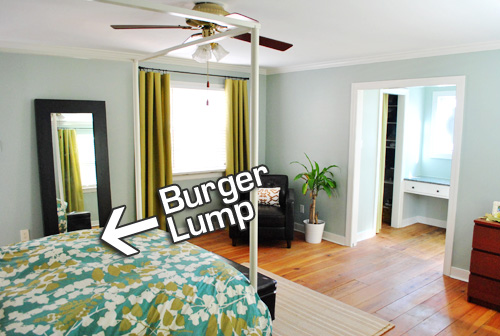
Oh, and last but not least, we thought you might appreciate a little “behind the scenes” tidbit. Sometimes we have to work around a sleepy chihuahua who refuses to get out of bed. Such a diva. But at least Burger doesn’t mind when I make the bed right over him. And our new fluffier duvet makes him nearly invisible. Yup, he was hiding in bed the entire time we shot these after pics.
And so ends the curtain diatribe that is this post. The whole process – as long as it was – has given us a bit of curtain fever. At least that’s what Sherry’s calling it when we drive by fabric stores and she presses her nose against the car window and says things like “I’ll never let go” in her best Rose-from-Titanic voice. We need them in a bunch of other rooms and we’re determined to choose bold and patterned textiles to add some serious interest. Because we definitely don’t want to end up with white Ikea curtains everywhere again (not that we don’t love ’em, but we’re just ready to have some fun and take some risks). So don’t be surprised to find us posting about our fabric store adventures again sometime soon. A guy can only listen to those Rose-from-Titanic impressions for so long before parking just to make it stop.
Psst- Burger’s totally letting fame get to his head. Check out his big DogMilk interview here.
Psssst- We just announced this week’s giveaway winner, click here to see if it’s you.

Jen says
For those who are interested in the material details here is a comment from Tuesday’s Swatch Watch post that may help….
Amanda says:
January 25, 2011 at 6:58 pm
I work at a Hancock Fabrics and it looks like our Home Dec cotton twill which is named (appropriately in this case): Success! :)
YoungHouseLove says
Thanks for connecting those dots for everyone Jen! Awesome.
xo,
s
Sarah says
I found it online actually (good eye or lucky guess) but it is not under that name. When I called Hancock.com and gave them the # I ‘thought’ it was I was told that the name of the fabric is success and the color is fennel. It will not be listed as such online though. It’s under a totally different name although I have been assurred it’s the same fabric.
YoungHouseLove says
Sweet! So glad it worked.
xo,
s
Alicia says
Love your room! That curtains look great with your walls!
Crystal @Beautifulhaven says
I wasn’t sure about the color at first, but wow I love them. They go with the room perfectly. Great job!
Shannon says
It looks absolutely amazing!!! I need tidbits on what to do curtain color/wall color with my new bedding. Help!!!!????!!!
YoungHouseLove says
Post pics on our Facebook page and hopefully other readers will chime in. Woot!
xo,
s
Patti says
Sherry, did you wash that fabric before using the iron-on hem tape? I used it recently on some cotton canvas (it was a dry clean only fabric) and it didn’t work well. It stuck but I could pull it apart. The directions say to make sure you wash fabric first so I was just curious. Love how your curtains came out, I never woulda guessed that color would work. You guys have vision I tell ya!
YoungHouseLove says
Hey Patti,
We didn’t but we’ve done that sometimes. We have learned that since we wash our hem-tape panels in cold water and then tumble dry or line dry them, they don’t shrink up so we don’t mind washing them when they get dirty instead of beforehand. More details in some prior comments for ya. Hope it helps!
xo,
s
Sarah Mc says
Love the curtains! My curtains are also hem taped and it’s last nearly 5 years. Think it’s time for a change? me too!
Also, I’m not shocked by Sherry’s hair down anymore. I will be more shocked when she’s not wearing black!
YoungHouseLove says
Don’t hold your breath! Haha.
xo,
s
Michelle @ Dream Home DIY says
Hmmmm…..Im thinking I might just give this technique a whirl! We have been trying to find the perfect geometric print curtains without any luck and I think this is the solution :0)
Jo says
Hi. Love the new curtains. This is a completely unrelated topic but do you guys ( John, Sherry & Readers )know of any good websites to research living in Richmond? Would be moving from Long Island, NY.
YoungHouseLove says
Anyone have ideas for Jo?
Richmond.com always works, and you might want to check out the section on there about neighborhoods. It may take some searching but it’s on there somewhere. Hope it helps!
xo,
s
Andrea B says
Beautimous. (Um. That sounded better in my head. Beaut-i-muss is how it sounds, if you’re wondering.)
I think I’m going to convince Mr. B to head over to Target and get some curtain rods, and then hit up Hobby Lobby at some point for material. This is good stuff. Especially since no matter how much I want to be a seamstress, I just don’t know how to thread the dang sewing machine, and by hand is exhausting to even think about.
Bookmarking for future curtain-makin’ reference. Thanks!
Kristina Atkins says
I’ve totally had 2 dreams that I’ve met y’all. Weird. I love those curtains, btw. That color scheme is awesome. One I would never think to do. When y’all bought your house, I had new house envy.
Question: Would the hem tape work to “sew” a curtain liner and the curtain fabric together? Is it that … “heavy duty”? Or does it just work for hemming edges?
YoungHouseLove says
We’ve never tried it but we’d imagine it should- assuming nothing is too thick (since the heat from the iron has to penetrate to melt the tape). Maybe try it with sample fabric swatches first? Good luck!
xo,
s
Katie says
Forgive me if this has been asked, but do you find the cost, time, etc of making your own curtains is better than buying them made ready to hang? I just find that fabric is so expensive sometimes/most of the time and its not hard to find inexpensive curtains at most discount stores. I almost jumped on the make your own bandwagon but totally freaked when I saw the price of most of the fabric!
YoungHouseLove says
It’s really all about personal preference! We love the options that picking your own fabric opens (ready made curtains are typically only sold in 86 and sometimes 95′ lengths, so they would be too short for us in the shorter length and would be too long, and need to be hemmed anyway in the longer length). We spent $5 a panel on all of our old breezy white curtains from Ikea (which we conveyed with our first house) and are really having fun with bolder choices, but if you can find cheap ready-made panels we completely see the allure of that too! We didn’t see anything that we liked for less than $80 a panel, which was a lot more than these babies cost us!
xo,
s
Rachel says
Wow guys the curtains look amazing!
Heather says
Thank you for the inspiration to go out and make my own curtains. A few years ago I made a panel for my bathroom the same way, only difference was that I attempted to finagle a rod pocket into the panel, and it looked horrible… But ring clips! …Ring clips will save the day. Hitting Hobby Lobby as soon as I get out of class. YAY!
Stephanie says
Love, love, love the curtains AND the duvet cover. Sooo jealous that W.E doesn’t ship to Canada!
I am totally inspired to try this curtain project for our oh-so-plain house, but what do you do if the fabric has a front and a back? A lot of fabrics we’ve seen only have the pattern on one side and not the other, so would you fold it in half? Or just hang ’em with the “faded” side facing the window? Anything you can think of would be much appreciated. Thank you!!
YoungHouseLove says
Yup, Clara’s has a bright side and a faded side so we just hang them with the bright side facing into the room. Looks just fine from the outside and great from the inside. Hope it helps!
xo,
s
Roshni says
The room is really coming together. I’m waiting for the pops of color now! Fun!!
Judy says
Hi Guys
I’m not sure if anyone asked this question already, if they have sorry….but do you pre wash your fabric?
Thanks
Judy
YoungHouseLove says
Hey Judy,
Yup, sometimes we do beforehand. Sometimes after a while (when they actually could use a good wash). We figured out how to do it so things don’t shrink and so the hem tape stays strong. Scroll back for more info. Hope it helps!
xo,
s
Kathleen says
Hey J&S! I read your blog every day and am truly inspired by your ideas! I want to try to make curtains for my dining area but need a bit of advice. I have one big window in the center and 2 regular windows on either side (touching the big window). Think of a breakfast nook but flattened on one wall space. How many rods/pannels would you suggest? Thanks!
YoungHouseLove says
We’d use one looooong rod. And either just put up two curtain panels on either side of the whole expanse, or toss in two extra ones (for a total of four) to hide the trim between those touching windows. Hope it helps!
xo,
s
Rebecca says
I had a similar problem and used electrical conduit to run it across the room, much cheaper than a rod.
Jessi E says
I love the life those curtains bring into the bedroom. Great choice!
Snickrsnack Katie says
This looks amazing! You both never cease to amaze me at how creative you are!
Carrie says
Looks great! I love your ironing board cover. That pattern is so pretty. Where did you find that gem?
YoungHouseLove says
Hey Carrie,
Scroll back for that info. Hope it helps!
xo,
s
ginai says
Love it!! the colour combo is simply perfect! I too am a big blue and green fan! so this is right up my alley!
Love all ya’ll do!!
*The perfect couple* with the perfect little baby *C* and baby *B*
Love Love Love!!!
brianne says
I too have become delirious with homewade window treatment fever! After moving in to a new place last spring I discovered (sort of by accident) that 60×84 tablecloths make perfect curtains – and require no hemming. 6 Dwell Studio (from Target, natch) tablecloths later, my living and dining room windows were covered!
floridaboater says
Love watching this transformation of the bedroom! We are both working parents of 6 year old twins and we FINALLY are at the point where it’s time to start remodeling/decorating our home we bought 7 years ago!! So I completely relate to your trials with the darling baby! We just remodeled our kitchen and now I am using so many of your ideas for the living/dining room area…actually hitting Ikea this weekend for white curtains! Any time my hubby and I talk about decorating, I say “young house love” did this or that! He knows exactly what I’m referring to!!!
Erika James says
The “Burger Lump” tag reminded me of the song “Sugar Lumps” by Flight of the Conchords. Its not exactly appropriate to quote in a PG environment, but totally worth finding the video on youtube if you haven’t seen it. Oh, and love the room! If only I had the patience to no-sew curtain panels.
dinah says
the curtain color is FABULOUS~ <3 IT!
I used to read ALL of your responses to the comments on every single post but lately it's been really hard! You guys have too many fans ;)!
Lindsey says
Curtains look great! And the phrase “dorky and short” had me laughing out loud.
Michelle says
Great job on the curtains! The color is spot on. Mind a couple of tips from a professional seamstress? John, good commentary but the actual word is puddle, not pool! For anyone trying the hem tape I would suggest that you trim off the selvage edge of the fabric. This is the woven part that runs lengthwise. It can cause the fabric to pull up on the sides and can experience shrinkage when a hot iron is applied. For corners that won’t stay try Alene’s fabric glue. And also, the fusible tape does not need more than about 5 seconds of heat, no steam. Hope the ceiling fans are next on the list, they are really bugging me! Love the house, congrats.
YoungHouseLove says
Haha, I’m dying over the puddle/pool switcheroo. Love it. John the seamstress. Thanks so much for those tops Michelle! Smart, smart, smart.
xo,
s
Amanda says
Great job guys! You surely have created that relaxing feel you were going for :)
Kristen @ {K Leigh Ford Photography} says
LOVE LOVE LOVE! These choice of colors are absolutely breathtaking. I usually don’t find blue and yellow to be a great match, think sailors for some reason. but these shades are so well in sync! And great job Sherry! You gotta love that iron on hemming!
Anne @ Its a Baltimore Life says
Did yall anchor that mirror to the wall? I have the same one in my basement and just had it sitting on the carpet and leaning against the wall, which was fine since the carpet and cushy padding kept it from moving. Well we ripped up the carpet a few weeks ago and installed pergo down there and now I am paranoid that it could slide or fall since it doesnt have the cushy base. Just wondering if yall had the same concerns??
YoungHouseLove says
Hey Anne,
We just used an anchoring kit from Home Depot (they sell them for anchoring bookcases and tvs and stuff). We’ll try to get a post up about it soon.
xo,
s
Hilary @ My So-Called Home says
I actually made a trip over the weekend to a place called Fabric Warehouse in New Jersey since they were having an amazing 50% off of everything sale. It’s funny that when you’re looking specifically for something it’s hard to find but when you’re browsing everything seems to look good! The curtains look great. The room is feeling very beachy, so maybe some bolder accessories will kinda take it in another direction?
YoungHouseLove says
Oh yeah, we’re just laying the foundation! That’s why we mentioned bringing in some deep plum or charcoal gray or inky blue accents. We are far from done! But we love taking things day by day and watching them slowly come together.
xo,
s
Jess says
I looked through all the comments and even looked on your other posts but didn’t find the answer to my question. Do you use the hem tape on the tops and bottoms first or the sides and then the top & bottom? Does it matter?
Thanks a bunch!
YoungHouseLove says
Nope, doesn’t matter. I got loopy and did some in a counter-clockwise direction (tip, side, bottom, side) and some were: top, bottom, side, side. Works just as well either way.
xo,
s
Anna says
WOW WEE.. It’s sure looking good in there! I’m a firm believer that paint and window treatments really make all the difference in a room! Keep it up y’all :)
JoDi says
LOL! I totally had to go back and find the Burger Lump in all the after shots. Too cute!
This room is coming together so well! The curtains came out great. I was planning to buy some new gray curtains for our yellow MBR to tie it in with the master bath that we just painted gray, but I think I’ll just make them now. I’ve used that seaming tape before to make shades for our kitchen windows, and it is so easy to do!
Sara says
“everyone freak out, Sherry’s hair is down” = favorite line!
These are great! I’m working on valances for some great new insulated curtains in my living room. Circular patten on the fabric… Any suggestions?
YoungHouseLove says
They sound pretty! We don’t have any valance experience but maybe try googling around for images and info if you’re stuck? Good luck!
Good luck!
xo,
s
Julie N says
Ooo your mention of incorporating some eggplant has me absolutely giddy!!!! I love it!
Also I have two dogs that do the crazy run around thing, but they are 45 pounds a piece… not as cute when it’s on the bed.. : )
debbie says
I love watching your decorating projects – we are a step behind you. We are preparing out 1980’s house to sell this spring. We have polished brass hardware ( door knobs, some cabinet pulls, some light fixtures) I want to replace with brushed nickel or oiled bronze. Which is the most up to date? Any tips or shortcuts….I was spying a can of spray paint – but I think the finish will not last – do you have any experience? thanks!!
YoungHouseLove says
We haven’t taken that on yet, but we are planning to try to spray some of the hardware in our house. We figure if the alternative is to replace it we might as well try to repurpose it before tossing it. Here’s hoping it works! We’ll definitely share our results, whether they’re pass or fail. Haha.
xo,
s
Cathy says
Debbie,
We built a house in 2007 and we chose oil rubbed bronze throughout. However, the master shower drain was not oil rubbed bronze but that silvery builder-grade material and when I priced them in oil rubbed bronze, I was horrified! I decided to spray paint it black, figuring I had nothing to lose. In our shower, used daily, that black paint is still hanging in there–and it looks like oil rubbed bronze. Since then, when I painted bathroom cabinets, I spray painted the hinges to coordinate with the pulls. My kids say that if you stand still long enough at my house, you stand the risk of being painted! Go for it!
Mel says
Can I ask what you would have used if you didn’t already have the white blinds installed? Also what would be the maximum width of window that you would use this no sew curtain on and do you actually draw the curtains closed on a night?
thanks so much :)
mel
YoungHouseLove says
Hey Mel,
We would have done what we did in the bedrooms in our old house. Bought white faux wood blinds, just like the ones we have in this bedroom (except we prefer them to be inside mount instead of outside mount, so they would fit inside the frame of the window for more of a flush look). Although it doesn’t look bad, we just like them stuck inside the window so the curtain rod is high and wide and the blinds are more integrated to the window, if that makes sense. We just have never been real curtain drawers. We’re blind-loving folks.
xo,
s
Libbie says
Your bedroom looks great! I love the contrast between the dark furnishings and the light colored linens. Awesome!
Love your blog!
mylovelysurroundings.blogspot.com
Christy says
The rug in our bedroom is at the foot of the bed, too, but it drives me crazy. I feel like I should have splurged on a great big rug to go under the bed, so it’s soft underfoot when we get up. Are you considering a bigger rug?
YoungHouseLove says
Of course! That’s just a placeholder (it was our old kitchen rug actually). Works for now, but someday…
xo,
s
Mary says
Love what you have done with the room! One other DIY suggestion, curtain rods!! It was killing me to pay for rods, when I was able to DIY them myself for less than $5 a window! It was super easy, too. I have directions and pictures if you’re interested, but they look just like regular curtain rods and are even sturdier! SOO, even safer for little Clara.
YoungHouseLove says
Love it! Post pics on our Facebook page so we can all learn!
xo,
s
Charisma says
I have to say, the curtains really make the room, and the fabric looks lush and expensive. They go so well with the wall color and tie in the duvet perfectly. Great job guys!
Kathryn says
LOVE the curtains…looks great in the room. Perfect color!
P.S. I love Burger and all his weirdness. :)
Zoe says
Sorry if you’ve already answered this one, but…
What about when you wash your duvet cover? Do you have another set that you put on the bed?
We have 3 sets that we rotate, all with a similar colour scheme to the bedroom, but allow for me not to have everything washed and dried within 1 day.
Hmmm… I just remembered you have a drier. Maybe that’s your trick?!
By the way, the place is looking awesomer by the day!
YoungHouseLove says
Yes, the drier saves the day! We usually only have one of things like that (we actually only have one set of sheets for our bed and one set for the guest bedroom (once we get a full sized bed for in there). We’re oddly minimalistic when it comes to bed linens and stuff like that. But we know lots of people who love to switch things out seasonally, which can be fun too! We just get so obsessed with one thing that we stick with it, and switch out smaller accessories like art and accents for a new look. Heck, we’ve been known to repaint rooms when we’re bored too…
xo,
s
Heather @ REOlisticRenovation says
They look fab! Totally worth the hard work. :)
Sandy M. says
You guys are amazing.
Or, in the words of my 2 1/2 year old grand-daughter, while on a walk last week, “too freakin’ cute”! Note to parents (and grand-parents) watch what you say around toddlers!
I predict you are gonna run away with the Homies this year.
Anna says
Hi guys, I am a new reader to your blog, and I just love it! I’m also new to this blogging world. But anyways, just wanted to say you guys are truly inspirational, keep the good work up.
P.S loving the curtain color
ronda w says
Love it! The colors are fantastic.
Sima says
Love the curtain color. It is amazng how quick you are pulling things together. It took me months to figure out the curtains for our bedroom and I am already thnking of changing them. My husband says he knew I would to such a thing, he could tell….hopefully I make a better choice next time. I do like the idea of making my own. You made it look so easy
Lauren M. says
Beautiful! You guys gave me advice on making my own curtains this way a few months back (since I couldn’t find the length that I needed anywhere) and it’s funny that you happened to post this today because we FINALLY finished ours and are going to hang them up tonight!
I love your room colors! It’s like a “grown up” version of your previous bedroom :)