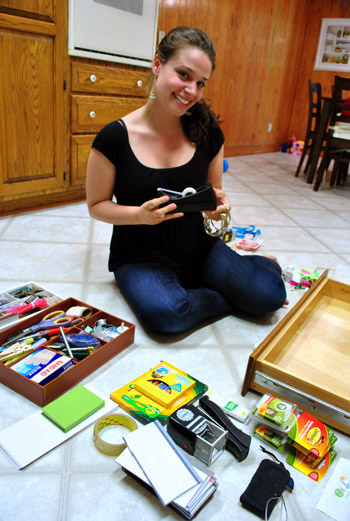
Sherry’s junk drawer switcheroo was actually just the beginning… the beginning of our kitchen makeover. At least the first phase of it.
With our self-imposed six month waiting period running out earlier this month, we finally started putting some plans into action last week (we like to force ourselves to live with things for a while before doing anything drastic – you know, so we’re sure to remove/demo/open the right things after some thought). The plan: to do sort of a “Phase 1” kitchen makeover where we work with as much of the existing kitchen as possible first (aka, keep the cabinets, the countertops, the vinyl floor, the paneling, the beams, etc). Then down the road we’ll enter “Phase 2” (where we do a more invasive reno after saving our pennies and really thinking about what we want/need and what we can keep/work with). But for now we’re happy to ride the Phase 1 wave (and see where it goes and how much our “refreshed” kitchen will meet our needs before jumping the gun on Phase 2 down the line).
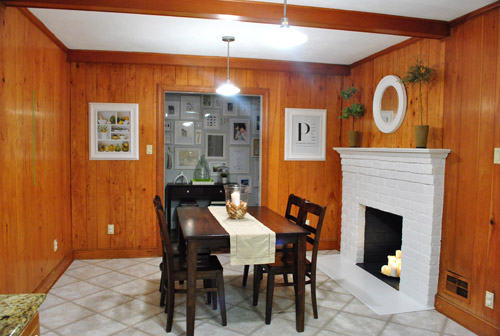
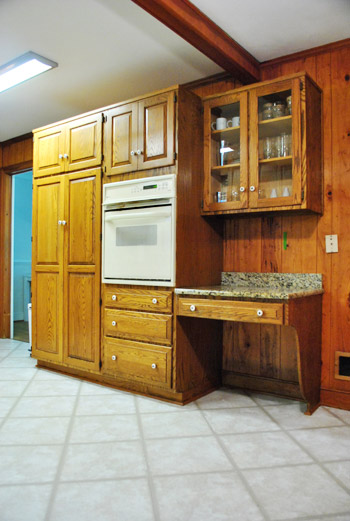
Here’s a taken-recently shot of the kitchen as it looks now for reference.
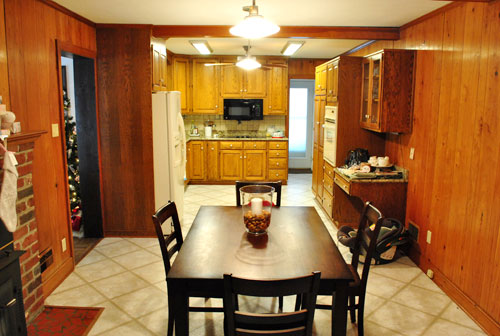
And here’s a taken-a-long-time ago shot from the other direction (see the stockings and the tree?) to refresh your memory. Apparently we don’t take many photos of the room from that direction, so this one is the most recent:
And now here’s the Phase 1 breakdown. Even this first phase has a lot of steps to it, so it won’t necessarily be a quick task (we plan to tackle it on and off as we have the funds/energy). But here’s a quick rundown of what we want to eventually accomplish (not necessarily in this order):
Remove woodstove insert from fireplace<– done herePrime and paint fireplace<– done here- Remove the desk area to the right of the oven to make room for a nice wide doorway into the dining room (we’ll be adding an island so a desk is redundant)
- Prime and paint all that dark paneling
- Open the aforementioned double-wide doorway between the kitchen & dining room (which will line up with the big dining room window for balance – so it looks like it has always been there) <– we’ll need a pro and a permit for this
- Swap the too-low-hanging microwave over the cooktop for a proper hood (the current microwave isn’t to code and causes steam to go everywhere but into the vent)
- Replace the wall oven with a wall oven/microwave combo
- Prime and paint the cabinets
- Completely redo the backsplash
- Overhaul and update the lighting (buh-bye florescent lights)
- Add an island full of storage and seating space where the current kitchen table resides (since the wide doorway to the dining room will make large gatherings at our big round table in there nice and convenient)
So as you may have guessed, Sherry’s junk drawer shenanigans were all in preparation for removing that desk area and the cabinet above it. Why? Because our future mega-doorway will slice right through it otherwise.
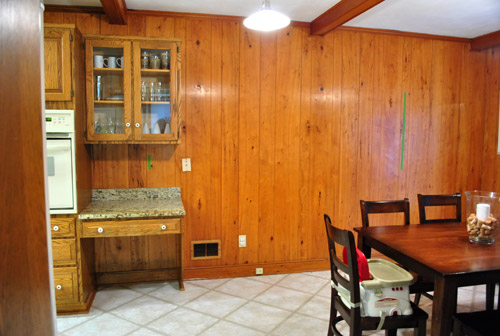
Can you see below where we’ve begun to tape off the future opening with green painter’s tape? We actually have had those pieces of tape up for months- just to live with them and see if we like that placement. And after 60+ days of consideration we’ve come to the conclusion that it’s the perfect location for the doorway, since it’ll open up the kitchen to the dining room while mirroring the width of the front window in the dining room on the other side for some nice balance. We don’t mind losing that one upper cabinet and desk area for the sake of a nice open kitchen and dining room along with a much larger island full of storage (and desk-ish usage if the mood strikes).
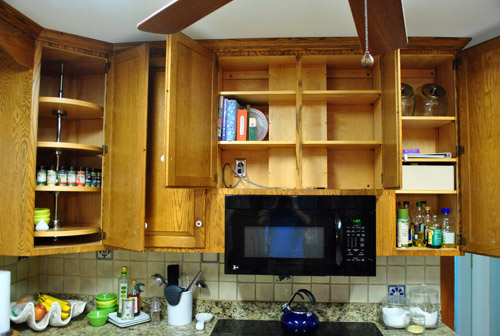
Obviously we could have worked around this cabinet if we wanted to, but so far that desk has only served as a junk magnet (kind of like the kitchen table that we’re desperately trying to keep clear). And we’re not short on upper cabinet storage at the moment so there’s lots of room for stuff to relocate (and you already saw that we had a few empty bottom drawers to put to use here):
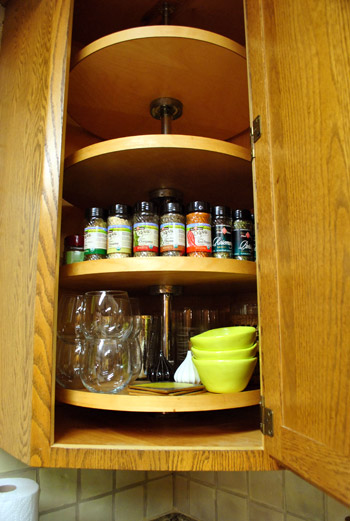
In fact, we had no problem transplanting all of the things in that glass upper cabinet (full of obedient items according to the wife) into our mostly bare lazy susan’d cabinet. Here they are all packed into the bottom tier (with upper space to spare):
Not to mention that once we add a nice big island we’ll have tons more when it comes to stash space in this room. So with the junk drawer and upper cabinet all clear, we were ready for this little slice of our kitchen to come down. Like yesterday.
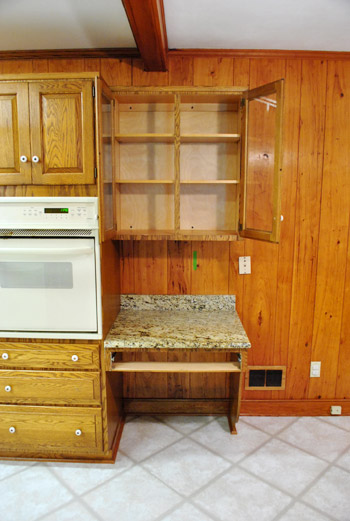
The upper cabinet was a cinch. First we removed the doors so there was no shattering of glass or slicing of body parts in the process. We’d like to find a use for these (we love a glass-fronted cabinet) – though they unfortunately don’t fit any of our other kitchen cabinets for a quick switch. Boo. Might rehang the whole thing in another room though. We’ll keep you posted.
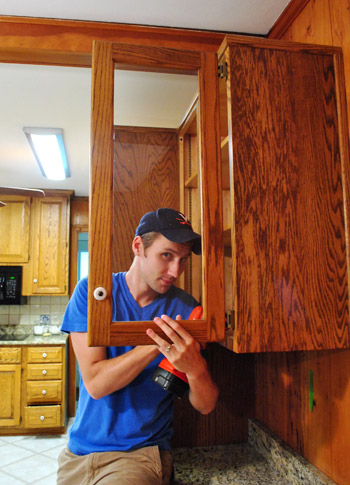
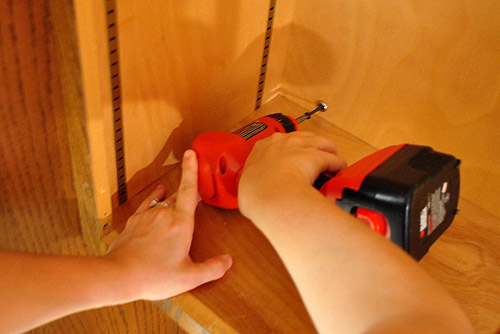
Then I supported the weight of the cabinet while Sherry unscrewed it from the wall and the cabinet next to it.
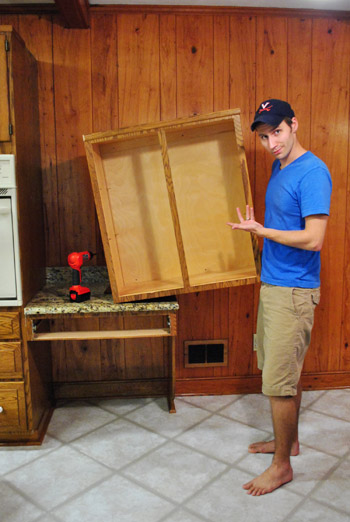
And just like that, the cabinet came down in one remarkably light piece. I was so unphased by the task that I even broke out my smirky Vana White impression. Look at that creepy lopsided half-grin. It reminds me of a face that Mystery (aka: The Pick Up Artist) would make. Anyone remember that show?
So the top cabinet was a cinch. But the little desk area below was a slightly different story. Sherry approached it the same way that she removed the granite backsplash from our bathroom (seen here). First she used a razor to slice through the silicone caulk holding it in place.
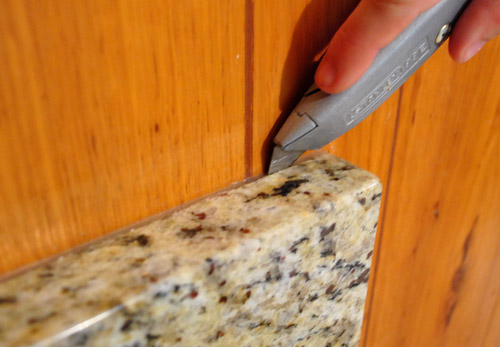
The backsplash part came off pretty easily (with a little prying with a screwdriver and a hammer used chisel-style to get behind it).
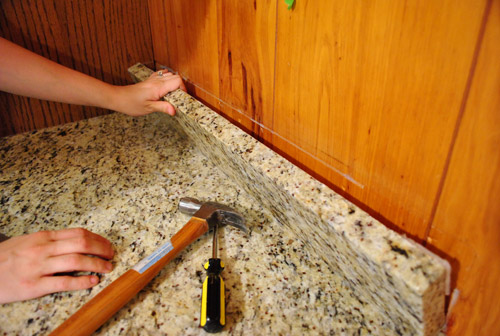
Then Sherry sliced the clear caulk holding the counter to the wall as well as to the other cabinet and the drawer below it – assuming it would just lift right off.
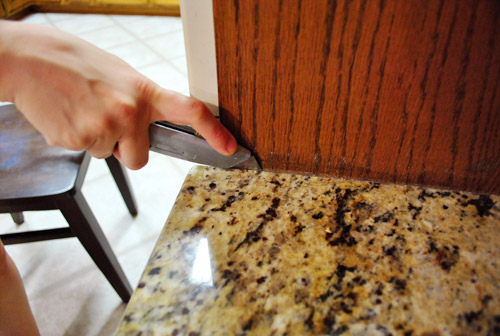
No dice. We tugged and shimmied that sucker with all of our might. We sliced the caulk again and again. We shimmied a few more times (just for good measure). And finally, in one strong tug, the whole thing (granite and drawer) tipped over onto the floor – nearly pulling us down with it as we struggled to keep it from slamming to the ground. Man, granite is HEAVY. This is my tired face. Note: Wear shoes when demo-ing. Barefoot = stupid and not recommended. Shame on us.
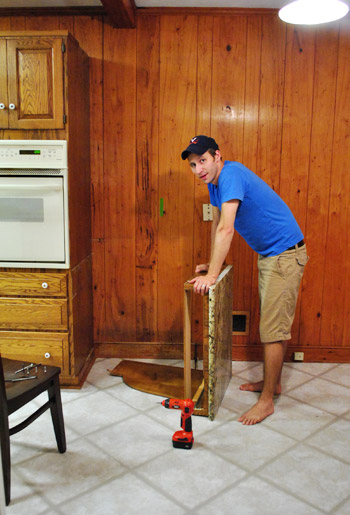
But at least everything was gone (and we still had all of our toes). There was some residual damage left in its wake – like some missing trim and some glue on the remaining cabinet. Both are semi straightforward fixes (we just have to scrape off the glue, use wood putty to fill holes, sand and stain things to match, and add back the missing trim up top).
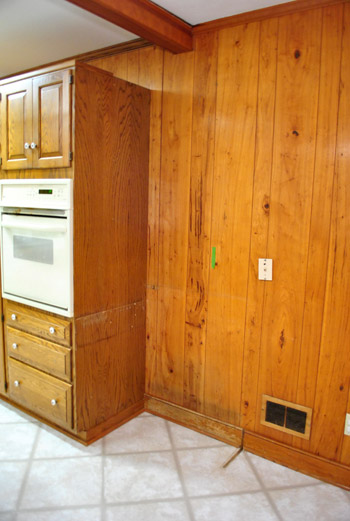
Since we eventually plan to paint the cabinets we may not even bother with all the sanding and staining, but we’ll definitely tend to the trim.
The most notable “damage” was the hole in the floor where the leg support once sat. We had hoped that the flooring went under the desk’s leg, but nope:
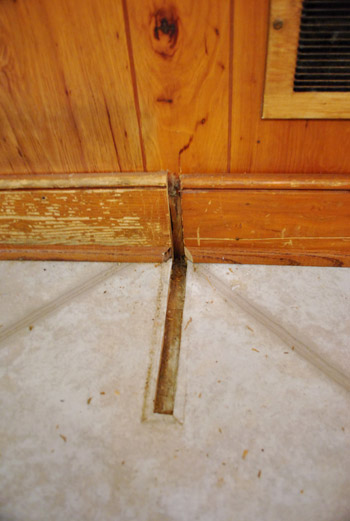
Lucky for us, the previous owners had left some spare vinyl floor tiles behind. So all I had to do was scrape up this old damaged tile (which was VERY thick, by the way)…
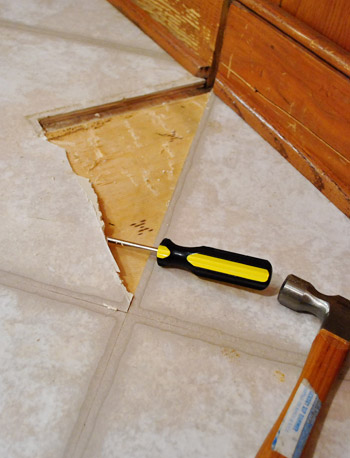
… to reveal something very interesting indeed: original hardwood flooring (wahoooooooo! picture me doing flips and cartwheels and clicking my heels in the air) underneath a thick layer of plywood. Perhaps I should add “restore old hardwood floors” to our kitchen to do list? Nah… that’s more of a Phase 2 project since it’ll necessitate removing all the lower cabinets and appliances which sit on top of the vinyl and plywood layers. Plus we’re not certain it runs all the way through the kitchen (this part of the room used to be a family room, so it stands to reason that there’s not any hardwood under the main part of the kitchen – I guess time will tell).
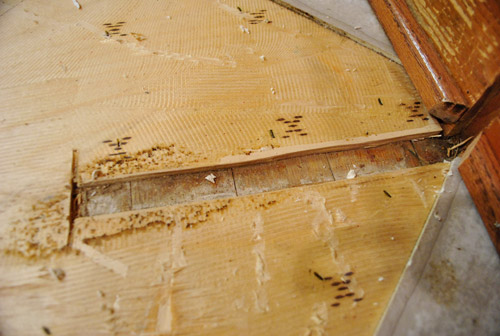
But back to the floor tile replacement task at hand. After I removed that tile and went crazy over the hardwoods, I just measured how much of the tip I needed to cut off of my replacement tile, and then used a razor to make my cut:
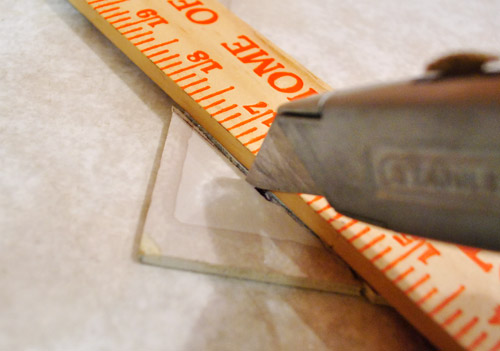
This isn’t the type of vinyl tile with a peel-n-stick base, so I just relied on the leftover glue residue on the plywood below (of which there was plenty) and slid the new tile into place.
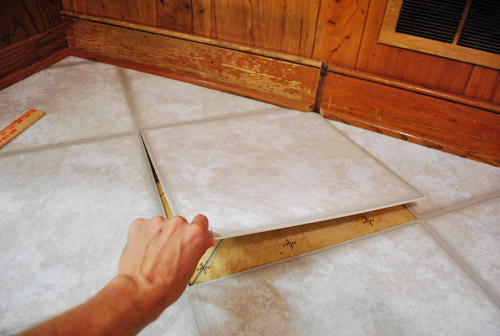
Then we sat Clara’s carset on that tile for a while to hold it down while the glue took hold. Now it’s nice and secure. And it looks like new, right?
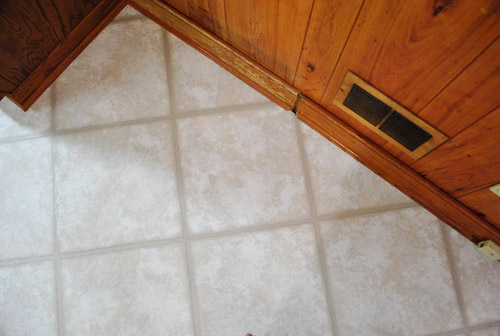
Well, except for that gap in the molding. But luckily I was able to reuse a perfectly sized piece of quarter round (that had been nailed to the front of the desk) and Sherry broke out her mad spackling skills to bridge the gap in the baseboard (along with some other cracks and holes in the paneling).
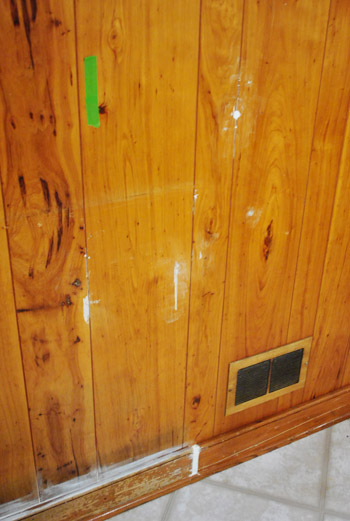
Of course, had this part of the baseboard not been on the “to be removed” area of the wall (our doorway to the dining room will be right here), we probably would’ve gone the more professional route (buying some baseboard, cutting it to fit, and nailing it in instead of caulking the gap). But this works for now since it’ll all be gone-zo when we open up the doorway to the dining room anyway.
And now that we’ve got this cabinet gone and those ugly caulk spots all over the wall, I guess that means it’s time to prime and paint (we learned that opening up the wall calls for a permit – which might take a while – so we’re happy to brighten up that dark paneling in the meantime). Sayonara dark paneling. But more on that later… well, sooner rather than later if all goes well. In fact, we’re probably priming as you read this.

Sarah says
Ohhhh man. There is *nothing* as exciting as a kitchen makeover.
*Pops popcorn, puts on bunny slippers, gets comfy.*
Lizzy says
as always, good team work! it must feel good to be one step closer to your dream kitchen! sounds like you will be painting the paneling soon. when you move onto phase 2, do you plan on doing everything at once or will it be a work in progress (cabinets one month, counters a few months later, floors, etc…)?
i’m dying to re-do the kitchen in our house we bought less than 2 months ago – i think waiting for the funds to build up is the hardest part! we ripped down the wallpaper this weekend out of pure boredom and now i’m even more eager to attack the space! gray lower cabinets, white uppers, soapstone counters (butcher block if we’re short on cash), new appliances, ahhh!
good luck with your kitchen project(s)!
(here are a few pics of our kitchen before/after the wallpaper was removed: http://anexcellentadventure.blogspot.com/2011/06/rainy-saturday.html)
YoungHouseLove says
We have no idea about Phase 2. Haha. It depends what we decide to do down the line (so not sure what we’ll end up needing/wanting after Phase 1). We’ll keep you posted when we get there though! Our last kitchen reno took 113 days to complete and it was really hard to go without a kitchen sink for so long!
xo,
s
Maya says
I’m excited too!!
Do you have any plans for that night slab of granite from the old desk area? I wonder if it could be incorporated into your island somehow…
YoungHouseLove says
We’re excited to use another material for our island (to keep things layered and interesting). We might craigslist it or send it to the Habitat For Humanity ReStore though!
xo,
s
Katie Kerr says
I can’t wait to see how phase one turns out! I am looking forward to you changing out the backsplash. I want to do that in my kitchen and scared!
Dave says
I would have gone a bit further. I would at least cut the wall paneling with a skill saw at the height of the fire place mantel and removed the top portion of wall panel. Replace the top piece of wood paneling and put in drywall. Can be as thin as 1/4″ which is light and would not come out as far as the paneling or so. Then put a piece of chair rail between the new drywall and the wood paneling and you now have wainscoting, which will look more modern intentional and low cost way to modernize the house still in keeping with the overall look. Paint the “new wainscoting” white and and the top of the wall your Grey color.
But hey that would be me.
YoungHouseLove says
That sounds like it would look great too! We love painted paneling (it’s like painted brick to us, we don’t mind the texture at all and loved our paneled-and-painted den in our last house) but it’s not for everyone!
xo,
s
Robin @ our semi organic life says
I agree, I love the idea of this if it were my place – but of course to each their own!
Nancy says
You’re a brave man to work with tools in bare feet. Hope no toes were smashed.
YoungHouseLove says
We added a note to the post- shame on us. Always wear shoes when you demo!
xo,
s
Donna Huebsch says
Waiting is pretty tough, but a smart idea…we want to redo our kitchen, but are working on other areas first. What makes it extra tough is that this house was a foreclosure, and there are gaping holes where the wall oven, microwave, and cooktop were. Since we aren’t ready to renovate the kitchen, but are pretty sure that we want to change the layout, we haven’t replaced the missing appliances; instead we are making do with a countertop microwave, a toaster oven, and a single burner hotplate, supplemented by a grill and a crockpot…very interesting :o)
Heather @ REOlisticRenovation says
Kitchen makeover is exciting! I can’t wait to start ours. Excited to see your progress.
Andrea says
Do you guys not eat/cook?! Your cabinets are empty – where do you keep all your food??
YoungHouseLove says
We eat/cook nearly every breakfast, lunch, and dinner at home! We just have a big pantry-type cabinet to the left of the oven (it’s like an armoire with lots of pull out shelves).
xo,
s
Barb says
OMG!!! Kitchen Reno….coming up!!! So excited for you all!
Honestly, this will be the Mother Project and it will be so rewarding in the end…so carry on!!
Quite honestly, the first thing I noticed was/were John’s bare feet….YIKES!!! Be careful and wear your shoes…(the Mom in me coming out) …sorry!
Can’t wait to see this kitchen come “ALIVE!!” It can only get better, right. We will patiently wait to see your mega project… hurry though, we are honestly rooting for this project…I might add……….IMPATIENTLY …
Can you give us a hint on the color choice?
YoungHouseLove says
We’re going to add some color in there! And it’s going to be Sue the Napkin inspired. More details soon!
xo,
s
mribaro says
I bet it’s going to be that apple green you’re so fond of.
Pipsqueak says
Have been hotly anticipating what you’d do with all that panelling and wood cabinetry! Congrats on kicking off the kitchen to do list – how satisfying :)
Ashleigh says
How do you guys decide a project that will add value to the house. Obviously, the kitchen will, but my husband’s argument is that he doesn’t want to invest what we won’t earn back in the sale of our home. I convinced him to let us re-do the master bathroom which will likely speed up the sale of our home, but not increase the price of it. So I was just curious if you just do projects to make the house one you’ll love or if you consider the re-sale and how much money to invest to at least breakeven at the end. Just curious…
YoungHouseLove says
We figure almost every project that makes a space feel lighter/bigger/more welcoming/more updated/more desirable has to help with resale. So as long as you’re not thinking about something “risky” (like black walls or painting your cabinets aqua) it’ll probably make your house more desirable. It’s definitely one of those fine lines to walk though. We like to focus on making the house functional and welcoming to us (so we tend to think about resale less than our own comfort/needs/wants) since we plan to be here a while.
xo,
s
Gina says
I can’t wait to see what the kitchen looks like with a fresh coat of paint! At least you have solid cabinets to work with, ours are just particle board from the 80s! Also, a great place besides Anthropologie for knobs is Hobby Lobby!
.g.
http://beatbeatheartbeat.com
Lindsey d. says
Hahahaha. I have to share this. I just IMed a good friend who also regularly reads YHL to excitedly report that y’all had started on the kitchen. Her exact response: “Our long national nightmare is over!”
To say the least, we’ve been waiting for this day! Good luck!
YoungHouseLove says
Haha- and our nightmare is just beginning!
xo,
s
Hannah says
I’m so excited to watch this process happen! I feel like it’s the last frontier, since you have DIY’ed a bathroom, and bedrooms, but not a kitchen yet. Can’t wait to see the final product and get more inspriation from you!
Tash says
FINALLY!!! Not that I was growing impatient or anything. :)Looking forward to each step.
Kristen says
I have been waiting and waiting for the kitchen renovation to begin – and I am SO EXCITED now that it has! I can’t wait to see what you guys do!
Melody says
I’m surprised at how easily that cabinet came off of the wall…now I’m wondering which one of my cabinets I can try it on! haha.
Annie says
Here’s an age-old question: Do you remove the vent covers or just paint over them? I’ve noticed from time to time in your photos that you’ve left them on (or it’s just the magic of the interweb). Doesn’t anyone find it necessary to take them off and clean them before painting them? They can get awfully dusty on their little slats, especially when just moving into a house where no one ever cleaned them)?
YoungHouseLove says
We’re tackling that process in the next few posts as we go! Stay tuned for pics and details (aka: we’re not 100% sure which way we’ll go yet, so we’ll have to report back- haha).
xo
s
Kate says
A couple of weeks ago I was painting our bedroom and took the lower vent cover off to clean it before painting. In the two seconds my back was turned, my cat slipped into the room and jumped down itno the vent. She had a great time running around in the duct work and would not come back out! My husband even took off the end of one of the duct in the basement and tried to get her out that way, but she refused to come close enough for us to grab her. You could tell that she thought this was a grand adventure! After about and hour and a half she jumped back out of the same vent she went into, no worse for wear. I put the cover back on and later that day she kept pawing at it and trying to get back in! It was sort of terrifying at the time, but it’s kind of funny now.
Lesson learned: Always make sure your husband fully closed the door before removing vent covers around kitties.
YoungHouseLove says
Oh my gosh – good to know! Glad she had a grand ol’ time and came out no worse for wear!
xo,
s
Sara says
We had the same thing happen with our kitty and open ductwork. We replaced most of the flooring in our house and it tooks us several weeks to lay down all the new flooring.
In that time, we often had several vent covers off and one of our cats kept climbing into the vents as soon as we took the cover off. She always came back out, but we had to watch and make sure to keep the vent openings covered. She did seem to do a decent job cleaning out the dust and lint from the ducts, she came out pretty dirty!
Becky S. says
That reminds me of the time we were having new carpet installed. My daughter’s hamster (Holly, the confused boy hamster) climbed/fell down the floor vent. She was missing for about a day before we realized where she was! We heard her/him trying to climb out of the heat pump “return” in our utility room, which was like a giant reverse hamster wheel – it was like she was trying to climb up the “outside” of the wheel. We ended up stabilzing the “wheel” so she could climb to the “top” of the “wheel”, and then we dropped down a kitchen towel so she could climb on it and we could grab her! She was an absolute mess…reminded us of Bert the chimney sweep from Mary Poppins…completely covered with soot! We gave Holly a warm bath and wrapped her in a dry washcloth, and within an hour she was all clean and fluffy again!
Jessica says
Looking forward to the progress and always impressed by your go forth and conquer attitude but i have to ask, now with Clara as mobile as she is, do you still take turns working and the other one of you entertains her, or is it only work time while she naps?
I ask since I have a 13month old son who absolutly wants to help with everything and is not impressed if one of us works on a project and he doesn’t get to help out.
YoungHouseLove says
Clara is off the walls these days! One of us always has to be “on” her all day (unless she’s napping), so for bigger projects like these (that we definitely want to tackle together) we have to wait until naps and night-sleep to get stuff done. And beg John’s mom to come help us by babysitting if we need blocks of time longer than 2 hours or so.
xo,
s
Jessica says
o’h good, this makes me feel better! Our son loves to help and is into everythign we do. When possible we encourage his “help” yard work is perfect but painting I just haven’t figured out how to do with him. I guess nap time projects is the way to do it.
Chuck says
Perhaps you’ve explained before, buy why not get a paid sitter so you both can work? I mean, this is your “real” job, right?
My wife and I are both technical writers, and we tried this one summer with us and the kids at home – we thought it would be great! It was a total exercise in futility! Kids need attention, parents need to work. Everyone was frustrated. A paid highschooler to play games, sing, swim was the best money we ever spent. Seriously.
Just imagine if you freed up 5 hours each afternoon? That kitchen would be done in no time!
YoungHouseLove says
Just can’t afford it. We both took pay cuts to blog full time (and stay home with our baby girl), so we save money by not having to pay for child care.
xo,
s
Carol N. says
You may want to hold on to that granite slab. It would make a cool table top for something either outside or in the sunroom later on. And you could always use the upper cabinet either in the laundry room or make in the basement for storage if nothing else.
YoungHouseLove says
You’re right, we’re definitely going to hold onto it for a bit to see if we have a use for it anywhere else.
xo,
s
Reenie says
Oh…I can’t wait to see the paneling painted ~ yea!! :)
alg says
“Mystery” actually hit on me AND my friend Nicole once (waaaayy back in the day — right before that show came out.) in the SAME BREATH. Classy.
Lemme solve the mystery for ya right now, buddy. You’re a loser. Pass.
YoungHouseLove says
NO WAY! We’re dying laughing over here. I love that you passed. Good move. Haha.
xo,
s
Liz says
Looks awesome you two!!! I really love a desk in a kitchen, but not enough NOT to have it connecting to the dining room. Can’t wait to see more changes! I also started a blog about mommy-dom, cooking, and design. I’d love it if you checked it out.
Have a great day!
Stephanie Messmer says
I agree with the other posters, I’m so excited to watch this transformation. You guys have been the insirpiration for many changes in my house and this is the one I’ve been anxiously awaiting every day!
Kim at Yellow Brick Home says
Ooh, I can’t wait to see how the kitchen progresses!
Christi says
Hello!
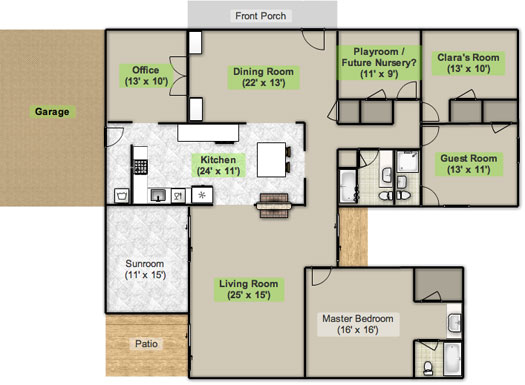
This may seem like a dumb question, but how did you do your house layout? I would love to be able to do that and use it to move walls, etc. Any help would be great! Love ur blog :)
CS
YoungHouseLove says
That was made on floorplanner.com. It’s free!
xo,
s
Christi says
AWESOME!!! Thanks so much
Sarah says
(sigh) Your floorplan is soooo dreamy…
My husband has been looking at open teaching positions and I’ve been sending him links from schools in Virginia. He has no idea the only thing I’m going off of is the YHL housing stock!
YoungHouseLove says
Wahoo! Come to Richmond!
xo,
s
tarynkay says
We ripped up the old kitchen linoleum in our house and refinished the original tongue and groove pine flooring underneath. Our house is from 1950, and according to our neighbors (who have been next door since 1950), the linoleum was put down as soon as the house was built. Apparently, builders used to put subflooring down, then tongue and groove pine flooring on top of that, then tar paper, then linoleum. SO the point here is, you might really have wood floors under there throughout the whole kitchen!
YoungHouseLove says
Oh man, that would be beyond amazing. A gal can dream…
xo,
s
JennyB says
Okay–so my rancher was built in 1957 and there is linoleum in the kitchen and carpet in the attached dining. We peeled up the carpet and it looks like asbestos flooring underneath..I wonder if there’s hardwood underneath that?? Dying to know now! But who wants to mess with asbestos? Drat.
YoungHouseLove says
Ugh what a bummer! I would steer clear of that asbestos though. Good call!
xo,
s
tarynkay says
You can test it for asbestos. Ours was just linoleum held on with tar and therefore safe to mess with. Our contractor friend told us that asbestos glue was not actually as common back then as people think- tar was cheaper.
YoungHouseLove says
Great tip!
xo,
s
ktmade says
Oooh, can’t wait to see that doorway into the dining room. That will make SUCH a big difference! Oh, and junk-magnets. Why is that you walk into a new house and think “Oh, look at this amazing counter space!” and then 2 seconds later, it’s completely covered in mail and phone chargers and random packages of wet wipes and kleenex and you couldn’t find a place to cut up a vegetable if your life depended on it?!
Adriane@fortheloveofpainting says
I can’t wait to see what it looks like with the wall opening…SO fun!
carolinaheartstrings says
Great job on the tile replacement. Looks like nothing was ever wrong. I forgot what a great floor plan this house has. Wonderful. Cannot wait to see what you do with this room.
Karen says
I’m so excited – it feels like Christmas!
Jen @ The Decor Scene says
YAY!!!! I’m so excited to see this kitchen reno start. I was not reading your blog when you started your old kitchen, so I’m excited to see this one unfold. Can’t wait to see the paneling painted. That is going to make all the difference in the world. YAY!!! :)
Jen A says
YAHOOOOOOOOOOO! The kitchen renos begin!!
Your kitchen is going to look wicked awesome once you paint ‘er out! I’m giddy with anticipation.
Jenny says
I actually hadn’t heard of the microwave/oven combo before. Sounds kinda neat –
Anna says
OOOOH HOW EXCITING! I’ve been wondering when yu were going to tackle the kitchen… :) Will be following your progress closely! Happy painting! :)
A
Peggy says
Ohboyohboyohboy- a kitchen reno! Great idea to wait on the planning- I’m so glad I did, because my plans changed several times, depending on how extensive I felt like going.
One suggestion on your range hood- you have enough space on either side of the existing micro-hood to put in a wider hood. It makes a big difference in capturing all the steam and fumes.
Also, it seems like it would be a bit of a hike to that proposed island, and wouldn’t it block the view of your fireplace?
Can’t wait to see the huge differnce in the room when you open up that doorway to the LR!
YoungHouseLove says
Something to think about for sure!
xo,
s
Amanda says
Can’t wait!
I spot a missing eye ball knob on the second drawer under the oven. You should replace it, because you know, you need another “eye ball” watching you!
YoungHouseLove says
Haha, exactly! The funny thing is that we later borrowed one from the glass cabinets we took down. Maximum eyeballs again.
xo,
s
Jessika says
Hi! I am currently working on an ugly paneling project too. However, since it wasn’t installed right 40 years ago (yes, 40 year-old paneling) and because I didn’t want to pony up for drywall right now, I decided to spackle the lines, then put textured paint on them, and then paint them. The result? The look like really nice, drywall-based walls. Your paneling looks better than mine (which had, to add an additional layer of awesome, yellow paint and warped trim), but I just thought I’d mention the other possibility for paneling– making it look like a “normal” wall!
YoungHouseLove says
Love it!
xo,
s
Rachel Tatem says
That’s great! moving slowly but surely! Better that then what I did… 9 mo w/o a kitchen!
amanda says
I’m giddy that you’re starting the kitchen redo! Kitchens are always my fave makeovers. One question about the backsplash, if you put in a backsplash in phase 1 and then move stuff in phase 2, won’t you end up either needing more tile or wasting some you have to remove later? Very exciting that you found hardwood!
I must commend you for all your diy-ing. I just finished redoing my bedroom and man, it was exhausting. All I really did was paint and then do a few decorative DIY projects (and of course sort through/trash the junk), but it takes longer than you think and is very tiring. And I do not look nearly as cute as Sherry when I’m doing this stuff
YoungHouseLove says
We have a few quick fix overhaul ideas for what we have (instead of retiling, which we might eventually do later down the line).
xo,
s
Sarah says
I cannot wait to read all about your kitchen makeover! Additionally, I love that you have Phase I and Phase II. We do the same thing due to finances and feel much better about it now that I see you all do that too!
Oh and the whole barefoot thing, yeah. Recently I blogged about our shed/playhouse makeover and noticed in the pictures that my husband was operating power tools outside barefoot yet wearing protective eyewear. Nice, huh?
http://sarahsimple.blogspot.com/2011/05/playhouse-part-2-glitch.html
Nette @ This Dusty House says
I was going to comment and say you probably don’t need a pro for the demo, and then found your reply that the wall is actually a supporting wall! Yes, probably wise to bring in the pros… I’m married to an engineer so, when we start pulling down supporting walls, I’ll be quite happy to let him and his friends put up the beam. If I wasn’t so confident in his abilities and knowledge, I would certainly be paying someone to do it too!
Your plans sound wonderful! Good luck and have fun!
Becca says
Eeeee! I’m so excited to see the painted walls! :)
Christina says
Will the painted cabinets be staying for good? We’re considering painting ours, but a contractor told us spraying looks much more professional and that regular painting only looks good for about 5 yrs. What do you think? Thanks!
YoungHouseLove says
John’s sister painted her cabinets (the right way, with great paint and primer) and they lasted over a decade and looked great when she later sold (they’re probably still going strong). If you paint with the right stuff in thin and even coats it’s comparable to spraying them (which is super hard to master if you’re not a spraying pro). Hope it helps!
xo,
s
Lori @ Richmond, BABY! says
So exciting! It’s going to look amazing!
Christine says
What color for the kitchen? I am guessing some sort of green. I love the big-opening-into-the-dining-room plan. Put up a webcam so we can watch in real time!! hah. (joke!)
YoungHouseLove says
Color details as we go! It’s Sue The Napkin inspired…
xo,
s
Amanda Wells says
Cannot wait to see the finished project!!
http://www.amandadovewells.com/?page_id=45