Sherry’s junk drawer switcheroo was actually just the beginning… the beginning of our kitchen makeover. At least the first phase of it.
With our self-imposed six month waiting period running out earlier this month, we finally started putting some plans into action last week (we like to force ourselves to live with things for a while before doing anything drastic – you know, so we’re sure to remove/demo/open the right things after some thought). The plan: to do sort of a “Phase 1” kitchen makeover where we work with as much of the existing kitchen as possible first (aka, keep the cabinets, the countertops, the vinyl floor, the paneling, the beams, etc). Then down the road we’ll enter “Phase 2” (where we do a more invasive reno after saving our pennies and really thinking about what we want/need and what we can keep/work with). But for now we’re happy to ride the Phase 1 wave (and see where it goes and how much our “refreshed” kitchen will meet our needs before jumping the gun on Phase 2 down the line).
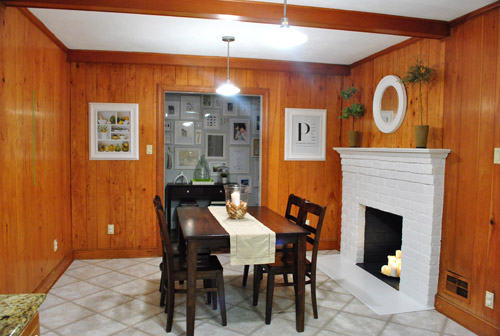
Here’s a taken-recently shot of the kitchen as it looks now for reference.
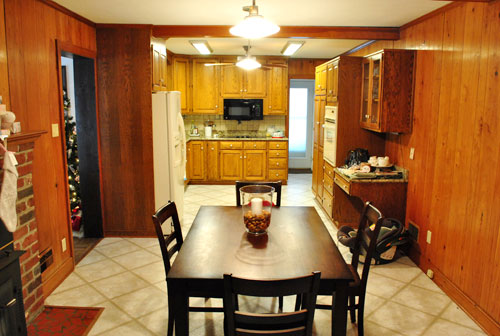
And here’s a taken-a-long-time ago shot from the other direction (see the stockings and the tree?) to refresh your memory. Apparently we don’t take many photos of the room from that direction, so this one is the most recent:
And now here’s the Phase 1 breakdown. Even this first phase has a lot of steps to it, so it won’t necessarily be a quick task (we plan to tackle it on and off as we have the funds/energy). But here’s a quick rundown of what we want to eventually accomplish (not necessarily in this order):
Remove woodstove insert from fireplace<– done herePrime and paint fireplace<– done here- Remove the desk area to the right of the oven to make room for a nice wide doorway into the dining room (we’ll be adding an island so a desk is redundant)
- Prime and paint all that dark paneling
- Open the aforementioned double-wide doorway between the kitchen & dining room (which will line up with the big dining room window for balance – so it looks like it has always been there) <– we’ll need a pro and a permit for this
- Swap the too-low-hanging microwave over the cooktop for a proper hood (the current microwave isn’t to code and causes steam to go everywhere but into the vent)
- Replace the wall oven with a wall oven/microwave combo
- Prime and paint the cabinets
- Completely redo the backsplash
- Overhaul and update the lighting (buh-bye florescent lights)
- Add an island full of storage and seating space where the current kitchen table resides (since the wide doorway to the dining room will make large gatherings at our big round table in there nice and convenient)
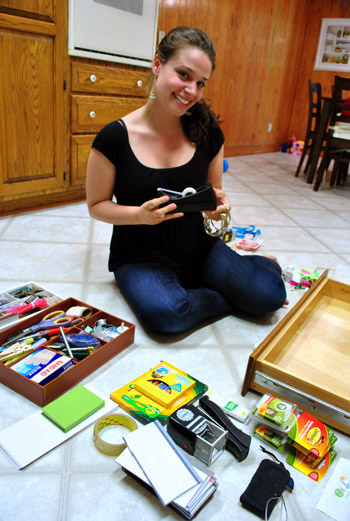
So as you may have guessed, Sherry’s junk drawer shenanigans were all in preparation for removing that desk area and the cabinet above it. Why? Because our future mega-doorway will slice right through it otherwise.
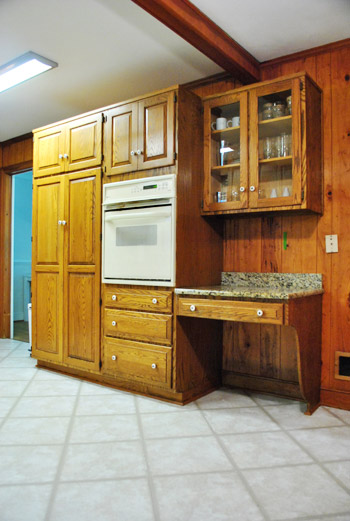
Can you see below where we’ve begun to tape off the future opening with green painter’s tape? We actually have had those pieces of tape up for months- just to live with them and see if we like that placement. And after 60+ days of consideration we’ve come to the conclusion that it’s the perfect location for the doorway, since it’ll open up the kitchen to the dining room while mirroring the width of the front window in the dining room on the other side for some nice balance. We don’t mind losing that one upper cabinet and desk area for the sake of a nice open kitchen and dining room along with a much larger island full of storage (and desk-ish usage if the mood strikes).
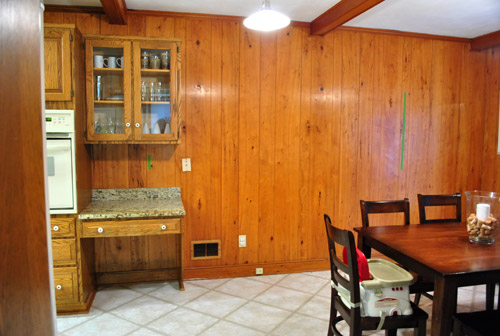
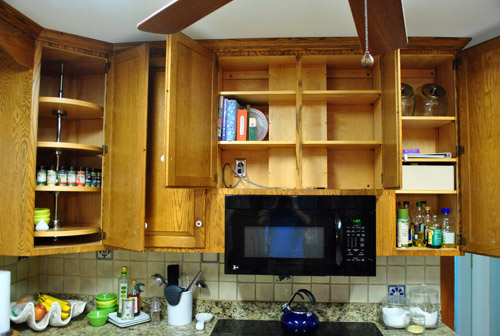
Obviously we could have worked around this cabinet if we wanted to, but so far that desk has only served as a junk magnet (kind of like the kitchen table that we’re desperately trying to keep clear). And we’re not short on upper cabinet storage at the moment so there’s lots of room for stuff to relocate (and you already saw that we had a few empty bottom drawers to put to use here):
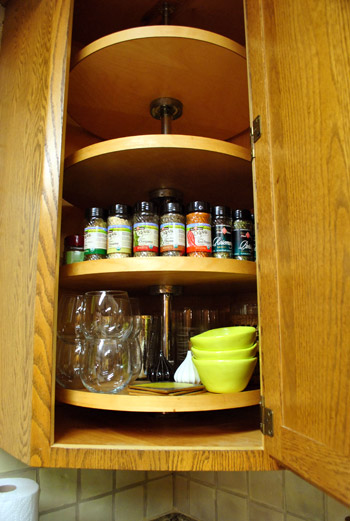
In fact, we had no problem transplanting all of the things in that glass upper cabinet (full of obedient items according to the wife) into our mostly bare lazy susan’d cabinet. Here they are all packed into the bottom tier (with upper space to spare):
Not to mention that once we add a nice big island we’ll have tons more when it comes to stash space in this room. So with the junk drawer and upper cabinet all clear, we were ready for this little slice of our kitchen to come down. Like yesterday.
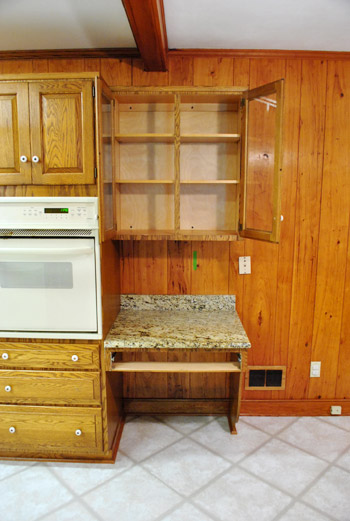
The upper cabinet was a cinch. First we removed the doors so there was no shattering of glass or slicing of body parts in the process. We’d like to find a use for these (we love a glass-fronted cabinet) – though they unfortunately don’t fit any of our other kitchen cabinets for a quick switch. Boo. Might rehang the whole thing in another room though. We’ll keep you posted.
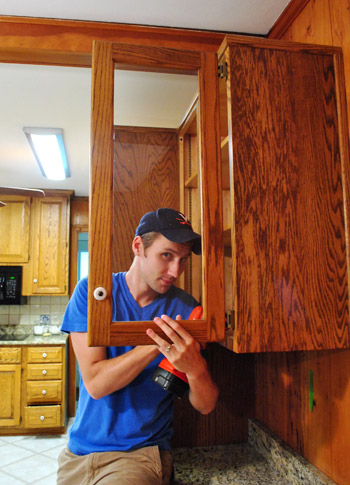
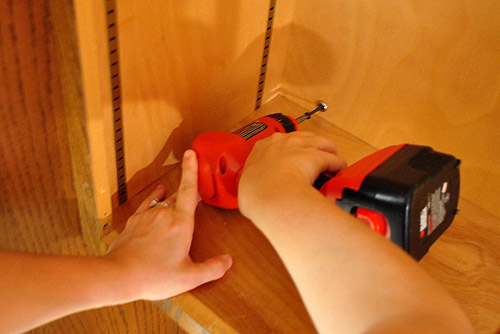
Then I supported the weight of the cabinet while Sherry unscrewed it from the wall and the cabinet next to it.
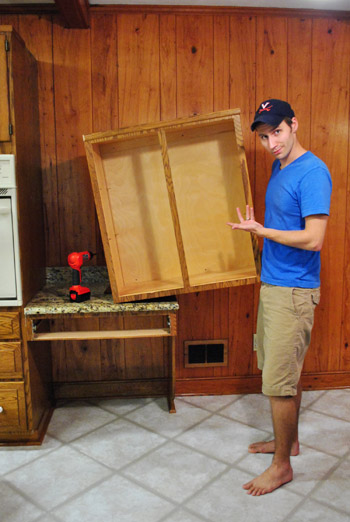
And just like that, the cabinet came down in one remarkably light piece. I was so unphased by the task that I even broke out my smirky Vana White impression. Look at that creepy lopsided half-grin. It reminds me of a face that Mystery (aka: The Pick Up Artist) would make. Anyone remember that show?
So the top cabinet was a cinch. But the little desk area below was a slightly different story. Sherry approached it the same way that she removed the granite backsplash from our bathroom (seen here). First she used a razor to slice through the silicone caulk holding it in place.
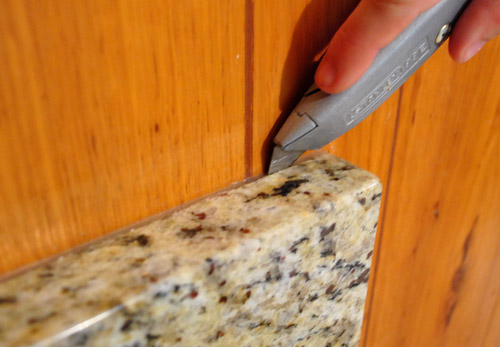
The backsplash part came off pretty easily (with a little prying with a screwdriver and a hammer used chisel-style to get behind it).
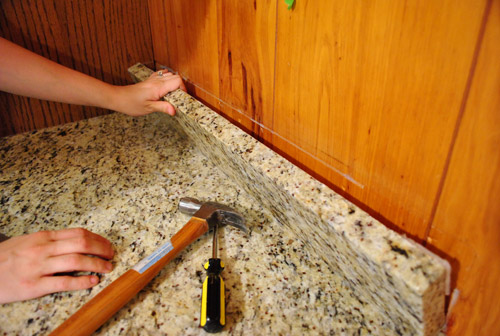
Then Sherry sliced the clear caulk holding the counter to the wall as well as to the other cabinet and the drawer below it – assuming it would just lift right off.
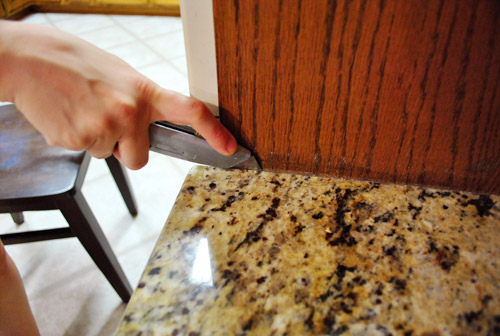
No dice. We tugged and shimmied that sucker with all of our might. We sliced the caulk again and again. We shimmied a few more times (just for good measure). And finally, in one strong tug, the whole thing (granite and drawer) tipped over onto the floor – nearly pulling us down with it as we struggled to keep it from slamming to the ground. Man, granite is HEAVY. This is my tired face. Note: Wear shoes when demo-ing. Barefoot = stupid and not recommended. Shame on us.
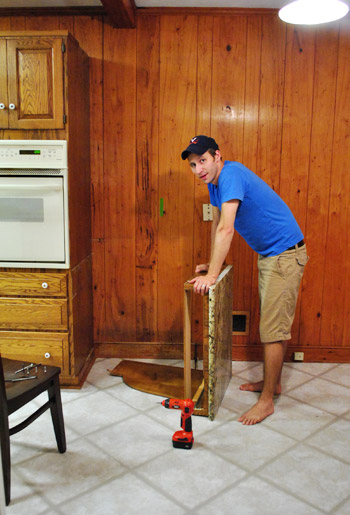
But at least everything was gone (and we still had all of our toes). There was some residual damage left in its wake – like some missing trim and some glue on the remaining cabinet. Both are semi straightforward fixes (we just have to scrape off the glue, use wood putty to fill holes, sand and stain things to match, and add back the missing trim up top).
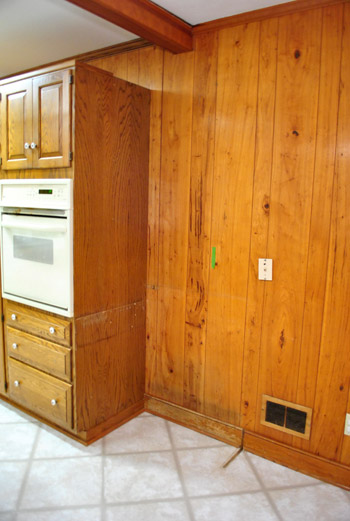
Since we eventually plan to paint the cabinets we may not even bother with all the sanding and staining, but we’ll definitely tend to the trim.
The most notable “damage” was the hole in the floor where the leg support once sat. We had hoped that the flooring went under the desk’s leg, but nope:
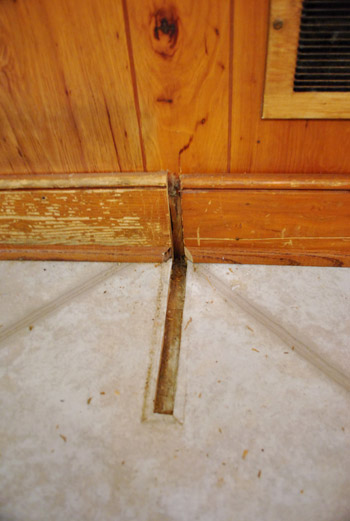
Lucky for us, the previous owners had left some spare vinyl floor tiles behind. So all I had to do was scrape up this old damaged tile (which was VERY thick, by the way)…
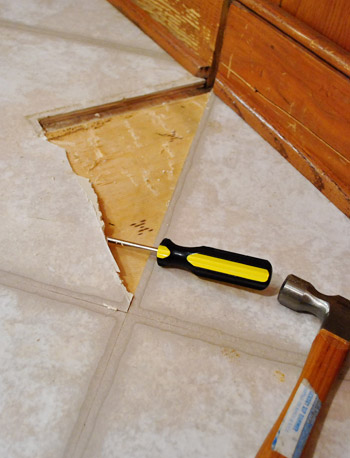
… to reveal something very interesting indeed: original hardwood flooring (wahoooooooo! picture me doing flips and cartwheels and clicking my heels in the air) underneath a thick layer of plywood. Perhaps I should add “restore old hardwood floors” to our kitchen to do list? Nah… that’s more of a Phase 2 project since it’ll necessitate removing all the lower cabinets and appliances which sit on top of the vinyl and plywood layers. Plus we’re not certain it runs all the way through the kitchen (this part of the room used to be a family room, so it stands to reason that there’s not any hardwood under the main part of the kitchen – I guess time will tell).
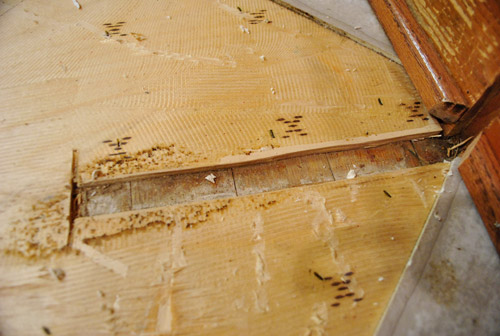
But back to the floor tile replacement task at hand. After I removed that tile and went crazy over the hardwoods, I just measured how much of the tip I needed to cut off of my replacement tile, and then used a razor to make my cut:
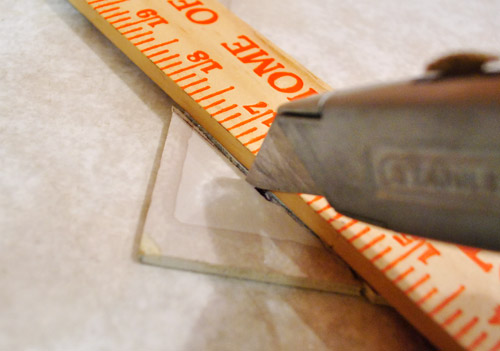
This isn’t the type of vinyl tile with a peel-n-stick base, so I just relied on the leftover glue residue on the plywood below (of which there was plenty) and slid the new tile into place.
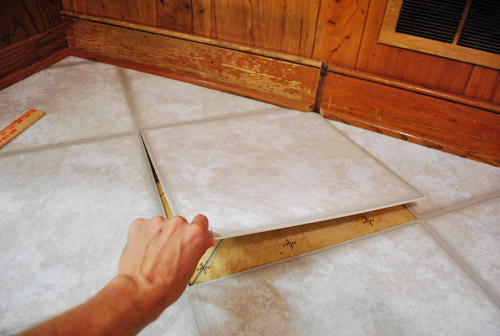
Then we sat Clara’s carset on that tile for a while to hold it down while the glue took hold. Now it’s nice and secure. And it looks like new, right?
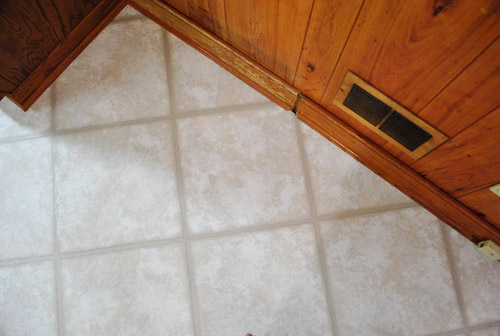
Well, except for that gap in the molding. But luckily I was able to reuse a perfectly sized piece of quarter round (that had been nailed to the front of the desk) and Sherry broke out her mad spackling skills to bridge the gap in the baseboard (along with some other cracks and holes in the paneling).
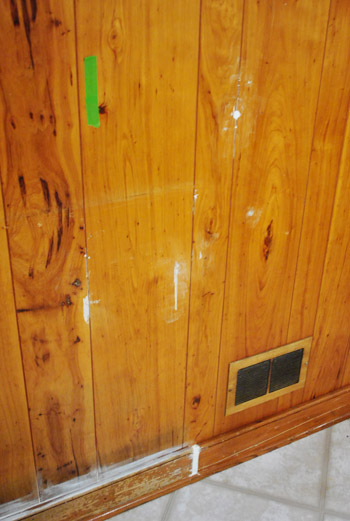
Of course, had this part of the baseboard not been on the “to be removed” area of the wall (our doorway to the dining room will be right here), we probably would’ve gone the more professional route (buying some baseboard, cutting it to fit, and nailing it in instead of caulking the gap). But this works for now since it’ll all be gone-zo when we open up the doorway to the dining room anyway.
And now that we’ve got this cabinet gone and those ugly caulk spots all over the wall, I guess that means it’s time to prime and paint (we learned that opening up the wall calls for a permit – which might take a while – so we’re happy to brighten up that dark paneling in the meantime). Sayonara dark paneling. But more on that later… well, sooner rather than later if all goes well. In fact, we’re probably priming as you read this.

Jennifer says
OMG! (I said that in a valley girl voice!) I can’t wait to see what you all do. My husband and I have been in our house for a couple of months and our kitchen is our biggest problem! We kind of want to go bold but anyhow, I can’t wait! I have been waiting for this moment!!!!! I’m so ridiculous!
Angela says
Can’t wait to see it! You guys are magic with redos. I wish I had a pinch of your motivation and talent.
Heather says
I’m so excited you’re starting on the kitchen. I hate paneling SO much and I can’t wait to see what you guys do with the space!
Ashley @ DesignBuildLove.co says
that already looks TONS better with the white fireplace and removing the desk! Can’t wait to see the wide opening and the rest of the kitchen updates!!!
Shellie says
Yay! Can’t wait to see the progress!
Erica says
WOOOHOOOOO! So excited for the paint.
Emma says
You need a permit to remove walls huh? Good to know as we hope to do that ourselves one day. AND I know permits are a good thing because Mr. Mike Holmes (from “Holmes on Homes of course) always says that permits are designed to protect the homeowner. Please keep us posted on how all that permit & contractor selection stuff goes. All the best with Phase 1!
YoungHouseLove says
Yeah it varies by county, but we need one since it’s a load bearing wall. You might want to google your county’s codes.
xo,
s
Suni (Sunny) says
I noticed your bare feet in one of the first pics and thought “oh, that’s a risky little game!” Glad you came out with all 10 toes!
Katrina says
When we gave the kitchen in our first house (built in 1935) a “face lift” we discovered the original hardwoods underneath UGLY 1970s linoleum. We also discovered the the kitchen used to be a separate kitchen/dining room. I think we did a happy dance when we pulled up the linoleum and discovered it went all the way across the combined 26 foot long expanse, with only a little damage and repair needed where the original wall was located. I can’t wait to see what you come up with for your Phase 1.
Kristy says
I love surprise hardwood flooring! My family recently pulled up my grandpa’s old shag carpet to reveal gorgeous hardwood floors. We were pretty excited about that.
heather says
hi guys – love your ideas for updating the kitchen! i am getting ready to start a very similar project with my husband. i noticed that your cabinets look almost identical to ours…do yours have the grooves that you usually get with oak cabinets? when you paint them, will you use something to smooth out the surface and then sand them down? if so, what can you use to get a smooth surface? i just don’t want people to look at my cabinets and be able to tell that i painted over oak. thanks!
YoungHouseLove says
We’ll detail those steps as we go. We haven’t completely decided on our cabinet painting method yet (we used oil based primer followed by latex paint at our last house with great results though).
xo,
s
Sara says
We painted our dated 90s oak cabinets using the same steps recommended by YHL. You can still see the grain of the wood when the light hits them just right, but I don’t really mind. I think it shows that they are real wood cabinets and not particle board or that plasticy stuff. You can use wood filler products if you want a completely smooth surface though.
pamela says
okey my favorite part of this blog? You guys keeping it real. Not wearing shoes for demo…yeah I do that kind of stuff all the time. And putting the car seat on the tile, just awesome.
Jennifer says
In reading this post and the comments, you guys reminded me to check out my local Habitat Restore for the makeover I want to give to our laundry room. I want an upper cabinet to place in the middle, above the washer and dryer and then have shelves on one side of the cabinet and a hanging rod on the other side of the cabinet. I am short like Sherri (4’10” here) and the current long wire shelf isn’t working out. I keep pricing basic unfinished cabinets at the local home improvement store, but what I want is $100+ (unfinished). Almost forgot about the Restore until I started reading the comments.
YoungHouseLove says
Oh yeah the ReStore is awesome for stuff like that!
xo,
s
Sabina says
Hi – how exciting! Taking the first step on a long term goal is always so rewarding!
But please consider the oven/micro combo. We currently have that and I so wish we didn’t. I’d give my left arm for a second oven – well over the micro.. Also consider that if one breaks – you’re out TWO appliances. Both our oven and micro have had issues – just make sure you think it out.
Here’s to following you’re next adventure!
YoungHouseLove says
Thanks for the tip! Definitely something to think about!
xo,
s
kathy says
Like everyone else, I’m really excited to see how the magic of paint transforms your kitchen. The painted paneling and cabinets alone are going to brighten it up SO much! Your kitchen remodeling posts will be the equivalent of TV’s “sweep’s week”–haha!! I’ve got a Q: I love the idea of your (eventual) double-sided fireplace; have you thought about how you will incorporate the fireplace on the livingroom side into that room? It will be on that wall away from your sectional/TV etc., so I’m trying to picture how you’ll furnish/decorate that area so it will feel like part of the whole livingroom. I guess I’m thinking too far ahead but I’m interested now that I’ve seen your blueprint plan. :-)
YoungHouseLove says
That’s why we chose a chaise for that side of the sectional (so you can face the tv or the fireplace). And we also plan to add a mantel and hang art to further balance that side of the room down the line.
xo,
s
kathy says
Oh, that’s right! I also just noticed that you plan to open the wall from kichen to livingroom–it’s going to be lovely and so open! Can’t wait.
Gracie says
I am so excited that y’all are starting on the kitchen now! I can’t wait to see what color y’all picked for the walls! Quick question: Are the floors in the kitchen area higher than the rest of the house? Or, would they drop down lower if you exposed the wood floors underneath?
YoungHouseLove says
They seem slightly but not noticeably higher (not a step up or anything, there’s just a small tradition piece of wood between them) so I believe they’d be on the same plane if we went back to wood in there. If we can. Time will tell!
xo,
s
Keri says
I have never been able to figure out why some people cover up hardwood floors! I’m probably as excited as you are about your discovery. I don’t know if I could have kept myself from prying up more tiles and plywood on the other side of the room. What a lovely mess that would be! When do you think would be the best time to do something like that? Do you wait until you’re ready to rip up all the floors? Do you go into it with plans to install new flooring and just hope that you don’t have to ? Or do you go crazy and peel up a corner to see what you have, then patch your mess until you’re ready to renovate?
YoungHouseLove says
Hmm, I think I would have gone to a transition point (between the hardwoods in the living room and the vinyl tile in the kitchen) and would have just removed the transition (the piece of wood across the doorway base) and peeked under the tile to see what we were dealing with). Hopefully that way you could put the transition back into place and nothing would look amiss. Or if you found something great under there you could go for it. Good luck!
xo,
s
angel valerio says
I’m glad none of that fell on John’s bare tootsies :)
Heather says
What are you planning on doing for lighting? We have similar lights and I fear swapping them for a single fixture won’t provide enough light.
YoungHouseLove says
We have no idea. We just know that we don’t want two long florescent lights flanking that fan. We have to get an electrician in to wire a fixture over the dining table so we might ask for an estimate to convert those to recessed lights (and do some research if we think that’s something we can tackle ourselves). We’ll keep you posted on all things lighting when we get to that phase though!
xo,
s
Emily says
I have a very, very similar kitchen with lineoleum floors that we do not intend to replace. I would like to paint my cabinets white to brighten up the kitchen, but I am concerned about how white cabinets will look with the tan/white floors (i.e. way too much beige). The floors are a similar color to your floors, so I’m excited to see what color you guys go with, unless you guys change the floors in the kitchen in phase one.
Otherwise, I’d love any suggestions for what color to paint the cabinets with floors like this: http://www.pbhandyman.com/sitebuildercontent/sitebuilderpictures/IMG_2650b.jpg
YoungHouseLove says
White cabinets look great with tan floors! I clicked over to that link and say: go for it! Lots of bathroom and kitchens that we love have light neutral floors and white cabs!
xo,
s
Emily says
Thanks :) I needed the vote of confidence; looks like my husband and I have our summer project ready to go!!
heather says
I’m doing the priming and painting of paneling right now! (Well not RIGHT now). The only difference is that ours isn’t exactly regular wood paneling. Think pine board floor…on the walls.
http://www.likeacupoftea.com/call-primey-painterson/
Caroline says
What is your plan with the layout when you open up the doorwawy? Are you worried about the dining table opening right up to where the kitchen table is and how that will look?
YoungHouseLove says
We can’t wait to be able to see from the dining table into the kitchen with the island and the fireplace! We think it’ll be a nice open floor plan with a breezy and airy layout. We had a dining space that was visible through a giant double doorway into our kitchen in our last house, so it’s what we love.
xo,
s
lara says
can’t wait to see pics. we have a lower level family room full of paneling i can’t wait to brighten up. hoping to get some tips from you. great timing!
FirstCorinthiansThirteen says
First things first… where are your SHOES John??? The granite desk thingy could have smashed your feet off. Kind of reminds me of the bathroom demo without shoes post :) Secondly… looks fantastic. That kitchen of yours is so ugly. No offense. Just sayin’. I have a hideous bathroom myself… like hideous. Plastic burgundy, pink and grey tiles floor to ceiling, including the ceiling. We havn;t worked up the gumption to demo it yet. Good luck. You guys are making great progress on the new house. I love it’s potential :)
YoungHouseLove says
We added that big bold note about the shoe thing – didja see it? Trust me, we wish we were both wearing steel tipped boots. Barefoot isn’t the way!
xo,
s
FirstCorinthiansThirteen says
LOL! Readers are leaders right! I was breezing through the post too fast apparantly! Still cracks me up though… I’m thinking about my bathroom… I have to send you pics. You would FREAK OUT. Seriously. Love the blog you guys.
Dianna says
I am giddy with excitement to see the work you do in the kitchen. I just painted my ugly kitchen cabinets all black and just love how it turned out. A bold choice for my normally conservative taste. New would have been amazing, but painted works in the meantime. Good luck!
gboll says
Love your hat John! Wahoowa!!!!
Lauren says
I immediately thought of you when I first saw the Game of Thrones girl and was all prepared to comment on the blog about it, and then like five seconds later she was all sorts of unclothed and I rethought the whole comment idea.
Oh and kind of coincidental…on Father’s Day my sisters and I were talking about all the times my dad hurt himself because he was doing something barefoot (stepped on a bee, dropped a wheelbarrow on his foot, broke a toe playing basketball.) You’d think he’d learn, but I’ll bet he’s probably doing something barefoot right now, something totally safe, like chopping wood or mowing the lawn.
KathyL says
Can you put up a blue tape doorway in the dining room with pictures for us to dream about tonight?
YoungHouseLove says
Too… busy… priming. Haha. More details soon!
xo,
s
Kati H says
Hmmm… I would be so bummed if I read all of those ‘tut tut’ comments. You’ve said ‘shame on us’ a million times. You’re barefoot- and still alive! Good job! I never wear shoes in the house, either. On another note: Yay! Yay kitchen! My hubs and I live in an apartment and I want to paint SO BADLY. Le sigh. Excited to see what comes next!
LauraC says
Totally agree with you. John and Sherry are adults and don’t need more parents! Arg! Stop with the nanny comments! What they do in their own home is their own business! It’s not agains the law to be barefoot and work! We know they’re smart, your average Joe can’t make a blog like this! Sorry. just. couldn’t. resist. anymore.
Cindy says
It’s pretty funny/concerning at how excited I am that you could be painting the kitchen right now…your site is going to be on refresh all week waiting to see!!! Haha I need a hobby lol
El says
I loved reading your plans. I’m wondering though if you would consider a suggestion for the microwave. Maybe consider putting in an under the counter microwave into the island you’re doing instead. Would allow Clara to heat things up too when she’s older and it seems like your current oven is at a perfect height as it is for a grown up. I wish my oven was up higher so my daughter won’t hang on the handle and open it like she often tries.
YoungHouseLove says
We thought about that but we’re nervous that she’ll microwave things that she shouldn’t (like Burger, or a fork for example). We talked to a parent who had one and she said it was sometimes frustrating to “police” – but we’ll definitely give it some thought!
xo,
s
KathyG says
My Sharp drawer micowave has a Child Lock – pretty sure they all do. It’s the greatest thing since peanut butter! lol Check them out – Best Buy has them, I think.
YoungHouseLove says
Ooh that’s smart.
xo,
s
Robin says
Yes I’ve noticed our pretty new standard microwave has a child lock on it. Similar to a child lock on car doors you have to be smart and punch a sequence of codes/buttons to open the door – I think just 2 buttons really. Smart for little ones who are within reach. You could research that route.
El says
If you don’t want to spend the money on one with a child lock, you could always do a door to hide it when not in use and put a regular child lock on the door.
Suzanne says
Our first major project when we bought this house was ripping up the horrible sheet of vinyl in the kitchen and installing new floors. We were SO EXCITED to find hardwood – not just plain hardwood but some sort of beautiful, antique dark stained hardwood (house was built in 1914). We did a happy dance all the way to the back 3 feet of the kitchen where we found…subfloor. The last 3 feet of our house used to be an enclosed porch and when they turned it into real house they didn’t match the floors in that part of the kitchen. (They did, interestingly, match the wood floor in the adjoining family room.)
We tiled over the whole thing. I hope you have better wood floor luck!
YoungHouseLove says
Oh mannnn. That comment was an emotional roller coaster. So sorry for that darn sub floor!
xo,
s
Kimberly says
Hi S&J,
LOVE LOVE LOVE your blog. Love your style, your thriftiness…everything! Saw you guys on Nate Show long time ago and found your blog. I assume you are full time bloggers as you haven’t mentioned working outside the home??
Congrats on your successful blog and I look forward to all your transformations every day!
I am certain you have probably answered this question many times, but I will ask. What did you guys do “before” Young House Love and wondering if you make most of your money from ads or clicks on your blog? Just curious! I think your blog is very well put together – too well unfortunately, I’ve found myself going through it for hours at a time!
Keep up the great work!
Kimberly-Canada
YoungHouseLove says
Aw thanks. Yup, after 3.5 years of blogging as a hobby John came on full time so we could both “run” this little blog of ours (right after Clara was born because we feared we’d have to shut things down if I didn’t have some help with a newborn around). We still can’t believe it’s actually our job. When it comes to how we make a living, we both took pay cuts to do this, but we live modestly off of the sponsors that come to us directly (they’re listed on our sidebar under the word “sponsors”) and the google ads that we have on the sidebar. We’re incredibly thankful to those folks who allow us to do this full time. As for what we did before, we met in NYC where I was an advertising copywriter (I wrote commercials and print ads for clients like Got Milk and Johnson’s) and John was an account guy (organizing photoshoots and castings, etc). In full disclosure, blogging is tons of fun, but working in advertising was really fun too.
xo,
s
Kimberly says
Thank you for answering! Very cool that you are able to work together from home.
Now that you said it, I do recall the mention of NYC and the advertisement biz.
Like I said, triple love reading your blog – thanks for sharing your creativeness (???? word???) and your home.
We are on our 4th home and we had this one built August 2010…hubby said no painting or any changes for two years. I am itching to get something on my walls other than builder beige! I will continue to live vicariously through you guys as you remodel and decorate.
Cheers,
Kimberly
YoungHouseLove says
Aw thanks Kimberly. Good luck with your house! I bet you’ll find all sorts of ways to creatively tweak things without painting or changing the house (maybe some homemade art or some curtains made from bedsheets?). Have fun!
xo,
s
heather says
sent you some blog love:
http://thebadhousewife.wordpress.com/2011/06/27/blog-love/
thanks for sharing your projects!
YoungHouseLove says
Thanks! Off to check it out…
xo,
s
jenn says
im beyond excited!
are you doing the paneling and the cabinets at the same time or just one for now? it’s so hard to picture paneling another colour besides white.
i hate all this not knowinggggggggg ahhh.
by the way, where is your stove? i never thought about it. i see your oven but no stove. is it a ceramic top or something?
YoungHouseLove says
We have one of those glass cook tops under the microwave (along with the wall oven that you see). As for the cabinets, we’ll paint those down the line. Paneling first…
xo,
s
Alexa says
We ripped out our broken build-in microwave and replaced with a hood – best improvement we’ve done in the kitchen! Looking forward to watching the kitchen transformation.
sarah says
super cool about the hardwood under the kitchen floor! that happened to us when we moved into our condo 10 years ago. we found out that the entire second floor of the house had hardwood under the nasty carpet. we didn’t waste any time refinishing. love it!
Liz says
I’m SO excited!
Isabel says
And that desk+counter looke heaaaaavy too! So glad to hear no toes were injured in the making of this post :)
Kacie says
All of your little makeovers are sooo inspiring! Thanks!
Kacie
http://www.acollectionofpassions.blogspot.com/
Julie says
Glad all your toes are intact, John. I have a similar story. My hubs was putting together our new grill a few weeks ago. It came to the part where he needed to add the side work table. I heard a loud crash, followed by some choice language. I ran to check on him, only to find the table had fallen onto his foot. After I got him ice and made sure he was ok, I asked him to not assemble heavy metal equipment in his flip flops anymore. He acted very offended that I would suggest such a thing, and angrily replied, “I wasn’t wearing flip flops! I was barefoot.” His foot was swollen for 3 weeks. Glad you averted disaster, John, because heaven knows granite would have caused even more damage!
Molly says
I don’t want to double dip on the Roomba freebie, but I just had to tell you that when I read the line “Did I say own? I meant win” in that post, in my head I heard it in the Old Spice commercial guy’s voice… and I giggled.
YoungHouseLove says
Haha- I love that guy. I’m on a horse.
xo,
s
Alex says
I had the same note about wearing shoes in one of our recent blog posts. Why is it that we all know better, but we still wear less than optimal footwear when doing things like demolition.
Alex says
omigosh I have been DYING to see your kitchen wall panels painted since you guys moved in!! I hope you’re going to post the pics today!!!! Waiting anxiously….. I know its going to look absolutely amazing!!
Adriane says
Can’t wait to see this kitchen when it’s all done! I can just imagine how perfect it will be :)
heyruthie says
i’m very excited! i’ve waited for the kitchen redo to start! is there any chance that you’ll stain the kitchen beams the same way as the ones in the addition, to tie the two spaces together? or are you going for everything white? i’ll be watching!!
YoungHouseLove says
We’re going to go all white for now (just because they go in different directions- so we don’t want it to look like a criss-cross mish-mash when you glance through the kitchen into the living room. We figure if the three weirdly placed beams in the kitchen blend in than the gray ones in the living room can be the stars. Haha.
xo,
s
Amber says
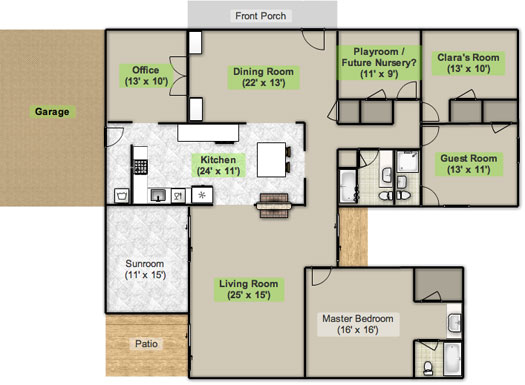
I love your blog and I am very excited to see your kitchen transformation. I did want to mention something that I had read…be careful about posting house plans and labeling where your children sleep. Probably an overprotective measure but I thought I would pass it along : )
YoungHouseLove says
Thanks so much for your concern! We definitely put tons of thought into safety (especially since Clara came along) and have one of the craziest alarm systems known to man (every door and window is armed, we have motion and even sound sensors along with video monitoring, etc). It really helps us feel nice and secure!
xo,
s
heyruthie says
p.s. random comment for Sherry: have you tried the “new” Wasa Thin and Crispy flatbread crackers? I’m in love with the rosemary flavor….sooooo tasty, and i thought of you.
YoungHouseLove says
Ooh I’ll have to try that!
xo,
s
Barbara H. says
I’ve seen some amazing blogs using Rustoleum’s Cabinet Transformations http://cabinets.rustoleumtransformations.com/ (I have no connection to Rustoleum!) – no priming needed, so it might be too late. Retro Renovation blog has some posts on it.
That granite might make a nice little outdoor table or bench.
Veronika says
YaY! You guys rock! i’m so excited about the kitchen makeover!! Can’t wait! Bring it on!!
Good Luck!