When our saga last left off, our heroes were being shuffled around the kitchen. That is, if a refrigerator and a pantry are your kind of hero.
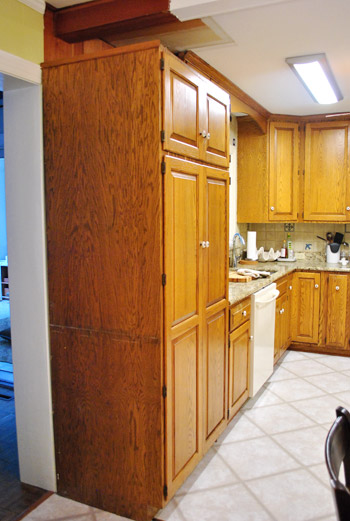
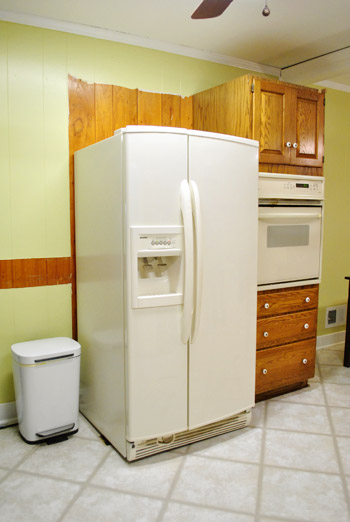
But before our new appliances arrived last week, we had to put the moves on a few more things. First in line? The cabinet that held the wall oven.
You probably recall that we were ditching the wall oven because it was burnt on the front, bisque colored, and cooked things unevenly. We opted not to replace it with another wall oven because (1) wall ovens are expensive – usually 1K more than ranges, (2) our cabinet is unconventionally narrow – most modern wall ovens wouldn’t even fit, and (3) the tall cabinet was big and bulky (we’d like the pantry and the fridge to be the only two tall things in the room). So that whole tall cabinet was getting the axe – but of course we’ll be repurposing parts of it.
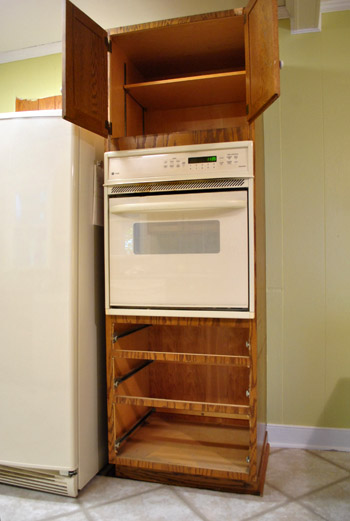
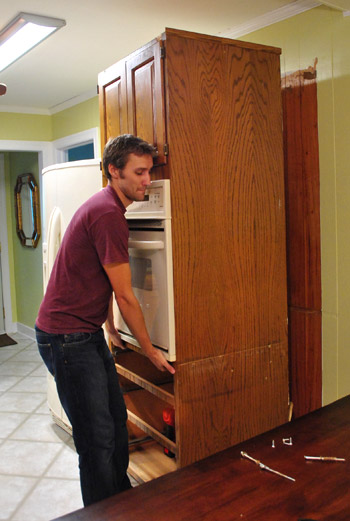
Once emptied, we unscrewed it from the back wall, removed any trim, and shimmied it out of its hole in the floor. Oh yeah, this was all after turning the power off.
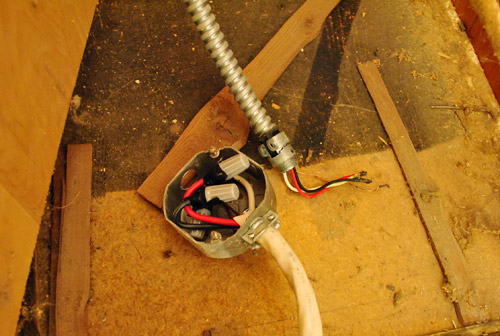
The darn thing was hardwired, so rather than just unplugging something, I had to do a bit of “unscrew this, rescrew that” to get it disconnected. Don’t worry about the crazy exposed wire. I capped it, put everything into the metal box (which had a lid) and left the electricity turned off to that area of the house until the electrician arrived this morning to take care of it all – and to finally figure out what that mystery wire is above the pantry (details as soon as we know!).
With a few more screws unscrewed and a bit more shimmying (we feel like we do a lot of that lately) we had the oven out of its wall hole and ready to be moved out of the room (we’re donating it to the Habitat For Humanity ReStore).
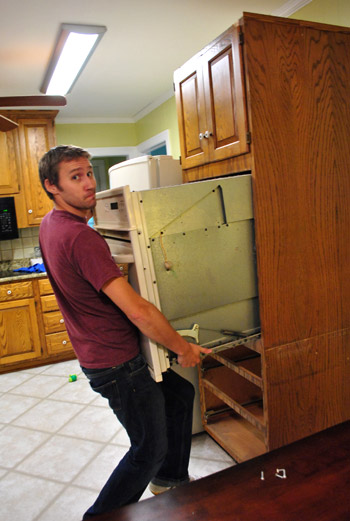
Once the oven was removed, the cabinet itself was awesomely light, so it joined our stockpile of kitchen scraps in the sunroom (we’ll be reusing things like the doors and drawers and possibly some of the other oak trim). We’re hanging on to everything until we’re done with the kitchen just in case a piece comes in handy (so our sunroom looks crazy – we should snap a photo for you guys). Then once we’re done, we’ll try to donate or craigslist as much of it as we can.
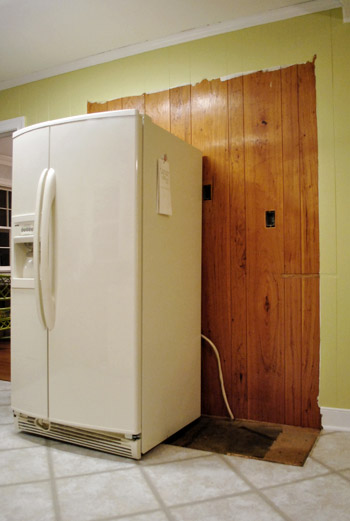
The womp-womp of having just exposed more unpainted paneling wasn’t so bad. Mostly because the next morning our new appliances arrived. Joy. The fridge got installed in place (the old one was hauled away to be donated to a local church) and the new stove temporarily sat by its side (not hooked up, because it will soon live on the wall to the left of the fridge as you face it – more on the future floor plan here). The dishwasher and microwave are sitting in boxes in front of the fireplace. Yes, our kitchen looks pretty insane right now if you couldn’t tell. And although the only new appliance that we’re actually using is the fridge, so far we love it.
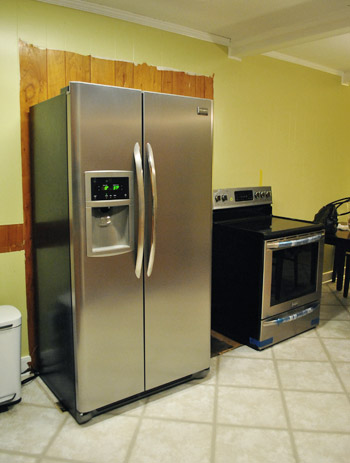
With the wall oven gone and the new stove not in place, we’d lost our baking function in the kitchen. No good. So our next mission became getting the new stove installed in its soon-to-be-permanent home. Only problem? This stood in our way:
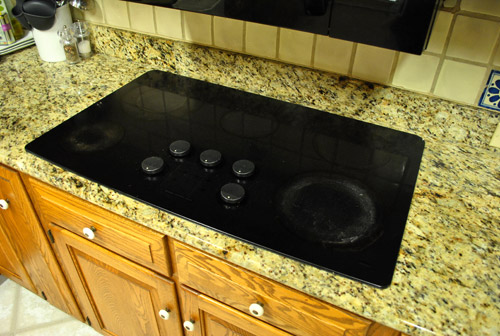
It was time for the cooktop to join the wall oven in craigslist/donate purgatory (we planned to craigslist it because it’s a pretty nice JennAir model). We started by emptying the cabinet below and I disconnected the electrical in the same turn-off-power-and-cap-it-all-in-a-metal-box-and-leave-off-power-to-that-area-until-the-elecrician-arrives-this-morning fashion.
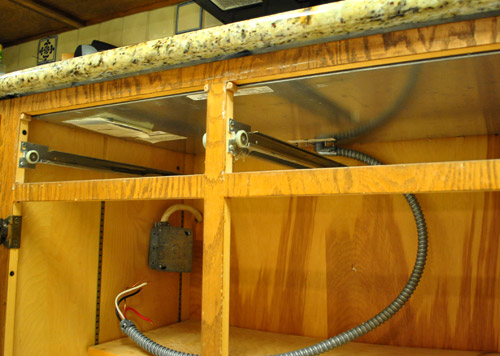
Based on the installation manual (which I looked up online), I should’ve just been able to lift the cooktop out (it wasn’t screwed in)… but this sucker wasn’t budging. That’s when we discovered this:
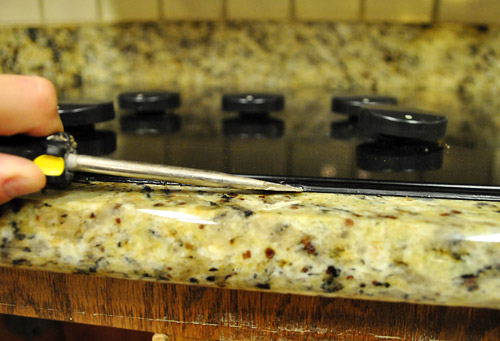
It was glued down with some sort of black silicone. Sherry did some quick Internet research on “removing cooktop glue” and came to the conclusion this was baaaad news. Apparently you’re not supposed to glue down your cooktop because it makes it very difficult to remove (uh oh) without completely shattering the glass (double uh oh) and many folks were rambling about how mad they were at their granite installers for gluing theirs in which they only learned was completely wrong after it needed to be removed to be serviced or replaced and was shattered in the process. Even though it wasn’t looking too good for our “craigslist the cooktop” plan, we were determined to at least give it our best try. So we started gently scraping and slicing the caulk to free the cooktop.
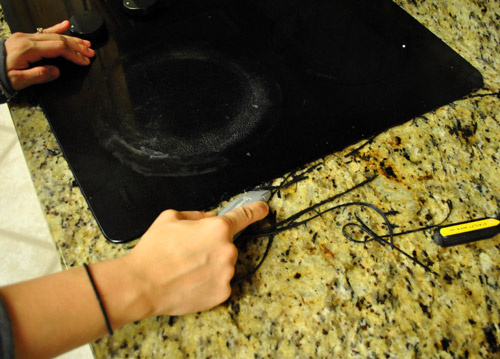
Well, the odds won. After about 15 minutes of trying to sloooowly and caaaarefully pry it up, we got our first crack in the glass. Then our second. Then our third. Then… well, we just accepted the fact that our cooktop wasn’t really sellable or donate-able anymore. Sucks. But from what we hear, any drop-ins that are caulked usually suffer a similar fate. So if you’re adding one remind your granite or countertop folks not to glue it down!
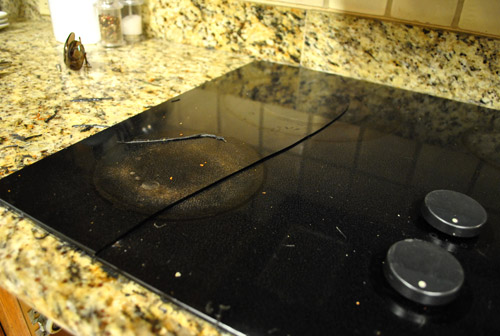
With our rescue mission having turned into a recovery, we plugged away at trying to detach the cooktop from the granite. After all, this whole section of granite was next on our remove-list (to make way for the stove) and it was already gonna be heavy enough without a cooktop piggybacking on it. So Sherry kept working on the cooktop while I started with the granite backsplash – which, ironically, came out quite easily. Having the backsplash out gave Sherry enough room to cut along the back edge of the cooktop (even her small hands couldn’t fit back there with the backsplash in place). Perhaps this would do the trick?
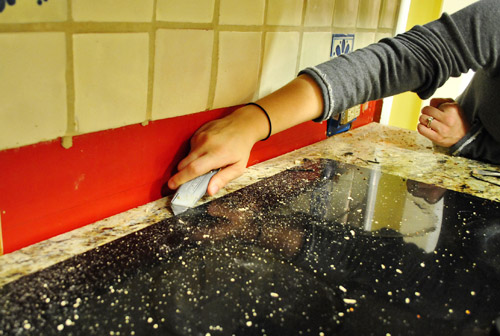
NOPE. No luck. So we gave up on trying to remove the cooktop and decided to just carry it out with the granite instead. Sherry was quite excited to turn her attention to something that (based on my backsplash experience) would be much more satisfying.
And it was. After a few slices along the silicone caulk that held the granite in place, Sherry was able to wedge a crowbar and screwdriver in a few places and start to pry it up within minutes.
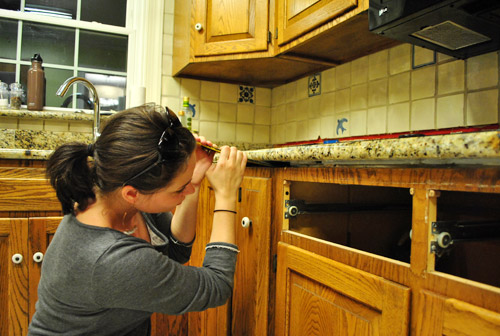
Once it was fully detached, we called in reinforcements (my dad, whom we had invited over to “help with a little project”). Because granite is HEAVY. He must’ve known our definition of “little project” usually calls for work gloves, so he showed up wearing his.
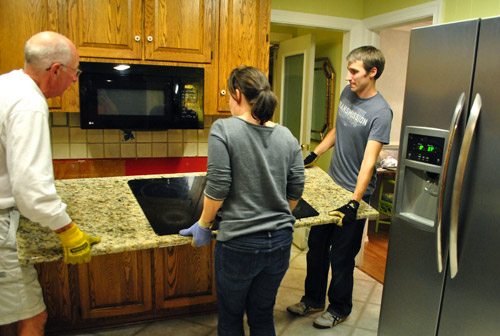
Moving it actually wasn’t that bad. We were able to get it into the carport no problem, where it now sits awaiting – you guessed it – our craigslist/donate bonanza. Meanwhile, back inside we were left with this: no cooktop or granite, but still a cabinet where our stove needs to go.
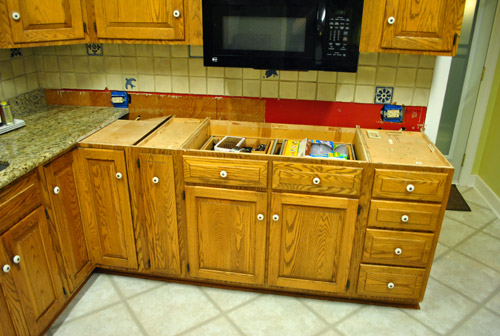
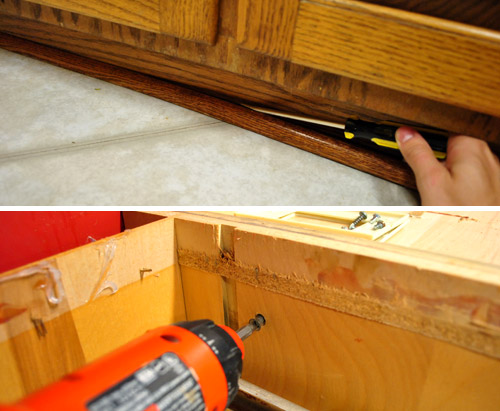
So with everything emptied, we pried out some more trim and unscrewed a few more screws…
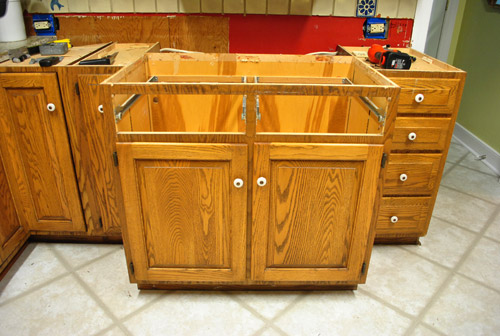
…and pulled the cabinet right out of its spot…
…and shimmied (darn it, there we go again!) the stove into place.
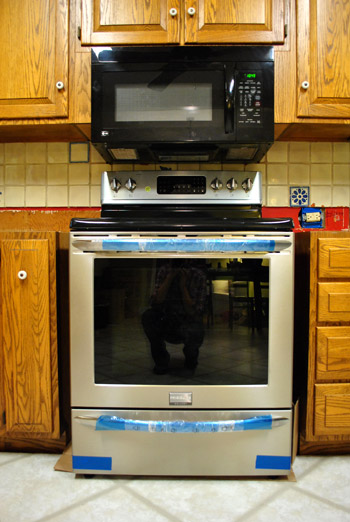
We left all of the wrapping on the stove as a visual reminder not to try to use it (it won’t be ready until the electrician finishes with things this morning since he’ll be converting the raw wires to a standard plug).
A couple of other things to note about that picture:
- See how close the top of the stove is to the bottom of the mircowave? That’s how awkwardly low our microwave is hung. Not normal, right? Can’t wait to upgrade to a properly hung range hood.
- The stove is 30″ wide, but the cabinet base had been 36″- so we’ll add some 3″ filler pieces to make it look built in (since the hood is vented/ducted to be centered over the 36″ opening, moving the stove to one side or the other would be major ceiling surgery that we just don’t want to take on). But once we add 3″ filler pieces and paint everything white we think it’ll be pretty darn seamless – and definitely worth having a work triangle instead of some sort of odd work parallelogram.
- The stove is counter-depth, so although it looks a bit deeper, we just didn’t push it in all the way (since the electrician is coming and we’ll have to pull it back out).
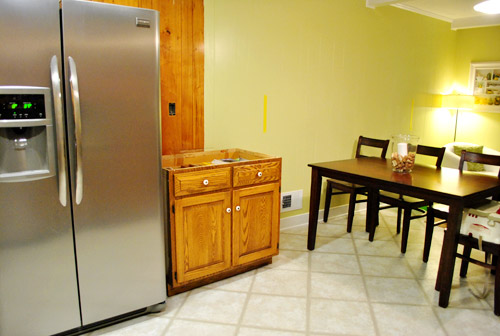
Oh, and speaking of that 36″ cabinet base. It did not end up in the sell/donate pile. Instead, it’s getting put to use where the giant wall oven cabinet used to live:
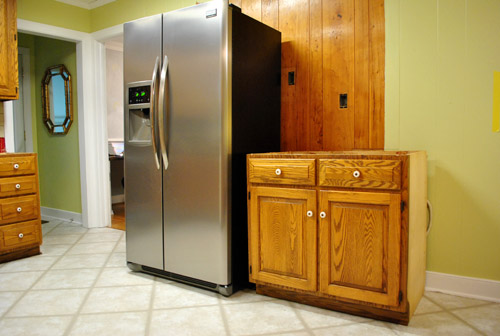
Yup, it’s gonna be part of the new workspace that leads from the fridge (which will get built in) all the way around to the peninsula that we’ll be adding. By reusing this cabinet it means we only have to buy 2 new ones to create our peninsula (one corner base cabinet and one 21″ drawer base cabinet). But we’ll talk more about that later (we got planz, yo).
With every item that we check off of our kitchen to-do list it seems like ten things get added, so I won’t even attempt to lay it all out here. But the main things are securing materials (backsplash, cabinets, counters, etc), painting the exposed paneling, and scheduling our wall knock-down-fest (we finally picked a contractor to help us – so it looks like we might accomplish it within the next month). Woo hoo!

Briel K. says
I don’t know why but I’m so excited to see all of your kitchen progress! Maybe it’s because I live in an apartment and can’t really make any changes! My kitchen cabinets are ugly and peeling, the floor is old black and white linoleum squares (and also peeling and rippling in a couple places) and my carpet is this ugly brown industrial type with lots of stains. I hope one day I can own a house and make it look how I want it to!
Jenni says
Wow, look at that progress! This must feel like a huge blog anniversary–wasn’t the kitchen the first project you blogged about? Awesome!
Also, I had a little chuckle when you mentioned that you told your Dad you needed his help with a little project. Whenever our friend invites us over for dinner, we always ask, “Okay, what do you need our help with this time?” :)
YoungHouseLove says
Yup, it’s so crazy to think that was over 4 years ago! We’ve come full circle. Haha.
xo,
s
Kate says
I also have an awkwardly low microwave over my cooktop which is also glued into the countertop!! Why do they do that???
Now that I know the problems you had removing yours, I feel more prepared to deal with mine when the time comes. Thanks for this writeup!
See my setup at:
http://retroranchrevamp.com/2011/04/02/a-mondrian-kitchen-for-the-retro-ranch/
YoungHouseLove says
I love the Mondrian-inspired plan!
xo,
s
Krista says
I have been reading your blog for YEARS and never made a comment. Lurker extrodinaire! I did enter a drawing once. I just thought I would finally tell you guys that I am a devoted reader and refered many friends to read you as well. We recently moved from Germany to Wilmington (not too far from your neck of the woods). We have a few minor house hold improvement projects and when I lack any motivation to work on them, I just read your blog and *bling* I want to get at it again! You deserve to make a living off this because it is so inspirational and helpful. Your spray paint recommendations have helped me as well as other project successes and failures. Way to go and thank you for taking the risk to do this!
YoungHouseLove says
Aw thanks so much Krista! You’re sweet. Love my lurker extraordinaire!
xo,
s
katrina says
When I discovered your blog, you guys were just moving into this new house, so this is my first time seeing you two undertake these major renovations. Exciting!!!
Firesparx says
The standard clearance above a stove depends on your local code. Up here in Ontario, the clearance must be at least 600mm (23-5/8in) if its a non-combustible material (such as a stainless steel range hood) or 750mm (2ft-6in) if it’s combustible (i.e. a wooden-enclosed range hood)
Firesparx says
And one more thing…if you crack open the owner’s manual of your shiny new stove it probably will tell you what vertical clearances you should have!
YoungHouseLove says
Oh yeah- great tip!
xo,
s
YoungHouseLove says
So interesting! Thanks for the details!
xo,
s
seriouslysassymama says
I love kitchen talk! Kitchens are my favorite makeovers!
Randa says
Great work!
Am I confused, or did there used to be an opening in the wall between your kitchen & front-room-turned-dining-room? I don’t see it anymore in the photos of the soon-to-be-peninsula.
(Do I get some points for all my phrases-joined-by-hyphens?) :)
YoungHouseLove says
That opening isn’t there yet! Haha. We’ll be adding it down the road. More info on that here: https://www.younghouselove.com/2011/09/bad-news-for-banquette-fans/
xo,
s
Randa says
Ohhh, I get it! I was confused, for some reason I thought it was there and you would just be widening it. Where have I been, right? :)
YoungHouseLove says
Haha- no worries!
xo,
s
Michele says
it looks awesome, you guys! so exciting.
and, as my husband and I will be moving into our new house in just a few weeks, were you close by we’d be inviting you over to help with lots of “little projects”
:) You are saved from that fate, as we are in Seattle. It seems we will just have to get our DIY on… fingers crossed!
liz says
I always love these big project posts of yours and so inspired that this type of wiring-lifting-shimmying-yanking work can really be DIYed. Can’t wait to watch it evolve!
Kirin says
Is it too rude/nosy of me to ask how much you’re paying the electrician? I have a few similar things that need to get done, but I have no idea what to expect for charges and I figured I’d ask you guys before I start calling around for estimates. Thanks!
YoungHouseLove says
Just an hourly rate (around $70) and the work should take 1-2 hours. Hope it helps!
xo,
s
Elisa @ The Self Life says
We paid just a hair over 200 for about 2.5 hours of work, which seems to be pretty midrange. In that time our guy installed two overhead lights and an extra outlet.
YoungHouseLove says
Yes, that sounds about right!
xo,
s
Jasmine says
I can’t believe how exciting this is for me! (dork). But you guys are inspiring!
Katie says
Ok first of all I LOVE your plan for the kitchen…I have kitchen envy! Secondly, even though this has nothing to do with your kitchen remodel I happend upon this awesome photographer on Etsy and thought you would like their picutres, especially the ones of the horses:) http://www.etsy.com/shop/EyePoetryPhotography?ref=top_trail
YoungHouseLove says
Oh my gosh I’m in love! Thanks so much for the link!
xo,
s
Darcy says
Hi Katie –
I wanted to thank you for the link too — Gorgeous!!!
Must order the close up dandelion picture!! :-)
Laura says
This is so exciting! I am hungry for more.
blake says
This project is so exciting to read about! Makes me look forward to my lunch breaks. My question is about how you going to handle flooring under the rearranged appliances/cabinets?
I’m considering a similar kitchen switcharoo. My hardwood flooring was installed under the appliances but around the cabinets. That means I can’t move thngs without bringing the new cabinets down to the subfloor and patching the bare spaces where the appliances will live, or installing new hardwood under everything so there’s a level surface.
I know you’ve got similar patches of subfloor from moving things around. Thoughts?
YoungHouseLove says
We’re not sure how we’re going to handle the floor just yet (we have to check if we’re dealing with asbestos tiles and liner) but we’ll keep ya posted! In your case since you have hardwood I would just build up where the appliances will go and keep the hardwood- love them!
xo,
s
Amy says
Yay for booking a contractor. So so so excited for the progress on your kitchen.
Sending happy kitchen remodelling vibes your way!
–Amy
Tiffany says
wow, thanks for the detailed kitchen post. I will be sure to bookmark this for future reference. Kitchen redos always seem so scary to me but you guys make it look super easy. I’m so excited for these kitchen updates :)
Kate says
Can you tell me what you mean when you say that the fridge will get built in? I’m a little confused by that… Thanks! :)
YoungHouseLove says
It’ll have wood that gets painted on the sides so you don’t see the black and a cabinet that’s set forward above it for easy access- just like the one in our last kitchen: https://www.younghouselove.com/2008/01/113-days-later/
xo,
s
Sayward says
have you thought about using a secret layer of magnetic paint on the side of your fridge built in? that way you wouldn’t lose that huge magnetic surface.
YoungHouseLove says
That would definitely be fun!
xo,
s
Lindsay says
Our wall oven that we changed out for a regular range was also hardwired into the wall. Fun times right!? ;)
Laura says
Do you plan to build out the cabinet next to the fridge so it’s flush? Maybe put something behind it and put counter on top so no one will ever know…except your readers! :) can’t wait too see your progress!!
YoungHouseLove says
Ooh that’s a good idea- not sure yet!
xo,
s
Christina says
So exciting! How I would LOVE to update my kitchen in a similar fashion. One day perhaps…
Katrina says
Love that your moving along full steam ahead! So much motivation for us!
mp says
Did Clara stow one of her dolls under the wall oven? My daughter used to put her dolls in the strangest places.
YoungHouseLove says
Haha- not that I can tell, but she does love to hide random “surprises” for us around the house!
xo,
s
Andrea says
Since you’re planning to put “filler” in on either side of the stove, you could let them be little “slots” for things like baking sheets and cutting boards. Talk about custom! Just an idea, but maybe 3 inches is too narrow for that… Love to see the progress, reminds of our kitchen remodel! :)
Sandra says
John is wearing shoes :)
Patti says
Love what you are doing in the kitchen… Have you checked out the size of the very narrow spice cabinets. It would be great if you have room on either or both sides of the stove for one or two of these. This is the one thing I wish we had thought of when replacing our kitchen cabinets.
Sandra says
If you’re serious about your spices, you don’t want them near the heat of a stove. You’ll want them in a drawer away from heat. :)
YoungHouseLove says
Never knew that!
xo,
s
Liz says
Great progress! I’m so excited that you’re tackling the kitchen!! I love all of your plans, and can’t wait to see what your next post will bring!
Beth says
Our similarly-aged and styled cabinets have an awkwardly low microwave too! Must have been the style back then… We wonder what the previous owners were thinking every time we use it.
Nancy S. says
I SO wish I could get me hands on the granite you are taking out! I suppose mailing it to New England would be out of the question? I think your kitchen will be awesome and I am glad you are re-using so much stuff. Have fun!
YoungHouseLove says
Aw man, if only it weren’t as heavy as ten million anvils. Haha.
xo,
s
Jen @ The Decor Scene says
WOW, lovin all this progress!!! I’m so happy to be following this kitchen remodel in real time. I missed your last kitchen remodel in real time because I didn’t know about your blog yet. I love the progress you are making. Things are really starting to change…in a good way. :)
Cathy says
I’ve been following your kitchen remodeling and office makeover posts (heck, ALL the posts!) for a while…and have to stop and say WOW! You guys are truly rock stars!
Just a tip for moving/shimmy-ing all the heavy appliances and furniture..I find furniture sliders VERY helpful. I received mine as a gift several years ago and have really put it to use every time I need to move something heavy. Here’s a website I found that sell them, but they have them everywhere! http://www.magicsliders.com/
Good job you guys! Can’t wait to see the final results! :)
YoungHouseLove says
Love it!
xo,
s
HeatherM says
What progress!
Where will your new microwave go?
What are you doing for food prep and what are you eating while your kitchen is torn apart? We set up a mini-kitchen w/ a table and microwave in our office while we remodeled our kitchen. How are you surviving through this.
Also, when are you guys going to tear out that wall?
YoungHouseLove says
The microwave is going to be built in next to the pantry. As for how we deal with the kitchen being torn apart, we already have our stove wired up so we’re good! Happy to have a place to cook and a fridge and a pantry and a sink! It’s all we need – although we can’t wait to have counters again!
xo,
s
Ashley says
Lots of progress! Is the cork flooring going to extend into the laundry area?
YoungHouseLove says
Yup!
xo,
s
Stephanie says
So there was a bit of an accident, their is now a hole in my bedroom door. (best friends son, im kind of on my own fixing it). Is their a way to repair it without getting a new door? Have ya’ll dealt with this before, or could you point me in the right direction?
YoungHouseLove says
Hmm, I would think that you can patch it! I’d bring a picture to the home improvement store to see what they say.
xo,
s
Lindsey d. says
Odd question: The cabinet immediately to the right of the stove. Is it actually a drawer, or is the pull just oddly placed?
YoungHouseLove says
It’s actually a drawer- just an odd placement!
xo,
s
Kelly says
So excited for you guys. It seems so crazy, but it’s smart to do it in stages instead of all at once. Madness! Cna’t wait for the end results!
bridget b. says
wow, you guys make removing and installing cabinets look so easy!
do you think it would be harder to remove upper cabinets that are attached to a lowered portion of the ceiling (kind of like the one seen in this kitchen (http://search.har.com/engine/3202-Hollister-St-Houston-77080-3033_HAR78461248.htm). our cabs are like this, and i would love to knock out that space and add moulding, but i wonder what we would find inside that space.
p.s. will you paint the newly exposed wood paneling before placing the new appliances?
thanks!
YoungHouseLove says
I think that’s an enclosed soffit, so if you take the cabinets down there’s just what looks like a drywalled beam- nothing open I wouldn’t think (except maybe a hole above a stove for a vent).
xo,
s
Emily says
I just wanted to let you know that I got a pop-up add for some sort of survey. I’m not sure what it was for exactly…sorry!
YoungHouseLove says
Ack- thanks so much for the heads up! We hate them- and they’re never allowed. Off to check it out!
xo,
s
Amy @ TrangleHoneymoon says
Looking good, we had to engage in some demo for ours too. Glad to see someone else’s microwave is as low as ours! http://www.trianglehoneymoon.com/2010/12/31/we-got-99-problems/
Suzanne Supplee says
Wow! All I can say is I hope the folks are babysitting tonight and you guys are going out for a quiet dinner. I don’t know how you do it all:-)
Katie @ Newcomb HOme says
Thanks for all the updates! We’re hoping to start a kitchen remodel this spring (waiting for better weather in the Pacific NW!). What I’d love is a post about choosing contractors… I’d be so excited to hear about the right questions to ask, how to talk to them about DIYing part and hiring contractors for part, and also how to finally choose. Just throwing it out there in case you guys feel like writing about it :) Thank you!
Also, love the appliances! We were lucky to find a wall oven and wall microwave at Habitat for less than $600: http://newcombhome.blogspot.com/2011/07/i-love-thrifting-party-recap.html
YoungHouseLove says
So lucky!
xo,
s
John@ Our Home From Scratch says
Really like your appliance selections. You did good.
Erin S says
It’s so exciting to see your process & progress! Thanks for posting all these details!
Erin @ Stumbling Tongues says
Yay!!! I feel silly for being so excited about this progress, but seriously, I’m loving the kitchen reno! And here’s why: No matter what awesome project you guys are working on, you always manage to make it look achievable, and it’s SO inspiring to see projects like this being tackled head-on by two non-professional, self-taught DIYers. (Does that sound right?) It gives me hope that I can do more than I think I can! Thanks for the inspiration :)
Alexis says
Curious if you have plans to overhaul the overhead lighting? Since, you know, your current to-do list probably isn’t long enough…
YoungHouseLove says
Oh yes- for sure!
xo,
s
Heidi P. says
Wow! So exciting!!! And I LOVE penny tile. Love it. Man you guys are impressive w/ your get-er-done-ness.
BethanyB says
Someone que the epic music… Sherries wearing GRAY not black!…. And its ok Sherry, that’s NOT all I got out of this post ;)
YoungHouseLove says
Haha- I’m a wild woman, what can I say?
xo,
s
carolinaheartstrings says
Don’t you love it when a plan comes together. This is going to be one gorgeous kitchen. Love the appliances!
Trish says
Love the new kitchen in progress! Can’t wait to see you paint the cabinets. I have knotty pine cabinets and so ready to paint them. I will wait for your tutorials though! Just wanted to ask, do you ever want to tell people to read all of the comments before asking questions? I would!! You do a great job in being nice to each and everyone who asked the same question for the tenth time!! ie have you thought of outting spice cabinets next to the oven, they are so great!!! Sorry couldn’t resist! I am not as nice as you both are!!
YoungHouseLove says
Aw thanks Trish! Sometimes it feels so harsh to say “read the comments!” especially since there are so many of them! Some folks don’t really have time to go though all those pages, ya know? So we usually don’t mind repeating ourselves at all. I’m chatty.
xo,
s
Trisha says
Will you turn the three inch space into anything? Like a hidden spot for cookie sheets or spices? Ala Pinterest:
http://pinterest.com/pin/351892345/
YoungHouseLove says
We actually have one of those to the left of the opening already – so it’s just cheapest/easiest to trim it out and paint it so it’s nice and seamless (most inserts need more space than we have to be fully functional).
xo,
s