When our saga last left off, our heroes were being shuffled around the kitchen. That is, if a refrigerator and a pantry are your kind of hero.
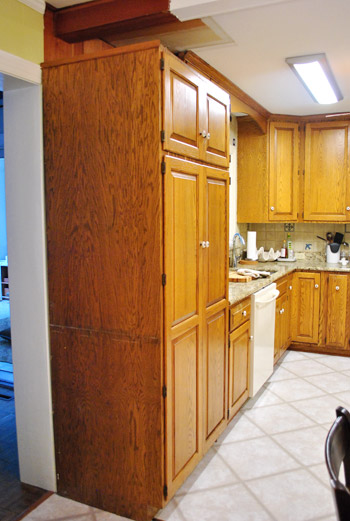
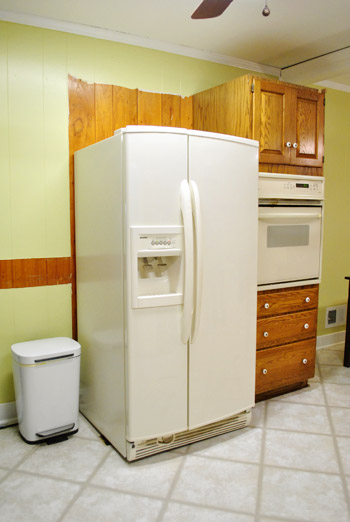
But before our new appliances arrived last week, we had to put the moves on a few more things. First in line? The cabinet that held the wall oven.
You probably recall that we were ditching the wall oven because it was burnt on the front, bisque colored, and cooked things unevenly. We opted not to replace it with another wall oven because (1) wall ovens are expensive – usually 1K more than ranges, (2) our cabinet is unconventionally narrow – most modern wall ovens wouldn’t even fit, and (3) the tall cabinet was big and bulky (we’d like the pantry and the fridge to be the only two tall things in the room). So that whole tall cabinet was getting the axe – but of course we’ll be repurposing parts of it.
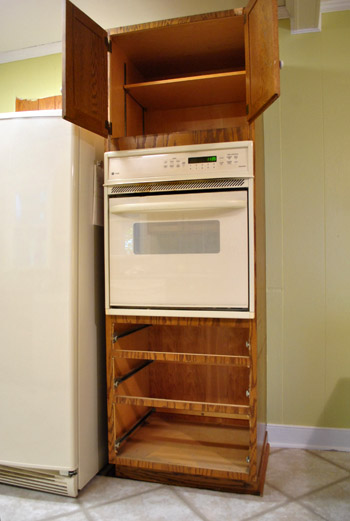
Once emptied, we unscrewed it from the back wall, removed any trim, and shimmied it out of its hole in the floor. Oh yeah, this was all after turning the power off.
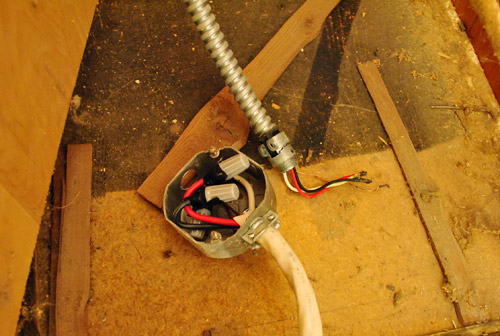
The darn thing was hardwired, so rather than just unplugging something, I had to do a bit of “unscrew this, rescrew that” to get it disconnected. Don’t worry about the crazy exposed wire. I capped it, put everything into the metal box (which had a lid) and left the electricity turned off to that area of the house until the electrician arrived this morning to take care of it all – and to finally figure out what that mystery wire is above the pantry (details as soon as we know!).
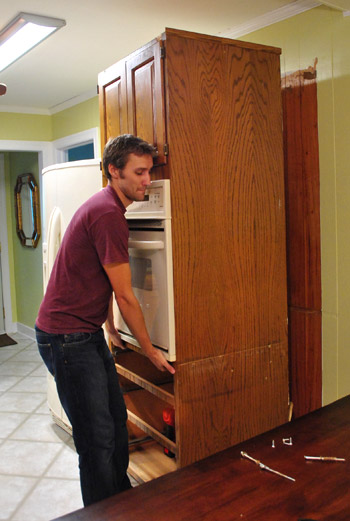
With a few more screws unscrewed and a bit more shimmying (we feel like we do a lot of that lately) we had the oven out of its wall hole and ready to be moved out of the room (we’re donating it to the Habitat For Humanity ReStore).
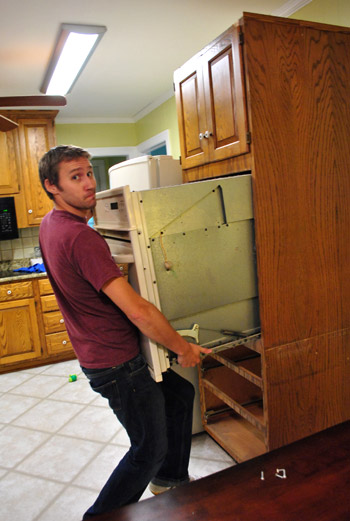
Once the oven was removed, the cabinet itself was awesomely light, so it joined our stockpile of kitchen scraps in the sunroom (we’ll be reusing things like the doors and drawers and possibly some of the other oak trim). We’re hanging on to everything until we’re done with the kitchen just in case a piece comes in handy (so our sunroom looks crazy – we should snap a photo for you guys). Then once we’re done, we’ll try to donate or craigslist as much of it as we can.
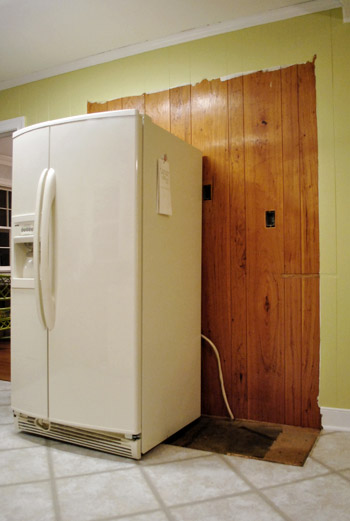
The womp-womp of having just exposed more unpainted paneling wasn’t so bad. Mostly because the next morning our new appliances arrived. Joy. The fridge got installed in place (the old one was hauled away to be donated to a local church) and the new stove temporarily sat by its side (not hooked up, because it will soon live on the wall to the left of the fridge as you face it – more on the future floor plan here). The dishwasher and microwave are sitting in boxes in front of the fireplace. Yes, our kitchen looks pretty insane right now if you couldn’t tell. And although the only new appliance that we’re actually using is the fridge, so far we love it.
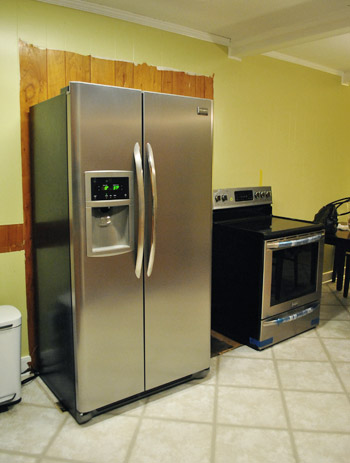
With the wall oven gone and the new stove not in place, we’d lost our baking function in the kitchen. No good. So our next mission became getting the new stove installed in its soon-to-be-permanent home. Only problem? This stood in our way:
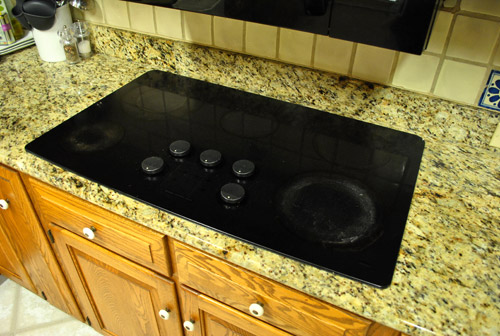
It was time for the cooktop to join the wall oven in craigslist/donate purgatory (we planned to craigslist it because it’s a pretty nice JennAir model). We started by emptying the cabinet below and I disconnected the electrical in the same turn-off-power-and-cap-it-all-in-a-metal-box-and-leave-off-power-to-that-area-until-the-elecrician-arrives-this-morning fashion.
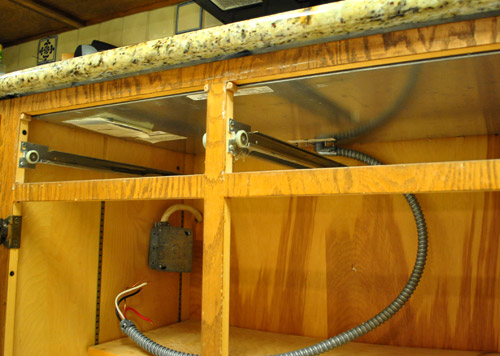
Based on the installation manual (which I looked up online), I should’ve just been able to lift the cooktop out (it wasn’t screwed in)… but this sucker wasn’t budging. That’s when we discovered this:
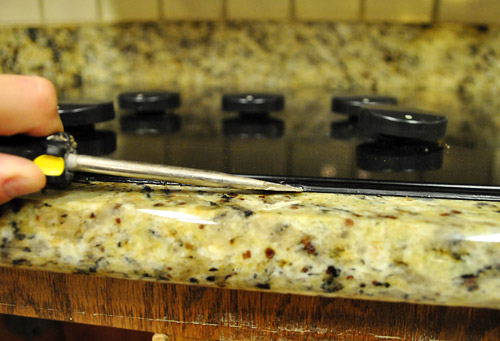
It was glued down with some sort of black silicone. Sherry did some quick Internet research on “removing cooktop glue” and came to the conclusion this was baaaad news. Apparently you’re not supposed to glue down your cooktop because it makes it very difficult to remove (uh oh) without completely shattering the glass (double uh oh) and many folks were rambling about how mad they were at their granite installers for gluing theirs in which they only learned was completely wrong after it needed to be removed to be serviced or replaced and was shattered in the process. Even though it wasn’t looking too good for our “craigslist the cooktop” plan, we were determined to at least give it our best try. So we started gently scraping and slicing the caulk to free the cooktop.
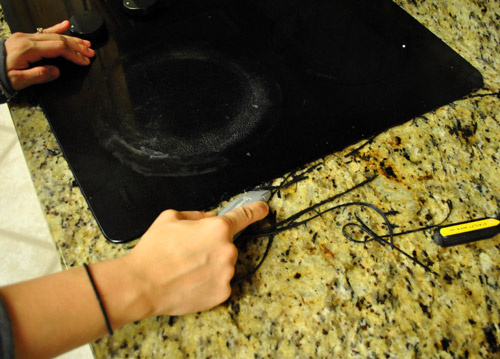
Well, the odds won. After about 15 minutes of trying to sloooowly and caaaarefully pry it up, we got our first crack in the glass. Then our second. Then our third. Then… well, we just accepted the fact that our cooktop wasn’t really sellable or donate-able anymore. Sucks. But from what we hear, any drop-ins that are caulked usually suffer a similar fate. So if you’re adding one remind your granite or countertop folks not to glue it down!
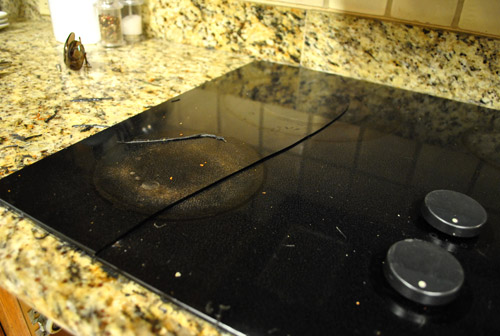
With our rescue mission having turned into a recovery, we plugged away at trying to detach the cooktop from the granite. After all, this whole section of granite was next on our remove-list (to make way for the stove) and it was already gonna be heavy enough without a cooktop piggybacking on it. So Sherry kept working on the cooktop while I started with the granite backsplash – which, ironically, came out quite easily. Having the backsplash out gave Sherry enough room to cut along the back edge of the cooktop (even her small hands couldn’t fit back there with the backsplash in place). Perhaps this would do the trick?
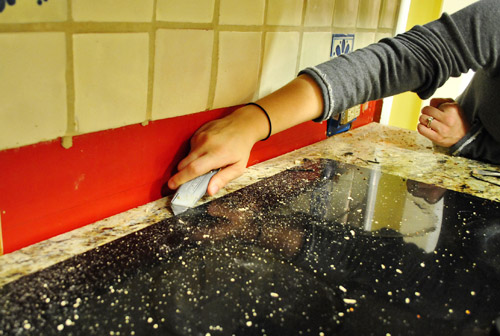
NOPE. No luck. So we gave up on trying to remove the cooktop and decided to just carry it out with the granite instead. Sherry was quite excited to turn her attention to something that (based on my backsplash experience) would be much more satisfying.
And it was. After a few slices along the silicone caulk that held the granite in place, Sherry was able to wedge a crowbar and screwdriver in a few places and start to pry it up within minutes.
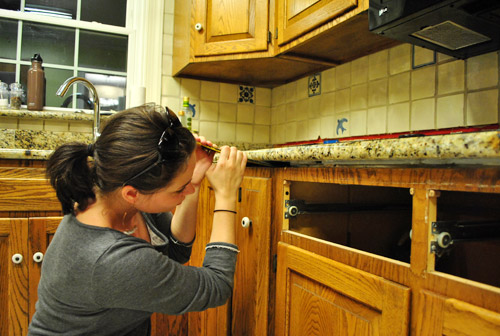
Once it was fully detached, we called in reinforcements (my dad, whom we had invited over to “help with a little project”). Because granite is HEAVY. He must’ve known our definition of “little project” usually calls for work gloves, so he showed up wearing his.
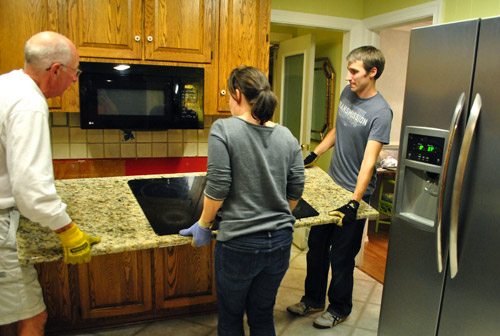
Moving it actually wasn’t that bad. We were able to get it into the carport no problem, where it now sits awaiting – you guessed it – our craigslist/donate bonanza. Meanwhile, back inside we were left with this: no cooktop or granite, but still a cabinet where our stove needs to go.
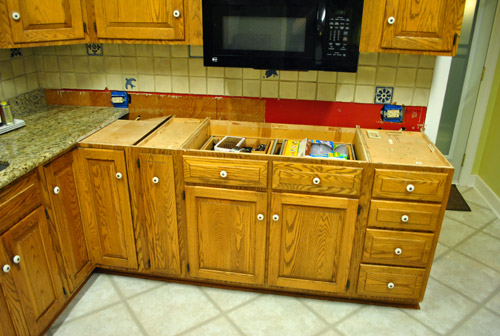
So with everything emptied, we pried out some more trim and unscrewed a few more screws…
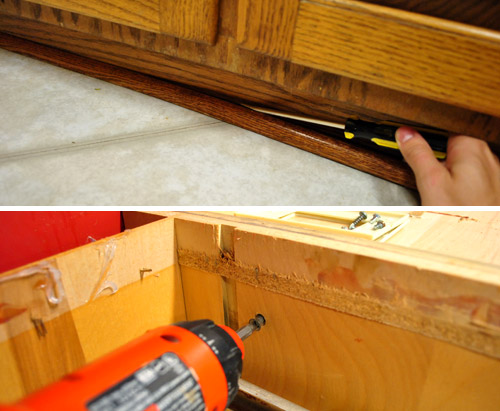
…and pulled the cabinet right out of its spot…
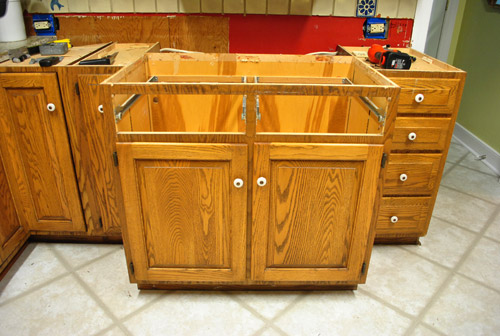
…and shimmied (darn it, there we go again!) the stove into place.
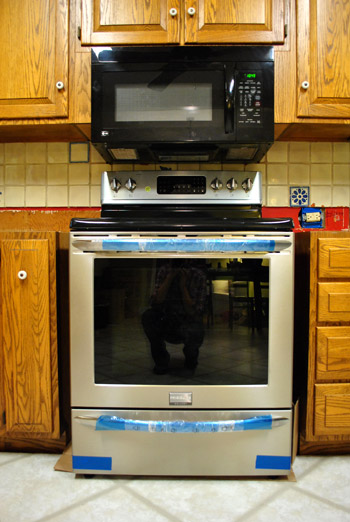
We left all of the wrapping on the stove as a visual reminder not to try to use it (it won’t be ready until the electrician finishes with things this morning since he’ll be converting the raw wires to a standard plug).
A couple of other things to note about that picture:
- See how close the top of the stove is to the bottom of the mircowave? That’s how awkwardly low our microwave is hung. Not normal, right? Can’t wait to upgrade to a properly hung range hood.
- The stove is 30″ wide, but the cabinet base had been 36″- so we’ll add some 3″ filler pieces to make it look built in (since the hood is vented/ducted to be centered over the 36″ opening, moving the stove to one side or the other would be major ceiling surgery that we just don’t want to take on). But once we add 3″ filler pieces and paint everything white we think it’ll be pretty darn seamless – and definitely worth having a work triangle instead of some sort of odd work parallelogram.
- The stove is counter-depth, so although it looks a bit deeper, we just didn’t push it in all the way (since the electrician is coming and we’ll have to pull it back out).
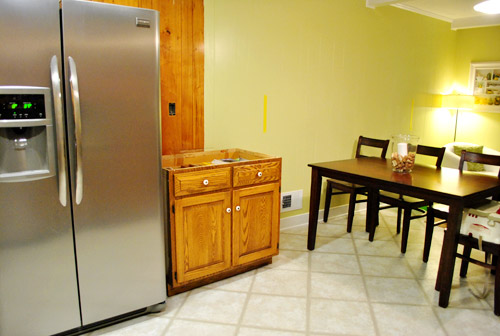
Oh, and speaking of that 36″ cabinet base. It did not end up in the sell/donate pile. Instead, it’s getting put to use where the giant wall oven cabinet used to live:
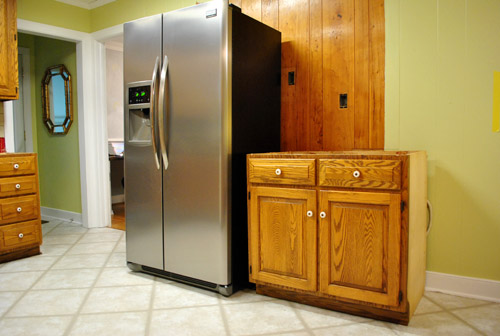
Yup, it’s gonna be part of the new workspace that leads from the fridge (which will get built in) all the way around to the peninsula that we’ll be adding. By reusing this cabinet it means we only have to buy 2 new ones to create our peninsula (one corner base cabinet and one 21″ drawer base cabinet). But we’ll talk more about that later (we got planz, yo).
With every item that we check off of our kitchen to-do list it seems like ten things get added, so I won’t even attempt to lay it all out here. But the main things are securing materials (backsplash, cabinets, counters, etc), painting the exposed paneling, and scheduling our wall knock-down-fest (we finally picked a contractor to help us – so it looks like we might accomplish it within the next month). Woo hoo!

RLB says
That looks like some darn satisfying work. Thanks for all the in-action pictures.
Claire says
looking good so far. i don’t know how i feel about the cabinets now, though
YoungHouseLove says
They’re getting painted white with new hinges and hardware- should look like new!
xo,
s
Mary says
Hi Youngsters, congrats on the kitchen progress! I love what you’ve been up to and can’t wait to see how things unfold. Quick question, do you know how wide your old wall oven and/or its cabinet were? I think I have a similar set-up and got fresh inspiration from all your reshuffling. Thanks! I tried looking in comments and back posts, but couldn’t find the answer.
YoungHouseLove says
The wall oven was 27″ (I think the cabinet was that wide so the oven itself was smaller). Hope it helps!
xo,
s
Bob says
“Oh yeah, this was all after turning the power off.”
But apparently not to the whole house. I am really shocked that you didn’t kill yourself as a result. And here I thought you were uber-cautious. Whatevs.
YoungHouseLove says
Always a joy to hear from you Bob!
xo,
s
Bob says
You just don’t get me, do you? How is it that I know you guys better than you know each other? Or do you not read your husband’s posts?
YoungHouseLove says
I guess you’re just misunderstood.
xo,
s
Bob says
I don’t think I would put it that way…
Sara says
2 questions!
1) Are you concerned about your new fridge getting bumped or dented as it will get moved around during the reno? (a sales person recommended to me, not to buy until the floor and such are in). And do you use a trolley to move it around?
2) I forget if you said whether you were going to install the cork floor under the appliances or cork around them? And what your reasoning was? Maybe this answer will answer the first question too … if you are not installing under the appliances maybe you are not moving them around?
Thanks for the insight?
YoungHouseLove says
1. We’re careful and cover it whenever we move stuff or do work (like when the electrician came). As for moving it- we just push it. It’s not too heavy.
2. Not sure about that yet- more details when we know more!
xo,
s
Amanda says
I am loving reading all about this project! I’m absolutely dying to re-do our kitchen but we have quite a while to wait before we can – I love getting to live vicariously through y’all!
Sophia says
Hey, I know you guys will likely do a whole post on painting your cabinets, but I just wanted to ask, since you’ve said that you definitely will be painting them instead of replacing them–do you think that painted cabinets stand the test of time? I have wood (maple) cabinets, and I’ve been thinking about painting them white for a while, but I just wonder how they’ll hold up over time. I know you’ve painted cabinets before and have said it’s gone fine–just wondering if you have any updated thoughts. Do you guys worry about scratches and chipping? Anyway, I’m sure you’ll get to all those details soon!
YoungHouseLove says
Oh yes! John’s sister painted her oak cabinets white and ten years later they were still going strong when she sold the house. Just gotta use high quality paint and primer and apply it thinthinthin so it doesn’t peel or crack off.
xo,
s
Alice H says
http://www.mulletcabinet.com/CMS/uploads/MulletHomeN_0014.jpg for your filler!
YoungHouseLove says
Love those! Wish we had enough room!
xo,
s
Tina says
RIP cooktop!
YoungHouseLove says
So sad.
xo,
s
MyDesignGuide.com says
Loving the gray in the kitchen…we just did a kitchen design for our client in Texas and had to get gray involved!
Check it out: http://www.mydesignguide.com/samplepg1.php?pid=0000001220&ic=1&ic2=1
Not copying you – seriously. A little more cottage-y feel.
YoungHouseLove says
Haha- I love it!
xo,
s
Carrisa says
I did a similar thing in my kitchen earlier this year. Removed old brown half working double ovens and cooktop and cut out counter and cabinet space.
Except we don’t have the funds yet to replace the floors or counters. So we’re kind of in limbo. And my contractor opted not to remove or cut into the upper cabinets so my microwave it freakishly close to the range. It doesn’t really bother me though since I’m quite short.
Here’s a link to my photo set of befores and afters.
http://www.flickr.com/photos/carrisablog/sets/72157624962388606/
YoungHouseLove says
Ooh it looks awesome!
xo,
s
Sarah says
You guys are really coming along! Everything looks great and the plans make me so excited to follow the progress. We just remodeled our kitchen and I totally know how you feel; when one thing is accomplished and 10 new things are added to the to-do list. You’ve been there, done that though and you know, at some point, it will be finished. Best of luck and thanks for sharing the journey!
andrea worley says
oh my!! you guys never cease to amaze me at all that you take on!! that’s amazing that you did all that on your own! totally my heros!! good job!
Wom-mom Ethne says
Sherry – you need to trade up your sunglasses for your Missoni headband – it was totally nighttime in those pics and you still had them on your head yo!
YoungHouseLove says
Haha- I’m so bad about using them instead of a head band. Sometimes they give me a headache though. Haha.
xo,
s
Sarah says
I can’t wait to see how your kitchen turns out!So exited!
Missy says
It is so much fun watching this happen!
Mary says
So, I’m really digging those random painted tiles in your current backsplash. If you chisel them out, I would so love to buy them from you (or at least a couple if you’re not planning on parting with them??) and make them into/using them as coasters or something! My email is [email protected].. :)
YoungHouseLove says
Aw thanks so much Mary! If we can get them out in one piece (sort of depends on how they’re stuck) we’d love to figure out a way to share them!
xo,
s
julianna says
Probably already been mentioned, but you can use the 3″ filler pieces for storage. I’m sure Rev-a-Shelf stuff is more $ than you guys want to spend, but if you look at their website you can get ideas for storage you can DIY (spice racks, pegboard utensil storage, etc.). IKEA kitchen cabinet hardware is made by Blum, but much cheaper than regular Blum, so you could buy full-extension drawer slides from them and rig something up pretty cheaply. (even though their catalog looks like you have to buy everything together, you can buy just drawer slides, just hinges, etc., etc.).
Really enjoying seeing someone decorating with what they love, not what they think is good for resale. Can’t wait to see the finished project!
Katie P. says
It’s looking great!
Question: have you decided what you are doing for countertops? Are you re-using your current granite, or going for a different material?
YoungHouseLove says
Not sure what we’re doing but not reusing what we have since we would have to buy more for the peninsula but we didn’t love it enough for us to buy more. So we’ll craigslist it and use the money towards something new!
xo,
s
Jordann O'Brien says
I love what you guys are doing to your kitchen, I don’t know how you guys can visualize what you want and just do it, I would be far too scared but maybe when I have my own house I will be braver. But I do have to ask, the picture of the 3 of you picking up the granite, who took it? Was it a timed picture or was somebody else there? Love the site by the way
YoungHouseLove says
It was John’s mom! Haha.
xo,
s
partyofsix says
Sorry if someone else has already asked this, but what do you think about putting some blue tape up on the kitchen-side wall fully marking out what will be removed? And then photograph it and put out for us to see? This would be a fun way (for us peepers) to see how your vision will work with the fridge, cabinet & peninsula layout. Thanks!
YoungHouseLove says
Here’s a post with the opening marked in photoshop with a line for ya: https://www.younghouselove.com/2011/09/bad-news-for-banquette-fans/
Hope it helps!
xo,
s
partyofsix says
Yah, I know, I just am positively itching to see how it will look now that you’ve demoed the pantry/oven and have the fridge in place…just thought it might be fun to see it with the current changes since having the old cabinetry changes the perspective a little.
YoungHouseLove says
Gotcha! We’ll have to try to work in another drawing/photoshopping session soon!
xo,
s
www.orchidlanedecor.com says
“Always a joy to hear from you Bob”
Oh Sherry, I just love you :)
Loving the makeover so far, I’m so envious that I have dumb laminate cabinets – boo for dumb laminate.
Suzy xxx
Stefanie W. says
The appliances are gorgeous! That looks like a much better workspace.
I will be so excited to see the progress as you come to tackling the backsplash! I would LOVE to redo our kitchen but my mom – a former kitchen and bath designer – thinks it would be too much trouble to remove our current (ugly) tile backsplash because it would rip out the sheet rock, etc, etc….Just hoping you have a solution that gives me an out – in other words – please save me from my awful kitchen counters and backsplash!
YoungHouseLove says
I think if you’re redoing a room- just redo it all the way whenever you can- even slowly in stages. It actually ends up being less complicated and expensive than doing something “for the interim” or “redoing it all again” to get to what you really want. Otherwise you’ll always wish you had done that one last thing and regret is a terrible thing. Haha.
xo,
s
Patti says
Love your plans. Have you checked out the narrow (very narrow) cabinets specifically for spices. You may have room by the stove. This is the one thing I wish I had considered when updating our kitchen. They look very handy and would give me more space in my upper cabinet by the stove.
YoungHouseLove says
Sadly we don’t think they’ll fit, but it’s worth checking out!
xo,
s
Renee says
man, we just finished our kitchen remodel and everything you guys are doing right now, we did a month ago! wish we had been more in-sync…..i love y’all’s stuff and i’m sure i’d have gotten some tips.
we almost went w/the penny white backsplash, but ultimately, i like the horizontal look, so we got white mini-subway tiles and i love them! no pics to post, but here’s the link from overstock- it was a good price and came in 2 days! i love that it looks traditional, but w/a twist
http://www.overstock.com/Home-Garden/Somertile-Victorian-Subway-White-Porcelain-Mosaic-Tiles-Pack-of-10/5785316/product.html
good luck on all your kitchen stuff- it’s going to look so good!!
YoungHouseLove says
Love them! SO pretty!
xo,
s
Kiran @ KiranTarun.com says
You guys are adventurous and funny!
I can’t wait to see the new look of the kitchen. Bet y’all are anxious since a lot has been accomplished. Bravo :)
p/s: Missing Clara. Hug her for me :)
LMC says
It’s so cool to see the puzzle pieces rearranged. My apologies if you already mentioned this, but it looks like the relocated pantry cabinet is really close to the family room doorway – does it block the door trim/molding?
YoungHouseLove says
Oh yeah that will get set in closer when we remove the counter (there’s a lip that will go away) and the trim (so it can slide into place better). It currently doesn’t block the doorway but is flush with it but it’ll slide in further so there’s trim again!
xo,
s
Cathy Gorga says
I had to stop looking at this at work today because it was getting me all excited…like, squeal-out-loud excited. Eventually, I’ll pull the trigger and get started on our kitchen overhaul, but in the meantime, it’s so nice to have you guys as inspiration – both aesthetically AND in terms of, “If they can do it, maybe I can, too!” :)
Penny says
Can’t wait to hear what y’all made for your very first meal cooked on your shiny new stove! So excited for you and all the progress you’ve made. Especially with the Lucky Penny tile. :)
YoungHouseLove says
We made some delicious curry cauliflower shrimp roast (a Men’s Health recipe).
xo,
s
Anya says
Looks really great! Can’t wait to see it as you keep taking your kitchen apart and put it all back together.
I’ve been wondering if you’ll be doing any Pinterest challenges again soon? I suppose this kitchen make-over is a mega Pinterest Challenge, though!
YoungHouseLove says
Haha, yes! Katie and I have one planned by the end of this month actually!
xo,
s
Becky says
You are so fortunate that you have real cabinets that can be taken apart and moved around. Our house came with “custom” cabinets that were not real cabinets, but huge boxes that ran the length of the counters. It was a horrible mess when it came time to remove them, but so worth. I love seeing your progress as you work. It’s all worth it in the end though!
marissa says
every day you’re shufflin’ :)
Laura says
I see people keep mentioning those spice racks. Do you have room for just one or do you have to put the new hood in exactly the same place where the microwave is now. Just wondering if you could move stove to left or right and build a spice rack on just one side. Just a thought. Might look wonky, but figured I’d ask. Also, is your peninsula going to be counter height or bar height? One advantage of bar height is it might help hide dirty dishes from view in the dining room.
YoungHouseLove says
It’s going to be counter height just because we want it to be a comfortable prep surface for food and we like the idea of kiddos sitting a bit closer to the ground. As for the hood, we would like to keep it in exactly the same place because moving it to the left or right can mean tearing up the ceiling and moving the vent over – we definitely want the new 30″ hood centered over the 30″ range!
xo,
s
Kelly says
Fearless!! I have to ask, do you have an Oh s****, plan? What if a major catastrophy happens while all the this kitchen cabinet surgery is going on? Something like the stovetop but on a much larger scale. Do you really have a roll with the punches, everything can be fixed attitude?
YoungHouseLove says
We have a trial and error method. Haha. We just try to do things one small step at a time and are definitely not afraid of calling in the pros if we get in over our head!
xo,
s
KarenH. says
Yay! For almost all of it. But about that microwave venthood….
I suspect that either your electrician or the microwave installer person is going to tell you you risk partially melting/burning the underside od the microwave if you don’t put in a shorter cabinet above in order to raise the microwave. I know this because that’s why my venthood microwave is currently still in its box in the spareroom, instead of over the range where my olive green venthood with the Boeing 747 jet engine blower still presides.
Since I do plan to eventually replace my kitchen cabinets, I’m planning a temporary fix of removing what’s there now and installing an open shelf with a 3/4 inch thick board between the cabinets on either side to provide the top portion for hanging the microwave in the meantime. But since you have cabinet parts, you may be able to come up with a fix of your own that won’t require you to buy another cabinet.
YoungHouseLove says
Hey KarenH,
We’re right there with you. That’s why the microwave is soon moving to a different location and we’re gonna install an exposed vent hood over the stove at proper height. The old owners put this current microwave in and it’s low height has always been a problem. Stay tuned for more on that!
-John
Sherry from BC says
You guys are amazing! Love following your blog. Can’t believe your detailed plans and how much you do yourselves. I am really looking forward to following this transformation with you. It is going to look so beautiful.
Kim says
Just wondering if you are planning to use Kilz Clean Start Primer instead of Kilz Oil Based Primer on your cabinets? I’m excited to see your new kitchen come together!
YoungHouseLove says
Not sure- I keep going back and forth.
xo,
s
Chelsea Asermely says
Hey, i was reading along with the latest in your remodel (love how quickly you guys plug along btw! awesome energy!) anyways, you mentioned the 3″ on either side of the new stove/range and how you plan to fill it in…. i recently saw a super sneaky cabinet idea for just that kind of space. It was very narrow and stove height, and slides forward/out to reveal handy spice storage!! it was very clever.. here’s a link of what i was thinking of… http://www.flickr.com/photos/37486592@N03/3866410938/in/photostream
just an idea!
YoungHouseLove says
Love it! Not sure we can fit one (we really only have 2 3/4″ of play on each side- so it might be really narrow.
xo,
s
Janke says
Wow, I’m so impressed by the progress you’re making! I usually feel totally overwhelmed before starting a big project, don’t know where to start and where to go. My husband is really good at seeing the entire picture and imagining the finished project. So he’s the one that keeps us on track when I get frustrated by those little tiny steps and the in-between chaos.
Can’t wait to see the finished kitchen, with the new doorway and all. You’re going to have a wonderful new dining area / kitchen by Christmas! Awesome!
Ari Syarifudin says
It’s great house for the kitchen set developing. COlour is natural. Wood is very atractive element for creating great attention.
Laurie says
Great work so far. It will be fabulous.
Amy Holtcamp says
I’m not sure – maybe this is what you mean by fillers already – but wanted to make sure you’d seen these little numbers:
http://www.thehardwarehut.com/catalog-product.php?p_ref=258336
They are pull outs, 3 inches wide, with a totally self-customizable front so you can blend them in with the cabinets in whatever way you want.
I’m all about eking as much storage out of a kitchen as possible.
YoungHouseLove says
Sadly we don’t think those will fit in the space we have- but they’re awesome!
xo,
s
Rachael@LovelyCraftyHome says
It’s all looking great!!
Nora says
Totally had the same stove/microwave problem! We rehung all of our cabinets (well the BF and his dad did) the first day we moved in so that our microwave wouldn’t catch on fire. Can’t wait to see more progress, I just caught on to your site this spring and I’ve only seen ‘afters.’ I love watching the ‘during,’ this is such an exciting remodel!
Heather W says
Sherry,
Quick question that is totally unrelated to kitchen but which size curtain ring clips do you use from Target?
Thanks
YoungHouseLove says
I think they only come in one size at ours- about an inch and a half wide maybe? Maybe 2″?
xo,
s
Heather W says
Interesting…. Our Targets have two sizes. One is bigger than the other. The smaller one is a little over $4.00 a pack and the larger ones are over $6 bucks a pack. Does that help?
YoungHouseLove says
Hmm, I would just look at the ring size and aim for something in the 1.5-2″ range. Those are the ones!
xo,
s
M says
This is so awesome! Haha! I am so excited about your kitchen remodel, meanhwhile we just built a year ago and I feel like I’m reliving the excitement:). I feel like fast-forwarding to the before/after picture when you’re done. Can’t wait!!!
Alice H says
Could you move the oven over all the way to one side to make room? Just curious! You guys are so awesome. I always read your blog and I think “I could do that!” But then I don’t. LOL!
•Alice H says:
October 19, 2011 at 4:50 pm
http://www.mulletcabinet.com/CMS/uploads/MulletHomeN_0014.jpg for your filler!
Reply
•YoungHouseLove says:
October 19, 2011 at 4:53 pm
Love those! Wish we had enough room!
xo,
s
YoungHouseLove says
Sadly we only really have 2 3/4″ between each side (since we need room to slide the stove in) so they’re all too wide! And if we move the stove over to one side we would have to rip up the ceiling to move the range vent- which is definitely a can of worms we’d rather not open (since we have awesome spice storage in the pantry already).
xo,
s
Jyl says
Great work, Petersiks!
I love seeing Sherry with a utility knife, work gloves and a crowbar. It gives me a warm and fuzzy “Girl Power!” feeling. You go, girl!
Nina says
i just had a question on why you guys are choosing not to move everything out from the walls and paint the bare spots.. wouldnt that be easier as you may choose to move things around later down the road or if/when you choose to move?
YoungHouseLove says
We’ll be painting the bare spots for sure! Just needed to hook up the fridge right away so our food wouldn’t spoil- but it can be pulled out easily (it rolls). As for the range, we’ll be tiling behind it and doing demo of the current tile so that will be pulled out too (we just wanted a functional kitchen while we go since it’ll take a while!).
xo,
s
Alison says
Looks awesome!! I totally missed the post that said you were going to update your counter-tops as well. Where was that?
YoungHouseLove says
We just mentioned it in a few posts (like the one about the peninsula and moving the appliances around).
xo,
s