Our recent road trip to see Katie and her amazing house gave us that tickle to get down to business when we got back home. You know how your DIY momentum is up and you’re moving right along ticking things off your to-do list and then the dust clears and you’re just spent and need a little break? Like, mehaps, a road trip? That seems to be the way it goes with us. When it comes to house progress, we tend to work in fits and starts. But then something sparks that get-back-to-business excitement and suddenly we’re done with our four-ish day Hammer And Paint Brush Hiatus and are refreshed and ready to go. Yeah, so that happened.
I guess being on the road produced that absence makes the heart grow fonder effect. Not that we were mad at our house, but we just weren’t raring to go when we left like we were when we got back. So the morning after our 9.5 hour drive I woke up early, sorted through a million (ok, a thousand) photos, wrote that shopping post that went up in the afternoon, caught up on comments/Facebook/Twitter/email, wrote this house crashing post for the next morning, and then it was dinner time. Then I up and made dining room curtains. And they might just be my favorite things in the whole darn house.
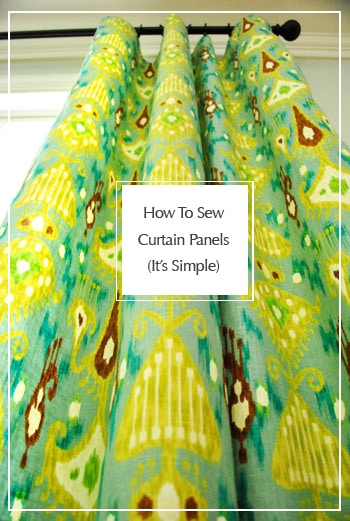
Seriously, I love them.
You guys know we’re into our hallway frame gallery a little too much (along with our giant bedroom light fixture and humongous gray sectional). And I adore my weird horse art and miscellaneous ceramic animal menagerie. But you’d think I carried these curtains for nine months and went through 48 hours of labor to bring them into this world – that’s how much I love them. And it only took me about an hour and a half – two tops – to make them. Wham, bam, thank you Katie (for the kick-in-the-pants inspiration that your gorgeous house provided).
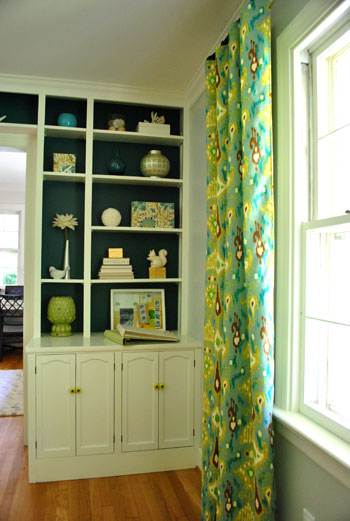
Here’s how it all went down. We already mentioned snagging this deeply discounted Robert Allen curtain fabric from a local fabric outlet called U-Fab (for any non locals, here’s an affiliate link to the same fabric on amazon). It was fancy schmancy designer fabric that I’d been in love with forever, but it was marked down to $12.99 a yard (as opposed to the original cost of $40+ a yard!) thanks to a bit of an irregularity in the fabric (a white stripe that ran down one side, which I knew I could work around).
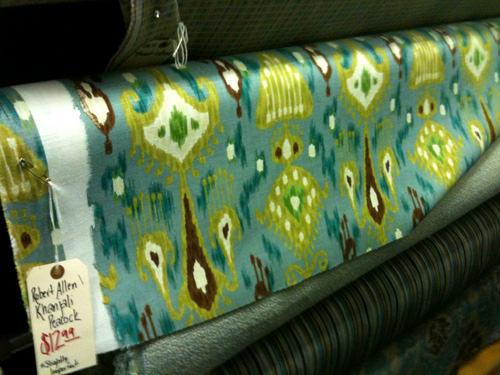
Since I wanted two 90-ish inch panels for either side of the big picture window in the dining room I calculated that five yards would do the trick, which factored out to $32 a panel (still not dirt cheap but a whole lot cheaper than the regular price of that fabric, which would have run me $100 a panel). Score.
We’re just not really curtain closing and opening folks (except in the nursery since we close the blinds and draw the curtains – anything for five more minutes of sleep) so we don’t plan to draw them shut (we add white faux wood blinds or bamboo shades when it comes to actually gaining privacy, although since we usually hang out in the back of the house when it’s dark enough to see into the windows, we’re not in any rush to add privacy blinds or shades just yet). But we do love hanging curtains high and wide to let the light stream in and add height and drama. Which means we didn’t have to worry about the width (since we’d need a lot more of that than what we had to cover the long picture window). And boy are these babies a fresh little slap in the face compared to the white Ikea Vivan curtains that we embraced in nearly every room of our last house.
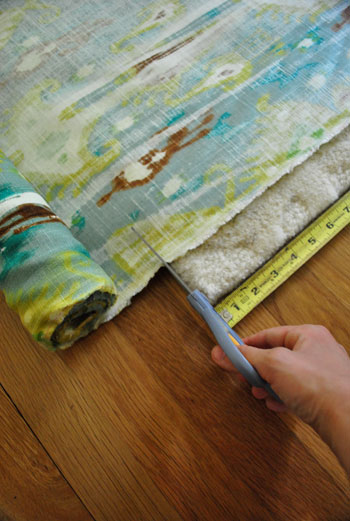
But on to how I made them. First I rolled out the fabric on a 5 x 8′ rug in our office (one of my completely not patented ways to get straight cuts since you can line up the fabric with the corners/edges of the rug to be sure it’s square before snipping away). Then I just pulled out my tape measure to see how long I wanted them (90″ each before hem allowances, which would make them about 87″ long after hemming – but then I add ring hooks which make them 90″ again):
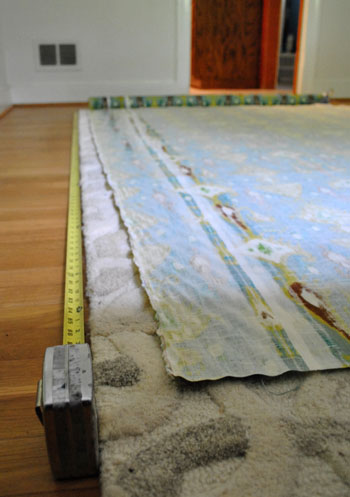
It was as simple as lining up the end of the fabric with the 90″ mark on my tape measure and then cutting the other edge against the rug at the 0″ inch mark, for a nice straight cut (sure enough, I was left with a nice 90″ long rectangular swatch of fabric).
When it comes to the width, I just usually go with the width that it comes right off the bolt (which is wider when you get upholster fabric like this- ours was 57″). But remember it had that defect running along one side of it, so I just cut three inches or so from that side (again I used the edge of the rug to get a straight cut). But I didn’t completely cut off the white part since I knew once I hemmed it, it would be completely invisible (even from the back). You can see the normal white edge that comes on fabric on the right of the swatch below and the irregular white defect on the bottom half of the left edge below:
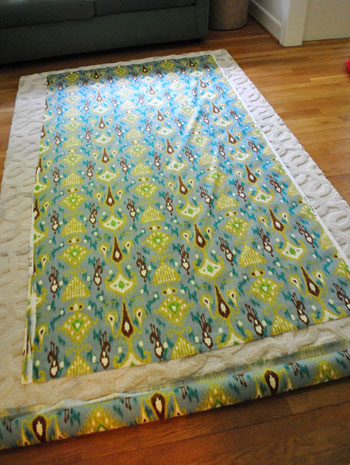
So there I had one 90 x 54″ curtain panel cut out, and just needed one for the other side of the window. So I laid the freshly cut one on top of the uncut remnant of fabric and used it as a template to create another panel of exactly the same size:
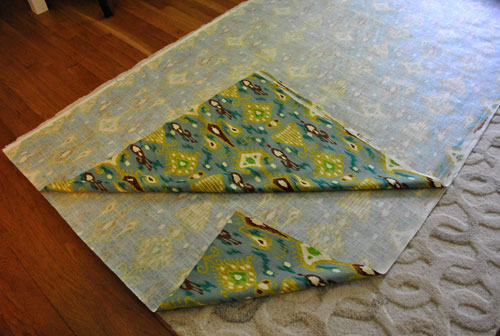
Then I washed both curtain panels so they would be “pre-shrunk” and easy to launder from here on out (one of our main goals is to have as many “washable” surfaces in the kitchen and dining room as possible). Oh but it’s always smartest to preshrink fabric before you cut it, I just knew I only had enough fabric to make two panels of this size so whether I washed or cut it first (or cut and washed it later) I’d end up with the same sized panels in the end. I grabbed them fresh out of the dryer instead of letting them sit there to keep them wrinkle free for the most part.
Next I had to decide between my trusty curtain-making method of using iron-on hem tape or the slightly scary idea of using Oh Brother (my new sewing machine) to attempt to do what I used to use hem tape for. After a decent amount of out-loud debate with myself, I decided to try my hand at sewing curtain panels- just to see if I could do it (but you can find full curtain making tutorials with hem tape here and here). Even without my hem-tape security blanket, I did break out the iron to make a half inch “seam” down one of the short sides of the curtain. It just seems like now whenever I dabble in sewing, I find myself trying to iron instead of pinning – just to see if it’ll work. Am I a rebel or what?
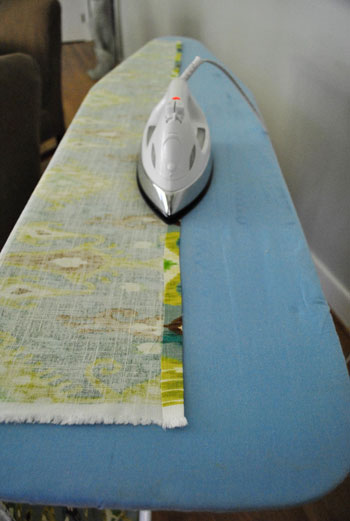
The ironed seam definitely stayed put while I dragged the giant fabric swatch back into the kitchen to sew the hem, so I happily skipped the pinning step and even boldly (well, maybe that adjective is a stretch) decided to try another hemming technique that some of you have commented to tell me about in previous I’m-a-shaky-little-sewing-novice posts. I took the ironed seam and folded it over one more time, then I sewed down the seam to create a nice finished looking hem (even from the back). That extra fold hid the raw cut edge of the fabric, if that makes sense. And even with my extra folding step, there was thankfully no pinning required. Sweet.
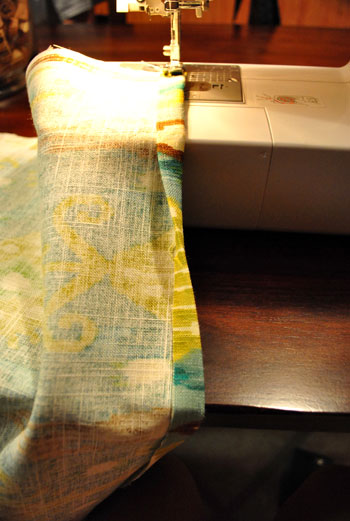
See, here’s what it looked like completely folded over as I sewed down the seam.
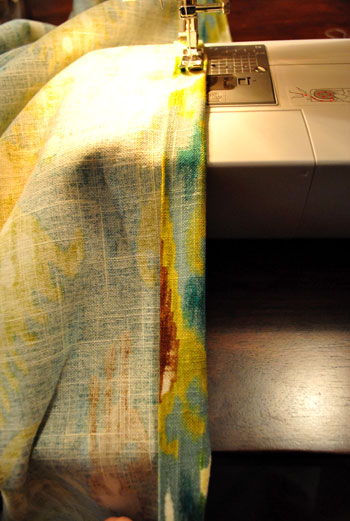
And this method surprisingly worked on all sides (I worried the long 90″ sides of the panels wouldn’t take to ironing and would need to be pinned, but it went just as well as the short sides). And as for the defect, you can see how when I folded the hem over one more time, it became invisible and I was once again left with a finished looking edge from both the front and the back.
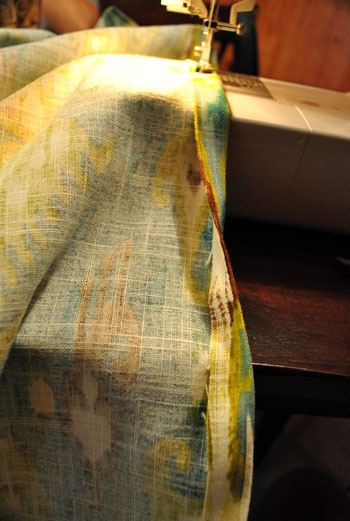
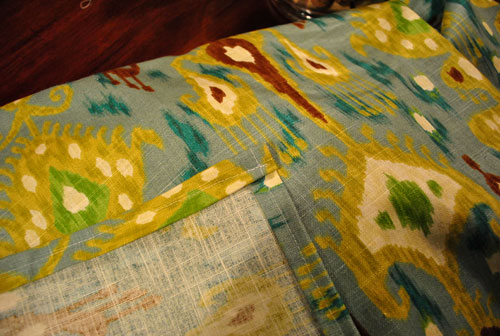
Here’s how the back of a corner looked once I was done with my quickie ironing-then-folding-then-hemming technique:
Then I clipped seven oil-rubbed bronze ring clips to each panel (from Target) and slipped them onto a super long oil-rubbed bronze rod. Oh how I love not having to sew a rod pocket or anything complicated thanks to the magic of ring clips. I ended up getting the curtain rod from Lowe’s since the ones at Target weren’t long enough – I ended up needing 144″ of length (that’s what she said).
Our curtain hanging method (also not patented or even endorsed) is for one of us to then stand on a chair (in this case, John) while the other one steps back and looks at the length of the curtains and how they hit the floor while the chair-stander raises and lowers the rod ever so slightly until the floor-stander screams “perfect- don’t move an inch or I’ll kill you” and then runs up to hold a rod bracket under the perfectly held rod to measure the distance from the crown molding or ceiling that it should be hung to keep the rod right where it’s being held.
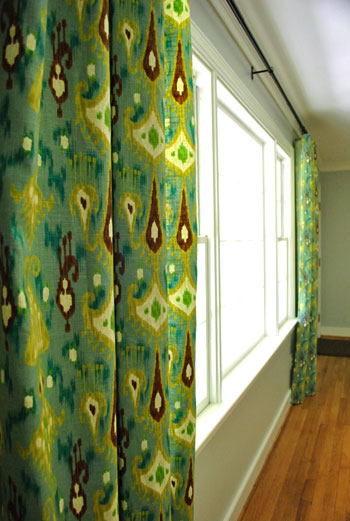
Of course this only deals with the height of the rod and not the width, but we typically like to go as wide as we can with the curtains so they drape in front of the wall instead of blocking light and hanging in front of the window. In this case we went as wide as our extra long rod allowed (19″ outside of the window molding on each side). See how the panel just kisses the window and blocks wall instead of light?
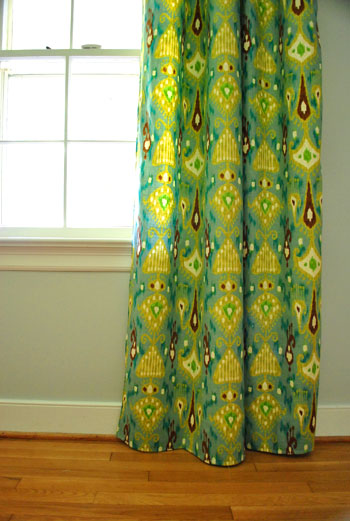
Oh and notice how the curtain also seems to just graze the floor ever so slightly? Poor John raised and lowered the curtain on that chair fifteen times until it was juuuust right. We’ve tried measuring the wall or the panel instead of doing the by-eye real-test (involving two people, a chair, and some serious arm strength and balancing skillz) but you just can’t beat the result. At least we can’t. So we keep going back to it. And I tell John he’s my Atlas when he’s up there holding the rod up. Gotta keep team morale up.

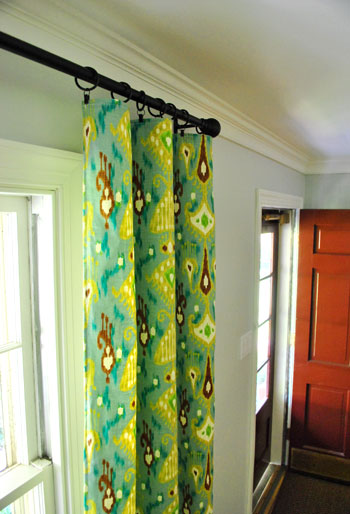
Here’s another rod shot for you. You can also see how the curtains just hang slightly in front of the window trim here as opposed to blocking the whole side window, which is only 20″ wide. Since we mentioned that we hung the panels 19″ wide on each side of the window trim, you can totally see how if they were hung flush with the trim they would block all but one inch of that 20″ side window. Which is definitely not what we were going for.
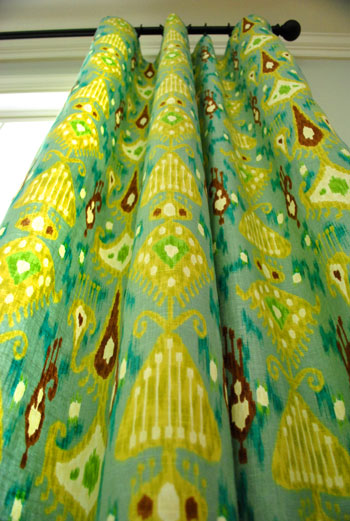
You’ll have to excuse all of the wide shots of the room in this post. Things like the curtains and the room in general are coming off greener/yellower than they are in real life (the green grass/trees/bushes outside were casting a yellow-green tint through the big light-filled window, and I was too lazy to photoshop it). John will definitely be in charge of photos of this room next time around. As for the true color of the curtains, it’s best depicted in the closer shots without a lot of window going on, like the ones above.
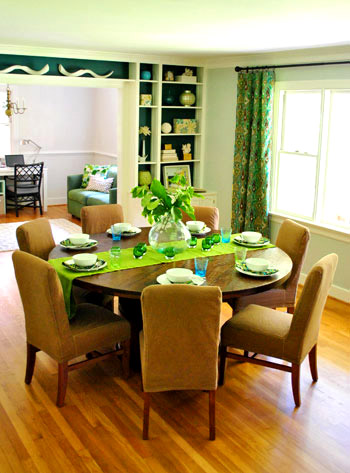
Actually this shot is probably the most accurate to what they look like in real life. I’d describe them as mostly blue with hits of green, chartreuse, white, and brown. Crazy busy but also crazy gorgeous if you’re me (and miracle of all miracles, John loves them too). Who ever would have thought that two white curtain fiends like us could branch out and embrace curtain color and pattern? I wonder if my mom will like these or they’ll finally be a choice that she won’t endorse. What say you, mom?
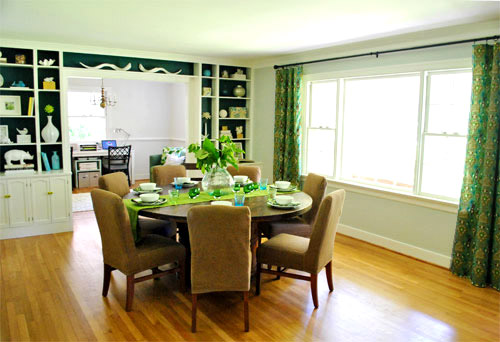
Here’s another wide shot where they look more yellow/green than they really do in real life (they’re more like a teal blue color when you glance at them from afar) but you get the idea. Oh and the dark rod ties into the other deep tones in the room (the chair legs and dark dining table, the deep color on the back of the built-ins, etc). So that’s why I chose it over stainless or white. I always think a dark rod hung high and wide is like eyeliner on a window.
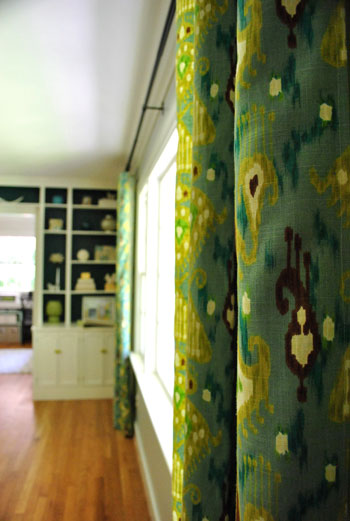
Mmmm, here’s a good shot of my favorite detail in the fabric. See those smeary turquoise blobs? They tie so deliciously into the slightly darker teal on the back of the built-ins. Yummy. Even the little yellow-green knobs that we added to the base cabinets of the built-ins relate perfectly to the pops of bright yellowy-green chartreuse in the curtains. Hooray for happy accidents like that (we had no idea what curtain fabric we’d pick when we snagged those babies at Hobby Lobby).
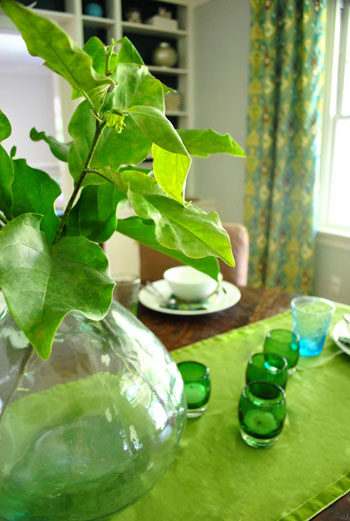
Oh yeah and I had some fun setting the table. Not that anyone’s coming over today. Or tomorrow. I just wanted to pull out a runner and some plates and cups and clip some random branches from outside. Why? I don’t know. Why do birds sing? I guess the colorful curtains got me hot and bothered enough to break out Sue the Napkin (times seven) and add some fun to the big empty wood table.
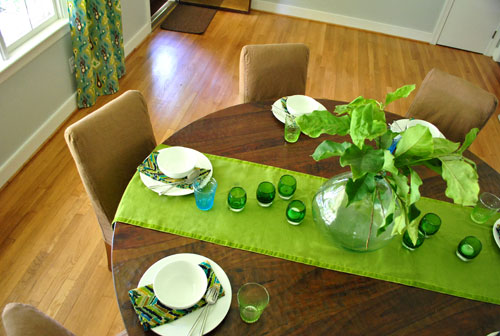
And guess what? I’m leaving everything there tonight. Just because I’m weird and I can’t wait to wake up in and morning and pad in there and smile. Kind of like how I paint a room and the next morning I run in and look at it again. Just grinning at the wall like a fool.
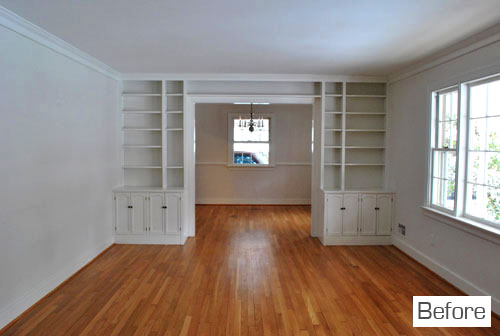
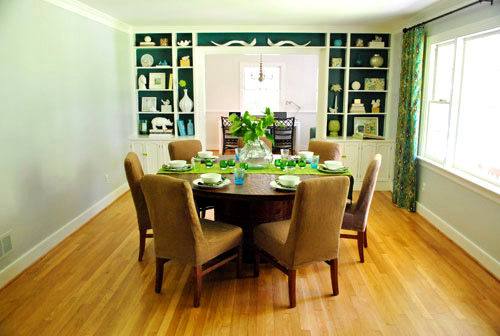
Isn’t it amazing how much of a difference curtains can make? Well, that and some rich color on the back of those built-ins. Here’s a little flash back to the room as it looked when we moved in:
And here it is now (albeit a little side-heavy with that bare wall on the left- for now):
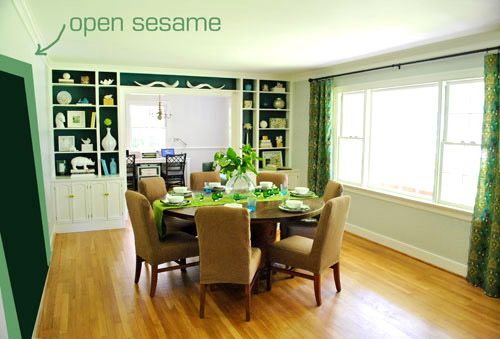
Thought I was done? Nope. One more thing. Here’s a terribly rendered depiction of the doorway that we can’t wait to add that will connect the dining room to the kitchen (we plan to mirror the size of the picture window so the whole room feels nice and balanced). And of course adding a big chandelier over our giant table will add a lot more function (the room doesn’t have any ceiling fixtures!):
It’s so funny to remember that this room was a formal living room when we toured this house (and the office was the dining room). In fact we dug up these old shots that we took during our first walk through:
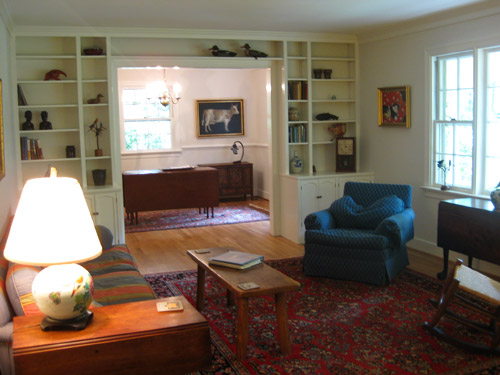
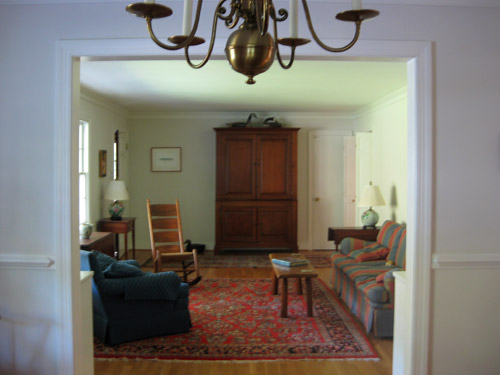
Gosh, that feels like a million years ago and it was less than six months back. As soon as we walked in we were struck by three things: we reeeally wanted the house, we wanted to change up a few of the rooms, and we reeeeally wanted the house. Yup, we were sold upon entry. I don’t think we ever got into the specifics, but the sellers weren’t 99% sure they even wanted to sell. In fact the night after we walked through the house for the first time they took their stuff out of storage. A sure sign to the realtor that they might take it off the market. Thank goodness it all worked out and they ended up accepting our offer.
As for looking past the way a room looks when you’re house hunting to see “the real space” we just completely discount furnishings and wallpaper and paint color and even entire room functions. That’s how we could look past the dining table and the sofa to almost immediately proclaim that converting the dining room into an office and turning the living room into a big spacious dining room would work more for the way we live. You know, since we have a huge family that we couldn’t cram into the former dining room, a giant living room in the back of the house (no need for two), and a penchant for open living and big wiiiide doorways. We just can’t help ourselves. Anyway, have you guys made any curtains lately? Knocked down any walls? Set the table for nothing but kicks?
Pssst – Soooo not a sewing person? I wasn’t either. Here’s a tutorial for making no-sew curtains with iron-on hem tape (and here’s another one for good measure).
Update – Wanna know where we got something in our house or what paint color we used? Just click on this button:


Brooke says
I totally understand the feeling of just knowing you wanted a house. We moved into our current house in Feb and we made the offer without me even walking inside. We couldn’t get a showing the day I came and my husband had seen the inside the day before. I saw pictures only and walked around the outside. I just knew it was the right one. It was built in 1955 so y’all are a HUGE inspiration! I painted my sons room this weekend which inspired me to paint his dresser yesterday and I’m hoping to redo his toy box in the next week! Thanks for all y’all do!
Julie W. says
I’m so glad to see this post! It looks beautiful. I’ve been struuuuggling with curtains in our dining room…to do or not to do. I think I have my answer. The room is small with strange window size and placement. I found your site while researching for our new house. It’s great. And more importantly, I love it when I get to be the recipient of someone’s passion! Thanks for sharing. I’m from the Ithaca area and if you ever need a place to relocate, there are alot of old homes that need you!:)
hillary says
The dining room looks fantastic! Really great choice with those curtains. They tie everything together beautifully.
Can’t wait to see it when the wall comes down! We did the same thing with our house. When we bought it, there was a small living room with a huge window, a tiny dining nook, and a kitchen closed off to both in the front of the house. In the back of the house is a large family room addition, so we turned the old living room into a light-filled and spacious dining room, the small dining room into an entryway/landing pad, and took down the wall between the kitchen and both rooms so now it’s one big open space. It’s SUCH an improvement and fits our lifestyle much better than the original 1948 layout. It felt like we added square footage to our house because we use all the spaces so much more now. You are going to LOVE IT when you connect the kitchen and dining room.
Staci says
I’m dying over that fabric. Like, I’m on the floor.
Okay, not really, but I’m desperate to find a fabric outlet like that somewhere in Kansas!!!
Also, I’m glad I’m not the only one who sets the table for nobody. (http://myfriendstaci.wordpress.com/2010/09/23/a-pretty-table/) My reason is to keep myself from cluttering it up! (I am a compulsive clutter-er… sigh).
Beth says
Could I ask where you got your curtain rod?
YoungHouseLove says
Lowe’s. We heard they sell extra long ones.
xo,
s
alg says
Fab.U.Lous. Couldn’t love them more!!!
Megan says
I need to do your window curtain hanging method in my dining room! Now I just need an extra long curtain rod, curtains, and a helper! :)
Janelle says
I must tell you how much you have inspired me to tackle some little home projects at my house! I love your curtains and need to do something similar. The windows in our new house are freakishly high so all my old curtains are short by about 6 inches. I love shopping at IKEA but the closest one to me is about 4 hours away and they don’t ship curtains. Ugh! I think I’m going to try this too and hopefully have good luck in finding fabric that looks as great as yours does!
NettyC says
I think you’ll appreciate this… I, too, have been in love with that print- the indigo and white version. Found it for $19.00 on sale locally. Thought about it for a few weeks. Went back to the store with a coupon. It was marked down to $5/yard. Unbelievable. I got cold feet again. Left the store. Went back the next day, super psyched to purchase and BAM! GONE!!!!!! boohoo. Ended up with a lovely titan/birch chevron instead. Still the agony of losing that deal kills me. Good job P family.
Laurie says
Hi Sherry! LOVE the curtains, that fabric is rich, and love the whole room. I wish I had built ins just so I could paint the back like you guys did. Gorgeous! And pretty table, too! If you see this email, maybe you could answer it with your immense decorating wisdom!!! I have bought some gorgeous fabric (priced in Canada at $78/meter, found at Calico Corners for $18/yard less 20%–even with shipping and taxes it was a deal). It is a large pattern print (Thomas Paul–seen on Sarah Richardson tv show in Canada) and I have a large living room window for them. They are grey with golden yellow chrysathemums, and my walls will be a darkish grey, furniture is grey, accents in whites and yellow, with 2 teak mid-century chairs reupolstered in dark orange/rust velvety fabric. Okay, to the point now! I am a novice curtain girl, and my fabric will have to be matched just right to make them big enough to cover the window–2 pannels each side. I like the idea of blinds and side curtains, but think blinds will cost a fortune, and wonder if white would be too white and confusing with the wild print fabric, the orangy chairs in front and grey walls. What would you do? How cheaply can I go? Any thoughts? Oh, and I totally loved those squirrel bookends–please notify me immediately if you get tired of them! Thank you so much! Your big fan, Laurie (I’ll be amazed if you actually read this wordy and lengthy email!!!!
YoungHouseLove says
As for the blinds I would totally do this again since it worked so well the first time (and bamboo or white faux wood ones would be so classic looking): we got two pair of off the shelf bamboo blinds at Walmart and hung them next to each other. The woven texture made it impossible to tell where the seam was unless you were me and you knew it was there. Here’s a pic of our old living room to show you how “undetectable” it was. Oh and the combined length just has to be longer than the expanse of wall above the windows that shows since the curtains will cover any overhang beyond the window when hung nice and wide. Hope it helps!
xo,
s
Torrie @ a place to share... says
I am in awe. Utter awe. I’ve spent a nice long time reading this and looking at that final ‘after’ shot. I love them, and am also hugely satisfied when colors work and tie together so nicely. A huge high, that never really goes away, since you get to be in your home and admire daily!
Very, very cool :).
PatC says
Sorry Sherry, I previously posted this to the wrong entry…
When did you dye the chair slipcovers?
Please let me know the date so i can go back and read the tutorial.
Thanks.
YoungHouseLove says
Here ya go: https://www.younghouselove.com/2011/06/a-four-color-process/
Hope it helps!
xo,
s
Karissa says
I’ve been considering this fabric for a while, but have held off because every picture of it I see online appears slightly different. Sometimes it’s more teal, as in your pics, and other times it’s a more muted blue. I’m confused! If “peacock” is the stated color on all examples I’ve seen online, do you think it just photographs very differently based on the surroundings? Thanks!
YoungHouseLove says
I would definitely describe it as not muted but not teal (they do have bright teal or turquoise blotches, like I called out in that one shot). They’re probably somewhere in between muted and teal though (when it comes to the main color). That pic in the post where I called it out as “the most true to life” really is the best depiction I’ve seen (a lot of site photos of fabric are definitely lacking in accuracy). Hope it helps!
xo,
s
Mercedes says
Fabric, unfortunately is rarely true to both it’s color and texture online. Always send for a swatch, it’s makes your decorating projects much easier. And then you’ll have that swatch for future design purposes, like finding coordinating paint color and other accessories, such as pillows. I’m not sure if this color way is in Calico Corners or not, but you can always stop in one and try and request a swatch. Good luck to you!
K (Barking Babymama) says
Oh Sherry, I LOVE it. Everything looks so amazing together now, especially with that table setting! I love the green and blue glass tumblers and the big vase with branches, and the brown chair covers look PERFECT. I LOVE it! I wish we had a giant dining room so I could copy this room exactly, haha! :) I will be ever-jealous of that table, so beautiful.
Adam says
WOW! Major kudos Sherry, these look fantastic and are great for this room! Not luck, just a positive result of all the design trials and experiments you two have done over the past couple years. Great step by step post, too!
Mandie says
These look fabulous! I am so proud of your sewing! The curtains really finish the room! AWESOME!
Jennifer says
We are not curtain closing people either. Mine are really just for looks. Love these curtains and the whole room!
Elisha says
Hey how do you light the room like when you eat in there???
YoungHouseLove says
We’ll be adding a big overhead fixture above the table (for now we bring in floor lamps but it’s still pretty dark).
xo,
s
Tricia says
May I just say that I love you? That’s light and fun, right?
I stumbled on your blog about 6 weeks ago and have fallen in love with your house, family, and ideas. Such inspiration! I have lots of antiques (OK, crazy junk that we collect), but I am thinking that I want a cleaner look, and your blog is just the thing to inspire. I will definitely be making bedroom curtains soon!
Thanks,
Tricia
Kylie says
As I was working on my own living room curtains today, I realized that I needed to give you a tip (apologies if it’s already in the comments somewhere): hang the empty curtain rod where you want it, hang the un-hemmed curtains, pin at the perfect length and *then* take down and hem. Even easier with clips because you don’t have to take the whole rod back down, you can just pull them off. Your room is coming together so beautifully!
cyndee anthony says
I have been enjoying your blog for several months. You guys are such a great inspiration.
I just have one suggestion. When sewing anything, but especially curtains and big pieces of fabric, it is best to preshrink before cutting. Many fabrics have some significant shrinkage ( think George Kostanza here). If the panel shrunk up 2 inches, which is not that great on a 90 inch cut, it would change the look and weight of the hemming of the panel.
But, I have to say, you are doing such a fantastic job with your sewing. This is such a short time after your first experience with Oh Brother. Very impressed.
Kristen in Hawaii says
Finding that fabric was fate. Seriously, it looks so amazing with everything else in the room. It’s like you dreamed it up and then it magically materialized in a store. I wasn’t a fan of those yellow knobs before but now they totally look like they belong! And I love how you were able to work in your apple green without putting it on the chairs. The room looks fantastic…and now with the neutral table and the great colors to pick from the curtains and Sue, you have endless options for table settings! Ahhh, geeking out over thoughts of sunny yellow table settings with pretty flowers…or teal & brown…or all white with burnished gold chargers…or, or, or… :)
YoungHouseLove says
Oh my gosh you just got me crazy hyper about bringing some yellow into the table in another setting. Oh man, I might just have to set the table differently once a week for kicks.
xo,
s
Shannon says
A wide bottom hem on drapes looks elegant and polished, and at least an inch on the sides. Maybe next time. Also, it feels very disconnected being able to see the side of the window frames like that and makes it look like you’ve hung fabric on the wall and nudged it too close to the window. And that cheap, skinny rod with so little fabric and the curtains not covering the sides of the frame is very distracting. I know change is always exciting, and especially something you’ve created yourself, so I applaud your efforts. Those blues and greens are lovely. But I wanted to balance out the feedback you’ve been receiving and give you something to think about. I know you’re loving the change, but the effect feels like something you might find in a rental as opposed to a home you’ve purchased.
elle C. says
SO gorgeous! You sure got lucky with Sue the Napkin and those curtains – how perfect are they together! Great tip on doubling over the curtain seams, and I love the table set-up. Do you have any plans for lighting over the dining table?
YoungHouseLove says
Yes, we can’t wait to add a chandelier over that big table of ours! Someday…
xo,
s
elle C. says
I’ve already commented, but I just can’t stop staring – going back and forth between the before & after – between your gallery walls and your dining room, I’m just drooling. Oh how I wish you could come to Oklahoma and see past the exposed beams from walls we’ve torn down, and the cement floors from the purple carpet we tore up, and the 6′ fold up table that currently serves as our dining room table, and stacking chairs we borrowed from our church, and lend me a vision for this one room I don’t know what to do with. *Sigh*
Lindsey says
Great job on the hem. Next time you can try a top stitch. When sewing hems or other visble stitches, sew from the top of the fabric rather than the back so it looks even more finished!
Kelly says
LOVE your curtains!! I am a huge fan of bold curtains. They just bring the whole room together. I am in the process of making curtains for my brother’s whole new house. I hate the pinning process and it takes forever. I am going to try your iron tick. Wish me luck!!
Elizabeth Horn says
I’m glad you’re still sewing. Pillows and curtains are all you need to know girl! I’ve been “sewing” for about 15 years and that’s pretty much all I can do.
Erin says
Love them!
Just curious if you considered hanging a skinnier panel in the center for some balance. Just seems like a lot of curtain rod across the top, but not sure if a lone center panel is a “no-no” in the decorating world?
YoungHouseLove says
I like a third panel in the middle when there’s actually a strip of wall between two windows (so it hides that and creates the illusion of a full pane of glass). In this case since we’ll be opening a doorway across from it we thought the open span of window that will mirror the open doorway will feel more balanced in the end than adding an extra middle panel. Hope it helps!
xo,
s
Erin @ Out on a Limb... says
Gorgeous, gorgeous curtains! You did such a great job pulling the space together. The fabric is stunning, especially now that they’re actual curtains and hung. I feel like lots of my fabric spends so much time sitting and waiting, lol. Congrats on tacklin Oh, Brother again, too!
reFresh reStyle says
Looking gorgeous, I hope you got to keep that cow picture from the other room!
Debbie
Jennifer says
Love the curtains, green is my fav color anyways so of course I fell in love with it right away and the table display as well. Also when you said and I quote: “I ended up needing 144″ of length (that’s what she said).” This had me cracking up & took me a few minutes to get over that before I kept reading!!
Kahley says
Sherry! Wondering where you find those amazing vases you have in your house. The one you set on this table setting, and then you have that giant one in your hallway on the table!? I have been looking desperately for one! Thanks girl!
YoungHouseLove says
Those are both from ZGallerie a while back, but I’ve also seen them at vivaterra and HomeGoods, Marshall’s, and TJ Maxx. Hope it helps!
xo,
s
Michele says
This isn’t actually related to your seriously awesome curtain making skillz, but the reference to the original layout of the living room-turned-dining room reminded me that I would love to see a floor plan of your current house, since I can’t seem to arrange it well in my head. I can’t find one on your site. We are actually looking at buying a ranch house (inspired by you – never thought I would actually consider it!) and the one we like has a kinda weird layout with a little family room near the kitchen, and a formal living room on the bedroom side of the house. I need some inspiration as to how we could change that up. Like a floor plan. :)
YoungHouseLove says
Here’s that post for ya (scroll down to see the revised floor plan after the original one): https://www.younghouselove.com/2010/11/the-floor-plan-stan/
xo,
s
Michele says
Um, never mind. Found it. (Place forehead in palm of hand.) But maybe throw it into your house tour area?
YoungHouseLove says
Thanks for the suggestion! I think it’s already in there (somewhere in the top paragraph) but I’m off to make sure…
xo,
s
Christine says
You might want to consider sewing some inexpensive white (or light) colored fabric to the back of your curtains. I had an experience where my beautiful homemade fabric curtains became sun-bleached… so I tried again with a backing, and they have lasted for years. Looks gorgeous!
Lynn says
Those curtains were the star of the show on Candice Olsen Tells All last night! Very nice…they had actually run out of fabric and had to sew in a solid strip across the bottom! LOVED IT! Thought you might like to see her take! :) http://cache.wnetwork.com.s3.amazonaws.com/Shows/Candice_Tells_All/S1/101.pdf
YoungHouseLove says
Love it so much! Candice can do no wrong. That room is so pretty.
xo,
s
Lynn says
Actually….on second look they look sightly different…but VERY similar! :)
Kelley says
When you wrote, “Here’s another rod shot for you.” I immediately (and pathetically) thought ” That’s what HE said.”
Andie says
STUNNING!!!!
The curtains look great! They really tie the decor of the room together, great job! You might have been the inspiration I needed to get my hiney in gear to make curtains for a few rooms in our home. Thanks for sharing!
Cori says
I love the curtains but I love your dining room even more. I read about the chairs but where did you get that table? I bet if Pottery Barn(like it’s a person)saw this room they would be teal with envy! Can you copyright a room?
YoungHouseLove says
Aw thanks so much Cori! Here’s a link to the post about finding our table: https://www.younghouselove.com/2011/02/table-talk/
xo,
s
Cara says
Well done!! Whoo whoo! I tried to write that like Julia Roberts said it at the polo match in ‘Pretty Woman’ – but that was obvious, right? ;)
Sherry, now that you’ve shown Oh Brother who’s boss, do you feel like sewing is way more secure than using no-sew hem tape? Would I be crazy to use the tape to make some throw pillows? Thanks!
YoungHouseLove says
I am still a fan of iron-on hem tape (it did me right after years of use and has held up beautifully). I think sewing is cheaper (since thread is less expensive than hem tape) and sewn things are a tad less strong around the seam so they drape more (hem tape is kind of like using wired ribbon sometimes- not as rigid, but more so than just hemming with thread). But hem tape pillows aren’t a crazy idea at all! Hope it helps!
xo,
s
SherL says
Kinda makes me want to go to Good Will when I head to Georgia this summer. The highlight of your goodwill hunting was the sweet, sweet pics of Clara. As soon as I saw her reaction to the spoon, I started laughing and laughing. I swear it is bred in our youngens to open their mouths when a spoon gets near, and Clara is a perfect bird (written in the most complimentary way). I think it would make a great video.
Anyway, lots of fun to read your adventures (decorating with humor), and hope the god times continue. All the best.
carolinaheartstrings says
Those are just perfect….. great job. Love everything about them.
Sara says
LOVE. I’m caught somewhere in the middle of copying what you did with your old place and what you’re doing in your new one! Just love the happy colors! Really like your “unstuffy” style. I’m (only :)34, and you have me convinced my house doesn’t have to look like a granny’s EVER.
Ashley @ DesignBuildLove.co says
didn’t get a chance at all to comment yesterday… too busy, BUT, I had to come back and tell you how much I absolutely LOVE the curtains! The fabric is absolutely stunning and they turned out amazingly! They are totally the statement piece in the room and tie everything together! And from what I can see, they also pull in the couch from the office! :) BONUS!
PS- I would totally be neurotic and set the table for fun! The table setting is so simple and beautiful!!!! NICE JOB AS ALWAYS!!!
Ashley Keylor says
Love the curtains!!! They totally make the room (especially with the fun table decor). Great job!
–and I love the pictures of Clara and the spoon…too funny!
Rosie says
Hi there,
I just came across your blog a few days ago and I must admit – I’m OBSESSED!!!! You are both extremely talented :-) I am in the process of purchasing my own home and I’m just ecstatic to start my renovations. With the help of your blog I know that both my hubby and I will accomplish our renovation goals. Thanks so much for sharing your renovation process.
You have just added another loyal follower :-)
XOXO,
Rosie
Julia says
I would love to ask you what you think about putting the drapes up high on the wall close to the ceiling if you have wood blinds that have a crown molding like header. Do you think that would look okay to have that header and then a rod 2′ above?
YoungHouseLove says
I always say there are probably multiple right answers when it comes to window treatments. So you might just want to eye it and see how it looks (have someone hold the rod at the same height as the blinds and then raise it up a bit to see which way looks better).
xo,
s
Megan says
Ikat, you ‘kat, we all scream for Ikat! I love, love the Ikat curtains. It looks polished, yet fun and warming.
If you ever wander up Northeast you should check out Zimman’s in Lynn, MA. 2 floors of fabric + 2 floors of antiques/reupholstered furniture = heaven.
Jasmin says
Hi there,
I have been enjoying your blog and your style for about a month now. The drapes look really cute,I have admired that print for a while as well. As a fellow DIY peep, I thought I might make a (albeit unsolitited) suggestion. Consider lining your drapes. Lining will keep the colors rich because over time, drapes fade from the sun. It also gives them a fuller, more expensive look and sets custom draperies apart from off the rack. Lining runs about 5.99 per yard at JoAnns but you can buy a whole bolt for 2.00 + per yard online and keep it for lots of projects.