Ok, so we completed the door-painting process a few days ago (picture us doing the droopiest super-tired happy dance that you’ve ever seen) and we’re now into the “waiting game” portion of the cabinet painting process. But we couldn’t wait to share all the photos of everything both during the painting-process and now that they’re all glossy and finished, so here ya go:
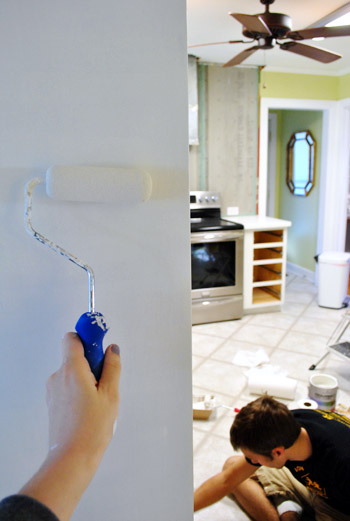
We used Benjamin Moore’s Advance paint in Cloud Cover in a satin finish (it’s a soft tonal taupey-gray color, so it’s not quite as bright as our glacier white counters for a subtle layered look). Benjamin Moore Advance paint (in the satin finish) actually came recommended by a few pro cabinet painters that we know. We used it on our office cabinets a few months back (which still look mint after Clara has beat on them relentlessly with wooden toys) so it’s safe to say that we’ve been extremely happy with it. The fact that it’s low-VOC, self-leveling, and amazingly durable is pretty much the cabinet paint trifecta.
Just like we did for the office cabinets, we applied it with a high quality 2″ angled brush to get into all the cracks and a small foam roller to smooth everything out and ensure that we were applying super thin and even coats. As for applying any sealer or topcoat, the general pro recommendation for cabinet painting is to use high quality stain blocking primer and 2-3 thin and even coats of super high quality paint with ample drying time between coats (Benjamin Moore’s Advance paint is meant for cabinets without any top coat, since sealers can drip, yellow, and even cause things to stick/crack since they thicken the application). We’ll be back with a video on Wednesday to share more actual application details/tips along with the big full monty reveal (we thought it would be helpful to share one exhaustive how-to-paint-cabinets-post with a detailed tutorial, application video, and the after pics all in one spot).
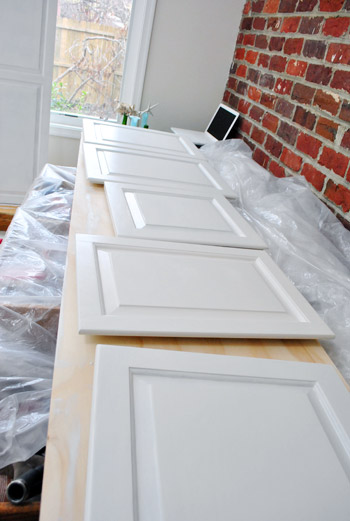
Using high quality primer and good self-leveling paint helps hide a lot although it doesn’t guarantee 100% invisible grain (we don’t see any evidence of grain on the oak cabinets in the office but do see a hint of it on the kitchen cabinets, so it probably just depends how much grain your cabinets have to begin with). We don’t mind painted wood that looks like painted wood though, so a little grain is ok with us, as long as the paint is nice and even and glossy.
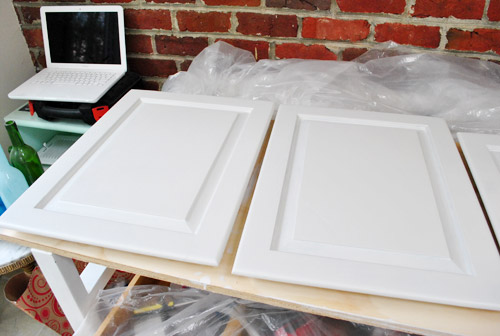
For those wondering how those few retrofitted doors that we whipped up are doing with primer and paint (more on that process here), some of them are completely seamless (the two corner cabinet doors might even stump a detective) while a few others are a tad less than perfect. By this I mean if you look at them from an inch away for five minutes (bobbing your head back and forth to catch the light bouncing off of them) two out of ten people might notice a tiny seam. See the über light horizontal seam on the door with the arrow in this pic below?
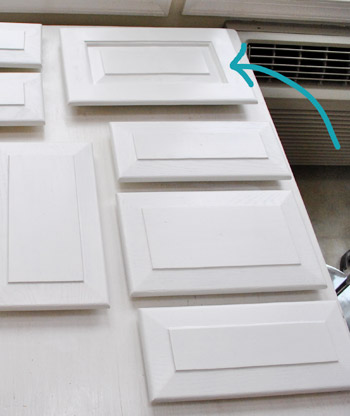
Yeah, me either. Haha. It’s nearly invisible and impossible to photograph. But once we hang them all we’ll take some close up pics for ya. Even in person it’s so subtle that we can’t decide if it’s worth doing anything about (thankfully at least two of the five doors are seamless, so we’re leaving those for sure). We’ll keep you posted if we decide to sand the other three one more time and use some sort of buildable primer and a few more coats of paint to hopefully make them as perfect as the two corner cabinet ones).
We’re psyched to have two perfect ones among the group because it gives us faith that if we want to be super type-A about things, we can probably get all of them to look that good with a little more work (if none of them worked out we’d bag it and go with Plan B). All in all I’d say we’re really happy about being able to work with our existing cabinets to save some major loot (thereby making other upgrades like new appliances, cork floors, new counters, new backsplash tile, and a big opening into the dining room possible).
So for $40 in paint (ya know we used a $10 off coupon, haha) and $22 in primer, we’re beyond overjoyed at the new layout and the lighter look! Painting cabinets is right up there with painting wood paneling or dark brick – we think it’s one of the biggest bangs for your buck. It’s amazing what 60 bucks can get ya. Well, 60 bucks and a week of puttying, sanding, deglossing, priming, painting, and waiting not-so-patiently to put everything back together.
Oh and we primed and painted the outside of the frames and the front and back of the doors while leaving the inside of the cabinets oak. This way we can toss things in there and pull them out without worrying about scratching or peeling paint. We also like the two-toned effect of clean paint with wood interiors (we did that in our old kitchen and in our office built-in cabinets and really love the surprise of natural wood when you open the door).
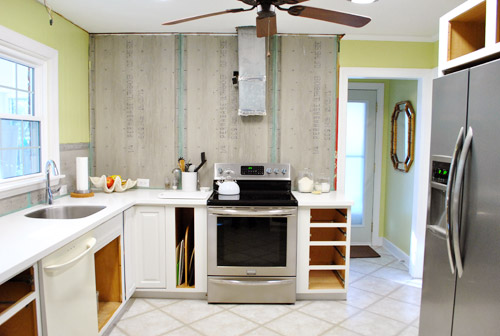
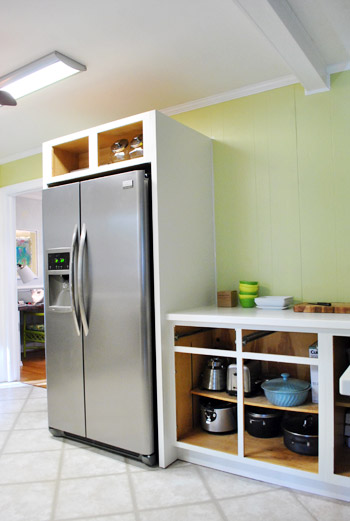
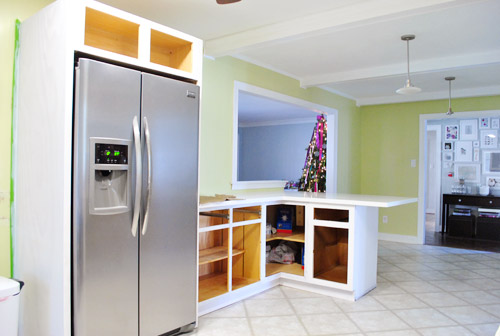
Of course the room’s still pretty white-washed since the rich cork floors aren’t in yet, but we’ll get there eventually. And now for a bunch more random doorless pics. This is fun because you can spy on all of our kitchen items like my pretty blue cassarole dish:
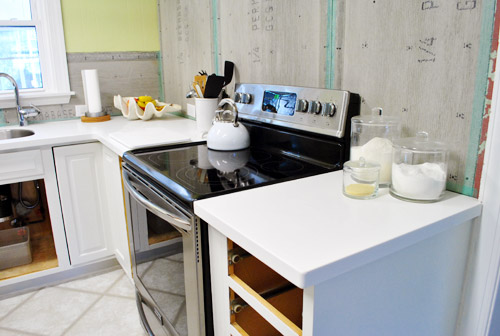
This shot makes me long for our backsplash tile to go up (after we hang our cabinet doors and add hardware it’s next on the agenda!).
Yes, our tree is still up. I always hate taking down my glowy happy friend.
It’s so light and airy in here now… except for that terrible bisque dishwasher. Egads. Can’t wait to install the new one (after we lay the new flooring so it can run under it).
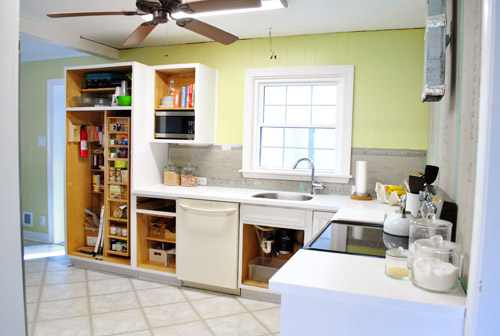
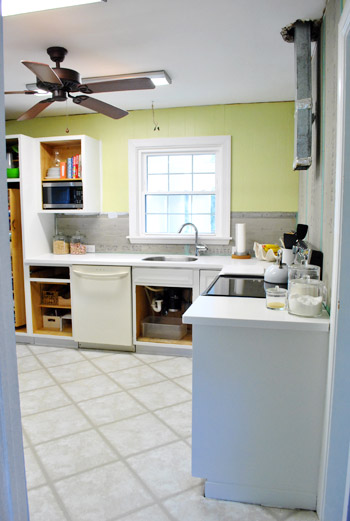
These two views (the one above and below) are a lesser seen angle (taken from the office doorway). I still do that “ahh!” thing when I walk in that way because I keep picturing the dark old kitchen that used to be there.
You know, the one that looked like this (although John didn’t always stand on the counter like that).
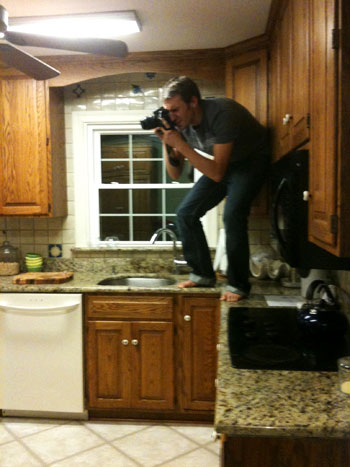
I like it a lot better now.

And once we add the 12″ deep floating shelves and a range hood over the stove, things like the sink window will look a lot more balanced (there will be 14″ of space on either side of it):
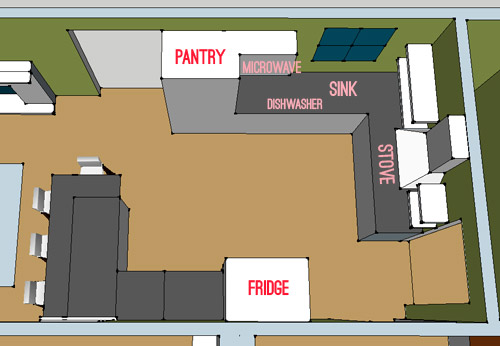
We’ll be back with an entire cabinet-painting tutorial complete with a detailed video and lots after photos on Wednesday when things are finally cured enough to hang the doors and add hardware. Ahhhhhhhhhhhhh, even typing that is more thrilling than I should admit. I’m off to watch paint dry. Literally. Ok, and write more book stuff. There’s nothing like an entire-manuscript deadline of the 4th to get the year off to a ca-razy start! But just like fiiiinally finishing our painted cabinets, handing in our huge 260+ page beast of a book should feel pretty darn good! Then we just have to shoot 100 secret photos/projects in our house over the next two months. Ah chaos, come on in and get comfortable. I hope you don’t mind an in-progress kitchen…
Psst- In case you were off caroling and cavorting, here’s a roundup of all the posts that you may have missed over the “holiday break”:
- Our ribbon-rific holiday card (here)
- A whole lotta cabinet puttying and sanding (here)
- Making some 2012 resolutions (here)
- Priming our pants off (here)
- A superlative-riddled December recap (here)
Glad to have ya back!

Dana H says
Love seeing this house come together ~ can’t wait to see the kitchen cabinets go up :)
We sanded down our old oak kitchen cabinets a couple of years back, made new doors (my dad is a woodworker), and re-stained it a dark walnut. It looks fantastic but was a TON of work! Now we’re looking at flooring.
On that note… what colour and pattern of cork floor did you pick out and how did you decide on using cork flooring? We’ve looked at the normal wood and tile flooring options. We’re even considering tile flooring that looks exactly like wood planks. I hadn’t considered cork flooring though but I’ll be checking into it now :)
Dana
YoungHouseLove says
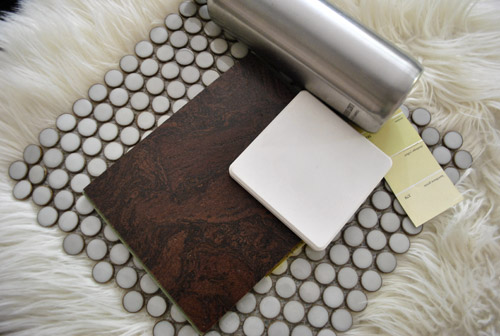
You can see the type of cork that we chose in one of the pics in this post (the one with the backsplash tile sample). It’s really pretty in person, sort of a marbled mocha color. We did a lot of research about flooring, and you can see why we chose cork here: https://www.younghouselove.com/2011/10/houston-we-have-liftoff/
Hope it helps!
xo,
s
Chris @ Foible and Folly says
I wonder how that BM Advance compares to their Impervo line, which is what they reccomended for our cabinets when we painted 5 years ago. The frames anyway. The doors *ahem* are still stacked with only one coat on them. I swear I will finish them this year! The frames have a chip or two on the corners from things hitting them, but otherwise look fine. If Advance is better, it might be a good idea to redo them all with that since the doors still need a few more coats.
YoungHouseLove says
I wonder if Advance absorbed Impervo? They seem to be BM’s favorite cabinet recommendation these days and I haven’t seen Impervo for a while. Anyone know? I wonder if Advance is the new low-VOC version of it.
xo,
s
Robin @ Our Semi Organic Life says
I love coming back to YHL and seeing this. Makes my day (and yours too I bet!)
Kate says
It looks great so far, I can’t wait to see it with the doors back on!
This weekend I built a side table from Ana White’s site and it feel like I spent forever sanding it (I still need to paint – hopefully sometime this week). I can’t imagine sanding all of those cabinets!
YoungHouseLove says
Wahoo! Congrats! That sounds amazing. Would love to see pics when it’s done!
xo,
s
Riki says
The paint job looks absolutely amazing.
But the real question is — who is the messier painter?
(Confession: I usually end up covered in paint myself).
YoungHouseLove says
Haha, my hands are probably messier when it’s all said and done. And it’s always in my hair and randomly on my face somewhere. I always seem to have face/head itches when I’m covered in paint. Haha.
xo,
s
Diana @ Boy + Girl says
Yay! I Can’t wait to see the doors hung. I’m in love with the kitchen already!
-Diana
angel p says
I’m wondering why you don’t remove the window in the kitchen and make it an open pass through? Is the temperature in the sunroom a lot different than the rest of the house? Just curious.
YoungHouseLove says
Yup, it’s not on the same heating system so there’s a little heat/air conditioning unit for just that room that we would have to run all the time if it was a pass through. Maybe down the line we can extend ductwork into there but for now we’re cool with a window (we actually had a window over our kitchen sink that looked into our sunroom in our last house too- isn’t that funny?).
xo,
s
angel p says
Thanks. That explains it. We don’t have sunrooms here so I didn’t know how the a/c and heat worked.
Terra says
Wowwwww!!! I’ve been waiting for the kitchen cabinet transformation since you guys bought the house. It’s amazing how nice the cabinet doors look now. The paint finishes look perfect. I can’t even see any wood grain from your picture. I am also thinking about painting my old kitchen cabinet using a light color. But I am worried that the wood grain will show so the finishes won’t look so smooth. Some parts of my cabinet have laminate finish, do you think I can sand the laminate finish?
YoungHouseLove says
Hmm, laminate is tricky since it’s slick like plastic and sanding it doesn’t work (it’s not sandable like wood or veneer) so I would just use the best primer and paint you can find and super thin coats. You might want to ask the paint pros what they recommend at the store when you go since their might be a product just for laminate!
xo,
s
Jenny@EvolutionofStyle says
It’s looking fantastic!! I used the Benjamin Moore Advance paint when I recently painted my kitchen cabinets, and I’m in. LOVE. In the words of the paint store guy – “It’s revolutionary.” Amen to that!! It’s truly a latex paint that holds up like an oil-based paint. The best of both worlds for projects like this.
Just curious if you ever considered using an HVLP spray gun for painting your cabinets? I found a great one that I hooked up to my air compressor, and it made fast work out of spraying the cabinet doors. Kind of a moot point now I guess, but just curious. :-)
Here is a link to my newly painted kitchen cabinets if you’re interested. I’m so in love with the new look, it’s like a brand new kitchen.
http://evolutionofstyleblog.blogspot.com/2011/11/kitchen-reveal.html
YoungHouseLove says
Agreed! Totally REVOLUTIONARY! As for a sprayer, I’m chicken! Haha. I worry about drips and just being not-as-experienced as I am with a brush and a roller (I feel like an old pro at that and am happy with those results, so it feels risky to switch to a sprayer). I also have to admit that cleaning a sprayer sounds like a nightmare. Haha. I like rinsing my brushes and being done! Oh and your kitchen looks amaaaazing! Such an awesome job.
xo,
s
Tammy says
I’m loving watching the kitchen renovation in “real time,” but it never ceases to amaze me that with a family of 4 (counting Burger) that you have all this extra cabinet space available. Any chance you’d do a post on how you simplify your kitchen gadgets, dishes, etc.? I’ve got an entire cabinet dedicated to plastic ware, and it still feels like I don’t have enough, but all other cabinets are crammed full.
YoungHouseLove says
I think it’s just that we’re not huge bakers or chefs! We do have things like one big pot and two cassarole dishes, but we don’t have things like a stand mixer or a pie plate or a bundt pan or all those other things that “real cooks” have- haha. I think from back in our NY days, we have learned to live as simply as possible (you have two cabinets in NY if you’re lucky) and we don’t really use plastic cups and paper plates and all that stuff so maybe that cuts down? We pretty much have some simple dishes and cups that are not only our everyday stuff their our special occasion stuff (we just dress things up with cloth napkins or a pretty centerpiece) so that saves space from storing formal china or anything. Hope it helps!
xo,
s
Anika says
WOW! You guys have really come a long way! Thanks for sharing that older picture of John in the kitchen: its fun to look back at a different angle (rather than the one you often show from when you first moved in) and see just how much has changed. Congrats on all the hard work – can’t wait for the big reveal!
Jordan@the2seasons says
Thank you so much for the tips and advice how to on how to paint your cabinets. I have been starting to research the best way etc and this is so helpful. Since you have white trim and a different color white for the cabinets does it look ok? Or are they not close enough that it doesn’t matter? I have been wondering about our white trim color and a white color for the cabinets. Can’t wait to see more pictures!
YoungHouseLove says
The nice thing is that our counters are exactly the same white color as the trim- so those things tie together and the cabinets are a softer tone to sort of layer in there. I think it would look crazy if our trim, counters, and cabinets were all slightly different tones (might look like a mish-mash or a mistake) but since two of them are the same bright white color, the slightly toned cabinets just look intentional and more dimensional than if everything was the same bright white color. Hope it helps!
xo,
s
Tracy says
Looking amazing, guys!! Keep up the good work! I was curious if the new cork floors are going to run into the laundry room as well over the existing linoleum?
YoungHouseLove says
Yup, the laminate tile runs into the laundry room too, so we’ll float cork over both rooms!
xo,
s
Laura Parker says
It was nice to see you yesterday on Belle Isle – it was like a celebrity sighting! I spent the rest of our walk telling Jeff all about your fabulous blog :) Best wishes in 2012!!
YoungHouseLove says
Aw thanks Laura, you’re so sweet! It was great to bump into you!
xo,
s
Sara says
Non cabinet refinishing question: Why do you keep referring to the “holiday” break rather than Christmas? Seems kinda awkward to me. I mean, what kind a holiday is it for you?
YoungHouseLove says
Oh we say Christmas a lot too! Haha. Like we did here this morning. And we shared everything from our two Christmas trees to an advent calendar that we made throughout December, so I think we’re pretty open about celebrating Christmas. Haha. We’re just used to offices calling it a holiday break and not a Christmas break since it can be a different holiday for everyone!
xo,
s
Melissa says
Just wanted to let you know that I look forward to watching the progression of your kitchen every day!! It is looking so awesome!
YoungHouseLove says
Aw thanks!
xo,
s
Seriously Sassy Mama says
I cannot wait to see how the floors change the look of the kitchen. They are going to being in such warmth!
WSquared says
I’m so excited to see the finished results, and am thrilled for you both that you got two seamless doors!
…and please don’t take the Christmas tree down too, too soon: there are, after all, twelve days of Christmas. :)
YoungHouseLove says
Haha- I like that argument…
xo,
s
Alice says
Following up on the floor-under-cabinets question…I am dying to put cork floors down in our kitchen and the easiest would be to lay it on top of our UG-MO tile. But – the geniuses who originally put the tile down clearly laid it on top of something else, so we already have a bit of a “step up” into our kitchen from our pantry hallway and from our living room. I’m loathe to add another layer to that and trip all the time! But the tile goes under the cabinets and we aren’t going to rip those out any time soon. Could we conceivably pull up all the exposed tile, leaving the layer under the cabinets? How difficult would it be to get an even-ish line on tile at the cabinet-edges if we are smashing it out? Any suggestions?? Thanks – love the progress so far! I’m exhausted just reading it, so you guys must be wiped!
YoungHouseLove says
I am totally stumped by this. Maybe ask a contractor or pro at a home improvement center what they’d recommend? Anyone have ideas for Alice?
xo,
s
Alicia says
The room already looks amazing!!! This really makes me want to redo our kitchen. It is also one of those old fashioned really DARK boxy kitchens. Now if I can jut talk my husband into doing it.
And I also find your blue casserole dish very pretty!
I’m def following you guys closely on this project!
Becky says
Have you guys ever used a spray paint gun? What are your thoughts on spraying cabinets/furniture? I know you like spray paint in a can but I am talking about the kind that you se regular paint with. Just wondering what your opinion would be.
YoungHouseLove says
I chatted about that a little ways back in the comments, so hopefully that’ll help!
xo,
s
J'Ann says
Cannot wait to see the finished project. I must stand on my counter and take pics….never thought of that hehe
Rochelle New says
WOW! It’s so bright!! What a difference already! Very beautiful, and so inspiring.
Mary says
Thanks so much for addressing the grain issue! Ben Moore scared me but I think I’m going back. I might have to prime and paint a door back to see just how white I can get mine.
I love the blog and find myself wanting to click the pics to look closer! I read it in Google Chrome browser and the wallpaper edges take up a ton of screen. I checked it in IE and it’s a much nicer layout. Just FYI. Maybe it’s something in my settings, though.
TheChangingHouse says
Great progress!!! Amazing!
Amanda says
I love how your kitchen is coming together! The cabinets make a HUGE difference! I can’t wait to see it all finished :)
I have a question about the materials you used. My husband and I want to paint a wooden dresser we already have for our nursery – no sense in buying new if we don’t have to! Would you recommend the same materials and steps for that project…putty, sanding, deglosser, Zinsser’s Smart Prime, Benjamin Moore Advanced Paint? Would we need to add some sort of top coat or poly? We want the dresser to stand up to wear and tear and last through at least a few kids in the nursery. Thanks!!
YoungHouseLove says
Yes! Those exact items would be perfect! No poly necessary.
xo,
s
Candice says
I’m loving everything in your kitchen, but I have to admit that my feelings are a little bit hurt when I read the words “that terrible bisque dishwasher”. I have a dishwasher just like that! My small kitchen has no windows as it’s at the back of the condo with neighbors behind and on both sides, and all of the windows are at the front facing north. We refaced the medium oak cabinets an antique white because the kitchen looked like a cave with no natural light. We went with bisque appliances to create more of a seamless look. We also love how bisque appliances don’t show fingerprints!
YoungHouseLove says
Oh no! I just meant that it looks terribly clashy with our freshly painted cabinets! Bisque can look a lot better with antique white or oak cabs – but horribly mismatched with crisper whites that make it look dirty! Hope that makes sense!
xo,
s
Debbie says
O-o-o-o-o She’s going to be bee-u-tee-ful!! What a great job painting(and everything else).
Say, have you replaced the ceiling light fixtures or know what you are going to do yet? I’m really interested because I have a huge, ugly(though effective)fluorescent box to change out.
YoungHouseLove says
We’re planning to drop two pendants over the peninsula and add some can lights to the cooking area instead of hulking fans and dated lights! Should open things up a lot more!
xo,
s
Kaycee says
looks great! good job
Jordan says
are you considering that “bee art” (that i believe you got for John as a gift) to hang on that open wall space by the penisula (above the lower cabinets)? Looking forward to seeing that piece find a resting place:)
YoungHouseLove says
It’s definitely a contender!
xo,
s
Katie @ Epistle says
I have to say watching you guys do this is more fun than seeing an instant before and after. The process of things is almost as sweet as the result, I think. Excited to see it all come together. I think the floor and backsplash will make a world of difference in this space.
Melody says
I think I found your voice twin. I watched Friends with Benefits last night and Mila Kunis sounds just like you! Oh, and the kitchen’s looking great!
YoungHouseLove says
I’ve totally heard that a ton of times! And Natalie Portman too. So funny because they’re both from Black Swan!
xo,
s
michelle says
looks sooooo great!
off topic, $herdog is wearing nail polish!!!! I thought you were anti-polish girl!?
YoungHouseLove says
Haha- I occasionally use the eco stuff I like on my toes for special occasions (I figured if I was going to have paint in my hair when we hosted people for the holidays I might as well try a little with nail polish). Haha.
xo,
s
Abigail says
i am just so in love with the fresh palette of colors you guys are going for in this house! i keep staring at each post just soaking up the ideas.
and have you seen the new cousins of Sue the Napkin over at West Elm? (like this bedding: http://www.westelm.com/products/organic-oasis-duvet-shams-b819/?pkey=call-new , and this silk pillow: http://www.westelm.com/products/oasis-silk-pillow-cover-b828/?pkey=call-new ) Not exactly the same but they must be related :)
YoungHouseLove says
Love them!!!!
xo,
s
Adrienne says
Can I ask what brand of foam roller you used? After my foam rollers caused bubbling on some wood panelling, I want to make sure I get better ones for the kitchen cabinets. If countertop guy is on time, I should be able to start our cabinets next week! FINALLY!!!!!! :)))
YoungHouseLove says
Ours are Whizz brand rollers that we had around from a few projects ago. They worked great for us!
-John
Brett says
My husband and I have been following theses posts closely as we’ve just finished painting our kitchen recently. Deja vu for sure! Our cabinets were very similar and we went through a lot of the same challenges. The hinges were a particularly difficult thing to work through, and ultimately replaced our visible hinges with similar painted ones, instead of the hidden hinge i was hoping would work. One difference was that we used a brushing putty from Fine Paints of Europe because I wanted as little grain to show through as possible. My husband did most of the work and he is not a perfectionist but the surfaces came out practically mirror-smooth, especially after painting (and we went with the BM Advance paint as well — LOVE the end result!). We did a new backsplash and wall color as well and are really happy with the update. Glad we DIYed but REALLY glad we’re done!
Thanks for so painstakingly documenting the process…I only wish we had had this as a resource when we were working on ours!
YoungHouseLove says
Ooh that sounds gorgeous! So glad it came out so well!
xo,
s
Cindy S. says
Loving every bit of your new kitchen! I’ve been planning to paint my cabinets every year for the last 4 years, and I think I’m finally going to pull the trigger this spring, when I can take all the cabinet doors off and work outside. Your posts are going to be my go-to guides for getting the job done. Finally!
By the way, did you get a pretty new white tea kettle for Christmas?
YoungHouseLove says
I couldn’t resist (you know I love white ceramic things…haha).
xo,
s
Rachel B. says
I looove that white tea kettle on your stove. I can just imagine how gorgeous everything will look when its put back together and decorated. I can’t wait to see the finished project of this whole kitchen so I can get major motivation to overhaul mine!
Hilary @ My So-Called Home says
Yay you’re almost in the home stretch and things are really gonna take shape from here on out! It seems new beginnings are the name of the game for this new year: we just trash-picked an awesome “new” dresser to use as our TV console and LOVE it. You can see it here:
http://www.mysocalledhome.com/2012/01/trash-picked-treasure.html
YoungHouseLove says
Wow! That looks great!
xo,
s
Monika says
Could you give more details on the brush and the roller you used (size, brand, etc.)? Also, do you toss the brush and roller between primer-paint, paint coat #1 and #2? You might already be planning to share all these details in the future, in which case I can definitely wait :) Happy NEW YEAR to you!
YoungHouseLove says
I think John dropped in with some roller details a few comments back so hopefully those help! We did toss the primed roller and use a new one for paint because we wanted the most perfect finish possible (but didn’t toss them between each coat of those things – for that we just stored them in a ziplock bag)!
xo,
s
Laura@JourneyChic says
Wow, it’s really coming together! I’m so impressed with your work ethic and patience – you will be so very proud of yourselves when it’s done!
Christine says
Looks great!!! Y’all are so inspiring!!! You would never, ever get an award for being lazy. It just looks amazing. Can’t wait to see the final results. You and John are our DIY inspiration. Thanks for doing what you do!
YoungHouseLove says
Aw thanks Christine! You guys are so sweet today. Well, always actually! Haha.
xo,
s
jodanders says
So BEAUTIFUL!!! The dark cork floors are gonna rock and really show off the white and brightness of the cabinets!!!
Whitney says
This is looking so amazing! During the talk about painting the cabinets (so precisely), I actually had the thought: “I wish they would come and help me paint my cabinets because they look like crap and we only painted them four years ago”. Hahaha! Can’t wait to see the end result!
Dana C says
Will the floors be your last step? I remember from a previous post that you are going right over existing floor… It is tile or laminate. Do you know how you will transition from new cork floor to hard wood? Thanks!! Cabinets look awesome!!
YoungHouseLove says
Yup, it’ll be one of our last steps! We’re not sure how all of the finishing will work (we try to take things one step at a time to avoid getting overwhelmed) but we’ll keep you posted!
xo,
s
Kelly says
That was a good idea to show that pic of John standing on the cabinets! I am a daily follower and seeing you go step by step, I forget how bad the kitchen was before!! CRAZY DARK!! With those last two pictures, it was definitely a WOW moment for me. :o)
Great job on the cabinets doors too. Those are looking so bee-u-ti-ful!
And I don’t like taking down my tree either. It’s like finally admitting that Christmas is over. :o( Sadness!!
Kelly
Kelly says
Oh, also. . .I’m dying to see that last kitchen pic (the one before the sketch) with the cork and penny tile photoshopped in. I thought I’d ask just in case there are any amazing YHL fans out there that know how to do it. :o)
I am not very good at picturing things.
Regan @ RenovatingRothenbergers says
It looks amazing. You spent those $60 well! :)
Lilly says
Oh I’m so happy u guys painted the cabinets it’s sure to be the biggest bang change for the smallest buck. I know because we also painted or cabinets n love love love the change. Totally brightens things up.
Jenn R. says
Wow! Way to go you two! You have made that space so bright and inviting. I look forward to seeing the finished project.