We’re back to share how we painted our $39 Marshall’s mirror so it’s a bit less upscale-formal (in black) and a smidge more playful and nursery-ready (thanks to a few coats of deep asparagus green paint).
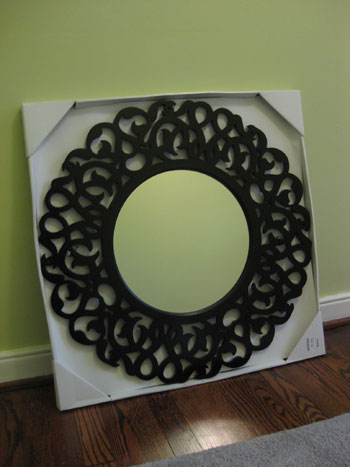
It was a super straightforward process, although I’m not gonna lie- all those curvy openings definitely took me a bit longer to work around than a basic mirror frame would have. But it was totally worth it in the end. As in, I’d do it again ten times without a second thought. We just love it!
We were inspired by the deeper green tones in the leaves from our curtain fabric so the color that we decided on for the mirror was a nice deep-ish green tone called Behr’s Scotland Isle (we got it color matched to an inexpensive quart of Olympic’s No-VOC Premium Paint in a semi-gloss finish). We passed on using any primer since our mirror was already painted (not stained) so we didn’t worry about anything bleeding through (and we wanted to avoid the primer fumes if at all possible). But we did rough it up with a bit of high-grit (350) sandpaper before picking up a paint brush. Note: if you’re not prego and not making over a mirror for a nursery, you could easily use a spray primer like Kilz followed by a few thin and even coats of spray paint in your color of choice for a perfectly polished finished product- just be sure to spray in a well ventilated area because those fumes aren’t great for anyone- pregnant or not.
So as I mentioned, I passed on the spray paint approach and resolved to do the work with a small craft brush instead. I left my usual 2″ angled paint brush in our tool drawer and reached for a tiny less-than-one-inch brush from Michael’s from my craft drawer instead- just to get into all those nooks and crannies. Two coats, and about two hours later, I was looking at a gorgeously green mirror that appeared as if it had always been that color. Not an ounce of black paint bled through the paint or peered around the cut outs thanks to my tiny brush. Oh and I painted the mirror on a flat piece of cardboard to catch any drips and make it easy to spin around so I could access it from all sides (which was crucial to ensure that I didn’t miss any of the many edges that needed green paint to cover the black).
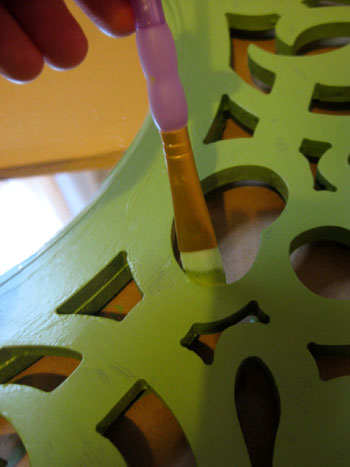
Then I sat back and let everything fully dry (I didn’t even attempt to hang it for 24 hours, just to be sure it was fully cured) and used a simple straight edged razor to scrape the small amount of paint that had dripped from the frame onto the round face of the mirror in the middle. Then we used two heavy duty anchors to securely fasten it to the wall in the nursery. We intentionally hung it across from the only window in the modestly-sized room to reflect lots of light and make the space feel more open and airy.
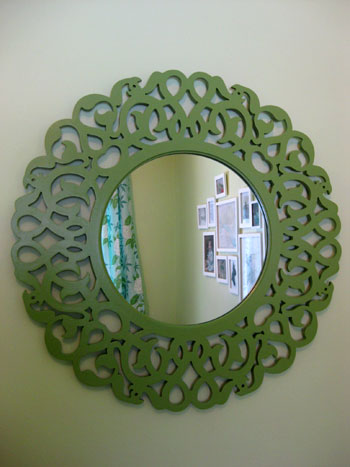
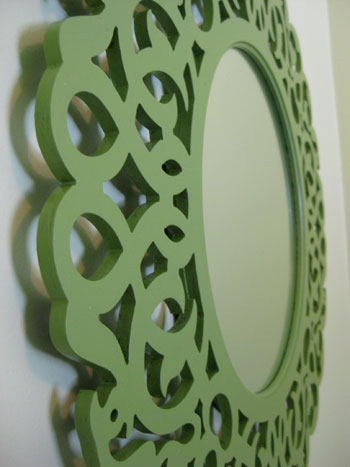
We love how the color works with the tones in our curtains. And of course we adore all the fun little shapes that it makes on the wall (that we’re sure the beanette will love to stare at). We especially enjoy the four little hearts around the mirror’s perimeter that we never even noticed back before we painted it green.
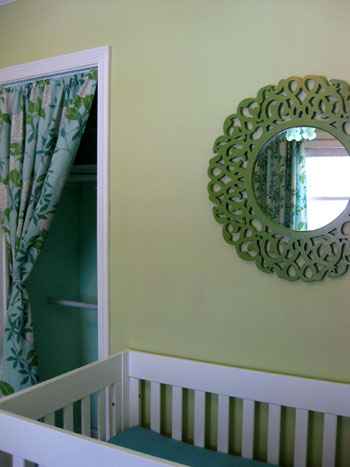
See how smooth our paint job came out just from applying two thin and even coats of latex paint with a small craft brush? Painting a frame or a mirror is really one of the most simple and rewarding projects that you can take on (how about painting a bunch of them in a bold punchy color and hanging them in a grid above your sofa?). Easy peasy. Especially if they’re less ornate than this guy.
So there you have our latest little nursery project that we completed with just one cheap-o brush and a quart of colorful semi-gloss paint. Oh and we should mention that we do realize that when the beanette gets bigger and eventually can stand up in her crib (even though we’ll be lowering the mattress at that point) hanging the mirror even more securely on the wall will be in her best interest. At that time we plan to screw right through the frame and into the wall (we can countersink, putty and paint the heads of the screws to hide ’em) so the mirror can’t even be yanked off the wall by a hulking adult. Stay tuned for all those little childproofing adventures that we’ll take on as Baby P grows and becomes more mobile towards the end of 2010…
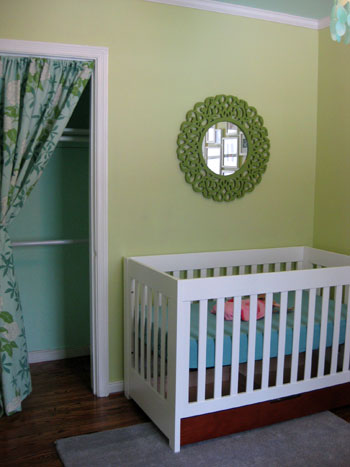
And before we forget, did you notice that we snagged an awesome aqua colored 100% organic crib sheet? We actually ordered two of them (we’ve heard that it’s easier to always have a spare on hand) and also grabbed two 100% organic changing pad covers in the same color. We love the pop of happy hue that it adds without being too busy (we considered some patterned options but realized that with the scrolly mirror and the printed curtains it might be a bit too much).
Best of all? After sleuthing out about twenty organic crib sheet and changing pad cover options, these were the cheapest and the color happened to be perfect- plus they even offered free shipping so we couldn’t have been happier. Not bad for $18 and $15 a pop respectively. Of course we did that thing where you cross your fingers that the color n the monitor is close to the real color, but as soon as they arrived we breathed a sigh of relief. Now we just have to pick up about a million other things (waterproof mattress cover, changing pad, dresser, side table, lamp, art, cloth diapers, toy baskets, etc). Not to worry, we’ll get ‘er done.
Psst- Wanna see our nursery progress from the very beginning? Here’s our painting post, our big shopping spree, our crib hunting rundown, our curtain-making tutorial, and our fun little chair search.

Stephanie says
You’ve mentioned a couple times that you’ve used anchors to attach items to the wall. Do you have a post with a little more information about that? (i.e. When to use them (only when you aren’t attaching something to a stud)? What kind to buy (does it depend on the fastener – nail, screw, etc.)?)
Apologies if you’ve answered this before. Thanks so much!
YoungHouseLove says
Good question! Here’s a post about using anchors to hold things securely on the wall:
https://www.younghouselove.com/2009/04/threes-company/
We basically use heavy duty plastic or metal ones whenever we hang anything except when we’re going into a stud. And we always use them with screws, not nails- in fact they even sell packages of screws with coordinating anchors so you know they’ll always fit. Just swing through your local home improvement store if you have any questions, they’re the people who taught us about using them a few years ago and they work like a charm.
xo,
s
Michele says
I started to buy the same adorable mirror {in white} for my daughter’s room, but it was chipped. I LOVE how you painted it green- too cute.
CB says
Gosh, I love your mirror but wouldn’t hang it above the crib. What about next to your nursing chair at seated height where you and baby can mug for each other instead?
CB says
Sorry about the previous comment I made before reading your replies to others with concerns too. I should have read the comments before commenting!
I did just read that you will use cloth diapers! Yay! Good for you. I can’t wait to see what you choose to use.
YoungHouseLove says
No worries!
xo,
s
Megan says
I’m so amazed with what you’ve accomplished in your little bean’s room :) It looks great!
Katie says
Have you guys considered painting the reddish drawer under the crib or does it not bother you?
YoungHouseLove says
That picture actually makes it look a lot redder than it is in person. Check out this link for a more true to life photo of the drawer. We actually love the dark rich wood tone:
https://www.younghouselove.com/page/2010/02/nursery-progress-crib-notes/
xo,
s
kelsey says
you guys are doing such an amazing job with this nursery!!please do another update quite soon,i cant wait to see what else you guys have in store! :)
Stephanie says
Thanks for much for the link for anchors! Exactly what I was looking for!
Follow-up question: Is it hard to remove anchors later? I would assume, based on the size of the hold created, that a patch and repaint job would almost always be in order.
YoungHouseLove says
You most definitely will need to putty and repaint after removing an anchor but that’s not a big deal (and certainly worth the effort to have art on those walls until you choose to move it). One trick that we’ve learned is that sometimes an anchor just won’t come out so banging it INTO the wall a bit and then puttying and painting over it is easier than digging it out with a flathead screwdriver and creating a huge hole in the process. Hope it helps!
xo,
s
Carol H. says
Gosh you guys are so talented! To see beauty in a black mirror. Thanks so much for sharing your life with us (and for putting up with all of our advice. Are you sick of it yet?) I just can’t stop myself for adding my 2 cents…(Why are people like that?) You can’t have enough crib sheets and having lived in California I wouldn’t think of hanging a mirror over a bed – not for anyone’s bed!
Jenna says
Too funny! We just painted my husband’s office Scotland Isles. I probably wouldn’t normally choose to put that color on the walls, but he IS a guy and likes green and I wanted something “happy” and not too dark. It really looks great with the bright white built-ins.
The mirror looks fantastic! I love how scrolly it is. :)
Jillian says
This is off topic, but…
Sherry, did you catch Oprah today? Your imaginary boyfriend Nate Berkus was on doing a “make-under” of a family’s den, and he transformed the room by painting the wood paneling and red brick walls a creamy white!!! Sounds familiar, doesn’t it?
YoungHouseLove says
Wahoo! We haven’t watched it yet but I DVRed it. Can’t wait to watch my main man Nate in action.
xo,
s
Natalie says
Oh my gosh, I love it!! Seriously, it looks like a completely different mirror! And it looks PERFECT above the crib. Great job, you guys! :)
P.S. I also recently painted a scrolly mirror and will be posting pics on my blog soon.
Natalie says
P.S. In regard to other people’s posts regarding waterproof pads, I found an organic one you might like:
http://www.amazon.com/Snoozy-Organic-Flannel-Cotton-Waterproof/dp/B001387H40/ref=sr_1_5?ie=UTF8&s=baby-products&qid=1266370685&sr=8-5
YoungHouseLove says
Thanks for the link! We’ve also seen organic ones at mainstream places like Buy Buy Baby – hooray for more organic accessibility!
xo,
s
Lisa @ lists in my pocket says
Gorgeous! I love how fun your nursery is – so unexpected and original. :)
Michelle Z. says
Can I share a little piece of “Mom” advice (it also applies to dads)?
When you make the crib, do it like so: mattress, water-proof pad, sheet, waterproof pad, sheet.
This way, when it’s 1 am and the baby has made a mess in the crib, you don’t have to scramble around to find that extra sheet or pad. You just rip up the top sheet and soiled pad and you have a clean crib. You can even do it with a baby in one arm!
YoungHouseLove says
Thanks so much for the tip! We’ve actually gotten that exact advice close to ten times on this post alone so we’ll definitely be putting it to good use!
xo,
s
nell ann says
Love the bright green! My son’s room is actually lots of bright green and soft aqua. It’s such a fun room to be in and I always smile when we spend time in there. It’s like you have to be happy!
If I may add one more piece of advice — it’s nice to have three instead of just two sheets/bed stuffs. That way, one can be dirty, one on the bed, and one clean just in case. Sometimes babies go through more than one sheet a night. Nothing is worse than having to do emergency laundry in the middle of the night.
Kathy says
Love the green mirror! Is it made of wood?
YoungHouseLove says
Yup it was scrolly light balsa wood that was cut to make those crazy shapes (with a round mirror popped in the center). Hope it helps!
xo,
s
thursday says
No matter how glued that mirror is to the wall, as a new mother, I would have been freaking out about it every time I put my son in the crib underneath it. Just because that’s what new moms tend to do! As long as you feel comfortable with your skills anchoring it to the wall, and that you won’t have any freak earthquakes, I’m sure you won’t worry too much.
So funny about the crib making advice- I think I only ONCE had to change the sheets in the middle of the night! So far, of course. My son is 19 months old though. And I used disposable diapers (couldn’t wrap my head around what on earth I was going to do with cloth diapers when I don’t have a washing machine).
cynthia says
So lovely! It’s really refreshing to see a baby girl room that doesn’t look like a pink bubble-gum explosion, the green you chose is such a relaxing and more timeless colour in my opinion. Just wondering (as I’m sure you’ve looked into it!) is it safe to paint things while pregnant if the paint is No-VOC? Or are there still other toxins in paint of which to be wary? Did you use a mask? Sorry for the barrage of questions, you just always seem to be so ‘in the know’ about organic products, health & safety, etc. so I’d love to hear what you (or your soon-to-be-Dr. Dan bro) think! :-)
YoungHouseLove says
Good question! I’m totally a better-safe-than-sorry-paranoid-first-time-mom, so not only did I wear a mask but I also painted the mirror on cardboard in the sunroom which is three walls of glass (I kept all the doors open for tons of ventilation plus I turned on the ceiling fan). Sure it was a little chilly, but it just made me feel better. The funny thing is that John lowered his head into the paint and gave it a good sniff (you know boys and their experiments) and he said it had no odor at all… but I’m nothing if not a super protective prego lady- haha.
xo,
s
Erin says
I think I love that mirror way more now that it’s green. SOOOO cute! I just had to add that your crib is adorable. I’m sure your baby is going to love how sleek and comfy it is!
P.S. I know that people are shooting you advice left and right, and you’re being kindly receptive of everyone’s tips. But here’s my 2 cents- every parent will figure out the best way to do things for their children and I have a feeling that you and your husband already know this. I got a ton of advice that just didn’t work for us. After two kids ourselves, I can honestly say that NOT ONCE did I change a mattress sheet in the middle of the night and all the spare things people told us to buy were a waste of money. I’m sure other couples swear by them. I mean, getting advice is nice, but too much unsolicited advice gets old. You guys are obviously capable of figuring things out for yourselves and I hope that getting so many tips doesn’t get too irritating! :)
Erin says
P.P.S.
We actually DID just have a freak earthquake a very short distance away from the center of it- up in the Midwest. We felt the shake- it woke us up with the noise of rattling around- but nothing tipped over or came off the walls. And we had some artwork dangling on tiny nails. I’m sure when you babyproof with anchors, that mirror will be just fine (as you already know :)
erin says
I know you’ve gotten tons of comments on the cloth diapers thing, but I just wanted to give another shout-out to gDiapers. We use them for our 8-mo-old and LOVE them. We also use a Bum Genius/Happy Heinies hybrid (loveydoodle.etsy.com) that is a pocket diaper, but can be used as an all-in-two (similar to g’s). We use cloth soakers in our g’s, but I usually have a couple spare disposable flushies on hand just in case we are going somewhere that it would be inconvenient to carry around 86 billion yucky soakers all day. The flushies are compostable and degradable, which is really nice.
For a while we were needing to use a disposable at night because my daughter would leak through the layers and layers of cloth I would put her in. For the sposies I found Nature Babycare (naty.com) and really preferred them. They are soft, degradable, and compostable. Even the packaging is made from chalk, so it is plastic-free and degradable also. Bonus: they don’t have annoying cartoon characters on them!
I also second the cloth wipes business – LOVE my cloth wipes. Don’t forget you will also need wet bags and a washable pail liner (we use a Diaper Dekor pail which is easy to fit a washable liner). I use the wet bags and liners from hannahstoybox.etsy.com. And finally… I predict a diaper sprayer tutorial in the future! http://misseireann.blogspot.com/2009/11/diaper-sprayer-tutorial.html :)
Jennifer says
I’m sure that you guys will come up with a system that works best for you, but I thought I would mention sheet savers, two in particular to check out:
The Ultimate Crib Sheet: http://www.bedbathandbeyond.com/product.asp?order_num=-1&sku=118730
The Quick Zip: http://www.cloudsandstars.com/
Also, I thought I would share a few sites offering DIY wall decor:
http://www.wallnutz.com/
http://www.whatisblik.com/
http://www.wall-pops.com/
As for cloth diapers, there are a couple of sites online that offer test packs, so you can sample a variety of brands at one time before making a large investment of one kind. In general, I’ve heard great things about Bum Genius and Fuzzi Bunz. Isn’t it great that there are so many cloth diapering options nowadays? Good luck!
Rachel says
I am loving the green!
Marilyn says
Went to Home Goods, 2 hours away, and found the same mirror already painted the same color of green but with distressing on it. Love it!
adanielo says
I’ve read your blog off and on for some time, but haven’t been moved to comment until now. The thing I love about this blog is that many of the ideas are inspiring even to those who don’t necessarily share your exact decorating style. My own taste runs a bit quirkier than yours, but even so, I often find things I love here. This mirror is a perfect example: simple and brilliant, yet really different. I’m now thinking of doing something similar for my own baby girl’s room. I’ve done lots of research on nursery decor/blogs and this room really stands out, both for all the DIYs and the lovely colors. What a lucky little girl! Thanks for sharing.
Jeannette says
Just bought a mirror from home goods with the intent on painting it just like you guys did. I was just about to dive in and thought: WAIT! do i have to sand this puppy? Let me check YHL to be sure! Thanks so much for posting all your DIY projects with step-by-step instructions. Off to go sand my mirror now! :)
Dawn says
What about using a spray paint? Just curious, and it seems with all the angles it may be easier. I am thinking of spray painting a mirror frame with a silver color any special tips? Thanks for your blog it is a life saver for my husband and I as new home owners =)
YoungHouseLove says
Oh yeah- just like we mentioned in the post, spray paint would work wonderfully (we just wanted to avoid VOCs since the mirror will hang in our nursery). Just sand things a bit (or use a spray primer like Kilz) and then apply a few thin and even coats of spray paint in the color of your choice. Should work like a charm. Hope it helps!
xo,
s
Marcie says
Hi Sherry,
I was just wondering where you guys ended up getting your mattress pad cover, and changing pad. I’m having trouble finding reasonable organic options in these categories :) Thanks!!! The nursery looks wonderful!
-Marcie
YoungHouseLove says
Hey Marcie,
Buy Buy Baby has been the best! It’s the main place we registered since it’s a lot more eco friendly than most chains (like Babies R Us) and they even accept those 20% coupons from Bed Bath & Beyond (they’re owned by the same company) so that’s always nice. Here’s a link to the organic changing pad (which admittedly is still a bit steep- but great if you can register for it and some people can go in on it together) and here’s our organic waterproof mattress cover. Oh and we ordered a few organic fitted sheets and changing pad covers from diapers.com since we wanted something bright and fun (which is surprisingly hard to find while sticking to organic options). And the prices are awesome. Hope it helps!
xo,
s
Marcie says
Thank you so much for the info!!
I really appreciate it :)
-Marcie
Angie says
Hey Sherry,
Do you have any ideas on creating my own ‘pop-art? I have a picture of our cat, that I thought it would be fun to put in my daughter’s room.
Angie
YoungHouseLove says
Hey Angie,
Check out our How To page (see that tab under our blog header?) and scroll down to the Artsy Ideas category for lots of DIY ideas. There’s a pop art pear painting that we whipped up that comes to mind. Hope it helps!
xo,
s
Passionate Blogger says
We also have an ugly mirror at home which we loath to part with as it was given by someone dear to us. Repainting it is definitely in our plan, but the shape (almost like a face) really hurts our head – we can’t think how to make it look better! Any ideas?
YoungHouseLove says
We would start with paint. You’d be surprised how it might make the shape a lot easier to love. Of course you can also try to change the shape with plaster or even paper mâché so that’s another thought. Good luck!
xo,
s
MelissaG says
I bought what I think was an almost identical mirror at Marshalls last week. I gave it one coat (okay, one coat and a touch up coat so far) it doesn’t look that good! Kind of lumpy or bumpy. I’m so disapointed. Wish I would have sprayed it! Any ideas on how to fix it? My idea was to hang it high enough (I have an odd, high place in my house) so that nobody would notice…I’m lazy like that.
YoungHouseLove says
Just wait for it to dry fully and sand it down with low grit sandpaper (60 grit) followed by higher grit stuff (150+) to get all the bumps out. Then you can repaint it (spraying it if you’d like).
xo,
s
Crystal says
I love your nursery blog and love this mirror idea! I found a very similar mirror at Target but it was in metal not wood. How do you suggest I paint it for my nursery? I originally was thinking spray paint and then actually read your blog and agreed about the fumes. Any suggestions would be appreciated!
YoungHouseLove says
We’d try Behr’s Primer Plus Paint since it’s Low-VOC (which is a lot better than spray paint). It’s not no-VOC though, so you want to let it fully dry and air out outside (or in a garage or sunroom or porch or attic) before hanging it in the nursery. Good luck!
xo,
s
Eleni says
I stumbled upon your blog while trying to figure out how to stain older dressers and all I can say it WOW! You have inspired me to do so many projects myself in my new house! Thank you! Its so well written and detailed that a DIY novice such as myself can tackle most of these projects! Keep up the great work! PS You deserve your own show!
Julie says
I’m new to your site so sorry this is on an old post – looking for mirror painting help. I have had trouble painting mirrors where the mirror’s old color is still visible reflected from the back of the frame. I think this happens when going light to dark, etc. Can you see the old color from the back of the frame reflected in the mirror? I don’t think, aside from removing the mirror and totally painting the frame, that this can be avoided. Any tips you have would be great! Thanks so much. Loving the site!
YoungHouseLove says
My tip for that would be to stuff your brush into the crack and get all that new paint color in the crease. Then just use a razor to get the excess paint off the mirror (taping off the mirror can leave that reflection stripe issue that you mention). Hope it helps!
xo,
s