Well, we recently took on the biggest nursery project to date and we lived to tell the tale. This post is a bit of a two-fer, since it not only details how to stain any wooden or veneered piece of furniture but also touches on how to paint anything that’s wood or veneer since we did a two-toned treatment on a dresser that we hunted down on the cheap.
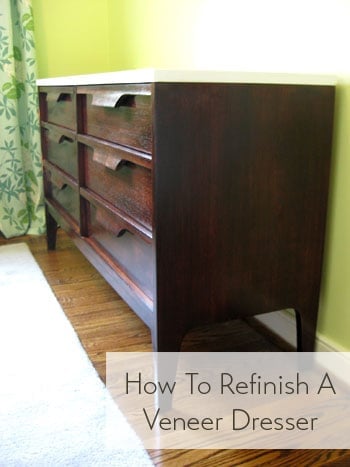
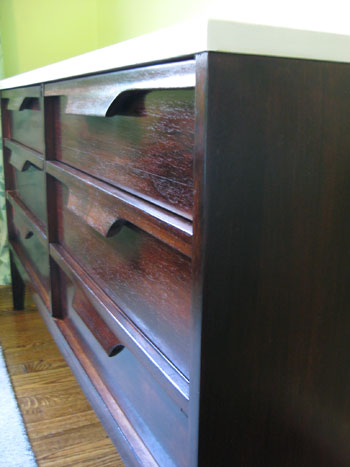
That’s right, we stained our “new” six drawer dresser with a deep rich brown tone and painted the top a crisp and glossy white color. Here’s how it all went down.
First we had to search for something to add tons of storage space to our tiny-closeted nursery, so we measured the wall that we knew we would be dedicating to a nice double dresser and hopped on Craigslist chanting “less than sixty inches” and crossing our fingers. Our hope was to find something that was up on little legs (so it felt airier and less heavy than a legless version) and we also needed it to be deep enough to accommodate a 17″ wide changing pad since part of the dresser top will also be used as a diapering zone. We had a budget of $150 or less in mind, so we hoped to find something that was a few decades old and solidly made (as opposed to something more flimsy from Ikea circa 2005). We also wanted a piece with nice clean lines to work with our crib which is a bit on the modern side, so a super curvy dresser might feel a little out of place. A few days of stalking Craigslist turned up this listing:
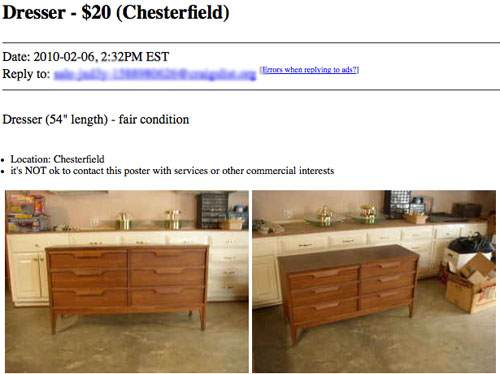
The little legs along with the 54″ length was perfect, plus the clean-lined look of the dresser would work amazingly well with our crib. And did you see that price? Twenty bucks?! Yes please. I said a little prayer to the Craigslist gods and shot off an email right away. Less than three hours later we heard from the dresser’s owner and he said we were first in line if we still wanted it. We just had two more questions: what was the depth of the piece (just to be sure it wasn’t too narrow to accommodate our 17″ changing table pad) and was the dresser made of solid wood (since that’s a lot easier to refinish than something covered in laminate or thin flaking veneer).
The good news was that it was just deep enough for our changing pad. The bad news is that it was veneered (although still extremely solidly made with dovetailed joints, etc). Oh well, it was $20- what did we expect? The verdict: we said we’d love to take a look at it and again found ourselves crossing our fingers (this time in hopes that that the veneer was nice and thick so it could take some sanding and staining). See, the plan had always been to stain the dresser and paint the top a glossy white ever since we got our two toned crib and loved the look. But unlike solid wood, if veneer is too thin it’s pretty hard to sand and restain without going right through it and hitting the plywood underneath during the sanding step.
Luckily when we got there to check out our new Craigslist crush the dresser had amazingly thick veneering (about 1/4th of an inch) which made it easy to determine that we could totally sand it down and restain it without any trouble. Note: to check how thick your veneer is just open a drawer or look at the back of the piece where you’ll hopefully be able to see if it’s paper thin (aka: not-sandable) or thicker than a dime or so (aka: sandable).
Now certain that our dresser hunt was over and this was “IT”, we handed over twenty beans to our nice Craigslist friend and took home our “new” double dresser (thanks to John’s sister’s borrowed SUV- love you Emily!). Then it was time to refinish her. Here she is hanging out on the patio atop a nice big piece of cardboard to catch any stain, paint or primer drips during the muti-phase project:
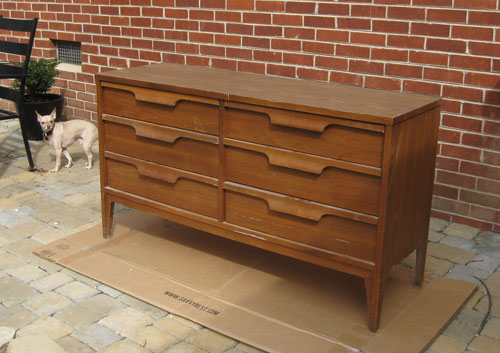
You can see that the veneer is scraped and stained in a few areas and of course the finish isn’t deep and rich like the rest of the wood tones in our house (including the drawer on our new crib in the nursery). Hence the refinishing idea. Oh and it bears mentioning that this little staining & painting tutorial will work for any solid wood items as well as anything that’s veneered as long as the veneering isn’t paper thin. Note: this method is not recommended for any laminate furnishings because that material cannot be successfully stained since it’s not a true layer of wood.
The first thing we did was wipe everything down with a moist rag (both inside the drawers and out) just to remove any spiderwebs, old pen caps & pennies in the drawers, etc. Of course everything was about to get coated in sanding dust again momentarily, but it was a nice “reset” for the dresser and we were able to take things like random paperclips out of the drawers so they didn’t fly around when we got to our big sanding step. Oh and while we wiped things down we came across this label inside the top right drawer:
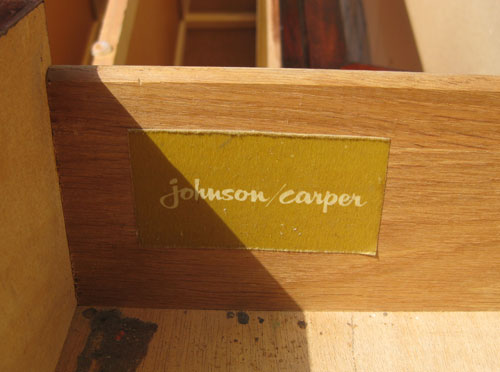
It turns out our twenty beans had scored us an original 50’s or 60’s mid-century dresser. Cool right? We thought so. And that explained why it was so well made and had such nice thick veneering (they just don’t make ’em like they used to). Anyway, the next step was to break out our trusty sander and some extra sandpaper to get to all those crevices that it couldn’t reach by hand. We used 80 grit sandpaper to rough everything up and followed that with another soft sanding with 200 grit paper just to smooth things out. Oh and be sure to always sand WITH the grain of the wood for a nice natural look (nothing screams bad refinishing job like round sander circles that soak up stain and look even more obvious when you’re done).
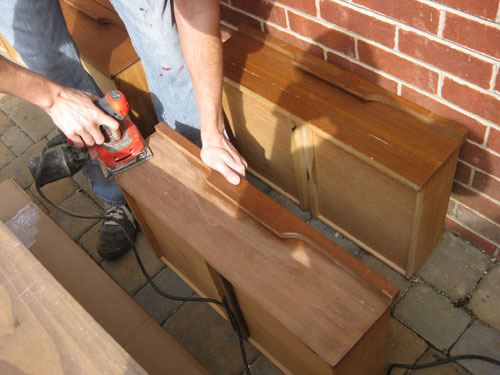
Here’s a shot of our set-up. John got to work sanding the top, sides and front of the dresser along with the flat fronts of the drawers while I was in charge of getting into all the smaller crevices and built-in bentwood drawer pulls where the bulky electric sander couldn’t reach. We also set up a staining station for me to work on drawers on another piece of cardboard nearby (don’t worry, Mrs. Prego wore a mask to avoid inhaling anything nasty).
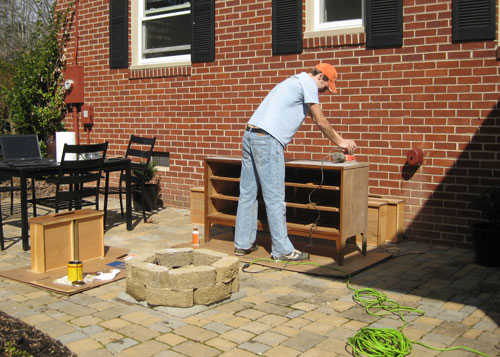
Once things were sanded down with both 80 grit and 200 grit sandpaper (with the grain of the wood) it was time to wipe everything down with a moist rag once again, this time to remove all that sanding dust. Then when things were thoroughly dry (you don’t want to stain a moist recently-wiped down drawer) it was staining time. We picked up a cheap-o synthetic 2″ angled brush (knowing that stain would likely ruin it) along with a pack of rags (which we used to wipe the stain off once we applied it) and a quart of Minwax Wood Finish stain in “Red Mahogany.” Note: we picked our stain color by taking a pretty true-looking photo of the crib drawer with our digital camera and bringing our camera with us to use as a reference while standing there in the stain aisle.
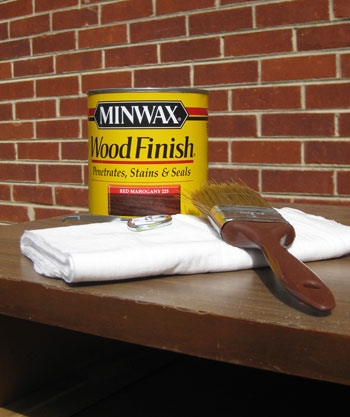
This kind of stain necessitates a coat of poly on top of it to seal everything and add a nice glossy finish but we intentionally opted for it because we knew we could use our eco-friendly Safecoat poly (which is lo-VOC, no-odor and 100% non-toxic… more on that later). We could have chosen to buying a stain with a poly sealer built right in, which is unquestionably the easier approach since it doesn’t call for the extra polying step at the end, but it’s also undeniably more fume-y and chemical-y, especially for something that will live in a nursery.
But it’s definitely worth noting that if you’re looking to take on a staining project and don’t mind the smellier chemicals in the poly-plus-stain-in-one option, just visit your local home improvement store to check out those “shortcut” products (also made by Minwax, although their color palette is a lot more limiting than the ones without poly worked in). We also tend to prefer liquid stain (like the one we chose above) over gel stain because we have more experience working with it, but we’ve heard that gel stain can also be amazing- especially for items that can’t be thoroughly sanded or those on a vertical plane (like wood trim) since the liquid stain can be too runny and messy. So definitely talk to the pros at your local home improvement store or do some preliminary google stain research to pick the right one for the job before you start.
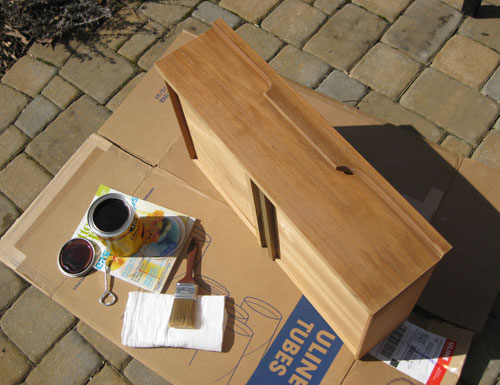
But back to the matter at hand: staining our dresser. After everything was wiped down and dried completely I just used my 2″ brush to apply one thin and even coat of stain WITH the grain of the wood on each surface that I wanted to stain (the fronts of the drawers and the sides and front of the dresser). It went on incredibly smoothly since stain is very watery and the sanded veneer happily soaked it right up. Note: if your wood or veneer isn’t soaking up the stain you probably haven’t sanded it thoroughly enough, so go back and be sure to really sand through the existing poly so the wood underneath can absorb the stain.
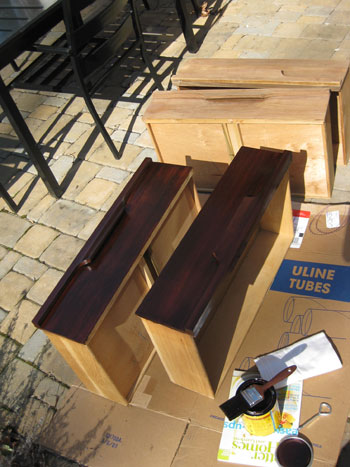
Next we let the thin and even coat of stain sit on every surface that we applied it to for twenty full minutes. We wanted to achieve the richest and deepest absorption possible (which we reasoned would hide the most flaws and leave us with a nice saturated dark tone).
Then after those full twenty minutes we used a clean dry rag to gently rub- again in the direction of the wood- every plane of the dresser that we stained to remove the excess stain. Since we waited so long for ours to soak in we didn’t pull very much stain off at all (our rag was still dark brown but we didn’t see much of a change in tone on the dresser, for which we were extremely grateful). It’s important to remember that you should be gently running the rag along the surface to catch any excess stain but you shouldn’t be applying a lot of pressure (which will result in a streaky and worn down look). Slow and light is the name of the game.
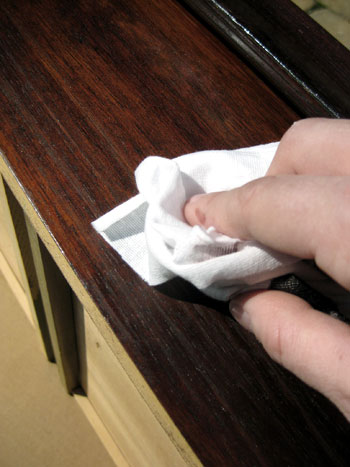
Presto. When you get to this step you have officially stained your item of furniture. In other words, at this point there was a victory dance in progress on our patio. Of course there’s always the option to apply another coat of stain following the same steps outline above (brush on stain, let penetrate for a set amount of minutes, wipe away excess with clean dry rag) if you’d like a deeper or more uniform look. So if you’re left with a piece that is a bit to light or a bit too streaky for your liking we suggest going for a second coat and letting it sit at least 20 to 25 minutes to really soak things up before gently wiping it down again.
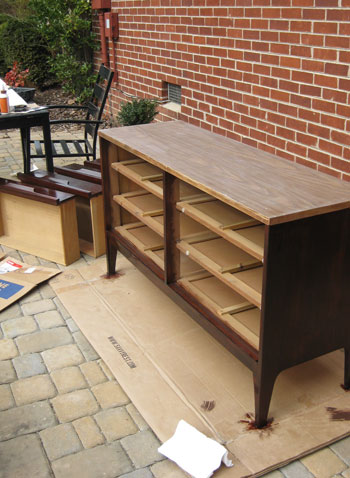
Now on to how we painted the top of the dresser (we’ll get back to polying the stained portion of the piece in a moment). We had already thoroughly sanded the top of the dresser before we began staining so the next step was to apply one thin and even coat of oil-based primer to the top of the dresser with a small foam roller (while being careful not to get any on the recently stained part of the piece). It’s always smart to work out a game plan so you’re not doing a second round of sanding as an afterthought which could result in your stain getting coated with sawdust. And when it came to priming, I was able to use my foam roller to carefully apply primer without getting any on the stained area, but if you don’t have a steady hand you can hold up a rigid piece of cardboard under the lip of the top of the piece to keep primer from getting where you don’t want it.
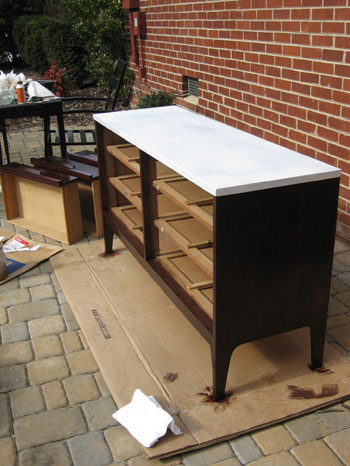
One thin and even coat of oil-based primer should do the trick. The coverage won’t look flawless but it’s there to provide tooth and some nice grip so it’s doing its job as long as everything is coated- even if it looks patchy and thin in some areas while other spots are thicker and less transparent. The reason we suggest oil-based primer over water-based formulas (or primer-&-paint-in-one products) is solely based on personal experience. We’ve attempted to paint furniture with water-based primer and have dealt with bubbling, tackiness, and terrible staining and bleed-through but have never had those problems with the oil-based stuff.
Of course the oil-based formulas are stinky and harder to clean up but it’s worth it to us to do the job right the first time instead of having to do everything over again when something bubbles or bleeds through your water-based coat of primer (which you often don’t see until after your last coat of paint dries- talk about annoying!). And obviously taking precautions like applying the primer in a well ventilated area (we prefer being outside) and even wearing a mask while you work is always recommended. Really, it’s nasty stuff so you want to get ‘er done but be as safe as possible while you’re at it.
The next step was applying three thin and even coats of semi-gloss latex paint with a second small foam roller (remember you can use latex paint over oil-based primer without issue, you just can’t use latex paint over oil-based PAINT since it’ll bubble and separate). We were sure to apply the paint extremely thinly and evenly and not to roll too quickly (which can rile up the paint and cause air bubbles). The white paint that we used is Freshaire’s off-the-rack white semi-gloss paint from Home Depot which is also what we use for all of the trim in our house and many other furniture projects. We love that it’s no-VOC and extremely comparable when it comes to the quality and coverage of other less-eco brands.
Then we just let everything dry for 48 hours (we brought the dresser into the sunroom in case of rain, but kept all the screen doors open for some nice ventilation so the stain and paint were both sure to cure up nice and solidly).
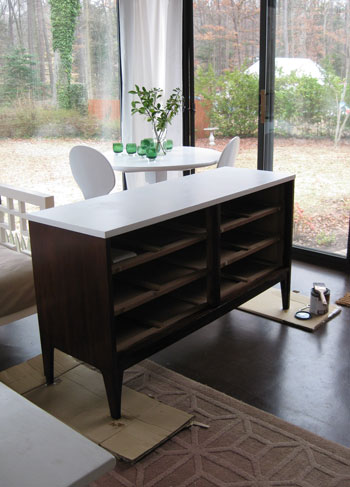
After two full days it was time to coat everything (both the painted top of the dresser and the stained base of the piece) with a nice protective, glossy and totally wipe-able top coat of Safecoat Acrylacq. Of course you can use a cheap and easy to find quart of basic water based polyurethane instead (sold in the same aisle as the Minwax stain) but if you’re not familiar with Safecoat it’s definitely worth checking out. We actually first used it here when we made a bathroom vanity from a night table, and we had most of the quart leftover so we happily used it to seal all that stain and primer/paint for a non-toxic, odor free finished product. Note: we found it at a local green boutique called Ecologic but you might want to google around or even check out greendepot.com to see if you can hunt any down for yourself.
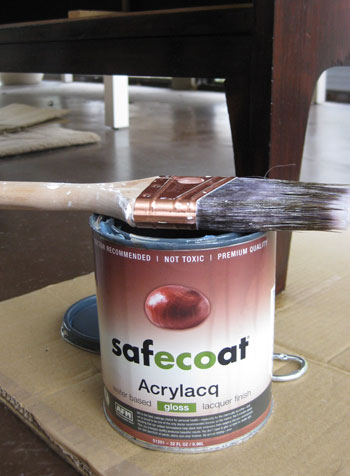
We just applied two thin and even coats of the stuff with a brush (giving it ample drying time in between coats- about five hours or so- to avoid any tackiness or drag marks). You should not get brush strokes if you apply this (or any other water-based poly) very thinly- about as thin as an eggshell or a piece of paper. And you definitely want to brush it on WITH the grain of the wood and gently brush out any bubbles that you see (bubbles can dry and remain forever). The only way you’ll end up with a marred finish or unsightly brush stokes would be if you apply it too thickly or don’t allow an area to thoroughly dry before touching it up again. So gently brush out bubbles as you go and apply very thin even coats, then wait to do a second coat and resist the urge to go over areas that you already did a minute or two before to “clean them up” (because you’ll do more harm than good).
Here are our glorious and glossy drawers drying:
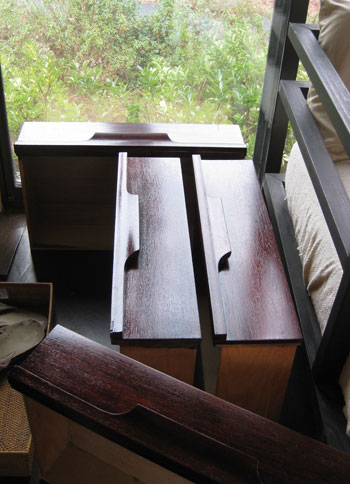
We gave everything three full days to completely cure in our well-ventilated sunroom so by the time we brought the dresser into our nursery over 72 hours later everything was nice and solid so we didn’t have to worry about getting rings on the tabletop if we placed an object on it. Plus everything was 100% odor free and non-toxic thanks to those last coats of Safecoat, so it was nice to walk into the nursery and visit the dresser without smelling it from a mile away. You know how we like to visit our recent projects (we hung out in our recently renovated bathroom for weeks after we finished that big makeover).
So here’s our “after” of a dresser living it up in the nursery:
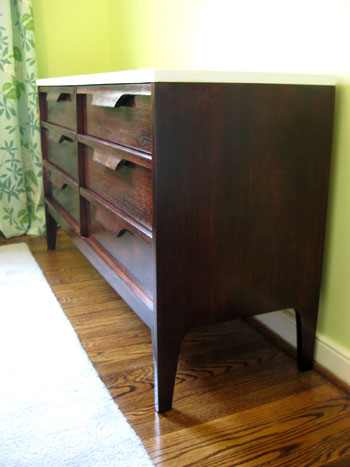
Isn’t the two-tone finish fun? We think it ties in perfectly with our crib, and it sort of has a kitchen island effect (it’s reminiscent of rich dark cabinets with a glossy white countertop). Plus we love that the entire piece is super protected and wipe-able thanks to the Safecoat, so whether the beanette decides to have a digestive explosion while we change her or throw a wood block at the dresser in a fit of rage, we’re pretty sure it’s up for the challenge.
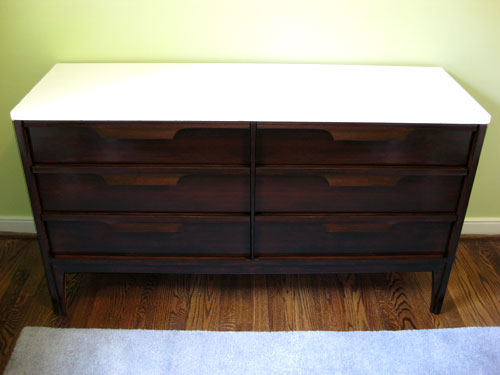
We also love the hardware-free handles since they’re unusual and interesting- and the fact that we get six spacious drawers for storing everything from clothes and diapers to books and toys is really the icing on the cake.

Oh and we know you guys love a budget breakdown, so here you go:
- Dresser: $20 from Craigslist
- Sandpaper: already owned (80 grit and 200 grit)
- Electric Sander: already owned – it’s by Black & Decker from Home Depot for around $50)
- Stain: $7.02 (Minwax Wood Finish stain in “Red Mahogany” from Home Depot)
- Ten cloth rags: $2
- Cheap synthetic brush for stain: $2.49
- Two small foam rollers for primer/paint: already owned
- Oil-based primer: already owned
- Freshaire White Semi-Gloss paint: already owned
- Safecoat: already owned
- TOTAL: $31.51
Not bad right? We totally expected to come in around $175 because our original budget was $150 for a large super-solid double dresser from Craigslist and we knew we’d need some supplies. But our budgetary surplus just means that we have more money leftover for a few other fun nursery projects (we still have art, DIY shelving, a homemade mobile, closet organization and lots more on the agenda). Oh and we actually have a second dresser project to share a little later in the week (lets just say we had the time of our lives lining the drawers so we’ll be back with those details). Stay tuned…
And while we’re on the subject of staining and painting furniture, have you guys taken on any big makeovers of your own? We’d love to hear what you’ve been up to. And since we also owe this dresser makeover to Craigslist for supplying this beauty (we still can’t believe it’s an original 50’s or 60’s dresser) feel free to tell us all about any and all recent Craigslist finds that you guys have snagged. Fun, fun, fun.
Psst: Wanna see our nursery progress from the very beginning? Here’s our painting post, our big shopping spree, our crib hunting rundown, our curtain-making tutorial, and our fun little chair search, our mirror-painting extravaganza, and our DIY faux sheepskin project.
Update: We finally created this Shop Our House page to help you hunt down any furniture/accessories that you see in our house, along with all of our paint colors.

claire says
it looks great, of course! and thanks for going over all of the details – you guys always explain everything in a simple way that makes me more likely to tackle a similar project
Holly W. says
We snagged a VERY similar dresser from Craigslist a few months ago (listed for $25 but the guy ended up giving it to us for free!) We went through the sanding process, but unfortunately, it had very thin veneer and we sanded through to the wood underneath in some places. We’ve been meaning to put a coat of nice, deep blue paint on it. Should we paint it with a semigloss paint and call it good, or add a coat of sealer on top? Would we need to prime the wood before painting?
YoungHouseLove says
We would definitely add a coat of oil-based primer to prep the dresser for the paint (and add tons of durability and long-lasting performance). And you’d probably be just fine going with semi-gloss paint and calling it good, but if you’d like the added glossy wipe-ability just add some poly on top (it’s more like a lacquered finish than a semi-gloss one). Hope it helps!
xo,
s
abby says
This is truly your best furniture/accessory transformation to date! What an incredible find and make-over! This belongs on Design Sponge’s weekly before and after for sure. Now I’m heading over to Craigslist…
Sandra says
I love it! Great work, you two (and a half)! :)
Amanda says
That is a WONDERFUL dresser- looks SO GREAT!
Dominique says
Refinishing furniture is a job, that’s for sure.
Two summers ago, I took on the monumental task of refinishing (stripping, re-staining, & clear-coating) several pieces of furniture that had seen better days: a mirror, two chairs (upholstered), small bench, desk, small table (that I later painted over! ack!) and two, count them, TWO dressers.
The turned legs and arms of the chairs were a pain, but those dressers first had to be stripped of black latex paint, and let me tell you, that was a chore like no other.
The furniture turned out great, and I learned a few things along the way, such as:
1.) Wearing a face mask while sanding really helps cut down the amount of sawdust you inhale. Wearing earplugs while you’re using the sander is not a bad idea, either.
2.) Buy a stain that’s already as dark as you want your finished product to be! You can do up to three coats of stain, but not likely more, and getting a stain already as dark as what you want makes things much easier.
3.) Poly made sound like a lot of work since you have to sand between coats, but do it anyway. I used lacquer because it sets up well, looks beautiful, is simpler to apply, and easier to fix if the finish gets damaged. But I had bad luck with my lacquer pulling up the oil-based stain in areas that I went over too much. Later, I found sources online that said using lacquer over oil-based stain was not recommended for this reason.
By the way, I wondered if the reason you didn’t choose to use mineral spirits to clean your furniture after sanding, & before staining is because of the fumes?
YoungHouseLove says
Yup, we have found that a moist rag tends to do the trick (especially if you’ll be sanding everything down anyway) and we wanted to avoid anything stinky if we could. Hope it helps!
xo,
s
Joy says
Looks FANTASTIC!
HopelessChest says
WOW!!
That looks totally amazing.
Coincidentally, I found a smaller similar one today for $20 on kijiji.ca. I hope I can grab it up.
Heather says
Your dresser and nursery look amazing! I am sure you guys are getting so ready to meet your little one :)
Laura says
LOVE IT! What a beautiful dresser! Great work, guys!
Lisa @ lists in my pocket says
You guys outdid yourselves again – the dresser looks awesome! What a difference!
Supriya says
what a gorgeous make over for 30$. Love the steps you took. I have a question, which brand of oil based primer did you use?
Was it one of those Zinsser primers?
YoungHouseLove says
Here’s the link to the oil-based primer that we’ve been using for years: http://www.homedepot.com/h_d1/N-5yc1vZ1xkw/R-100371321/h_d2/ProductDisplay?langId=-1&storeId=10051&catalogId=10053
As you can see it’s not just listed as a primer but it’s also a stainblocker (which really seems to make all the difference). Hope it helps!
xo,
s
Amber says
I love the look of this dresser! I’ve seen other two tone dessers that have the top and the sides painted white. Or, they will be opposite and have the drawers white and the entire outside stained. I keep trying to convince my husband to like this look so I can do it to a dresser in our house.
How did you decide what you wanted to paint and what parts you wanted to stain?
YoungHouseLove says
Hey Amber,
We originally thought about staining the top and painting the bottom of the dresser but we reasoned that when you walk into the room you’ll see the top of the dresser first (which may have looked heavier and darker if it was stained). That’s why we opted for the white paint on top (for an airy lighter look from the moment you enter the room). Plus since our crib is mostly white with a wood drawer on the bottom it feels nice and balanced to have a mostly stained dresser with some white on the top. Hope it helps!
xo,
s
Erin @ Cultivating Home says
The end result looks very professional! Although I find it hard to do myself, your patience in the drying process really paid off. I also admire all the counter space for your changing table; it will come in handy later. Great job!
kelly says
Absolutely gorgeous!! Good job :)
Natalie says
What an amazing find. It looks gorgeous!
Jane @ The Borrowed Abode says
Oh my gosh, a beautiful mid-century dresser scored for $20 used? That’s insane! Trying not to be jealous. :) Great job guys!
Sunny's Life in Rehab says
Awesome job as always, guys! I really love the contrast in the colors. You’ve given me some excellent inspiration for redoing some free-cycled pieces to replace charred furniture we lost. And your instructions, as always, were just super crystal clear. No wonder I never go a day without a Petrsik Fix.
stephanie says
very nice!
what i’d really like to know is, how on earth did you guys manage to find such a warm and sunny day to do this outside? I live in CT and have been waiting impatiently for a day warm enough to bust out my compresser and work on all that furniture currently crowing our garage!
YoungHouseLove says
Hey Stephanie,
We actually completed the sanding/staining/priming/painting portion of the redo outside two weekends ago on a particularly warm Sunday afternoon (it happened to be in the 60’s that day, especially when the sun was shining). I’m definitely no good at being cold so we’re thankful for the brief warm spell (this weekend was much colder so we’re lucky that we tackled it last weekend instead).
xo,
s
Sarah says
I am loving the two-toned finish!!
Did you do anything to the sides of the dresser drawers? You can’t see them when everything is closed up, but did you sand them or just wipe them down?
You guys are making such great progress. This budget breakdown is incredible.
Sarah
YoungHouseLove says
Hey Sarah,
You can check out the sides of the drawers in the picture of them stained on the patio and drying in the sunroom (after we applied the SafeCoat). We basically stained the edges (on all sides) of the drawer fronts, but when it came to the actual wooden sides of the drawers we didn’t opt to stain those since they weren’t veneered so we knew they’d absorb the stain differently. They weren’t stained originally, just left raw (many interior drawer sides are left unfinished so we didn’t mind at all). Hope it helps!
xo,
s
Bungahigh says
Wow, that dresser looks great! I love the detail on the incorporated drawer pulls. And great advice on letting the stain sit for 20 minutes, then wiping away any excess. Definitely would help to prevent drips before applying a second coat. Bang up job!
Erin says
wow, wow, wow!! 100% gorgeous!
Marie Elena says
We’re inheriting two old scratch and dent dressers tomorrow from my boss. He says they’re in pretty good condition, but I’m guessing we’ll have to do some sanding and staining like you did. This post made me excited to take the project on!
Erin C. says
Check you guys out! I’m always impressed by your cheap finds and amazing makeovers. Love it!
Rachel says
This really did turn out beautiful! Thanks so much for the detailed tutorial. I’m totally doing this with a pair of dressers I bought for my new house.
L.Duncan says
Hi Five guys! You rock, and you know that!!!
HAve a great day!
CasaCullen says
you guys, this is soooo amazing! not to reiterate what everyone else is saying but a HUGE bravo from me! a $30 dresser for that sweet bean that looks like it’s from some swanky design store…kudos, high fives and smiles! GREAT JOB!
http://www.casacullen.com/
SARA says
Fabulous!!!! I LOVE Craig and his list! ;)
Michelle B. says
Great tutorial! I have been planning on writing one for my blog recently since a lot of people are refinishing old furniture now.
I thought I’d share a couple of tips with you and your readers that I’ve found in my hours spent in the garage with stain, sandpaper and poly. :) (Kitchen table, 4 chairs, 2 desks, and 2 plant stands…my neighbors thought I was refinishing furniture for a side job!!) I’m waiting for warmer weather to get out there and finish my last three pieces!
I prefer to use foam brushes for gel stain AND the poly. No problems with streaks or brush marks. I have used bristled brush for regular stain – and I like that kind of stain as well. Not too picky. :) I haven’t used SafeCoat – but if typical Minwax poly isn’t like a water consistency, it’s gone bad and needs to get tossed. Your final applications won’t be as nice (I learned the really hard way on that one).
I also haven’t had to use any elbow grease with gel stain. It was easy peasy…
And I noticed a previous reader mentioned sanding between poly coats. I use 0000 steel wool to give it a little rub down between poly coats and wipe it down once with a rag damp with mineral spirits and then follow that with a rag damp with water. I know you guys were avoiding fumes for the babe, though – so good thinking. I do not sand between coats of stain though – not necessary, in my opinion.
Thanks again for the tutorial!
Nicole B says
Beautiful! I have two midcentury dressers that I want to redo. Maybe this summer…. So inspiring!
Roeshel @ The DIY Show Off says
Great job! It looks gorgeous! Thanks for the helpful tips!
Christin says
Thanks SO much for this step by step tutorial! I have a veneer desk and a dresser that I’d like to either stain or paint some day and this is so incredibly helpful! I love what you did with that dresser. It’s so inspiring to use what I have. Great job! :)
Danielle@Newlyweds Paradise says
This looks like something you would buy at a high end decorating store! Great job! You two rock my socks!
Eryn Chandler says
As soon as I saw the craigslist add I thought, “ooo It’s mid-century!”
I recently wrote a post about our mid-century dressers in our master…take a look:
http://erynchandler.wordpress.com/2010/02/28/fancy-furniture/
vanessa says
This is just so inspiring! I have a huge bookcase that I want to refinish, but I am worried I will ruin it. I read somewhere that it’s hard to sand furniture surfaces evenly – would you say it takes a lot of skill, or should I (a beginner!)go for it?
YoungHouseLove says
Hey Vanessa,
It’s actually pretty simple to sand something evenly, just go slow and steady and follow the grain of the wood. Just as we did, it helps to do two rounds of light sanding (one with 80 grit and one with 200 grit) so you’re not doing one too-deep-and-uneven sanding job instead. Also if you’re using an electric sander remember to go back and forth slowly and evenly since you can more easily sand off more than you mean to (whereas hand sanding is harder but virtually impossible to “overdo”). Hope it helps!
xo,
s
Lorena says
WOW! I absolutely LOVE it ~ looks great:)
Kathy says
You guys never cease to completely inspire me. The dresser looks AMAZING. I can’t wait to see how you line the drawers… yay!
KK says
This is amazing. Absolutely amazing. Such a great Craigslist story! And I can not believe how much you paid for something this stinkin’ cool.
P.S. I want to buy it from you when you’re finished with it. ;)
Connie says
Wow, what cool parents you are! That dresser looks awesome. You have inspired me once again.
Melinda says
Wow. This is absolutely and amazing transformation! I’m usually just a lurker and don’t comment much but this was worth coming out of hiding for :) You guys did an amazing job!!
Erin says
The dresser looks great! Just a tip that I learned the hard way – make sure you put down a small blanket between the changing pad and the dresser. I learned that the hard way!
Also, is it necessary to put down cardboard if you’re just sanding something? Does the dust accumulate on the ground?
Thanks in advance, and great stuff!
YoungHouseLove says
Nope, no cardboard is necessary when you’re sanding since dust blows everywhere (and is hardly confined to the cardboard) but we didn’t want to get stain, primer, or paint on our pavers (hence the cardboard). Hope it helps!
xo,
s
Amber P says
Wow! That looks amazing! You two are very inspiring to me! What I want to know is, did you give the Craigslist person your blog so that they could see the refinished product? I think they would be amazed!
YoungHouseLove says
We’re actually thinking of emailing him the link. Should be fun for him to see what happened to his old $20 dresser, right? Hope he doesn’t want it back now!
xo,
s
Sarah says
I am blown away by what an amazing job you guys do on all your projects! You’re so thorough and diligent–I’m married to a contractor/carpenter and even I can’t usually get that level of craftsmanship on the projects we do!
amy says
long time reader—never a poster! but i had to say 2 things:
1. it’s gorgeous. love it.
2. because it’s not made for a baby/nursery, you may consider adding “stops” to the inside tracks of the dresser drawers. our dresser/changing table (urban by munire) has stops so that the drawers cannot be pulled out. believe me, our daughter isn’t even 2, but so many times i’ve been grateful for these! she pulls up on the dresser, or wants something in a drawer & yanks the drawer. luckily, ours cannot be pulled from the dresser. just something to consider adding so that the little one is not hurt by a drawer pulled onto her.
YoungHouseLove says
Thanks for the “stops” suggestion. We’ve actually never heard of them but will definitely check ’em out!
xo,
s
Christie says
I’m curious if you had to do anything to the insides of the drawers. Were they musty smelling?
patti says
i love LOVE this dresser! love the danish modern style. so cool – what a score!
we are in the midst (literally – tile back splash is being put in as i type) of a long term kitchen remodel. basically doing things as we can find the budget. next up…painting the cabinets – i’m shaking at the thought, but know that your helpful step by step instructions will come in handy and help put me at ease. excuse me while i go print them now!
question…what’s your thought on doing two colors for the cabinets (meaning over the counter one color – like white and under the counter a darker shade)? i’m still trying to figure out if i want to do that or not.
YoungHouseLove says
Patti- We love two toned cabinets. In fact we recommended them for one of our clients a while back. Check out her awesome results here: https://www.younghouselove.com/2008/10/kims-color-conundrum-solved/
Christie- We actually mentioned at the end of the post that we lined the drawers and we’ll be back with those details in a few days. Stay tuned…
xo,
s
Kristi @ Life at the Chateau Whitman says
Great job!
We love craigslist so much. Here’s my most recent score – 2 large jute rugs (the nice soft kind) for $50 total!
http://chateauwhitman.blogspot.com/2010/01/craigslist-score-jute-rugs.html
We have gotten many other good deals too, but another notable one is over $950 worth of Ikea desks for $120.
patti says
…addendum…i noticed (and had forgotten) that you did a two tone kitchen in one of the photos on the “how to paint cabinets” post. i’m wondering how that would look with our charcoal gray concrete counter tops?
YoungHouseLove says
It’ll look great. We love that it’s a sophisticated and layered effect for any space- especially with concrete countertops for extra texture. Hope it helps!
xo,
s
Peg says
This is a great post! Thank you for being so detailed in describing the sanding process. It was something I skipped over this weekend when I painted a bedside table and it didn’t come out so well. I have a question: what happens when you use water-based paint over oil-based primer? Is it a no-no? Thanks!
YoungHouseLove says
Hey Peg,
Nope, just like we mentioned in this post, water-based paint over oil-based PAINT is a no no. But oil-based primer is regularly used under water-based (aka latex) paint without a problem. Hope it helps!
xo,
s
VéroniQC says
Nice job you guys!!! And a perfect match for the crib! :) LOVE!