Well, we recently took on the biggest nursery project to date and we lived to tell the tale. This post is a bit of a two-fer, since it not only details how to stain any wooden or veneered piece of furniture but also touches on how to paint anything that’s wood or veneer since we did a two-toned treatment on a dresser that we hunted down on the cheap.
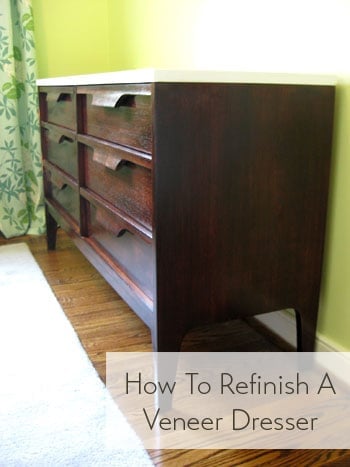
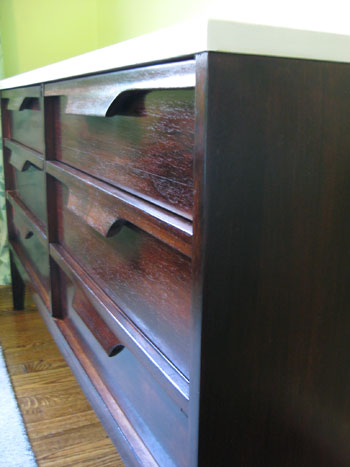
That’s right, we stained our “new” six drawer dresser with a deep rich brown tone and painted the top a crisp and glossy white color. Here’s how it all went down.
First we had to search for something to add tons of storage space to our tiny-closeted nursery, so we measured the wall that we knew we would be dedicating to a nice double dresser and hopped on Craigslist chanting “less than sixty inches” and crossing our fingers. Our hope was to find something that was up on little legs (so it felt airier and less heavy than a legless version) and we also needed it to be deep enough to accommodate a 17″ wide changing pad since part of the dresser top will also be used as a diapering zone. We had a budget of $150 or less in mind, so we hoped to find something that was a few decades old and solidly made (as opposed to something more flimsy from Ikea circa 2005). We also wanted a piece with nice clean lines to work with our crib which is a bit on the modern side, so a super curvy dresser might feel a little out of place. A few days of stalking Craigslist turned up this listing:
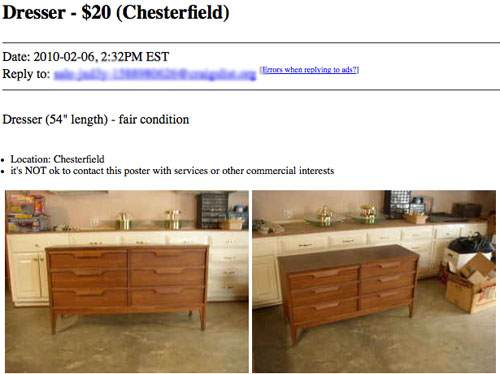
The little legs along with the 54″ length was perfect, plus the clean-lined look of the dresser would work amazingly well with our crib. And did you see that price? Twenty bucks?! Yes please. I said a little prayer to the Craigslist gods and shot off an email right away. Less than three hours later we heard from the dresser’s owner and he said we were first in line if we still wanted it. We just had two more questions: what was the depth of the piece (just to be sure it wasn’t too narrow to accommodate our 17″ changing table pad) and was the dresser made of solid wood (since that’s a lot easier to refinish than something covered in laminate or thin flaking veneer).
The good news was that it was just deep enough for our changing pad. The bad news is that it was veneered (although still extremely solidly made with dovetailed joints, etc). Oh well, it was $20- what did we expect? The verdict: we said we’d love to take a look at it and again found ourselves crossing our fingers (this time in hopes that that the veneer was nice and thick so it could take some sanding and staining). See, the plan had always been to stain the dresser and paint the top a glossy white ever since we got our two toned crib and loved the look. But unlike solid wood, if veneer is too thin it’s pretty hard to sand and restain without going right through it and hitting the plywood underneath during the sanding step.
Luckily when we got there to check out our new Craigslist crush the dresser had amazingly thick veneering (about 1/4th of an inch) which made it easy to determine that we could totally sand it down and restain it without any trouble. Note: to check how thick your veneer is just open a drawer or look at the back of the piece where you’ll hopefully be able to see if it’s paper thin (aka: not-sandable) or thicker than a dime or so (aka: sandable).
Now certain that our dresser hunt was over and this was “IT”, we handed over twenty beans to our nice Craigslist friend and took home our “new” double dresser (thanks to John’s sister’s borrowed SUV- love you Emily!). Then it was time to refinish her. Here she is hanging out on the patio atop a nice big piece of cardboard to catch any stain, paint or primer drips during the muti-phase project:
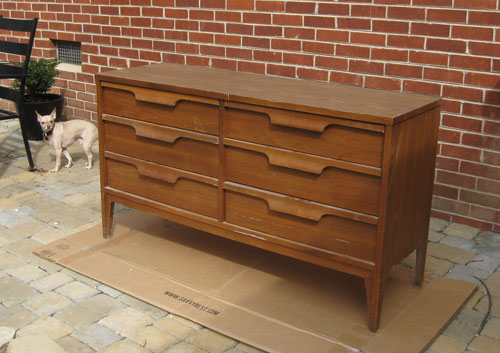
You can see that the veneer is scraped and stained in a few areas and of course the finish isn’t deep and rich like the rest of the wood tones in our house (including the drawer on our new crib in the nursery). Hence the refinishing idea. Oh and it bears mentioning that this little staining & painting tutorial will work for any solid wood items as well as anything that’s veneered as long as the veneering isn’t paper thin. Note: this method is not recommended for any laminate furnishings because that material cannot be successfully stained since it’s not a true layer of wood.
The first thing we did was wipe everything down with a moist rag (both inside the drawers and out) just to remove any spiderwebs, old pen caps & pennies in the drawers, etc. Of course everything was about to get coated in sanding dust again momentarily, but it was a nice “reset” for the dresser and we were able to take things like random paperclips out of the drawers so they didn’t fly around when we got to our big sanding step. Oh and while we wiped things down we came across this label inside the top right drawer:
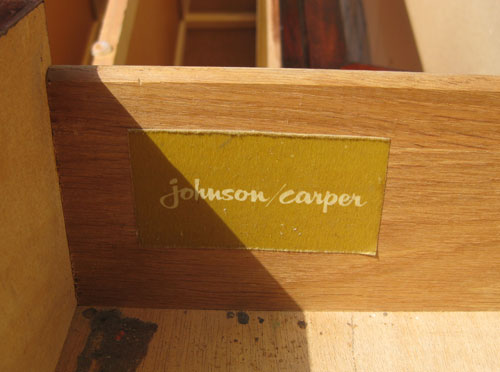
It turns out our twenty beans had scored us an original 50’s or 60’s mid-century dresser. Cool right? We thought so. And that explained why it was so well made and had such nice thick veneering (they just don’t make ’em like they used to). Anyway, the next step was to break out our trusty sander and some extra sandpaper to get to all those crevices that it couldn’t reach by hand. We used 80 grit sandpaper to rough everything up and followed that with another soft sanding with 200 grit paper just to smooth things out. Oh and be sure to always sand WITH the grain of the wood for a nice natural look (nothing screams bad refinishing job like round sander circles that soak up stain and look even more obvious when you’re done).
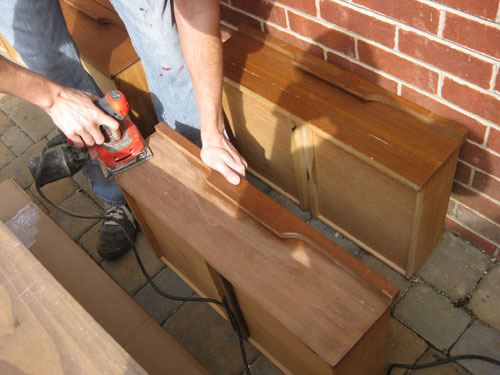
Here’s a shot of our set-up. John got to work sanding the top, sides and front of the dresser along with the flat fronts of the drawers while I was in charge of getting into all the smaller crevices and built-in bentwood drawer pulls where the bulky electric sander couldn’t reach. We also set up a staining station for me to work on drawers on another piece of cardboard nearby (don’t worry, Mrs. Prego wore a mask to avoid inhaling anything nasty).
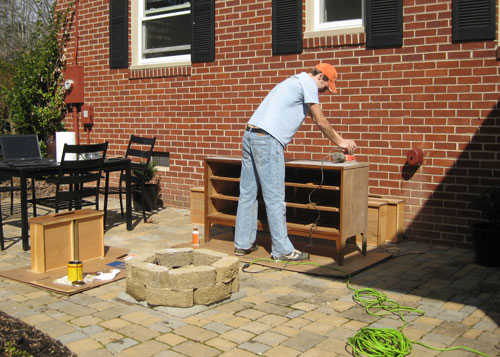
Once things were sanded down with both 80 grit and 200 grit sandpaper (with the grain of the wood) it was time to wipe everything down with a moist rag once again, this time to remove all that sanding dust. Then when things were thoroughly dry (you don’t want to stain a moist recently-wiped down drawer) it was staining time. We picked up a cheap-o synthetic 2″ angled brush (knowing that stain would likely ruin it) along with a pack of rags (which we used to wipe the stain off once we applied it) and a quart of Minwax Wood Finish stain in “Red Mahogany.” Note: we picked our stain color by taking a pretty true-looking photo of the crib drawer with our digital camera and bringing our camera with us to use as a reference while standing there in the stain aisle.
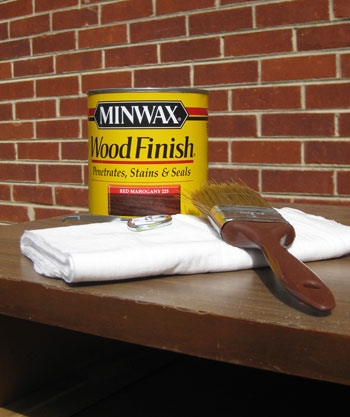
This kind of stain necessitates a coat of poly on top of it to seal everything and add a nice glossy finish but we intentionally opted for it because we knew we could use our eco-friendly Safecoat poly (which is lo-VOC, no-odor and 100% non-toxic… more on that later). We could have chosen to buying a stain with a poly sealer built right in, which is unquestionably the easier approach since it doesn’t call for the extra polying step at the end, but it’s also undeniably more fume-y and chemical-y, especially for something that will live in a nursery.
But it’s definitely worth noting that if you’re looking to take on a staining project and don’t mind the smellier chemicals in the poly-plus-stain-in-one option, just visit your local home improvement store to check out those “shortcut” products (also made by Minwax, although their color palette is a lot more limiting than the ones without poly worked in). We also tend to prefer liquid stain (like the one we chose above) over gel stain because we have more experience working with it, but we’ve heard that gel stain can also be amazing- especially for items that can’t be thoroughly sanded or those on a vertical plane (like wood trim) since the liquid stain can be too runny and messy. So definitely talk to the pros at your local home improvement store or do some preliminary google stain research to pick the right one for the job before you start.
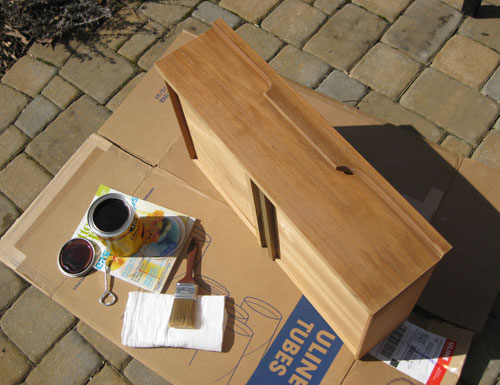
But back to the matter at hand: staining our dresser. After everything was wiped down and dried completely I just used my 2″ brush to apply one thin and even coat of stain WITH the grain of the wood on each surface that I wanted to stain (the fronts of the drawers and the sides and front of the dresser). It went on incredibly smoothly since stain is very watery and the sanded veneer happily soaked it right up. Note: if your wood or veneer isn’t soaking up the stain you probably haven’t sanded it thoroughly enough, so go back and be sure to really sand through the existing poly so the wood underneath can absorb the stain.
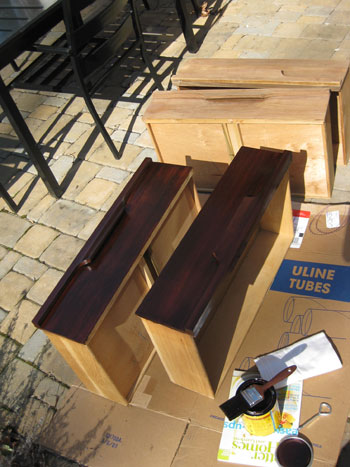
Next we let the thin and even coat of stain sit on every surface that we applied it to for twenty full minutes. We wanted to achieve the richest and deepest absorption possible (which we reasoned would hide the most flaws and leave us with a nice saturated dark tone).
Then after those full twenty minutes we used a clean dry rag to gently rub- again in the direction of the wood- every plane of the dresser that we stained to remove the excess stain. Since we waited so long for ours to soak in we didn’t pull very much stain off at all (our rag was still dark brown but we didn’t see much of a change in tone on the dresser, for which we were extremely grateful). It’s important to remember that you should be gently running the rag along the surface to catch any excess stain but you shouldn’t be applying a lot of pressure (which will result in a streaky and worn down look). Slow and light is the name of the game.
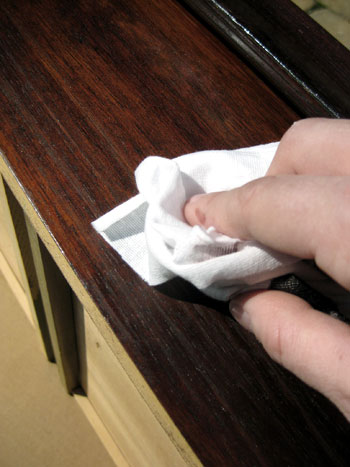
Presto. When you get to this step you have officially stained your item of furniture. In other words, at this point there was a victory dance in progress on our patio. Of course there’s always the option to apply another coat of stain following the same steps outline above (brush on stain, let penetrate for a set amount of minutes, wipe away excess with clean dry rag) if you’d like a deeper or more uniform look. So if you’re left with a piece that is a bit to light or a bit too streaky for your liking we suggest going for a second coat and letting it sit at least 20 to 25 minutes to really soak things up before gently wiping it down again.
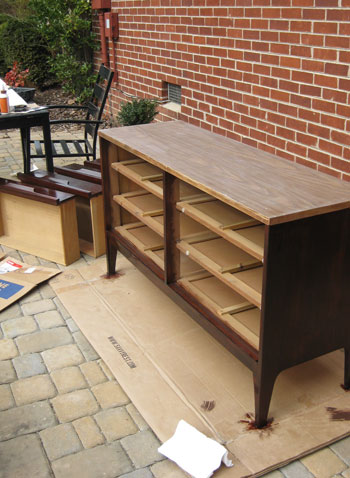
Now on to how we painted the top of the dresser (we’ll get back to polying the stained portion of the piece in a moment). We had already thoroughly sanded the top of the dresser before we began staining so the next step was to apply one thin and even coat of oil-based primer to the top of the dresser with a small foam roller (while being careful not to get any on the recently stained part of the piece). It’s always smart to work out a game plan so you’re not doing a second round of sanding as an afterthought which could result in your stain getting coated with sawdust. And when it came to priming, I was able to use my foam roller to carefully apply primer without getting any on the stained area, but if you don’t have a steady hand you can hold up a rigid piece of cardboard under the lip of the top of the piece to keep primer from getting where you don’t want it.
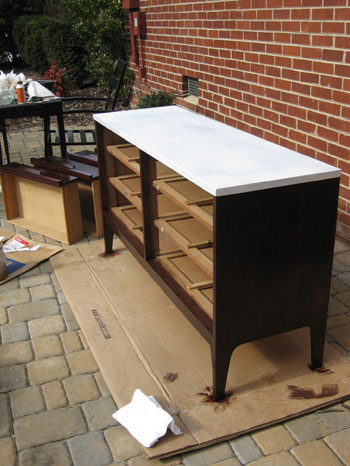
One thin and even coat of oil-based primer should do the trick. The coverage won’t look flawless but it’s there to provide tooth and some nice grip so it’s doing its job as long as everything is coated- even if it looks patchy and thin in some areas while other spots are thicker and less transparent. The reason we suggest oil-based primer over water-based formulas (or primer-&-paint-in-one products) is solely based on personal experience. We’ve attempted to paint furniture with water-based primer and have dealt with bubbling, tackiness, and terrible staining and bleed-through but have never had those problems with the oil-based stuff.
Of course the oil-based formulas are stinky and harder to clean up but it’s worth it to us to do the job right the first time instead of having to do everything over again when something bubbles or bleeds through your water-based coat of primer (which you often don’t see until after your last coat of paint dries- talk about annoying!). And obviously taking precautions like applying the primer in a well ventilated area (we prefer being outside) and even wearing a mask while you work is always recommended. Really, it’s nasty stuff so you want to get ‘er done but be as safe as possible while you’re at it.
The next step was applying three thin and even coats of semi-gloss latex paint with a second small foam roller (remember you can use latex paint over oil-based primer without issue, you just can’t use latex paint over oil-based PAINT since it’ll bubble and separate). We were sure to apply the paint extremely thinly and evenly and not to roll too quickly (which can rile up the paint and cause air bubbles). The white paint that we used is Freshaire’s off-the-rack white semi-gloss paint from Home Depot which is also what we use for all of the trim in our house and many other furniture projects. We love that it’s no-VOC and extremely comparable when it comes to the quality and coverage of other less-eco brands.
Then we just let everything dry for 48 hours (we brought the dresser into the sunroom in case of rain, but kept all the screen doors open for some nice ventilation so the stain and paint were both sure to cure up nice and solidly).
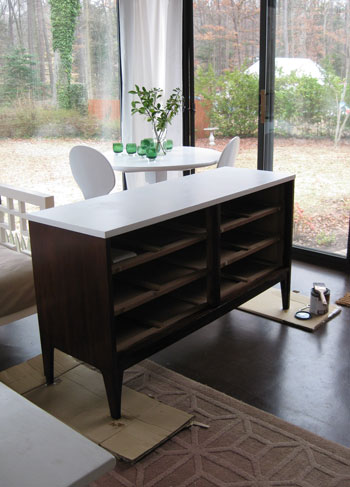
After two full days it was time to coat everything (both the painted top of the dresser and the stained base of the piece) with a nice protective, glossy and totally wipe-able top coat of Safecoat Acrylacq. Of course you can use a cheap and easy to find quart of basic water based polyurethane instead (sold in the same aisle as the Minwax stain) but if you’re not familiar with Safecoat it’s definitely worth checking out. We actually first used it here when we made a bathroom vanity from a night table, and we had most of the quart leftover so we happily used it to seal all that stain and primer/paint for a non-toxic, odor free finished product. Note: we found it at a local green boutique called Ecologic but you might want to google around or even check out greendepot.com to see if you can hunt any down for yourself.
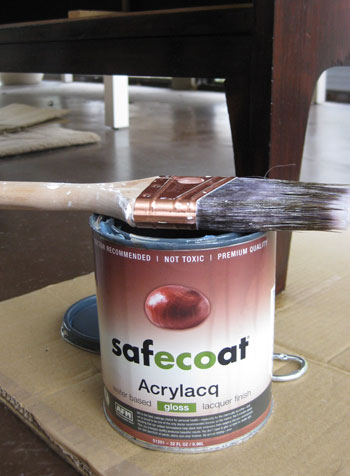
We just applied two thin and even coats of the stuff with a brush (giving it ample drying time in between coats- about five hours or so- to avoid any tackiness or drag marks). You should not get brush strokes if you apply this (or any other water-based poly) very thinly- about as thin as an eggshell or a piece of paper. And you definitely want to brush it on WITH the grain of the wood and gently brush out any bubbles that you see (bubbles can dry and remain forever). The only way you’ll end up with a marred finish or unsightly brush stokes would be if you apply it too thickly or don’t allow an area to thoroughly dry before touching it up again. So gently brush out bubbles as you go and apply very thin even coats, then wait to do a second coat and resist the urge to go over areas that you already did a minute or two before to “clean them up” (because you’ll do more harm than good).
Here are our glorious and glossy drawers drying:
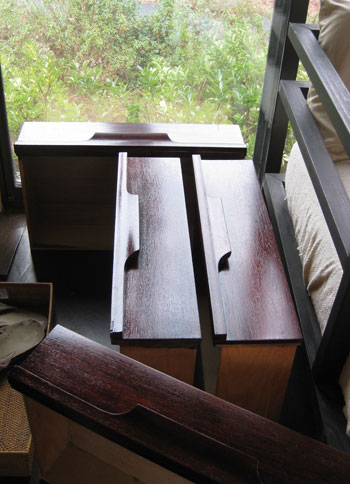
We gave everything three full days to completely cure in our well-ventilated sunroom so by the time we brought the dresser into our nursery over 72 hours later everything was nice and solid so we didn’t have to worry about getting rings on the tabletop if we placed an object on it. Plus everything was 100% odor free and non-toxic thanks to those last coats of Safecoat, so it was nice to walk into the nursery and visit the dresser without smelling it from a mile away. You know how we like to visit our recent projects (we hung out in our recently renovated bathroom for weeks after we finished that big makeover).
So here’s our “after” of a dresser living it up in the nursery:
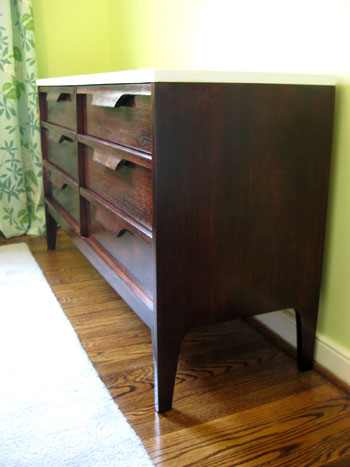
Isn’t the two-tone finish fun? We think it ties in perfectly with our crib, and it sort of has a kitchen island effect (it’s reminiscent of rich dark cabinets with a glossy white countertop). Plus we love that the entire piece is super protected and wipe-able thanks to the Safecoat, so whether the beanette decides to have a digestive explosion while we change her or throw a wood block at the dresser in a fit of rage, we’re pretty sure it’s up for the challenge.
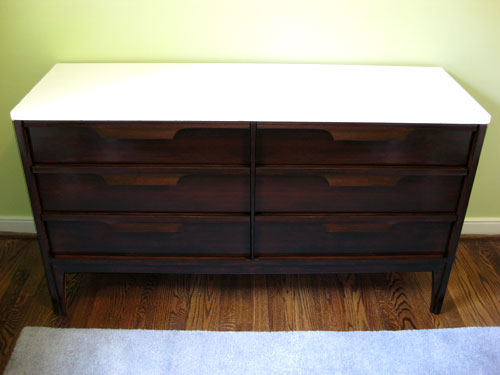
We also love the hardware-free handles since they’re unusual and interesting- and the fact that we get six spacious drawers for storing everything from clothes and diapers to books and toys is really the icing on the cake.

Oh and we know you guys love a budget breakdown, so here you go:
- Dresser: $20 from Craigslist
- Sandpaper: already owned (80 grit and 200 grit)
- Electric Sander: already owned – it’s by Black & Decker from Home Depot for around $50)
- Stain: $7.02 (Minwax Wood Finish stain in “Red Mahogany” from Home Depot)
- Ten cloth rags: $2
- Cheap synthetic brush for stain: $2.49
- Two small foam rollers for primer/paint: already owned
- Oil-based primer: already owned
- Freshaire White Semi-Gloss paint: already owned
- Safecoat: already owned
- TOTAL: $31.51
Not bad right? We totally expected to come in around $175 because our original budget was $150 for a large super-solid double dresser from Craigslist and we knew we’d need some supplies. But our budgetary surplus just means that we have more money leftover for a few other fun nursery projects (we still have art, DIY shelving, a homemade mobile, closet organization and lots more on the agenda). Oh and we actually have a second dresser project to share a little later in the week (lets just say we had the time of our lives lining the drawers so we’ll be back with those details). Stay tuned…
And while we’re on the subject of staining and painting furniture, have you guys taken on any big makeovers of your own? We’d love to hear what you’ve been up to. And since we also owe this dresser makeover to Craigslist for supplying this beauty (we still can’t believe it’s an original 50’s or 60’s dresser) feel free to tell us all about any and all recent Craigslist finds that you guys have snagged. Fun, fun, fun.
Psst: Wanna see our nursery progress from the very beginning? Here’s our painting post, our big shopping spree, our crib hunting rundown, our curtain-making tutorial, and our fun little chair search, our mirror-painting extravaganza, and our DIY faux sheepskin project.
Update: We finally created this Shop Our House page to help you hunt down any furniture/accessories that you see in our house, along with all of our paint colors.

Jen says
Wooow! It looks great! I love love love the dark stain! If you have a cheapo piece of furniture from Ikea that has an extremely shiny veener (?) on it, which I’m sure would be paper thin how would you recommend refinishing it? I’ve had the dresser for a number of years (bought it off of craig’s list for $20 bucks when I was in college) and it’s a very very light wood color. I have never been a big fan of the way it looked but it has pretty decent storage so I feel it wouldn’t be very green of me to just chuck it and buy a new dreser. I’d love to paint it black and change out the hardware. Would you recommend sanding and just priming and painting? I’ve never gotten the opportunity to refinish furniture but after reading your post I have a whole bunch of pieces I want to try working on this spring/summer!
YoungHouseLove says
You’re probably talking about a laminate piece of furniture if it’s from Ikea, which can’t be sanded or stained since it’s not actually made of wood (and doesn’t have any actual wood grain). You might want to talk to the experts in the paint department at your local home improvement center but we think your best bet for painting laminate would be oil-based primer followed by a few coats of latex paint (just like we did on the top of the dresser). Then you could seal it as an added layer of protection but it bears noting that laminate can’t “grab” paint and primer like solid wood or veneer (whether it’s sanded or not) so you may have a piece that looks great for a few years but it probably won’t be a decades-old look that lasts. It’s a great idea for tiding yourself over until you save up the money to upgrade though. Hope it helps!
xo,
s
Caitlin in MD says
First-time commenter here! I came across your blog a couple months ago, and at the perfect time. I am 4 months pregnant and also getting ready to design our nursery…on a budget, of course. I absolutely LOVE your style and have gone through a lot of old posts (in addition to your tabs at the top of the page!) and gotten a lot of inspiration. I am particularly inspired by the nursery posts, of course, and got some great ideas for cribs in particular. After reading this post I am very excited to – maybe? – attempt my own craigslist dresser makeover! Thanks so much for the great inspiration :)
HUMBER says
That was quite a challenge to refinish something that is not all wood. I’m just trying to convince myself right now that “I CAN DO IT too…” I have a wine cabinet that is destined to become a linen storage.
Your dresser looks beautiful. Great job!
Patti says
This is such a timely post for me, thanks so much! I have a very beat up coffee table that I’ve wanted to re-finish for years but kept putting it off because I just didn’t know where to start … now I do :-) The dresser, in true yhl style, is perfection.
Anne says
You guys did an awesome job. It looks amazing! And thanks for the tip…I had no idea you could sand and repaint veneer.
Off to scope out CL.
beks says
Thanks for the suggestion on the Safecoat. Can I get this at HomeDepot or Lowes or is it only available at specialty stores. I think is the final touch necessary! also, what is your go -to source for knobs/hardware!
YoungHouseLove says
Hey Beks,
You probably can’t find it at Home Depot or Lowe’s (as we mentioned we found ours at an eco boutique here in Richmond) so you might want to google around to find a local supplier or even order a quart on a specialty site like greendepot.com. Hope it helps!
xo,
s
Devon says
I love it! That is a steal for $20! We purchased a modern piece at an antique store for our daughter’s nursery. The quality is so much better than furniture made these days! You will love it and it will withstand everything!
Here is a link to my daughter’s dresser on my blog!
http://connaroefamily.blogspot.com/2009/08/meres-new-set-up.html
Ashley says
Hot!
tasha roe says
fab job!! looks amazing!!
kat says
wow what a score! that’s a gorgeous piece…
anyks says
I just wanted to say..”GOR-GEOUS”, you guys did such a great job. I love the two tone going on.
Lindsey says
Craigslist goldmine: Scoring a mid-century modern kitchen light for $10. It’s an amazing stainless steel piece that starts skinny at the top and ends in an about 30 inch diameter at the bottom. My dad wired it into an old switch and it looks amazing.
Current project: Refinishing and re-purposing a trunk that held all my brother’s Legos as a kid. I sanded, primed and painted it, and used a spray adhesive to line the interior with a boldly patterned fabric. I’ll soon trim out the fabric, put all the pieces back together and use it to store sheets. Best of all, my total cost for the project will end up at about $25, thanks to garage sale paint and a fabric sale!
Jo says
You should get some pretty organic drawer liners, they smell lovely and that way the Beanette’s things don’t touch the wood!
YoungHouseLove says
Hey Jo,
We actually DIYEd some drawer liners (which we mentioned at the very end of the post). We’ll be sharing more details on that subject later in the week. Stay tuned…
xo,
s
Jen says
Awesome Sherry, thanks for the tip! What would you suggest for furniture that is veneer over composite board (target dresser). Ideally, I would love to find a couple dressers made of real wood on craigslist to refinish but while stalking for the right pieces it appears laminate and veneer are my ingredients to work with. I do have a wood desk that I plan to refinish so I will at least be able to use your directions to refinish this!
YoungHouseLove says
Well if it’s veneer then just follow this very post. Our dresser was veneer so you can see what we did above. Hope it helps!
xo,
s
jbhat says
I love it. What a fantastic mid-century find. Another fantastic tutorial too.
I am wondering if you thought of staining the top, and painting the non-handle fronts of the dresser drawers white. It would have a different look, and would maybe even “go” with the crib even more that way?
(Who am I to second guess your guys’ approach?!)
jbhat
YoungHouseLove says
We did! In fact John was pretty gung ho about accenting those cool wooden drawer pulls with white paint while staining the rest of the dresser, but once I explained that I was scared that it would read as striped instead of more classic and light (we went with the white top since you see the top of the piece first upon entering the room so we thought something with dark wood on the top might look heavier) he agreed that they were sculptural enough even when we left them stained along with the rest of the base of the dresser. Hope it helps!
xo,
s
liz tsang says
oh boy, that dresser looks yummy! way to go, guys. thanks for the inspiration. as soon as we get through fixing some flooding damage in our place (grr…), i’m ready for a project like this :)
Jenny @ Words On Wendhurst says
The dresser looks great. Did you consider painting the fronts of the drawers (just the integrated handle part) white as well? If so, why did you decide against it?
YoungHouseLove says
Hey Jenny,
We did! In fact John was pretty gung ho about accenting those cool wooden drawer pulls with white paint, but once I explained that I was scared that it would read as striped instead of more classic and streamlined he agreed that they were sculptural enough even when we left them stained along with the rest of the base of the dresser. Hope it helps!
xo,
s
Jacquelin Hicks says
I’ve recently become a HUGE fan of Craigslist. One man’s junk is another man’s treasure! Your dresser is beautiful. I’m inspired to sand my husband’s old dressers that we keep hidden away. :)
Lauren Hufnagl says
Looks fantastic! I also wanted to say that I think these prints would look absolutely perfect in your nursery. I saw them on etsy and thought of you right away.
http://www.etsy.com/view_listing.php?listing_id=40858088
Kim at Yellow Brick Home says
The dresser looks great! What a steal.
I do have a question though: Has the Safecoat yellowed the white painted top? We’ve painted a few things white, and we’ve used a water based polyurethane (Minwax brand), and our whites have yellowed. It’s SO frustrating, since so much work goes into it.
Do you have any suggestions on what we could be doing wrong?
YoungHouseLove says
We actually only recommend one specific brand of Minwax water based poly for just that reason (many of them yellow your paint job, and even the one we recommend does if you put it on too heavy and don’t give it ample drying time between coats). The kind we have used with success is: Minwax Water-Based Polycrylic Protective Finish in “Clear Gloss.”
But Safecoat doesn’t even come close to yellowing so in our minds it’s far superior and a lot more error proof. So when it doubt we’d go that route if you can hunt some down. Hope it helps!
xo,
s
Stacy says
Wow, this is one of the most awesome furniture makeovers I’ve ever seen! Great job!
Laura says
Hey Sherry – my husband and I are tackling a wine storage unit this weekend. It is raw wood so we plan to do a quick sand and wipe followed by a stain and then poly sealer. Like you, I’m also pregnant, so I’m wondering about the mask you wore while staining. Is it the same heavy-duty gas mask you used in the basement project? I don’t want to breathe in a bunch of fumes during this project of ours.
Thanks!
YoungHouseLove says
Yup! Always go for the gas mask when you can since those little paper masks only block water-based fumes like regular wall paint (but are no match for oil-based products or stains). And being in a well ventilated area (outside? the garage? the porch? the patio? even a room with the windows open?) always helps!
xo,
s
Bridgit says
I love what you did with the dresser! I have an old dresser I need to refinish for our baby’s room and I would love to do something similar except my dresser currently has wooden knobs. Would you recommend painting them white or are there knobs you would recommend if you had to add them to that style dresser?
YoungHouseLove says
Ooh definitely check out places like Hobby Lobby, Anthropologie and even World Market for new knob ideas. You might want to paint the existing ones (or stain them to blend in) but you also might find something else that steals your heart (from glass knobs to pearly pulls, etc). Happy hunting!
xo,
s
Mindy says
LOVE THIS! You guys did such a great job love that darker stain!
Jill Stigs says
OK………..I know on FB I was chanting paint the dresser the asparagus color like the mirror, but after seeing this WOW! It looks fantabulous. I am confused it looks like it was placed where you put the crib. Did you have to move it?
YoungHouseLove says
Wow you’re observant! We did move the crib almost immediately because the chair and ottoman in the corner seemed to crowd the crib (and the room) while the slimmer profile of the dresser fit better on that wall. Stay tuned for more pics of the space to see where everything ends up…
xo,
s
Christine Schwalm says
What I’m really loving about the whole nursery project is that everything you’ve done will mature gracefully with the baby as she grows up. That same dresser will be perfect for her when she’s 5, 10, 15 etc. Same with the drapery and the color palatte. Nothing screams “baby” but it’s still appropriate for your needs.
Lisa says
This is fantastic – I gulped a little when you started refinishing a beautiful piece like this (although it definitely needed some TLC) but I knew you guys would do it up right. It looks fabulous and I LOVE the two-tone top. Good call on not doing the drawer pulls (no offence John!). Thanks for your fabulous blog!
natalie says
Great job. I love the rich color of the stain. Since you guys are so great at painting I wanted to know if you ever tackled your interior doors? I have unpainted hollow core doors and wanted to know if you have any ideas on how to tackle them (i.e. sanding prior to painting, etc.)?
Again, wonderful job!
YoungHouseLove says
Oh those are easy. Just prime (oil-based!) and paint them with semi-gloss paint (sealer isn’t necessary at all). And there’s no need to sand ’em unless they’re super rough or splintered. Hope it helps!
xo,
s
katherine says
Looks great! You guys continue to inspire. Now if only I’d do something with that inspiration…
carrie @ brick city love says
It looks GREAT you guys!! And I’m more than a little jealous of such an amazing MCM score {$20?! That’s crazy talk.}.
I just finished tackling our own craigslist redo. Wood headboard turned diamond tufted masterpiece. All part of our big master bedroom reveal. It’s the very first room DONE in our home, so a big deal for us. Followed you guys for so long now, I know we’ll get more done eventually.
Erin says
We found a great sectional on Craigslist for our small space. With a slipcover, it will rival a Pottery Barn sectional, but $150 is SO much better than 2 grand +! Great job with your dresser. It really looks like you spent a ton of money on it!
priscilla says
LOVE IT! wow, that is beautiful. nice work, you two, and even nicer price tag! i’m really getting into the two-toned look recently after picking out a two-toned crib as well.
Jenn says
I love the color of the wood. It’s so warm. You did a great job.
tammylee says
hey, great job on the dresser…as usual. :) just wondering what you all use to clean up after using the oil based products? is there anything eco-friendly to that with?
YoungHouseLove says
Hey Tammylee,
Good question! We mentioned that we purchased a cheap-o synthetic brush to stain with (knowing that we’d ruin it) so we just tossed that along with all of our stained rags. As for oil-based cleanup, since this time we used small foam rollers, those are also best if tossed so out they went (although usually when we use our good brushes we just use mineral spirits to clean up). Hope it helps!
xo,
s
Anna, Sydney says
$31! Looks like a $3100 job! You people are too good for words. And where on earth did you get the idea to a different coloured top? It never would’ve occurred to me, and yet, there it is, looking fab. Great work.
Ann says
Wow, the dresser really looks nice! Hmm, I could restain one of our kid’s dressers…
Kim@ NewlyWoodwards says
this is beautiful. I love the piece you found, and what a steal! I don’t know that I would have seen the potential, but wow!
I’m also impressed that you can do that with a veneer. I always assumed that a veneer was off-limits for staining. Silly me.
Haley says
My dad made a dresser for my first daughter. We put a contoured changing pad on top which comes with a strap and hardware for securing it to the dresser. The hardware is just 2 tiny “male” ends of a snap on button. I always kept at least one hand on the baby…but the extra security of the pad being attached made me feel better than just putting it on a slip proof liner.
Jen says
First of all, I wanted to say that I love your blog! I just discovered it about a week ago, and I check it out all the time now! I was so surprised when I saw your post for today, because I bought the EXACT same dresser at a yard sale last spring! We thought it was such a cool piece and we have plans to either stain it or paint it (because I could see this piece either stained in a dark mahogany or painted in a bright color or high gloss black depending on what we decide to use it for and in which room-we’ve even considered using it as a t.v. stand for a flat screen in either my sister’s new home or in my parent’s basement). I love how you decided to paint the top of it and stain the rest. It’s perfect for a nursery! (As a side note we only paid $10 for ours-we always enjoy finding a good deal!)
Amanda R. says
I LOVE the way it turned. The white is unbelievably awesome! It goes so perfectly with the crib! I want a dresser like that now!
michelle says
oh my goodness, im so glad you did this!! Im getting married in two weeks (aah!) and we’re using my old dresser in our house as the dresser for the master bedroom. I had been thinking about how to make it over from my the wear and tear (and tacky rose stencils) left over from my teenage years to a more adult taste. This post is great! It helps me see what I need to buy and how to complete it :) Thanks so much guys!
p.s: I plan on painting my drawers instead of staining them, should I use the same process you guys used for the top of the dresser to paint the drawers?
YoungHouseLove says
Yup, the same approach should work perfectly for painting your drawers. And you can just use the primer and semi-gloss paint without the poly/sealer if you’d like (that’s sort of like extra credit but since we wanted our dresser to be super wipeable we went for it). Hope it helps!
xo,
s
lea says
The person “Marie” who posted from Austin about the dresser that looked similar to Sherry’s. WAIT Before you paint your dresser!! It is teak, a very expensive wood, while Sherry’s was an inexpensive veneer. That’s why the price was so different. Truly, I love to re-purpose old things, but at least you should know what you have before you just paint.
Great job YHL, a beautiful re-do!!
Jess says
WOW! Amazing! I LOVE it! Keep the nursery updates coming!!! And since you guys are known for being green…will you be cloth diapering? I just picked up some Bumgenius Flip diapers and am making the switch to c.d. Just wondering what your take on that would be…
YoungHouseLove says
Yup, we’re planning to use the BumGenius Organic All-In-Ones with the snaps. Can’t wait!
xo,
s
Misty Becken says
Well, this was a year or so before Craigslist existed, but I was taking a walk with a co-worker and we noticed an old (solid wood) desk on the curb for garbage pickup. It was in pretty rough shape but we ran back to work and got her van to haul it home for me. My loving Husband was nice enough to sand it down and restain it for me and it is now the very desk which holds the computer I am using to type this comment. I know it will have a gazillion lives in the Becken Household (maybe paint it to match one of the kids rooms when they get older for a desk or put a mirror above it for a vanity…)but that it was FREE was the best part! Nice job on the dresser Petersiks!
Sayward says
I don’t know if you saw this, but someone else scored and refinished the same dresser
http://1402division.wordpress.com/2008/11/16/restore-rescore-2/
YoungHouseLove says
That’s crazy, Sayward – what a small world!
xo,
s
Laura @ PARING DOWN says
Thanks for the painting and staining tutorial. It looks wonderful!
Jenna says
Gorg!!
Too funny – we just bought a $60 johnson/carper dresser off of Craigslist a month of so back for my son’s room! We love it!
Oh, and since you asked – my other great Craigslist catch was an almost brand new Ikea Ektorp sofa (I had been thinking of buying one new anyway) for $100. We purchased a new slipcover that was on clearance for $10 (!!) and sold the old one on ebay for $50. So – hurray! for a $60 sofa and hurray! for Craigslist.
Renee says
Ok, you guys are freaking me out w/how in line yall are with what’s going on in my life right now! Seriously- I think I said it before, but I’m due 5-18 too and as if that weren’t enough, just last week I started hounding Craigslist for the same kind of dresser to use as a changing table! So yeah, your post made me do a little happy dance (or rather a big one w/this huge ol’ belly). However, the problem I keep finding is that the dressers aren’t tall enough- always around 30-32 inches. And w/my hubby being 6 foot 2, I don’t think that will be comfortable for him while changing diapers. How tall is this one that you found and do you think the height is an issue? No matter what- it turned out beautiful!
YoungHouseLove says
Ooh good question. Our dresser is 31″ tall so we figure with a changing pad on top it’ll be around 34-35″ (which is actually the height of our kitchen counters, so it should be totally comfortable for us). Hope it helps!
xo,
s
Dana @ House*Tweaking says
OK, I’m totally jealous that it’s warm enough for you to DIY outside. Send some warm wishes to Ohio please. There are so many things I want to paint but need the space (and air!) outside. Sadly, it’s been in the 20’s/30’s. Boo.
That aside, your mid-century Craiglist find looks sweeeet. I never would have thought of painting the top white?! Can I please be your official diaper-changer so I can check out the dresser 8-12 times per day? I have a lot of experience in that department. I can provide references.
Mrs T says
What a BARGAIN! You must be super pleased – it looks fantastic.